We adore Nancy Hiller’s new book “English Arts & Crafts Furniture,” even though we didn’t publish it. So we have gladly agreed to host a book-release party at 7 p.m. Aug. 11 at our storefront in Covington, Ky.
Nancy, as you well know, is a straight-talking, no-BS professional woodworker from Bloomington, Ind., who has written a number of books, including “Making Things Work.” (She’s now working on a book on kitchen design for Lost Art Press.)
During our book-release party next month, Nancy has a number of fun things planned (this time we promise – no prostitutes or single-ply toilet paper will be there).
Nancy will bring her C.F.A. Voysey two-heart chair (featured in the book) for you to inspect
She’ll give a short reading from the book
She’ll sign your copy of “English Arts & Crafts” furniture, plus any other books she has written. Note, we’ll have copies of “English Arts & Crafts” there for you to purchase.
There will be a pinata. Last time it was a pinata in the shape of a DeWalt biscuit jointer. This time the pinata will be related to the United Kingdom (though I promise it’s not Brexit-related or single-ply toilet paper).
We will supply drinks and snacks.
All are welcome – feel free to bring your spouse and children. Heck, make an evening out of it. There are lots of great places to eat in Covington. And if you are from out of town, Aug. 11 is a great day to plan a visit to Covington as the Lost Art Press storefront will be open to the public that day from 10 a.m. to 5 p.m.
Again, you can register for the book-release party (it’s free) via this link.
This Saturday & Sunday I (Daniel Clay, Saturday Box Company) will be teaching a two-day chip carving class at the Lost Art Press storefront. The class is designed especially for first-time and beginner chip carvers, and no prior woodworking experience is necessary — chip carving provides an excellent introduction to some fundamental woodworking concepts such as navigating grain direction and sharpening, so it’s a great place to start even if you’ve never touched a tool. Experienced woodworkers are welcome, of course, and will find chip carving technique to be a wonderful addition to their skill set.
I have a last-minute opening in the class, so if you’d like to attend please email me at daniel@saturdayboxcompany.com. I’m excited about this class — my first time teaching at Lost Art Press — and looking forward to sharing this beautiful, ancient decorative technique with others.
Class description:
In this two-day class, students will receive comprehensive instruction in the fundamentals of chip carving, a decorative technique in which faceted “chips” are removed from a wooden surface to produce geometric patterns, stylized images, lettering and ornamentation. Through demonstrations, guided practice, skill-building exercises, and the completion of a decorative wall hanging, students will leave class with all the knowledge, experience and confidence to pursue chip carving on their own. One of the most attractive aspects of chip carving (especially for beginning woodcarvers) is that it can be accomplished at a high level with minimal tools and materials; all you need to become a great chip carver is a sharp knife, some suitable wood and a little practice.
No prior woodworking or carving experience is necessary to take the class, but all are welcome! This class is best suited to those with little or no chip carving experience.
The instructor will provide the wood and other necessary materials for the class. Students must supply their own chip carving knives. If you don’t have a chip carving knife it is strongly recommended that you start with this knife, or this two-knife set. Additionally, it is recommended that students bring a pencil, a sheet of #220-grit sandpaper, a 12″ combination square, and, if you have one, a sharp block plane.
The first chair Fisher recorded making was in December 1802. This “small chair,” probably for children, seems to have been a trial run for him because a couple weeks after its completion, he began to equip his work shop for a more efficient workflow. He “made a rack (a bending form) for chair backs.” And “made a shaving [?] jack” (probably his shaving horse). With these two appliances, Fisher could refine his chairmaking process by “[making] several chair frames” before undertaking the production of a set of “kitchen” chairs in 1805.
Nancy Goyne Evans’s research into the New England usage of the term “kitchen chair” has shown that it refers to a slat-back side chair. Fisher’s documentation of the construction of these chairs concurs with that assessment.
The flats on the sides of the tenons ensured that when the legs shrunk, they would not split.
February 1805 he made four “little” chairs probably for his four children who would need them: Jonathan, Sally, Betsey and Josiah. Having his children’s sitting needs taken care of, he set out to build the full-size versions. The first one he made that March did not work out well. “Worked upon a chair; broke it putting it together. Began another.” This comment is interesting because it suggests that the method of assembly Fisher used to make his chair required significant force such that there was risk of completely ruining it. When driving the tenons of the rails and stretchers in the “green” legs, it was common practice to make the fit incredibly tight. This way, when the leg dried out, it would pinch the tenon from coming out. Having not yet developed the feel for “how far was too far,” Fisher perhaps fractured one or more members.
The slat-back chair (Cat#16, p 161) in the Fisher collection shows evidence of this kind of assembly. The tenons all have small flats carved on their sides. Thistechnique was a way to remove material on the legs’ cross-grain direction while allowing the top and bottom of the tenon to be oversized when driven in.If the orientation of the flats were reversed (meaning on top and bottom), the driving would split the leg due to the extra thickness of the oversized tenon running cross-grain. This is perhaps where Fisher made his early mistake. The method appears to work incredibly well because although the only pins in the entire chair are in the top slat, it has no wiggle whatsoever – pretty amazing for a 200-year-old chair.
This stout rocking chair was once painted red and had a woven seat. The tablet crest, although unusual for this form, appears to be original to the chair.
Fisher’s shop work during this time on chairs seems a little more focused than usual. Although he made a few visits and “wrote upon sermons” like always, he set aside a surprising amount of time to this batch of chairs.
Tuesday, April 2, Fisher recorded many of the steps of the chairmaking operation: “Primed some chairs. Went into the woods and cut a little chair stuff. Turnedposts and put together a kitchen chair.” During the ensuing weeks of construction, we learn that he “hewedout [his] posts” before turning them. He may have also used his “shaving jack” for further shaping but onlyever recorded using it to “shave … chair backs.” Interestingly, there is a comment on April 19 about “sawing out a few chair backs.” Typically “sawing out” refers to resawing rough material. So it appears that rather than rive backs from the log, he preferred to saw them.
The red paint is clearly visible on the seat rails.
After they were assembled, he painted the chairs, probably with the “1-1/2 gal. oil, 5 lbs. yellow ochre, 5 lbs. red ochre, 1 lb. patent yellow” he purchased from Mr. Witham’s store at the head of the bay during the construction process.
The “bottoming” (seat weaving) of Fisher’s chairs always appears to be connected to the pounding of “basket stuff.” The fact that he didn’t mention weaving baskets after the prep work but instead immediatelybegan weaving the seats seems to imply that they were woven of wood strips rather than the twisted rushes one would expect in northern New England.
Asher McDaniel, age 12. Let’s quit generalizing about young people being incapable of focus and work.On Wednesday Freddy Roman wrote an Instagram post that was part-tribute to his mentor, Phil Lowe, and part-lament.
“Master Lowe’s picture sits above my desk. A daily reminder from circa 2000 when I was punk, lost, and running. I don’t know where I would be if it wasn’t for him. Each day I try to carry his knowledge and pass on the torch to the next generation. Sadly there isn’t many to pass the torch to. But I do bust my rump to make him proud.”
The post struck a chord with many. Some shared their own appreciation of Phil, and also of Freddy, not least for being the kind of guy who takes the time to honor his mentor in public. As the comments went on, it became clear that many were responding more to the lament than the appreciation – some focusing on what they see as a lack of the requisite work ethic on the part of younger people, others on Freddy’s frustration with not having a worthy mentee, and a few on the dwindling number of mentors with the patience and generosity of spirit it takes to teach less experienced people on the job.
I added an observation based on my own experience: “I have to disagree. There are people aplenty waiting to take hold of that torch. The bigger question concerns the market, i.e. the ‘demand’ for the obviously super-abundant supply of skill and willing work.” Along with some other commenters, I was referring to the torch of doing the work, not teaching others how to do it; in other words, what I understood by the “bust[ing] my rump to make him proud” part of Freddy’s post.
I kept up with the comments all evening because this is a subject that interests me and I admire Freddy’s character, in addition to his work. Then I came across this one, copied and pasted here in its entirety:
“@nrhiller you’re crazy. It is common knowledge that less and less youthful people are willing to go into trades, put in the hard work, and stay off of their phone apps for more than 45mins at a time. Maybe geographically you have some different characters however this topic is discussed often in trade mags and even dudes like Mike Rowe.”
This one got to me. Not because the writer called me crazy — nothing new there. Nor was it the comment’s apparently unintended self-contradiction — “less and less youthful people” strictly means people who are growing older* (i.e., all of us). What bugged me was the generalization about “youthful people,” because I know a number of youthful people who possess an admirable work ethic and understand that nothing worth doing can be mastered without serious effort.
*I think what the writer meant was “fewer and fewer.”
+++
In any discussion that even implicitly invokes some supposedly better time, as many of the comments on Freddy’s post did, it’s important to distinguish between history and fantasy. I doubt that there has ever been a Golden Age when youthful people universally grasped the importance of what we geezers call paying our dues. “The younger generation” has a long history of taking knocks from elders.
What IS different today is how our culture legally and institutionally conceives of childhood and child-rearing, not to mention risk and investment, authority and discipline, work and leisure. Ours is a culture with exceedingly low expectations – a culture that heaps praise on those who do little more than show up. It’s one that rewards us for fulfilling the most basic responsibilities of citizenship with flag-draped stickers announcing “I voted” and tells university alumni they are “awesome” for taking the time to weigh in on their alma mater’s trustees. One that increasingly molds education on an entertainment model, treating students as customers in an economic transaction instead of encouraging them to embrace the existential challenges that are integral to anything worth calling education. Ours is a culture that
glamorizes consumption and goofing off and creates special incentives to attract “clean” tech jobs to century-old factories, then brands those sites a “Trades District” – because we all know the trades are cool, even if the actual work they involve is not-clean, not to mention no longer economically viable.
+++
As the comment about my insanity marinated, it occurred to me that I happened to have a youthful person right outside of my shop. He was working with gusto in the heat of a south-central Indiana June afternoon. Asher McDaniel is 12 and has been actively working since the age of 7. His jobs at home include feeding the dog, sweeping the barn, and tilling the garden – it’s 5/8 of an acre, on which the family grows the majority of its vegetables each year. This level of responsibility is not inconsequential.
Aaron (left) and Asher McDaniel. Lest anyone be concerned by Asher’s dour expression, I will reassure you that it was due to his discomfort at being the subject of my attention (though he did give his express consent to the interview and the pictures), not due to his work.“He’s also our mechanic,” adds his father, Aaron, who was sweating alongside him. “We were going to scrap two riding mowers, and I told him to get them out of the lean-to to load into the trailer. They hadn’t run in years. One was a gift from a client, one from a grandpa. Before I got home from work that night he got both of them running.” Bear in mind that Aaron can figure out how to make almost anything run long after others have written it off… and even he had written these mowers off.
Asher continues to maintain those mowers, in addition to the one owned by his older brother, who operates a mowing business.
Asher’s thoughts on work?
“I like it,” he says. “It pays pretty good.” How much does it pay? “Eight dollars an hour. That’s 75 cents more than what I could make flipping burgers.” (Not that he would be flipping burgers at his age. There’s a legal difference between minors working with their parents and those who are employed by others.) But the pay is far from the only motivation. He’s homeschooled. This work is no less integral to his education than his state-mandated academic studies and lessons in guitar.
Asher has been going to work, on and off, with his father for five years. This is in addition to what he does around the family farm. “I like going to work with him,” he says. “And I like the kind of work it is.” Liberate yourself from prevailing norms and you may glean just how rewarding vigorous physical work and the kind of constant problem-solving Matthew Crawford wrote about in “Shop Class as Soulcraft” can be. You may appreciate the sense of competence that comes from making an undeniable difference in the world around you.
“I didn’t have a lot of the same opportunities at his age,” says Aaron, in a statement some may imagine was intended to be ironic. (It was not.) When Aaron was 14, Aaron’s father left his job in research and development for a corporation to start a family farm. “I saw (my father’s) work ethic and admired it,” Aaron says.
As a result, Aaron and his wife, MeChelle, who shares his perspective on the value of labor and family, decided to include their children in their own work from a much younger age – not because doing so was convenient, but, as Aaron puts it, “because I wanted to share my joy and satisfaction with them.”
If your reaction to this statement is one of cynical disbelief – because how many of us today see hand-digging a trench through gravel on a humid summer’s day as a source of joy and satisfaction? – you may be contributing to Freddy’s problem. This is not just about young people.
“One of the measures of success is how far we can distance ourselves from physical and mental strain,” Aaron adds. “If we value work – if our attitude to work is that it’s profitable and good and healthy – we’ll want our children to participate with us.”
+++
Finally, back to that comment. I asked myself, “Who the *&^ is Mike Rowe and why should I care about what he has to say on this matter?” (We don’t have cable TV.) Before writing this post I looked him up online and found this presentation, which speaks volumes more about this subject than I can convey.
So, thanks, commenter, for turning me on to a onetime scholar of Classical Greek who is getting people to question attitudes about work. If more of us consider the bigger picture and our own part in it instead of just complaining that young people are lazy or “entitled,” we may have a shot at making things better.
“Great post!” he wrote. “Love your work on this topic…have you ever thought of doing an in-person class on this topic? I would love the opportunity to go in depth on this stuff, imagine others would too…”
Undeterred by my reluctant reply, he contacted me a few days later. I’m sharing most of his note here, with his permission, because it’s the best way I can convey what this event will be about.
There is a charge to attend; part goes to the owner of the venue, and part will go toward the cost of the extra day away from my shop required for me to put this on.
Ms. Hiller,
I am following up on our brief correspondence on the LAP blog regarding my recommendation for a class on the business of woodworking. I did not respond sooner because I wanted to go back and look at the blogs and your book and make sure I wasn’t just being lazy and missing things.
While I can always learn more from reading things multiple times, I do know that I learn better when I’ve discussed the ideas and tried to apply them (especially if that application takes place in classroom and not in real life). That is how I think a class on the business (and life?) of a professional woodworker could be most helpful: simply taking the ideas you’ve written about and taking a group of students a little bit further with them.
I’m imagining a seminar in which we go through several modules…each student brings his/her own experiences and together, we discuss how we could best handle situations and talk about shared challenges. You could perhaps frame out some general overarching principles to all of the experiences you’ve shared.
A few topics I’d love to cover:
Difficult customers has to be one…your writing on this hilarious and I know there must be details that haven’t made it into print. While helpful and entertaining to read those stories, I think people could benefit from trying to discuss how they would handle a situation, and perhaps share how they have done it in the past.
Pricing. This is the biggest challenge for everyone I know doing this kind of work. I’d love to hear how you do it, in detail, and discuss with a group when to use fixed prices vs. time/materials, how/if you negotiate prices, etc. Do you have spreadsheets or other technical tools you could share?
Accounting tips. Again, this is a big challenge…and information is available in other places on the general concepts, but working through your experiences and discussing class member’s approaches could be useful.
Marketing/Scaling…you talk in the book about the aversion to having an employee…I think many feel that and want to do everything (except maybe the literal heavy-lifting) on their own. How do you market to get more work and then what do you do when you have a long backlog (and have a life)?
Work-life balance. Woodworking in a time-intensive profession…how do you extricate yourself at the end of the day? How do you organize your day–splitting up writing, woodworking, client meetings, etc.
Social media…how do you do it effectively and still get pieces out the door on time. Is it actually beneficial to your bottom line?
I actually read Making Things Work twice, and then bought more copies to give away. To me, this class would be an extension of that work and help some of dive deeper into the topics you’ve laid out there.
Why I think this is a good idea:
– You already have a ton of material
– It does not require a woodshop, so it could be anywhere.
– Much of the book focused on opening the eyes of daydreamers…this class would take the next step of helping those of us who read your warning, but are hurtling forward anyway 🙂
If you are interested in pursuing this further, I am ready to help with whatever I can offer to help get it off the ground.
Adam has gone above and beyond to make this event a reality. I’m really looking forward to it.–Nancy R. Hiller, author of Making Things Work

 Nancy, as you well know, is a straight-talking, no-BS professional woodworker from Bloomington, Ind., who has written a number of books, including “Making Things Work.” (She’s now working on a book on kitchen design for Lost Art Press.)
 Update: The space has been claimed.
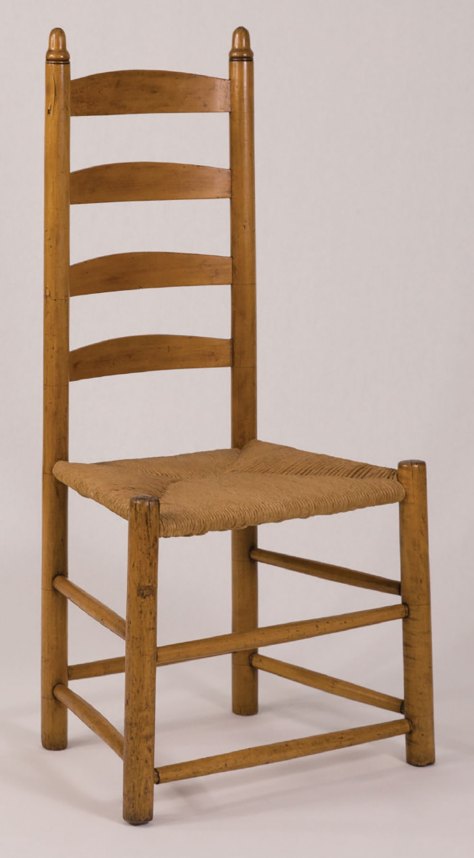


![IMG_4211[1]](https://i0.wp.com/blog.lostartpress.com/wp-content/uploads/2018/06/img_42111-e1530224366315.jpg?resize=640%2C854&ssl=1)
![IMG_4212[1]](https://i0.wp.com/blog.lostartpress.com/wp-content/uploads/2018/06/img_42121.jpg?resize=640%2C853&ssl=1)
