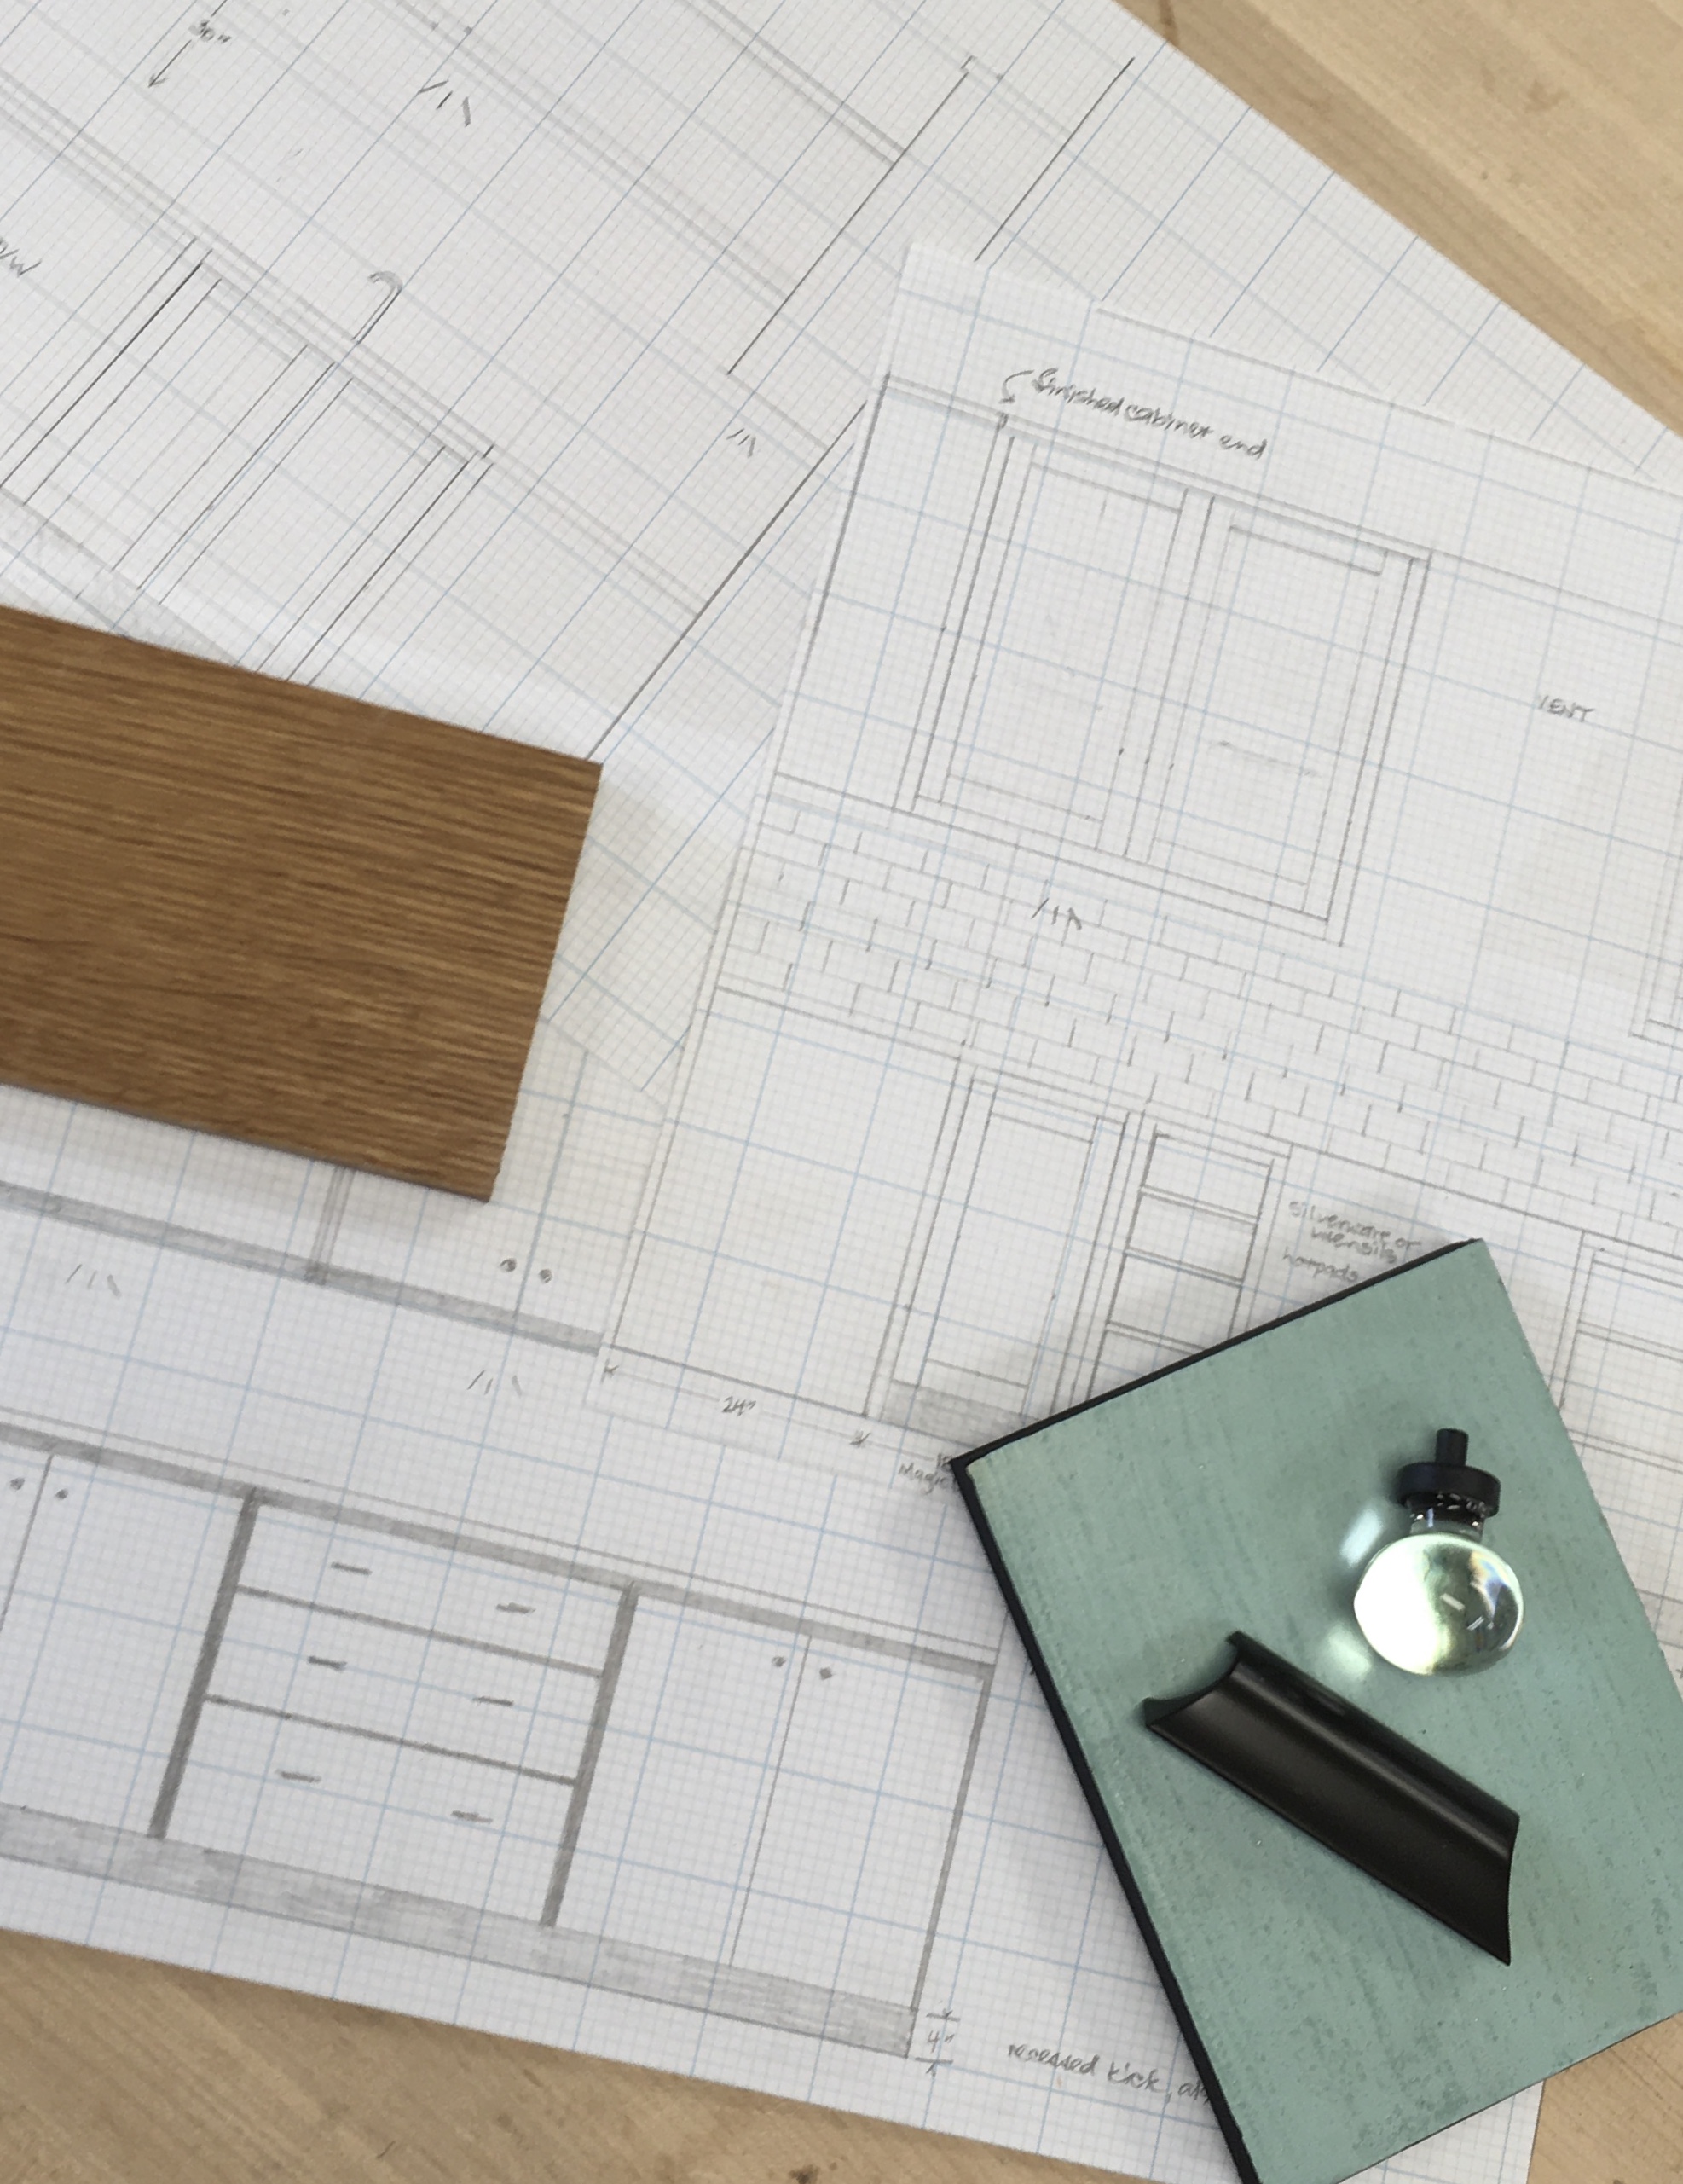
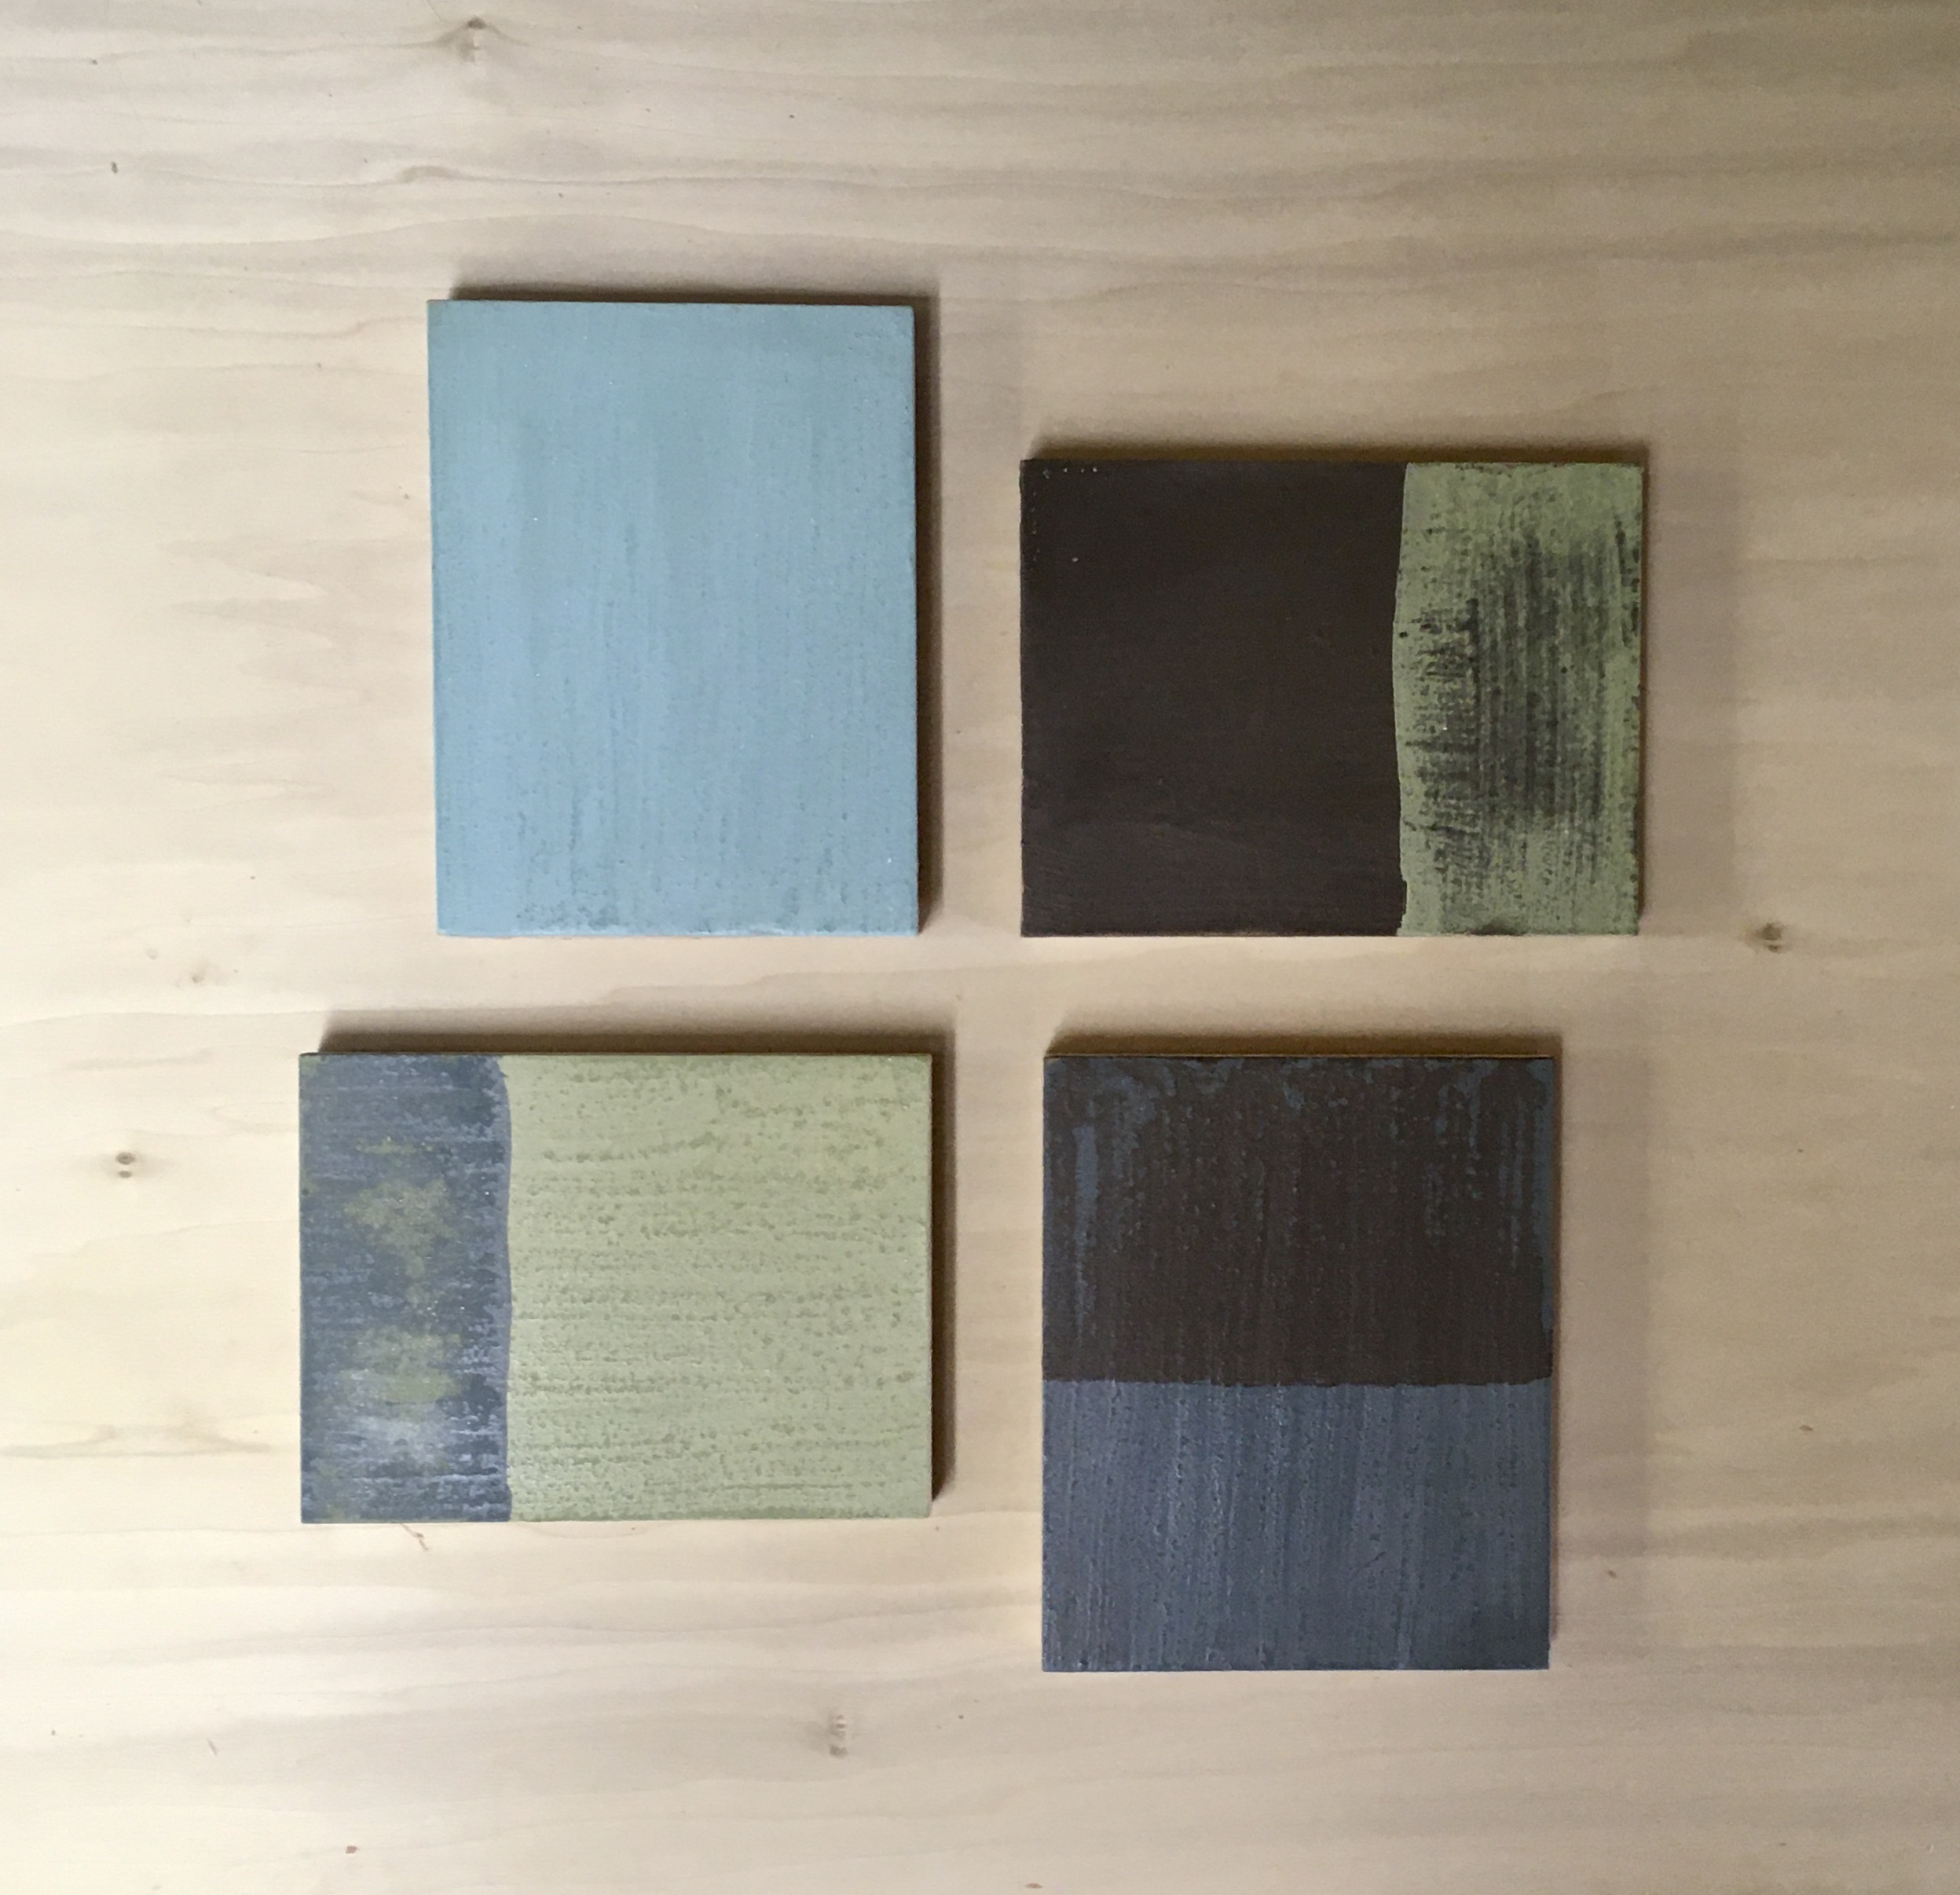
Elements of this kitchen’s design. The subway tile is not definite yet but is among the elements Ben and Jenny have had in mind from the start.
The big picture
As with methods of building cabinetry, there may well be as many potential takes on designing the kitchen for a particular house as designers who might be hired for the job. My own starting points include the clients’ preferences and the architectural context.
This kitchen is for a 1959 ranch originally built for a middle-class family. While decidedly modest (not shouting Hey, I’m cool! Look at me!), it incorporates some classic mid-century modern features. There’s an asymmetrical façade and stepped roof with generous overhangs at front and back. Inside, the kitchen cabinets are set into bulkheads. There’s streamline casing on windows and doorways. The floors are a mix of plain- and rift-sawn oak. The layout is split-level, with public rooms (living room and kitchen) on the main/entry floor, a short flight of stairs going up to the three original bedrooms and a full set of stairs to the walk-out basement, which has a laundry room, bedroom (added several years ago) and storage.
I don’t have access to pictures of the original kitchen, but in this case the missing information is immaterial. The clients didn’t want to recreate the kind of retro kitchen typical of local mid-century modest ranches.
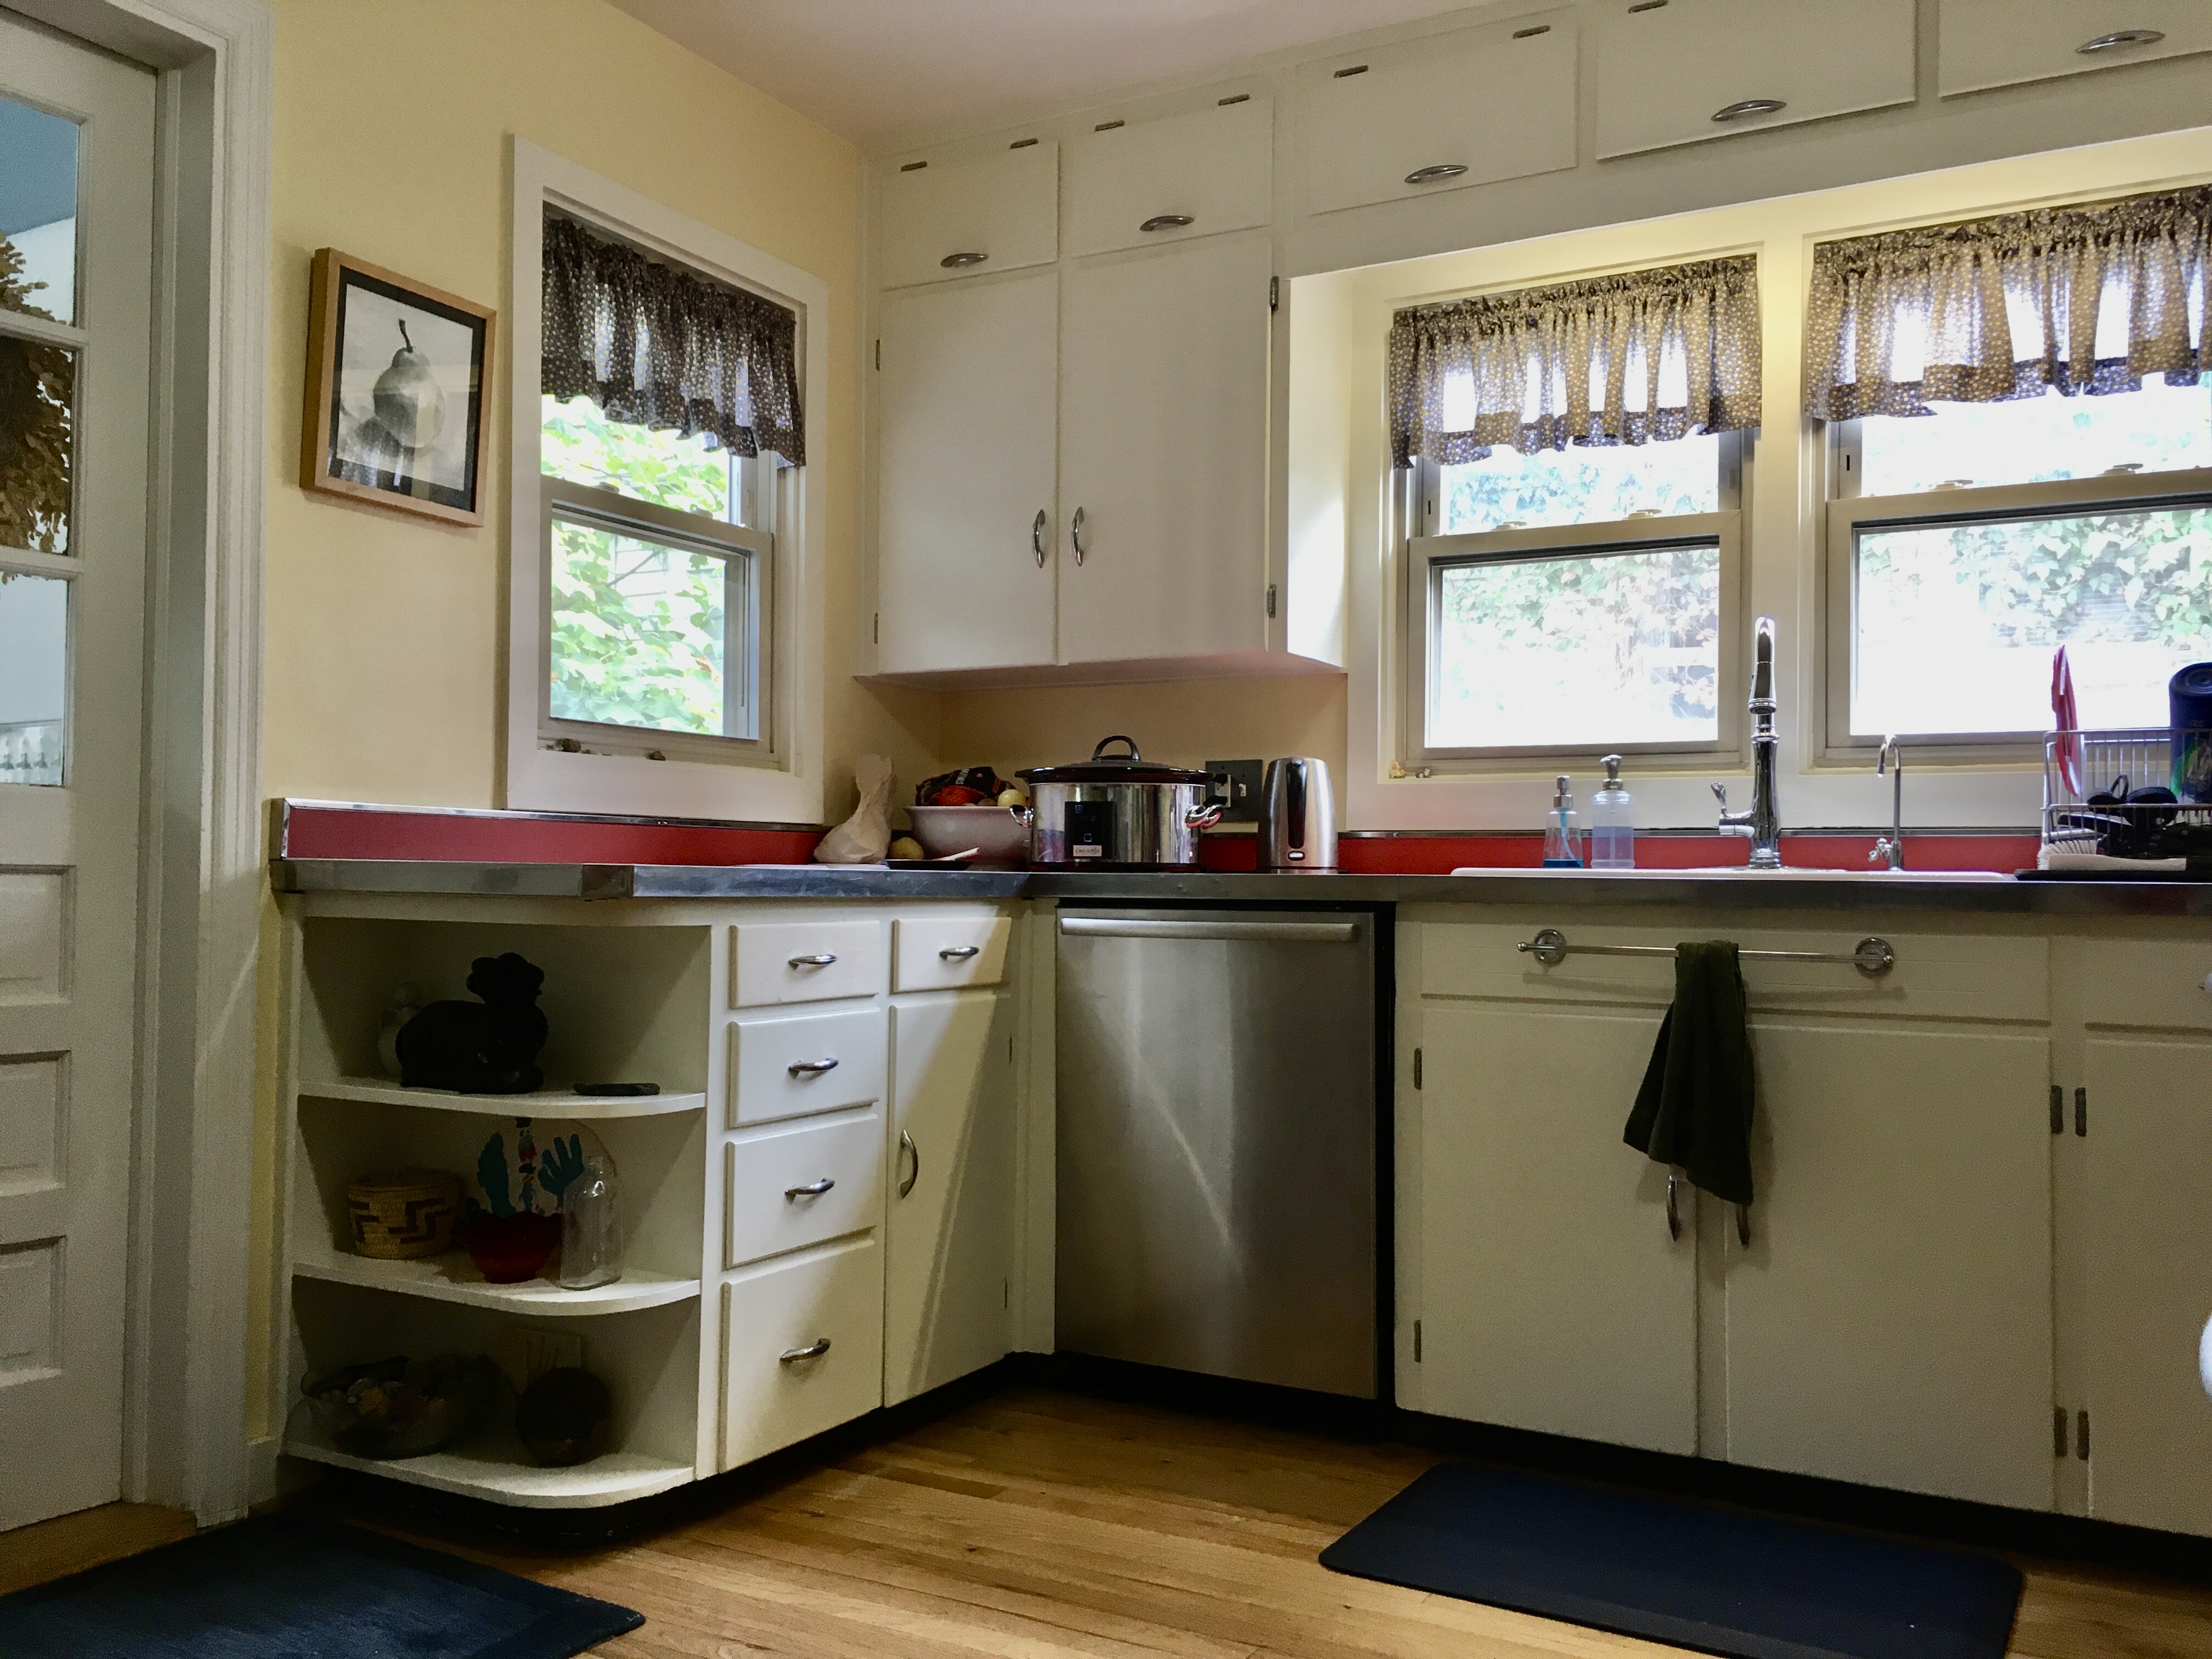
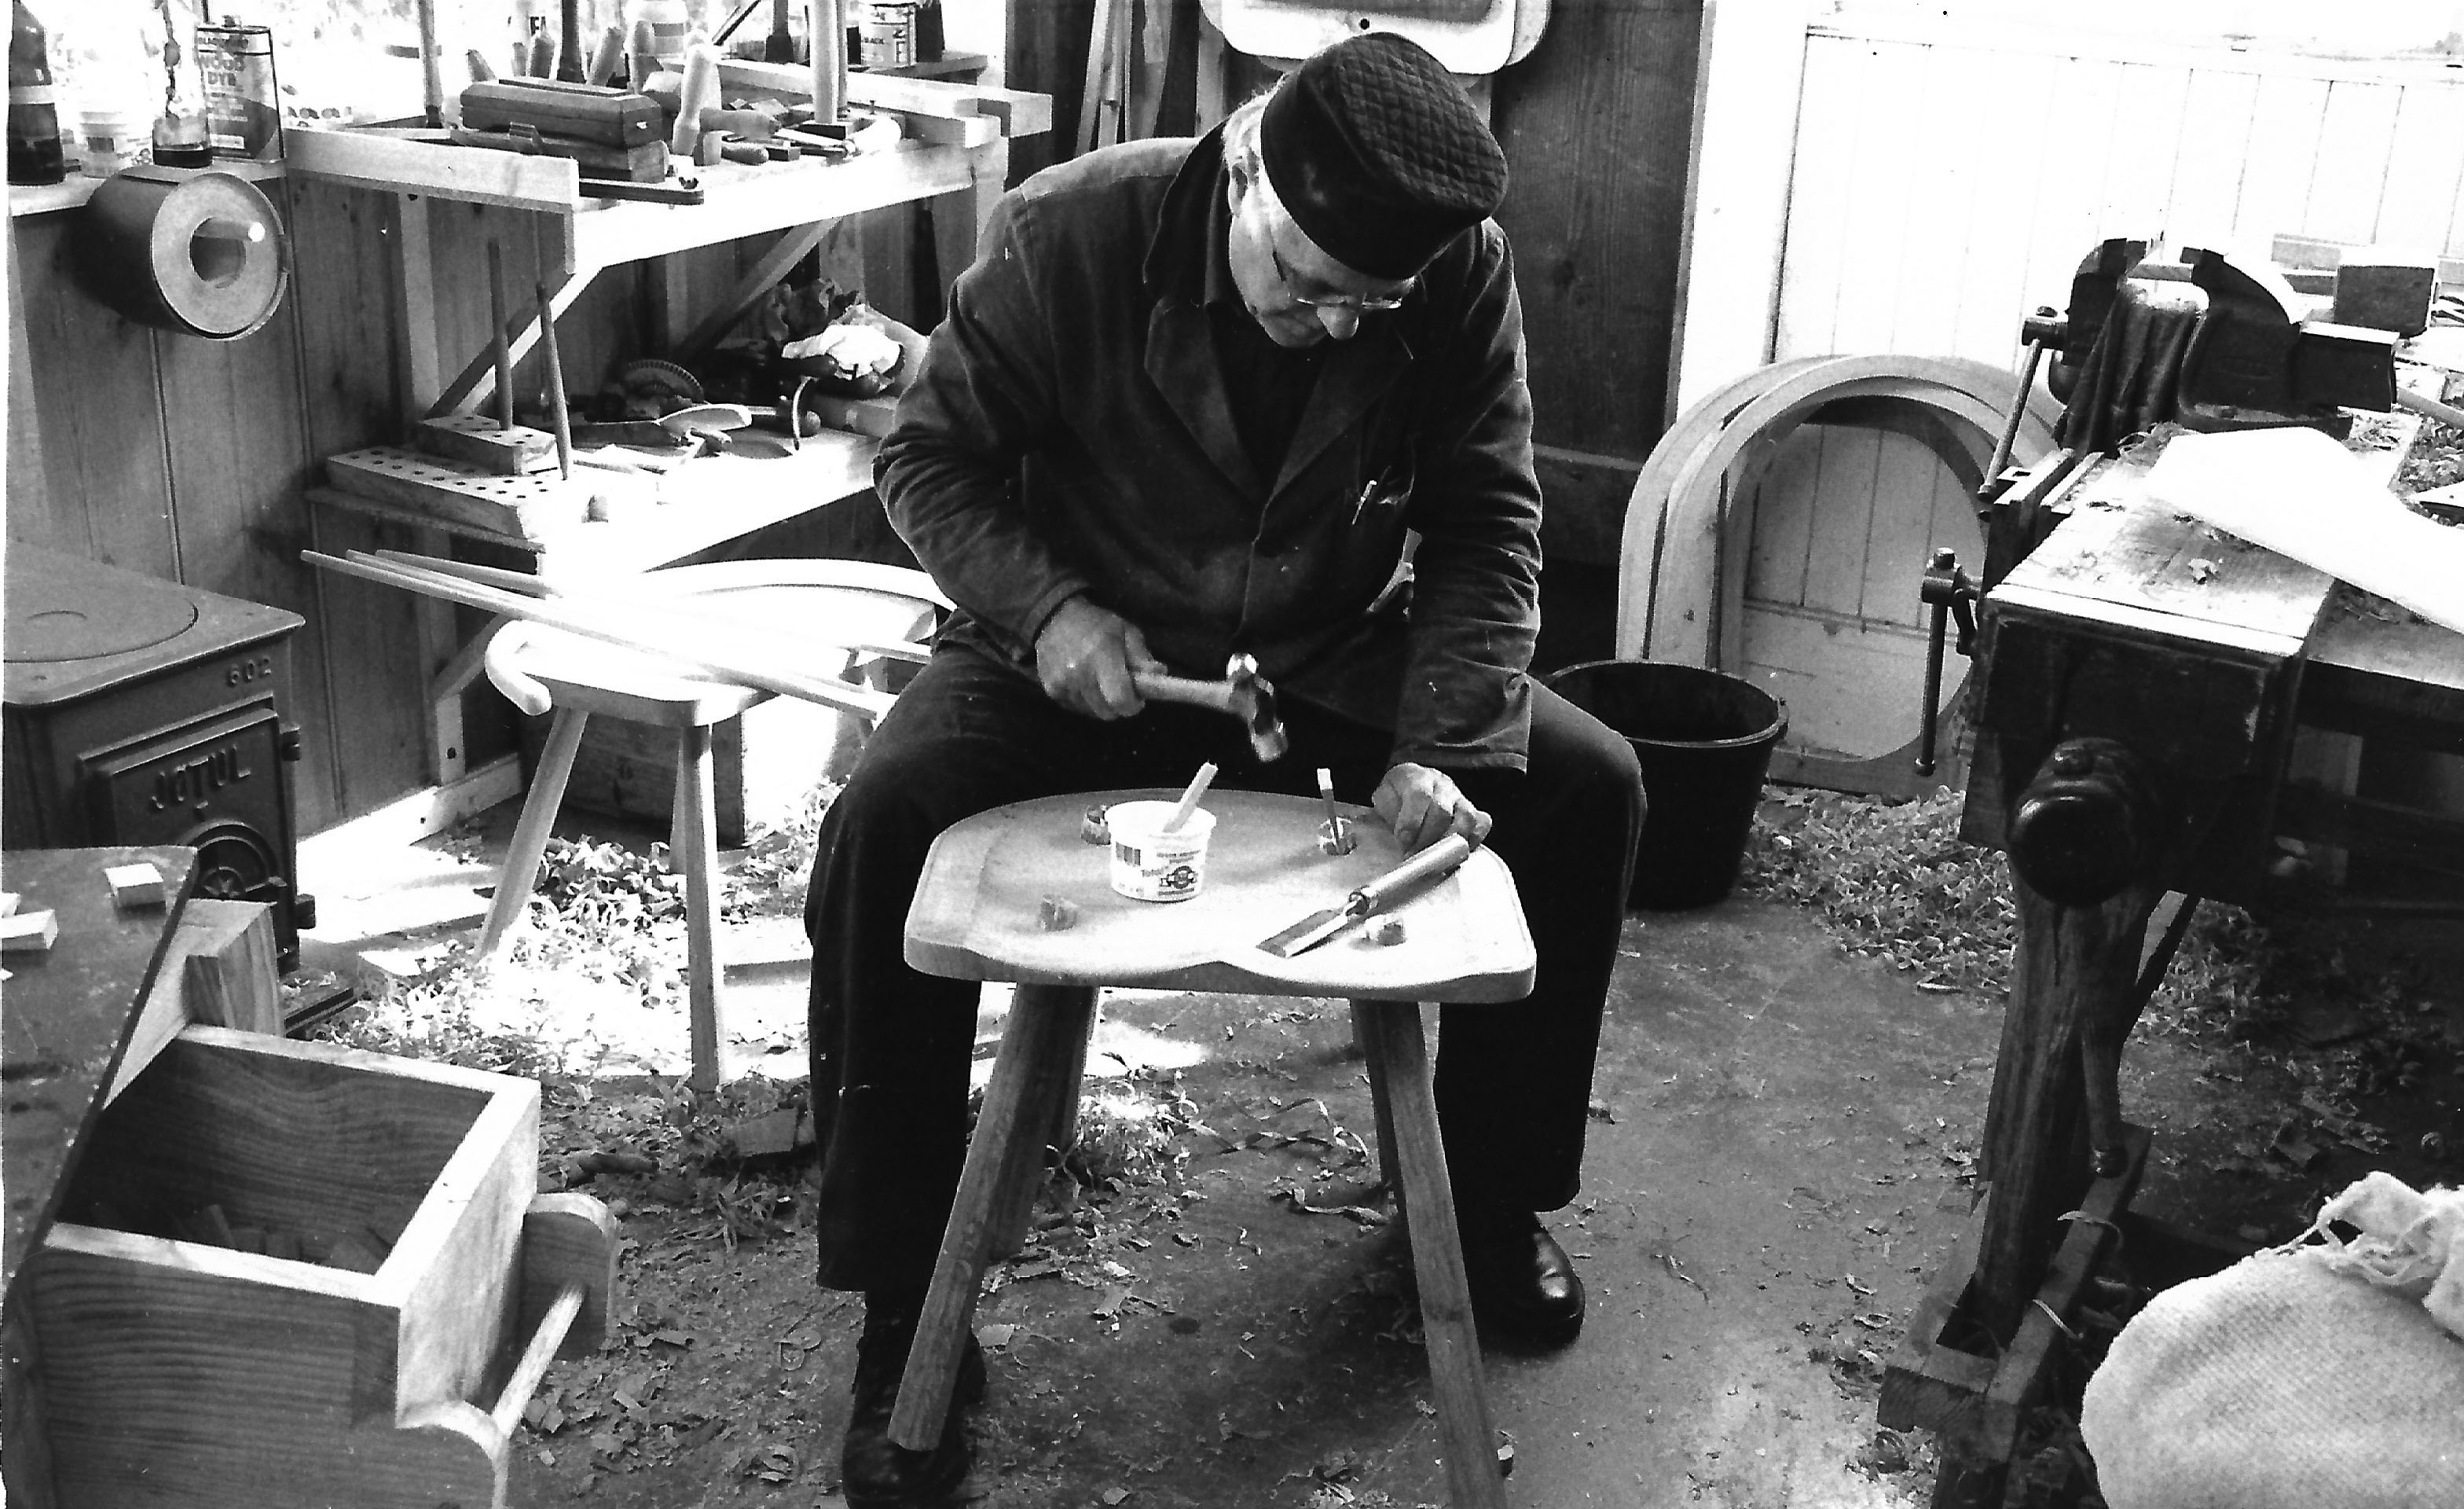
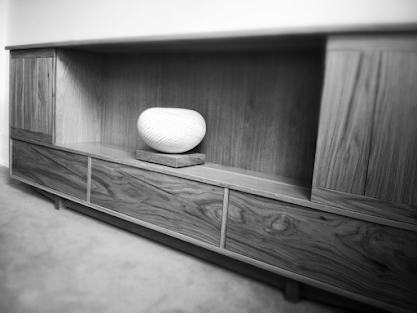
A mid-century classic. Most of this cabinetry is original to this kitchen, whose owners hired me several years ago to help with a few repairs and missing details. The original counters had been replaced; these red laminate counters with period-authentic metal edgings were fabricated by Laminated Tops. (General contractor: Golden Hands Construction)
Instead, as I’ve described in previous posts (here and here), they hoped to integrate the kitchen at least somewhat with the living room, as well as make it feel warmer and lighter. Replacing the hard, cold tile floor with oak run continuously from the living room will make a huge difference in perceived warmth. Skylights will bring in more natural light, and replacing the barely functional dark cabinets with clear-finished white oak will further enhance the warming and lightening effect.
I give clients all the pros and cons I can think of concerning every detail, from hinges to toekicks, and then I give my own opinion, assuring them that the decisions are ultimately theirs to make. I also think it’s important at least to broach the subject of resale appeal in kitchen design discussions. (Whether or not you have this discussion, you can be sure your clients’ family or friends will bring it up; at least if you’ve already run them through it, they will be better able to stand their ground in the face of know-it-all second-guessers.) Real estate agents and other pros have reams of advice, but I find the overwhelming majority of it useless (not to mention boring; who wants to live with a room designed for the lowest common denominator?). You can’t read the minds of future buyers. The fact is, an awful lot of people — perhaps the majority, these days — are determined to redo the kitchen when they buy a place, even if the existing kitchen was recently done; it’s a way of making their own statement. So if you’re jonesing for a kitchen based on the original cabinets of your 1915 bungalow, or your heart is set on a vision of teal, aquamarine and green…well, you can probably tell where this is going.
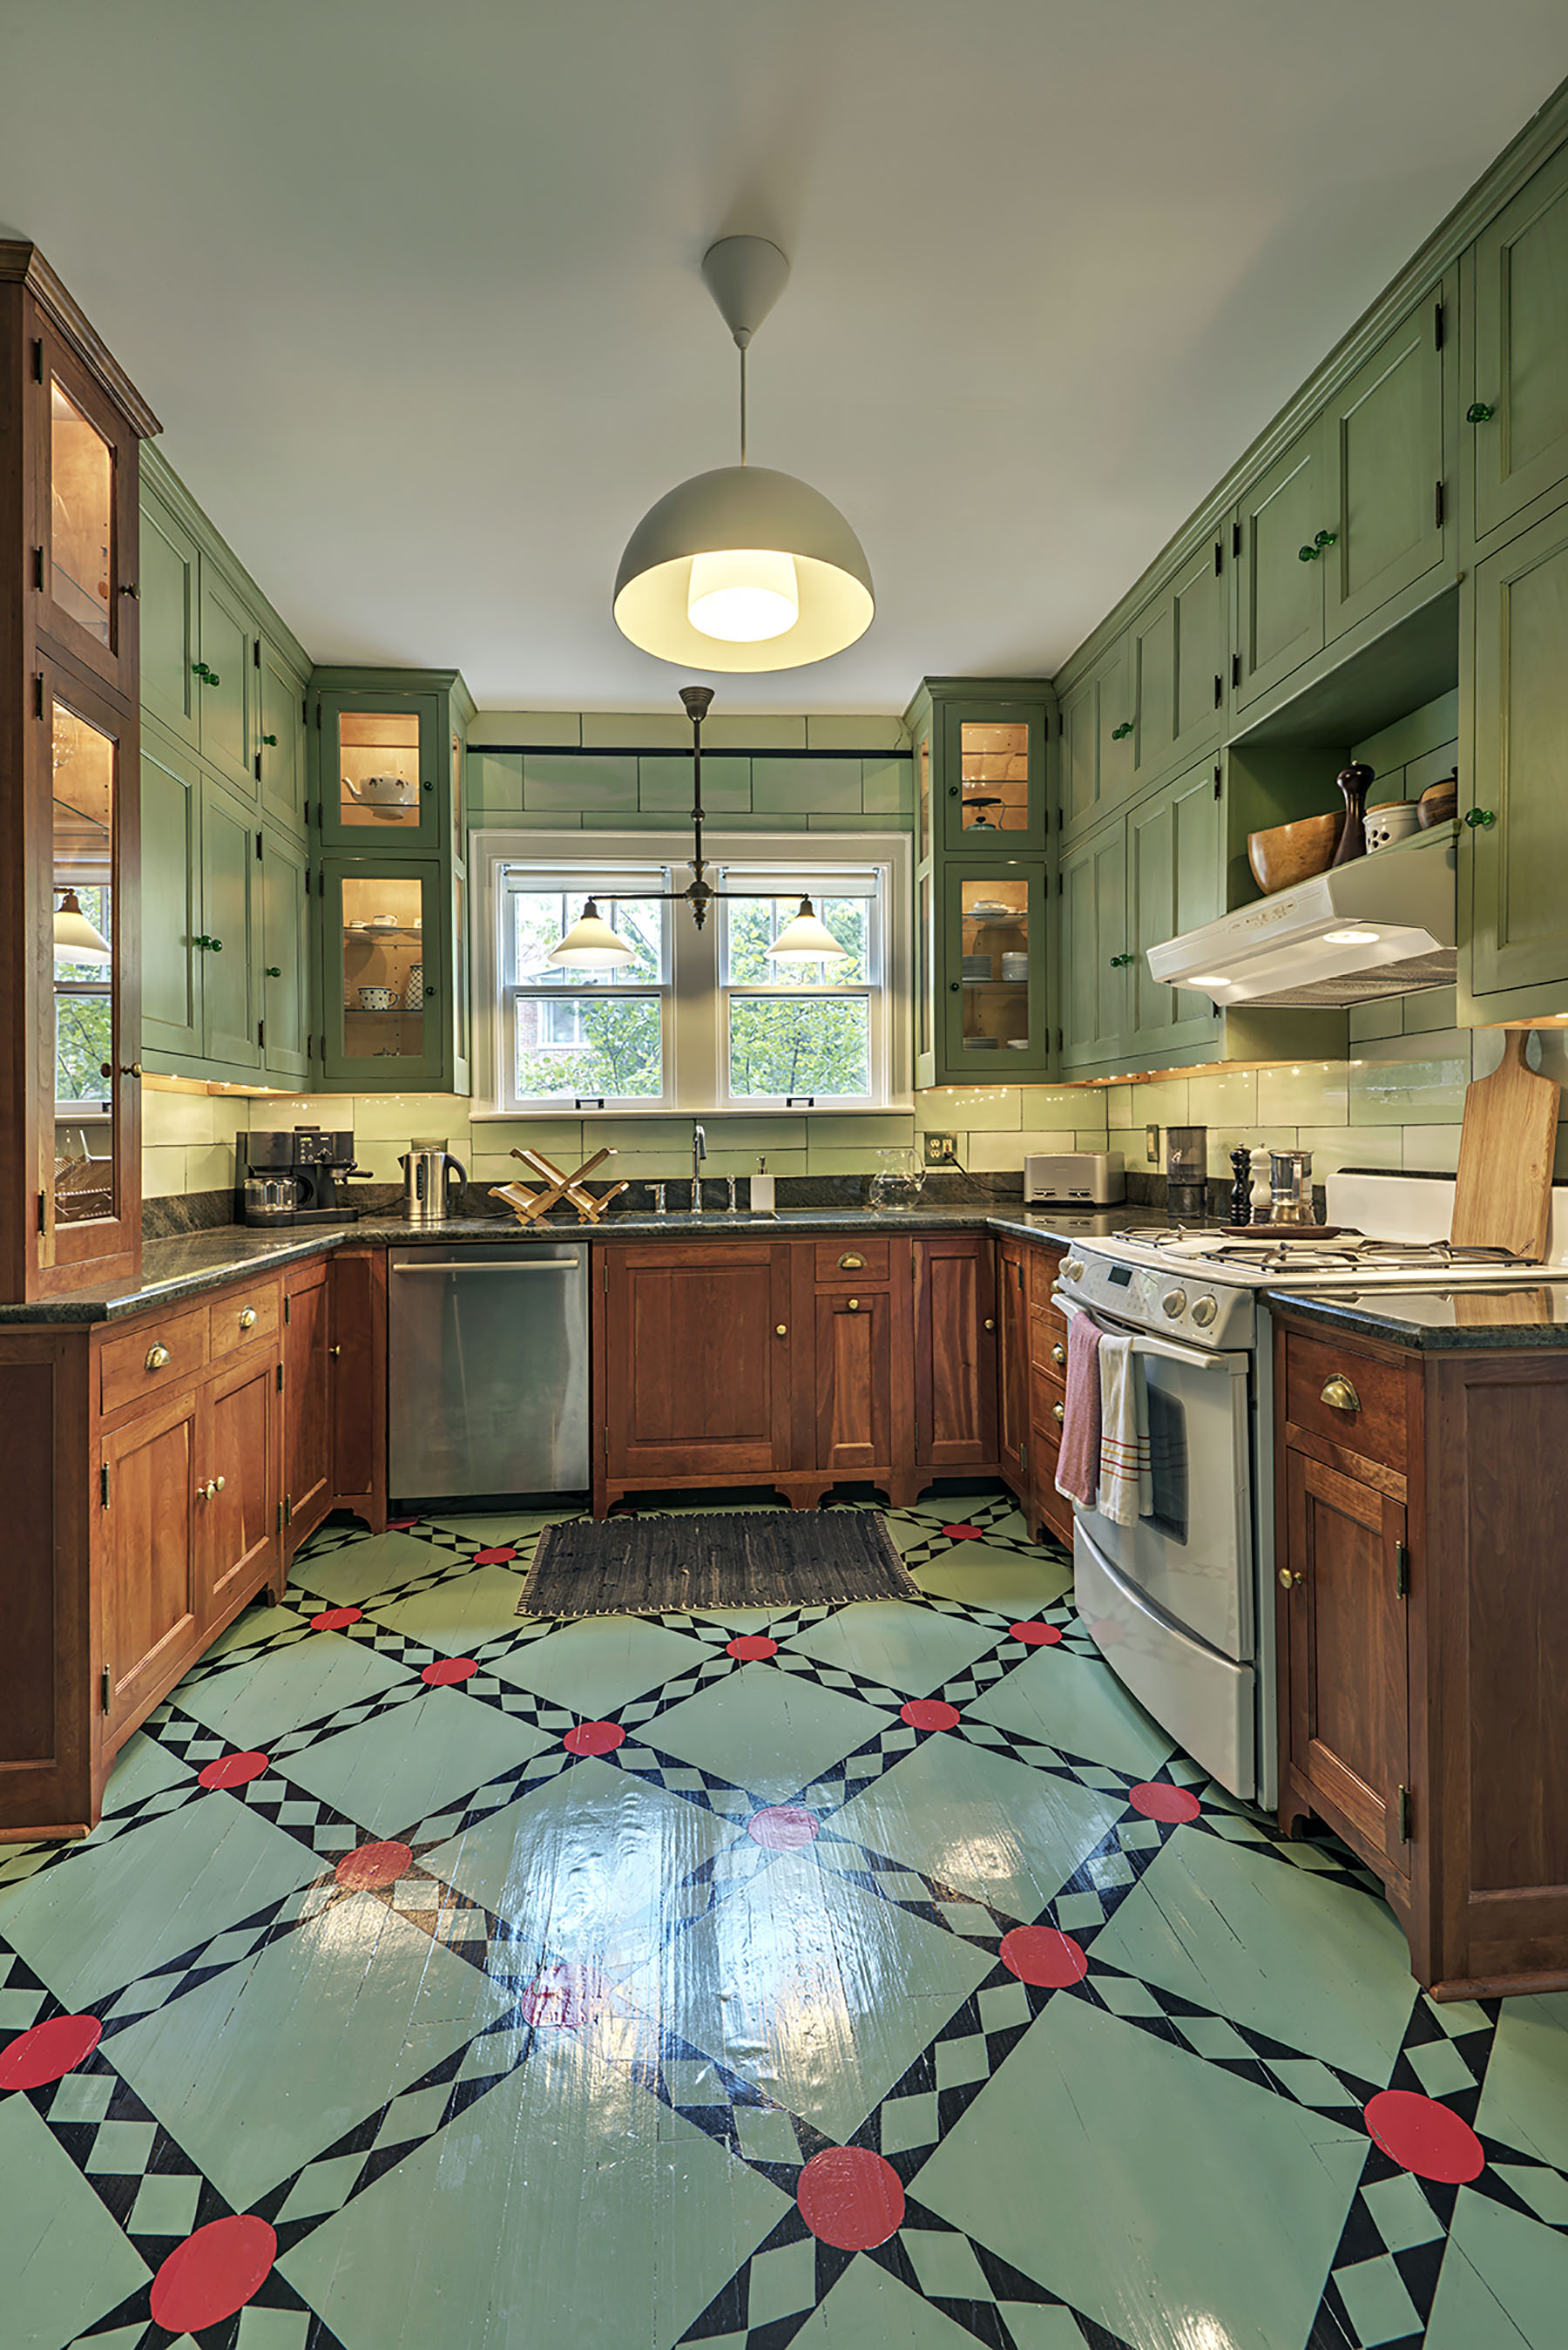
Kitchen in a 1915 bungalow, Indianapolis. Newly built cabinets based on a surviving original built-in, reclaimed heart pine counters, a reproduction sink and faucets and refinished original maple floor. The leaded glass windows are also original. (No cries of complaint about the beer bottle, please! It was not mine, but the client’s from the night before.)My business did this kitchen for Carol and Roger Parks in 2006. Daniel O’Grady and Jerry Nees worked on the job with me. Carol chose the color scheme, which includes emerald-green glass cabinet knobs, in response to the original glass wall tiles; she had the floor painted with a quilt-inspired pattern. The base cabinets are cherry, the uppers finished with milk paint sealed with oil-based polyurethane. Regarding the durability of the finish, when I had the kitchen photographed in 2018, thanks to gracious permission from the current homeowners, the cabinets and floor of this hard-working, well-used room were in excellent condition. (General contractor: Golden Hands Construction Photo: Spectrum Creative Group)
Cabinet design
Jenny and Ben have three children and really use their kitchen, so when considering materials, I put durability at the forefront. White oak faces would be fairly bullet-proof, and the grain’s a champ at distracting the eye from scratches, dents and other signs of wear. I suggested straightforward lines for the cabinets in the main preparation area. But wanting to distinguish the cabinets from the ubiquitous take on mid-century style produced by the more commercial shops in our area, I suggested a few tweaks: Instead of fully recessed kicks, we’d have a more “carpentery” design, with stiles going to the floor to accentuate the cabinets’ structure. Using adjustable European hinges and drawer slides, I could fit the cabinets with inset doors and drawer faces while staying within the budget. For optimal durability, I’ll have the cabinets sprayed with conversion varnish by my finishing subcontractor.
When it came to designing the shallow cabinets for the opposite wall, which forms the transition between entry area and living room to kitchen, I couldn’t bring myself to repeat the same design. I wanted these cabinets to be less “workerly,” more appropriate to this liminal space. I have a vivid memory of a stacking set of small, circular wooden boxes my parents had in the early 1960s; they may have been Japanese. I was mesmerized by their form and finish — enamel paint in mid-century versions of yellow, red and green, each with a rounded black rim. This built-in — part kitchen, part entry area — seemed an ideal place to incorporate such an aesthetic.
Milk paint
I suggested milk-paint for this cabinet because it lends itself to so many textural finishes. For the carcases, blocks of different colors will be framed by narrow solid lippings painted black. Full-overlay doors and drawer faces will have black edges. The kick will be fully recessed and painted black. The clients will choose a mix of colors and finish effects — perhaps single-color, perhaps layered — and I will have the whole thing sprayed with topcoats of conversion varnish for durability.
A few of the possible colors, all from Real Milk Paint: Beachglass, Boardwalk, French Gray and Granny Smith green.Another possible color combinationThe textured two-layer treatment in the red/gold sample recalls similar effects in this painting by Paul Klee. What does a 1922 painting have to do with mid-century design, you wonder? I was born in the year my current clients’ house was built. In the early 1960s our parents had a print of “Senecio” in the living room. Many expressions of “high culture” in the pre-internet 20th century (such as works by artists and architects) did not become widely known and influential on popular style until decades after their original production. This is another aspect of kitchen design that gets a workout in the section of my book on period kitchens. (Image: Phaidon)
Cabinet hardware and counters
The door and drawer pulls (in the picture at the top of the post) are from Schoolhouse. Hanging open shelves over the sink area will retain the openness between the kitchen and living room while adding extra space for storage and decorative objects. The counters will likely be a dark gray soapstone.
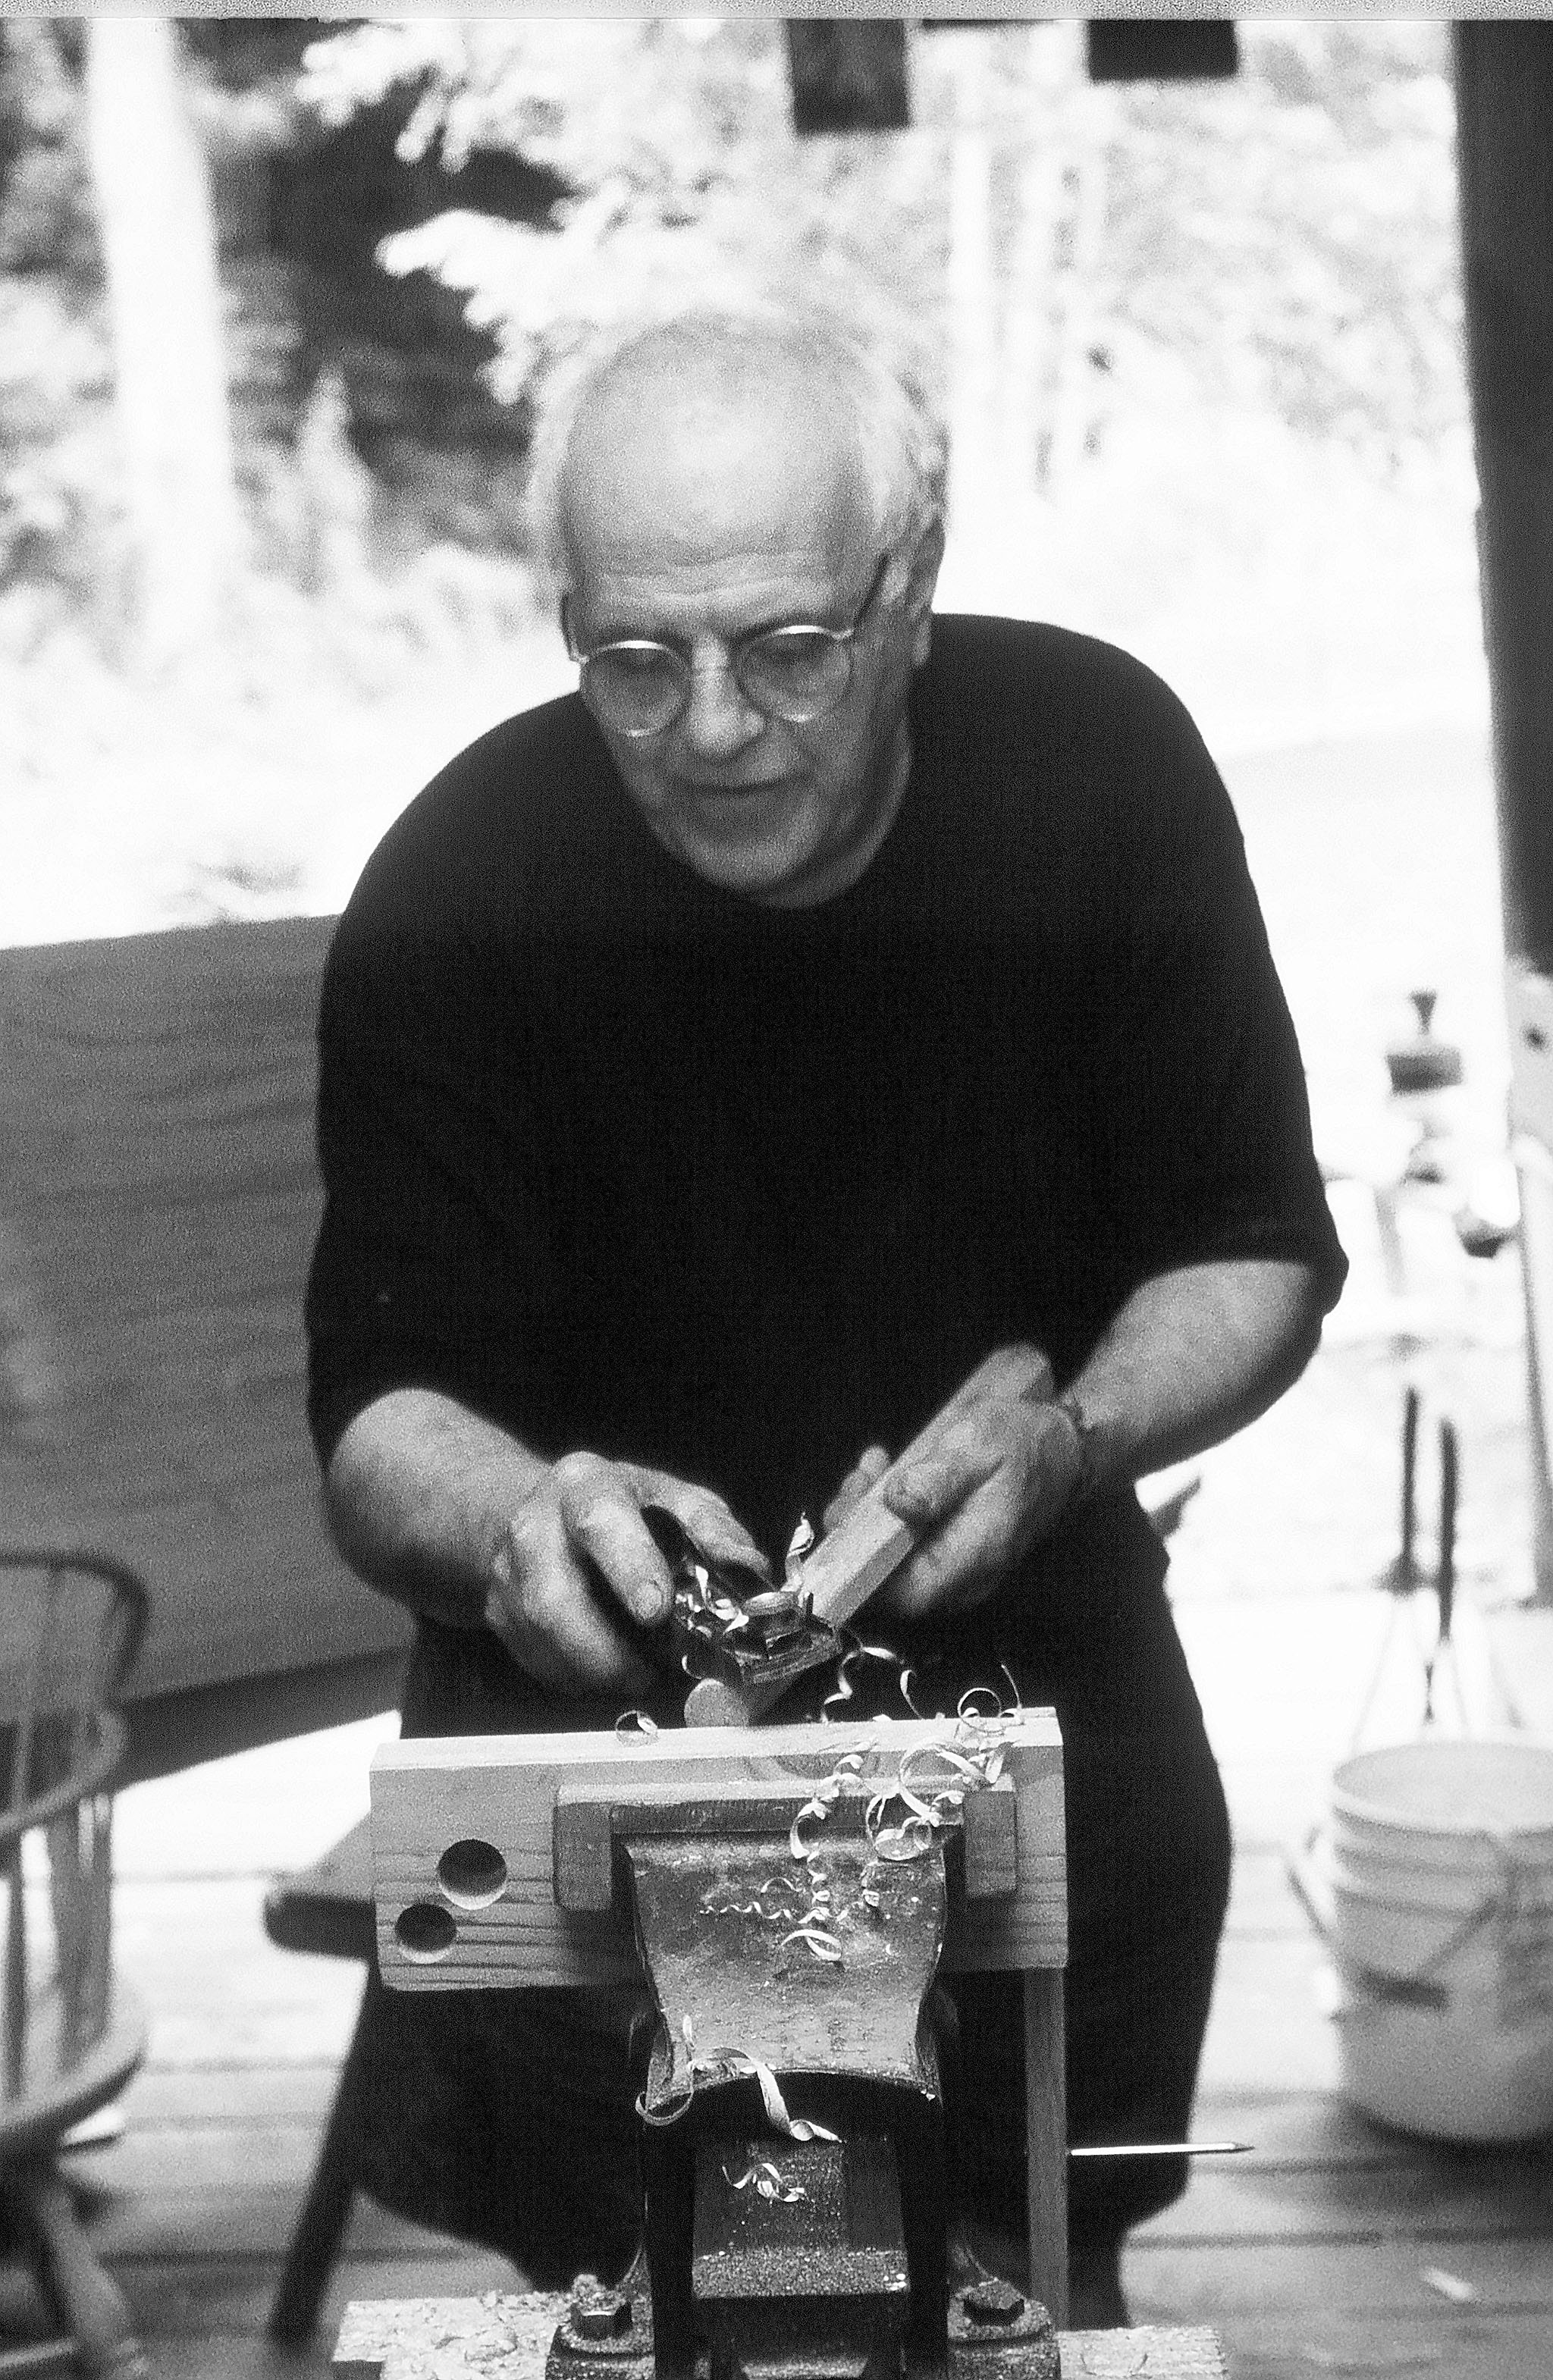
The first time I met Chris(topher) Williams was in the Cincinnati/Northern Kentucky Airport (CVG). I can’t remember why I was dispatched to pick him up on his introductory visit to the States (maybe there was an author reading going on?), but I was, and I had no idea what he looked like. Arrivals at CVG come up a long escalator, so I hung out at the top, peering down for someone who looked Welsh. I don’t, however, have any preconceived notion of what a Welshman looks like – maybe a strong bow arm? But I spotted a tall man with curly hair in a polo shirt, pulling a large bag (he’d packed a chair in pieces, along with his tools), who looked slightly bewildered and awfully tired of traveling. “Chris?,” I asked, as he stepped off the escalator. Yep. (Must have been the adze arm, not the bow arm.)
On the drive back to the shop, he was fairly quiet. I chalk that up to exhaustion; that was the last quiet moment in his delightful company. Most of the time when I’m with him, he’s making me laugh…or I’m making fun of his penchant for claiming “the Welsh invented that” (the Welsh apparently invented everything).
And after three two-week (or so) long visits, I’ve now spent a fair amount of time in his company either shopping, drinking, driving to a “must-see” site or listening in on his Welsh stick chair classes. Chris is a great deal taller than the average man in Wales, so every time he’s here, I take him shopping at Carhartt’s so he can stock up on his favorite pants with 34″ inseams (apparently he can’t get his beloved long-length Carhartt’s overseas). And Chris loves his red wine; he decimated the supply of Revolution Red at Crafts & Vines, a delightful family owned wine bar that’s around the corner from our shop (I think we’ve ended up there every day it was open during his visits). The owners – and Philip – miss you, Chris!
And I miss Chris, too. He was scheduled to be here in early September to teach a Welsh stick chair class before we all drove out to Amana, Iowa, together for Handworks. I was looking forward to hearing “the Welsh invented basketball” as we rolled through Indiana. Here’s hoping we’ll be able to hang out together again soon.
John Brown had a vast tool collection – a whole chapter could be written about the tools that he amassed over the years, but I will concentrate on his core chairmaking tools. The majority of these tools were of a good vintage but, interestingly, several of his favourites were new. If a particular tool has an intriguing story, I’ll tell you about it.
No. 8 Jointer Plane For jointing boards for chair seats, his favourite was a Stanley No. 8, which had been “stuffed” like an infill plane. Not dissimilar to a Norris or Mathieson plane in appearance to the layman. In truth, he had two of these, one stuffed in mahogany, the other in yew. The one in yew was his favourite as it had been “stuffed” by his son Henry. John loved its huge mass for shooting “the perfect edge” whilst thinking “flat.”
Jack Plane This was used for roughing out chair parts and, in particular, for making chair sticks and legs into octagons.
Two Block Planes JB had a real affection for his Stanley No. 6-1/2 low-angle block plane – this was a vintage one fitted with a Hock blade. He’d use this plane for shaping sticks and in particular for creating the 5/8″ and 1/2″ tenons on the stick ends. I believe whilst teaching at Drew Langsner’s Country Workshops in North Carolina in 1995, the students pooled their money together and bought him a small bronze Lie-Nielsen block plane as a thank you. A few years later he was gifted a Lie-Nielsen No. 60-1/2 low-angle block plane by a friend. During my own time with JB it was these two planes that were never away on his bench. He particularly liked the weight of them in his hand, which he felt was always an advantage in a one-handed tool. Although the plane is typically one for use on end grain, that didn’t bother him, he used it without too much thought. Other makers now wax lyrical about having a spare blade honed at various degrees to eliminate tear-out on long grain. The minutiae of this subject would have no doubt infuriated JB. The tools’ function was to make beautiful chairs not to beautify the grain of the wood. His dumbscrape (more on that later) would sort any tear-out later.
John Brown shaping a tenon with a 60-1/2 block plane. Photo courtesy of Drew Langsner.
Stanley No. 53 Spokeshave The No. 53 spokeshave was a definite favourite. JB couldn’t understand why modern tool manufacturers didn’t copy its simple design. He felt that the adjustable throat was a huge asset. You can close its throat up tight to take the slightest of shavings. Its raised handles were always a huge positive to him as the No. 53 was used after the scorp (aka inshave) as a surrogate travisher. I’ve talked elsewhere in the book about its use in seat stock preparation. John Brown had several of these and his favourite had been fettled for a Hock blade to fit. Travishers are now de rigueur and although he had a homemade one, I personally can’t recall him particularly using them as a matter of course. The No. 53 was the important tool here.
Braces His brace and bit collection was one of the first things that I noticed when I met him at his workshop. There were several hanging on a rack, each with a different auger bit. The reasons were tenfold, he would often glue up chair seats from two or three boards. The jointed edges required a dowel to strengthen the joint (in his opinion) this needed a 1/2″ dowel, so a brace was allocated for this, which included a Stanley depth stop permanently fitted to the 1/2″ Jennings bit.
Next was an oversized sweep Millers Falls (I believe) brace fitted with a 1″ auger for drilling the leg mortises. He liked the extra size of the sweep whilst drilling the leg mortises
Then a brace fitted with a 5/8″ bit for drilling both the mortises for the sticks that entered the seat and for the mortises in the doubler on the arm, this also included the mortises for the short sticks to enter the arm, and finally the mortises in the legs for the stretchers.
Next, a brace with another 1/2″ Jennings bit for drilling the mortises into the comb and medial stretcher.
Finally, an electrician’s brace with a small sweep. This was important because it allowed him to drill out the mortises for the short stick that is closest to the long sticks in the arm without the brace hitting the back sticks. You must bear in mind that the arm was at this point already fitted over the rear long sticks. The electrician’s brace was fitted with a large 5/8″ auger, which had been extended to reach down through the arm mortise, thus being able to drill the mortises for the short sticks.
This being JB, something had to be different, the bit being 5/8″ was in his words “a smidgen smaller,” which allowed it to penetrate the already-drilled mortises in the arm for the short sticks without enlarging the already-drilled mortises in the arm. There was method in his eccentricities…. I personally did the same for years, but as you can see in the chapter on building the chair, I now use an extended bit in a battery-powered drill. The augers he used were both Irwin and Jennings pattern.
John Brown drilling a leg mortise with a brace and an auger bit. Photo courtesy of Drew Langsner.
Saws Saws were a subject close to JB’s heart. He realised early on his journey that a good saw was essential to master both in use and maintenance. He owned boxes of them, too many to discuss here, so I’ll tell you just about the relevant ones.
Gent’s Saw A 12″ gent’s saw was used for general workshop use. The tasks included crosscutting sticks to length, cutting the V-groove on the swan neck detail on an arm bow, but probably more importantly it was used to cut the kerfs in the legs’ tenons. The saw bottomed out on the brass back at approximately 1-3/4″, which is an ideal measurement for the length of the kerf.
Bowsaw or Turning Saw These he made himself from oak. Its blade was cut to length from a huge roll of band saw blade that was coiled up. Its use was to cut out arm bow stock. I witnessed this personally, which was a joy to watch. Later on he used the band saw for this grunt work so the bowsaw was used mostly to cut coves on the swan neck detail of his arm bows.
Crosscut and Rip Saws I’ll discuss JB’s favourite crosscut saw here for a few reasons of interest; he wrote an extensive article in Good Woodworking magazine about this saw. It was 26″ long with six teeth per inch. I watched him once crosscut an elm board. Firstly he placed his pocket watch on the board and started sawing. He had previously worked out that if he had correctly set and sharpened the saw and worked to 66 strokes per minute, it took 140 downward strokes to cut through the board. On several occasions I had to study the end grain of a board to witness the marvel of correct sawing.
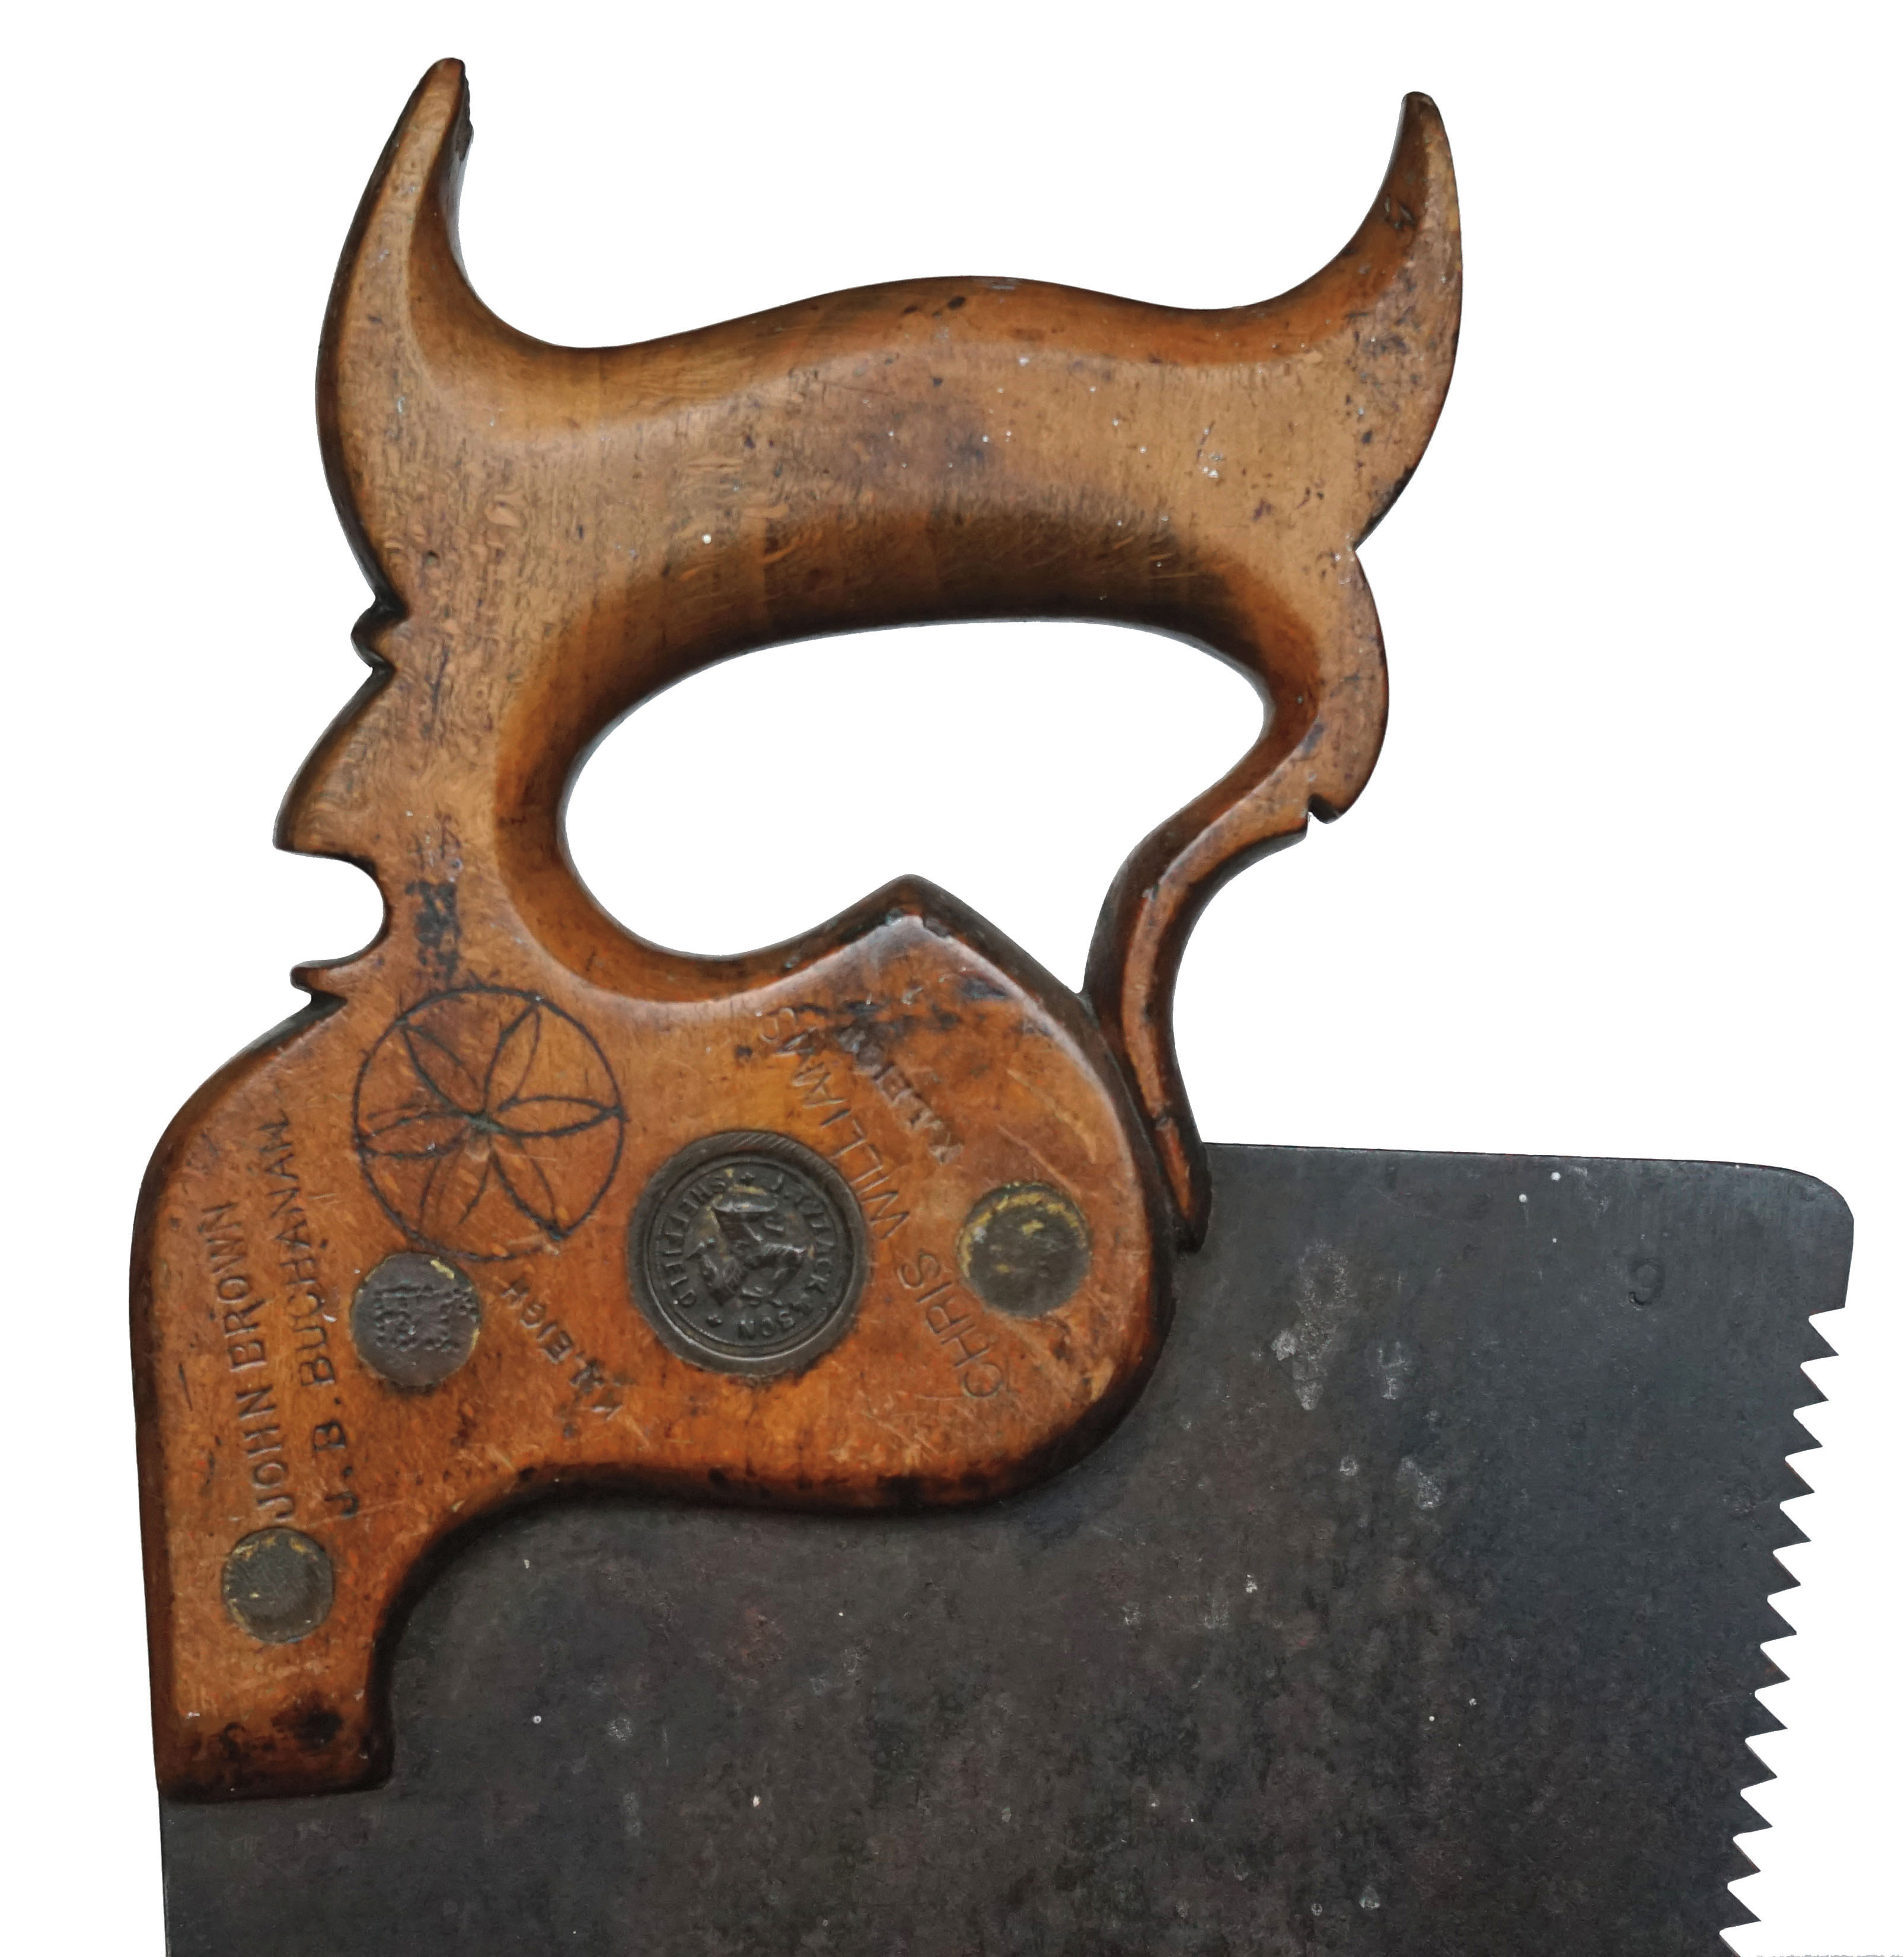
Etched on its blade is Harley, Old Maymarket, Liverpool. Its fruitwood handle has a medallion which reads J. Tyzack and Son, Sheffield. It was a conundrum to John why the medallion and saw plate had different names. When JB retired he asked if I’d like to choose a saw from his box as a gift – I did and I’m now the custodian of this fine saw for another generation, my name along side J.H. Buchanan, M. Leigh and John Brown on the handle.
The saw intrigued me for some time, so I put a photo of it onto social media and asked for information. Shane Skelton of Skelton Saws contacted me to say it was made by John Harley of Liverpool between 1882 and 1902. John Harley would apparently later become a mechanic. Another person contacted me to ask if I realised what another mark on the saw demarked? I didn’t. It transpired that it was a “Daisy Wheel,” an apotropaic mark that comes from the Greek word for averting evil. The marks were meant to protect from witches and evil spirits. If only a saw could speak.
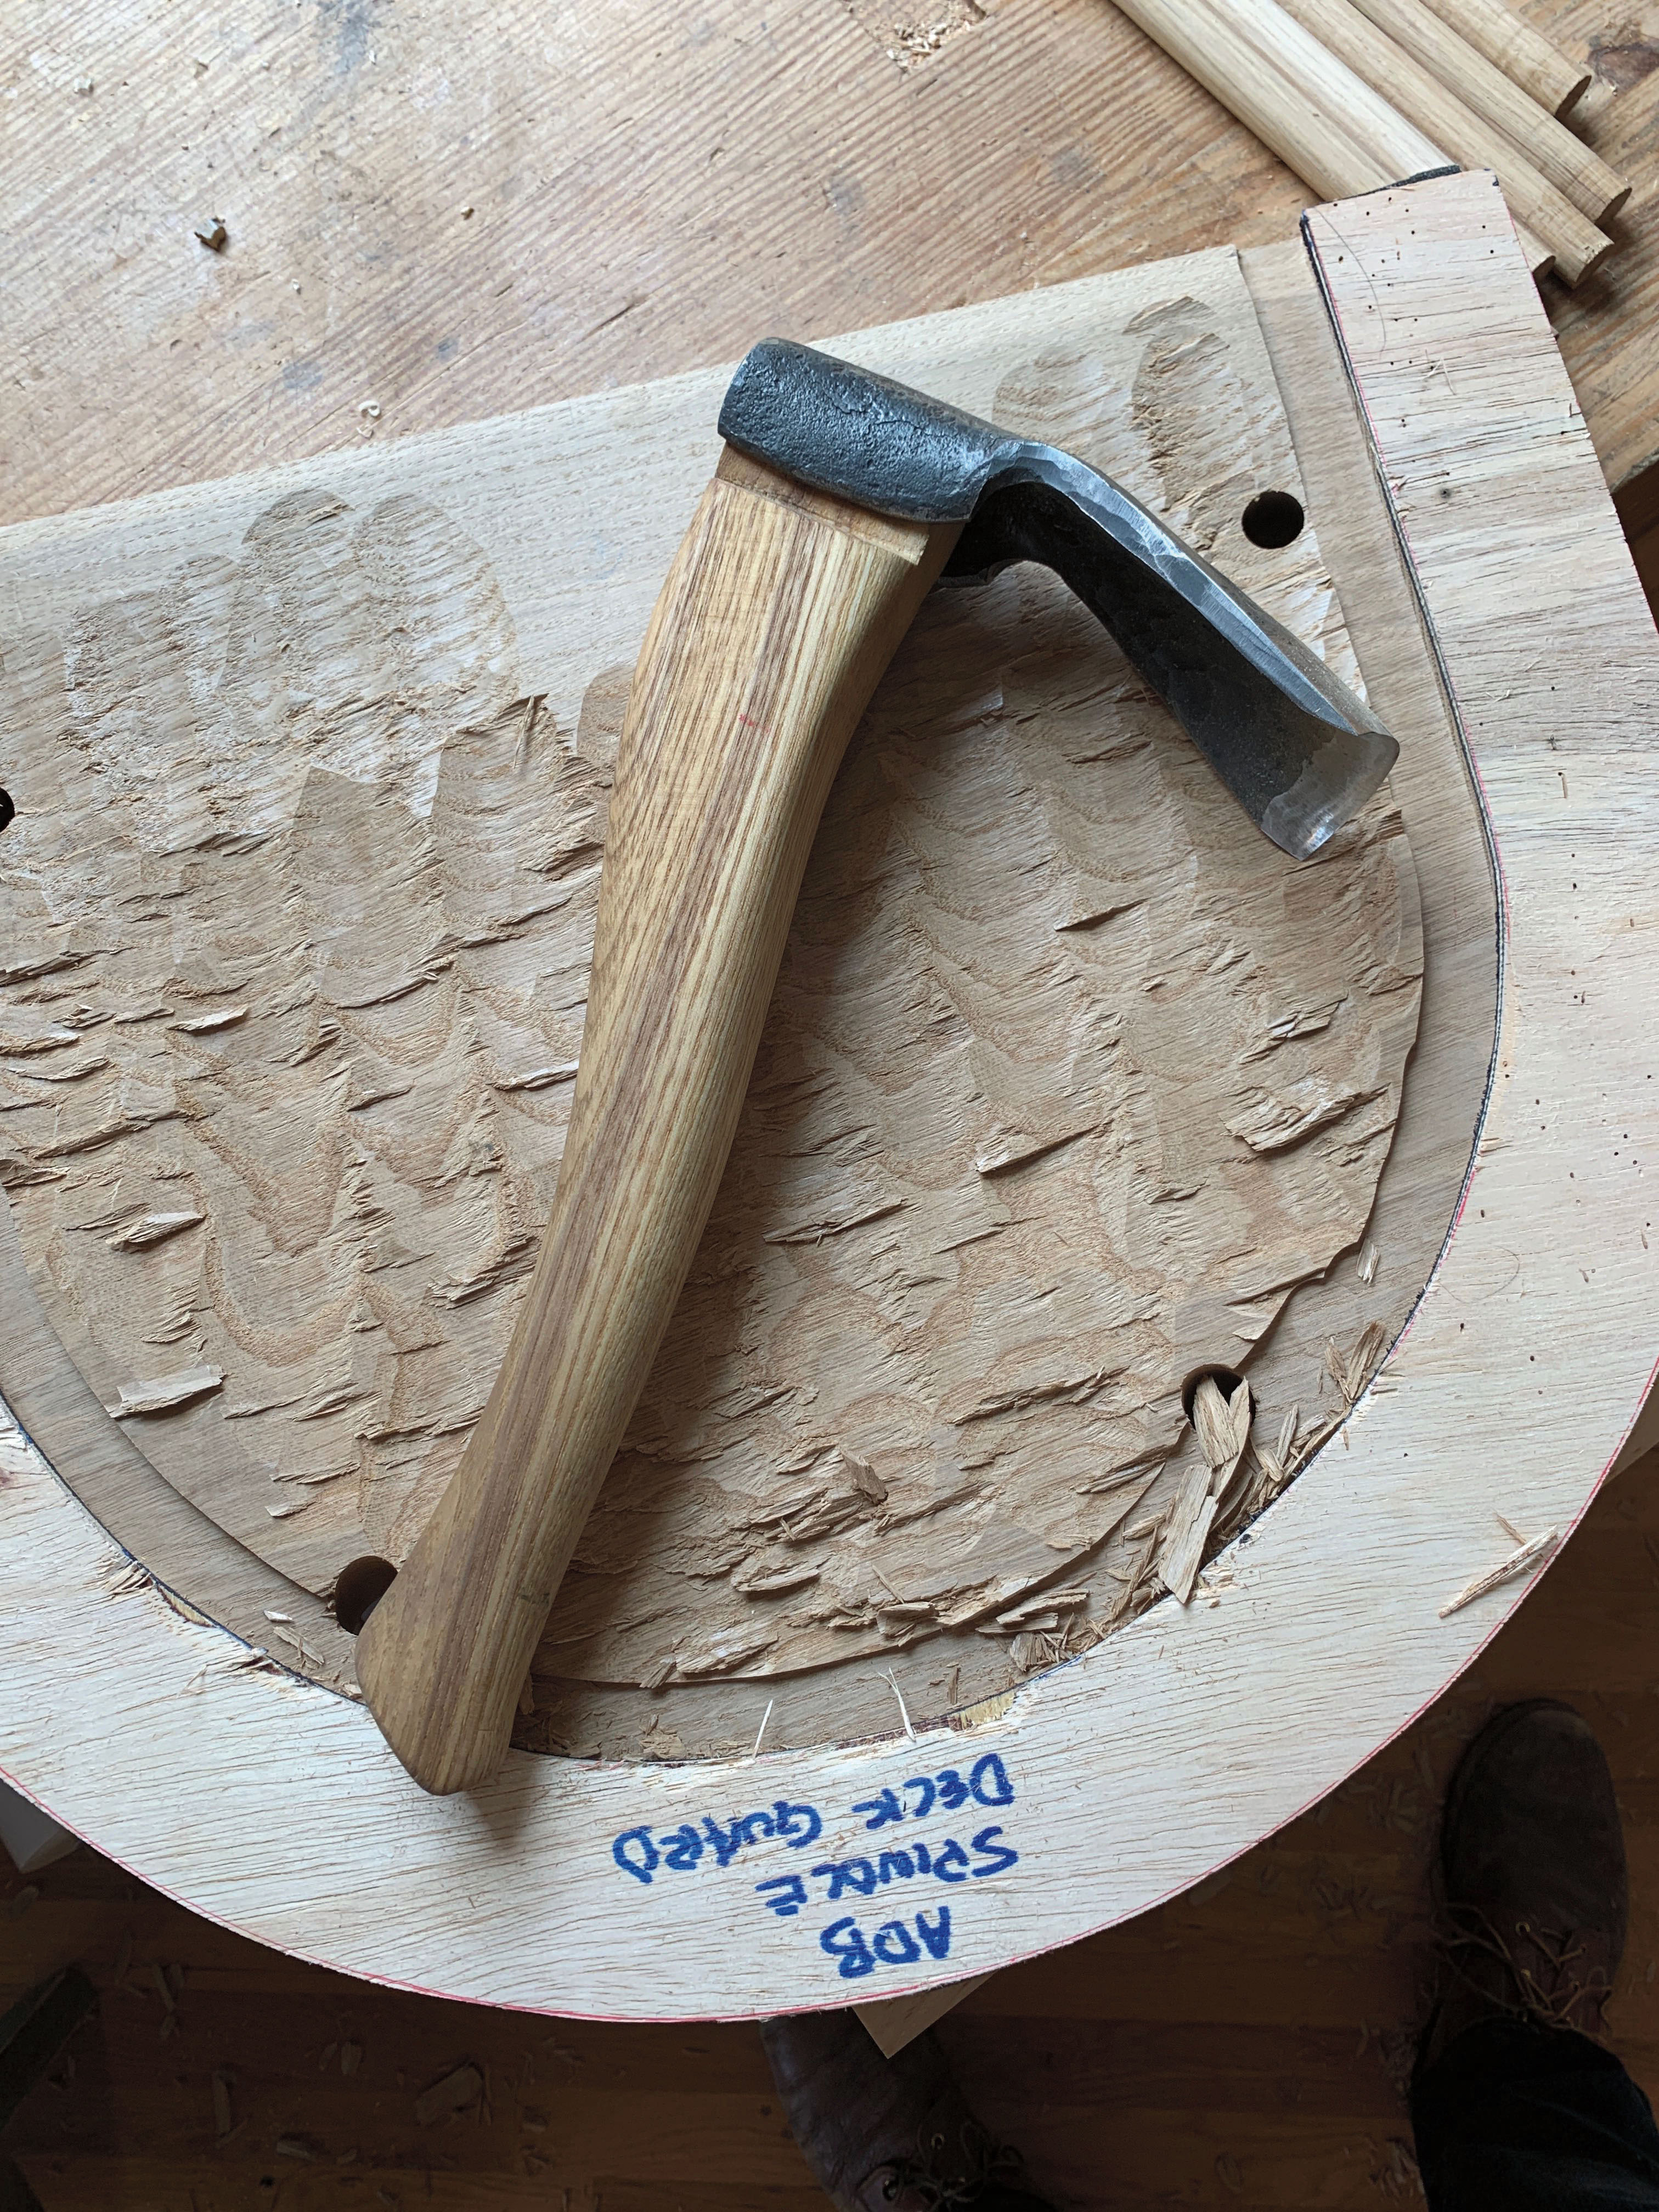
Adze, Scorp & Drawknife I’ve grouped these three tools together as they were made for JB by his son Matty Sears. John spoke highly of these tools and was proud to own them. Matty is a great craftsman and understands wood and metal in equal proportion. This benefited JB as these tools were immediately user friendly – so many tools are not.
I have seen lots of beautiful adzes that couldn’t chop a chair seat. An adze needs to be made intuitively and become intuitive to the user. This is where the maker’s skill and experience comes into play. The ergonomics of an adze are difficult to describe – the haft has to be the correct shape as does the head. Matty mastered this and he’s developed a technique of forging the head so it can be removed from the haft on a sliding dovetail. This makes maintenance easy, yet the clever part is that whilst being struck, the haft and head tighten. I coveted JB’s adze for years. Now, more than two decades later, I own one. Sentimental? Maybe, but it’s without doubt the best I’ll ever use. And its provenance? I couldn’t ask for more!
The drawknife and scorp I believe were also made by Matty from a leaf spring from an old Land Rover (an iconic British 4×4 vehicle, in case you’re not familiar). Again, both tools were an important part of JB’s arsenal.
The adze made by Matty Sears. He refined an African form for chopping out seats.
Dumbscrape I never asked JB why he called his curved card scraper a dumbscrape. I’ll let John Brown explain it as he did in “Welsh Stick Chairs.”
“God forbid that I should ever have a fire in the workshop, but if I did, and had to get out in a hurry, I’d make sure my dumbscrape was in my pocket. This is a magical tool. Called a cabinet scraper in the tool catalogues, it is sharpened to have a wire edge with a burnisher of hard steel. It cuts like a plane – see the curly shavings on the seat. When they come from the shop they are oblong, four-sided. For this kind of work the edges need grinding to a gentle curve. It is a most pleasing business using a scraper.”
I can remember making one after reading this quote. Back in 1990s I bought a new Sandvik cabinet scraper from my ironmonger and fettled it to shape. There wasn’t a photo of it in WSC so I just made what JB describes. It is without any shadow of doubt a must-have tool for chairmaking and woodworking in general. Its uses are endless. I’m not suggesting that I’ve ever opened a tin of wax polish with one, mind you…woe betide anyone who was reckless with JB’s.
Hammer In “Welsh Stick Chairs” there’s an iconic photo of JB hammering a leg home into the seat. It’s a piece of real theatre, and although I wasn’t present to say for sure how hard he was hitting the leg with the mallet, I can honestly say that I never personally witnessed anything like that. In my experience he used a 16 oz. ball peen hammer to drive legs into seats and sticks into their mortises. Well, at least in retrospect it looked approximately 16 oz. to me. In my own personal experience with JB, the seat stock was thinner. So more of a close fit was needed whilst making tenons fit into their mortises. Particularly if anything other than elm was being used for seat stock.
Driving in wedges with a ball peen hammer.
Mechanic’s Vice The mechanic’s vice was instrumental to John Brown and in particular with how he developed its use for chairmaking. Its use was twofold. One, its being at a suitable work height for sculpting an arm bow (for example). And two, in holding stretcher stock up and away from the bench. Its metal jaws were lined with oak so as not to mar the work. I have described its use in the build section.
Folding Rule A boxwood folding rule was always used instead of a tape measure. It is large enough for the dimensions involved in chairmaking. I’ve discussed how JB disliked measuring things too much; the eye was the important tool for making chairs the John Brown way.
Workbenches John used a few varieties of benches through the years. He wrote some wonderful articles for Good Woodworking on the subject with detailed plans. I’ll briefly discuss two benches.
Workbench No. 1 John made the bench from pine which was readily available PAR (planed all round) from the local builders merchants. He’d dress the edges and laminate the leg stock to roughly 4″ x 4″. The top was glued up from three 9″ x 3″ boards. These were dowelled on the edges – the same way he joined chair seats. Tenons were worked on the ends of the legs, and these were mortised and pierced through the benchtop and wedged.
Stretchers were put around the circumference of the bench low down. He made several benches of this style, and my personal bench is exactly the same. I guess you could say it was more French than British in appearance, particularly in that it didn’t have the typical deep apron that appears on a British Nicholson-style bench.
John always used to make a tool rack that sat to the rear of the bench and ran its full length. This worked fine but it’s one thing I personally dislike; when chopping a chair seat the cacophony created by clanging tools infuriated me. Making chairs should be a peaceful pursuit.
For the purists, the bench measured approximately 6′ in length by 26-1/2″ wide. Lots of benches measure 24″ in width, which is fine for cabinet work but is slightly narrow for a full-blown Welsh chair with its eccentric leg splay. A quick-release vise was used as an end vise.
Workbench No. 2 JB also wrote a great article on his designated chairmaker’s bench. This measured approximately 4′ 6″ long by 27″ wide. It was made from various materials. The top was laminated from plywood, which was then sheathed with oak. Narrow dovetailed aprons then sheathed all of the edges of the ply and oak benchtop.
He made the undercarriage much the same way as mentioned on the first bench, but with much deeper stretchers – 8″ x 1-1/4″ wide rather than 4″ x 2″. This added mass and eliminated racking. The top sat on the legs with only stub tenons instead of the through-tenons of the previous bench. The aprons on the benchtop sat proud of the legs all the way around. A dowel located both through the apron and leg tenon secured the top to its undercarriage.
Three vices were built into this particular bench. One was a standard big Record quick-release. The second was a homemade leg vice, and the third a Veritas twin-screw vice, which ran on a chain. I believe that the bench was inspired after JB saw Drew Langsner’s chairmaker’s bench when he taught at Country Workshop back in the 1990s. And for the bench nerds, it measured 34-1/2″ in height. I used this bench extensively for a number of years and it worked incredibly well – yet with me being 6′ 4″ tall, it was too low. I raised it on 4″ x 4″ timbers to suit me. (Heaven forbid this book should start a debate on the subject of bench height; I mention it purely for posterity.)
Lastly, both of the workbenches’ undercarriages were decorated with paint in JB’s favourite drab green. There was no “Welsh Miserable” involved whatsoever.
John Brown’s mechanic’s vise was the centerpiece of his chairmaking operations.
Hand Grinder JB was a proponent of the hollow grind and honed his freshly ground edges with oilstones. He wrote quite a lot about its use and was even instrumental in helping to promote a grinder made in Eastern Europe. It was simply attached to what I would loosely describe in appearance as a bench hook. This was held in the mechanic’s vice and by being well up and away from the bench, the hand-cranked handle could be turned without encountering any part of the bench. JB made a simple oak tool rest, which was adjusted with a wedge to attain his 30° degree preferred grinding and honing angle.
A Favorite Chisel I’ll finish up with one chisel in particular – a 1-1/4″ bevel-edged paring chisel. This was never far from him. It was used broadly – and yes, it was struck at times. What more can I say? It’s just a chisel. As I said earlier I could have written a book on JB’s tools. He loved tools. We all must not forget: Tools are necessary to the making of something tangible, to get to the glory of the form, and to one of beauty that John Brown deemed to be “A Chair.”
We have two upcoming classes in July at our storefront that should – by all rights – be filled and have a long waiting list. But they aren’t.
If you can attend these classes, I encourage you to do so for two reasons. One, in both cases these classes are being taught by the premier instructor on the topic. Two, we won’t offer a lot of classes next year, so these opportunities will dry up in December.
Here are the classes:
French Polishing With Derek Jones
July 11-12
Most people know Derek as the editor of Furniture & Cabinetmaking magazine. But Derek is way more than that. He’s a time-served professional woodworker who has an affinity for toolmaking and French polishing. His classes on French polishing sell out quickly in the U.K. and Europe because Derek has distilled the process so it contains 0 percent garbage. I’ve watched Derek teach it, and it’s brilliant. In fact, the reason I wanted him to teach the class here is so I could take it (as luck would have it, my Germany trip was extended, so I cannot).
Honestly, if you want to up your finishing game (or just establish your finishing game), this weekend will do it. Period. This class is for beginners. Intermediates. Experts.
Make a Carved Oak Box with Peter Follansbee
July 29-Aug. 2
Yup, we managed to lure Peter Follansbee west of the Allegheny Mountains for this class, and he is bringing primo red oak for the students to build and carve their boxes. Follansbee is one of my favorite woodworking writers, instructors and builders (I said it so right here). He’s also the author of our newest book, “Joiner’s Work.”
This class is the gateway drug to 17th-century-style construction methods and carving. You get to make this beautiful little box with traditional joints and then cover every surface with the geometrical carvings. Even if you’ve never carved a block of soap or a ham, you’ll do great. I’ve been amazed by what Peter’s students turn out their first time holding a gouge.
About Next Year This year has been nuts. We offered so many classes that I found it difficult to keep up with the shop’s commission work and work on future books. While I loved having people teach here from all over the world, we’re going to dial things back – way back – for 2020 so we can regain our footing and catch up on commercial furniture work and toolmaking.
We’ll still offer a weekend class or so each month. Maybe a two or three week-long classes during the year. And we’ll bring back Chris Williams for another Welsh chair class. But for the most part, we’re going to hunker down and build stuff.
So if you want to take a class here, you might want to comb over the current list of classes for 2019. Next year is going to be quiet.
Helen says this moody portrait, taken during a promotional shoot for a business bank, represents “the only time I’ve ever earned money for standing around doing very little.”
Chris Schwarz suggested I invite Helen Welch to be interviewed for the Lost Art Press blog. “She is a “[bleep]ing badass,” he wrote. “A tool nerd. Funny and sharp as hell.” So I wrote her by email. She sent back the following reply.
“If nothing else (other than saving lives), this lockdown has given us all a chance to do stuff we wouldn’t normally do. Things I’ve discovered during this time:
“I hate sourdough.
“I do not like to work from home. A one-bedroom apartment is no place to make the kind of mess I enjoy in the workshop.
“Practicing my golf swing indoors has aged the fixtures and fittings.
“The homemade wines I made two years ago are now drinking well. A rare case of serendipity.
“Danish is a very odd language but I’m enjoying the challenge.
“Videoing myself is a special kind of torture, only topped by having to edit the damn thing. Gruesome. Likewise Zoom, Skype etc.”
Then she said sure, she’d be happy to do the interview.
I knew I was going to enjoy our phone call.
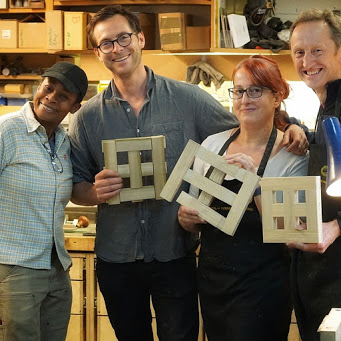
Helen with Mark Armstrong (center) and Sam Brown. “Sam teaches all the classes I don’t want to do, basically evenings and weekends,” Helen says. “Mark is a carpenter and friend of the school. He comes in to hang out because the school is his happy place. He’s also partially responsible for my tool collecting habit.”
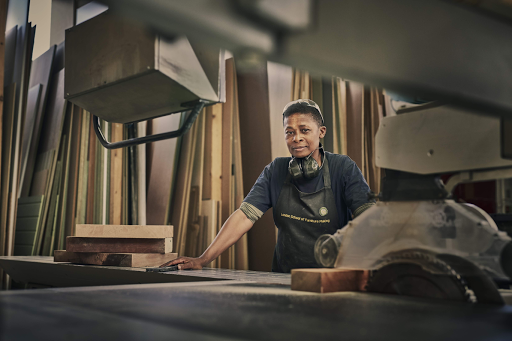
Most woodworkers familiar with Helen know her through the London School of Furniture Making, which she founded and has operated since 2013. “It’s nowhere near as august as the London College of Furniture,” she laughs, acknowledging the similarity between the two names. Woodworking schools pride themselves on a range of qualities, from their size and diversity of course offerings to their cultivation of individual students’ skill in artistic design, or their faithfulness to particular historical traditions. The London School of Furniture Making is tiny, with just four benches, which allows Helen and her fellow instructor, Sam Brown, to give each student an extraordinary level of attention. Course offerings are varied in terms of topic and duration, aimed primarily at amateur makers. Short courses build specific skills; project courses offer opportunities to put them into practice. Beyond this, students can pay a daily fee to come in and simply use the benches and tools, as well as pick her brains. If the London School of Furniture Making were to claim a special niche, it might be that these characteristics make learning there unusually customized and accessible.
Students from a three-day Core Skills – Joinery class last December. “As you can see,” notes Helen, “not everyone finishes their graduation project.”
Helen’s parents, Michael and Leonora (with friendly pigeons)
Helen started the school after decades of work in the trades. She was born and raised in North London, where her father sold film (the kind for cameras in the pre-digital era) at Boots, a nationwide pharmacy chain. Her mother had a variety of jobs that included work in a perfume factory but spent most of her career in retail sales at John Lewis, one of Britain’s best loved department stories. Helen’s older brother, Maurice, is a passionate photographer who’s all about electronics and gadgets.
Maurice and Helen
At the age of 11 Helen made a conscious decision to go to a girls’ school. “I didn’t want to have to fight for my teachers’ attention,” she explains. By the time she entered sixth form (senior high school in the United States), the school had become co-ed. In 1984, as she was preparing to take her A-Levels in biology, chemistry and business studies, she says, “all my fears about being overlooked came to fruition. I was simply exhausted from the struggle, so I left.”
Later that year she returned to the school to attend a careers fair, most of the offerings at which were “not interesting, just banks and boring things, not what I envisaged doing…” But as she wandered around the booths, a couple of people at a tiny stall in a corner called out “Come chat to us! If you’re not doing anything, why don’t you come and work in our woodwork-cum-training college?” Why not? she thought, and jumped right in.
The business was a collaboration of four people – two men and two women – who shared a shop in the north London area called Kentish Town. “Splinter Group was a training center which carried out woodworking jobs in the local community,” she told me. “I was paid £25 per week as part of the government’s Youth Training Scheme.” The shop was a large space with an eight-bench hand tool room and a separate machine shop, all on the first floor (which we in the States refer to as the second floor) of a Victorian-era light industrial building. The work entailed a mixture of teaching/learning and making. “If it was wood, they did it. They would bring their trainees on site as well as building in the shop.” While working there Helen made a set of stairs; a complicated play frame for a children’s play center; a table and shelves, and a toolbox for the tool set they gave her. “I remember thinking it was quite a good mix of skills and different woodworking projects. It gave me an idea of what was possible — there are all sorts of things I can make with these skills.”
After about six months at this cooperative shop, Helen spent a year doing a variety of work, “including making some fake French antiques for a guy I met in a pub.” She worked in building maintenance for a local women’s center and ended up applying for an apprenticeship in carpentry and joinery with Camden Council, where she spent three years – one year in building maintenance and repairs; one year of renovation and restoration on jobsites; and one year in a joiner’s shop making windows and doors. She earned her City & Guilds Certificate in carpentry and joinery in the late 1980s, specializing in (of all things) building forms for cast concrete structures, a skill she hasn’t used since. As soon as she had the certificate, she left the council job. “’This is a three-year prison sentence which is now up,’” she remembers thinking – “three years of misogyny and racism. I have very few happy memories [of that time]. It was tiresome, but I worked hard to not let it scar me.”
Helen took a job as a building inspector for the Building Control Department in Camden and then Islington, where she worked for five years. As someone who had worked in the trades, she says, “I realized there was a split between the people who came in from university and those from the trades. I quickly made friends with the ex-carpenters and the ex-plumbers. We were more collaborative when working with the chippies (Brit-speak for carpenters) on site, whereas some of our colleagues just wanted to read the letter of the law. [The work of building inspectors] is more of a problem-solving exercise,” she says, alluding to the kind of considered and constructive approach that anyone in construction or remodeling appreciates. She sums up that experience as “five years of interesting developments in my understanding of construction and the legal side [of that business].” But in the end, she felt “I was too young to be trapped telling people what to do. I missed being back in the workshop making things.”
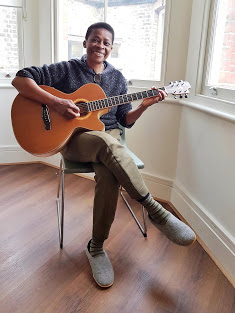
So she took herself off to the London Metropolitan University (formerly the London Guildhall University/London College of Furniture, and before that, Shoreditch Technical Institute) to study guitar making. “I had a fantastic three years there,” she says of that time, which allowed her to develop her skills at a far higher level. She graduated from the program thinking “Wow, this is amazing – and there’s absolutely no career in it!”
Helen with the last guitar she made, about 15 years ago. “I keep thinking I’ll get around to making another…,” she says.
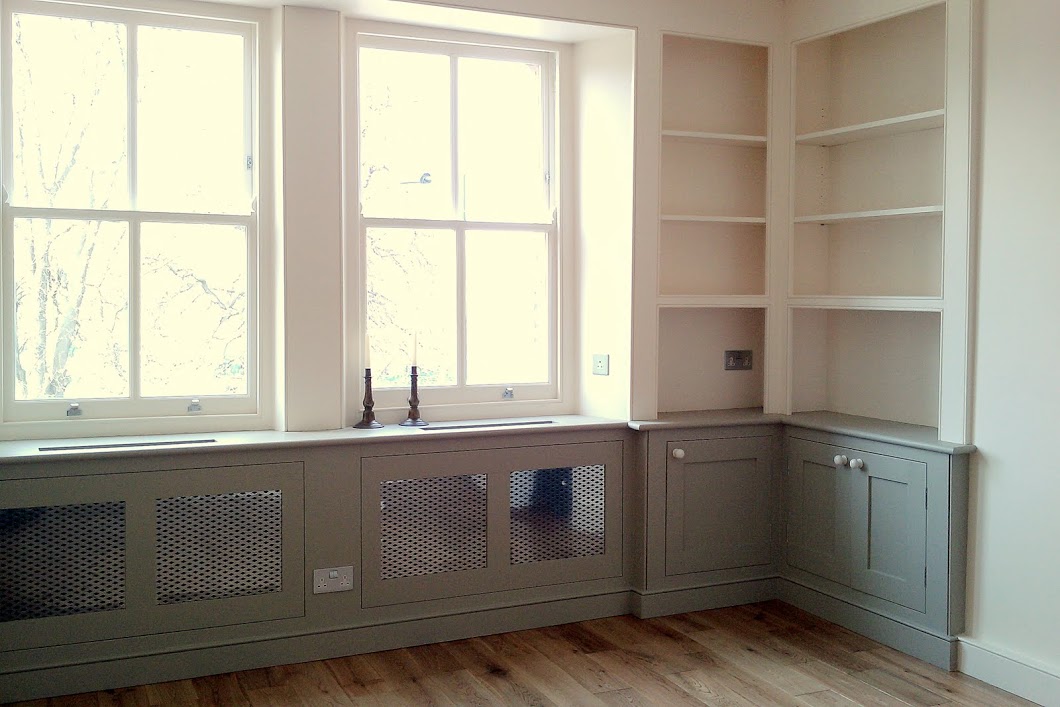
Being a determined individual in need of income, Helen started making built-ins and doing carpentry. She had no shop; she worked in people’s homes. “[It was] me, my van and tool kit. Me constructing things on site. It worked for a good number of years.” Her business came exclusively by word of mouth. Her customers were mostly married couples with a couple of kids, “quite well-paid people in their mid-30s who’d just bought their first proper house and wanted to have some built-in cupboards.”
She supported herself by means of this work, without a shop, for about 10 years, starting around 1994. She had a typical complement of trim carpentry tools: a portable Festool table saw (made up by fitting her track saw into a table), a jigsaw, planer, power tools, and used a couple of “trestles” (sawhorses) topped with a sheet of plywood for a bench. “Not a lot of hand tools,” she says, then throws in: “When I think about it now I wonder how did I manage to last 10 years doing that? Eight-by-four sheets of MDF. Hateful!”
A set of living room built-ins typical of the work Helen did for ten years without a shop.
As a side gig ever since completing her training in lutherie she taught part time at London Metropolitan University, City and Islington College, Women’s Education in Building and The School of Stuff, to name a few – some evening classes, sometimes one day a week. She enjoyed teaching but she still had no intention of doing so in her own set-up.
Around 2004 Helen finally got a workshop in a space shared with a fellow who went by the name Bob Smoke (not his real name); he made props and designed special effects for film and television. Although she describes it as “an enormous hangar of a place which was freezing cold in winter and hot in summer, never comfortable,” the new work situation gave her the opportunity to retrieve her better equipment from the storage unit where she’d been keeping it, and to make more interesting things than painted built-ins. Jobs still came entirely through word of mouth.
Oak sideboard, circa 2014, made for Helen’s friends David and Paul. She thinks this was the last commission she took on before closing down Welch Assembly, her cabinetmaking business.
By 2010 she’d decided it was time to commit to what she calls “a proper workshop.” She looked around. For £600 a month she could get a place that wasn’t much bigger than the living room in her apartment. But for £750 she could get something much better: a shared workspace in a complex of industrial warehouses built around the 1970s in Tottenham, North London, that’s home to 15 cabinetmaking businesses. She went to see the couple of guys who had the space to let, Alistair Williams and Joe Ridout – they run a furniture and cabinetmaking company – and she ended up renting the space. Since then, she says, “I really haven’t looked back.” When they moved into a bigger unit she asked if she could take on a couple of students as a new venture – “something sustainable that makes me feel like I’m having a good time…something that will not give me sleepless nights and leave me feeling resentful to[ward] customers.” She found that there were lots of people eager to learn, people who valued her flexible set-up. Her fledgling venture grew, and she decided it was going to be a school. Happily, Joe and Alistair were and still are very supportive.
Most students find her through the school’s website. Classes have been cancelled since mid-March. She’s spent her time at the shop alone streamlining things and improving ergonomics – much-needed improvements to what she calls the previous “controlled chaos,” while also “playing with my tool kit, as opposed to the school’s. I’m a tinkerer.” The last thing she made was a solid silver plane, just for fun. “I wanted to try my hand at jewelry, working with precious metal clay.” After firing you end up with 99 percent pure silver.
Most other businesses in the building have been carrying on as usual. For those doing custom furniture and cabinetmaking, there’s plenty of space to keep the recommended distance from others; for teaching detailed hand skills, not so much. She hopes to resume classes in June.
Ash and fumed oak display cabinet for a school in Essex, circa 2011
Hang out with six (and in a couple cases a few more) of your new closest friends as you learn woodworking in our upcoming classes. Below are listed and linked those in which there are one or more bench spaces available, both at the Lost Art Press (LAP) storefront and at other locations in classes taught by LAP regulars.
As always, if you’ve questions about classes, please send them to me (Megan with no “h”) at covingtonmechanicals@gmail.com, not to Meghan with an “h” at the LAP Help Desk.