Anyone who has read “The Anarchist’s Tool Chest” or worked in my shop knows that I dislike French-fitted cubbyholes for tools. I prefer my tools to roam free and migrate amongst my tills as they rise and fall in importance to the job at hand.
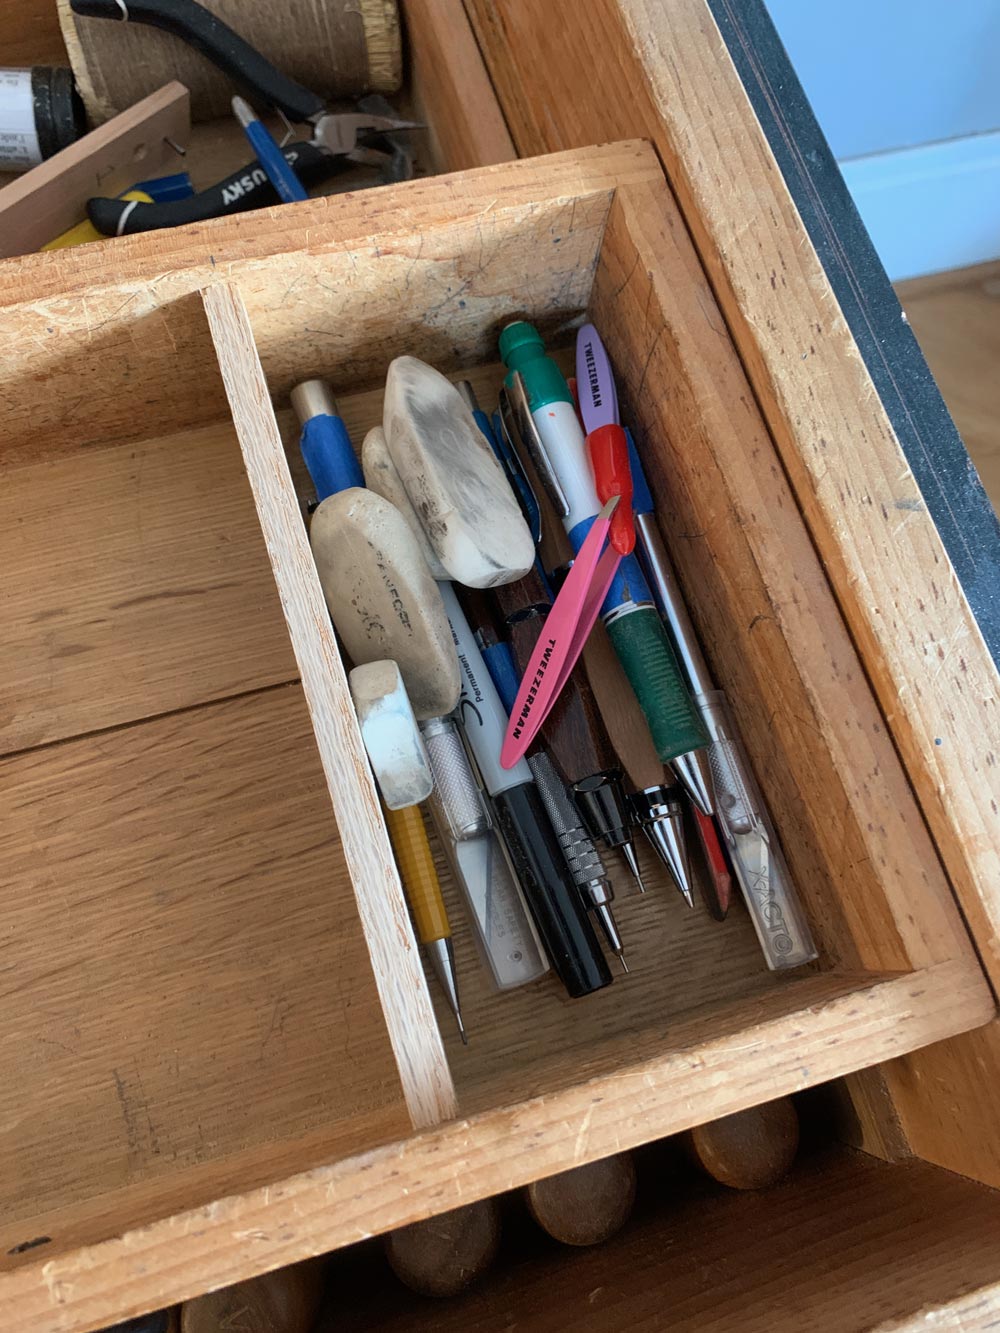
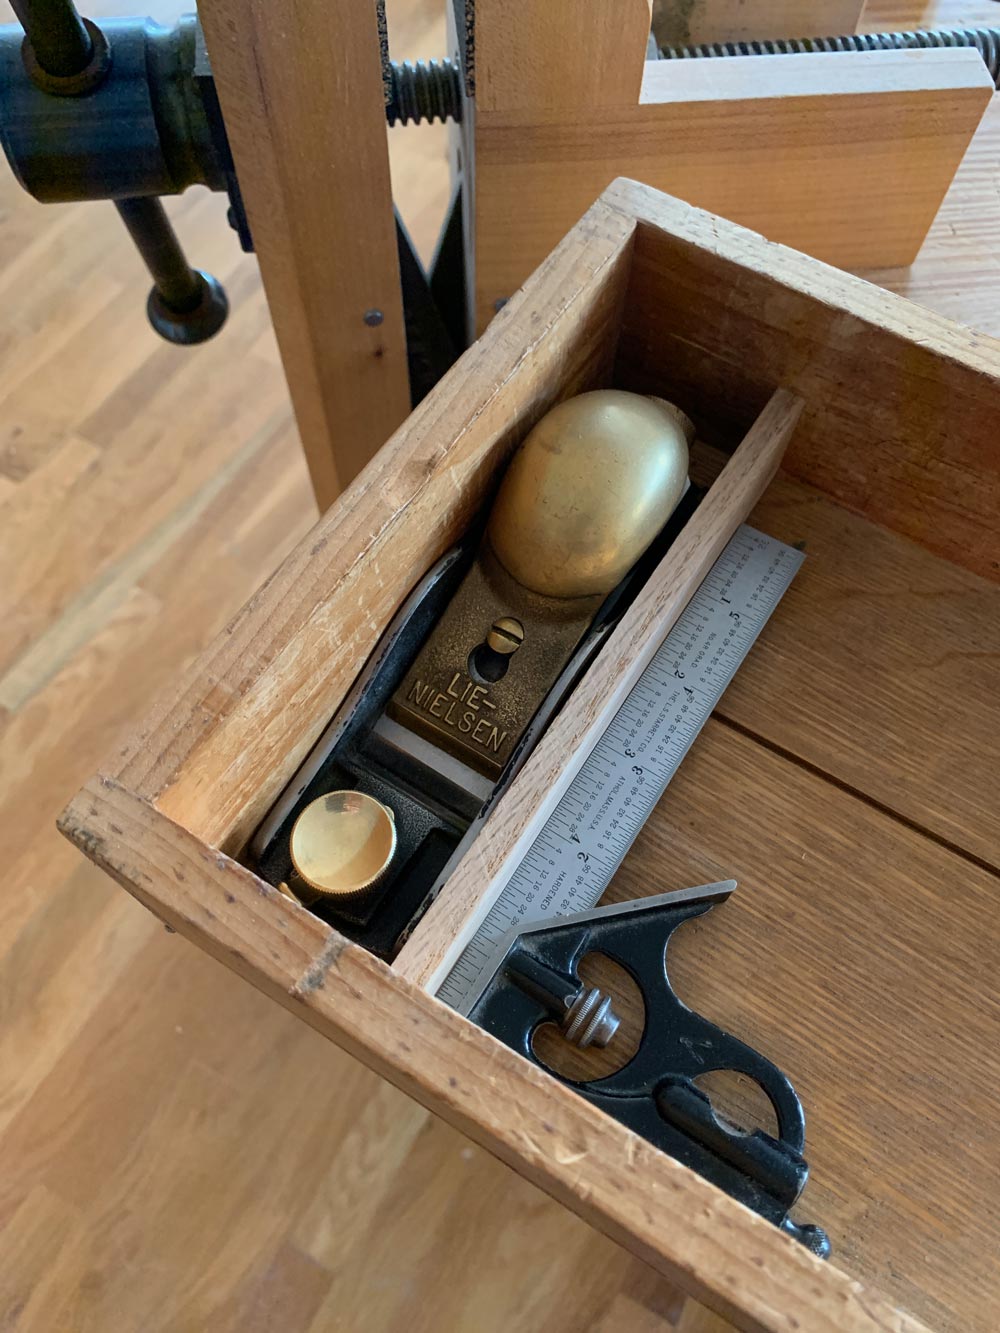
I still think this way, but this morning I took a small step to both corral my pencils and tip my hat to my Lie-Nielsen 60-1/2 block plane. I added a small oak divider to keep my pencils, knives and 6” rules in one spot. And I added a smaller divider for my block plane at the other end of the till.
The pencil divider has been a long time coming. I hoard my mechanical pencils, rules and erasers and the like (you have to in a group shop or you will end up pencil-less). And like Nesquik or Tang, they soon dissolve into the rest of the till, hiding under the other tools and becoming invisible.
The divider for the block plane is simply an admission that this block plane has been with me for 23 years and isn’t going anywhere.
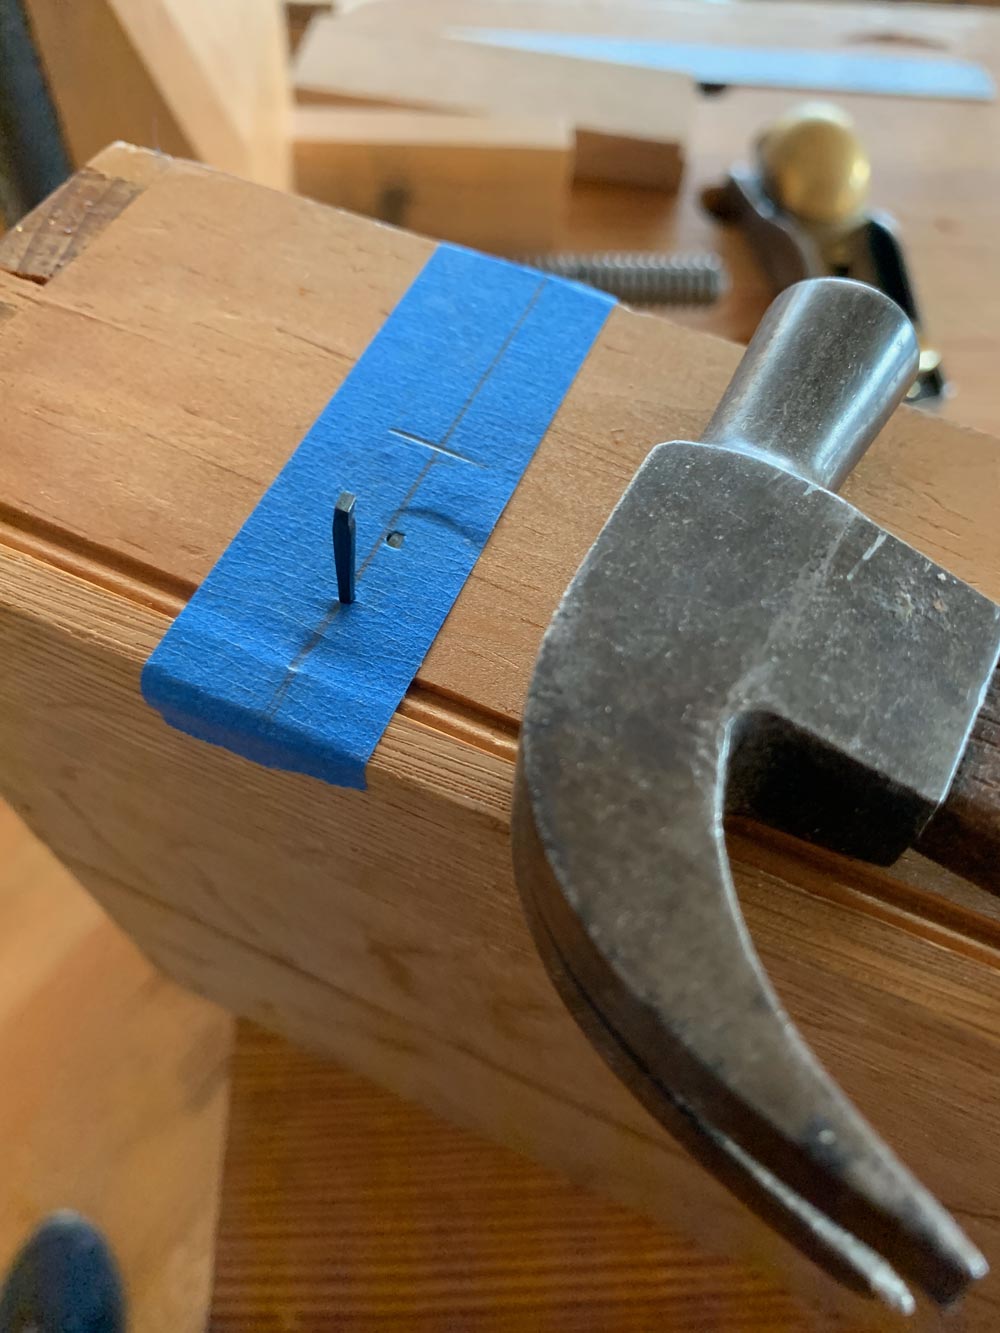
The dividers are oak scraps that I secured with headless brads only. So if this turns out to be a bad idea, it’s reversible.
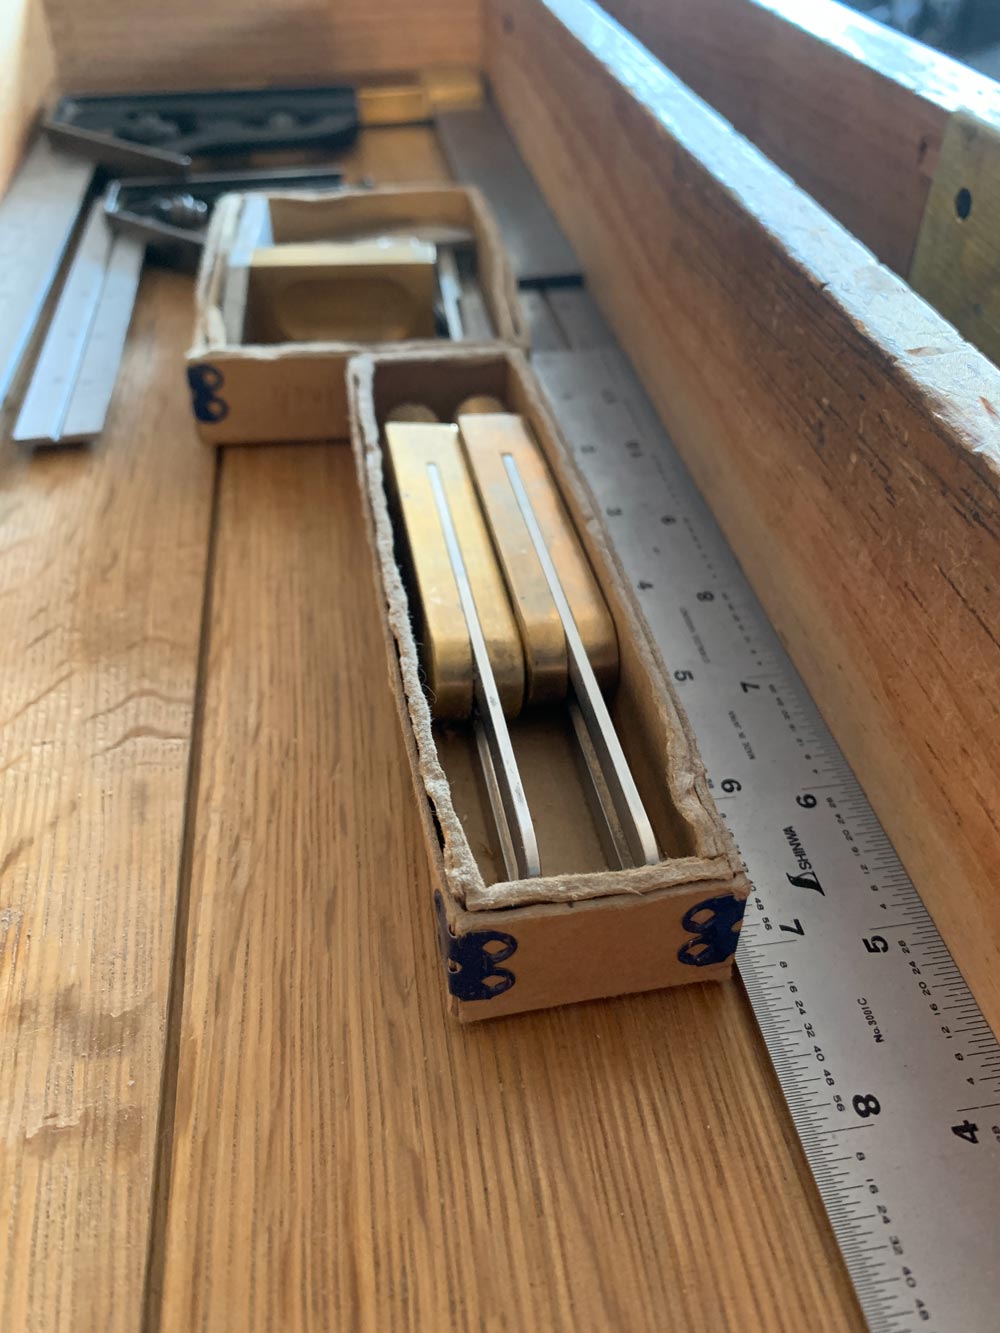
One other small tip: to restrain and protect valuable tools, such as my sliding bevels, I keep them in small cardboard boxes. The boxes can migrate (a good thing) but they never become invisible (also a good thing).
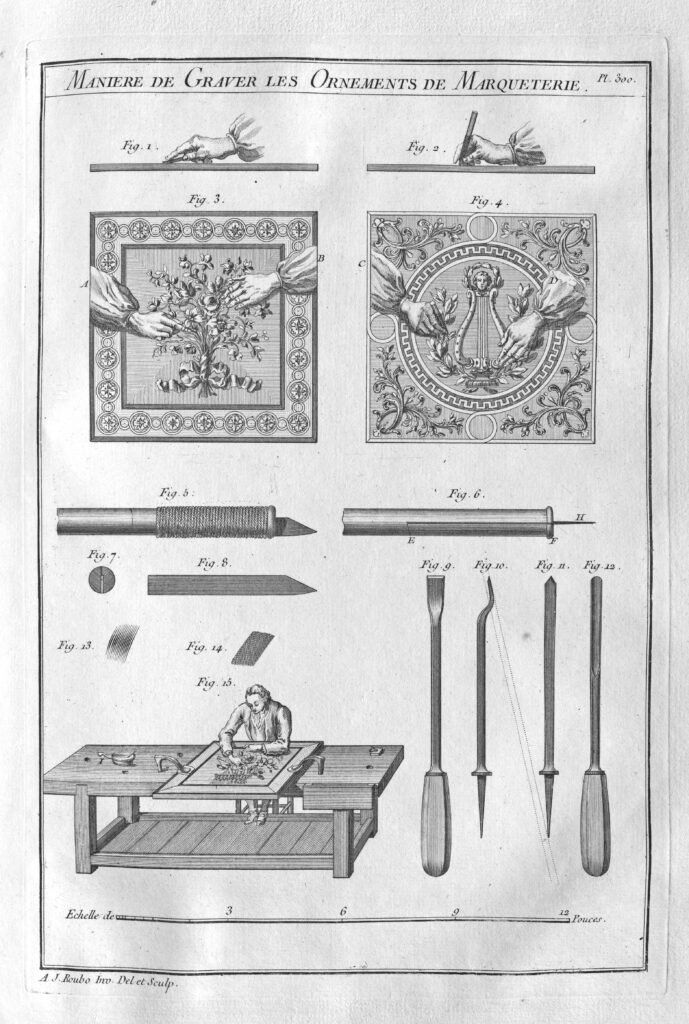
The different Compositions of Dyes appropriate for dyeing Woods, and how to use them
The tinting [dyeing or staining] of woods is of great importance for cabinetmakers, because it is with its help that one can give to woods the different colors, which are necessary for representing all sorts of objects, such as fruits, flowers, animals, etc. However, cabinetmakers always make a great secret of the composition of their dyes in order to preserve exclusivity, and not to increase the number of workers in their trade. From that circumstance comes the fact that most of the compositions that the ancient cabinetmakers used have not been passed on to us, or are presently badly imitated. Those being used presently are defective, or even if they are good, cannot be perfected given that those who possess them hide the process. They keep this information secret not only from their colleagues but even from those for whom the theory could be useful in perfecting the composition of their dyes. This would be much more advantageous than the enjoyment of maintaining a secret, which is not a big thing, but which, even when it is perfectly well known to us, leaves us still to regret the loss of the method of Jean de Veronne, who tinted woods with boiling dyes and oils that penetrated them. This would be a very helpful thing to know, the research of which would be a worthy undertaking for some of our scholars. It is highly wished that one could find the means to use the chemicals having a good tint in the dyeing of woods, because their colors would be more durable. Sadly, the colored parts of most of these chemicals are too thick to penetrate the interior of woods, which is absolutely necessary, so that when working with tinted woods they are all found to be of uniform color throughout their entire thickness and the surface.
That is why in the description of the woods, without the means to which I would like to know the procedure to accomplish the perfect tint, I will explain only ordinary procedures to cabinetmakers, to which I will add some of my own experiences, which is still a long ways from attaining the perfection of which this part can be capable.
The five primitive colors are, as I said above, blue, yellow, red, taupe [brown] and black. Each of these colors is given by different chemicals, which, when mixed together, give the second or composite colors.
The blue appropriate for tinting woods is made with indigo, diluted in oil of vitriol [also known as sulfuric acid], and then put in a sufficient quantity of water.
Yellow is made with barberry, yellow earth and saffron mixed together, or even simply from gaude [this plant, Reseda luteola, is known as weld].
Red is made from the boiling of wool, or even a concoction of Brasilwood mixed with alum.
Taupe is made with walnut husk.
Black is made with the wood of the Indies, the gall nuts and iron sulfate.
Before entering into the detail of the composition of different stains, I am going to give a general idea of the chemicals of which they are composed, so that the cabinetmakers may be less subject to being fooled when they buy them.
Indigo is a type of ash of a deep blue, provided by the leaves of a plant that grows in the Americas and Indostan, and which they sell in little pieces. For it to be good, it must be medium-hard, so that it floats on water, so it is inflammable and of a beautiful blue or deep violet color. Its interior should be strewn with little silver-colored spangles, and appear reddish when rubbed with a fingernail. Indigo is preferred over all other chemicals for staining woods because it is a powder of extremely fine and granular pieces, which are easily introduced into the pores of the woods.
Oil of vitriol or sulfuric acid is the final spirit that one gets from vitriol. This acidic liquor should be very concentrated and be absolutely free of all aqueous parts to be of a beautiful blue color, as I will speak more of later.
Barberry is a little bush of which the fruits, and the bark of the roots are stained in yellow. That from Candie [island off the coast of Crete] has a very yellow wood, and passes for the best.
Woad [this cannot be woad that produces a blue dye] is a rather common plant in France. One boils it in water to extract a yellow liquid, which mixed with a bit of alum, tints very well. Dyers prefer that one, which is the most spare [meaning thinnest] and of a rosy color.
One also dyes in yellow with the yellow wood of which I spoke above page 777. Yellow earth is nothing other than yellow ochre, used by painters.
Saffron is a plant that grows in France, especially in Gatinois [western part of France]. It is the pistil of the saffron flower, which gives these little reddish filaments, or better said, orange, which they sell under the name of saffron, which gives a dye of a golden yellow. For saffron to be good, it should be fresh, of a pungent odor, of a brilliant color and when touched it should seem oily and should stick to the hands.
Alum is a fossil salt and mineral, which is used much in dyeing, whether to set up the materials to be stained or whether for fixing the colors [as a mordant], which it retains all the particles by its astrin-gent quality. The best is that of Rome, which is white in color, and is transparent, a bit like crystal.
Liquor decanted from boiled wool is sold by the wool merchants. In boiling this wool, one gets a decoction of the color rose, which is more or less deep, according to how much water is used to scour the wool, proportional with its quantity.
I spoke up above of Brasilwood, page 771. I will content myself to say here that the decoction of this wood gives off a clear red color, tending toward the orange, and that one deepens its color by adding a bit of alum. Brasilwood from Fernambouc is the best, and they sell it all chopped up at the spice merchants, who sell it by the pound.
The husk of walnuts is nothing more than the first wrapping of these nuts, which one takes off before they are perfectly mature, and which one boils in water to extract a brownish or taupey tint.
Indian Wood, of which I spoke on page 777, gives off a concoction of a deep red, which one stains in black, and when one mixes with alum it stains in violet.
Nut gall is a type of excretion that is found on the tender shoots of a type of oak named “Rouvre.” The most highly esteemed nut gall comes from the Levant [the name given to the countries on the eastern coast of the Mediterranean]. The best ones are those that are the heaviest, and where the surface is thorny. There are both green and black ones, both of which work equally to stain in black.
Ferrous sulfate is a type of vitriol that is found in copper mines. It is the most powerful of the acids, it corrodes iron and copper, and it etches the soft parts with an infinite number of small holes, into which the dye is introduced. Ferrous sulfate is also named Roman vitriol or English vitriol, according to whether it comes from one or the other countries. We make some in France that is, they say, as good as the others. The color of ferrous sulfate [known also as green vitriol] is of a light green: it should be neat and shiny.
Verdigris also works well as a wood dye. It is the green rust scraped from copper sheets. For it to be good, it should be dry, pure, of a deep green and filled with white spots.
There you have a bit of a description of the ingredients commonly used for staining/dyeing woods. All that remains is to give the manner of making use of them.
The Way of Staining Wood Blue
The preparation of blue with indigo and oil of vitriol [sulfuric acid] is done in two ways, namely, hot and cold. Blue for wood is prepared cold in the following manner:
you take 4 ounces of oil of vitriol of the best quality, that is to say, that it is deprived of all aqueous parts, which you pour into a pint-size bottle, with 1 ounce of indigo reduced to a very fine powder. Then you fill the bottle with water, at least nearly so, and you bottle it very carefully, and you seal the cork with wax. you let it infuse for five to six weeks, at the end of which you can use this stain that will be more or less strong, by putting in as much water as you judge appropriate, always ob-serving to add a bit of oil of vitriol, so the dye will be fixed better. When the dye is to the degree of strength that you need, you put it in a stoneware or glazed earthenware vessel, and you soak the wood in it until it is totally penetrated, which sometimes requires 15 days and even one month of time, according to the hardness and thickness of the wood. The wood can hardly have a thickness of more than one line [1/12″].
Cabinetmakers ordinarily use a stoneware butter pot for putting the wood into the dye, which is very convenient because the shape of this vase enables one to put in rather large pieces, without the need of having a very great quantity of dye.
It is very easy to know when the interior of the wood is penetrated, given that you only have to cut a small piece of the wood about 2 to 3 lines from its end. When the pieces that you want to dye cannot be cut like this, you put with them another piece of the same quality, with which you test the degree of penetration of the other pieces.
The Way of Dyeing in Yellow
Cabinetmakers tint in yellow with barberry, with yellow earth and with saffron, which they boil together. This being done, they soak the wood pieces until they are totally stained. The proportion of these chemicals is 2 liters [in this case the French word refers to “litron,” which is about 79 percent of a modern liter, so 2 modern liters is a much larger quantity] of barberry, 6 “sols” [a French penny] of yellow earth, and 4 “sols” of saffron.
A concoction of woad gives a very beautiful yellow of a good tint, and you soak the wood as normal. When this concoction is added to a bit of verdigris, you have a sulfurous yellow color. Saffron infused in grain alcohol gives a very beautiful golden yellow.
The Way to Dye in Red
Red is normally made with brasilwood, which one boils with 6 sols of alum for each pound of wood. This red is a false tint because it is more orange than red. you can substitute the boiling-liqueur from wool, which gives a very beautiful red, leaning toward rose, which one makes deeper by passing the pieces that you have stained into the liqueur of the mixture of Brasilwood mixed with alum. This makes a very beautiful red, more or less deep, depending on whether you leave the pieces of wood more or less a long time in the dye bath of Brasilwood.
Dyeing with decanting liqueur is done very easily. One only needs to boil some wool dyed to this effect, just until it makes a beautiful red concoction. Avoid boiling too much, because the wool will take back the color that it discharged at first.
The proportion of the liquor of wool to be decanted is 1 pound to 4 pints of water for the first decanting, to which one can add a second, even a third, until the wool renders no more color. The concoction of Brasilwood without alum gives a yellowish red, which is sometimes attractive, and is named “Capucine.”
The concoction of Indian Wood is very red, but it makes a blackish stain, which makes a very beautiful violet when mixed with alum from Rome, as I will speak of it later.
How to Dye Taupe [Brown], Black and Grey
Taupe dye is made with a concoction of walnut husk, which can be more or less strong, as you judge appropriate, always adding to it a bit of alum.
An attractive black is made by staining the wood first in a concoction of wood of India (or Campeachy, which is the same thing). When this first application is dry, you dip the wood in a concoction of gall nut in which you have put some ferrous sulfate, or vitriol of Rome. Sometimes one only makes a single dye of these various ingredients, of which the proportion should be 1 part nut gall, 1 part vitriol and 6 parts of Campeachy, all boiled together, into which you dip the wood until it is penetrated.
A grey tint is made with a concoction of nut gall, into which you dissolve some green vitriol [ferrous sulfate] in smaller quantity than for the black stain. The more ferrous sulfate-cuprous there is, the deeper grey it will be. The normal proportion is one part of ferrous sulfate for two parts of nut gall.
The Way to Tint Composite Colors
The ordinary green stain of cabinetmakers is made with the same ingredients as for the blue, to which is added the barberry in more or less quantity, according to whether the green should be more or less deep.
One can make a very beautiful apple green in staining first the wood in ordinary blue, and then dipping it in a concoction of woad, and that with more or less time according to whether one wants to have a green more or less strong.
Violet is made with a concoction of Campeachy, to which one has mixed some alum from Rome. One can have violet more or less deep by staining first the woods in rose and then in the blue, which will give a clear violet.
If, on the contrary, one wishes to have a brown-red leaning toward violet, one stains the wood first in the concoction of Brasilwood, then in that of the Campeachy.
One can obtain composite dye of all nuances imaginable by tinting the wood in a primary color then in another one more or less dark, so that the stain that results from these two colors reflects more or less of each other. This is very possible to do because one is the master to strengthen or weaken the primary colors as one judges appropriate, whether by reason of what the form of the object re-quires, or even by reason of the different quality of wood, which takes the dye more or less well, or strengthens or weakens the color. This has to be highly considered, and it requires much attention and experience on the part of cabinetmakers.
In general, all the dyes of which I just spoke are applied in cold baths. It is not that many of them cannot be used hot, but it is that because it takes a considerable amount of time for the same dye to penetrate into the interior of wood, it is not possible to use them hot. What’s more, cold dyed wood has much more vibrancy than when used with a hot bath.
There it is, a bit of the details of staining [dyeing] wood, at least those that most cabinetmakers use, or which I myself have employed in the attempts that I have made. These have succeeded rather well, but they have not been followed by a long enough time to be assured of the success of my at-tempts. It would be highly wished that those who are currently making use of these dyes, or who will be using them later, apply themselves to perfect them which, I believe, is not absolutely impossible. Having done this, they would be rather good citizens to not make a mystery of their discoveries, but only succeed by rendering them public.
Cabinetmakers dye not only their woods for veneer to use them in the place of the natural color of the woods. They also use these same dyes to accentuate various parts of their works while they are being worked. As such, these dyes, like the red of Brasilwood, the violet of the Campeachy, the black, etc., are used hot, which is very easy to do because it is sufficient for only the exterior of the woods being dyed. Other than these dyes, woodworkers in furniture sometimes use a type of yellow color for bedsteads, which is composed of yellow ochre and common varnish, or of this same ochre and the very clear English glue, sometimes they even put it in only water, which is of little use.
Before finishing the dyeing of wood, I believe I ought to give a least-costly method of dyeing white wood red, which is done in the following manner:
you take some horse dung, which you put in a bucket of which the bottom is pierced with many holes, and you place it above another bucket, into which falls the water from the dung, as it gradually rots. When it does not rot fast enough, you water it from time to time with some horse urine, which helps a lot and at the same time gives a red water, which not only stains the surface of the wood, but penetrates the interior 3 to 4 lines deep. In staining the wood with this dye, one must take care that all the pieces be of the same species, and about equal in density if one wishes that they be of equal color throughout. This observation is general for all water-based stains, which have no palpable thickness nor even appearance [they leave no residue or any evident change in appearance], which requires the cabinetmaker to make a choice of wood of equal color and a density as I mentioned before. This demands a lot of experience and attention on the part of the cabinetmakers. And with the exception of the way to compose and use dyes, it is hardly possible to give theoretical rules on this part, for which success is not often due to anything but experience, which is not acquired except with a lot of time, attention and work.
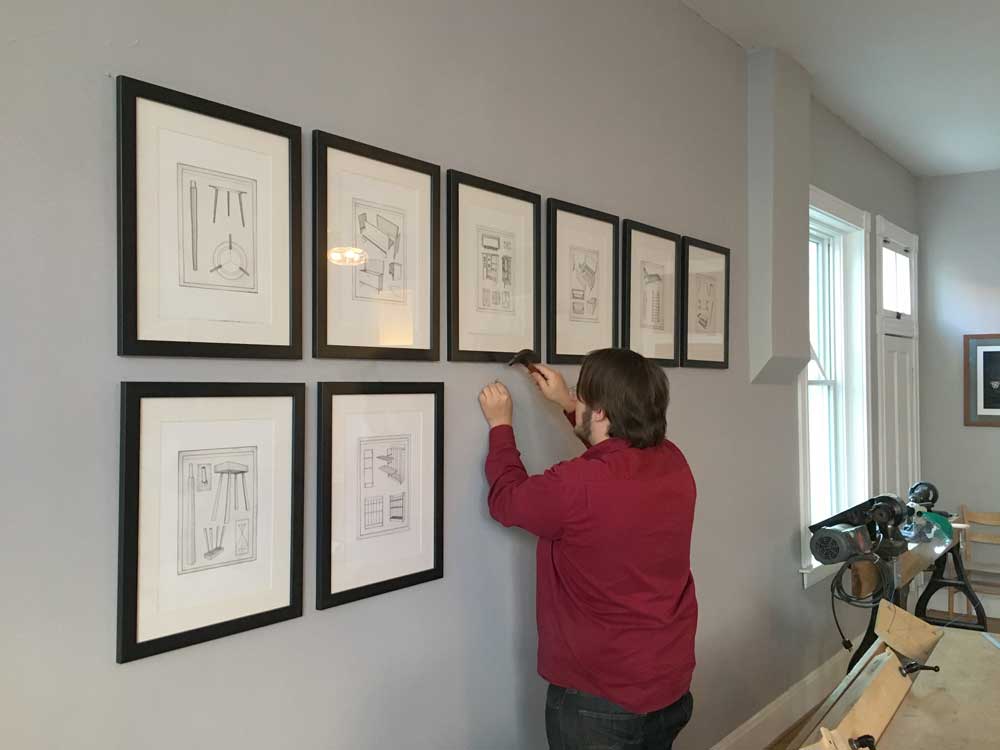
Brendan helps install original copperplate engravings from “The Anarchist’s Design” book in our bench room.
Megan Fitzpatrick and Brendan Gaffney will staff the Lost Art Press storefront this Saturday so I can have a weekend with my wife (it’s our 25th anniversary).
There have been lots of changes at the storefront, 837 Willard St. in Covington, Ky., since last month. The Electric Horse Garage will be up and running (the new roof goes on starting Tuesday). Plus, we are setting up the bench room for classes that Brendan, Megan and Will Myers will be teaching there this year.
We now have nine (!) different workbenches at the storefront for you to examine.
My French oak Roubo bench
The Holtzapffel workbench
A Nicholson bench with angled legs
Megan Fitzpatrick’s “Glue-bo” bench made with laminated beams
A nice commercial Ulmia
A cherry and cottonwood Roubo bench
The Loffelholz 1505 workbench
The Saalburg Roman bench
The Herculaneum eight-legged bench
So if you are in the market for a workbench design, our storefront might be a good place to investigate.
As per usual, we will be selling our full line of Lost Art Press books, plus T-shirts. We are, however, quite low on blemished books right now.
The storefront is open from 10 a.m. to 5 p.m. on the second Saturday of each month. Directions and a map are here. Our next open day will be Feb. 10 (I’ll be there!).
As in a lot of other Shaker furniture, the distinctive features of a Shaker workbench are not always immediately obvious. As a utilitarian piece of equipment, the Shaker bench has to meet many of the same requirements as a worldly workbench. There is only so much room for variation and development before such a basic tool becomes over-specialized. Though the Shakers, like their contemporaries, distinguished between joiners or carpenters, who made architectural elements, and cabinetmakers, who made furniture and small goods, the workbenches of these craftsmen were probably quite similar. Chairmaking and boxmaking were separate industries with different workholding requirements. Shaker chairs were a production item, mainly comprised of interchangeable turned parts. Thus the lathe was the primary tool and workholding device. Chairs were clamped in a vise like the one shown below while their seats were woven. Shaker boxes were also mass-produced, and they were assembled on benches that were much smaller and less refined than the workbenches used for furnituremaking or joinery.
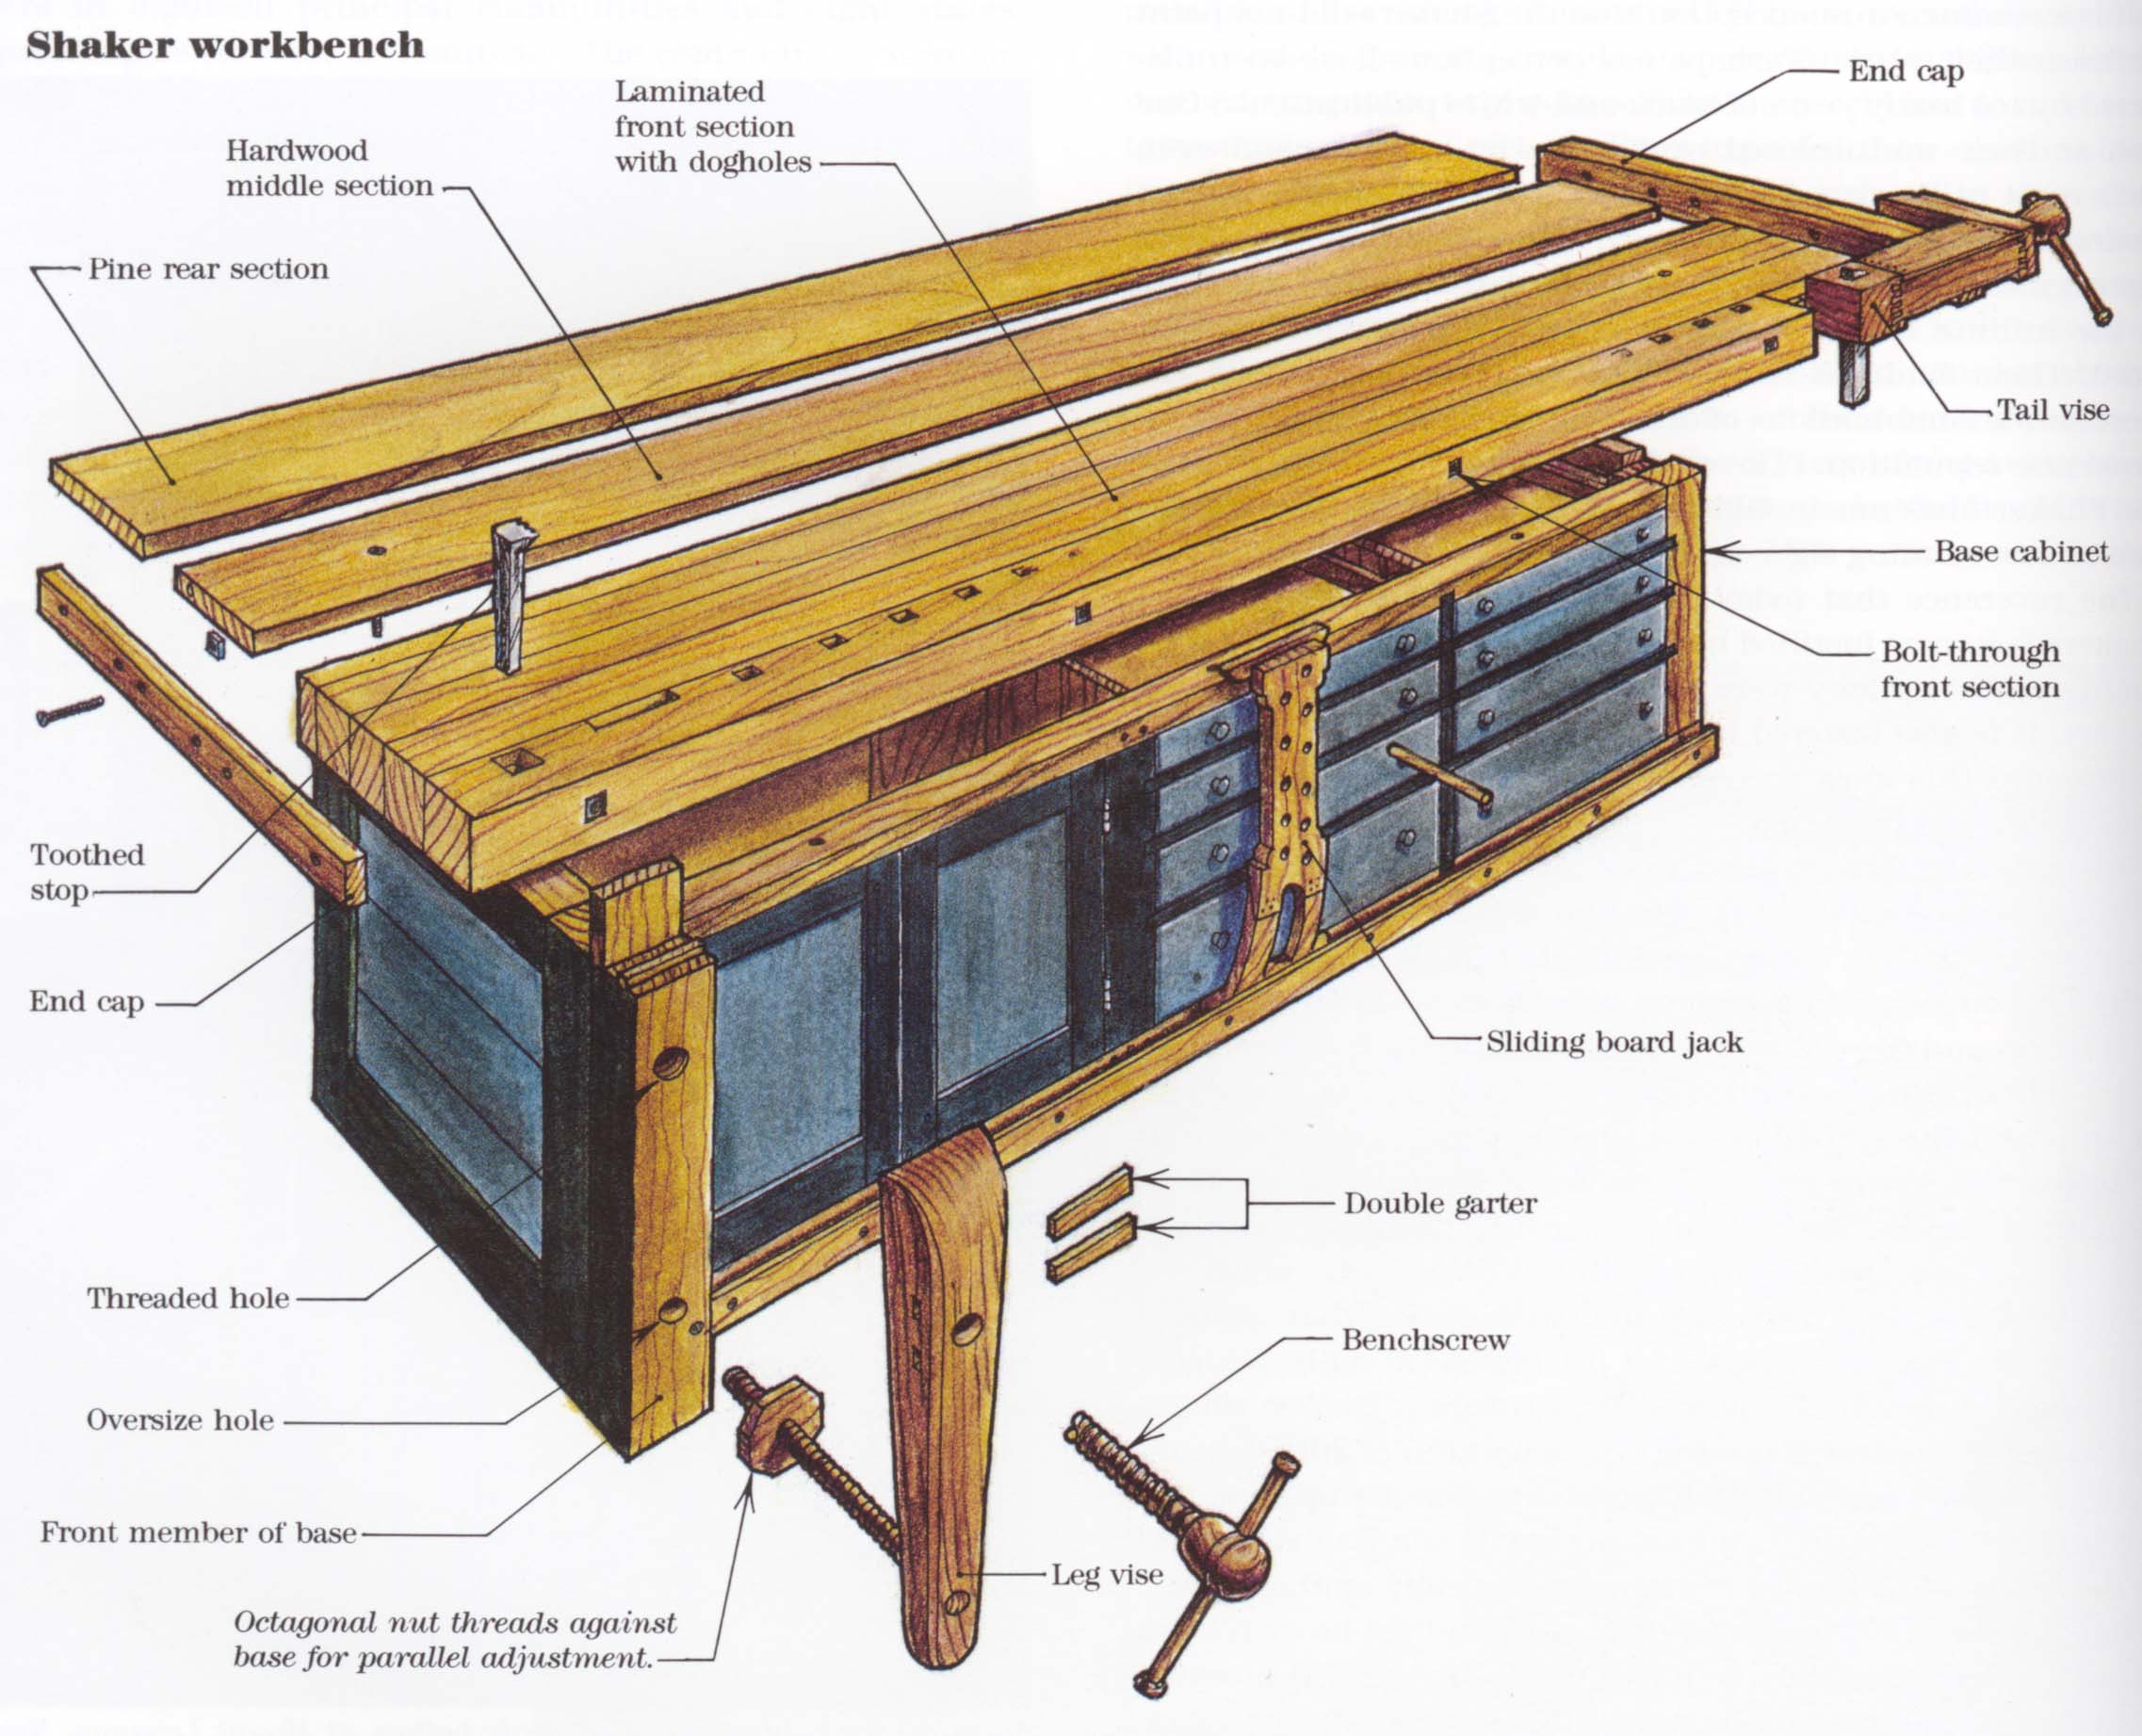
The Shaker workbench, like others in the world, has many standard components: a tail vise and dogholes, a front vise, and room for tool storage beneath the top. Likewise, most of the same materials, hand tools and machinery available to the Shakers for workbench making were the same as those used by their worldly counterparts. As a result, similar woods may be found in both Shaker and non-Shaker benches, joined with the same mortise-and-tenon or dovetail joints.
It is unclear exactly when the Shakers began building workbenches. Perhaps a few were brought along when woodworkers joined the fold. (Gideon Turner, an early convert, became a member of New Lebanon in 1788 with “1 Set Carpenters tools & 1 Set Joiners Tools” valued at eight pounds.) Or, more likely, makeshift arrangements may have been employed until permanent workshops could be built and proper benches installed. In any case, journal entries and a couple of dated benches indicate that Shakers were building benches by the first or second quarter of the 19th century. This coincides with the period during which most Shaker furniture was built and the stylistic features that distinguish it today were firmly entrenched. Although Shaker life and work became increasingly codified at the same time, no precise description of the ‘proper’ workbench or its appropriate usage has yet been discovered. (The idea that such a description might exist is not as farfetched as it sounds, considering that the Millennial Laws mandated: “Floors in dwelling houses, if stained at all, should be of a reddish yellow, and shop floors should be of a yellowish red.”)
Since my first introduction to those two Shaker benches, I have looked at a dozen benches in other Shaker museums – Fruitlands in Harvard, Massachusetts, and the Shaker Musemn in Old Chatham, New York – as well as a few in private collections. While these represent only a fraction of the total number of Shaker workbenches that must have been made (every Shaker family had a woodworking shop, and the large families, such as the New Lebanon Church Family, had both a joiner’s and a cabinetmaker’s shop), certain patterns begin to emerge.
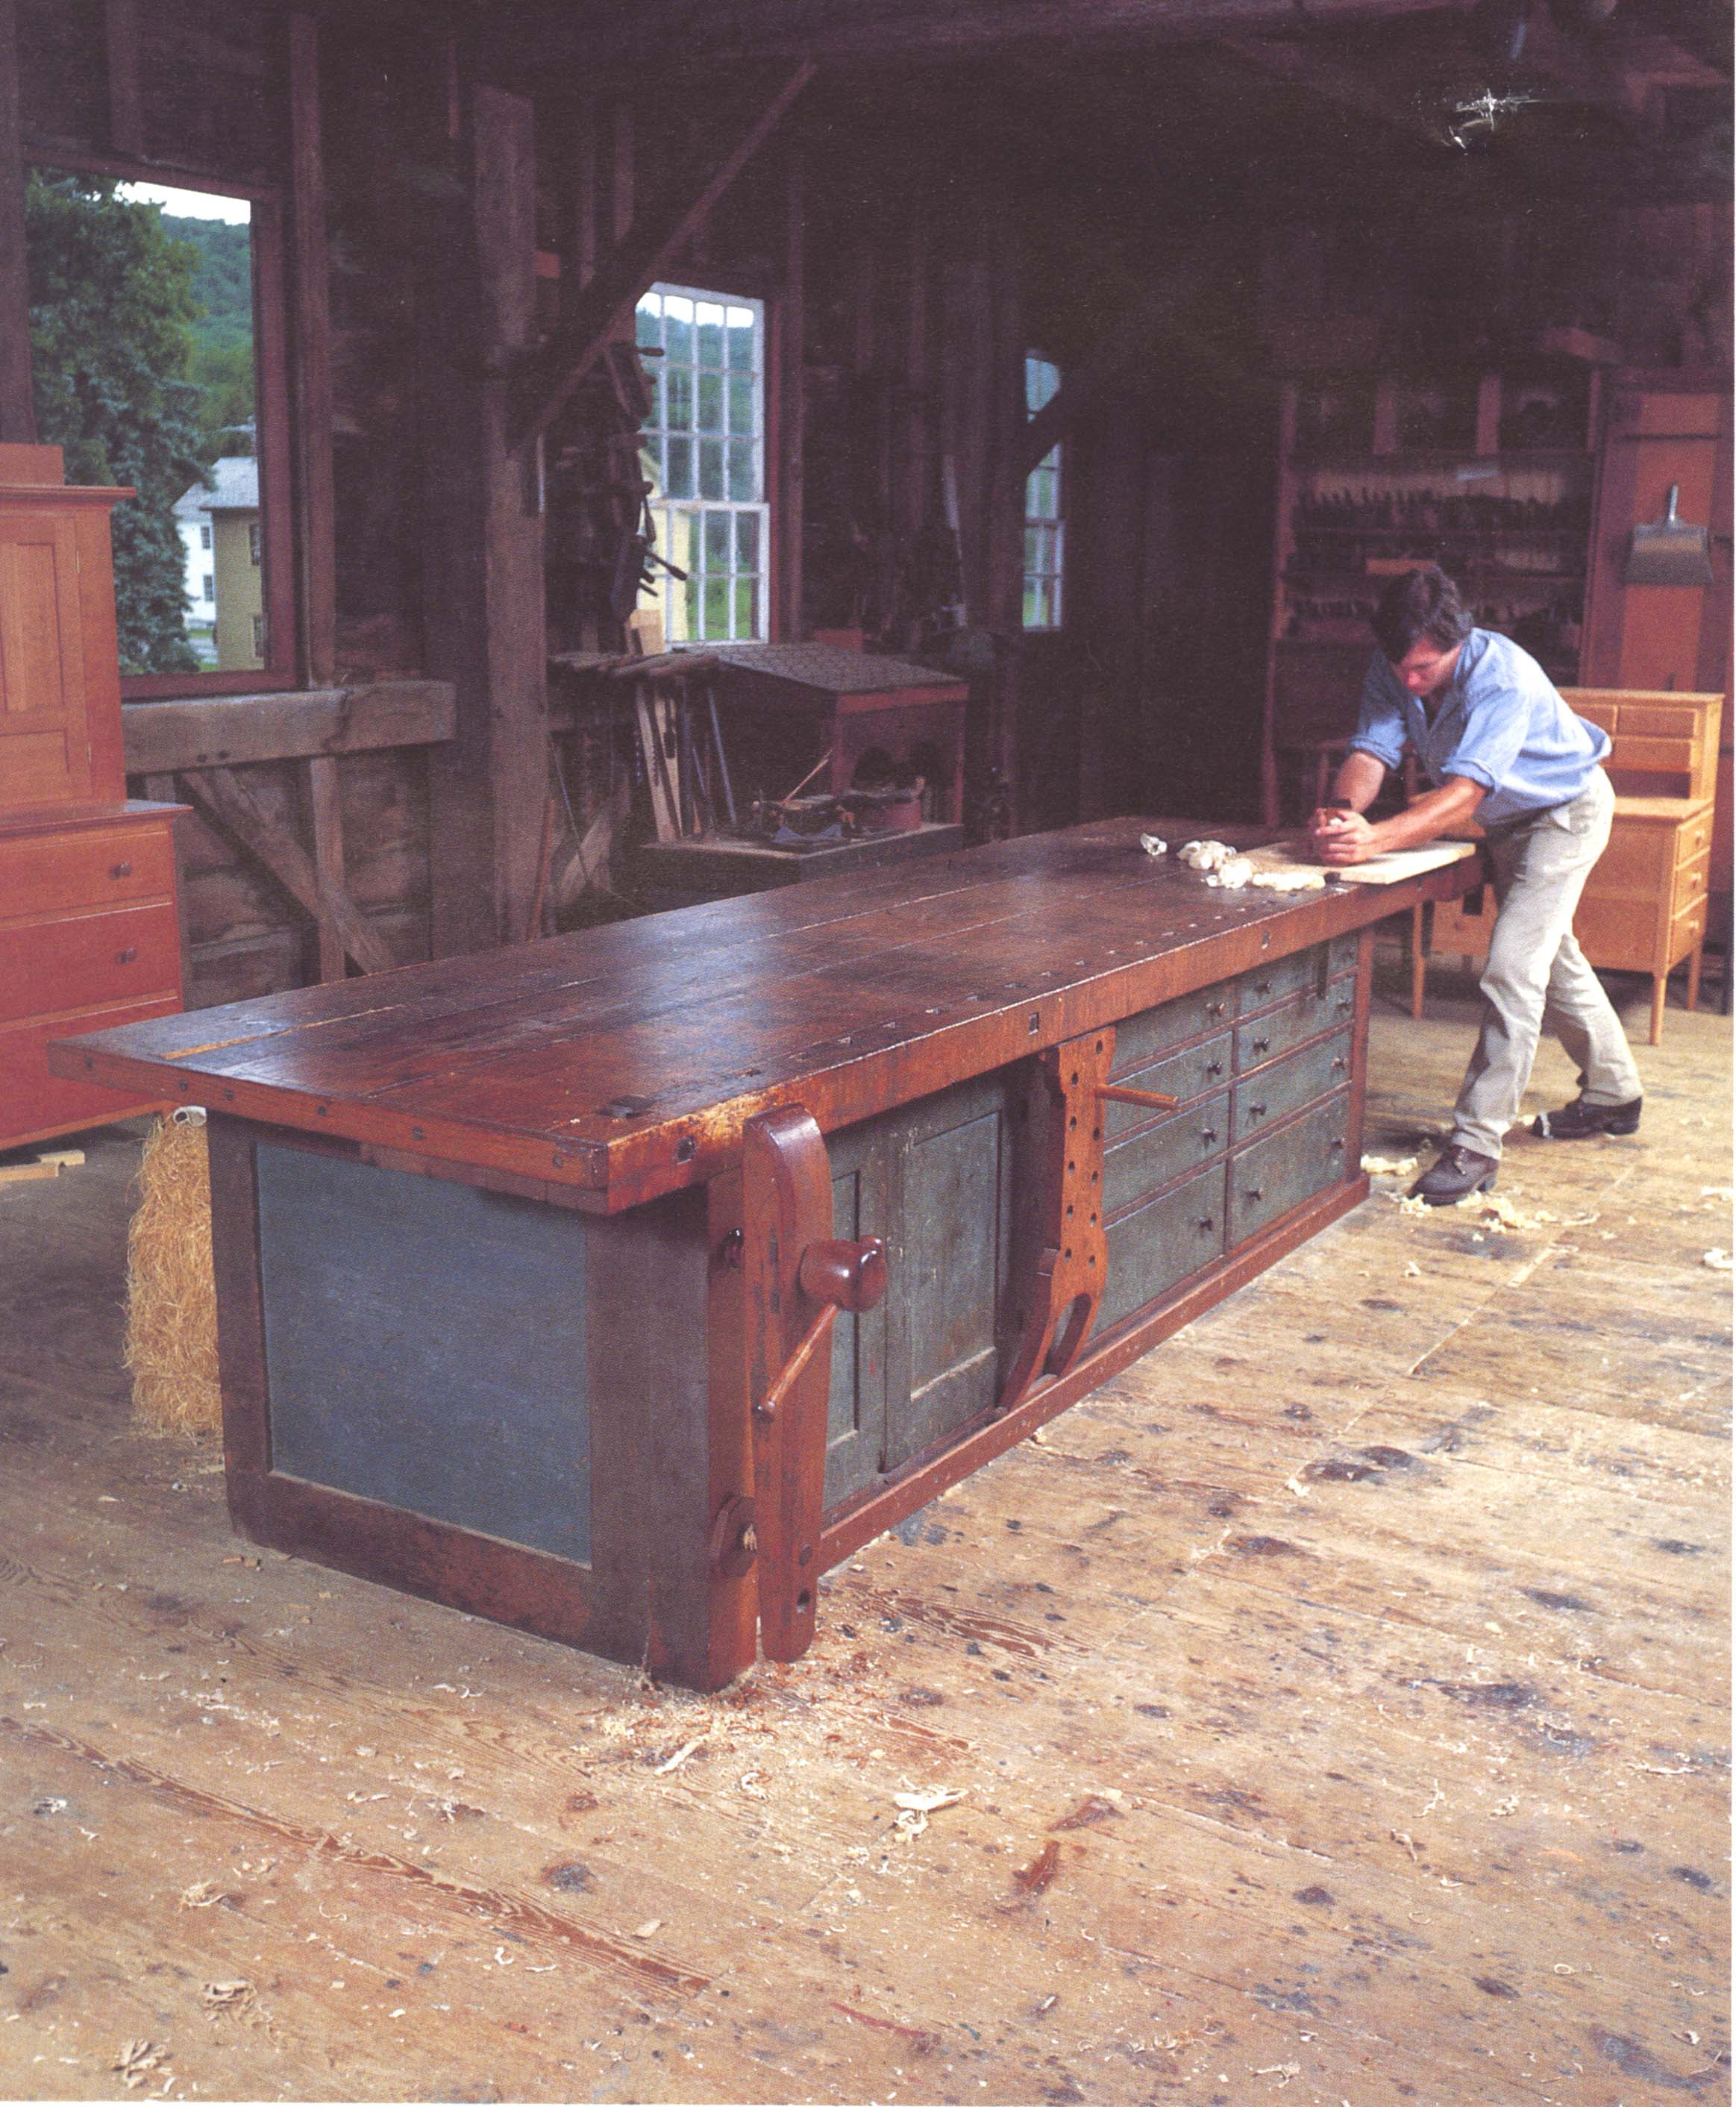
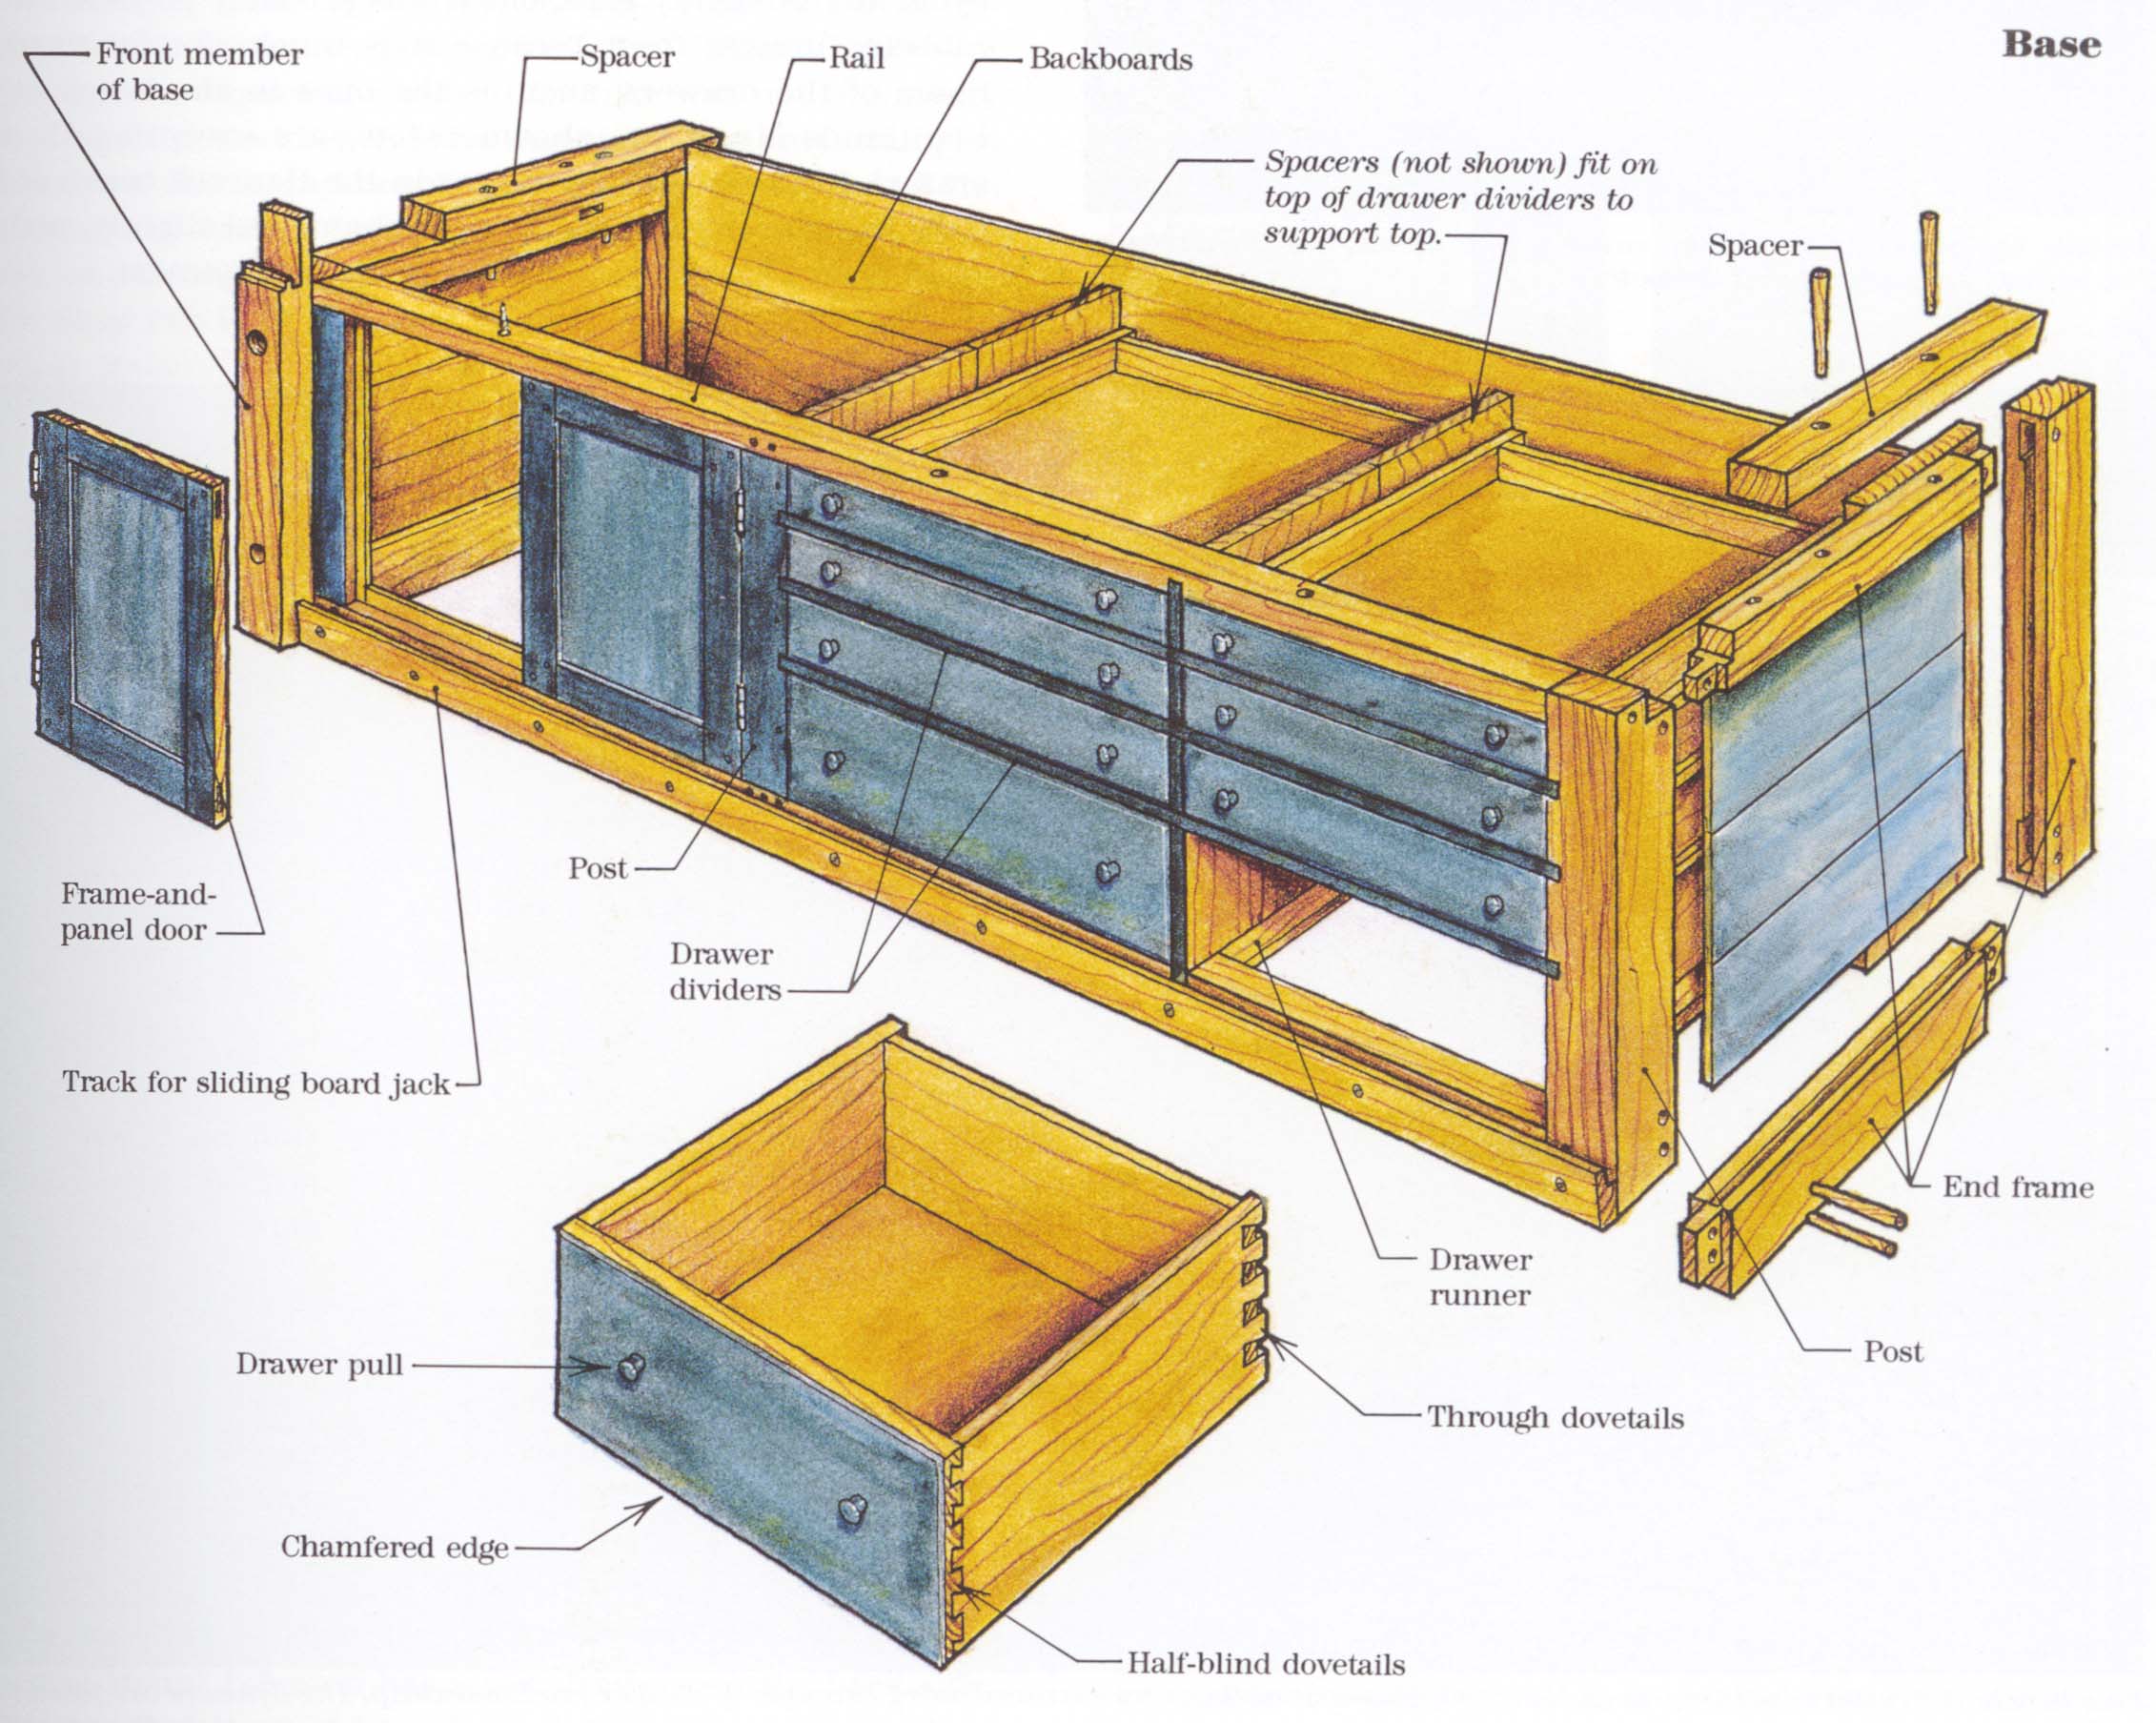
I chose to focus my attention on the Shaker workbench at Hancock Shaker Village, shown on p. 32 [and on the cover, above], for several reasons. It is well made and in good condition and does not appear to have been materially altered. In its dimensions and construction, it is as fine an example of a Shaker bench as any I have seen. And it is the only such bench I am aware of that remains in everyday use in a working, Shaker-style cabinet shop, albeit in an interpretive museum. I will describe details of other Shaker benches I have seen as they differ from the Hancock bench or further an understanding of it.
As my first impression suggested, Shaker benches tend to be massive. The Hancock benchtop is 11 ft. 9 in. long and 38 in. wide. The main body of the top is 3-3/4 in. thick. The smallest Shaker bench I found (at Fruitlands) is only 8 ft. 1 in. long. The largest (at Old Chatham) is 16 ft. 7 in. Most of the others are between 12 ft. and 15 ft. long. Indeed, it would seem that a small Shaker bench would be anything under 10 ft. long-several feet longer than what would be considered a large workbench today. (This may not have been unusual at the time, given the 18th-century Dominy workbenches [p. 13] and the French workbenches described by Roubo [p. 21].)
The top of the Hancock bench is comprised of three separate sections (as shown in the drawing on the facing page), built stoutly and purposefully. The front section is 16 in. wide and laminated from four pieces of 3-3/4-in.-wide maple or birch and a 1-in. strip of pine, glued and bolted together with four handforged bolts. (The 3-3/4-in.-square laminates would have been convenient to work with.) This area houses the dogholes and vises, and functions as the primary worksurface; maple or birch was used on this part of the bench, as it was on all the others I’ve seen. (Due to the age and patina of the bench, it is often difficult to determine the exact species of wood used; the woods I describe should be considered ‘educated guesses.’)
The midsection of the top is a single chunk of 9-1/4-in.-wide chestnut or oak. Although hard and dense, the open-grained wood provides a rougher benchtop texture than that of the front portion, and was presumably acceptable for a secondary worksurface. The 12-3/4-in.-wide back section of the top is made of knotty, hard pine. Both the middle and back sections are 1-3/4 in. thick, supported by spacers that rest on the base frame. Both ends are covered by simple, bolt-on end caps with captured nuts fed from the underside of the top. No tongue-and-groove or splined joints were used to attach the end caps. They were merely intended to conceal the end grain on the benchtop and, in the case of the end cap on the right end of the bench, to serve as the nut for the tail-vise benchscrew.
The very size of the enormous top offers some interesting clues to Shaker woodworking. “It’s never big enough,” according to Joel Seaman, the cabinetmaker who has been making restoration Shaker furniture on the Hancock bench for over ten years. Seaman could lay out all the parts of a cabinet on the top and still have room to use the vises.
The order and cleanliness of the Shakers is legendary, however, and it’s unlikely that the benches were built large to accommodate such expansive work habits. (Even the woodshed and tool room of a Shaker brother in Union Village, Ohio, was impeccably organized: ” … every stick of wood was exact in its place …. His little work shop exhibited the same care.”) In part, bench size may be explained by the institutional nature of the Shaker dwellings and the size of the joinery and furnishings required for them. In every community these buildings are imposing structures, with high ceilings and wide hallways. As shown in the photo below, some of the most remarkable case pieces stand over 8 ft. tall; built-in cupboards, housing dozens of drawers and cabinets, may run floor-to-ceiling and the length of a long hallway. All this work, plus the miles of pegboard circumnavigating the rooms, would have been more easily hand-planed and joined on a long bench. While there was some specialization among Shaker woodworkers, records indicate that a typical woodworker’s week would have been spent in a wide variety of pursuits. As the communities stabilized and eventually began to shrink, there would have been less new furniture (apart from chairs for sale) to build. At the same time, fewer craftsmen would have had to perform an even more varied range of tasks.
There is also reason to believe that more than one person worked at the bench at a time. Entries from the journals of Freegift Wells, an Elder and woodworker of considerable stature from Watervliet, New Yorrk, depict what was probably a typical relationship between a cabinetmaker and his apprentice. In these notes…Wells tells us that he installed a vise at the opposite end of his own workbench for his apprentice, Thomas Almond. There are also frequent references in other Shaker letters and journals to projects undertaken by two or more craftsmen working together.
Without exception, all the Shaker benches I’ve seen have an enclosed base, which contributes substantial mass and storage space, while it restricts any clamping to the ends or the narrow overhang along the front edge of the top. One thing I have never seen on a Shaker bench, but which is common on other benches out in the world, is an open tool tray. This tray, whether built into the top or between the stretchers of the base, collects debris and allows tools to knock about, damaging their edges. To an early Shaker, an open tray would have seemed like an open sewer-seductively convenient, perhaps, but unsanitary and hazardous.
Mother Ann could have been lecturing her woodworking followers when she said: ” … take good care of what you have. Provide places for your things, so that you may know where to find them at any time, day or by night …. “,Just as the walls of the Shakers’ dormitories are lined with built-in cupboards, so their workbenches are equipped with substantial cabinets that fully occupy the area between the legs and beneath the top. They are also unique in that the drawers and cabinets are usually built into the base framework, a tedious and exacting process. It would have been much easier to support the top with a basic four-leg structure and to install an independent tool-cabinet carcase between them. … In the case of the Shaker workbenches I have seen, the members of the carcase itself-posts, drawer dividers and the frame-and-panel ends-generally function as the legs and stretchers of the workbench. This may have been preferred for aesthetic reasons, or simply to lend continuous support to such a large worksurface.
On the Hancock bench, like most of the others, the base is divided into a succession of drawers that progress in size from the smallest on the top to the largest on the bottom. A portion of the base consists of open shelves, which are reserved for storage of items that won’t fit in the drawers (large tools or specially prepared stock, perhaps). These areas are always enclosed by doors. The insides of the door panels on the Hancock bench display remnants of different-color paint, indicating that they were borrowed from some other project and reincarnated in the workbench.
The order and cleanliness provided by the enclosed base cabinet had many practical dividends for the workbench. The problems of racking and sliding, which are inherent in an open-frame base, are automatically resolved by the rigidity of the casework and the sheer weight of the structure. Loaded with tools, as it presumably was, the cabinet anchored the whole bench to the floor and to move it would have taken a small army. Workbench storage would have made it easier to keep track of tools in a large community. “No one should take tools, belonging in charge of others, without obtaining liberty for the same … ,” the Millennial Laws decreed. “The wicked borrow and never return.”
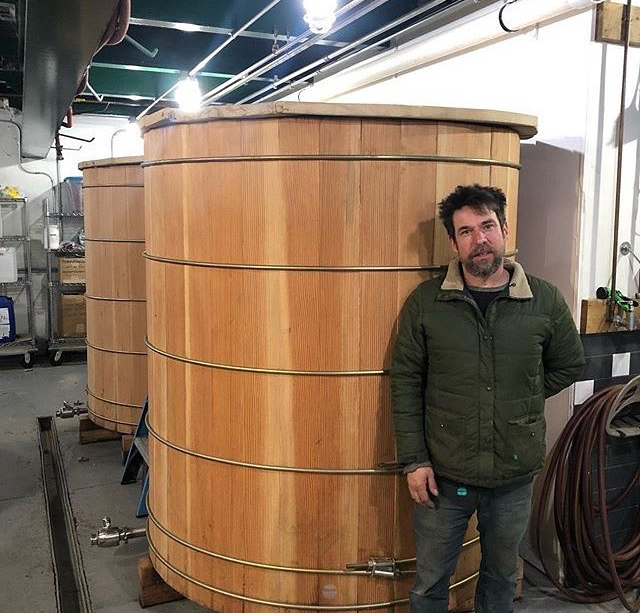
John with a pair of 800-gallon fermenting tanks called “washbacks” that he made in clear fir for Stoutridge Vineyard and Distillery
Question: What does that glass of Bulleit bourbon or Lagavulin Scotch have in common with a Chicago water tower and a wooden hot tub?
Answer: They all belong to the culture of tight cooperage, a subject on which John Cox is a fount of information.
I met John on a sweltering afternoon in 2018 while delivering a small piece of furniture to the Hudson Valley. Anissa Kapsales had invited me to meet her at John’s workplace, located in a large warehouse building on the outskirts of High Falls (population 627), about 90 minutes north of New York City. While I have long appreciated the fruits of the distiller’s art, I confess I hadn’t given much thought to the oak barrels that play such an important part in their production. John was the ideal person to enlighten me; a polymath with the personality of a showman and boundless enthusiasm for his work, he’s a natural teacher.
John was born in Philadelphia in 1969. His father was a tool and die maker who’d followed in his own father’s footsteps. They hoped John would become a doctor and not work with his hands. Oh well.
John (lower right) with his family: parents John, Joyce and brother Jay, Easter, 1983.
In high school John played music. He attended Muhlenberg College for a year of pre-med studies, then transferred to the Esther Boyer School of Music at Temple University. Many of his fellow students had been studying music seriously for years, and he soon realized that he was not in a position to compete – he’d never get a chair or play on Broadway. However, he knew some luthiers and thought “if I can’t play, I can build.”
He did a traditional apprenticeship with Richard Buccigrosse and John DelVecchio, who ran a millwork shop in his South Philadelphia neighborhood. Richard made flamenco guitars, in addition to fabricating millwork and repairing antiques. Richard was very strict – the shop culture was closer to that of a Philadelphia furniture shop in the 18th century than in the 20th. John worked full days in the shop, unpaid, then went to his job as a short order cook in a diner.
Affordable shop space was plentiful in Philadelphia in the 1980s; the recession had hit the area hard. John opened his own shop, and Richard sent turning and millwork jobs his way so he could spend more of his own time on flamenco guitars. On weekends, John took finishing classes with George Frank (author of “Adventures in Wood Finishing”) at the Olde Mill Cabinet Shoppe on the outskirts of Philadelphia.
Meanwhile – and this is where John’s story starts to sound like a Who’s Who of woodworking – the Snyderman Gallery, located a couple of blocks from John’s shop, was regularly exhibiting studio furniture. John developed a niche as a finisher, catering to local studio furniture makers and doing repairs and touch-up for the gallery. He specialized in ebonizing, French polishing and work with color, using a lot of aniline dye. At the age of 21 he found himself repairing a Gary Knox Bennett desk. Several graduates of Wendell Castle’s school had opened a group shop in Fishtown; John became the finisher for the group and worked with Michael Hurwitz and Peter Pierobon, among others.
In 1994 he took a job as foreman in a finishing shop, Finish Resources Studio, in New York City. They developed specialty finishes for designers, such as cerusing (decorative pore filling) for Tom O’Brien of Aero. “George [Frank] taught me the process,” John says. “It was us in the workroom that developed it.”
Four years later, he met Danish craftsman Jan Engberg and his son, Ian, who had a shop making high-end furniture; John ran their finishing shop from 1998 to 2001. “For the fourth or fifth time in my life, I find myself working with an old European master,” he says with appreciation for these opportunities. “I kept falling into these relationships with them, sort of avuncular. I’m very fortunate – to be working with these insanely talented older Europeans.” Working for the Engbergs, John did jobs for high-end interior designers such as Steven Harris (a protégé of Robert Stern) and Lucien Rees-Roberts. “Everything got published – Elle Décor, Architectural Digest. This was before Instagram,” he adds as a slightly wistful side note (that’s quite familiar to me). “We would never get pictures of anything unless it got published.”
Lucien designed some “wacky stuff,” says John, that was inspired by 20th-century designers Jean Michel Frank and Samuel Marx. They used a lot of goat skin, cow hide, leather, parchment and gilding, and produced pieces destined for swanky apartments in such upscale areas as Central Park West. Recalling the kinds of orders they got from the designers, John says “’Let’s do the rosewood tables we did for the last client…let’s do the leather closet doors we did for Cabo – let’s do that for this client, but bigger.’ They sent me to Cabo right during the mad cow disease outbreak … with 42 cow hides! I feel like we worked for everybody that ran Lehman Brothers,” as well as entertainers such as John Leguizamo. “They flew me all over the world. It was all custom work.”
Then came 9/11. “We stood on the roof of the shop and watched it go down,” John says. “It affected our business. I wanted to leave New York.”
At a finishing convention in St. Paul the following year, he met Greg Johnson, who worked for Wendell Castle. Wendell had opened up a 42-man furniture factory called Icon Design outside Rochester; they were so busy they’d reached a bottleneck in production. Greg asked John to join them, and he did. As you’d expect, the work was meticulous. Each piece involved about 21 quality control checks, right down to razor-fine specs for the sheen of the finish. While working for Wendell, he met the sculptor Albert Paley and took on jobs for him, too, flying to installations around the country where a piece of work needed repair due to damage suffered in a move.
The downside: all of this work involved a lot of chemicals. John was spraying urethane and lacquer – “doing great things that were not good for me. But I got really good at it and got a reputation…”
After a year in Rochester, he was ready for a change of scene. They moved to the Hudson Valley, where John opened a one-man shop combining restoration work with commissioned pieces like a goatskin side table. He found himself running all over the area for jobs that barely paid the bills. Even with freelance gigs for Albert Paley, it was tough to make a living.
One day in 2015 John was talking with a friend who planned to open a mushroom-growing operation. “I said ‘I’d love a change. Why don’t you bring me in?’” His friend suggested something different. “Do you know there’s a barrel crisis right now? Why don’t you make barrels?” About a week later, Time ran an article about the barrel shortage, which has been exacerbated by a federal mandate that American distillers must use newly charred oak – in other words, a whisky barrel gets one-time use. Kentucky cooperages couldn’t keep up – they were working with lead times of 18 months. Craft distilling was a burgeoning business, but distilleries couldn’t find barrels.
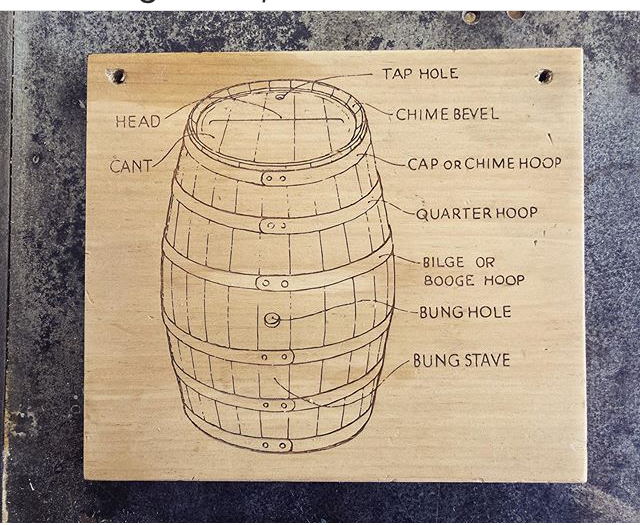
John discovered that there was scarcely any information available on how to make barrels. Fine Woodworking had published an article about coopered joinery, and he found another on coopering by Tage Frid, but that was about it. It was truly, he says, a lost art. “So I bought three different barrels from three cooperages, took them apart and reverse-engineered them. It was a cipher. What’s the formula? It was like a cryptogram.” A cryptogram indeed – the research and development for Quercus Cooperage took more than two years. In the meantime, John was still running his furniture restoration business.
There are three types of coopers
1. Tight coopers make watertight containers.
2. Slack coopers make containers for dry goods. Everything shipped in the 19th century went in these containers, which were made by giant factories – nails, cotton, tobacco, salted meat and fish, gunpowder, oysters, fruit, cement.
3. White coopers have traditionally made household containers such as buckets, butter churns, bowls and pails. In Japan, white coopers made koji trays.
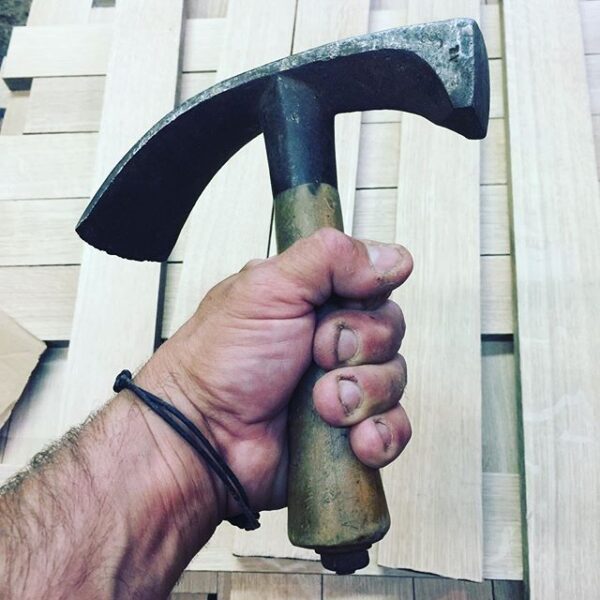
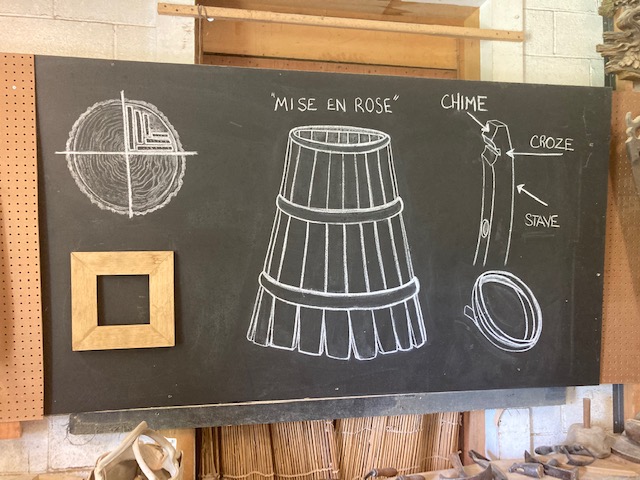
Cooper’s adze, used for pounding down the hoops. In the past, the blade end would have been sharpened and used to cut out a semi-circular groove at the top and bottom of the barrel.
The cooper’s adze was used to cut the chime and croze (top right).
When he heard about a large collection of 19th-centuring coopering tools for sale by a museum in Ottawa, he bought it. Then he set about learning what each one was, and how it should be used. “There was every tool you would need in a cooperage. Some looked familiar; some I had no idea what they were. Eric Sloane had some of them in his books; one of the first books Taunton did was a republication of a book of tools from England. I identified some from that.”
Next, he worked to figure out how to get his 20th-century machine tools to do what these hand tools did in the 1800s. “I held these 19th-century tools in my hand and said ‘How can I get my 3-horsepower shaper to do the same thing?’ How would I make this stave?’”
Here’s where his jazz background came in handy: there’s a lot of math in both fields. “Embracing the mathematics behind it really helped me figure it out,” he says, noting that Johannes Kepler had laid the groundwork for calculus by trying to figure the volume of a wine barrel. “It was becoming an obsession.”
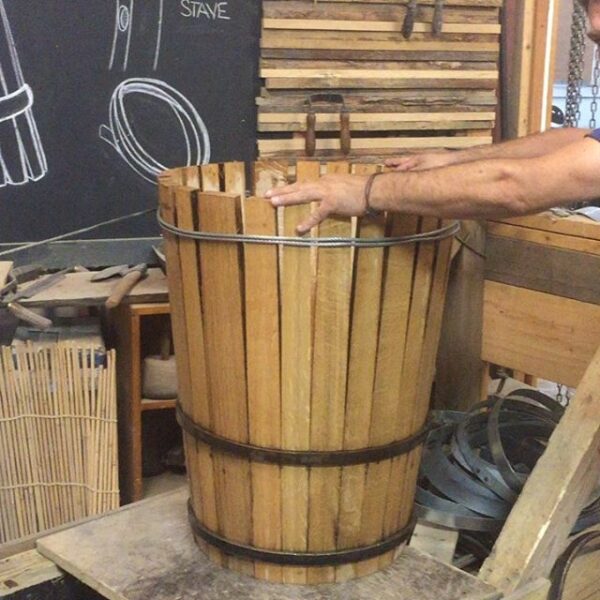
Using a winch to pull the barrel together after it has been steamed.
He broke the process of barrel-making down into five stages:
1. Acquire and air-dry the wood. It has to be air-dried, not kilned. He bought locally grown oak logs and had them quartersawn, then stickered.
2. Mill the staves. He had shaper knives custom-ground.
3. Find the steel for the rings, then make the rings and hoops.
4. Toast and char the oak to the client’s specifications. Toasting the sugars in the wood is an art that can make or break a whiskey.
5. Assembly. The point is to make a watertight cask. “It can’t even have a pin hole.”
On Dec. 22, 2017, the Winter Solstice, John succeeded in getting a barrel to hold water for the first time.
He’s now one of 33 cooperages in North America, and he makes his barrels largely by hand. A cadre of “meddling woodworking friends, machining savants and a welder” have helped along the way. As with most highly skilled custom work that uses top-quality materials, the economic side of the business remains a challenge. The wood for a barrel comes in at around $150. You can buy a barrel for less than half that from a major manufacturer.
John recently expanded into another of the traditional cooper’s arts: tanks for fermentation. Stoutridge Vineyard and Distillery, his regular client in Upstate New York, asked for an 800-gallon tank, the kind used for Scottish whisky. Adds John: “That’s also what the soy sauce guys ferment in. Before Covid hit, everyone was starting to make shoyu. But no one’s making barrels for shoyu; they were using stainless steel. You’re not going to get the flavor profiles you want from fermenting in steel. In Japan they use open-tank traditional wooden fermentation. No one makes them here.” He made a 2-gallon prototype, and things took off.
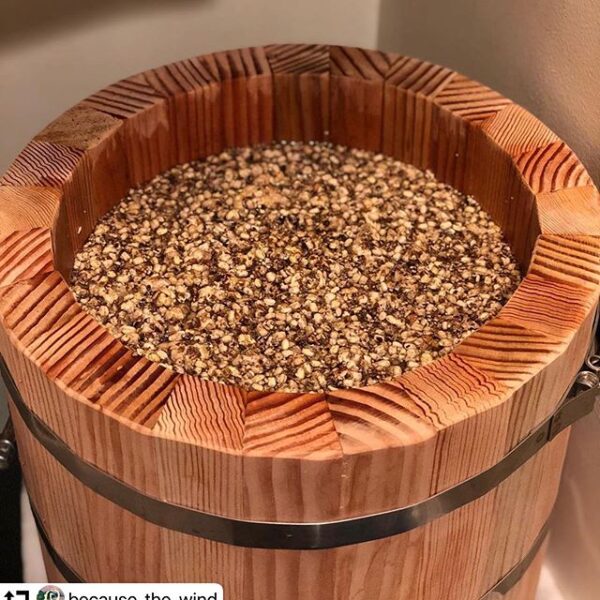
Two-gallon kioke made in fir, used for shoyu production. The contents are soybeans and fermented rice. John points out that the barrel is just the same form as the two 800-gallon tanks at the top of this post.
“I pivoted into this culinary world. This koji thing that’s happening – they’ve been fermenting rice for 7,000 years. No one in America was making koji trays. If I hadn’t pivoted into the culinary stuff last fall I don’t know where I would be now.”
Brad Leone of Bon Appetitdiscovered John through Instagram; a chef John knows had asked him to make koji trays, and his name and pictures quickly made their way around that community. “They came to the shop and posted some stuff and it really blew up. [People] want to do this traditional Japanese work” – think sauerkraut, or kimchi – “but they don’t have the traditional objects to make it.”
Still, he says, it remains challenging economically. Margins are slim. “I’m a struggling one-man shop no different from any other.” Every barrel is custom made and takes time. Even with the technical challenges involved in figuring out his methods, John says the biggest learning curve has related to shipping and logistics. Instagram has helped him market the work; it’s one thing to get press in a print magazine, but there’s a two (or more)-month lag between the writing and publication. There’s no lag-time in Internet publishing, which makes it easier to change course swiftly.
Because of Covid, John’s craft distillery and brewer clients are closed, so the culinary stuff is filling his time. There’s a market, for now; it’s also more affordable. He says he’s the only person making the small tanks in America right now and adds, “I’m 5’6” so they actually call me a mini cooper.”