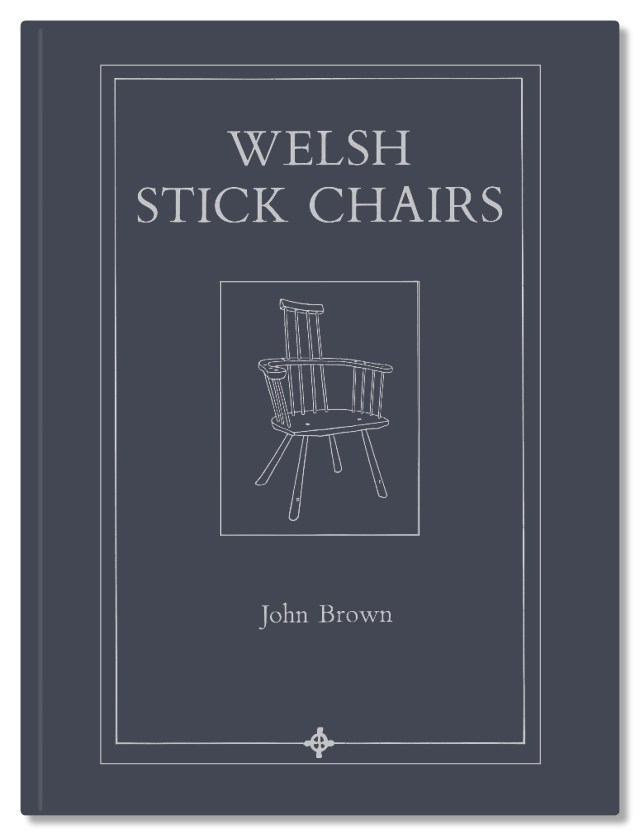
“Welsh Stick Chairs” by John Brown is a small but mighty book. At just 104 pages long, this book can be read in an afternoon, but it has changed the lives of thousands of woodworkers all over the globe.
John Brown (1933-2008) was a chairmaker in Wales who specialized in Welsh stick chairs, a vernacular form of furniture that was typically made by the end users. Compared to Windsor chairs, Welsh stick chairs are masculine, lively and even sometimes a bit aggressive.
They are built with simple hand tools and (when made properly) are designed to last for hundreds of years.
John Brown made hundreds of these chairs, and in 1990 he published a small book that explained how he made the chairs at that time, plus some history of stick chairmaking in Wales and a critique of the Windsor chairs they were sometimes confused with.
The book electrified woodworkers everywhere. Even those who weren’t chairmakers were fascinated by John Brown’s approach to the craft. His disdain for measured drawings. And his honest and forthright writing style.
“Welsh Stick Chairs” has been out of print for some time. But thanks to the efforts of Matty Sears, one of John Brown’s sons, and the rest of the heirs, we are pleased to present a beautiful and well-made edition of this important work.
The book is now available for pre-publication ordering in our store. It is $29, which includes free domestic shipping. The book will ship to customers in late June 2018, which is the 10th anniversary of John Brown’s death.
Using first-edition examples of “Welsh Stick Chairs,” we reset the entire book in the original font to ensure the text was crisp. We rescanned and processed the photos and drawings and cleaned them up. And we spent weeks researching the paper stock of the original in order to capture the same earthiness and perfection of the first edition.
We also made a small but invisible improvement – we sewed the signatures together to ensure the book will last for lifetimes.
The book is a softcover, covered in heavy card stock like the original. The book measures 7-1/4″ x 9-5/8″.
Our version includes John Brown’s original introduction to the book, plus the additional introduction he wrote for the third edition and an updated essay on John Brown by Nick Gibbs.
Detail from Albrecht Durer’s “Melencolia 1,” 1514,
There are a number of geometric constructions that allow us to create regular (i.e equal-angle and equal-facet length) polygons. Most of those for squares, rectangles and triangles are quite straightforward, requiring but a few steps. However, those dealing with five or more sided polygons get quite tedious involving numerous exacting steps.
Traditional artisan’s constructions are far simpler and each work in the same way to create polygons of any number of sides. The caveat is that they do not generate perfect vertices and therefore do not form regular polygons – i.e. they are approximations. Their products are so close, however, that we cannot see the difference in most drawing and furniture-scale applications. In constructions such as building foundations or landscape layouts, the deviation is a bit more evident. The constructions can, however, easily be “tuned” to near perfect by making small adjustments in the step-out procedures. Here’s a look at three trade-practice methods to create a seven-sided “heptagon.” More details and full instructions for executing these methods are available as a download (free for the next 10 days) at our www.byhandandeye.com shop page.
We use this construction when we know the length of one of the facets of the polygon we wish to generate. Basically, it gives us the focal point of the inscribing circle:
We use this next construction when we know the radius of the inscribing circle. In both of these methods, we are segmenting a line into the number of facets required by our polygon. (In the first, we are segmenting a half-circle circumference line, in the one below, the diameter):
The fastest method, however, is attained through the use of the sector (which you can download for free in the form of a paper template at www.byhandandeye.com).
Using the “line of polygons” (which we derived from another traditional calculator called a “scale of chords”) we start by setting the dividers to the radius of the inscribing circle at the line’s “6” index point:
Then we reset the dividers to the number of facets we want – in this case at “7” for producing our heptagon:
When we step this span around the circle, we have our construction. Again, because this is just an approximation, we will likely have to make a tiny adjustment to allow the dividers to return to the exact starting point. Be assured, though, that you will be so deep in the ballpark with any of these traditional methods that you’ll be able to smell the hot dogs.
A handful of new woodworking class sessions from Daniel Clay, Brendan Gaffney and me will go on sale Wednesday, May 9, 2018 at 9 a.m. EDT on Eventbrite. Classes are limited to six students – the number of benches (plus one for the instructor) we have available in the front room of the storefront, which is filled with natural light. And the mechanical library, Electric Horse Garage and biergarten are all open for inspection.
If you’re one of the first six to register, the instructor will be in touch regarding payment and tool lists. If you’re number seven or after, you can choose to be added to the waitlist (for which I encourage you to register – I filled an empty slot in my last class from the waitlist, and Brendan has added the sector sessions below as a result of robust demand).
All proceeds go directly to the instructor; they are not a money-making enterprise for Christopher Schwarz or Lost Art Press. He’s let those of us who are teaching use the space for free as a way to help build and get the word out on the local woodworking community, and because he is incredibly generous. (Note: He is also an excellent teaching assistant, and will likely be around for at least a little while during the classes.)
In this two-day class, students will receive comprehensive instruction in the fundamentals of chip carving, a decorative technique in which faceted “chips” are removed from a wooden surface to produce geometric patterns, stylized images, lettering and ornamentation. Through demonstrations, guided practice, skill-building exercises, and the completion of a decorative wall hanging, students will leave class with all the knowledge, experience and confidence to pursue chip carving on their own. One of the most attractive aspects of chip carving (especially for beginning woodcarvers) is that it can be accomplished at a high level with minimal tools and materials; all you need to become a great chip carver is a sharp knife, some suitable wood and a little practice.
No prior woodworking or carving experience is necessary to take the class, but all are welcome! This class is best suited to those with little or no chip carving experience.
The instructor will provide the wood and other necessary materials for the class. Students must supply their own chip carving knives. If you don’t have a chip carving knife it is strongly recommended that you start with this knife, or this two-knife set. Additionally, it is recommended that students bring a pencil, a sheet of 220 sand paper, a 12” combination square, and, if you have one, a sharp block plane.
Learn how to cut dovetails by hand, and cut and refine curves with hand tools, as you build a classic Shaker two-step step stool (out of cherry) that will withstand decades – lifetimes, really – of use. This one is based off the classic stool in “Making Authentic Shaker Furniture,” by John Shea (Dover, 1975). You’ll also get to listen to me wax prolific about liquid hide glue, use it, and take home a bottle of Old Brown Glue courtesy of Patrick Edwards.
In this two-day class, students will build their own Cabinetmaker’s Sector, my modernized design for the ancient geometer’s tool, used for drawing, drafting and (in my shop) the layout of dimensions and joinery on woodwork. The class will revolve around the skills of modern hand-tool makers, including careful marking and measuring, mixing metal and wood, hand shaping, finishing and (of course) how to use the tool.
Each student will be provided the wood and the necessary brass hinges and pins, everything needed to produce the sector. The first day will revolve around affixing the brass and wooden tabs into the tools, riveting the leaves together, flattening and lapping the tools and reviewing the principles behind the geometry of the sector. The second day will revolve around shaping the sectors, stamping and inking the sector marks, finishing the sectors and learning to use them in the shop. Every student will leave with a completed sector, plus the knowledge of how it works and how to use it.
Build the Boarded Bookshelf from Christopher Schwarz’s “The Anarchist’s Design Book” as you learn how cut dados and tongue-and-groove joints by hand, and drive tapered, square-shanked nails without splitting your work. And of course, plane up your work for a perfect finish. The bookcases will be built in pine…and we might even have time to give them a first coat of General Finishes milk paint (or casein-based milk paint, if that’s your preference – the tool list will include links and pros/cons for both finish treatments).
In this two-day class, students will build their own Cabinetmaker’s Sector, my modernized design for the ancient geometer’s tool, used for drawing, drafting and (in my shop) the layout of dimensions and joinery on woodwork. The class will revolve around the skills of modern hand-tool makers, including careful marking and measuring, mixing metal and wood, hand shaping, finishing and (of course) how to use the tool.
Each student will be provided the wood and the necessary brass hinges and pins, everything needed to produce the sector. The first day will revolve around affixing the brass and wooden tabs into the tools, riveting the leaves together, flattening and lapping the tools and reviewing the principles behind the geometry of the sector. The second day will revolve around shaping the sectors, stamping and inking the sector marks, finishing the sectors and learning to use them in the shop. Every student will leave with a completed sector, plus the knowledge of how it works and how to use it.
During this intense two-day class you’ll build a Dutch tool chest (from either pine or poplar, depending on what’s good, available and inexpensive that month) using dovetails, dados, rabbets and nails (or screws). Because of the demands of the project, this class will likely run into the early evening to ensure everyone completes the chest. The Dutch chest is an excellent introduction to handwork and the result is a fine place to store your tools.
Hinges and lifts are up to the individual makers, but I’ll provide some suggestions/links for both commercially available and handmade options.
Make a Coffin-Shaped Bookcase…for use Now & Later with Megan Fitzpatrick October 20 & 21, 2018 (just in time for Halloween!) Cost: $340, which includes all materials. (Click here to register: Will go live on 5/9/18 at 9 a.m.)
Build a traditional kerf-bent and nailed pine coffin (which we’ll then make into a bookcase for interim use). Note that at the bookcase link, you can download the coffin chapter from “The Anarchist’s Design Book,” free. But it doesn’t come with fun, frivolity or candy corn (all of which you’ll get in this class!). As tempted as I am to build the fire-bent version…my health care exchange insurance just isn’t good enough to chance it! (Apologies to John Hoffman for the coffin image – it makes me chuckle every time!)
It’s difficult to believe that it has already been 10 years since John Brown died on June 1, 2008. It’s even more difficult to believe that his landmark book “Welsh Stick Chairs” is not in print.
With a little luck, we hope to have “Welsh Stick Chairs” in your hands in June 2018 for the 10-year anniversary of his passing. Today I uploaded the final files to our printer and they should start production on the book on Monday afternoon.
We hope to open pre-publication sales of the book next week. We’re still waiting on a couple elements of the print job to make sure we have the costs correct. We’re shooting for $27 to $29, which will include domestic shipping.
Note that we have the rights to distribute “Welsh Stick Chairs” only in North America. Not in Europe, the UK or – oddly enough – Wales. We’ve been told another publisher in the UK will be publishing a version for that market. But we don’t know when or what it will look like.
Ours will be printed in the United States on heavy and smooth coated paper. The signatures will be sewn for durability. And the book will be covered in heavy 100-pound Mohawk cardstock with a vellum texture. (We love Mohawk paper – it’s made with wind power.)
The dark blue cover will then be stamped with a matte silver foil. It’s going to look crisp and have a lot of nice textures.
This is a common fault even amongst experienced men who should know better. The wood between the dovetails is torn out, leaving an unsightly gash which robs the joint of much of its strength. In nine cases out of ten it is concealed when the joint is assembled, and this is probably the reason why so many do not take the trouble to avoid it. There are cases, however, when the blemish is seen, especially when the wood tears just below the surface. When the joint is levelled it is easily possible to plane into it with the result that an unsightly gash is disclosed. The fault is easily avoided as explained below.
FIG. 2. WHY WOOD IS TORN OUT. The waste is completely removed as at A. When reversed it is unsupported and is levered over, tearing out the fibres as shown
Let us first consider the reason why the wood tears out in this way. There is first the downward chop short of the gauge line across the grain, as at (A), Fig. 2, followed by a horizontal cut which splits away the waste piece. Next is another chop right on the line and a second horizontal cut. So far no tearing out has taken place, yet it is this preliminary cut that is the cause of all the trouble. The wood is now reversed and a similar chop made, as at B. It is easy to see what happens. The shock of the blow causes the unsupported waste to bend over, and it tears out the fibres from the shoulder as shown. If the chisel happens to be blunt the defect is so much the worse. It is all due to the projecting waste piece having no support when the wood is reversed and the second cut made.
The remedy is simple. Begin by chopping down across the grain short of the gauge line as before, and then make a sloping cut to meet it as at (B); Fig. 3. Make a second cut a little nearer the gauge line followed by a second sloping cut, and finally right up to the line, as at C. Note that sloping cuts leave a short piece of uncut wood at the corner. On no account cut away the waste horizontally from the end. If now you reverse the wood and chop down, the grain will not tear out because the waste piece is supported. You can ease the work too by splitting away the waste at the end. It does not matter once the wood has been reversed.
FIG. 3. CORRECT PROCEDURE. Wedge shaped piece is removed leaving the corner Intact
It will be realised that in working in this way the removal of the wedge of wood enables the chisel to penetrate easily when the second chop is made closer to or right on the line. The idea is shown pictorially at (D), Fig. 3. In thick wood or extra hard wood it may be necessary to make several cuts, easing away a wedge of wood after each, as at (C), Fig. 3. The great point in avoiding tearing out, however, is to leave the wood untouched at the corner so that it is not forced downwards when the wood is reversed. The corner supports it, as shown in Fig. 4. Chopping in with the grain at the end after the wood has been reversed however enables the chisel to penetrate more easily.
FIG. 4 . HOW UNCUT CORNER SUPPORTS THE WASTE WHEN THE WOOD IS REVERSEDFIG. 5. WEDGE INSERTED TO SUPPORT WASTE
If for any reason you have cut away the waste right to the end in the first chopping, you can still prevent tearing out by inserting a little wedge of wood beneath the overhanging waste as in Fig. 5. This gives support and prevents it from bending over under the force of the blows and so wrenching the fibres.


 A handful of new woodworking class sessions from
  Chip Carving Class with Daniel Clay
 Dovetailed Shaker Step Stool with Megan Fitzpatrick
 Build the Cabinetmaker’s Sector with Brendan Gaffney
 Boarded Bookshelf with Megan Fitzpatrick
 Make a Coffin-Shaped Bookcase…for use Now & Later with Megan Fitzpatrick


