I use colored waxes quite a lot in my finishing, especially the darker colors. I’m partial to Liberon’s Black Bison Paste Wax, but that’s because it is the only brand I’ve ever used.
Colored waxes are a secret weapon when it comes to muting a particularly loud or brash color. They also add a depth to many finishes by adding a second hue to the overall piece.
Many antique restorers use black wax to add age to a finish or a repair, and it’s great for that. But that’s not my goal with black wax. I hope the photos here will explain it better than words.
First, ignore the sales copy about the stuff.
“(I)t feeds, polishes and helps to prevent wood drying out…” No, it doesn’t.
“Giving a highly lustrous and hardwearing finish…” It actually gives a low-luster finish. And, like all waxes, isn’t particularly durable.
“Well-known for its quality and pleasant, distinctive aroma…” Uhhh, this stuff smells like a 1950s cleaning solution for septic tanks. It is not pleasant. But the smell dissipates.
A comb-back chair with only acrylic paint. No black wax.
The same chair after a coat of colored wax.
Here’s what it really does. It’s a fast-drying sludge. Pick a color. I use “Dark Oak” and “Tudor Oak” and cannot tell the difference. When you use it on raw wood, such as oak, it will darken the oak and collect in the wood’s open pores. When used on raw closed-pore woods, such as pine, it generally looks like a smeary mess (a test board will confirm this).
I typically use it on top of a finish, either shellac or paint. When used over shellac, it will reduce the brashness of the new shellac, and the wax will collect in the pores of the wood, giving the piece a bit of dimension.
I adore the combination of mahogany, shellac and black wax. That’s what I use on virtually all of my campaign pieces.
When used over paint, the black wax gets a little smeary. It will collect in small voids left in the paint. And it will buff off unevenly on the paint. This is a good thing. A bright new paint finish can look like you dipped your furniture in Plasti-Dip. The uneven absorption of the wax mutes the single color.
Application
The stuff dries quickly, so I recommend you work small areas, about 12″ x 12″. Wipe the wax on generously with a rag so you can push it into the pores and small voids (wear protective gloves). Keep wiping the wax until you have a thin, consistent coat. Then immediately begin wiping it off with a clean, coarse rag (I use towels with a Huck weave – basically surgical towels). Keep wiping until you cannot remove any more. Then move on to the next section of the project.
If you botch a section, simply apply more wax. The wax’s solvent will dissolve the hard layer and you can wipe again. Or dab some mineral spirits on a rag and you can rub the surface to remove thin layers of wax until you get the effect you want.
If at any time you hate the finish, flood the surface with mineral spirits and rub hard. Most of the wax will come off.
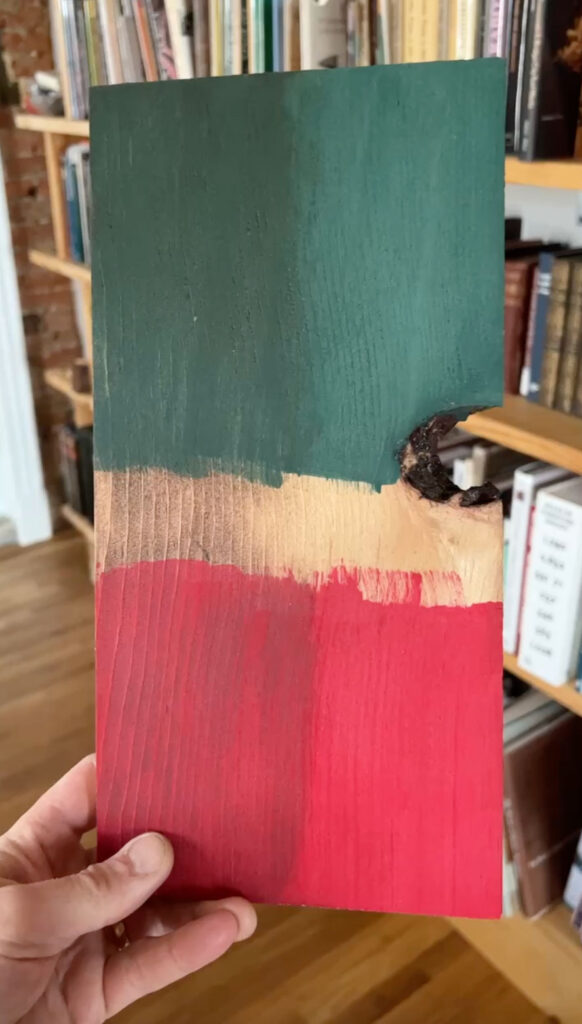
A recent test board, The raw colors are on the right. The colors on the left show the appearance after a coat of the colored wax.
Test Boards
Making test boards is the only way to ensure you will get the effect you want. I’ve used the wax for decades and still do a test board before I start smearing the stuff on anything.
A tin of this stuff lasts for many years, so don’t be put off by the high price (about $35-$40 here in the U.S.). Don’t be put off by the smell (we call it the “stinky janitor” wax because it smells like some cleaning fluid from my childhood). And don’t be put off by the bison part. I think there’s hardly any bison in the wax.
The following is excerpted from Chapter 3 of Christopher Schwarz’s “Campaign Furniture.”
For almost 200 years, simple and sturdy pieces of campaign furniture were used by people all over the globe, yet this remarkable furniture style is now almost unknown to most woodworkers and furniture designers.
“Campaign Furniture” seeks to restore this style to its proper place by introducing woodworkers to the simple lines, robust joinery and ingenious hardware that characterize campaign pieces. With more than 400 photos and drawings to explain the foundations of the style, the book provides plans for nine pieces of classic campaign furniture, from the classic stackable chests of drawers to folding Roorkee chairs and collapsible bookcases.
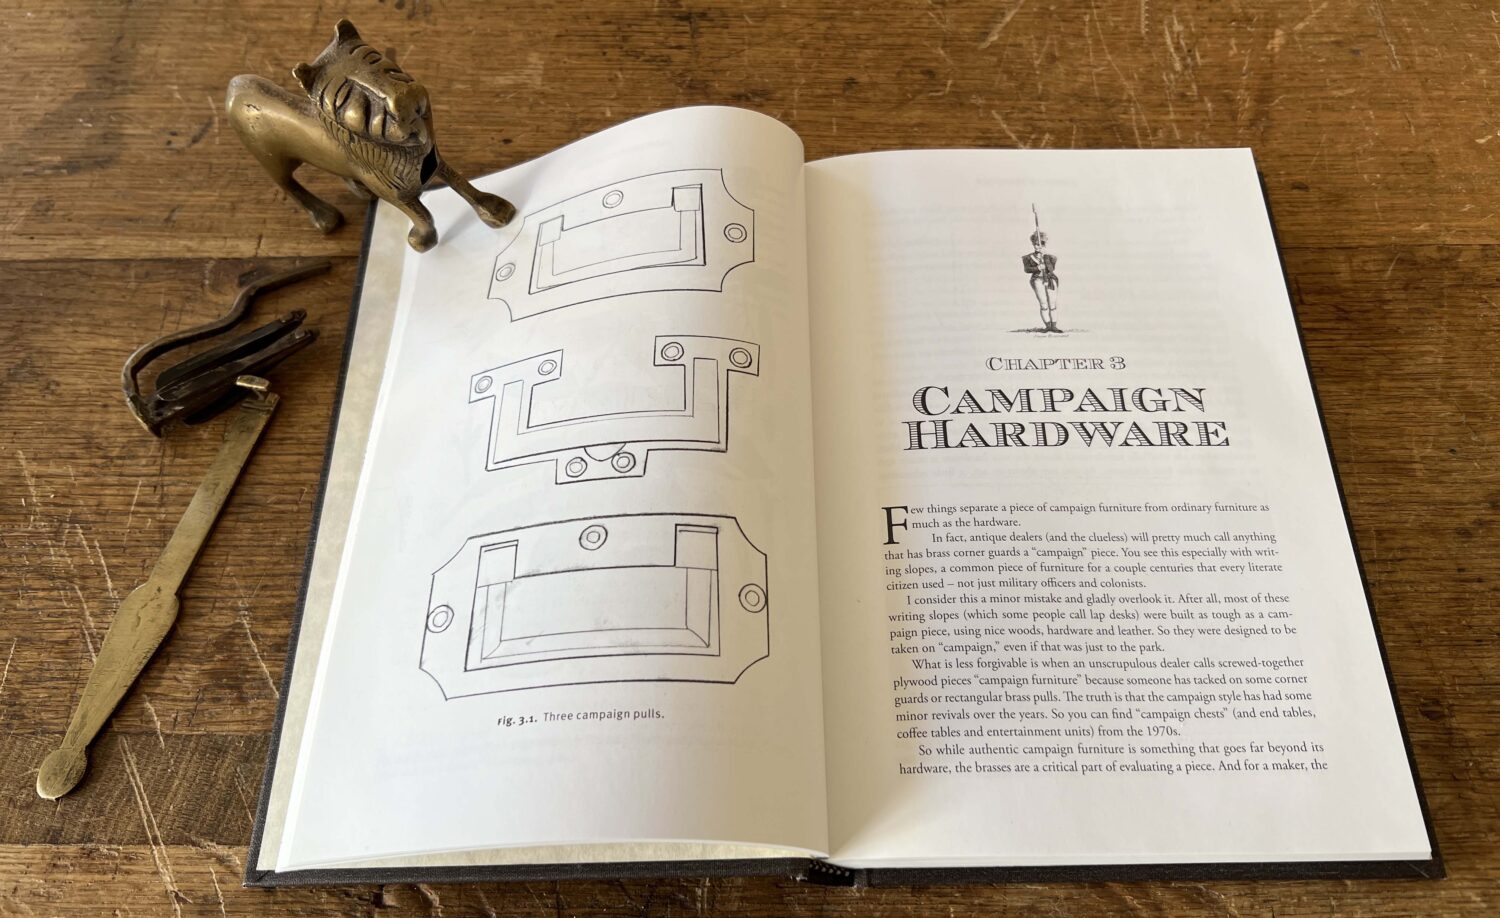
Few things separate a piece of campaign furniture from ordinary furniture as much as the hardware.
In fact, antique dealers (and the clueless) will pretty much call anything that has brass corner guards a “campaign” piece. You see this especially with writing slopes, a common piece of furniture for a couple centuries that every literate citizen used – not just military officers and colonists.
I consider this a minor mistake and gladly overlook it. After all, most of these writing slopes (which some people call lap desks) were built as tough as a campaign piece, using nice woods, hardware and leather. So they were designed to be taken on “campaign,” even if that was just to the park.
What is less forgivable is when an unscrupulous dealer calls screwed-together plywood pieces “campaign furniture” because someone has tacked on some corner guards or rectangular brass pulls. The truth is that the campaign style has had some minor revivals over the years. So you can find “campaign chests” (and end tables, coffee tables and entertainment units) from the 1970s.
So while authentic campaign furniture is something that goes far beyond its hardware, the brasses are a critical part of evaluating a piece. And for a maker, the brasses are one of the major expenses when building a piece. When you shop for hardware, it’s tempting to buy pulls that look OK from 10′, but feel like tin foil in the hand.
This short chapter is designed to introduce you to the different kinds of hardware and the ways they are made – cast, extruded, bent, welded and die-cast. And to teach you a bit about the strategies for installing inset pulls, corner guards and the other inset plates common on campaign pieces.
How Hardware is Made Like your tools, the brasses for your furniture can be made in many different ways. The process affects how the hardware looks, feels in the hand and costs.
A lot of campaign brasses I’ve studied have been cast. There are several ways to cast metal; the three most common methods for making hardware are sand casting, die-casting and investment casting (and their variants).
While all these casting processes are different in their details, they are the same in their basic idea: There is a mold made in the shape of the hardware and it is filled with molten metal. When the metal cools, the casting is finished and assembled.
All three types of casting have advantages and disadvantages for you, the furniture maker, and I’ll be covering them in some detail here. Most woodworkers are woefully uneducated about the way hardware is made and as a result make bad decisions. As you are about to see, a little education about metal casting can go a long way toward improving the quality of your projects. Let’s start with sand casting.
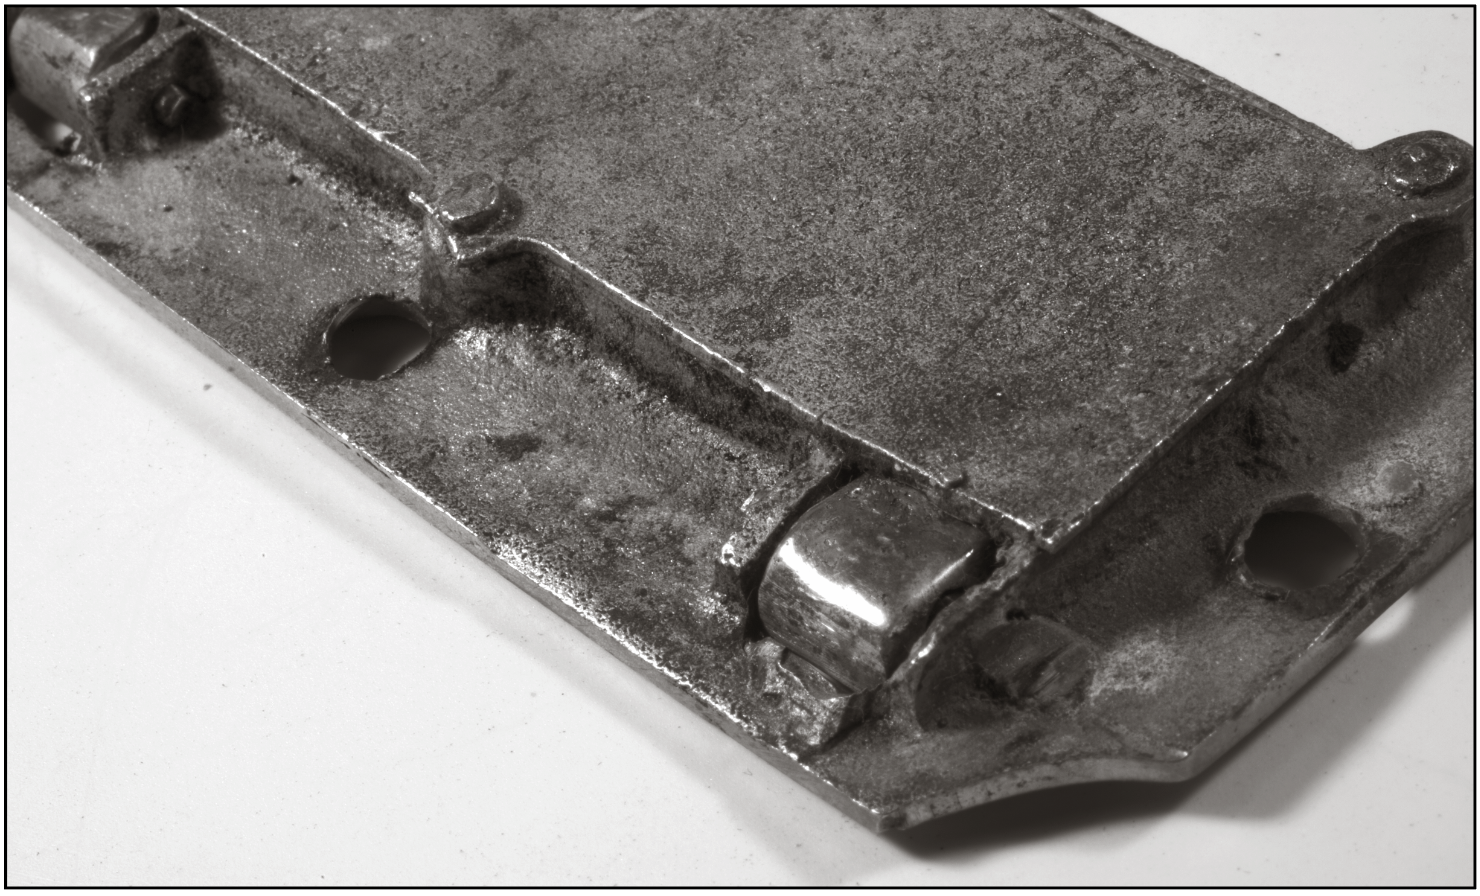
Fig. 3.2 Rough behind. One of the sure marks of sand casting is a rough surface finish left from the sand itself. On the backside of a pull, this is not a problem.
Sand Casting Many handplane bodies (and woodworking machines) are made using sand casting. It allows a maker to produce castings in an economical way. The downside to sand casting furniture hardware is that the surface finish is never nice enough to use as-is. The manufacturer usually needs to finish the visible surfaces and touch points. This can be labor- or time-intensive.
But what is more important for a furniture maker is that the finishing process can make the parts non-interchangeable, especially if the pieces are finished by hand. The upside is that hand-finished hardware with small variations can be beautiful.
Hardware made this way is called “sand cast” because a sand that is moistened with oil or chemicals is used in the casting process The casting begins with a “pattern,” which was traditionally wood, but is now typically aluminum for pieces of hardware. Then either the pattern or a matchplate or some other representation of the finished object is used to make depressions in two boxes of sand – one is called the cope and the other is called the drag. These two bits of sand are put together and the cavity is filled with molten metal via tubes called “sprues” in casting parlance. Gates are put into the matchplate or simply cut into the sand itself to allow the metal to flow completely through the part and out the other side. This helps the metal completely fill the cavity and helps prevent shrinkage (which is a cause of surface pitting).
Fig. 3.3 Not the same. These two pulls were made by the same maker in the same year and even sold in the same box. But they require completely different recesses. None of the curves (or even the straight lines) match.
After the metal hardens, the sand is removed (and reused) and the resulting metal shape is finished – by grinding, filing, polishing, machining or some combination of these processes. After grinding and/or filing, all cast parts are put into vibratory tumblers filled with a variety of different medias to get the surface finish smooth. The tumbling is the key process that turns a very rough casting into a smooth finished part. Machining typically takes place after tumbling.
Sand casting produces hardware that typically has a substantial feel. Its components are fairly thick. The unfinished faces of the hardware will typically be a bit coarse – like sand. (Proper tumbling eliminates this rough surface.)
Fig. 3.4 You get the idea. The level of detail with sand casting isn’t as fine as with some other methods, but it has served well for thousands of years.
These qualities are the nice things about sand-cast objects, but there are some downsides with sand-cast hardware. The level of detail isn’t as good as with other casting methods. So a sand-cast lion’s face will look a bit “blurrier” than one cast by other methods.
Also, the sand-casting process can result in some variance in dimensions. This is not a big deal at all if you install your hardware piece by piece. But if you want to have one router template for all your inset sand-cast pulls, you might want to closely examine the pulls first and see how close in size they are to one another.
Believe it or not, sand casting (the oldest form of casting, by far) can be done at home or even on the beach. Peter Follansbee once showed me ring pulls that he and other researchers at Plimoth Plantation made on the beach. And Thomas Lie-Nielsen fondly recalls how his father – a boatbuilder – would cast the keels of his boats on the beach.
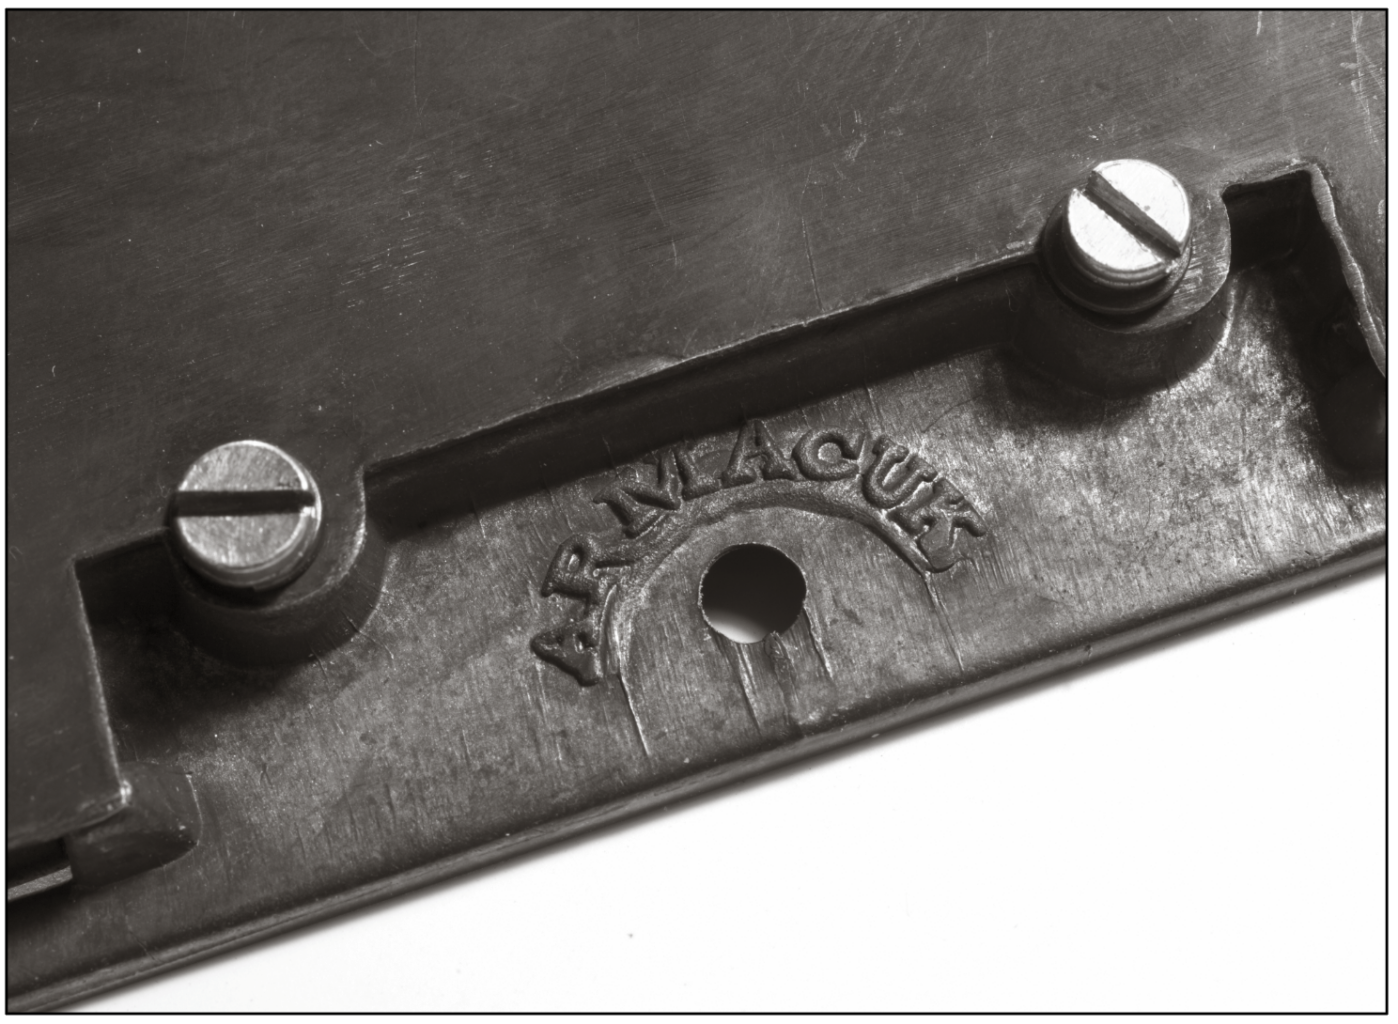
Investment (Lost Wax) Casting Investment casting is a more complex process than sand casting, but it is suited for small objects and short runs, and results in some fine details that might not require additional finishing.
Fig. 3.5 I can read that. Investment casting allows a much higher resolution of detail straight from the mold, such as the manufacturer’s name cast onto this pull.
The process is complex (and can be more expensive than sand casting), but it starts with a pattern that goes through several stages of production involving creating a wax mold of the object that is then covered in a ceramic material.
Investment-cast pieces of hardware have few downsides, other than the fact that they are typically more expensive than a similar sand-cast object. They allow much finer detail than a sand-cast piece, can have a much thinner cross-section and have the presence of a sand-cast piece.
Orion Henderson, the owner of Horton Brasses, says that investment casting can be pretty economical for very small parts. He says the downside to investment casting is that the metal suffers from greater “shrink” – when the metal cools it gets smaller, leaving pitting; the part gets so small that sometimes the part is not usable. The molds need to be oversized to account for this. Because of this shrinkage, Henderson says, investment casting is fine for small parts but not as suitable for big pieces – a bed wrench for tightening bed bolts, for example.
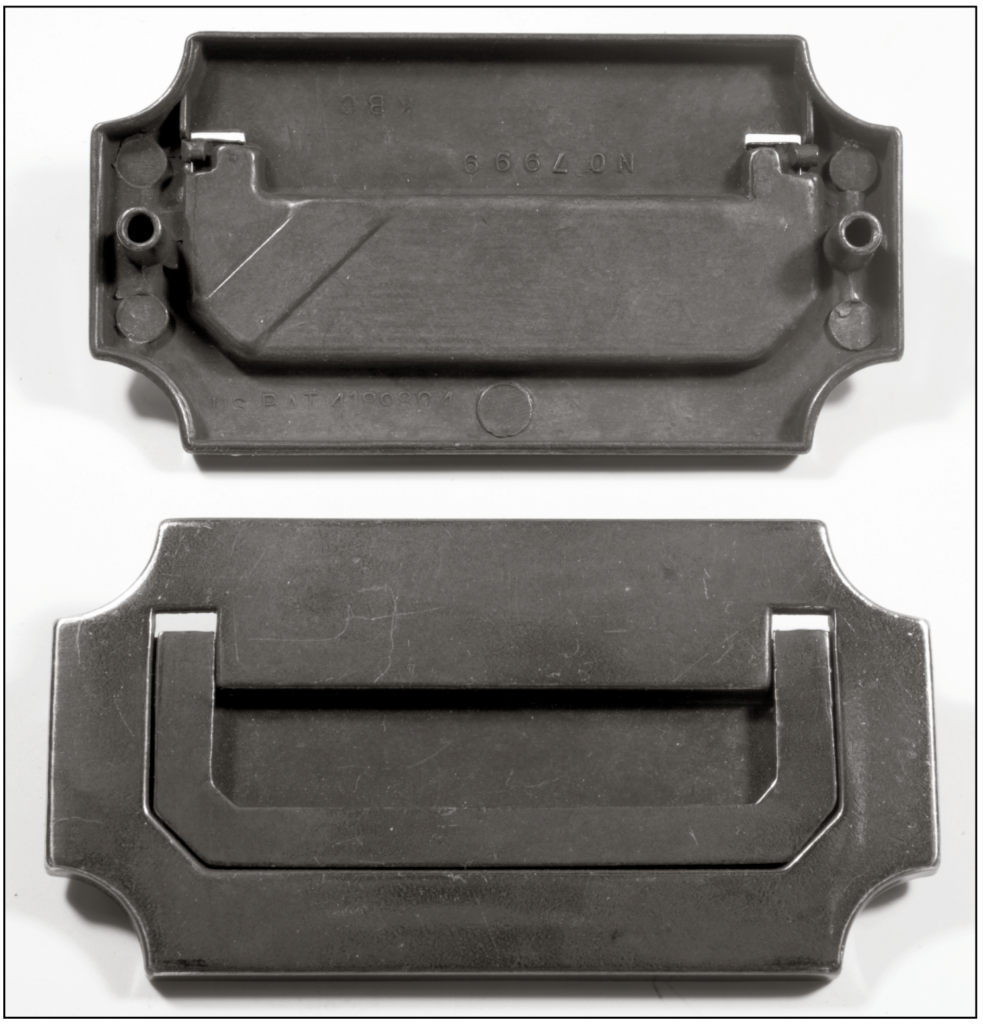
Die-cast Hardware Die-cast objects get a bad rap. And that’s because die-casting has been used with lightweight raw materials to produce lightweight (sometimes featherweight) pieces of furniture hardware. They are inexpensive and look good from across the room. But once you grab the hardware, it can feel insubstantial.
Fig. 3.6 Die-cast. These die-cast pulls are perfectly consistent and inexpensive, but lightweight. One of the advantages of die-casting is that it is easy to cast in threads and other details that might otherwise have to be machined in a sand casting or investment casting.
Like all casting processes, die-casting has a mold – in this case a two-part metal mold called a die that is machined with hollow areas. Molten metal is injected under pressure to fill the hollow areas in the die. Then the two pieces of the die are mechanically separated and the finished part is ejected.
Die-casting produces parts that require little or no finishing. The parts are remarkably consistent. You can make many of them in a minute, and the individual units are inexpensive as a result. So why do some people dislike the process?
Like all technology, die-casting isn’t the problem. It’s how it is employed.
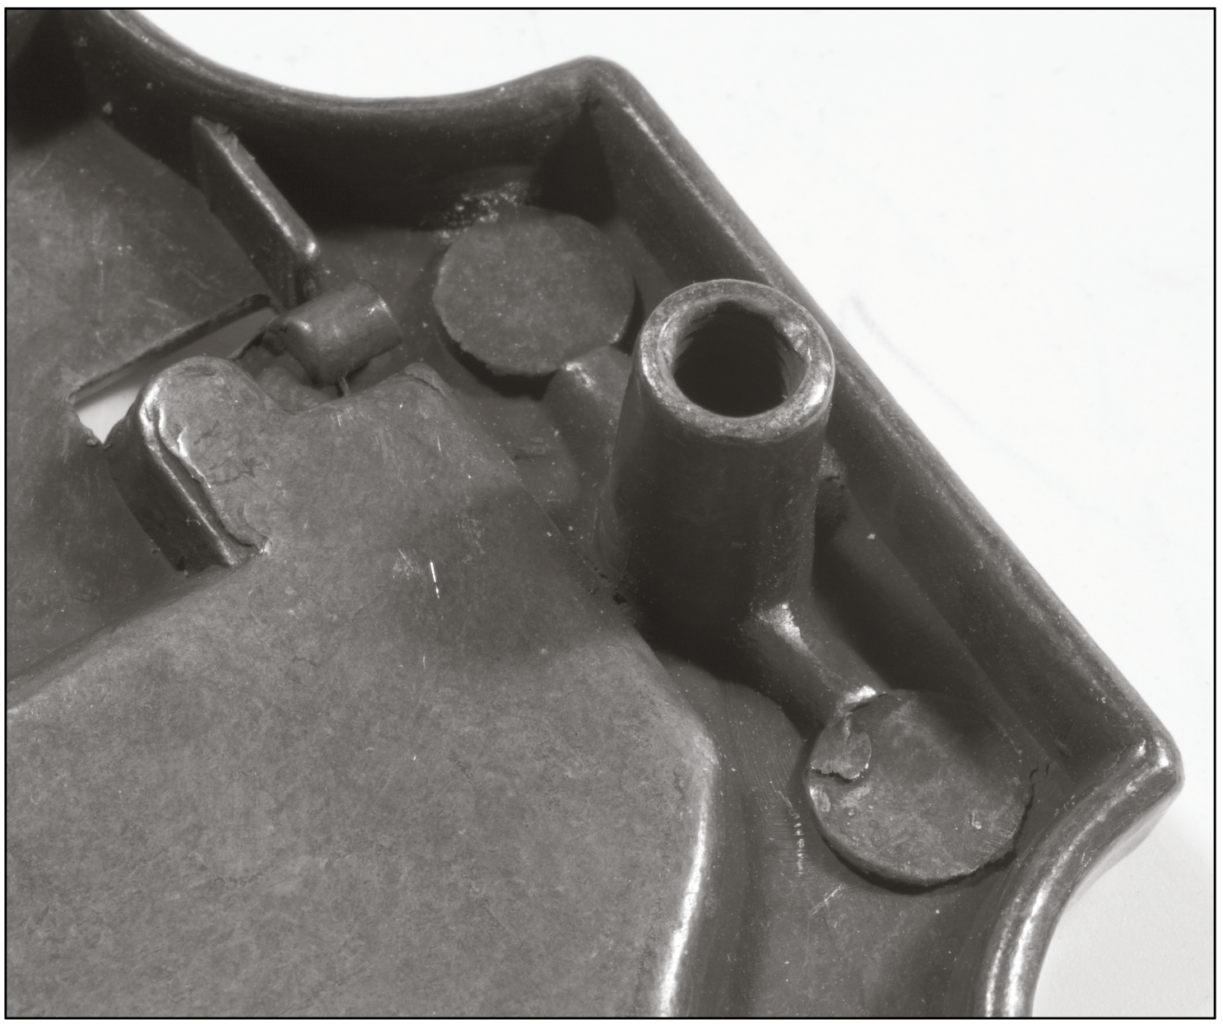
Fig. 3.7 Ejector-pin marks. The small circles are the marks of a die-cast object. Look for them on your Hot Wheels.
You can use copper (or even lead) in die-casting to make a nice and heavy piece of hardware. (In fact, die-casting was invented in the early 19th century to make movable lead type for printing presses.) But in many instances, the manufacturer will use lightweight metals, such as aluminum, tin, zinc or Zamak, an alloy of lightweight metals.
To be honest, these lightweight metals are fine for some pieces of hardware. A drawer knob, for example, can be just fine when it is die-cast. But when you get into pieces of hardware that have movable parts that you grab, such as a drawer pull, the whole thing can feel chintzy.
You can identify die-cast pieces of hardware easily, even if its catalog description doesn’t mention the process. The finished casting is pushed out of the die by ejector pins – movable rods inside the die. These pins leave telltale round marks on the hardware. Look for them on the back of the hardware, and you’ll start to see them everywhere.
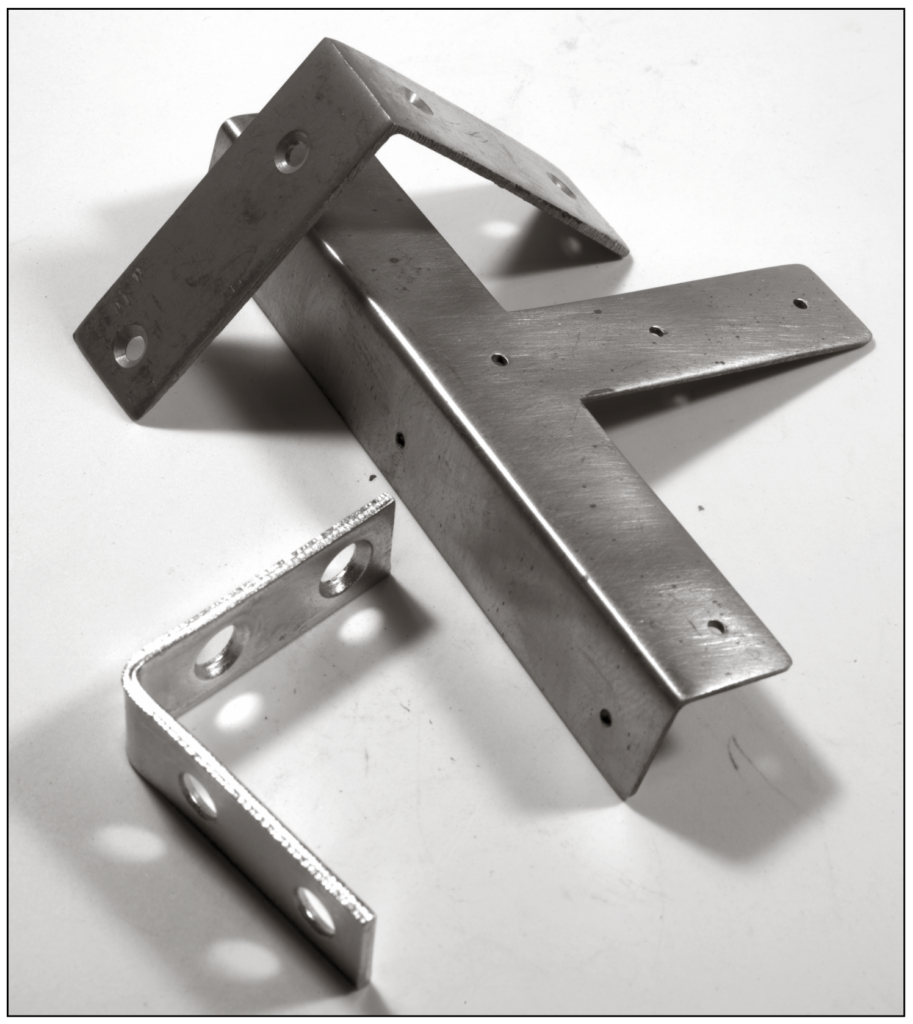
Bent Plate When it comes to the corner guards that are prevalent in campaign furniture, many modern manufacturers will use thin brass plate that is bent and sometimes welded at the corners.
Fig. 3.8 Or bend it. Bending your corner guards can be easier than casting them. So it’s a common practice with this piece of hardware. The big difference is that the corner is radiused instead of sharp.
This might sound like a cheap shortcut. It indeed is a shortcut compared to cast-brass corner guards, but it can be a good shortcut.
The plate is more consistent in thickness than any piece of sand-cast hardware. So installing it is easier because you can use one depth setting on your router plane or electric router.
The downside to using brass plate is that the corners of the hardware – both the inside corners and outside corners – are rounded because of the bending process. The cast corner guards can have sharp inside and outside corners. It’s a subtle difference, but it is noticeable once you are sensitive to it.
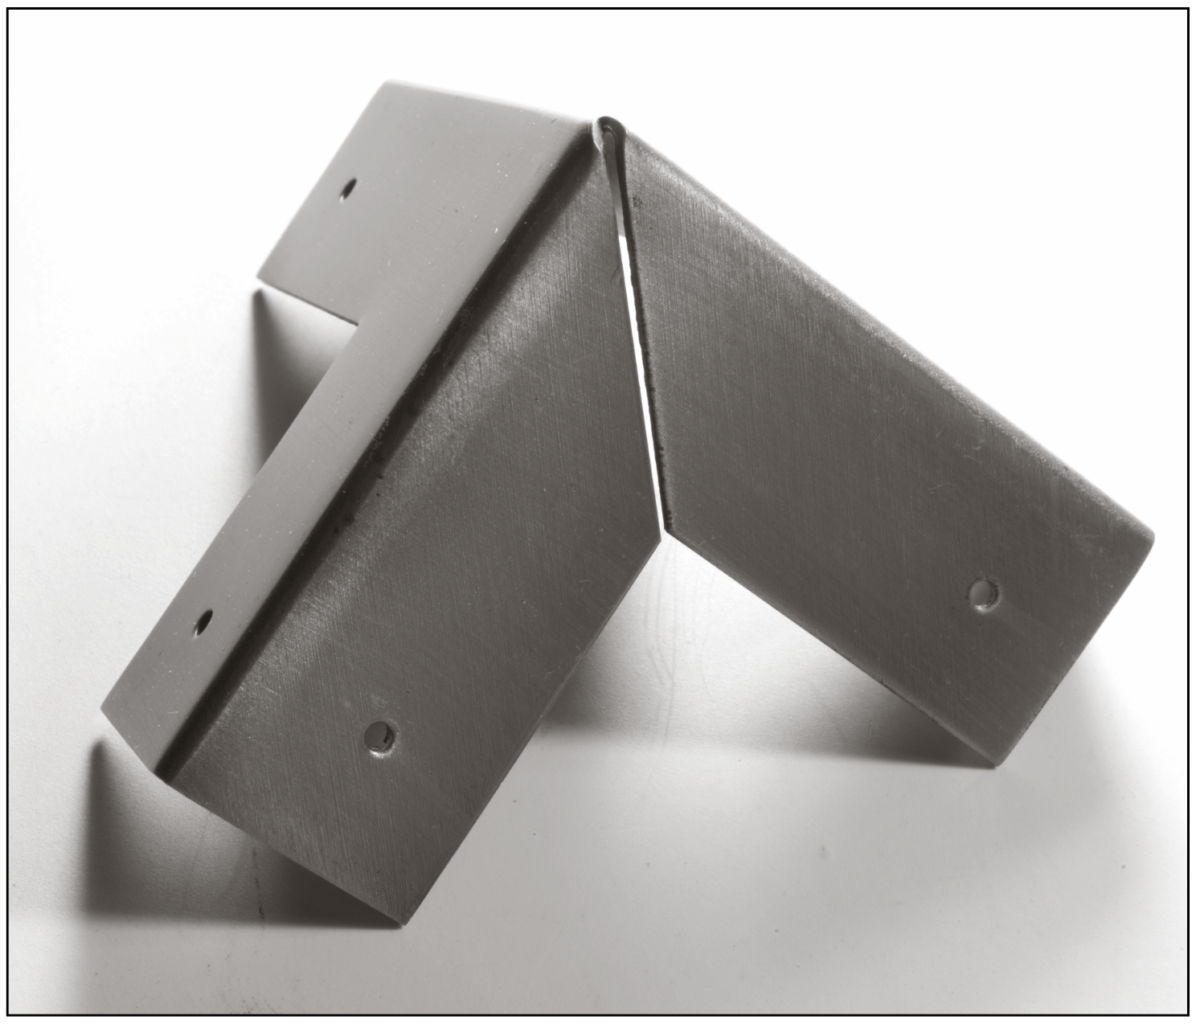
Fig. 3.9 Mind the gap. This corner guard isn’t welded at the corner. This makes it easy to manufacture, less expensive and wrong-looking.
If you do use hardware made from bent plate (and I do), look for welds at the corners when the hardware covers three surfaces, such as when you have a brass guard designed for the top corners of a chest. A quality guard will be bent then welded. Some of the less expensive guards are simply bent with no weld. This looks just weird and wrong to my eye.
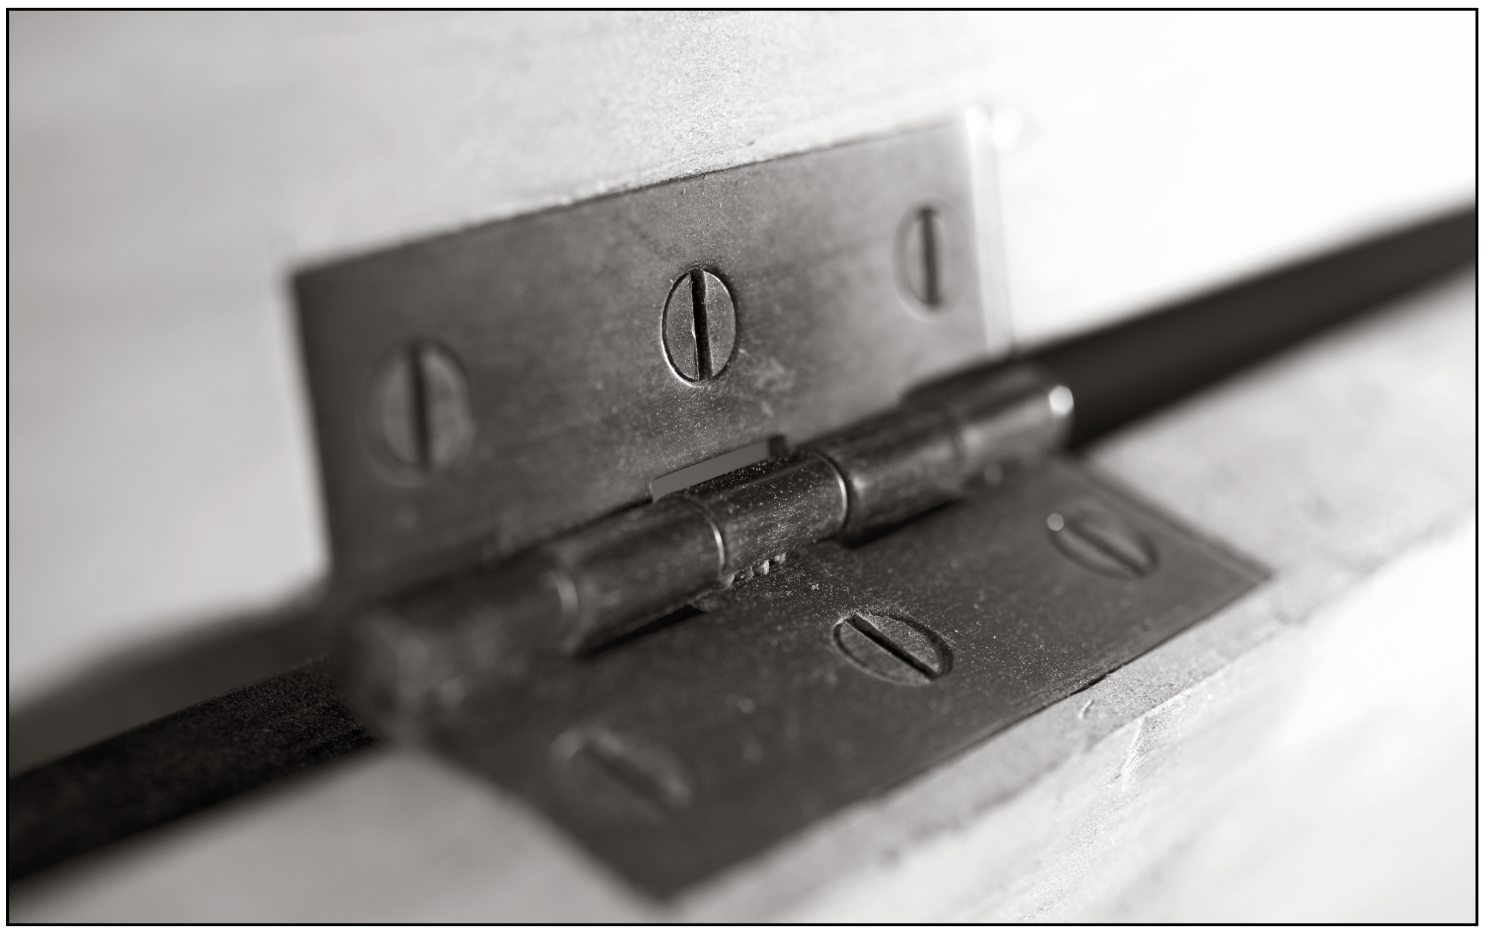
Extruded Hardware Some of the hardware you’ll see in catalogs will indicate it is “extruded.” Extruding hardware parts is analogous to making macaroni or using the Fuzzy Pumper Barbershop with Play-Doh. Metal (cold or hot) is pushed through a die to make a finished shape that is then cut up to finished lengths.
Fig. 3.10 Pretty, standard. Most quality cabinet hinges are extruded these days, though you will still see some that are stamped out then bent. Oh, and there are still blacksmith-made hinges, too.
Many quality hinges are made with extrusion. The leaf and barrel are extruded. Then they are cut to length and machined to accept screws. The only downside to extruded hardware is its price.
Choosing Hardware So why is all this talk about hardware manufacturing important? I think that hardware can make or break a piece of campaign furniture. A zinc die-cast drawer pull on a teak chest is like a nugget ring on a millionaire’s hand.
When I am shopping for hardware for a piece of campaign furniture, I like to purchase a sample pull, hinge or corner guard to inspect the quality before dropping hundreds of dollars on a suite for a chest or trunk.
The samples also help me ensure that the color and finish on the hardware will work. And the color of the brass is another can of worms we need to open.
If you buy your hardware from several sources for one piece of furniture, the chance of them matching in color is tiny. And the last thing I want to do after spending $700 on pulls is to open a chemistry set to strip the hardware pieces and color them.
If you like dabbling in solvents and other noxious fumes, you can easily find information on how to strip the lacquer from your hardware and color it with ammonia fumes. Me, I have enough volatile organic compounds in my life. I’d rather leave that to other people.
That’s why I take one of two strategies when buying hardware: Either I buy all the pieces from one maker to ensure they have a consistent color, or I ask (nicely) if the hardware seller can color the pieces. The better hardware merchants are happy to do this for you. In fact, some will even bring in hardware from other sources and color your entire suite so everything looks the same. It might cost a little more to go this route, but the results are worth it.
One last note about buying hardware and I’ll shut up: I think slotted screws are really the only kind of screw that looks good on a campaign piece. Phillips screws are a 1930s invention that were intended for assembling cars – not fine furniture.
Once you get your hardware in hand, you can build the piece and install the pulls, knobs and corner guards. There are several strategies for creating the recesses for the hardware, ranging from a chisel and a mallet all the way up to templates for the electric router and pattern-cutting bits.
Often when we start working on a new book, among the first steps are to acquire any good (and sometimes bad) research that’s already been done on the subject – at least for topics that haven’t been written about ad nauseam (see workbenches…or Shaker furniture; we’d need far more shelving to hold everything written on those subjects).
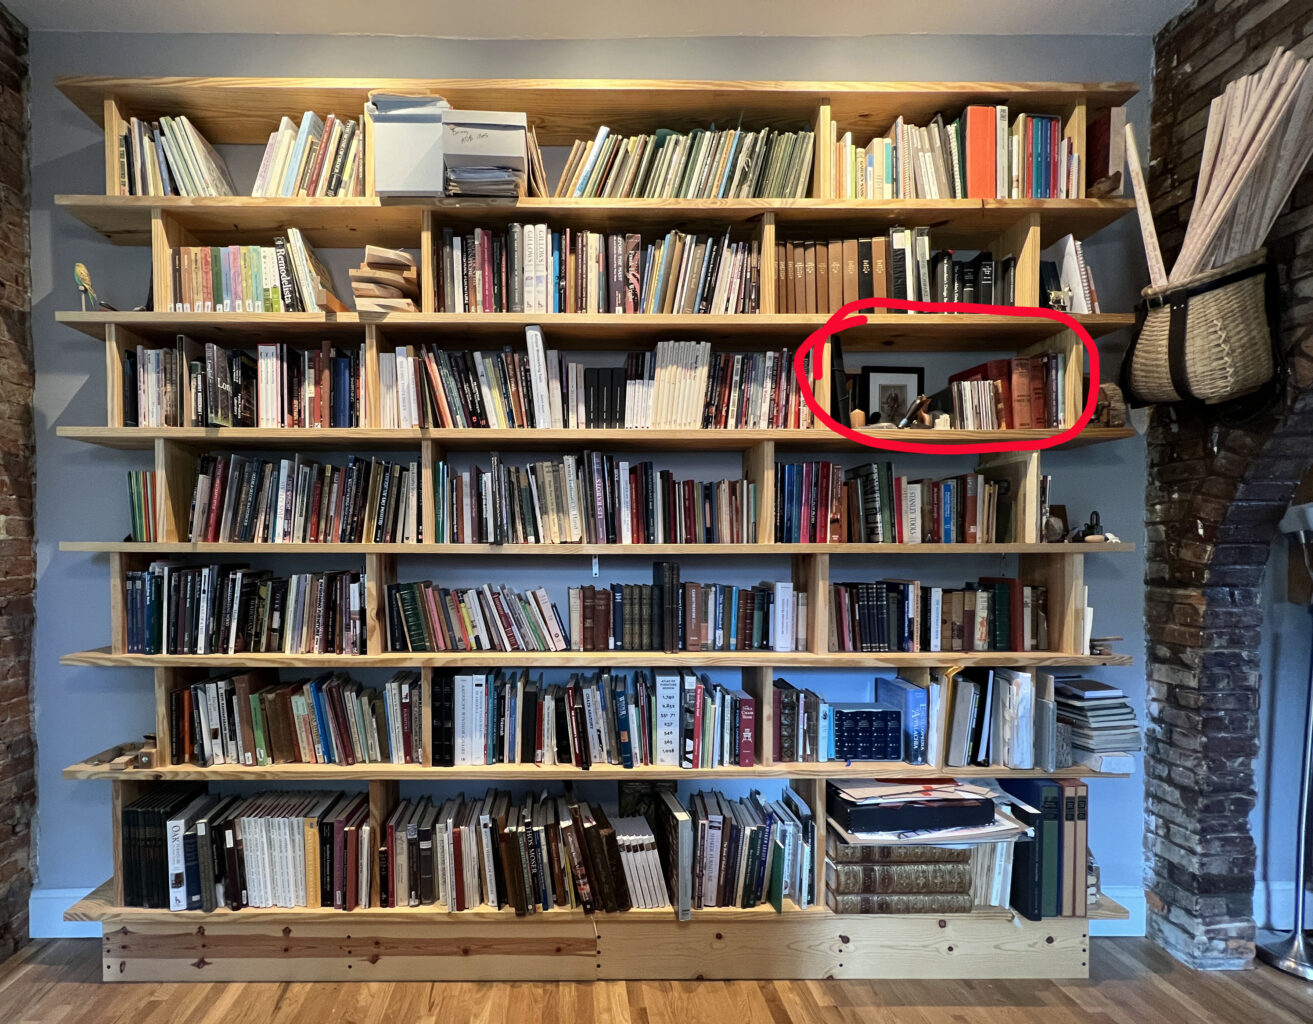
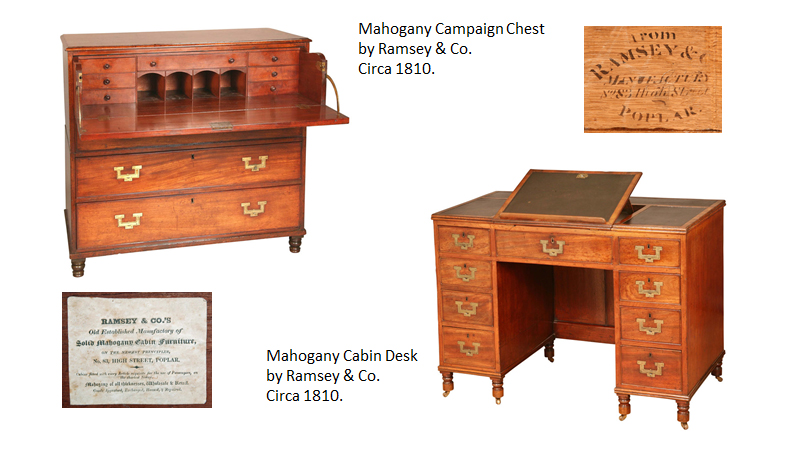
This bookshelf bay holds just about everything Chris could find that’s been written on campaign furniture, from books – OK, book – to various magazine articles and (most helpful) the catalogs from Christopher Clarke Antiques. Also, period sales catalogues for British Empire posting needs.
It also holds some “overflow” and backup tools.
Let’s start with the Army & Navy Co-operative Society price lists. These listed just about everything the British military man could need or want for his self, family or house – whether posted to a colony or not. Find what you needed, then go to one of the stores, or have it delivered (sometimes free of charge), from London to Kolkata (formerly known as Calcutta). Chris bought three of the price lists, because in addition to a vast selection of pie frills, corsets and party performers (see below), you could purchase campaign (and other) furniture. In our collection are the price lists from March 15, 1907, 1923-24 and 1929-30. These are fascinating – and you can now find most of them digitized online (you could not in 2014, when “Campaign Furniture” was published). But that does take away the fun of paging through them from the comfort of my Rhoorkhee chair (I could lose whole days in these).
The colorful paperback books to the left of the Price Lists are every print catalog that Chris could get his hands on (and in the black binder to the far left are printout of the digitized ones that weren’t available in print) from Christopher Clarke Antiques Ltd., an incredible store in the Cotswolds of England – and the only place that specializes (specialises?) in British military campaign furniture and travel-related antiques. The Clarke brothers, Sean and Simon, kindly answered all the questions Chris had that no one else could, and they proofread “Campaign Furniture” for us. Their shop is half store, half research library. They have every photo of every piece they’ve ever acquired and sold, along with notes about it and its history. They’re under contract for a book with Lost Art Press – and we eagerly await their having time to write it. In the meantime, follow their Instagram feed for close-up looks at some fascinating pieces.
Tucked alongside the Christopher Clarke catalogues is “Britain’s Portable Empire: Campaign Furniture of the Georgian, Victorian, and Edwardian Periods,” a 2001 museum exhibition catalogue from The Katonah Museum of Art in New York.
On the far right are “Edwardian Shopping: A Selection from the Army & Navy Stores Catalogies 1898-1913” compiled by R.H, Langbridge (David & Charles, 1975) and “Britsh Campaign Furniture: Elegance Under Canvas, 1740-1914,” by Nicholas Brawer (Abrams, 2001), the earliest book we know of on the subject. (Brawer was also the curator for the museum exhibition mentioned above.)
The aforementioned black binder also holds copies of various antiques magazines that featured articles on select pieces of campaign furniture, and the working layout of the first draft of “Campaign Furniture.”
Now the tools: These are a mix of tools that are backups in case Chris’s primary versions get lost/destroyed/etc. (the Lie-Nielsen No. 3, a Lie-Nielsen 60-1/2 block plane, an extra block plane blade, a Blue Spruce 16 ou. mallet*, a Lucian Avery scorp and a Tite-Mark cutting gauge), and overflow tools – things he now longer uses…mostly because we now have versions of them from Crucible Tool (the Sterling Tool Works dovetail marker and two small Vesper Tools sliding bevels ). Also stored there is the first of the Crucible Tools Sliding Bevel that worked like it was supposed to (a lot of R&D went into making the two locking mechanisms perfect).
The sepia photo is a period original that shows a nattily dressed man leaning against an English-style bench; he’s holding a pair of dividers. So of course we had to have it. The marquetry panel is a thank-you gift from a Kickstarter campaign to which Chris donated.
The bookend (which shows one of Cincinnati’s Art Deco gems, Union Terminal) is from Rookwood Pottery.
– Fitz
*That Blue Spruce mallet is brand new. When I was leaving to teach in Florida last month, I grabbed the older backup one and tossed it in my carry-on. I was assured by my shopmate and a visitor that I would have no trouble with it at TSA – they’d taken one through security many times. They were wrong. So I bought us a new backup as I awaited boarding. (Thank goodness I didn’t try to take my beloved and irreplaceable blue Blue Spruce mallet!)
p.s. This is the fifth post in the Covington Mechanical Library tour. To see the earlier ones, click on “Categories” on the right rail, and drop down to “Mechanical Library.” Or click here.
Every year, your spouse and friends ask us which books they should buy for you during the holidays. And if they aren’t sure which book you want, they ask us: “Well, which books are your best-sellers?”
Until today, I had only a gut feeling about it, but I’d never really looked at the statistics. After some ciphering, I came up with a list that had a few surprises.
10. Doormaking and Window Making by Anonymous. This was a shock. This small book is a reprint of two historical texts brought to our attention by joiner Richard Arnold. It found an audience among people who restore old buildings.
9. Campaign Furniture by Christopher Schwarz. This book is one of the few in print on this style of furniture, which my grandparents collected for many years. I’ve been told by readers that it is a nice text on classical casework.
8. Kitchen Think by Nancy Hiller. I was a little surprised by this one because it was released in the summer of 2020. It’s a fantastic book, as is everything Nancy writes. If you are interested in how to design (and build) a kitchen that is in context for your house, this is the book.
7. By Hand & Eye by Jim Tolpin and George Walker. This one is no surprise. Ever since this book was released, it has continually found new audiences who are interested in designing good-looking furniture using whole-number ratios.
6. The Anarchist’s Workbench by Christopher Schwarz. On the one hand, I am not surprised to see this book on the list. It is, after all, about workbenches (the birdhouses of the intermediate woodworker clan). But on the other hand, the book is free as a pdf. Free.
5. The Woodworker’s Pocket Book edited by Charles Hayward. I love this little book. I knew it would be a home run among woodworkers, and I was (for once) correct.
4. With the Grain by Christian Becksvoort. This book is immensely popular because it is incredibly practical and avoids the heavy science stuff, but it still tells you exactly what you need to know to use solid wood in furniture effectively.
3. The Essential Woodworker by Robert Wearing. This book is a classic and should be on the shelves of every woodworker who is curious about hand-tool woodworking. We fought hard to bring it back into print, and readers have been thrilled as well.
2. The Anarchist’s Design Book by Christopher Schwarz. I am so happy to see this book on this list. This book took so many years to write and get just right. I feel like it’s the right combination of practical construction advice and a screed about poorly made and overly ornate furniture.
1. The Anarchist’s Tool Chest by Christopher Schwarz. This book helped us get this company on its feet and the capital to publish the works of other authors. Even after 10 years, this book still sells and sells – thanks to word of mouth.
On a last note, please remember that we are a small publisher (we recently graduated to “small publisher,” up from “microscopic publisher”). So none of these books would make a blip on the screens of a corporate publisher. And our annual revenue could easily be found between the couch cushions of the CEO of Penguin/Random House.
Maybe someday we’ll hit the Medium Time – with a book on birdhouses.
As a reminder, Sean and his brother, Simon Clarke, are the second generation to run Christopher Clarke Antiques, in Stow-on-the-Wold, England. Sean and Simon, who helped Christopher Schwarz with his research when writing “Campaign Furniture,” are considered leading historians of campaign furniture.
In this lecture, Sean covers the history of campaign furniture during the golden period for portable furniture, the many different types of British and Irish makers, those who used campaign furniture and its eventual demise.
Sean notes that wealth and rank mattered, and how well your tent was fitted out was a good sign of your social standing.
“There was the opinion that the better prepared you were, the better you would do your job, so camp comforts were a necessity,” he says.
He quotes from a lieutenant’s diary, written in 1813 during the Peninsular War, about the need to equip one’s self with 600 pounds of personal baggage. “The more an officer makes himself comfortable, the better will he do his duty, as well as secure his own health, and the comfort of those belonging to him. It does not follow, that because we attempt the best in every situation, that we cannot face the worst.”
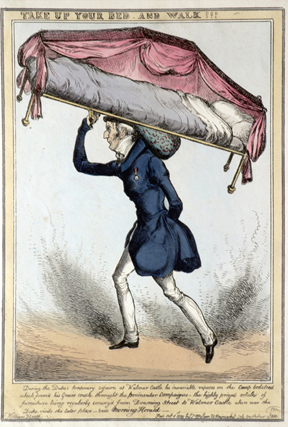
Later in the lecture Sean shares this cartoon, drawn by A.S. Boyd, published in “The Graphic” on October 19, 1901. The soldiers are weighted down by their furniture and personal items, which in the illustrations includes everything from a grandfather clock and a piano to a cradle and lawnmower.
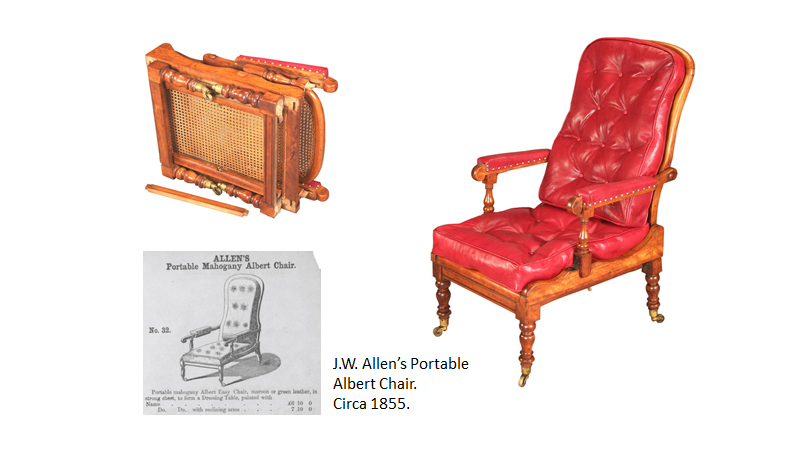
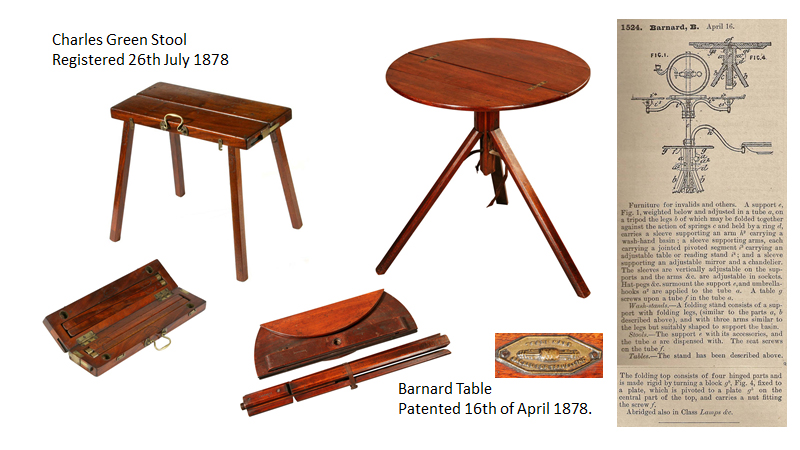
The great joy in this lecture is the many clever examples of ingenuity in the metamorphic furniture shown. Consider the patents alone. Before 1866, Sean says there were 28 patents for chairs. Between 1866 and 1900, 306 patents existed for folding chairs alone.
In this lecture you’ll see a late 18th century mahogany cylinder bureau bookcase that, at first glance, you’d never guess would break down – but it does, considerably. A four poster patent screw bed by Thomas Butler, circa 1800, that is easily set up or taken down without screws, nuts or bolts, and even has a canopy for mosquitos when hot or drapes when cold. There’s a mahogany Naval bureau from 1750-80 with a top that comes off allowing the bottom to become a temporary operating table if needed.
The Victorians broadened the campaign furniture market, building furniture such as the Thornhill Patent Games Table, circa 1910, which easily folds into a small suitcase and could be used at home, in the garden or while on picnics. Sean points out that a plastic version of Thornhill’s folding picnic table and benches can still be found in most camping shops today. And, of course, the Roorkhee Chair is the predecessor to the folding chairs we take to our children’s sporting events, minus the cup holder (and elegance).