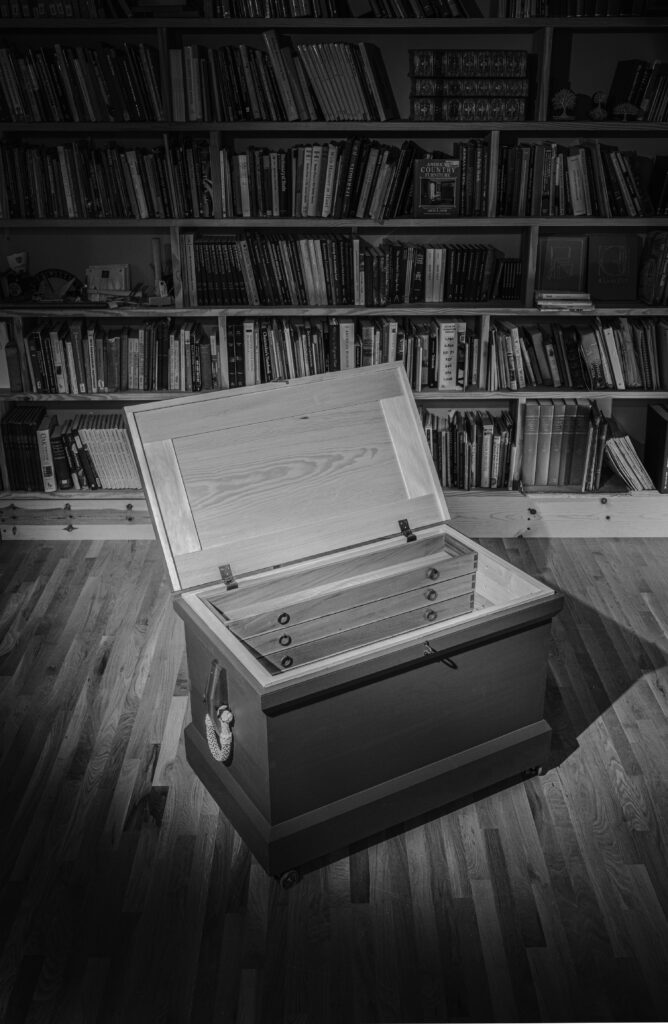
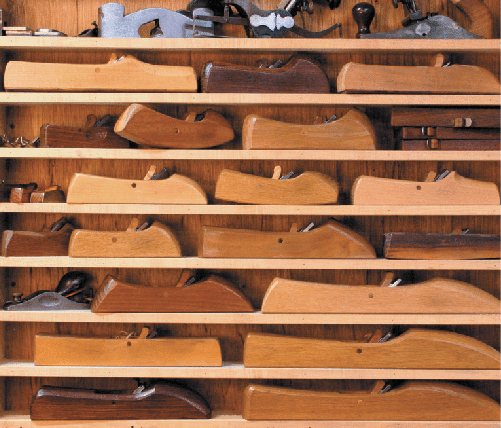
The 2025 chest in Eastern white pine and some mahogany scraps – ready for work.
Last week, we sent the revised edition of “The Anarchist’s Tool Chest” to the printer. It will be released in late June. The book has been updated throughout, including the section on building the chest. The new chest holds more tools and takes about half the time to build (sacrificing nothing in the process).
If you’ve ever thought about building one of these chests, I have good news. Alexander Brothers now offers a kit of wood for the chest in gorgeous and perfect Eastern white pine. Check out the details here, but everything is milled so you can get started. Price: $575. (Alternatively, they will sell you a bundle of rough lumber if you want to save money and do that work yourself.)
This pine is fantastic. I bought the pine for the new chest from Alexander Brothers (at full price – this boy doesn’t take discounts). They have access to clear and wide stock that we simply do not.
Eastern white pine is – hands down – the best wood for this chest. It is lightweight, strong and a joy to saw and plane. Highly recommended.
And because the internet sucks, I have to mention this: We don’t get any royalty, kickback or affiliate money from Alexander Brothers, a family-run business in Virginia. Like Alexander Brothers, all we care about is getting good material in the hands of people so they can build stuff.
Editor’s Note: Philippe Lafargue, along with Michele Pietryka-Pagán and Don Williams, are the folks we have to thank for “To Make as Perfectly as Possible: Roubo on Marquetry,” which we first published in 2013, and “With All Precision Possible: Roubo on Furniture,” which we first published in 2017.
Those editions are now sold out. However, the new deluxe edition of “With All Precision Possible” is now available, and we plan to offer a deluxe edition of “To Make as Perfectly as Possible” soon.
Philippe, Michele and Don are also working on more volumes of Roubo, with a focus on interior carpentry, garden carpentry and carriages.
Philippe Lafargue was born in the southwest region of France, in the Basque country, in a town called Biarritz.
“It’s called the little California of France,” Philippe says. “It resembles the California coast because of the cliffs, beachgoers and surfing. The weather is pretty mild all year round, and you have mountains in the background. I was lucky to be born there and raised there. I had access to the natural beauty of the environment, which was very nurturing.”
Philippe lived with his parents, grandparents and older brother in a small, one-floor house with a basement.
“I would find refuge in the basement because we were crowded in the house,” he says. “I remember the winter months when I sheltered there. The furnace was there so it was warm and I could see the rain falling but I was protected.”
In the basement was an old workbench, anchored to the wall. Philippe worked on projects on that bench, imprecise but creative work that he loved. He also spent a lot of time at his uncle’s farm.
At times, Philippe found it difficult to feel motivated in school outside of the more artistic classes. He loved hands-on classes that inspired new ways of looking at things and doing things. He connected with a teacher at school who helped him get started in airplane model making.
Early on, Philippe knew he wanted to be a cabinetmaker.
“I was fascinated with the work of a cabinetmaker,” he says. “I wanted to be a true cabinetmaker, making case furniture. I don’t know where this came from.”
He wonders if he was, in part, influenced by all the furniture, made by a local cabinetmaker, in his parents’ house.
“You could buy what you could afford at the time, so it’s not very attractive,” he says. “But it’s very well done.”
As a teen, he was set to study cabinetmaking at school, theory and practice. But three months before the course was slated to begin, academic offerings shifted regionally. Suddenly, cabinetmaking wasn’t available based on where Philippe lived, and none of the other options offered to him interested him.
“I told the staff of the school that I didn’t see cabinetmaking there so I wasn’t interested,” he said. “I started looking for an apprenticeship.”
While looking, Philippe was offered an opportunity to attend a school two hours away from his hometown.
“Life is about opportunities,” he says, “but it’s also not being afraid to take the train when it’s going full steam.”
Becoming a Cabinetmaker
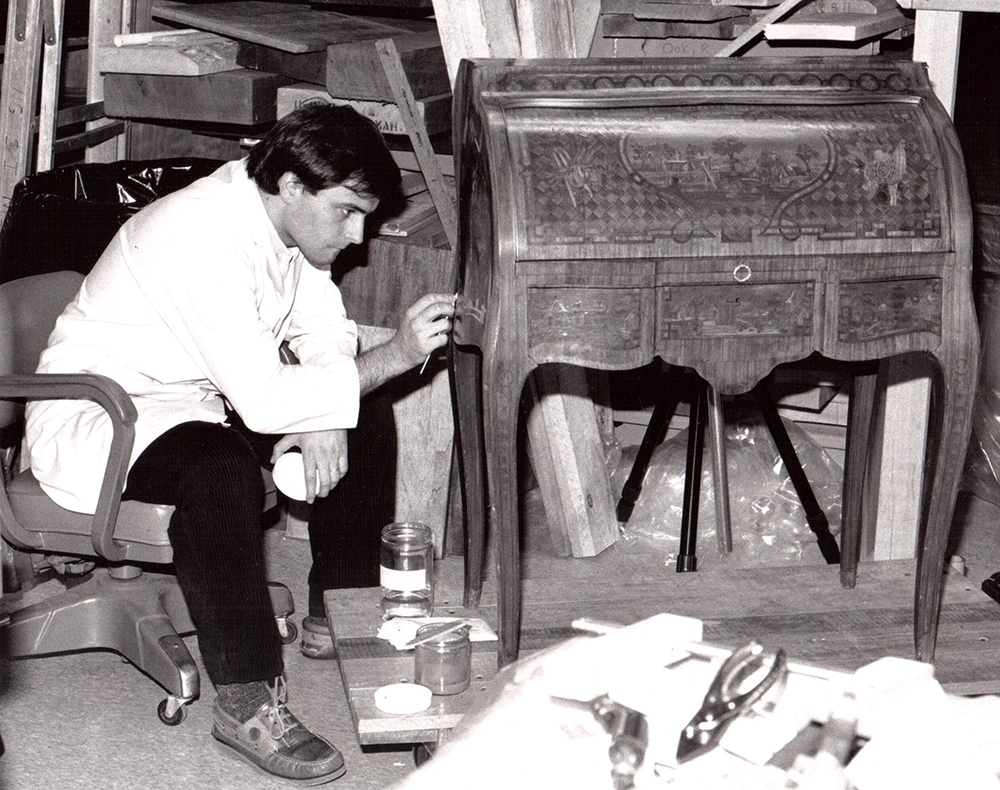
Before being accepted into the school, Philippe had to complete a series of tasks and projects. Philippe wonderfully shares that experience in an essay in “With All Precision Possible.”
In short, that summer he found a cabinetmaker who agreed to take him under his wing. In addition to helping the cabinetmaker with odd jobs, he worked through his tasks and projects, the cabinetmaker serving as mentor.
For his first task, Philippe dressed up the face and edges of rough lumber, making it perfectly equal in thickness and length, with hand tools only. Next his mentor taught him how to cut dovetails and he built a jewelry box and bread basket out of mahogany and cherry, using a set of provided blueprints for reference. He also learned how to sharpen chisels and hand plane blades.
This, from his essay:
That summer was an eye-opener in many respects and it cemented my desire to work with wood in some capacity. When fall arrived, I enrolled in my new school as a cabinetmaker. The school was training young fellows like me to be ready to enter the workforce quickly and thus the training was more focused on knowledge and use of equipment than on hand skills. After a summer of working with my hands, I balked. Two weeks into the school year I was certain that this was not the path I was seeking. I asked for an audience with the school director and shared him my dilemma. I told him I wanted to work with my hands and chairmaking would work better for me. I asked to be transferred and bid farewell to cabinetmaking. It is amazing what you can do when you are very motivated and stubborn.
I began my education in chairmaking the following week and while machinery was part of the training, there were many parts of a chair that could only be accomplished by hand, and that suited me just fine. So for the next two years, I learned the art of chairmaking, “industrial style,” which also included making beds and end/pier tables. There was a pretty straightforward approach to accomplishing such tasks. Now I was able to read a set of blueprints and from it, trace all the required contours and profiles used to cut out the necessary chair parts from the lumber. Thinking back, I am still amazed that in that class, all of us could produce an armchair in 24 hours, ready for finishing.
At the end of two years I had a diploma in my pocket and some experience under my belt. Now I could return to my mentor’s workshop and turn on and use all the power tools to my heart’s content, something I had earned and did proudly. I had a great summer in the little workshop that year.
During that summer, a friend told him about the esteemed École Boulle in Paris, which has offered higher education in applied arts and artistic crafts, including cabinetmaking, marquetry and restoration work, since 1886. To enroll, Philippe first had to pass a two-day exam, which included creating a full-size set of technical drawings with accurate dimensions of a Louis XV-style chair. He was accepted.
“It was another world,” Philippe says. “You’re learning about a lot of things, all around.”
After two years at École Boulle, he worked out a deal with the director. He would come back a third year, tuition free, and help fabricate everything that came out of the design workshop.
“That was very cool because they were doing some very interesting stuff, combining not only wood but metal and plastic,” he says.
Now he was firmly planted in hands-on learning and he loved it. But the dream situation was short-lived.
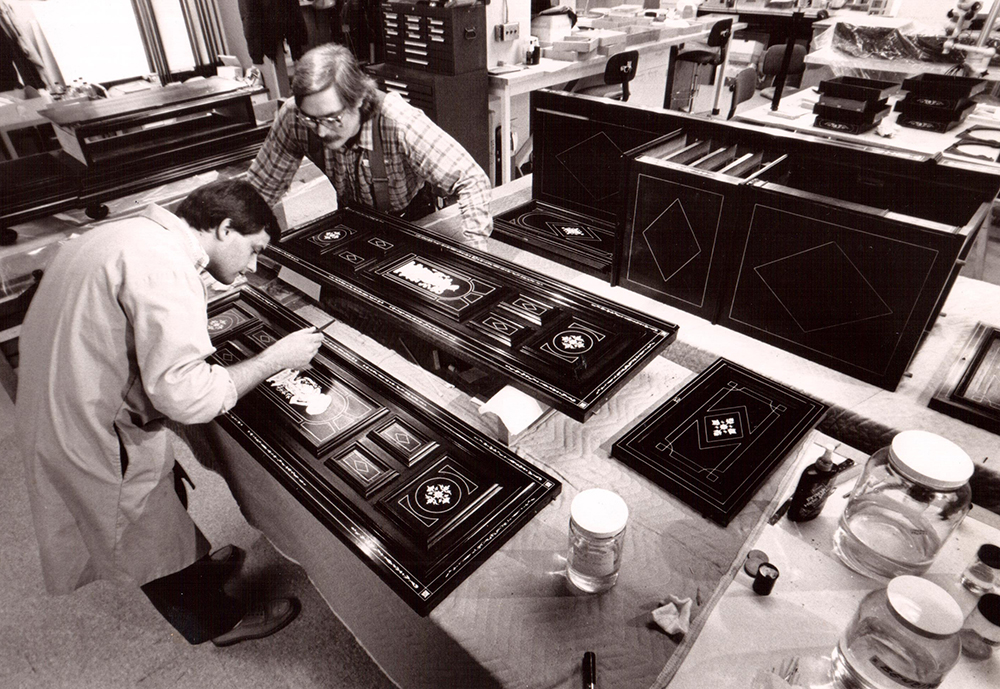
Mobilier National
A couple of weeks into his third year at École Boulle, a teacher told him about chairmaking job openings at Mobilier National, that manages the furniture of the French State, such as the furnishing of ministries and embassies, its storage, its restorations, and its design, notably with the Research and Creation Workshop. It was an opportunity Philippe couldn’t pass up. So he and a friend decided to apply. But first, they had to pass an exam.
When they arrived, they were given an armchair and a stack of wood. On day one, they were tasked with drawing the chair to scale. On day two, they were tasked with using their own drawings to each build an armchair in 24 hours. They both were hired.
Philippe worked there for three years.
“It’s like the history of France in all kinds of objects,” he says. “It was incredible. I saw all the campaign traveling furniture of the Napoleon War.”
Here, for example, Philippe worked on chairs stamped by famous chairmakers of the 18th century. The “users,” often high-ranking government officials, didn’t want reproductions. They wanted original pieces, signed and perfectly restored. It was all cyclical, too. For example, a canopy bed might be used by the president of France while elected for seven years and then returned to be left in storage.
Philippe questioned the restoration work at times, ripping off nails, redoing this, fixing that.
“But there’s so much, that you don’t even consider when there will never be enough one day,” he says. “That’s the problem. You value it differently.”
After three years, Philippe realized the job came to him too young. He could envision himself as head of the section in which he worked, but he wanted more out of life.
“If you stay in a job like that young, you are going to lose everything you have to offer,” he says. “There is no room to express yourself. There’s no room to grow. It’s very limited.”
Philippe went back to South France. He felt boxed in. In France, work is quite compartmentalized and segmented, he says, to the point of being rigid. He knew if he stayed that trying anything new would be complicated.
“So in 1987, I took my bag and went to the U.S.,” he says.
An Internship at the Smithsonian
“In the U.S., I realized quickly that first I had to learn English,” he says. “And I had to think out of the box because I could not just be a chairmaker. If you’re going to be a chairmaker in the U.S., you’re only going to be a chairmaker if you make things that are exceptional. You’re going to find a clientele that wants your stuff and that’s it, but that’s going to be rare.”
Eventually he landed an interview at the Smithsonian Museum’s Conservation Analytical Laboratory (now called the Museum Conservation Institute). The job – the museum’s first wooden objects intern. At the time, Don Williams worked in the lab and Mark Williams was head of the lab.
“I remember the interview in the meeting room,” Philippe says. “I was at the end of the table. I was shaking like a leaf. I knew 200 words of English. I had a little portfolio of photographs. And all these heads of all these sections were bombarding me with questions. It was freaking me out.”
He got the internship.
In his first week, he ended up in New Orleans at a convention for conservators from around the world. His eyes were opened to how other countries view the roles of conservator, restorer and curator. In the U.S., he says, you respect the stain as much as you respect a brand-new piece.
“You respect the history because everything is telling you something,” he says. “We’re just only passing information. We are not here to change information. That’s the big difference. You restore to have something look good. In the U.S., you encapsulate this moment and pass it along. And you remember that the best is always the enemy of the good.”
One day at the Smithsonian he saw someone had left three volumes of Roubo on his desk. Don and Mark asked Philippe if he could translate them.
“I said no. I won’t. It’s impossible,” Philippe says. “I didn’t know enough English at the time and I didn’t think I would have been able to manage that at all.”
While protesting, Philippe opened up one of the volumes and found a plate that shocked him. It was an illustration of a workshop and it looked identical to his workshop in Paris.
“It was and still is exactly the same,” he says. “It’s a row of workbenches. Windows on the left, big windows, floor to ceiling. The same spacing between each bench, the same lineup. On the right you have space to have small sawhorses or your glue pot. And you have an equipment room on the other side. When I saw these pictures, I couldn’t believe it. We haven’t moved from that yet. To me, it was unbelievable.”
In the beginning, Philippe worked closely with Mark, who hired and supervised him. When Don took over as head of the lab, he and Philippe worked well together, connecting over a shared taste in music.
No longer stuck in the role of chairmaker, Philippe decided to spread his wings even more.
Tryon Palace
In 1990, Philippe found a new opportunity as a conservator at Tryon Palace in New Bern, North Carolina. He enjoyed this work for a while, but eventually realized he was missing something.
“I was lacking communication with what I was doing because those objects, they never talk back to you,” he says. “It was a bit too quiet.”
He switched gears to technical services manager, taking care of the well-being of its collections and buildings and its day-to-day operations. He worked up to the role of deputy director, which involved more finance work and human resources, and then helped build the N.C. History Center. In 2014, he was named executive director, a role he had been filling since the 2012 death of the previous director.
During this time, Philippe realized that all of his education, hands-on experiences and exposures to new opportunities had prepared him well for such new and varied work.
“Suddenly, you have all these resources that help you find a solution,” he says. “It’s like when you are building case furniture and you have something that doesn’t work, you find a solution. There is something, a mechanism in place that – click – it goes in. If you’re in a field that’s not quite yours, you use your mechanical skills to resolve stuff. It’s in place. You have learned how to make it work. You pull on your resources. I was glad to have my training because I can visualize things in three dimensions. I can see things very quickly.”
Philippe has found his professional journey gratifying.
“I was able to start from a wooden block but it’s not a block anymore,” he says. “It becomes whatever you want it to become. But you still have this hands-on quick understanding and then up, up, up and you work with people. It just happened to be that way. Primarily, I was able to open my mind. And it’s not always easy. But you make a mistake and you start again.”
Working on Roubo
Over the years, Philippe and Don kept in touch, somewhat sporadically. One weekend, Don called Philippe and told him he had started the translation of Roubo’s books. Don once again asked Philippe for help. This time, Philippe agreed.
Don asked immediately if he’d like to be named as an author.
“I said, Don, I don’t know. Send me stuff. If you like what I do, that’s fine with me. If you don’t like what I do, don’t put me on. So that’s the way it ended up being,” Philippe says. “I had no expectations. I was just doing it to help and for the fun of reading historical documents.”
They found a rhythm. Don and Michele completed their work, then sent everything to Philippe to look at it from the perspective of someone whose native language was French and who had a breadth of knowledge in French historical craftsmanship.
The first book took a while. Philippe worked on it every night after work, for two to three hours. The second one was a lot faster – it took Philippe about six months to complete.
After the first edition of “To Make as Perfectly as Possible” was printed, Philippe joined Don at Woodworking in America 2013 in Cincinnati for a book signing.
“I thought I was on another planet,” Philippe says. “I said, ‘What the heck is going on?’ It’s one of those feelings like you don’t know where you’ve landed. It was funny. Don gave a lecture. I bumped into people like Roy Underhill. I ended up staying with Megan [Fitzpatrick] in her house. She was trying to finish her house. Is she still? I’m sure she is, with all the work she puts in at Lost Art Press. Anyway, Don and I got to see all the beautiful furniture she’s made. That was a lot of fun. It was all very strange but it was one of those moments in life that stays always engraved. You have these beautiful vignettes in life where you cross paths with people.”
Philippe is now back in France, in Saint Nazaire, a small town of about 2,500 people. He’s 20 minutes away from Spain, surrounded by mountains and the Mediterranean Sea.
He’s working with Michele and Don on new Roubo translations.
“That team is very relaxed,” he says. “This is the type of project you don’t get ready for. You can’t work ahead of time. You just wait for it to fall in your lap and then you go.”
‘Life is to Discover Yourself’
Having spent many years living and working in France, and many years living and working in the U.S., Philippe finds the differences quite interesting.
“In the U.S., there’s this quest for success and not being afraid of it,” he says. “There is a lot more freedom available where you pursue things or dream of things.”
It’s an attitude of, Why not? Let’s try, he says.
“What I did in the U.S. professionally is impossible to do in France. You could do it in France, but only if you had the right diplomas. In the U.S., I was not judged by my diploma. I was judged by my character, by my work ethics, by all these things that we should be judged on.”
These days, Philippe had rediscovered the joy of model making (with a nod to his childhood) and he’s tapping into more creative work, creating folk art. He works in a room that is a bit less than 10 square meters, with a tabletop as a workbench. He’s content.
“I’m very curious by nature,” he says.
For example, when making a model sailboat, he also made the sail.
“I pulled out a sewing machine and I sewed the sail because the process was a mystery to me,” he says. “I’m attracted to all those things that are new to me. I have a desire to surprise myself and discover other matter.”
He’s also being mindful about sharing what he’s learned over the years.
“That is also something that is more common in the U.S. than here,” he says. “Here, people retire and are finished. A lot is lost, really. The mentality is really different. In the U.S., when I was working in the museum, we had a lot of volunteers. They don’t want to just stop and do nothing. They come and share their stuff, they participate in life. I don’t know. It’s another way of looking at things. I’m not saying one way is better than the other, but for me, I was glad to be exposed to that way of looking at things because it made me bigger, bigger in looking at things and accepting things and opening up my mind. That’s what I like.”
Living life this way has required him to make some hard choices, he says.
“I’ve learned when you go down river, it’s always easier to go with the flow,” he says. “There’s always something you’re going to be able to catch on the side of the river to make a pause. When you try to go against the current, that’s where you’re drowning and you’re missing all the opportunities.
“You can fight all the time but life is going to take you where it’s going to take you. It’s up for you to go for it, to be quick to accept and change. And you are always part of it. That’s the beauty of it. No matter what happened, you are part of it – 50 percent is your choice. The rest is to accept that you have decided to do this or not. That’s the difficult part. But life is short. Life is to be lived. Life is to discover yourself.”
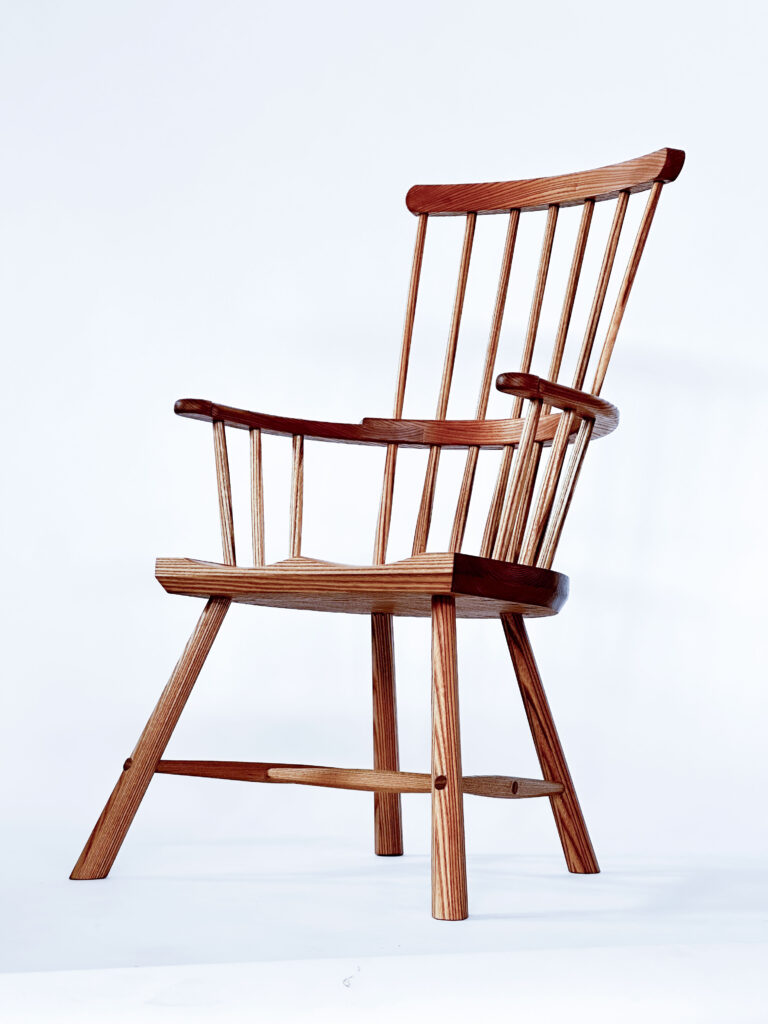
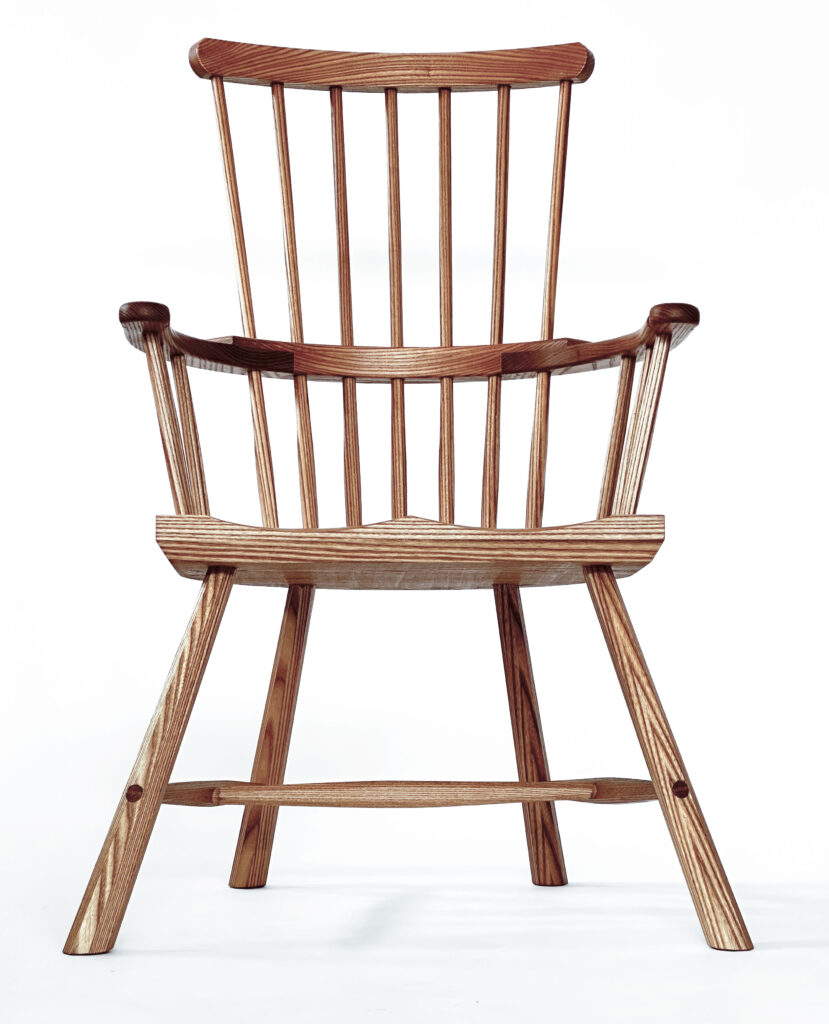
One of the gratifying things about teaching others to build stick chairs are the woodworkers who embrace the craft and grow to work at the same level (or even higher) than the teacher.
One of those woodworkers is Claire Butler, who lives outside Seattle, Wash. Claire has assisted me in teaching two chair classes during the last year and is now making stuff for sale while working a day job.
Earlier this year, Claire built this chair using some gorgeous red elm while assisting me with a class. The chair came out beautifully, it’s as good as my work. And so I offered to sell it on her behalf to help nudge her into the world of full-time furniture making.
Detail of the hand.
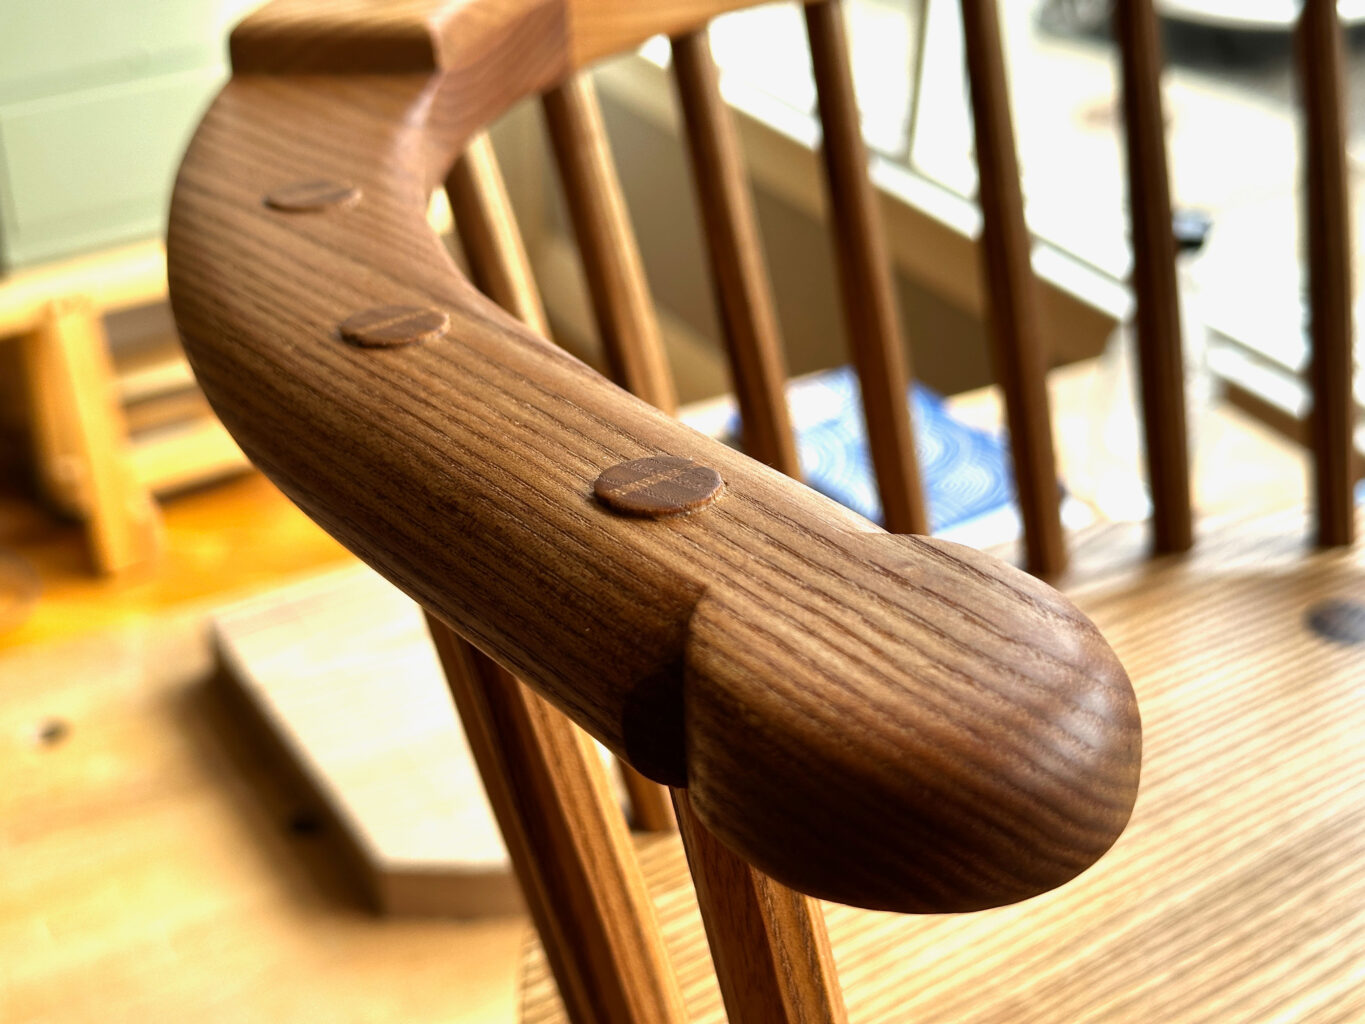
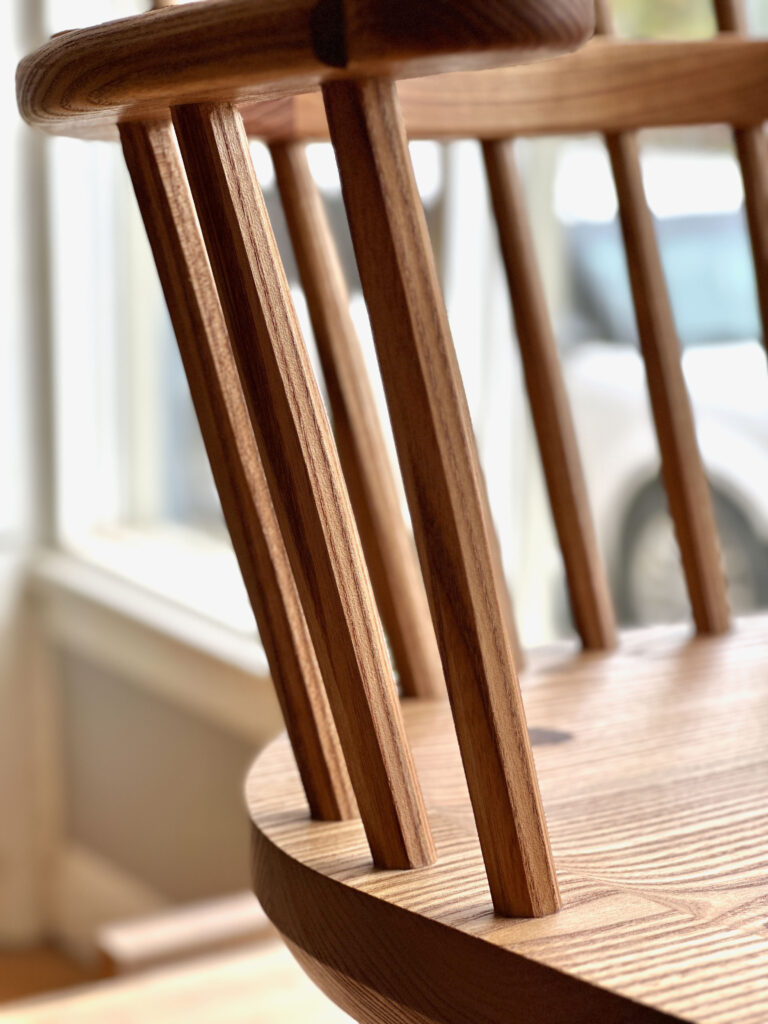
The chair is gently raked back 14° for lounging, reading or sitting by the fire. The chair features heavily shaped arms, tapered octagonal stretchers and slightly proud and burnished tenons throughout.
The chair is made from red elm with hickory wedges, a perfect combination for chairmaking. The wood is strong, lightweight and has a difficult interlocked grain that prevents the parts from splitting. The chair’s sticks are shaved and left octagonal. All the tenons are cut slightly proud and burnished. All the chair’s joints are assembled with animal glue, which is reversible, and wedged.
The seat is tilted 5.8°. The seat is 16-3/4” off the floor, making it comfortable for most sitters. The chair is 37-3/4” tall overall.
The chair is finished with a soft wax. It offers a low lustre and looks better the more you use the chair. The finish isn’t terribly durable, but it is easily repaired (just add more soft wax).
How to Buy the Chair
The chair is $1,300. That price includes shipping and crating to anywhere in the lower 48. If you wish to buy the chair, send an email to lapdrawing@lostartpress.com before 3 p.m. (Eastern) on Thursday, May 8. Please use the subject line: “Claire’s Chair.” In the email please include your:
U.S. shipping address
Daytime phone number (this is for the trucking quote only)
If you are the “winner,” the chair will be shipped to your door in a crate built by me and Kale. The price includes the crate and all shipping charges. Alternatively, the chair can be picked up at our storefront. (I’m sorry but the chair cannot be shipped outside the U.S.)
This is an excellent chance to buy a beautiful and comfortable chair made by an up-and-coming woodworker you are going to hear more from, I’m sure.
Chapter 1 contains information on resawing the plane blank into the two cheeks and the midsection. It also shows how to determine which would become the front, back, top, and bottom of the blank, and how to mark these parts out with a cabinetmaker’s triangle.
Following are the remaining techniques for making hand planes. Also included is a list of the tools needed for these procedures.
Tools and Supplies Needed • Six-inch combination square • Protractor • Pencil • Block plane • Practice stock: straight-grained hardwood, about 18 inches long, 3/4 inch thick, and 3 inches wide • Dowels (5/16 x 2 inches) • Brad-point drill bit (5/16 inch) • Drill press or power hand drill • Dovetail saw or razor saw • Chisel (1/2 inch) • Clamping cauls: two pieces of 3/4-inch particleboard or plywood about 12 inches long and 3 inches wide • Router with a 1/2-inch guide bushing and 3/8-inch bit
Optional Tools and Materials • Double sticky tape—thin type for carpet • Plug cutter (5/16 inch) • Sanding drum (3-inch diameter)
Preparing the Glue Surfaces The plane blank has been resawn into the two cheeks and the midsection, and the front, back, top, and bottom have been marked. The next step is to smooth and flatten the adjacent surfaces of the cheeks and the midsection that eventually will be glued back together. With experience, hand tools quickly do the job: a plane can be used to smooth the surfaces or a scraper can be used to remove defects like raised lines left by a chips in the planer knives. Avoid hand-sanding because the outer margins tend to get rounded, which only accentuates the glue lines. Another option is to leave the surfaces as they are off the machine; the glue lines may be apparent once the plane is assembled, but it should hold together securely.
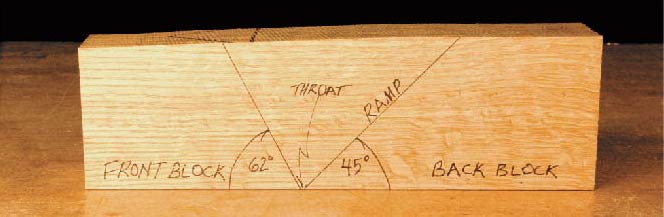
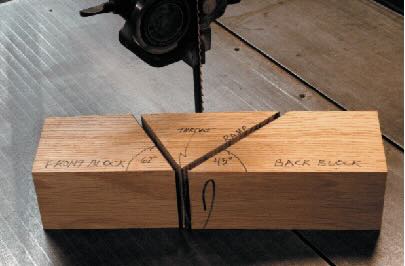
Laying Out and Sawing the Front and Back Blocks
Determine the position of the throat opening on the midsection and lay out the angles that when sawn will create the front and back blocks. A strong word of caution: The layout and cuts occur on the midsection; be sure to separate it from the cheeks before proceeding. The plane blank is ruined if the cheeks are sawn mistakenly.
The throat opening will be slightly more than halfway along the bottom of the mid-section, closer to the front end than the back. (If you feel stranded without precise measurements, a throat opening located five-ninths of the total length will do. To determine this, multiply the length of the blank times five, divide this number by nine, and measure that result from the back end of the blank.)The exact location is not critical, but why should the throat plate be in this area? One of the most demanding planing tasks is preparing boards for edge-joining. It requires precise control of the plane. The planing stroke begins at a stand still and ends with the plane in motion. With the throat opening forward of center, less of the sole of the plane is resting on the board when the blade begins its cut, but the plane is easy to control because it is motionless. Because of the throat opening placement, when the blade finishes its cut more of the sole will be in contact with the board, which helps you balance the plane while it is in motion.
4–2. A plane blank with front-and-back-block layout on the midsection.
From the point of the throat opening, lay out a 45-degree line angled back toward the rear of the plane. This defines the back block and the ramp that the plane iron will eventually rest upon. From the point of the throat opening, move forward about 1/16 inch and draw a line angling to the front of the plane at 62 degrees. The center block is now divided into three sections: the back block, the triangular center section, which becomes scrap, and the front block, forming both the front of the throat opening and the front portion of the plane (4–2).
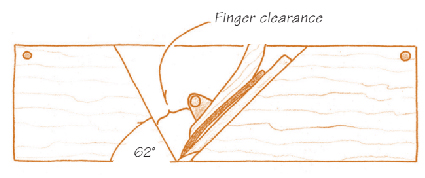
4–3. Finger clearance between the cross-pin and front block must be wide enough to conveniently extract jammed shavings.
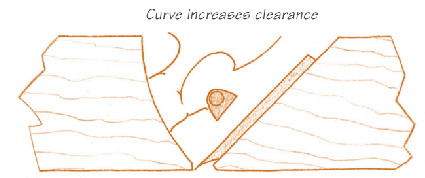
The front block is angled at 62 degrees for several reasons. It’s about the steepest slope that gives sufficient clearance for shavings to exit between the front block and the cross-pin while allowing enough space for most people’s fingers to remove an occasional jammed shaving (4–3). If it were much steeper, the space between the cross-pin and front block would be so tight that if shavings collected and jammed there, removal would be an irritating task requiring a pencil point or needle-nose pliers.
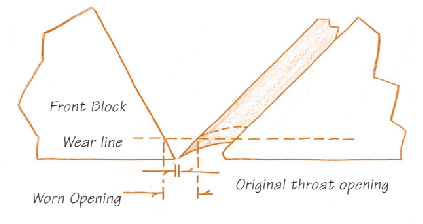
4–4. An enlarged view of the throat opening. It widens as the bottom wears. The steeper the angle at the tip of the front block, the slower the process.
The angle can be made lower, but that may interfere with the shaping of shorter planes. Also, as the bottom of the plane wears, the throat opening widens; the lower the angle of the front block, the faster the widening occurs. One of our goals and one of the advantages of making your own plane is that the plane can have a very narrow throat opening (4–4); it pays to maintain this narrow opening as long as possible. Alternatively, the front block can be cut with a curve, keeping the angle steep at the throat opening and sweeping away in the vicinity of the cross-pin (4–5). This is a good solution. Still, I prefer a straight cut for the first plane because you can practice truing that cut before advancing to the critical job of truing the ramp of the back block, using the same techniques.
4–5. The curved front block increases finger clearance between it and the cross-pin.
Prepare the band saw for making the cuts along the angled lines by precisely squaring the blade to the table. The band saw may not seem the natural choice for this task over the table saw, but in actuality neither machine will make the cuts accurately enough. Making these angled cuts on short, thick stock feels dangerous with a table saw, and requires some setup time. I prefer to use the more benign band saw, carefully making the cuts freehand, and cleaning up the sawn surface to perfection with a block plane. Saw to the waste side of the lines—within the triangular area. Make the 45-degree cut first and don’t be concerned if the saw kerf nicks a bit of the 62-degree line (4–6). Save the triangular scrap.
4–6. The sawn-out front and back blocks.
Now clean up the cuts to produce smooth, square, and straight surfaces on both the front and back blocks. Use the block plane to do this. In experienced hands the task is completed in one or two minutes for each block. A complete novice may require half an hour for the first block and five or ten minutes for the second. This is time very well spent, for in the process you will have touched on almost all the skills needed for just about every other type of planing task. It is a challenging way to start off—trial by fire, if you will—but persevere and there will be great rewards.
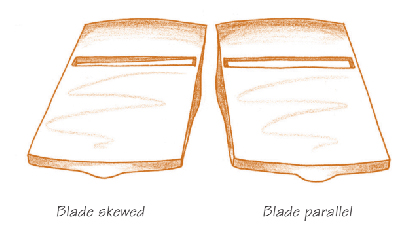
4–7. Bottom view of a block plane. Set the cutting edge precisely parallel to the bottom of the plane.
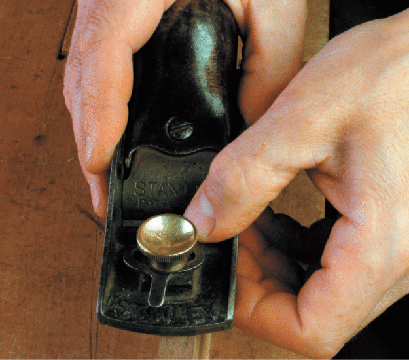
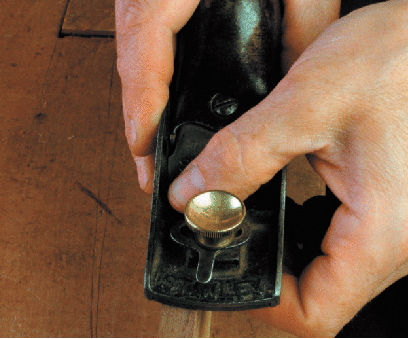
Cleaning Up the Cuts – Adjusting the Block Plane The block plane must be tuned up and effectively sharpened for the work to proceed smoothly (see Chapters 2 and 3). Set the blade for a very fine cut with the blade protruding evenly across its width. Back off the blade until it does not protrude through the bottom. View the cutting edge from the back of the plane with the plane turned upside down. As you slowly bring the blade forward, see if the cutting edge is skewed in relation to the bottom of the plane; it should appear parallel (4–7). To make adjustments, pivot the blade, bringing one corner up and the other down, using the plane’s lateral adjuster. For some inexpensive block planes that lack adjusting mechanisms, the blade is brought forward and adjusted laterally by gently tapping the back of it with a two- to three-ounce hammer, and it is backed up by tapping the back edge of the plane itself (see Making an Adjusting Hammer on pages 102 and 103). The plane must be properly tensioned for this to work well (see Chapter 2). You will probably find it more precise to adjust the plane with a hammer even if it has a mechanical lateral adjuster.
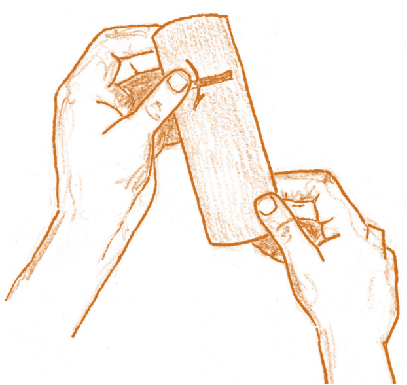
4–8. The thumb is used to feel for the protruding cutting edge.
When the blade is nearly protruding, let your sense of touch guide the adjustments. Gently caress both sides of the throat opening with the pad of the thumb while bringing the blade forward (4–8). Both corners of the blade should simultaneously become barely discernible. If not, make lateral adjustments until the same amount of slight drag is felt on the thumb at both corners. If the throat opening is very fine, you will be very close to the final setting. If the throat is wide, the blade will most likely need to come out a bit further yet. That is because the pad of the thumb dips into the larger opening and can feel the blade before it actually extends beyond the bottom of the plane.
Final Adjustments Begin a stroke on the practice stock. If the blade thunks against the wood and you feel yourself tensing to shove it through, stop: the blade is out too far. Though it is difficult to suppress the urge, there is no need to continue; the only likely result is damage to the planed surface, be it a serious dig or planing it out of true. Back the blade up and try again.
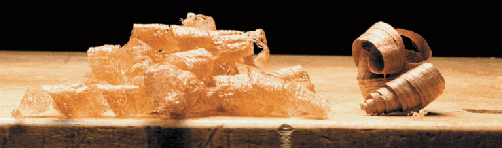
Ideally, the first stroke should either produce no shavings or take the smallest bit, requiring little if any effort to slide the plane across the wood. The shaving should be so thin that it falls apart and is almost dusty. This is because the jointed surface of the wood is not smooth, but slightly scalloped by the action of the jointer cutters; the blade hits the high points of each scallop and misses the low. Always adjust the depth of cut in this fashion, progressing from no shaving to a very thin shaving to the final setting. In this way, you will eliminate accidental digs and the frustrations of dealing with them.
To produce a shaving of equal thickness across its width requires setting the lateral adjustment of the blade exactly. The blade edge must be perfectly parallel to the bottom of the plane. This is crucial; if not done properly, it is very difficult to adequately true or polish a surface. When the blade takes a deeper bite from one side of a surface, either each subsequent pass dips it lower and lower or that corner of the blade may leave a prominent dig.
4–9. Planing with the left edge of the blade.
To check the lateral blade setting, take two shavings, first utilizing only the left side of the blade, and then only the right. The plane is held flat on the practice stock but offset to the left, and then the right, rather than planing right down the middle of the stock (4–9 and 4–10). Compare the thickness of the two shavings and be sensitive to the amount of resistance you feel; it takes more effort to produce a thicker shaving. You may find that one side takes a small bite and the other side produces nothing. Adjust the blade in the direction of the lesser cut and try again, until the resistance feels identical when planing with either corner of the blade. It may also be necessary to readjust the depth of cut.
4–10. Planing with the right edge of the blade.
The shavings are of the proper thickness when they lose their “woodiness” or stiffness; instead they feel fluffy and soft when bunched together, like a cotton ball (4–11). Practice your stroke (see below) until continuous shavings can be consistently made from one end of the practice stock to the other. If the board gets out of true from the initial efforts, true it with the jointer; otherwise, it’s difficult to produce a continuous, thin shaving.
4–11. “Cottony” shavings on the left; “woody” shavings on the right.
With only a little experience, peeking at the throat opening and stroking your thumb across it will reveal almost all that is needed to know to set the blade properly. Practice stock becomes unnecessary. It takes just a few minor adjustments as you begin planing to set the blade; this is done without a second thought and with no time lost.
Our new storefront is fully up and running these days – and one of the benefits of visiting us in Covington is the opportunity to shop our Seconds Shelf (which is the Boarded Bookcase from “The Anarchist‘s Design Book“).
On it go all of the books and tools that aren’t quite perfect – items we can’t sell at full price. Maybe we spilled coffee on the pages. Maybe a cover was put on upside down at the bindery, or a few pages got folded incorrectly at assembly. Or the post service damaged the book in shipping. Or we dinged a hammer head while seating the wedge. This is all good stuff – readable and usable…just a wee bit blemished.
As a result of this less-than-perfection, these books, tools and accouterments are priced well below their usual retail price…and you have to visit us to get them. We can’t ship them. We’d lose money if we did…and not only because of the packing and shipping cost, but the human cost in keeping on top of online listings and the like. There is usually no more than one or two of any given title/item, and it would be prohibitively person expensive/time consuming to deal with listing them online.
So I’m afraid you’ll have to come to 407 Madison Ave., Covington, Ky., 41011 to partake. Bonus: You get to see us, and hang out for a while in our beautiful river city!
Store hours are currently Monday-Wednesday-Friday from 10 a.m.-2 p.m.
– Fitz
p.s. About those store hours: I regularly receive emails with special requests to come in early/late or on an unscheduled day. I beg you to please stop sending those. While we might change the hours in the future, for now, these are the hours. In our other hours, we are writing/editing books, building something in the shop, making tools, spending time with friends and family, communing with our cats….