After more than a year of struggling to get our inventory under control, we did a little rearranging of things in our warehouse and figured out that we have enough open floor space to build our storefront, editorial offices and a new tool assembly area.
We were shocked that our plan worked.
For the last month, we have been building out the storefront and offices on the first and second floors. It’s going quickly because we had done a lot of prep work during the agonizing first phase of repair and restoration.
Our plan is to hold our Open Day on Nov. 23 at our current storefront at 837 Willard St. After that, we will move all our retail and editorial offices to the Anthe Building at 407 Madison Ave., about a half-mile away.
Here’s how that looks: We’ve finished building the walls in the storefront area at the Anthe Building, refinished the floor and have almost finished the interior painting.
When we move our retail operation there, we will have all our books displayed on the Monticello bookcase. We are building a tool chest that will be used to display our tools. Our apparel will be pinned to a big corkboard on the wall. And a Holtzapffel workbench will be in the center of the room for demos and trying out the tools.
The front of the storefront will be built out like a 19th-century store. We’re building a platform at window height that will fill the enormous window bay that faces Madison Avenue. On top of that platform we will have two large stair-step risers (4’ wide x 3’ tall) that will allow us to display our books, tools and apparel to passers-by. Between the two risers, we’ll have space to show off a project. The risers and platform are all mobile, so we can easily rearrange things for a holiday display (get your elf hat on, Megan).
We are still working out where to display the blemished books and tools. That will come after we get the other fixtures in.
Offices
On the second floor we are building our offices and tool-assembly area. The walls of the front third of the building have been scrubbed to remove the old dirt and grease. The fireproof drywall (at the county’s order) has been mudded, sanded and primed. We have a heat pump system installed on the second floor. We just need a little paint, a little electrical and some yellow-pine flooring installed over the original old flooring (which is too delicate for us to use, but we are preserving it).
What About Willard Street?
As most of you know, Lucy and I live above the shop at Willard Street, so this will reduce the hustle and bustle below for us. The first floor will remain exactly as it is now – except for the fact there will be no retail sales there.
The bench room will remain the same and be used for classes. The mechanical library will be intact. And the kitchen and biergarten will remain the same for students and our employees to enjoy.
The machine room won’t change at all. All the machines are mine personally, anyway. So there’s no plan to move those.
Megan, Kale and I will work at both locations, depending on the day. I’m sure we’ll find a rhythm eventually.
And Then…
There is still tons of stuff to do at Anthe. We need to restore the exterior and make storm windows for the third-floor windows. And eventually we will have a break room on the third floor (or maybe the second floor) for employees.
The curators (one is standing in the rear of the photo) were pleasantly bemused by us.
I love books, photos and drawings, but if you want to quickly learn a lot about making and designing chairs, there is one path: Study the suckers in person every chance you get. Up close and slowly.
Last week, Welsh chairmaker Chris Williams arranged for me and some friends to study four old stick chairs in the collection at the Carmarthenshire Museum. Only one of these chairs was currently on display, so it was a chance to see some chairs that aren’t in the public eye. In addition to Chris and me, we had Megan Fitzpatrick, Kale Vogt, Ryan Saunders plus Tim and Betsan Bowen of Tim Bowen Antiques. Lots of eyes, both fresh and old.
This entry is a close look at these four chairs, and some of what I learned from them. There’s no way this blog entry can replicate my in-person experience. But it’s cheaper than a trip to Wales. Note, I didn’t take measurements of these chairs, so don’t bother asking for them. For me, the proportions and angles are far more important than eighths of an inch.
The short sticks were the first thing we investigated.
Brown Comb-back
This is a massive and well-proportioned chair that has a low stance and some curious details.
Let’s start with the obvious: it has only two short sticks holding up the armbow. That’s a rare configuration for a comb-back, so we immediately took a closer look. The thick brown-yellow paint (one of several colors) didn’t show any evidence of missing short sticks. But turning the chair over showed us the truth.
Though the underside of the arm was painted, raking light from a flashlight showed evidence of at least two more sticks that were missing under each arm. This was a relief in some ways, as the single stick under the hand was tempting me to try something stupid in a future chair.
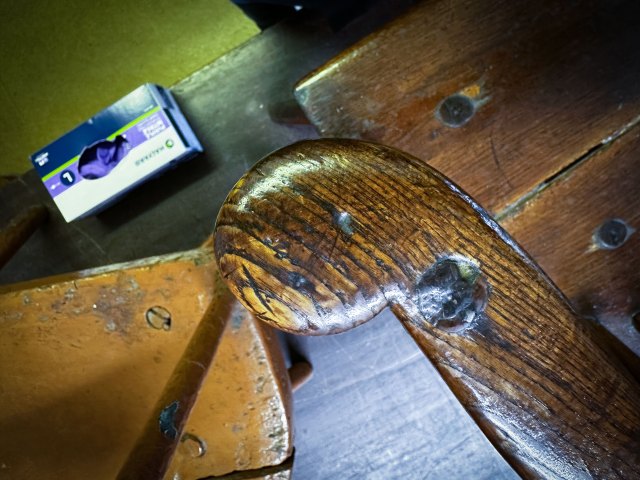
Here you can see how the seat and arm curve inward toward the front of the seat. Also, note the two different hand shapes.
Next, we looked at the seat. Despite what I’ve seen in the past, I’m always surprised by how thick the seats on these chairs can be. I’ve seen them as thick as 3”. This one is a full 2” thick, with a generous bevel on the front of the chair that lightens the visual load (the “vertically striped shirt” of the chair world).
The seat looked like a typical D-shaped seat until we took a look from the rear of the chair. The sections of a D-shaped seat that are usually straight weren’t straight. They curved in toward the front edge of the seat.
When we looked at the shape of the armbow, this made sense. The armbow also curved inward toward the front of the chair. Many Welsh chairs begin with an arm shape, with the seat shape flowing from that. Perhaps the arm was made from a curved branch. Perhaps not. The paint wasn’t telling.
Other interesting details: The hands of the arm were not identical. This happens more than you might think. I don’t think the builder intentionally made two separate hands. I suspect that the hand shapes were determined by the wood itself, its defects or voids.
Note the repair on the arm – a common feature on these chairs and nothing to be ashamed of.
The legs were shaved round – you could still feel the facets.
A straight-on shot of the comb (you’re welcome).
My favorite part of this chair is the playful comb. Its basic shape is common: two Mickey Mouse-like ears on the ends with a raised area between them. But the chair’s builder went further. The ends have a delightful cove on the underside. And the top of the comb has a nice convex curve. The whole thing looks like a crown.
Despite the bark on the front seat, this is a well-considered chair.
Lowback
This tidy lowback has some secrets, some of which we were able to suss out.
First, look at the front edge of the seat. Yup, that’s bark. Wide boards have always been difficult to come by, so they didn’t waste any width on this one.
Evidence of a replaced stick.
The front posts were curious. They looked more English or West Country to my eye. They were joined to the chair with square mortise-and-tenon joints, while the rest of the joints in the chair were cylindrical. A close look under the arm showed us the shadow of a round mortise behind the square front posts. Likely the front posts are a replacement.
Also curious: None of the tenons for the short sticks poke through the armbow. They’re all blind. This feature is isn’t unique to this chair. It got me thinking how the mortises were drilled when the chair was built.
All the mortises through the seat were through-mortises – not blind. I think there’s a chance that some of the mortises were drilled from below the seat and then directly into the arm. The sticks all seem to lean back the same amount. So, it’s possible. Who knows?
Nice shoe. Some would call this a “swan’s neck.“
Finally, take a look at the beautiful shoe. The detail on its ends – an ogee and fillet – are nicely proportioned. And the hands are also tidy. I think this chair was made by a skilled hand.
This piece deserves its own investigation.
Unusual Child’s Chair
The third chair is one I didn’t spend much time with because of its odd construction. You see this in chairs in Ireland and Scandinavia more than Wales. I kinda wonder if it’s an import. The turned legs and insanely thick seat added to its curious stance.
I forgot to ask the curators about the provenance on this chair. Perhaps that will give us some answers.
The charmer of the group (both the chair and Chris Williams).
The Best of the Bunch
The final chair in this group was my favorite (I wasn’t alone). All the details point to the fact it was made by a trained woodworker. The provenance of the chair supported this idea.
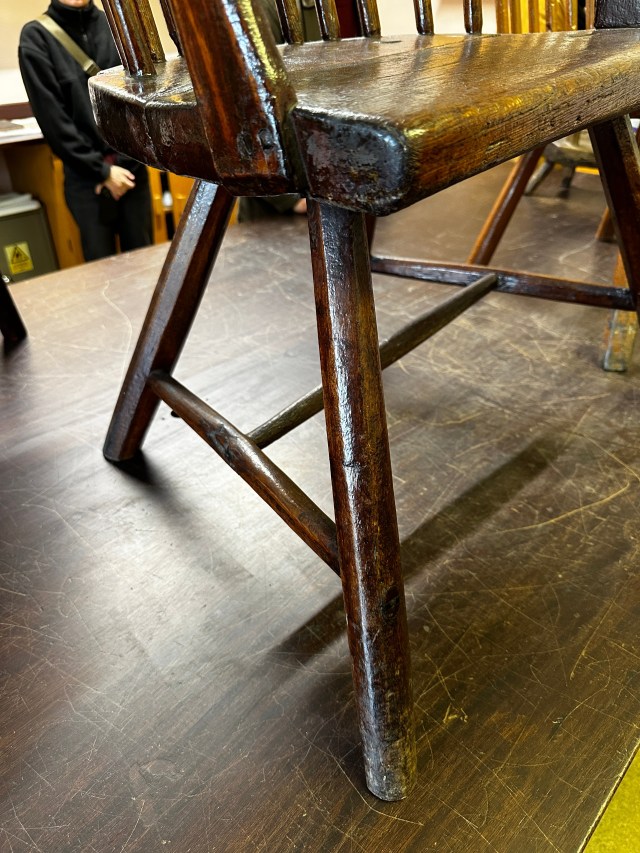
A clever and attractive stretcher arrangement.
First, take a look at the undercarriage. The side stretchers are tapered octagons. What is (somewhat) unusual is that they are ovals in cross-section. The stretchers are thicker than they are wide. It’s a trick that allows you to use a thicker tenon for the medial stretcher without adding bulk. I’ve seen this detail before, but not this well executed.
I’ll be stealing that idea.
The hands.
The hands on this chair aren’t identical, but they are close and crisply executed.
Compared to the other chairs in this group, the rake and splay of the legs is dramatic, adding to the overall dynamic stance of the chair. Also, take a look at the long sticks and the comb. The long sticks splay out perfectly. When paired with the undercarriage, the chair has an attractive hourglass shape.
Note how the arm is attached (and another shot of the undercarriage).
The most unusual aspect of the chair is its front posts. They’re tenoned into the arm but then lapped onto the seat and reinforced with screws. It’s another of the joiner-like touches on this chair that points to a trained maker.
This chair is the one the museum has on display for the public. I agree with their choice. This is a special chair.
This one has been a long time in coming. On May 31, 2020, I announced here that I was writing a book on Dutch tool chests. Today, November, 8, 2024, “Dutch Tool Chests” is finally in our warehouse and available for order. (Surprise! – the cover is blue.)
Inside the book, you’ll find in-depth instruction to help you build your own slant-lid chest, from soup (choosing the wood) to nuts (and bolts – which I suggest you use to attach the chest handles). There are plans and cutting lists for two different chest sizes, as well as for a rolling base that adds storage and convenience for moving it around the shop.
I love these chests – and have built more than a few! I find them to be great additions to the workshop and for hauling tools hither and yon when I drive somewhere to teach. (And, thanks to the fun of the “hidden” bottom compartment, these also make excellent toy chests for kids!) But more valuable in the long term (if I do say so myself) than the chest are the detailed lessons on some fundamentals of hand-tool woodworking: dados, rabbets, through-dovetails and more. My intent is that in building this chest, you’ll learn skills that will serve you well in all your hand-tool projects to come.
The chapter on through-dovetails, for example, includes just about everything I know about cutting (and teaching) this joint.
Plus, you’ll find a foreword from Roy Underhill, and a gallery of chests from 43 other makers (my favorite part of the book) that shows clever interior (and a few exterior!) modifications. Unique solutions that set them apart, and can be adapted for your own tool storage needs.
“Dutch Tool Chests” is 192 pages and is printed on 8-1/2” x 11” #70 matte-coated paper in Tennessee. The pages are folded into signatures, sewn, glued and reinforced with fiber-based tape to create a permanent binding. Enclosing the signatures are heavy (98-pt.) blue-fabric-covered boards. The cover and spine are adorned with a silver foil die stamp.
The book is $39 and comes with a free pdf if you order it from us by December 11. And all copies ordered direct from us will have my illegible scrawl of a signature in the front of the book. (We don’t know which of our retailers will carry it; I and my cats sure hope they all do! For complete information on that, click here.)
Note: Orders placed today (Friday, Nov. 8), will ship on Tuesday, Nov. 12 because of the holiday.
A bevy of brand-new DTCs (lids still to be attached) from a recent class in London.
Table of Contents:
Foreword 1
1. Let’s Go ‘Dutch’ 5 2. Materials 11 3. Parts Prep 23 4. Dovetails 29 5. Dados 49 6. Shelves 57 7. Top Angles 61 8. Assembly 65 9. Lock & Batten Notches 71 10. Bottom Lip 75 11. Front 79 12. Fall Front 83 13. Backboards 91 14. Lid 97 15. Hardware 111 16. Paint 121 17. Interior 127 18. Mobile Base 133 19. Gallery 139
Acknowledgments 185
– Fitz
p.s. Because someone always asks: Fully loaded with my tools for any given class, my white pine chest weighs less than 50 lbs. For now, I can still get it into the back of my car by myself (though it was easier for me four years ago when I first began writing “Dutch Tool Chests“).
Age-old elegance. A traditional dovetailed drawer that slides on wooden runners in a table made by Kent Perelman. The guides at each side are precisely in line with the opening and perpendicular to the table’s face. The runner itself is just wide enough to accommodate the thickness of the drawer side. The table is fitted with traditional wooden drawer stops that go immediately behind the face. The runners and side guides have been waxed to promote smooth movement.
For two decades, Nancy made a living by turning limitations into creative, lively and livable kitchens for her clients. This, her final how-to book, is an invitation to learn from both her completed kitchen designs (plus kitchens from a few others) and from the way she worked.
Unlike most kitchen design books, “Kitchen Think” is a woodworker’s guide to designing and furnishing the kitchen, from a down-to-the-studs renovation to refacing existing cabinets. And Nancy shows you how it can be done without spending a fortune or adding significantly to your local landfill.
In this excerpt Nancy gives options for mounting drawers – handy when facing a kitchen renovation or for any casework where a drawer is included.
The inside view of the drawer mount shown above.
1. Wooden Slides
Traditionally, drawers have slid on wooden runners: strips of wood tenoned into horizontal rails at the face of a cabinet. In casework where a drawer will not be guided by the cabinet’s sides – for example, when the cabinet has a face frame that protrudes into the drawer opening – the runners are fitted with guides to keep the drawers from sliding left or right and binding as they’re closed.
Wooden runners have several qualities to recommend them:
• They work wonderfully when drawers are well-fitted. When it comes to fine furniture, they’re the gold standard, not least because it takes finesse to make a drawer fit snugly while not so tightly that it’s a challenge to open and close.
• Their only cost is your labor.
• The drawer front is the finished face.
• They let your drawer sides and joinery shine without intrusion by metal hardware.
At the same time, wooden drawer slides are less than ideal in some respects:
• They don’t allow for full extension. Once you pull the drawer out to a certain point, it will sag and can fall out of its opening.
• A well-fitted drawer can stick in humid weather where humidity fluctuates significantly.
For decades, cabinetmakers have had access to mechanical slides, the features of which have improved steadily. Today there’s a variety of options offered by manufacturers such as Blum, Accuride, Salice, Knape & Vogt and more. I cover just a couple here.
Mechanical slides have a few advantages over traditional wooden runners, even if they lack the cachet that comes with a piston-fit drawer. They’re quiet, smooth-running and allow you to pull a drawer out fully without danger of it tipping its contents all over the floor, or worse, falling out and being damaged.
An earlier generation of full-extension hardware. A drawer in a simple set of kitchen cabinets fitted with Accuride side-mounted ball bearing slides. This kitchen uses Accuride model 3832. One part of the slide is screwed to the interior of the cabinet; the other, visible here, to the drawer. The slides telescope to allow for full extension, which makes a drawer’s contents completely accessible.
2. Side-mounted Ball Bearing Slides
Side-mount ball bearing slides, such as those made by Accuride, are affordable, dependable and hardwearing. They come with a huge variety of optional features, among them a detent (helpful in cases where you want to use whatever is on the pull-out surface, such as a keyboard, without the drawer or tray closing when you touch it); extra-heavy load capacity; specialty slides for file drawers, lateral files, and so forth. Other advantages include:
• They’re extremely easy to install in casework. You can put them almost anywhere you want, mounting the support to the cabinet side or using mounting plates to attach the hardware to the cabinet’s front and back.
• They only impose one constraint on the dimensions of your drawer – the width of the drawer must be at or just a hair under the precise width between the slides once they’ve been installed. Beyond this, you can use these slides on drawers that are deeper (from front to back) or shallower than the slides, depending on your application.
• It doesn’t matter how your drawer bottom fits into the drawer, i.e. whether it’s flush at the bottom surface, fitted in slips, or slid into grooves in the drawer front and sides.
• While this flexibility may not sound so impressive in principle, it can be a life-saver in rare circumstances where you need the combination of affordable price, full extension and flexibility in drawer construction that such hardware allows.
These slides allow the drawer to be removed simply by disengaging a lever. To replace the drawer, slide it carefully into position – if you don’t align the parts perfectly, you can damage the slides – then push until you hear a “click.” Now pull the drawer out and close it fully to check the fit.
Before you install set screws, the slides are adjustable up and down in addition to forward and backward, thanks to slots on both parts – the part that goes on the drawer and the part that goes in the cabinet. Some models also have screwdriver-adjustable cams.
As for drawbacks, side-mounted ball bearing slides are not completely silent; there’s a metal-on-metal sound when the arms of the slides are closing or opening, but it’s minor. These slides also take up some width. This space varies somewhat, depending on the model; most require 1/2″ on each side. As a result, in most applications, you need to cover the front of the drawer with an applied face. This face can be inset, as shown here, half overlay or full overlay.
When choosing these or other mechanical slides, read the specs and installation instructions to make sure the slides are compatible with your design.
My least favorite feature of these slides is their visibility. Although they come in different finishes (many lines are available in white, black and stainless, in addition to zinc), they do detract from the pristine beauty of a nicely finished drawer side – at least, when the drawer is open. When the drawer is closed, the slides are invisible.
The bee’s knees – with exceptions. A drawer on Blum Tandem undermount slides, which are invisible other than a little lever just behind the drawer face (not visible in this photo). While Blum Tandem drawer slides work well in many applications, there are times when ball-bearing (or other) slides are the best choice for the job.
3. Self-closing Undermount Slides
Since about the turn of the millennium, cabinetmakers have had access to a type of slide that combines full extension and smooth, silent operation with almost complete invisibility. The Blum Tandem is the most widely known version, but as soon as other manufacturers saw how popular the new design was with cabinet manufacturers and their customers, they began devising their own variations on the theme.
Not only are these slides silent, smooth-running, full extension and invisible, when fitted with the right locking devices (available from the same suppliers as the slides themselves), they offer a new dimension in adjustability over previous kinds of drawer slide hardware. You can move the drawer face up or down, forward or backward, tilt it to make it flush with the face frame and move it from side to side – a boon when you’re dealing with inset drawer faces in particular. These features come with some strict requirements:
• There are precise dimensional requirements: Drawers must be just the right width and depth (front to back) to fit specific slides. These and other specifications are laid out in a handy instruction guide published by hardware manufacturers.
• There needs to be a 1/2″ recess beneath the drawer bottom so that the sides and front will conceal the runners.
• You need to drill a couple of holes at the back of the drawer for the tilt mechanism.
• Because the position of the slide hardware is fixed in relation to the drawer sides (it has to go below the drawer bottom), you need to be more precise in positioning the hardware inside the cabinet than you do with sidemounted ball bearing hardware. You must also leave more clearance in height than with side-mounted hardware, which can eat up space, depending on other elements of a cabinet’s design.
As with the side-mounted slides, there will be a bit of space on either side of the drawer with undermount hardware. This space works out to about 5/16″ on each side. An applied drawer face hides the gaps.
Future armbows and combs for stick chairs in a corner of John Porritt’s shop. (Photo by Sue Porritt.)
by Brian Crawley
John Porritt recently gave a stick chair talk in Austerlitz, New York (click here to read about it). With so many of his chairs gathered in one place, I was able to take some quick photos of John’s different approaches to armbows. The joints are all based on those he has seen in traditional Welsh pieces. I’ve added a few more comments, too, on how he fashions sticks, legs, tenons, seats etc., intended less as prescription than permission to explore. Given that so many Welsh chairmakers look to have figured things out for themselves, there are an endless variety of solutions to be found, both within the tradition and outside it.
In the woods nearby, John looks out for near 90° bends he can use for armbows, and gentler bends for combs. His friends know by now to keep a lookout for him, too. If a bent branch is big enough, John can get bookmatched grain on the arms by sawing the limbs in two. But whether sawn from one limb or two, the armbow pieces need to be joined together in the middle somehow.
The two antique chairs John brought with him to the talk display two different common solutions. One has a long scarf, which stretches about 5″ across four of the chair’s six long sticks. The scarf is pegged at the center, I presume before the holes for the sticks were drilled, to help keep the assembly together. (The joint is not glued.)
The other, shorter of the two chairs uses a small square-edged half-lap, and a doubler above. There is no visible peg in the doubler, but there is a cut nail by the left side of the moulding. Maybe this is a later fix, as there is not one in the parallel position on the right. But there are several large builder’s cut nails underneath, one of which goes through the half-lap; of course the sticks going through reinforce the assembly too.
John suspects this chair may have been a lobster pot style, where the outer two sticks on each side bend inward toward a small comb. The doubler helps hold against the extra tension introduced by the bent sticks. John felt the more extreme bend of the outermost sticks of a lobster pot chair might be steamed, where the gentler bends beside it might not.
Two antique armbows, one a long scarf, the other a half-lap.
John’s chair with birch burl armbow uses the same scarf joint as the antique, pegged through the center (and glued). It strikes me that such a joint might be the first solution a self-taught woodworker might come up with, after the first time a butt joint fails on them. Though a simple joint, the two long slopes, angles matched with hand tools, are likely trickier to get right than a beginning craftsperson might imagine.
Six-stick black birch armbow, pegged scarf. (Photos by David Douyard.)
Sometimes John uses a doubler to bridge a long scarf joint. It might be called for if the grain in the arm’s bend is getting short, and will break over time, without support. Or it might be more a design choice, prompted by a visual need. John likes to consider how to bolster the confidence a sitter has in the look of a chair. (I have a light Texas ladderback chair, with a seat of woven twine. People always ask if I’m sure it will support them before they take a seat. They have no such insecurities with John’s chairs!)
Six-stick red chair, pegged scarf, doubler.
And as seen in the second antique chair, John sometimes uses a half-lap in his armbows. His joint is a bit more elaborate. The half-laps have angled outer edges, and central wedged and tapered keys to lock it together. After it is hammered home it is pegged from above once or twice, the number of pegs dependent on how deep the armbow.
Two chairs with half-laps, wedged and pegged.
It looks almost like a large timber-frame joint, and is in fact patterned after one John saw in a ridge board in a house in Wales. Another variation is a longer half-lap that extends across four sticks, not two.
A chair with a longer half-lap, wedged and pegged.
Two of the chairs John had in Austerlitz feature three-piece armbows with more elaborate timber-beam-style joinery. In both cases these joints span the middle of the armbow. The grain of these arms is too short to have stood the test of time without the extra support. The central piece has a dovetail in its bottom half; in the upper, there are angled edges at the sides, with pinned and tapered wedges at either side of the central two sticks. Tim Bailey, an antiques dealer in Nassau, New York, showed John how local German cabinetmakers from the Mohawk Valley wedged their dovetails. He admired their use of “belts and braces” (Brit-speak for suspenders!).
Eight stick chair, three-piece armbow, dovetailed, wedged, and pegged.
John’s current chair of soft maple and ash has a central insert cut from a piece of wood twice as thick as the arms. A dovetailed section abuts the arm, and a longer section above with a long-grained glue surface. I thought the upper half was a fourth piece to the armbow, but that’s a trick of the grain. It has two big locust pegs, wedged top and bottom, wide of the five sticks, down through the central piece into the arms, inspired by those German cabinetmakers. (“Belts, braces, and concrete abutments,” quipped John.) 1
Five stick chair, three-piece armbow, dovetailed, pegged and wedged.
John uses a limited tool set to make his chairs. The first stage of removing waste from a comb or an armbow is done with a band saw, one of his few powered tools. He keeps more wood than he thinks he’ll need, until late in the process. After the band saw, he uses a drawknife, not with a shavehorse, but with a big, old Record vise he uses while standing. We took turns working on the leg shown below, winded ourselves, then broke for tea.
John working on a leg with his drawknife. Note the bandsaw behind him.
John favors a Siegley or Hahn jack plane (prior to the c. 1901 acquisition by Stanley, when they still looked distinct from a Bailey plane). The iron is thicker than a Stanley, so it doesn’t flex in use. There is no chipbreaker; the lever cap, set back from the cutting edge, secures the iron. The single blade “just works better for green wood … rather than have …shavings getting jammed in there,” says John. It is also a pound lighter than a Stanley No 5.
With a very sharp blade, John uses it to shape the legs, sticks and their tenons. Next he uses one or more of several shaves. The largest of these is a Stanley cast iron shave with a cutter he has reground to work as a scraper. With diamond sharpeners, he makes two flats that meet at just under 90°. The scraper removes any tear-out left by the jack. It cuts at the arris, not with a burr. The mouth is quite open.
The block plane, a Stanley No. 60-1/2 set up as a scraper plane, further refines those surfaces. He does not round off all the flats and ridges, but leaves them for textural interest. John likes the surface to look worked, but not careless.
John’s tools. Note the surface of the finished sticks in the green box behind the bench.
A second, more recent power tool, is what John calls a planer, which I call a jointer; it’s a Craftsman pedestal model from the ’50s. (I think a Yank’s “planer” is a Brit’s “thicknesser.”) John needs to fix the Craftsman tool up, but the idea is to save some of the wear and tear on his wrists. He has a lathe, too, but rarely uses it for chairs. He did do a chair with a front turned short stick, like one of the antique chairs pictured above. John was little worried he’d managed to turn the front stick into a cricket bail; maybe there’s a design memory, akin to muscle memory?
The front sticks were turned on a lathe. Howzat!
John likes to leave the ends of tenons on his short sticks and legs a little proud – the same with pegs. Given wood movement, a perfectly flattened tenon won’t be flush with the chair’s seat or arm for long, so why fuss over it?2 John thinks the tenon’s extra height, and the mushrooming effect on its edge, gives a wedge a little extra to hold onto. He shaves them from the perimeter of the tenon toward the center, with a spokeshave set fine, or a chisel. He then burnishes them with a deer antler.
The short stick, leg and peg tenons are proud by a bit more than 1/16″, a bit less than 1/8″, which done by eye, not measured. John has kept some of the wane in this armbow.
The tenons on the underside of the seat protrude a bit further, maybe 3/16th” and are also done by eye. John likes to leave the ridges or “dawks,” made by a round moulding plane set up like a scrub plane.
To saddle a seat, John uses a scorp and adze. One chair has an unsaddled seat – common in the tradition. Most of John’s, though, are lightly saddled. He used the adze more in the past than now. “I’m actually ruining my hands, with too much handwork … though I don’t ever want a machine to dictate what I do,” he says. He uses a handsaw to trim tenons down, and a sliding bevel to set angles. (You can see more of his kit in a photo essay of John’s shop Megan Fitzpatrick did for Fine Woodworking.)
Though most of his chair seats are from one piece of wood, when John joins two, he uses pegged loose tenons. I’ve done a similar joint in a cricket table top, in a Derek Jones class. There, we cut the mortises as deep and wide as a Domino 500 could manage, made our own tenons, and drawbored them to close the joint as tightly as possible. John does the same process – minus the Domino.
A seat made from two pieces often has pegged loose tenons.
John’s stretcher configurations are as various as the armbows. Some have none; others have stretchers on the side, back to front; still others have a medial stretcher as well, resulting in an H-shape. Several chairs have seats of white elm, which, with its interlocking grain, it is very difficult to split. “If that’s dry, and the legs are dry, and they’re driven in, and they’re wedged” it doesn’t need stretchers, says John. With a seat of ash or oak, though (eminently splittable), stretchers “just give more confidence,” to the maker and the sitter, he says
Sometimes, not usually, John leaves the tenons of the long sticks proud of the comb. (Photo by David Douyard.).
For reference, John recommends the website and Instagram of Tim Bowen Antiques. Tim and his wife, Betsan, wrote about some of the pieces that passed through their hands in The Welsh Stick Chair.3Harvard & Harvard Antiques is another website John tracks. I found a couple of nice lobster pot chairs pictured there on a recent visit. 1stDibs, an conglomerate site of different antique dealers’ wares, often has a few good stick chairs among its offerings.
John sometimes shares a wry lament about the length of time it takes him to build a chair, but at this point in his life he’s unwilling to rush it. He does a variety of other work to make ends meet. He fixes plane totes, saw handles, infills and the like, for major antique tool dealers in the U.S. and private clients. He works on other, larger antique pieces as well. Passing through his workshop I’ve seen an original Holtzapffel lathe, with many missing pieces he had to fabricate, and a harp made in a medieval style. It had a key piece of wood the soundboard was anchored to; its grain was tearing apart under pressure of the strings, so John had figure out how to rebuild and reorient the piece, without modernizing the design. Both pieces are back in use now.
A few years back, Martin Donnelly posted a picture to a Facebook saw group that caused quite a stir. A very rare 17th-century saw was restored by John and his friend Tom Curran. After together working out how the missing piece might look, John added the wood to complete the missing section, and wood to fill old fastener holes. Tom carved the added piece in a style sympathetic to the original, and John colored the new to match the old. One of Tom’s specialties had been making beautifully worked flintlock rifles, from whence his carving skills derived.
A saw handle restored by Tom Curran and John Porritt (Photo by Martin Donnelly).
John did a simpler repair to a J. Nicholls saw of mine (Nicholls was one of the mid-19th-century Philadelphia saw makers Henry Disston eventually bought out). Simpler but not simple – the large chip missing from the lower ogee curve had sprung the alignment back to front. I watched John do the repair, with minimal intrusion on the old surface, and the color matching he’s perfected over his years of working on antiques.
I’d found out John is interested in teaching, but not in travel. So I asked if we could work for a couple of days one fall. I brought two stools I’d made, and we worked on finishing them; I brought some old saws in as well, and he worked on the Nicholls while I tried fixing an old Groves saw handle.
My J. Nicholls saw handle, restored by John Porritt.
There’s a sense of adventure, and play to John’s work that struck me in watching him. Once a wood repair is in place, he’ll add a stain, maybe burn it off, add another color, wipe it off, rub in some roofer’s cement, scrub it off. It’s a back-and-forth process that mimics the dings and furrows of outrageous aging. Hours are involved, but fun, too, in working toward beautifully imperfect patinated surfaces, which I think because they remind of our own temporality, and our connection to those who came before us, and those who will follow after.
Brian Crawley is a woodworker, screenwriter and award-winning playwright.
To see more of John Porritt’s work in aging a surface, check out his book, “The Belligerent Finisher” (Lost Art Press).
Near to John’s home is a place called Germantown, clearly named for those who settled there. I remember driving north on the Taconic Parkway years before I met John, joking with my daughter on the madcap tour of Europe we were on, given the place names on the exit signs: Athens, Nassau, Ghent, Rotterdam, Guilderland, Troy. Some of these were doubtless settled by corresponding Europeans. But Austerlitz was named by the eighth U.S. President, Martin van Buren, to piss off a political rival who had named a town Waterloo. (At Austerlitz, Napoleon won his battle. Which we in the States would be more likely to know if Abba had recorded a follow-up to “Waterloo.” As they still could. I think they’re all still with us. “Austerlitz! Could be the next of our megahits, whoa whoa whoa whoa, Austerlitz! Martin van Buren says it’s the tits.” ↩︎
I took a class with Mike Pekovich once, and by a similar line of thinking, Mike prefers his dovetail pins proud. If a pin will only stay perfectly flat for one season, he makes a design feature of the height difference.) ↩︎
Editor’s note: Lost Art Press is currently out of stock; we hope to have it available again soon. ↩︎