This is an excerpt from “Euclid’s Door” by Geo. R Walker and Jim Toplin. The book teaches how to make the tools from “By Hand and Eye.” At this point in chapter 7, a miter square that has a 15° tip is being constructed. This fragile corner of the tool has to be taken into consideration when choosing its placement on the grain of the board.
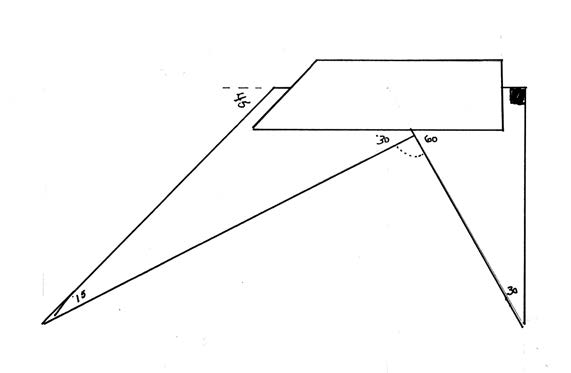
Fig. 7.13 The triangle on the left with its thin 15° tip poses a unique layout challenge
Many geometric layouts begin with just a given line. This has real practical value. It means we can construct the layout from just a small piece of the overall picture. This construction is a little more complicated than what we’ve done so far, so I suggest you work through this sequence on paper to get an understanding of it.
Fig. 7.14 The blade we eventually end up with has a clipped corner so we can have a 45° reference edge.
Case in point is this second triangle from our multi square, Fig. 7.13. The sharp blade that juts out to the left begins life as a 30:60:90 triangle that gets altered to include a 45° reference on one end, Fig. 7.14.
But that leaves us with a fragile, narrow point. We must lay out our triangle so that the hypotenuse is aligned with the long grain on our blank, Fig. 7.15.
Fig. 7.15 This layout is a challenge because our right angle is located up in the middle of the blade material. The only line we can know for certain is our hypotenuse located on the bottom edge.
So we need to lay out our triangle, but all we have to start our construction is the line that will be our hypotenuse. Before we proceed, let’s step back and take a look at a different geometric layout to get an understanding of how we get there. Here’s the construction we’ll base this on, Fig. 7.16.
Fig. 7.16 We’re going to use a few bits and pieces from this construction to reach our destination.
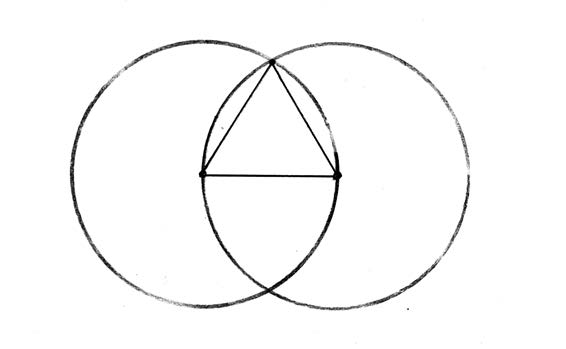
Let’s break it down into smaller pieces. We begin with Euclid’s first proposition, which is how to construct an equilateral triangle from a given line. Start by using the ends of a line to set the compass span and, using the end of the line as anchor points, draw two identical overlapping circles. Connect the top intersection where the circles overlap. Take note that the lines that connect the intersections also happen to share the radius of both circles. You just created a triangle with all sides equal which means all three corners are 60°, Fig. 7.17.
Fig. 7.17 The internal angles of all triangles always add up to 180°, so if our sides are equal, each corner must be 60°.
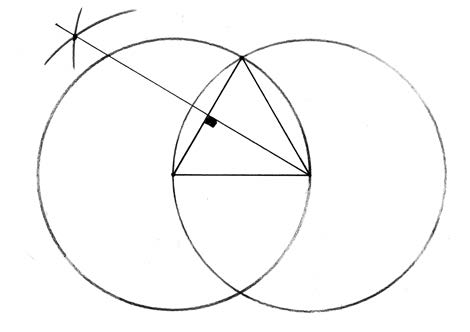
If you bisect this triangle, you get a pair of back-to-back 30:60:90 triangles, Fig. 7.18. It helps to see what you are after by superimposing this construction over our blade stock to see how it might apply, Fig. 7.19.
Fig. 7.18 (left) Note the hypotenuses of these two new triangles are facing out. Fig. 7.19 (right) In practice though, we don’t execute the entire construction, just a piece of it. It’s not really practical to draw this entire layout because much of it is out in space beyond our blade blank.
This is quite common in layouts at the bench. We don’t need to scribe every line, just the important ones that get us our result. Let the bottom edge of your blank be the hypotenuse of our triangle. Set a compass to span the length of your hypotenuse and strike an upward arc from the lower edge. Leave the compass at the same setting and anchor it where the arc touches the bottom of the board then strike a second mark across the arc, Fig. 7.20.
Fig. 7.20 The first arc is a portion of one of those overlapping circles. That’s all we need to execute our layout. The second mark defines the second side of the equilateral triangle.
Strike a line connecting these points then bisect this chord on one end of the triangle. Now you’ve created our 30:60:90 with the correct grain orientation, Fig. 7.21.
Fig. 7.21 Go back and compare this with our first layout. Does it come together for you?
We’ll use this construction to create our second blade with the proper grain orientation.
Steve lines up the stick (taped to the drill) with the mortise location on the side stretcher.
I cut dovetails pretty much the exact same way I did 20 years ago. Same layout, same sawing, same chiseling, same fitting. But when it comes to my chairmaking, things seem to change every day.
I’ve been building stick chairs since 2003 (and frame chairs since 1997). So it’s not like I am new to the chairmaking craft. But for some reason, I am constantly finding new and usually small ways to make things easier.
When I wrote “The Stick Chair Book,” I thought I was pretty much settled in how I make my chairs. But by the time we had to reorder the second printing, I decided to revise the book. Not in major ways, but in many little minor ways. And I added a lot of little shortcuts I had discovered.
Now, about a year after releasing the revised edition of “The Stick Chair Book,” I’d like to revise it again for the next printing. Again, nothing major, just small things here and there that make it easier to drill and assemble things.
Even today, I came up with a stupid little trick that really helped. Here it is. When drilling the mortises for the stretchers, tape a stick or skewer or chopstick to the centerline seam of your drill. It helps immeasurably in lining up the drill between the mortises in the legs and between the mortises in the side stretchers.
I’ve seen lots of tricks that use rubber bands or lasers. But none is as simple as taping a scrap to the drill.
When the scrap is aligned with both mortises, Steve drills the mortise in the side stretcher.
As a chairmaker and author, I know I’m not alone in the way I feel about my past writings. Many other chairmakers are constantly finding new ways to make the process a little easier.
Why have we not created the “Unified Method of All Chairmaking?” Because there are at least 100 ways to make a chair. And 1,000 tricks that go with each method.
This is one of the things I love about woodworking – the constant discovery. But it can be frustrating both as an author and a reader.
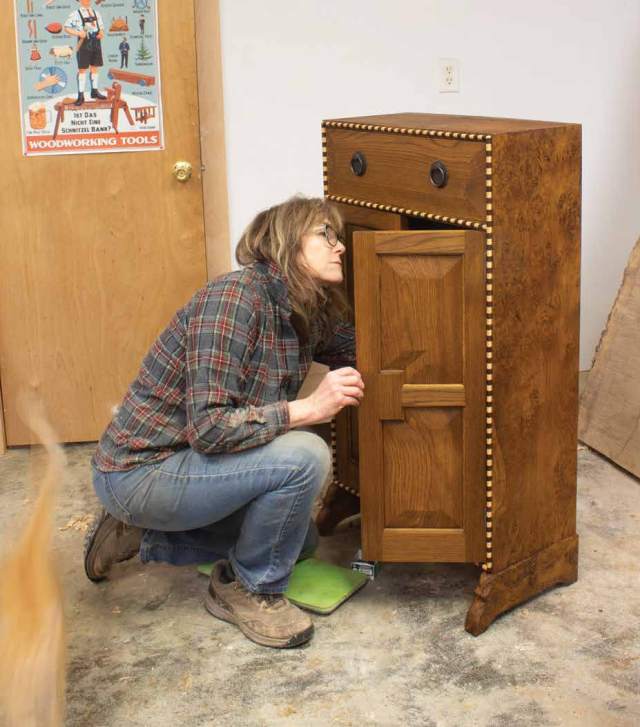
The cabinet I made in pippy (also known as burly) white oak with shop-made walnut-and-maple beading and hardware in walnut, based on Gimson’s original 1919 design for a sideboard for Guy de Gruchy in “Ernest Gimson: Arts & Crafts Designer and Architect.”
Nancy Hiller’s “Shop Tails,” a companion book of essays to “Making Things Work.” “Shop Tails” is different from “Making Things Work” in that it is structured around the animals that came in and out of Nancy’s life, with each chapter focusing on a different one (or several different ones). The animal tales are sandwiched between some serious existential and biographical content provoked by her diagnosis of pancreatic cancer, and all of it is interwoven with true stories about non-human animals, in addition to reflections on how much they taught her about life, love, illness, expectations, parenting, and death.
I continued to run up against the crucial big-picture question that so many books and articles told me I had to answer: What was I living for? What gave me joy? I still had no satisfactory response. Looking back over my life while fitting doors and discussing next steps with my oncologist from the top of a ladder as I painted cubbies for sheet music and CDs, I realized that I had rarely been motivated by a vision or a dream. I could recall few well-defined goals or desires. Sure, I had a basic three-fold vision: Do good work, make a home, have a happy partnership. But this was just an outline that would take a lot of filling-in. Why was I so vague about what I wanted?
In part, I realized, it was because I was raised not to want, but to be grateful for what already was. I worked at being happy, whatever situation I faced, and went from one situation to another without any real plan. When my mother told 8-year-old me that wanting things would make me unhappy, she was probably not referring to the important stuff, but to the latest toys we saw advertised on TV. But you can’t really predict what a kid will do with the Buddha’s First and Second Noble Truths, which, in a nutshell, see all life as suffering, and suffering as a product of selfish desire. I don’t recall any discussion about the need to envision my future, let alone plan my studies around my need to earn a living. Sometimes I was happy. Sometimes I was miserable. But eventually something would change and things got better. Only in my 30s, when I was reading Socrates, Plato and Aristotle in graduate school, did it dawn on me that desire can be among the most powerful motivations for good; what matters are the nature of that desire and its goal.
In place of motivation by well-founded desire, I had spent my life in search of validation that I didn’t get at home. Growing up, it seemed my sister and I were constantly being urged to be other than we were: Hold in your stomach, don’t slouch, don’t whine, get off your backside and do your chores – much of it the typical, benign work of training Baby Boomers for adulthood. The critical messages far outweighed any expressions of approbation.
My sense of never doing or being enough was only worsened by the father figures introduced to our household in the aftermath of our parents’ split. When I was 14, our mother’s boyfriend, George, told me I had a naturally down-turned mouth and should make an effort to smile, lest my face put others off. He said I was getting fat (I wasn’t) and should go on a diet, so I ran with that and developed an eating disorder. He told me I knew nothing – true, relatively speaking, but how does angrily hurling “You know nothing!” at a teenager really help matters? (Answer: It doesn’t. There are more precise and effective ways to make the point about youthful over-confidence versus lack of life experience.) His general demeanor was that of a smug, entitled guy who had put his degree from Oxford to profitable use by getting a job in law or finance in London and resented the intrusion of his girlfriend’s teenage daughters on what would otherwise have been his uninterrupted “me time.” I recognized his bitterness as evidence of his own unhappiness, but his words had lasting effects.
So when this arrogant man who arrived at our doorstep a few times a week, only to be ushered into a comfortable chair and handed a drink to enjoy while he read the evening paper, promised me 5 pounds for every A I got in my O-Level exams, I happily stuck it to him. I’d already experienced the satisfaction of earning good grades in middle school and realized I had the power to view my teachers less as unreasonably demanding authority figures than as partners in my education; I would do my best for them, as well as myself, not least because at the slightest imposition of real discipline, most of my fellow students complained. It had to be tough, being a teacher.
I lived by my As and A-pluses, my 10s-out-of-10. With every one, I felt better about myself and hoped that my teachers felt better about themselves, too. I worked hard to get into the University of Cambridge, only to discover, once accepted, that I had no idea why I was really there, even though I loved the day-to-day life of a scholar. What mattered most to me, I’m embarrassed to say, is that I got in – and with an honorary scholarship. No one could ever again call me lame-brained, even though my stepfather would do his best to prove my intellectual inferiority to his own sophistication in argument and repeatedly called me “useless” to my face. The same went for university after I returned to the States. I was determined to graduate Phi Beta Kappa, as my mother had. And I did. But again, in grad school, I was struck by the realization that I really had no idea why I was there, beyond my awareness that I enjoyed learning, having my mind lit on fire by new perspectives, and proving my ability to excel. In the end I did not want the life of a professional academic. And the most oft-cited alternatives for those with a doctorate in ethics, which I had planned to pursue, were nothing I wanted, either; I had no interest in being an ethics advisor to some big corporation, a job that too often means circumventing profit-diminishing foundational moral stances through arguments on behalf of ethical exceptions. What I wanted, for 50 years, was to prove that people were wrong about me, to exceed their low expectations. When people mentally translated my work as a furniture maker to “She makes ‘furniture’ out of pallets or fruit crates and decorates her work with cut-outs of ducks and bunnies – you know, because that’s what women like,” I would show them my take on an Edwardian hallstand with a perfectly fitted door and drawer and a cornice of compound bevels. Anyone who assumed that, as a tradesperson, I would be less intellectually curious and articulate than someone who works in an office (any kind of office would do; this is a matter of longstanding prejudice against “manual” and “blue-collar” workers) would have to square that assumption with a growing body of published essays and books in which I brought my academic training in Classical languages, history and ethics to bear on the social and economic significance of commonplace things such as kitchen furnishings. I did my best to illustrate the ways in which a house, typically thought of as “property,” could fulfill many of the roles we usually associate with a human partner. In response to the critics who might deride my ways of putting cabinets together, I would point out that there really are as many ways to build a cabinet as there are cabinetmakers, not to mention that the cabinets I build, however simple their construction, are far stronger than most that are commercially made.
No ducks and bunnies. Edwardian Hallstand, circa 2002. Curly white oak with locally quarried limestone counters. (Photo: Spectrum Creative Group.)
Throughout all of this, I now saw, I had moved forward in reaction to others. I was dangerously dependent on outside forces, people who expressed their opposition, no less than their approval. It suddenly felt deeply exhausting. I let my awareness of that exhaustion sink in. Whatever might happen with the course of my cancer, I was not going back to my old ways of living.
To be fair, those other-influenced decisions always reflected something of me – a love of houses, gardens and animals; an intellectual fascination with the endless ways in which people make meaning out of the seemingly random circumstances into which we are born; a desire to make myself a home. But viewing the span of my working life as a whole, I was staggered by a deep, yet vague sense that I had always been running away. What was I running away from – the person I was not, but was too often taken to be?
A friend recently took a furniture design course taught by a guy I’ll call Mr. Famous Furniture Maker. During the class there were lectures, field trips to find inspiration, drawing lessons, scale model-making and critiques.
“Well,” I asked my friend, “how was the class?”
“Great,” he replied. “Now I know how to design furniture that looks exactly like Mr. Famous Furniture Maker’s pieces.”
This is, of course, one way to learn design. But not everyone wants to become a Junior Sam Maloof or James Krenov the VIII. Some woodworkers just want to make a side table, dry sink or tater bin that is well-proportioned and pleasing to look at.
One excellent path to learn design has been blazed by Jim Tolpin and George Walker, who have written a series of books that teach design using artisan geometry and whole-number ratios. During the last 11 years, we’ve edited all of Tolpin and Walker’s books for Lost Art Press and deeply appreciate that their approach is style-agnostic and crystal-clear.
This book, “Principles of Design,” is an excellent and complementary approach to Tolpin and Walker. It was first published in 1916 under the title “Industrial Arts Design” and written by William H. Varnum (1878-1946). We renamed it “Principles of Design,” which is a far more apt title.
Varnum, a professor at the University of Wisconsin, was the author of two important design books, plus some other works on setting up a curriculum for shop teachers.
I own copies of all his works, but this one is my favorite. The book was written to teach shop teachers how to teach furniture design. And the book reads like the syllabus for an excellent college-level course in the fundamentals of furniture design.
Varnum lays out a series of step-by-step rules to guide the reader through the process of designing furniture, pottery and metalwork. It begins with function and form, of course. But it then delves into common-sense rules for dividing up a form both horizontally and vertically. These rules work. And once you read them and see the accompanying illustrations, I think you’ll say: “Of course.”
Varnum explains how to “enrich” the shape or contours of a design. Then how to enrich the surfaces. And there is an excellent section on using color.
Many of these rules have been embedded in buildings and furniture for centuries. Many of us know the rules innately. But Varnum puts them to paper in ways that allow us to use them to create new works.
“Principles of Design” was written during the waning years of the American Arts & Crafts movement, so the examples used in the book are gorgeous Craftsman designs and earlier traditional forms. Varnum’s rules apply to all furniture forms, but the austerity of the Arts & Crafts pieces in the book help make the use of his rules easy to comprehend and digest.
Bright paper plus stochastic printing make this book a pleasure to read.
Mechanical Specifications
The original printing of this book was gorgeous, so we sought to equal or exceed its specifications. The book is 7″ x 9-5/8″ and printed on #80 matte coated paper, which is a close match to the original. Because some of the details in the photos are dark, we chose a press that could do stochastic printing, which gives sharper detail. The book’s signatures are sewn together, backed with fiber tape and wrapped with heavy boards. The covers are wrapped in cotton cloth and printed in gold foil.
Like all our books, “Principles of Design” is printed in the United States. It is $41 plus shipping. We will offer this book to all our retailers worldwide, but it is up to them to carry it or not.
Note: We have printed only 3,000 copies of this historical text. Because space at our warehouse is at a premium, we do not plan on any future press runs of “Principles of Design.”
By the end of this week (assuming no more disasters), we should have a clutch of our new Exeter-pattern Furniture-maker’s Hammers for sale, as well as – finally! – “Principles of Design” (we thought we’d have it in June, but we’ve been bedeviled by cover problems at the bindery).
“Principles of Design” is our title for a reprint of “Industrial Arts Design” by William H. Varnum. It was first published in 1916 to help train industrial arts instructors to teach design. The book deals with furniture, ceramics and metalwork. All three crafts are regulated by the same rules laid out by Varnum in absolutely crystal-clear detail.
If you’ve been building or studying furniture for a while, there are some of these rules you know by instinct but not by conscious thought. By laying out his simple principles, Varnum makes the basic design process rational and not regulated by the dark arts of inspiration or creativity.
In many ways, Varnum’s rules prepare you for creative leaps. Here, he says, are the rules established by hundreds of years of furniture making. You can work within this comfortable envelope, or you can deliberately step outside his guidelines.
His approach is compatible with George Walker and Jim Tolpin’s writings on design. In fact, many of their ideas from “By Hand & Eye” (such as whole-number ratios) integrate easily with Varnum.
So keep an eye out for those two new offerings later this week.
And keep an eye out in early November (barring printer delays) for my book, “Dutch Tool Chests.” It will be available directly from us (yes, we will have signed copies), and we hope from our retail partners (as always, it is up to them whether or not to carry a book). In the meantime, here’s a taste of what’s inside, excerpted from Chapter 5: Dados. Below is my favorite way to cut them, though I offer other options in the book, including some that – GASP! – use electricity.
– Fitz
Saw With a Fence My preferred way to cut a dado is with a crosscut saw, followed by a chisel and a router plane to clean things up. With just a little experience, it’s easy to nibble your way back on the layout line with a crosscut saw to cut a shallow kerf. Once the kerf spans the board, you can use that kerf to guide the tool as you saw more aggressively down to the baseline.
If this is your first dado, or if you’re not yet comfortable sawing to a line, you can use a fence to help guide you. (Again, one of the skids can come in handy for this purpose – or any other piece with a straight edge that is no longer than the width of the side; otherwise, your saw handle might run into it.)
Clamp the fence down along your layout line (clamping the workpiece down simultaneously), with the waste to the inside. And here is why I like a 0.5mm pencil: if you use a fat pencil, the range of where across the line’s width to clamp is too great. A 0.5mm pencil is the perfect size for covering about half the line, leaving just enough of it to show along the edge of the fence. (If you can’t see the line, how do you know you’re sawing the line?) Make sure to arrange the clamps or holdfasts so that they aren’t in the path of your saw. Or your knuckles.
Here, I’m sawing the first side of the dado with a fence and block to guide the saw, and to help keep the cut perpendicular to the side. The goal is to cut a square dado.
Now grab your crosscut saw (backsaw or handsaw – it doesn’t matter much when you have a fence) and push the plate against the fence with a flat-sided block of wood held in your off-hand. If the block of wood is long enough, you can simply hold it in place to help keep the plate at 90° to the workpiece as you saw. With a shorter piece, it helps to move the block in tandem with the sawplate. Saw down to your baseline – and check to make sure you’ve hit it on the far side, too. Then lift the saw at a slight angle and make a few short cuts to deepen the center of the kerf. It’s possible you’re sawing below the baseline there … but more likely you’re removing waste in the middle that you missed. Either way, you’re making the waste easier to remove.
Here are the marks after I’ve removed the shelf.
Do not move the fence. I repeat: Do NOT move the fence.
Grab your shelf board and match up the marriage marks on the shelf to the mark on the side piece. (Both should be on the front edge and facing up.)
Press the shelf to the fence – on the waste side of course – and pencil a mark at the front and back edge. If the board is rocking at all, press it tight at one edge and make the mark, then rock it to press tight at the other edge and make a mark.
If the board rocks against the fence, or touches only at the edges, that’s OK. By marking only at the edges, you’re laying out the second dado wall for a tight fit.
Now you can remove the fence.
To cut the second dado wall, you’ll need to approach the work from the other side to keep your hands in the right place for ease of sawing. So if you can’t access your bench from both sides, turn the workpiece 180° before clamping the fence in place to the lines. As before, cover as much as possible of the lines, leaving just a hairsbreadth showing in the waste.
Set up, and ready to saw the second dado wall. Note that the waste is to the inside of the fence.
Double-check that the waste is to the inside of the fence, and that your clamps or holdfasts are far enough to the side so as not to impede your sawing. Now triple check. All good? OK – saw as before.
If you’re making a two-bay chest, go ahead and saw the walls of the second dado the same way. If you used the method above, I’ll bet after two cuts you’re already sick of that fence. And if you’ve made four cuts (for two dados), you’re definitely sick of that fence.
Saw Faster (No Fence) Now, you might be worried about messing things up without the training wheels of a fence – but if you’ve cut a dado or two, trust me: You’re ready to just saw. And (most) mistakes can be fixed.
Start with just the end of the saw – no more than an inch or two – on your layout line and take small bites as you work back along the line, blowing away the dust as you go so that you can see the line. Continue to gently nibble and blow for good results.
Raise the toe of the saw and use it to nibble along your layout line. Once you’ve cut a kerf all along the line (at which point the line should have disappeared), put the full plate in the shallow kerf and use the kerf to guide the tool as you cut to the baseline.
Once you’ve cut a shallow kerf across the entire board, drop the sawplate into the kerf and use it to guide the tool as you saw more aggressively down to the baseline. Do your best to keep the saw perpendicular to the work.
Once you become comfortable with that method, you can go faster still by starting the cut the same way as above, but lowering the saw into the kerf and taking longer and longer strokes to deepen the cut all the way across, using your first, nibbled kerf to guide you. (You’ll reach the baseline more quickly at the far side, so adjust your stroke as required to reach full depth all the way across.)
Note that sawing without a fence – and doing it aggressively – is easier with a backsaw because the back, or spine, help to keep the cut straight. But most backsaws have smaller teeth than a handsaw (a saw without a spine), so if you’re feeling both brave and in a hurry, grab a crosscut handsaw.
Now let’s say you started sawing without the training wheels. How, then, to mark the second wall of the dado? You could measure and mark, but that’s more likely to introduce error than simply holding the shelf in place on the waste side of the kerf, and marking at each edge of the board. Align the shelf so it just covers the full width of the kerf (you’ll be able to see it on the edge). Align it at the other side to make the mark there (just in case the shelf is not dead flat). Then use a pencil against a combination square to connect those lines.
For a tight fit on the dado, cover the full kerf with the shelf as you mark at each edge to locate the second wall.
Saw again – this time cheating just a hair toward the waste on the inside of your line. This will likely result in a dado that is too tight – but there’s a fast an easy “fix” that all but guarantees a nice, tight dado. I almost always shoot for too tight.
With all the kerfs cut on one side, you can show it to the other side and use a marking knife in the kerf to transfer the location to the interior of the second side (check those marriage marks!). If you marked the layout on both at the same time, check that your cuts on the first side match up to the lines on the second side. If not, erase the layout lines, transfer the new location and re-mark.
Here, I’m carefully aligning the two side pieces for a two-bay chest to ensure that my layout lines are in the right place on the second side. Note that I’m aligning the dovetail baselines, not the bottoms of the sides. Theoretically, the baselines and bottoms will both align perfectly. In reality, they might not. The shelf should be level after assembly – and aligning the baselines helps to ensure it is.
I prefer to put the two front edges together as I do the above, simply because that means the marriage marks are touching, and it’s easy to tell you have things facing the right way (at least, until you butt the boards together and can no longer see the marks).
Now saw the dado walls on the second side, same as before (or, if you used a fence on the first side, try it without now!).
Bash Out the Waste With the walls cut, we’re ready to remove the waste between them, down the baseline.
Grab the widest chisel you have that will fit between the dado walls. (A 3/4″ chisel is in theory the perfect size; in reality, you might need a narrower chisel. Especially if you cheated the cut toward the waste maybe a little too much.)
I don’t know if this is a 3/4″ or 5/8″ chisel, and I do not care, I just know it fits nicely between my dado walls.
Hold the chisel flat to the work (bevel up), about halfway or a little farther down into the waste, and knock out as much as you can across the width. Repeat, this time just above the baseline. (You might be able to get it all out in one go, depending on the wood species, dado depth and your tolerance for fear.)
First, work bevel up. And note how the workpiece is jammed against a secure board, which pushes the workpiece to the edge for easy access and moving. This allows you to do this work more quickly than clamping the workpiece.
Flip the piece and work in from the other edge. You might be able to reach the middle with your chisel bevel up for all the work. But if you can’t, flip the chisel bevel down to remove the remaining waste in the middle. Bevel down is faster, but the tool wants to dive in more deeply in that orientation, so stay alert.
If there’s a hump in the middle you can’t reach, work bevel down to remove it.
Get close to the baseline with the chisel. Or, finish the dado with chisel cuts if you like, taking small bites at full depth for a clean dado floor. But it’s easier to get a nice, smooth bottom by using a router plane. Use the baseline to set the router plane blade to the final dado depth. Make sure there are no chips under the plane’s sole, then simply zip out the remaining waste, working in from both sides so you don’t blowout as you exit the cut (blowout is never pretty).
A router plane is fun to use – and it cuts a nice smooth bottom in the dado.
Why not use the router plane to remove all the waste, lowering the blade with each pass? You can, but that’s a lot slower, and you miss out on mallet fun. Also, the router plane blade is more fussy to sharpen than a chisel – so I’d rather my chisel take the brunt of the waste removal.