Kale Vogt grew up just south of Covington, in Burlington, Kentucky, in a close-knit family – mom, dad and an older brother, T.J. A self-proclaimed “art kid,” Kale was athletic, playing soccer through high school, and loved to spend time outdoors. Kale’s mom is a special needs bus aide for elementary students, and Kale’s dad served in the military for 25 years, worked in HVAC for a while, and helped inspire Kale’s creativity.
“When I was young, he was really into woodworking,” Kale says. “I grew up surrounded by it but I was so conditioned to it I didn’t take much interest in it, honestly. Now that I’m older, it’s ironic to me that I’ve circled back to that. It’s something I obviously deeply appreciate now.”
This circle includes a loved childhood, a stint in art school, boondocking out West, working in a bakery then landing at Lost Art Press. Here’s Kale’s story.
99 Days Out West
After graduating high school, Kale worked food and retail gigs while trying to figure out how to pursue a career that allowed for creativity. Eventually, Kale took some gen-ed classes at a local community college, then studied studio arts at Northern Kentucky University while living in an apartment, solo for the first time, serving tables to pay for college.
“I got to the point where it began to seem silly to graduate with a major in studio arts,” Kale says. “I thought, ‘I don’t know what I want to do, why I am putting myself through this if I don’t know my focus.’”
Around this time Kale saw photos online of a hike in Zion National Park.
“I was completely blown away,” Kale says. “Having never been west of Chicago, I was like, ‘Wow. There’s a whole world out there.’”
Kale says they became obsessed (a word not used lightly) with the idea of traveling out West and spent the next 10 months planning, researching and saving up money – $8,000 for the entire trip. They took the passenger seat out of their 2010 Honda Fit and put in a cot. And then, in the summer of 2017, Kale started in the Southwest and did a big balloon loop, up through California and the Pacific Northwest, back down to Colorado.
One of Kale’s favorite trips: backpacking through the Sierras.
“It turned out to be, in total, 99 days where I was living alone, on the road, at 22,” Kale says. “I really put my parents through it,” they add, laughing. “There were daily texts to my mom. For the plenty of times I was out of service I would give her a heads up. Overall, hands down, one of the most influential trips I’ve ever taken. I truly don’t know where I’d be if I didn’t take that trip.”
Every day Kale hiked. They hiked Antelope Canyon in Arizona and got a permit to climb Half Dome in Yosemite – a 17-mile day chasing a loved feeling of being so small. They took a sunrise plane ride over the Cascades.
“I was really just living, you know?” Kale says. “Every day was a new hike, and every day was a brand-new experience. It was so memorable for me, all of my senses felt heightened. Everything was new to me.”
Kale boondocked and got a jetboil, living on soup, chili and oatmeal. Once home and having developed a deep passion for public lands, Kale immediately started applying for jobs with the National Park Service.
Four National Parks
Kale applied for more than 30 jobs before getting a call from Kings Canyon National Park in California. They loved the outdoors and had three months experience traveling – that’s it. At the end of the interview the interviewer asked Kale if they had anything to add.
“I basically just bared my soul to the person, begging her,” Kale says. “I was 23 at this point, and I said something along the lines of, ‘I know I may not have on paper a lot of experience but I have a lot of passion. I really think I’d be a great addition…’.”
A week later Kale received an email with a job offer.
Kale’s first year in the National Park Service, Kings Canyon, 2018.
For the next three-and-a-half years, Kale worked at four national parks. As a visitor-use assistant, they started out driving a camp truck from campground to campground in Kings Canyon, reporting visitor usage, ensuring folks were following the rules and performing general safety checks. From there Kale spent the winter at Arches National Park in Southern Utah, watching snow fall on red rocks.
“I love desert; it’s my happy place,” Kale says.
Next up was Glacier National Park.
“Turns out, Montana is very cold,” Kale says, laughing. “And so, from Montana I went back down to Zion, which was a full-circle moment for me. Zion is what inspired me to go out West and it ended up being my last job in the Park service.”
It was 2020, the start of Covid, and everyone wanted to get outside – Zion got hundreds of thousands more visitors that year than the year prior.
“It kind of just did me in,” Kale says. “It was a lot.”
By this point, Kale hadn’t lived longer than five months in any one place for three-and-a-half years and knew that a lifelong career working for the National Parks wasn’t what they wanted. Covid helped Kale realize they needed to get in touch with their roots again.
“Those relationships are hard to keep up when you’re on the road and moving,” Kale says. “So I came back to my family here in Northern Kentucky.”
Home
The first year back turned out to be really tough. Transitioning from an active lifestyle where they had complete control of what came next while living in some of the most beautiful places in the world to a period in their life where they didn’t know what the future held was difficult.
“I was feeling kind of lost,” Kale says. “I tried out this new thing that I was so passionate and sure of at first then it turned out to not be for me. It was scary. I didn’t know where to go from there.”
Kale lived with their parents for three months to get back on their feet and then found an apartment in Covington.
“I wasn’t sure what route I wanted to take,” Kale says. “Coming back I knew I was ready to focus on a creative career. Though I didn’t know what that would look like yet. It had always been my dream growing up and going to college – I wanted to do something creative, but I could never land on a focus.”
Kale worked at REI for a year.
“It’s what was comfortable, but I knew it wasn’t the goal,” Kale says. “I felt I’d done this – I’ve taken this route before to no avail.”
While visiting a local farmer’s market, Kale talked to some folks at North South Baking Co. and asked if they were hiring. They were.
“Honestly, I’m not much of a home baker at all,” Kale says. “I just really appreciate pastries.”
Kale brought drawings that could be translated to stickers or other merch to the interview. This, they thought, could be a path to a more creative career. But with few employees there was little time for extra creative pursuits. Kale did whatever was needed – retail, deliveries and working farmers’ markets. North South Baking Co. had a lot of regulars. Christopher Schwarz was one of them.
Building a Chair & the Start of Something New
“Full transparency, I didn’t know what Lost Art Press was,” Kale says. “I was looking for a restaurant on Google maps for lunch and ‘press’ was in the name. When I Google mapped ‘press,’ Lost Art Press came up.”
Kale pulled up LAP’s website and thought it looked interesting.
“I immediately see Chris and think, Wait a minute. This guy is a regular here. I see him all the time!”
Soon after this discovery, Chris came back into the bakery.
“I told him about how I came across his website and how amazing I think his work is,” Kale says. “I asked him about himself and figured, surely, he’s gone to college for industrial design and he’s like, ‘No, I actually just have hippie parents who were homesteaders and that’s how I learned woodworking.’ By the end of our convo he says, ‘Why don’t you come by sometime? We give out scholarships to local people if you’re interested. We could chat about that if you like.’ Which of course I say, ‘I’d love that.’”
The next day Megan Fitzpatrick came into the bakery and handed Kale her card and a copy of “The Stick Chair Book.”
“I was blown away,” Kale says. “I just talked to Chris and am now discovering this world, it was an exciting time. I was so thankful.”
A few weeks later Kale met with Chris and Megan for about a half hour after work one day, and Chris offered a scholarship to build a chair. It was mid-November and the bakery was busy with pre-holiday orders. With more time the first week of December Kale reached back out – they wanted to build a chair.
“Chris took me up to the lumberyard for our first day,” Kale says. “We picked out the wood, and he taught me how to read the grain, which I found super interesting. I was documenting all of it. I have so many pictures on my phone of this process because I figured, surely, this is a once-in-a-lifetime thing.”
Kale gluing up their first chair. Photo by Chris Schwarz
Kale began working on the chair at LAP several days a week. After working an eight-hour shift at the bakery, Kale at first found the additional two to three hours of chairmaking exhausting. But then, it became something they not only look forward to, but found energizing.
“It really lit me up,” Kale says. “This was a whole new world I was trying my best to absorb in real-time.”
It took Kale about a month and a half to build their first five-stick chair.
“It’s really unfortunate how unhappy I am with my first chair,” Kale says. “Looking back, it’s difficult knowing what I know now. I literally knew nothing going in. I had no idea what stick chairs were. I was trying to take in the history of stick chairs on top of designing one for the first time. I didn’t have a vision going in. So now, of course, I can only think of all the things I’d do differently. I’m sure that some time from now it’ll be a story to laugh about then be proud of my progress, but I’m just not there yet.”
Kale was about halfway through building the chair when Chris asked if they’d sit down with him and Megan to chat. Kale was nervous.
“He brought me back to his office and he had a book in his hands that he said was a really profound book for him.”
“He shared with me that it’s always been his dream to work with an apprentice and if I was interested, he had this idea about us both journaling from our perspectives during this process. I said, ‘Absolutely.’ It was so serendipitous. I go from working in a bakery and now there’s a possibility I get to learn from this master?”
By the time Kale finished the chair Chris had brought up the idea of a part-time position, working with him. By this point Kale had been looking for another job – they needed a full-time job. So Chris came up with a plan: They would work full-time at LAP, splitting their hours between working on editorial duties and helping with fulfilling orders.
“I think all of it was unexpected for the both of us,” Kale says. “I think we’re navigating it together.”
Kale’s been journaling, as Chris asked.
“Now that I’m working here, everything once again is a new experience,” Kale says. “I have so many thoughts about it all, so journaling has been helpful for processing.”
They are also studying the work of others.
“I’m learning about different styles and techniques,” Kale says. “It can feel a little overwhelming at times. I don’t yet feel ready to create my own designs. So as of now, to make myself feel less overwhelmed, I’m learning from the masters. I’m learning from Chris’s designs. I’ve been looking at Chris Williams’s work and of course John Brown, all the people I know Chris looks up to and has been inspired by. I’m taking note of the masters, taking what resonates and leaving the rest.”
These days Kale’s also been working on a research project for a workbench video, editing videos for the blog, and woodworking, which is considered part of the job (and really fun, they say, because it doesn’t feel like work). Megan is teaching Kale how to cut dovetails, and they’re finishing up a tool chest. Kale is also working on a second chair.
When not at LAP Kale loves spending time in nature.
“It’s my daydreaming time,” Kale says. Kale’s partner, Jordan, has two dogs and they like to take them out to explore several parks a week. Drawing will always be a hobby and lately, Kale’s been drawing a lot of chairs.
Portrait practice by Kale.
“I am wildly happy,” Kale says. “It’s been hard to articulate because I’m fighting the part of my brain that says this is too good to be true. I’m still in this headspace where I feel the need to prove to Chris that he made the right decision. I have a fair amount of imposter syndrome coming into this field, for good reason. Especially working with Chris and Megan, I mean, what teachers. I couldn’t ask for better role models. I’m allowing myself to be a student again and I’m just so wildly grateful to have been granted this opportunity.”
The following post is from our friend Mattias Hallin, who has been using linseed oil paint for a lot longer than have we – his approach is different than ours. (For starters, he’s willing to put in a significant amount of time whereas I, a pushy American, haven’t his patience! And OK…I can’t leave things to dry for as long as necessary in our shop for his approach. But his lovely results are undeniable.)
As regular readers of this blog’s ‘comments’ section may already know, I am a great fan and proponent of linseed oil paint as a furniture finish. (I also adore it as a house paint, both exterior and interior, and as a paint in general, but those applications are well beyond both the scope of this blog post and my personal practical experience.)
I won’t come as a surprise, then, that I have followed Chris’s and Megan’s work with and writing on these paints with great interest, not least as I have gone about painting with them myself in slightly different ways. This blog post follows from discussions I have had with Chris and Megan about those differences, and is a presentation of two particular techniques – glaze and three-coat paint respectively – that I have experimented with and used successfully (at least in the sense of to my own full satisfaction) on projects.
For those who don’t know me, I should perhaps add that I’m Swedish, but live in Belgium; hence the trans-oceanic qualifier to the title.
The Paints & Other Materials
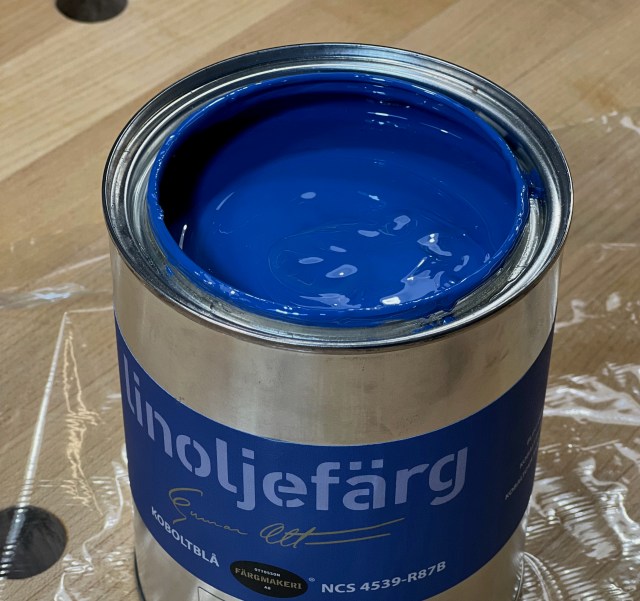
A range of Ottosson linseed oil products. From left to right: raw linseed oil, boiled linseed oil and glaze oil; sun-oxidized linseed oil (small bottle, half-hidden); a selection of linseed oil paints in cans of different size plus two tubes of artists’ oil paints; a small tin of balsamic turpentine; a tube of “Rubinol” linseed oil putty; linseed oil soap, liquid and solid; and linseed oil wax. By the way, the benchtop is finished with two coats of Ottosson boiled linseed oil.
To date, I have only ever worked with linseed oils, linseed oil paints and related products from the small company Ottosson Färgmakeri AB in Genarp, Sweden. This is not because I know or believe its products to be superior to those of its competitors, such as Allbäck, Brouns & Co, Gysinge, Heron or Selder (and I’m sure there are yet other brands that I’m not even aware of). I know no such thing. It is quite simply because I tried Ottosson first, and was happy enough that I never looked further. In other words, while what follows is indeed an endorsement on my part of the Ottosson range of products, this is emphatically not to the detriment of any of the others. They may be better, equal or worse, depending on your values for judging such things. But me? I’ve no idea, because I haven’t tried them. One day I may attempt to find out my true druthers by doing some comparative testing. Should such things matter to you, get some samples and get testing! In the meantime, I’d say the paint you can get is always better than the one you can’t, so if you are linseed oil paint curious, get whichever you can and try it for yourself!
Should you specifically want to get hold of some Ottosson stuff, though, in the U.S. you can find it at Solvent-Free Paint in upstate New York, Earth & Flax in Pennsylvania, and Atlas Preservation in Connecticut. If you are elsewhere, there’s a retailer map available at the Ottosson website.
And just to be totally clear, above-board and all LAP about it, I do of course not have any affiliation with Ottosson Färgmakeri AB (or any other company mentioned for that matter), other than as contented customer, and have paid full retail price for all products I’m about to mention.
For brushes, I have mostly used natural (pig) bristle brushes from another small Swedish company, Gnesta Penseln. Their Allround Brush, No. 5530, is my definite favorite, but I have also been pleased enough with their flat No. 609. For some glaze paint work I have also tried and had good results with a synthetic artist’s varnish brush.
From top to bottom: a Gnesta Penseln Flat No. 609, a Peacock No. 1240 synthetic varnish brush and a Gnesta Penseln Allround No. 5530.
To clean my brushes, I use liquid linseed oil soap and water. After painting, I will first remove as much paint as possible, first on some paper or a piece scrap, then onto a rag of some kind. I will then move to the sink, add a good dollop of soap to the bristles, work it in with the fingers to a good lather then rinse under running cold water. This cycle (dollop of soap/lather/rinse) is repeated until the lather shows no trace of color, and the rinse water runs clear. Depending on the size of the brush and for how long I had been painting, it will take me from a couple up to maybe 10 minutes to get the brush fully clean, but this video should give a better idea of how difficult it is (not):
I have not yet tried the alternative of storing my brushes in raw linseed oil without any cleaning, but am sure that this would work, too. I have simply found the task of cleaning them simple enough that I’m fine with the five minutes or so of extra effort at the end of a session.
Finally, while I’m sure all readers of this blog already know this, let’s stay on the safe side, and mention again that any rags or similar with linseed oil products on them must never, ever be left to dry balled-up or just thrown in the trash, as the oxidation that occurs when the oil or paint dries generates enough heat that they can spontaneously combust!
Rags can be laid out flat to dry, after which they will be safe to dispose of; they can be burned if local regulations permit; or they can be drenched in water. For my part, I will usually do what I show towards the end of the above video: hold them under the tap until they’re soaking wet, then tie them up like that in the nitrile gloves I like to wear when painting (‘cause I’m a certified, genuine, bona fide Fancy Lad™, who wants no paint stains on his dainty wee fingers). This keeps them both wet and deprived of oxygen, in which state they can be safely thrown away.
Glaze Paint Technique
I’m not entirely sure what this technique should properly be called in English. The Swedish word is lasyr, from the German Lasur, and it is etymologically related to words like azure and lapis lazuli. It is in effect to paint with transparent or semi-transparent paint, so that the underlying wood or other surface (such as a previous layer of paint – it is also a traditional fine art technique) still shines through. However, both various dictionaries and several paint makers refer to it as glaze or glaze paint, so that is what I will call it here. [Editor’s note: I think “glaze” is correct.]
As a wood finish, I believe this technique is often used to make one wood look more like another in color, or as part of grain painting. At least I know that Ottosson sell pots of paint in the correct size and intended for mixing with glaze oil that have names such as “walnut”, “teak”, “mahogany”, “oak”, “old wood” and “driftwood.”
For my part, however, I have been more interested in glaze paint as a technique to bring vibrant but transparent color to a project.
My first-ever attempt came about as part of my workbench build. The bench itself, in hard maple, had already been finished with two coats of boiled linseed oil. Having spent upwards of 800 hours on building it mostly by hand, my patience was beginning to wear just a little thin, and I wanted to be done and get woodworking. So instead of dimensioning the lumber for the shelf by hand from rough-sawn maple stock, as I had done for the rest of the build, I ordered a couple of S4S boards from my local lumberyard. They mostly sell construction lumber, and don’t carry hard maple, but do a usually nice enough sideline in ash. What they gave me this time was excellent quality, but to my mind perhaps not the most attractive grain pattern, so I hit upon the idea to liven up the bench with some color. which in turn made me wonder how a glaze paint might look?!
I read up a bit on glaze paint products, and, as we were going to Sweden anyway, decided to look in at Ottosson in Genarp. (They’re located about 12 miles from my old hometown of Lund, although their first production site was actually across the street from where I grew up!) My wife and I ended up spending a good couple of hours there, talking products, options and techniques, and came away with quite a shopping bag.
After a sufficient number of test pieces with which I will not bore you, I settled on a glaze paint mixed 50/50 from Ottosson glaze oil and the company’s Light English Red linseed oil paint. The glaze oil is a ready-made mix of boiled linseed oil, castor oil, lemon oil and odorless mineral spirits and, judging from the Safety Data Sheet, probably also a small amount of cobalt-zirconium driers (this particular product is thus not VOC-free, so not in the buck-nekkid application category).
I first gave the boards a base coat of boiled linseed oil and left that to dry for 24 hours.
(The Ottosson boiled linseed oil, by the way, is a traditional one, that is to say a purified linseed oil that has been pre-polymerised by heating for better drying properties but with no metallic driers added.)
After the base coat had dried, I applied a first coat of the paint-and-glaze oil mix in a thin but even coat and left it to soak into the wood for about half an hour. I then wiped off all the excess with a lint-free rag, a rather depressing procedure as the initial rich and vibrant color almost completely disappeared.
The second coat was applied in the same manner: brush on, wipe off, leave for 12 hours, but after application of the third coat, I gave in to temptation (ooh! pretty!) and just left it as it had been brushed on, with no subsequent wiping. Not my best idea. I did get away with it, but it took close to a week before the boards were dry enough to put in place, and even then, they remained ever so slightly sticky for a couple of months.
Application of the first paint-and-glaze oil mix. Ooh!
The same boards after initial coat excess had been wiped off. Ouch.
Finally dry enough to put in place. Still just a little sticky, though.
At the same time as the shelving boards, I also glaze-painted the bench’s swing-away seat, this time mixing Ottosson glaze oil with an Ottosson artist’s oil paint from a tube, in ultra-marine. I found no significant difference between mixing the oil with linseed oil paint or with linseed oil artist’s paint, except that it was easier to figure out the proportions with the standard paint as it was a liquid rather than a paste. In this instance it didn’t matter, but for multiple batches I think liquid paint will make for easier repeatability.
Once more I was tempted by the initial ooh! pretty! shine to skip the wiping. This time, though, it didn’t work. While I found the rich ultra-marine color absolutely lovely as such, it became impossible to brush out all air bubbles from the surface. Worse yet, it simple refused to cure, staying sticky seemingly forever, and it eventually began to slightly wrinkle and also to look dull.
There was nothing for it but to plane away the glaze paint, start over and let the color depth build gradually. After five cycles of brush on/wipe off, a final, very thin and unwiped coat of pure glaze oil went on top for some extra gloss, and I called the job done.
I’ve since learned on subsequent projects (as on the whisky cabinet shown below) that the way to go to build the depth of color is indeed a base coat of boiled linseed oil left to dry for 24 hours followed by as many thin brush coats as needed, each wiped off after about 30 minutes then left to dry for 12 hours. The number of coats will depend on when one is happy with the result. For extra gloss, a final very thin coat of pure glaze oil can be added.
The seat with the glaze paint laid on way too thick (see the bubbles along the upper edge) that just refused to cure.
Starting over. It is a nice blue color, though!
The slate almost clean again.
First new coat brushed on thinly …
… and wiped off again 30 minutes later! The rag was disposed of safely.
Slowly building to more depth, one coat at a time. I don’t remember how many coats there are in this particular photo, but at a guess there might be three.
And the final result! Not quite as vivid and strong a color as the first attempt, but it cured quickly and has stayed just like this ever since. And it matches my favorite coffee mug.
Three-coat Paint
This is a rather more straightforward and much less finicky technique that consists of near enough what it sounds like – does was it says on the tin of paint, as it were. The aim is a fully painted result, with some hints of the wood grain still showing but not all that much. For my part, I also aim for that paint to initially look just as new as it is, with neither a matte nor a glossy sheen. So far, I have not found any need to add anything like wax or otherwise try to modify the final appearance of the paint.
This is of course a pure matter of taste: I prefer patination to happen naturally, and with these linseed oil paint finishes, I rather suspect I may not live long enough to see them at their absolute best. (Not that I necessarily expect any furniture that I build to last beyond my looking after it, but on the off chance that it does, I try to build it well enough that it might, and choose a finish with at least the potential to wear and age with grace and beauty.)
The necessary ingredients for the three-coat paint technique are just linseed oil paint and boiled linseed oil. It could also include turpentine, which is supposed to make the paint easier to apply smoothly and shorten drying times, but so far, I have refrained from adding any. Turpentine may be a natural product, but it is still a solvent that comes with health risks, and to date I have done all of my painting indoors. My workshop is reasonably well-ventilated, but still indoors. Some nice, sunny summer’s day, when I can work outdoors, I intend to do some tests that include turpentine, but until then I prefer not to include it.
If the piece to be painted is from pine or some other resinous wood, and has knots or resinous pockets, these must first be sealed with two coats of shellac. Otherwise, the resin will sooner or later bleed through and cause local discoloration of the paint.
The first coat proper consists of one third linseed oil paint mixed very thoroughly (stirring! yay! Or do like Megan and get friendly with shops that have paint mixers) with two-thirds purified boiled linseed oil (no driers). This is applied as thin as possible with a brush, after which every part is dry-tipped with another, clean brush to level out any brush marks and to remove any small accumulations at the bottom of the vertical surfaces. (If there are substantial pools of paint at the bottom of the vertical surfaces after one has finished painting the piece, that is a sure sign that the paint went on too thick. What I’m talking about tipping off here are mere smidgens of paint brought down by gravity to the bottom of a vertical surface.)
It is also important to know that linseed oil paint has close to zero self-leveling properties. Any errant brush marks in the fresh paint will still be there when it has dried. It is thus key to work on a consistent (direction, evenness, etc.) final set of brush strokes, which is why tipping off comes in so handy. On the other hand, the long open time of the paint helps – there’s plenty of time to be thorough about it.
If this first, thinned-with-oil coat goes on bare wood, it is likely to be dry to the touch within less than 24 hours, and depending on circumstances (temperature, humidity and – not least – ventilation) might be ready for a second coat in 48 hours. Personally, I try to wait for another 24 hours, as I sand very lightly between coats, and for that want the previous coat to be sufficiently cured.
Strictly speaking it is not necessary to sand, but I have found the final surface becomes nicer and smoother to the touch if I remove any minute nibs and any dust that might have settled in the still-wet paint of previous coats. I have a paint stall in the least-dusty part of the workshop, so dust is not a massive issue for me, but the place is not clean to operation theater levels, either.
I usually sand very lightly with a #500-grit Mirka Abranet disk, either wrapped around a block of cork or just held in my hand, but before the first coat is sanded, I will go over the piece and apply some “Rubinol” linseed oil putty to any minor imperfections. After sanding, I carefully remove all loose dust with a vacuum cleaner followed by a damp, clean rag, and the patches where putty was applied are given a very light touch-up with the initial base coat oil/paint mix to get the whole piece back to an even base color. These patches are then left to dry for maybe 12 hours or so, after which the piece is ready for the second coat.
Both the second and third coats are of full-strength, undiluted linseed oil paint, straight out of the can, and applied as thinly as possible but with full coverage. The paint goes a very long way, though, as with no solvents there is no evaporation either: what goes on, stays on. A good natural bristle brush will hold a lot of paint, too, so it shouldn’t be dipped deep at all. A small dollop of paint is taken up at the end of the brush and deposited in a good spot on the surface, from where it is distributed as far as it will go with strong strokes and stipples in varying directions. Before moving on, the freshly painted surface is equalized with the same brush, while at the end of the session everything is tipped off again with a clean brush as already mentioned. What you see is what you get, so it should look as good as you can make it before leaving it to cure
I leave the second coat to dry for 48 to 72 hours, depending on circumstances, and again sand ever so lightly with the #500-grit Abranet.
The third and final coat I will try to leave alone to dry for a full week before moving or touching anything.
If it hasn’t become clear already, the three-coat paint technique is not for those in a hurry to be done. Not that it is inefficient as such – it takes about as long to apply as any paint, and you don’t have to stand there for a whole week actively watching it dry. (You can certainly go away for a coffee at least three times a day with no adverse effects on the final result.) In a production environment, where a piece has to go out the door before any money comes in, these long waiting times could be an issue. For the hobbyist, much less so, unless a slow-drying piece puts the whole workshop in lockdown for reasons of space or suchlike.
While the piece should be dry enough to handle and use after no more than a week on the outside, in my experience it will still be several months before the paint is really cured all the way through. The way I test this is by closing my hand over a part of the piece. If in a short while the paint feels ever so slightly “clammy” under my hand, I know it is still curing. When it no longer feels that way, I consider it well and truly set.
I thus aim for a fully painted effect, with an even, satin sort of sheen. If one wants a glossier surface, a certain amount of sun-oxidised linseed oil can be added to the paint for the final coat. For such a mix, Ottosson recommends a 10- to 15-percent by volume oil-to-paint ratio. For my part, I have yet to give this a try, so I cannot say what difference it might make.
Below follows a series of photos from the various stages of painting two pieces – a stick chair and a bookcase – with the three-coat technique described above.
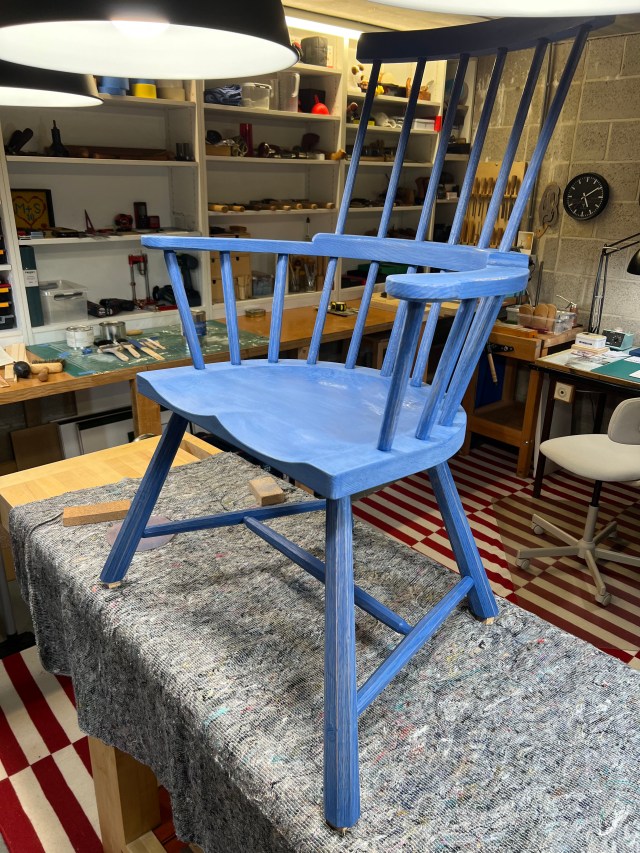
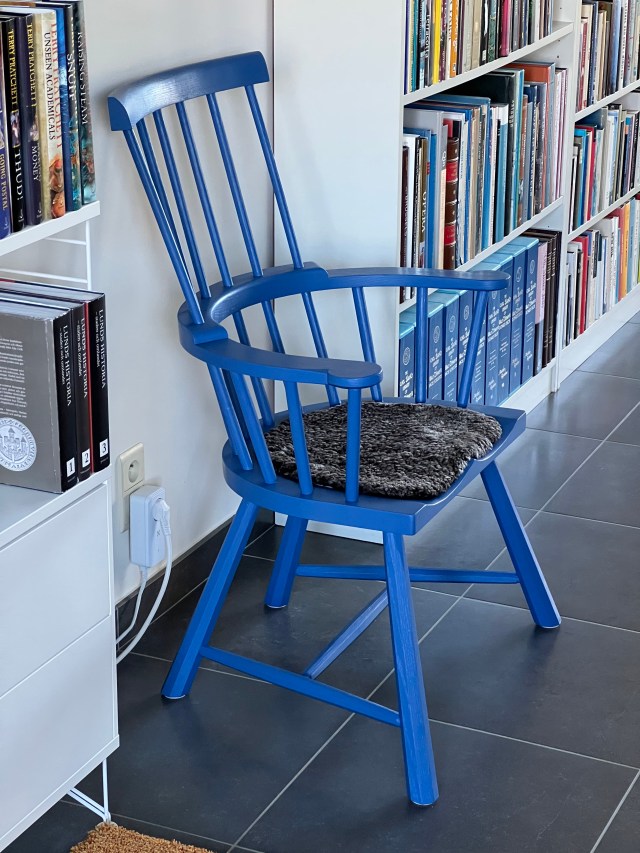
The first coat of one-third paint and two-thirds boiled linseed oil applied to a stick chair. The color is Ottosson Cobalt Blue.
The first coat has dried …
… and linseed oil putty has been applied to various minor imperfections.
The same first coat after some light sanding.
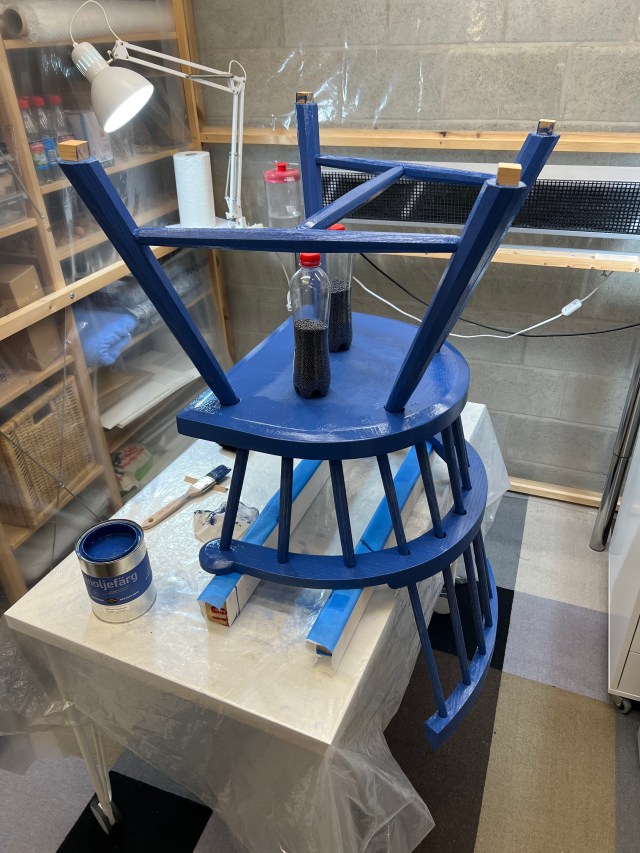
The second coat is applied undiluted and straight out of the tin. (The bottles, used here as counterweights, contain lead shot I use for ballast in model boats. I removed them before recoating the chair seat bottom.)
The second coat after drying and light sanding.
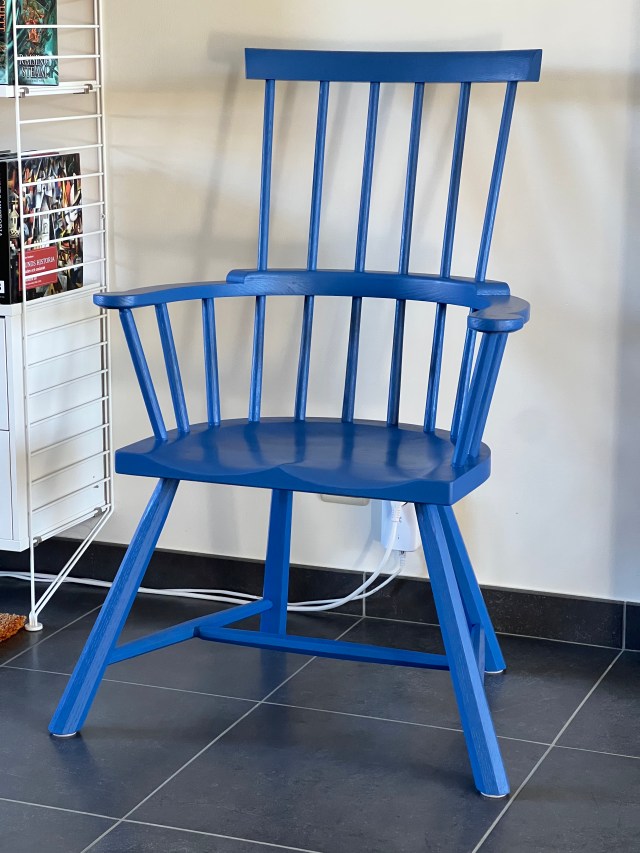
The freshly applied third coat just after final tipping off. Resist the urge to touch the paint unless you wish to sign the piece with a fingerprint.
The finished paint job about two weeks later.
The same chair from another angle, with a sheepskin pad added to the seat.
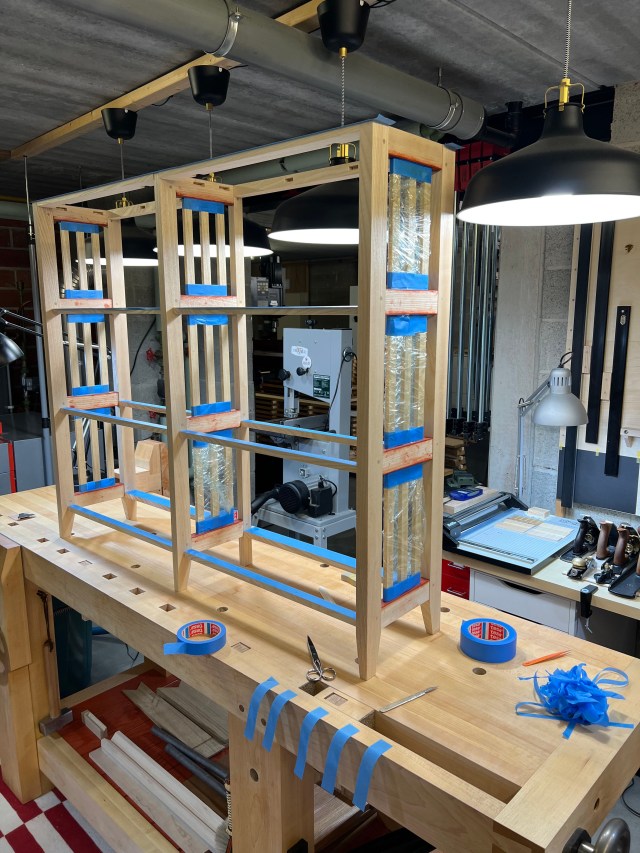
Pre-assembly painting of bookcase rail edges. The one on the left has just had the second coat applied, the one on the right is still wearing only the first oil-diluted coat, lightly sanded. Note the brush in the background, and how only the very tip has been dipped in the paint. The color is Ottosson Light English Red.
Glue-up of a gable with rails painted on the edges. The reason for the pre-assembly painting was that the slats were going to remain natural with just a soap finish …
… and as linseed oil paint is not great for precision painting, careful and generous masking of those slats was necessary.
First coat of diluted paint applied to the whole carcase …
… followed by putty …
… to improve on minor imperfections …
… then lightly touched up with small dabs of the oil/paint mix.
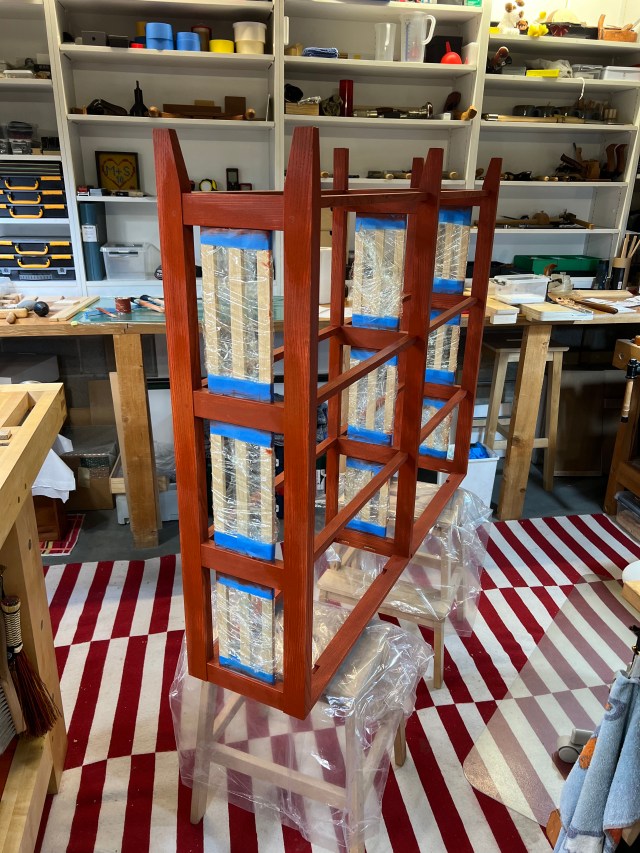
The second coat being applied …
… followed by light sanding …
… then by the third and final coat. Photo taken just after the last tipping off.
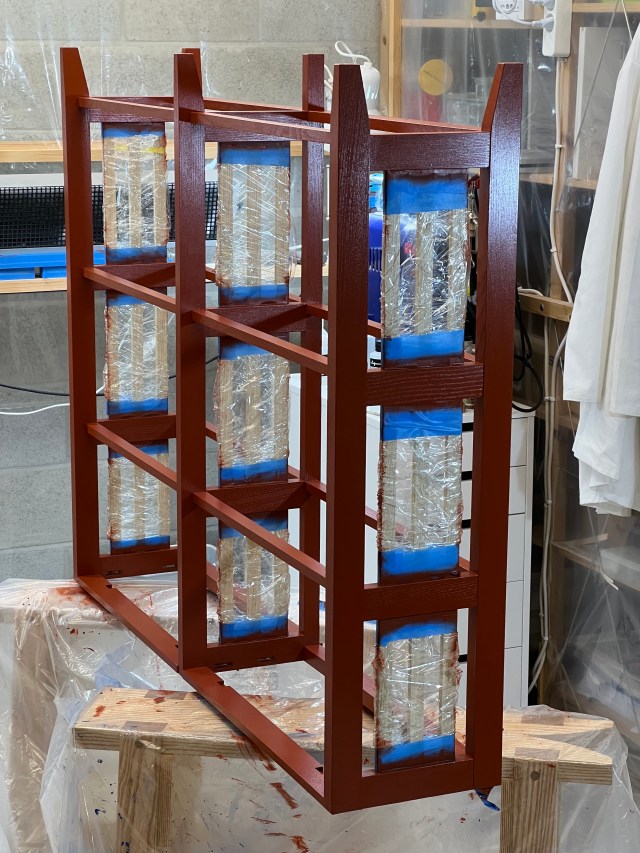
This was the result when the masking tape came off a couple of weeks later. I had strategically applied the final coat just before leaving for the U.S. and Handworks, so was never tempted to handle it too early. This photo gives a pretty good idea of the degree of coverage and sheen that I aim for with a three-coat paint job.
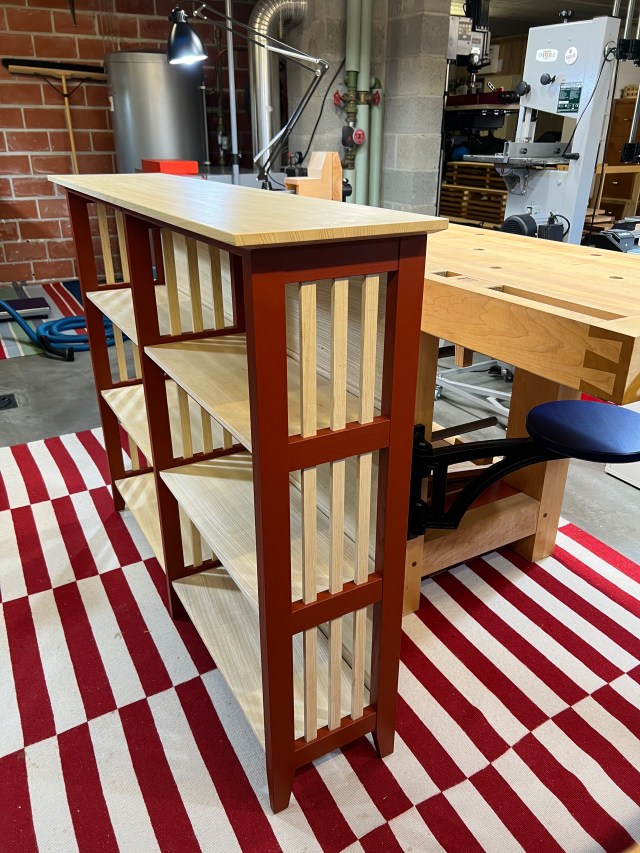
The finished bookcase. It is entirely made of ash, both the painted and unpainted parts. Everything not painted has been finished with soap (except for the rear of the back panel, which was left with no finish at all).
Mixing the Two
Finally, below are a few photos of a project on which I used both techniques. This is a whisky cabinet, designed by Geoffrey Fowler, that I (mostly) built during a post-pandemic get-together in London, also organized by Geoffrey, of a bunch of the regulars on Bench.Talk.101 (see Quercus Magazine #10 for more on that event). The wood is ash, while the glaze paint was made up with the same linseed oil paint used for the three-coat part: Ottosson’s Ardbeg Green.
Given the number of coats needed, the glaze-painting was by necessity a slow and somewhat painstaking process. It was made even more so by the fact that the glaze oil is quite thin, so not particularly suited to vertical surfaces. When glaze painting the cabinet, I found the safest way to a good result was to do only horizontal surfaces, so one side at a time. With four coats per side, six sides to the carcase and two to the door plus some edges that had to be glaze-painted before assembly, and with 12 hours between each coat, it did take me the better part of two weeks to get the job done. I was happy enough with the result, though, that to me it was worth the trouble. Your mileage may vary.
Glaze-painting the door frame. Before assembly, the back of the panel was given a three-coat paint job and the inside edges of the frame were glaze-painted.
The cabinet with the door in place. The visible exterior of the cabinet is all glaze-painted with four coats brushed on and wiped off. The door panel is finished with two coats of Ottosson linseed oil wax.
On the inside, the door panel back and the backboards have been three-coat painted. I did not do a great job with the backboards as the last coat went on rather too thick, as can be seen from the difference of sheen, but once the paint was fully cured it did even out to an acceptable level. The drawer front is, like the exterior of the door panel, finished with linseed oil wax.
In Conclusion
I still have much to learn about linseed oil paints, and am looking forward both to getting better at what I already do and to picking up new techniques and testing other methods.
For example, I am very interested to see what results can be had with a single-coat system based on diluting the paint with boiled linseed oil only. Ottosson recommends a 20/80 mix of oil and paint for single-coat interior woodwork, but it would be fun to experiment with a range of ratios and see what the results look like.
I also want to find out what adding turpentine will do, and if it would be worth the whiff? Ditto the addition of sun-oxidised oil to the final coat – will I like glossier? Not to mention to see what can be done with artists’ paints on smaller pieces, in the footsteps of Jögge Sundqvist (who, by the way and judging from the photos in Slöjd in Wood, seems to get his artist’s paints from Ottosson). And of course, to give some of the other brands a go.
I am well aware that painted furniture is not to everyone’s taste, but that is a simple problem to solve: if you don’t like it, don’t do it! If, however, you find the idea not entirely without merit, I heartily recommend linseed oil paint. As I hope is becoming apparent from recent posts and discussions on this blog, it is nice to work with and has the potential for some very attractive and tactile results, at least to my eyes and hands.
The following is excerpted from “The Belligerent Finisher,” by John Porritt. After walking you step by step through creating a believable aged finish, the book includes a gallery of just some of John’s gorgeous work.
Top: the “hands” of two chairs. Above: A scarf joint on one of the armbows of my chairs. The details of the finish are extremely important to me.
I think the phrase “standing on the shoulders of giants” has the ring of truth, certainly in woodworking. That, and the idiosyncratic nature of many vernacular woodworkers, plus the vagaries of time, have inspired me to try to understand some of the mystery of the old stick chairs. To work with that, simulate it (or “stimulate” as my old friend Johnny Jones would have said) and then, on occasion – having fallen short – sitting down in an odd chair with a restorative cup of tea, to ponder having another go. That’s my form of belligerence, and these are some of my chairs.
My first Welsh-inspired stick chair, made circa 1994 in Shropshire, England. I sent photos of several English and American-influenced chairs along with one of this chair – which draws on what at the time I thought of as a Welsh stick chair – to John Brown. He kindly wrote back to me and for a while we had a correspondence. He went so far as to speak highly of the chair and published a photo in Good Woodworking magazine. Looking back I now feel this chair is an amalgam of John Brown’s work with the steam-bent arm and an American way of shaping the hands, along with an exaggerated Welsh comb. It was my jumping-off point as I started to look more carefully at what the old Welsh chairmakers, in all their diversity, had achieved.
The chair has lived in Shropshire ever since and is a well-used and appreciated member of a friend’s family. It has an elm seat and steam-bent ash arm-bow, with ash legs, sticks and comb. The green paint was my first attempt at making a milk paint. It was not waxed and has had no intentional distressing other than the normal wear and tear of family life. It’s doing well.
This commissioned chair was an adventure. I found a curved ash branch, so I was able to make my first two-part scarfed and wedged armbow. The chair has a piece of oak with character for the seat, 10 ash sticks and an ash comb, legs and stretchers. The naturally curved ash arm supports have that gnarly grain that seems to encapsulate the life of a small tree in a harsh environment. The wood was never aged. It was painted with Lexington green milk paint, with a little added black, then waxed. Nearly 20 years later, every-thing has mellowed to a pleasing warmth with that dry bloom look some of the old chairs have. I once heard an elderly antique furniture dealer describe this look as “sleepy.” It was a pleasure to exhibit this chair at Westonbirt, The National Arboretum in Gloucestershire in “Chairs 2004.”
This, and the following chairs, were made in Spencertown, N.Y. The seat of this chair is English-grown burr oak from Picklescott, Shropshire. Ash sticks, legs and comb. Three-part arm in hard maple. Side stretchers and two arm posts in white oak, center stretcher hickory.
Finished with boiled linseed oil, no wax involved. I left the seat unfinished, owing to burr wood taking up the linseed oil quite aggressively in parts. It’s coloring down well with time. It’s my daughter’s favorite chair.
This and the two previous chairs are known as “lobster pot” chairs. Linseed oil and wax finish. English elm seat with ash throughout, scarfed and wedged armbow. Neither this chair nor the previous one had any wood-aging treatment. After several years, the color is getting good and mellow.
This chair, made at the start of the COVID-19 pandemic, was a major step for me down the road of getting the feeling I needed into a chair. It’s the only chair I have ever pictured completely in my head, then built and finished. It seemed to flow through me. Most chairs are a journey from armbow to what is possible, and I will work through various cul-de-sacs and hiccups along the way. Not this one.
The finishing process on this chair was similar to that described in chapter one. This one was finished with homemade black milk paint. American white elm seat (extremely difficult to work – much belligerence needed). Scarfed and wedged ash armbow. This was my first North Wales four-stick-inspired chair. It owes a lot to the chair on the over of John Brown’s great book, “Welsh Stick Chairs.” I consider this to be the most important chair I’ve ever made, certainly in my understanding and development.
Inspired by a chair from the wonderful book “The Welsh Stick Chair” by Tim and Betsan Bowen. Finished using nitric acid, Lexington green milk paint with a little added black, shellac, cement dust, linseed oil and 10-percent roofing cement with wax. The scarfed arms are in black birch – a great wood to work and color. They were eventually burnished with heavy brown paper after the chainmail burnisher and antler. White oak seat, American white elm comb; red oak legs, stretchers and sticks.
My first attempt at working a chair in red. Before painting, I used nitric acid, then Salem red paint, most of which I took right back off, scrubbing with coarse and medium 3M pads with thinners. After that, I painted it over with one coat of a mixture of red, brown and black milk paint. Shellac, cement dust, linseed oil, 10-percent roofing cement and wax completed the process. English elm seat, black birch two-part armbow, white oak comb. The legs, stretchers and sticks are red oak.
Soft maple two-part seat, cross-tenoned and pegged with scarfed hickory arms and sticks, oak comb, ash arm supports, legs and stretchers. Finished using nitric acid, a workshop-mixed thin brown milk paint, then shellac, cement dust, linseed oil and wax, with 10-percent roofing cement. I enjoy its stolid, “I’m here. That alright with you?” stance.
Another version of a North Wales four-stick chair. This exceedingly comfortable chair was left in the paint and waxed to allow Tom, its owner, to perform DIY chair distressing, at least three times a day. Oh yes, and let’s not forget the tea breaks. American white elm two-part seat, cross-tenoned and pegged, scarfed black birch armbow, hickory sticks and legs with an ash comb.
I really enjoy the visual movement of this chair. It is entirely made of white oak, apart from the scarfed and pegged arms of ash. The chair was fumed for 72 hours with ammonia then (minus the use of vinegar iron and brown mahogany oil stain) it was worked in a similar fashion to the green chair, Backstool No. 2 in chapter two. I did over-paint a lot of the Lily Pad green to get that crusty look, which I later distressed with the chainmail burnisher.
Apart from being stung by a tiny wasp while foraging by the roadside – where I managed to find an excellent piece of white oak for the comb – this chair came together happily.
Another very comfortable red chair. The photo of the entire chair was taken right after it was made; the two detail shots are after several months of use.
Note how the workshop-mixed milk-paint surface of mulberry is chipping with use to let the thick flag-red milk paint come through. Not introduced wear. I have enjoyed watching this evolve. Better than watching paint dry. White oak seat, legs, stretchers and comb, hickory sticks, ash armbow and doubler.
Over the years, I’ve made quite a few child’s chairs. To my eye, this one works well for proportion. The paint is Lily Pad green with a coat of Lexington green over the top, cut back to let the Lily Pad come through on the seat. The wear-through to the wood on the seat front, and slight wear all around, is my suggestion of rough-and-tumble in a nursery. Soft maple cross-tenoned and pegged seat, black birch two-part scarfed and pegged arm, ash legs, stretchers and sticks. Two outer sticks red oak.
I spent a long time attempting to get the white oak seat, hickory sticks, and ash arms and doubler, legs, stretchers and comb to a satisfactory surface. It didn’t work. So, over the entire chair (bar the arms) I painted Arabian Night black milk paint. Things don’t always work out – I think I was pushing too hard for an effect the chair didn’t need. I think this chair, which has a busy appearance, looks better for its unity of surface. This might be considered a fall-back position, but it is one I’m happy with. How much belligerence can one chair take? How much tea can one man drink?
Sorry it’s been awhile since my last library post – I’ll try to finish up the not-yet-covered cubbies in the next month to six weeks (I believe there are still three or four to go).
This week, I had to get out the stepladder and stand on my tippy toes to reach the top left collection, which contains architecture books, part of the David Macaulay collection (I think between us, we have all of his books, though they’re not all on this shelf) and a few outliers.
At far left is “From the Ground Up,” by John N. Cole and Charles Wing (Little, Brown & Co., 1976). Years ago, Chris asked his father, Paul, what had inspired him to buy a piece of land and become a “hippie builder.” His dad told him it was a book, “From the Ground Up,” and that he no longer had a copy, so Chris found one for him as a birthday present…but this was the wrong book. So it made its way back to our library.
Next is “The Lost Meaning of Classical Architecture,” by George Hersey (M.I.T. Press, 1988), which explores enduring tropes that have been around since the Greek and Roman golden ages. Then, there’s a trio of titles on the architecture of three cities: “Unexpected Chicagoland” by Camilo José Vergara and Timothy J. Samuelson (New Press, 2001); the 9th edition of “A Look at Architecture: Columbus Indiana,” by and published by the Columbus Area Vistors Center (2019); and “This is Charleston: An Architectural Survey of a Unique American City,” by and published by the Carolina Art Association. If you’ve never been to Columbus, Indiana (it’s more likely you at least know of the architecture of Chicago and Charleston), you simply must go if ever you’re in the area. It is a truly astounding modern architectural wonderland. (And save time to visit Madison, Indiana, too, which isn’t far; there, you’ll find one of the country’s largest National Historic Landmark districts.)
Then, it’s a handful of the Macaulay books that fascinated both Chris and me (and likely many of you reading this) when we were kids – and we both still love to page through these today: “City: A Story of Roman Planning and Construction” (Houghton Mifflin, 1974); possibly my favorite, “Castle” (Houghton Mifflin, 1977); possibly also my favorite…I’m mercurial, “Cathedral: The Story of Its Construction” (Houghton Mifflin, 1973); “Pyramid” (Houghton Mifflin, 1975); and “Underground” (Houghton Mifflin, 1976). (Another favorite is “Motel of the Mysteries” (Houghton Mifflin, 1979) – it’s around here somewhere!)
Next up are two books that speak to (some of) Chris’s obsessions. First is “Viewpoints on Folklife: Looking at the Overlooked,” by Warren E. Roberts (UMI Research Press, 1988). Among the topics Roberts covers is the Turpin family of Southern Indiana, a 19th-century family that produced generations of makers of post-and-rung chairs. Second is “The Timeless Way of Building,” by Christopher Alexander (Oxford UP, 1979). If you’re at all into architecture, you likely know this one that speaks to architectural pattern language – it’s kind of like “Make a Chair from a Tree” in that it inspired a new generation in its field.
That’s it for the left-leaning books (directionally speaking). After the empty space, and leaning right, we pick up with more architecture titles: “The Illustrated Dictionary of Historic Architecture,” edited by Cyril M. Harris (Dover, 1977); “The Ten Books of Architecture: The 1755 Leoni Edition” by Leon Battista Alberti (Dover, 1986 – obviously a modern reprint of this historic title); and the venerable “A Field Guide to American Houses,” by Virginia and Lee McAlester (Knopf, 1995, originally published in 1984).
From here we move toward miscellanea with “Painting and Experience in Fifteenth-Century Italy,” by Michael Baxandall (Oxford UP, 1972) (I suspect this one dates in our library to research for “Ingenious Mechanicks“) and volume two of the Dover reprint (1987) of “A Diderot Pictorial Encyclopedia of Trades and Industry: 485 Plates Selected from ‘L’Encyclopédie’ of Denis Diderot,” edited by Charles C. Gillispie.
(Chris here: The Baxandall book is actually one I have had since college, and remains one of my favorites. This was the book that pointed out how the connections between mathematics, music, painting and the way we see the world. Few books are as important to me as this one.)
Next is “The Antique Story Book” – a gift from the incredibly kind Richard Arnold – a delightful collection of stories from English furniture maker/dealer/restorer Bernard Jack on how he acquired some of his pieces (Cooper Combine Printers, 1978). “Cotehele,” published in 2013 by the National Trust, a souvenir guide to an area of Cornwall is next, followed by “Lewis Miller, Sketches and Chronicles,” edited by Robert P. Turner (Historical Society of York County, 1966); Miller was a 19th-century Pennsylvania German folk artist. Joshua Minnich‘s “Ephemera” (self published in 2018) follows – and it’s of great importance to us – Joshua designed the Lost Art Press logo!
(Chris here, again: Joshua’s book is where I encountered the “Nothing Without Labour” billhead. And then I sought out an original for us.)
“Ways of Seeing,” by John Berger (Penguin, 1972) is next – another venerable title; it’s based on a BBC series of the same name, and examines how we view art. (Chris: This Berger book remains mind-blowing to me.) Alongside it is Bruno Munari’s “Drawing a Tree” (Mauruzio Corraini, 1978) – a mostly pictorial how-to of just what the title says. That’s followed by a few on decorative arts and proportion: “Celtic and Anglo-Saxon Art: Geometric Aspects,” by Derek Hull (Liverpool UP 2003) (if I ever take up decorative carving, this one will be among my teachers); “The Sense of Order: A Study in the Psychology of Decorative Art,” by E.H. Gombrich (Cornell UP, 1979); and “The Power of Limits: Proportional Harmonies in Nature, Art & Architecture,” by György Doczi (Shambala, 1981).
Tucked in out of sight are two seminal Arts & Crafts movement texts (both Penguin “Great Ideas” reprints): William Morris’s “Useful Work v. Useless Toil” and John Ruskin’s “On Art And Life.” (Chris: David Savage gave me these as a thank-you for a visit.)
The last book in this cubby is one Chris has had since college; he warns against the instructions for making psychedelics from bananas: worst headache he’s ever had – and that was the only result. It’s “The Anarchist’s Cookbook,” by William Powell (Lyle Stuart, 1971).
– Fitz
p.s. This is the 12th (and long overdue) post in the Covington Mechanical Library tour. To see the earlier ones, click on “Categories” on the right rail, and drop down to “Mechanical Library.” Or click here. NB: I have used the same picture at the top of every post, simply circling the cubby I’m covering in a given post. For the close-ups, I’ve taken new pictures each time. The odds on that cubby still containing all the same books in the same order as the main image are slim indeed (in case you zoom in and see discrepancies).
The following is Excerpted from “Honest Labour,” a collection of essays from The Woodworker magazine while the legendary Charles H. Hayward was editor (1936-1966). This book is be the fifth and final volume in our series from The Woodworker.
And here’s hoping that, if you want to, you get to enjoy a few hours alone in the workshop today.
— The finest of all tools, the human hand, is determined by the will, mind, character of the man who wields it.
It often surprises me to find how few people can bear to be alone. It is almost as though they regarded time as a vacuum to be filled rather than as something to be used or enjoyed for its own sake. A man will drift along to the local, the club, or the pictures “to pass away the time” rather than spend a few hours in his own company, and yet it is just those hours when one might be alone that can be turned to the most valuable account. But to bear to be alone one needs an interest—any deep, abiding interest will do. With Paolo Uccello, the Italian painter, it was the interest of perspective which he pursued in all its most intricate forms and which so held him enthralled that we are told: “When engaged upon those matters Paolo would remain alone, like a hermit, with hardly any intercourse for weeks or months, not allowing himself to be seen,” taking pleasure “in nothing except the investigation of difficult and impossible questions of perspective.” A passion for the solving of a problem, an impulse to achieve something is already halfway to creation, and it is in the doing of a creative job that we really lose ourselves to find ourselves, and are no longer the bored, indifferent passers of time, but are unconscious of time.
It would be too much to claim that the man who follows a craft like woodwork is never lonely, but it is certain that he will never know the worst kind of loneliness, the apathy of mind and body which is the negation of life. The very acquisition of skill enriches the personality, adding to a man’s resources, making him more independent, developing his judgment and giving him more confidence in his own powers. We never know our powers, indeed, until we begin to use them, and then it is a lifetime’s job to find out how far they will go. Skill develops with the use of skill and it is one of the few things that can be carried to perfection in a lifetime. For, as we learn from the study of the arts and crafts of the past ages, there is no progress in the capacity of the human hand. The knowledge of tools and machines increases as time goes on, but the finest of all tools, the human hand, is determined by the will, mind, character of the man who wields it and does not develop from one generation to another. Indeed, there are examples of arts and handicrafts centuries old that will stand up to any comparison with the best work of today.
It is a humbling but heartening thought. We are challenged by the past to stand or fall by our own merits. It is commonly recognised nowadays how much the mind is bound up with the skill of the hands. It is in the mind that a job is first seen, planned, willed, and, says Ruskin, the work “is noble or inferior, first, according to the tone of the minds which have produced it and in proportion to their knowledge, wit, love of truth and kindness; secondly, according to the degree of strength they have been able to give forth, but yet, however much we may find in it to be forgiven, always delightful so long as it is the work of good and ordinarily intelligent men.” For indeed it is for a man to choose how he will use his mind—“discovering always, illuminating always, gaining every hour in strength, yet bowed down every hour into deeper humility; sure of being right in its aim, sure of being irresistible in its progress; happy in what it has securely done, happier in what day by day it may securely hope; happiest at the close of life, when the right hand begins to forget its cunning, to remember that there was never a touch of the chisel or the pencil it wielded but has added to the knowledge and quickened the happiness of mankind.”