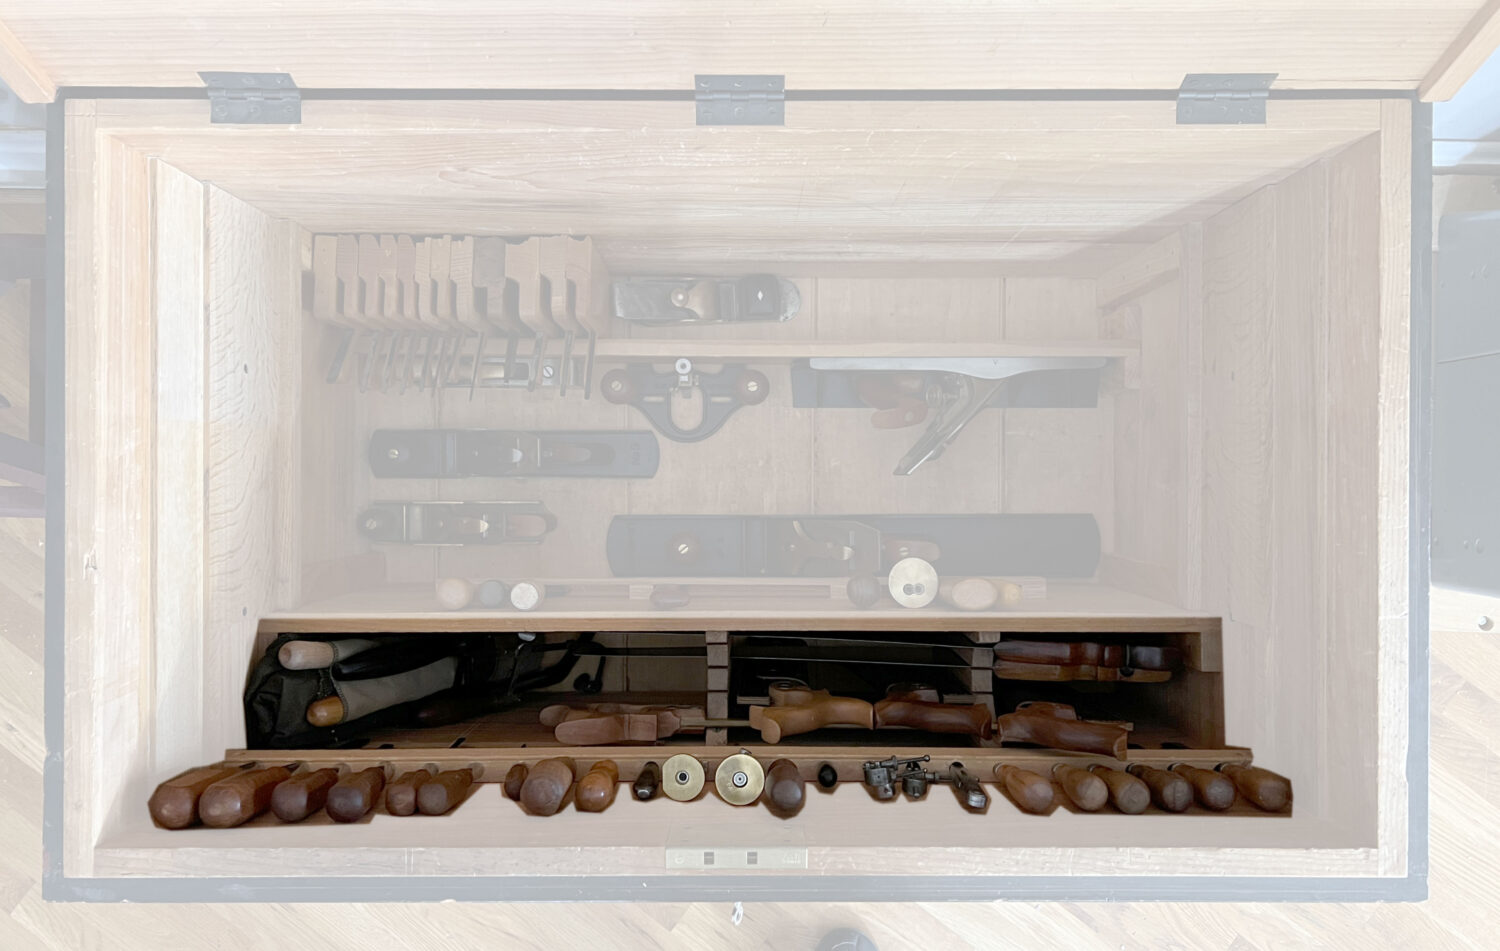
We receive almost-weekly requests for a current inventory of my tool chest. Usually, I am too swamped with work to take a complete inventory. Luckily, I had a couple days of downtime last week and took the opportunity to clean out my chest and take stock.
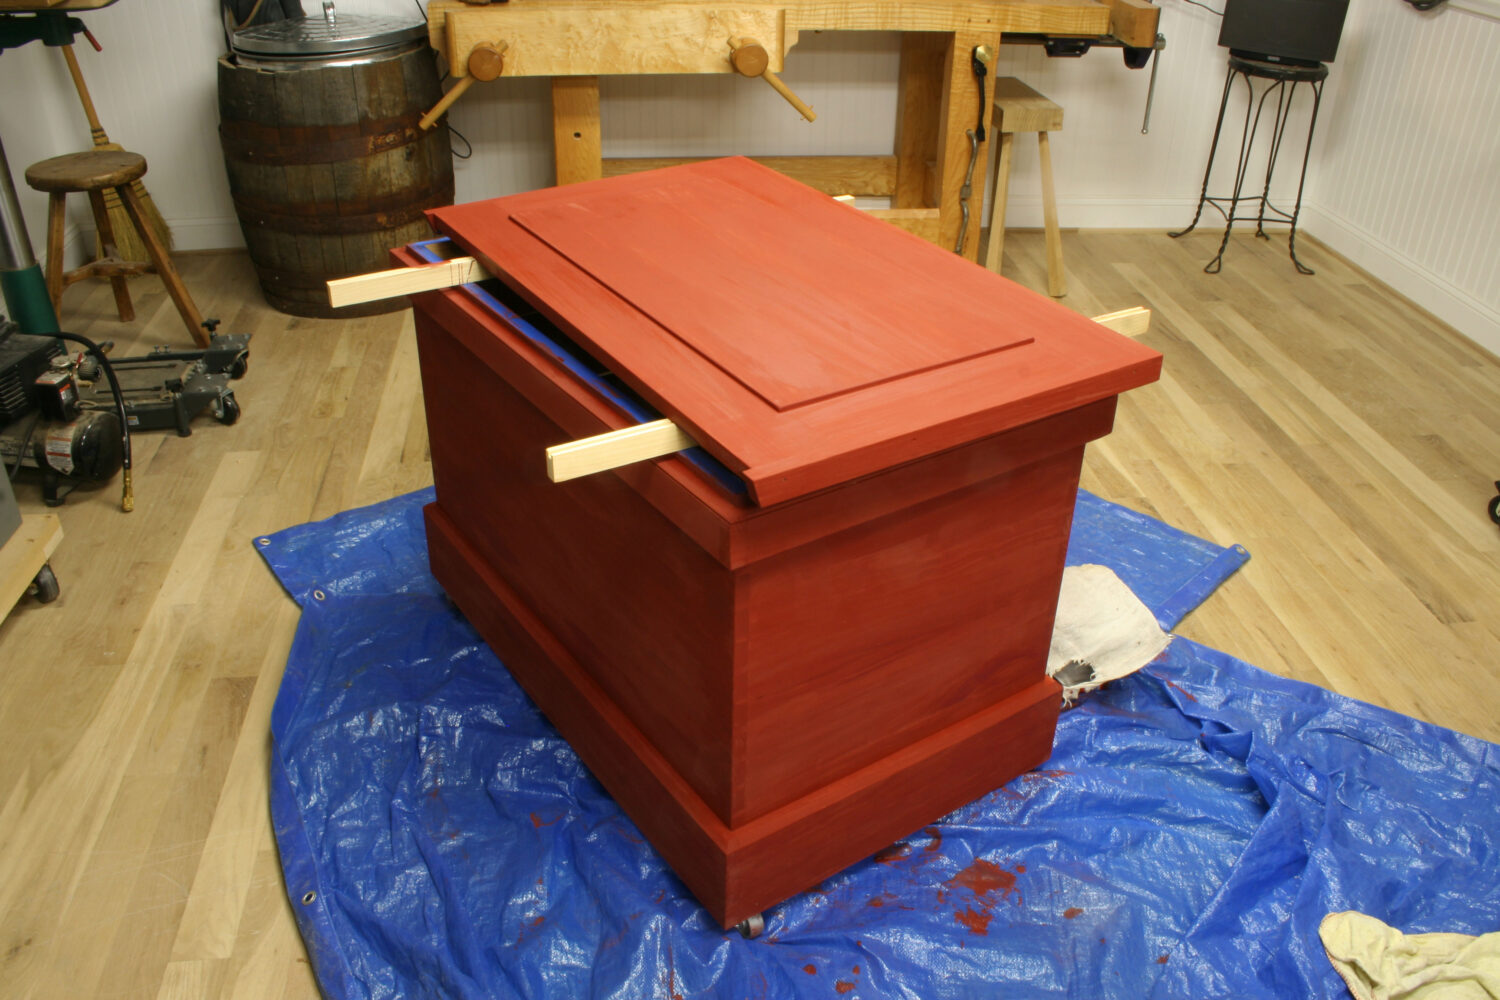
Not much has changed in terms of the chest’s structure since the publication of “The Anarchist’s Tool Chest” in 2011. I have nailed in a few dividers in order to corral small tools – plus I added a couple tool racks. But that’s about it. The chest continues to age gracefully, and I am just as grateful for it as I was the day I finished it in December 2010.
The tools have changed a bit as I now make more chairs for sale. In 2010, I was making only three or four chairs per year. This year I made almost 20.
This inventory is arranged first by location (the top till, middle till etc.). Then tools in that location are grouped by function (measuring, bashing, reaming, poking, slaying).
I hope this inventory is useful in some small way. I know there will be questions about why I own “particular tool A” instead of “particular tool B.” There are a handful answers to those questions. Let’s get them out of the way.
- This is a tool I have had for decades. There might be better/newer ones out there, but I am happy with this one.
- This tool was made by someone I have a strong connection to or someone I admire.
- We make this tool. Of course I like it.
- I have no clue why I own this tool.
- It is the ideal tool for the kind of things I build.
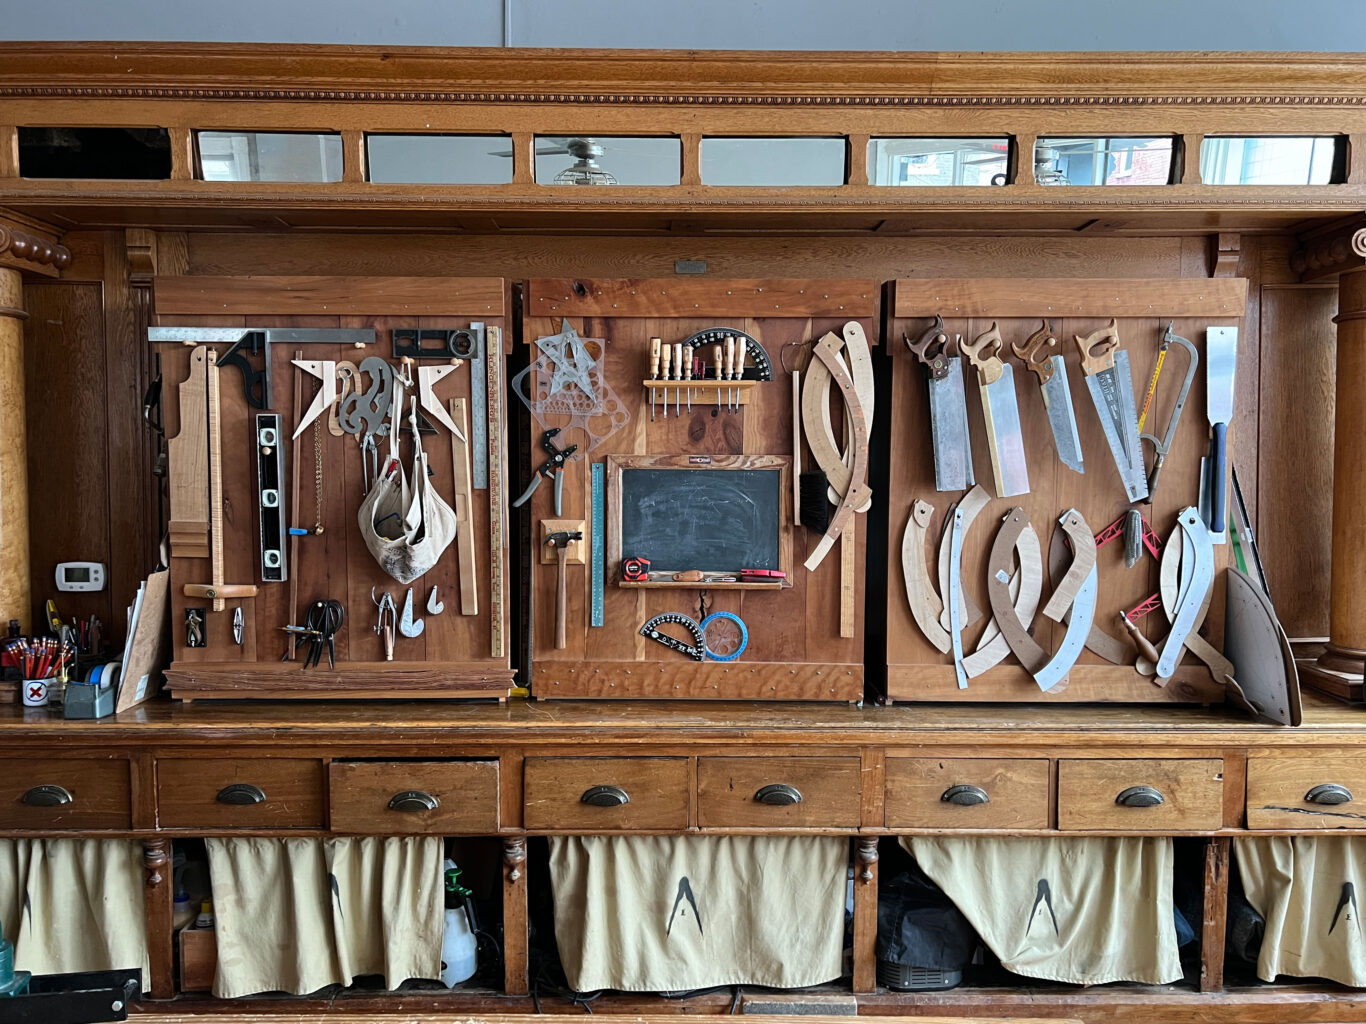
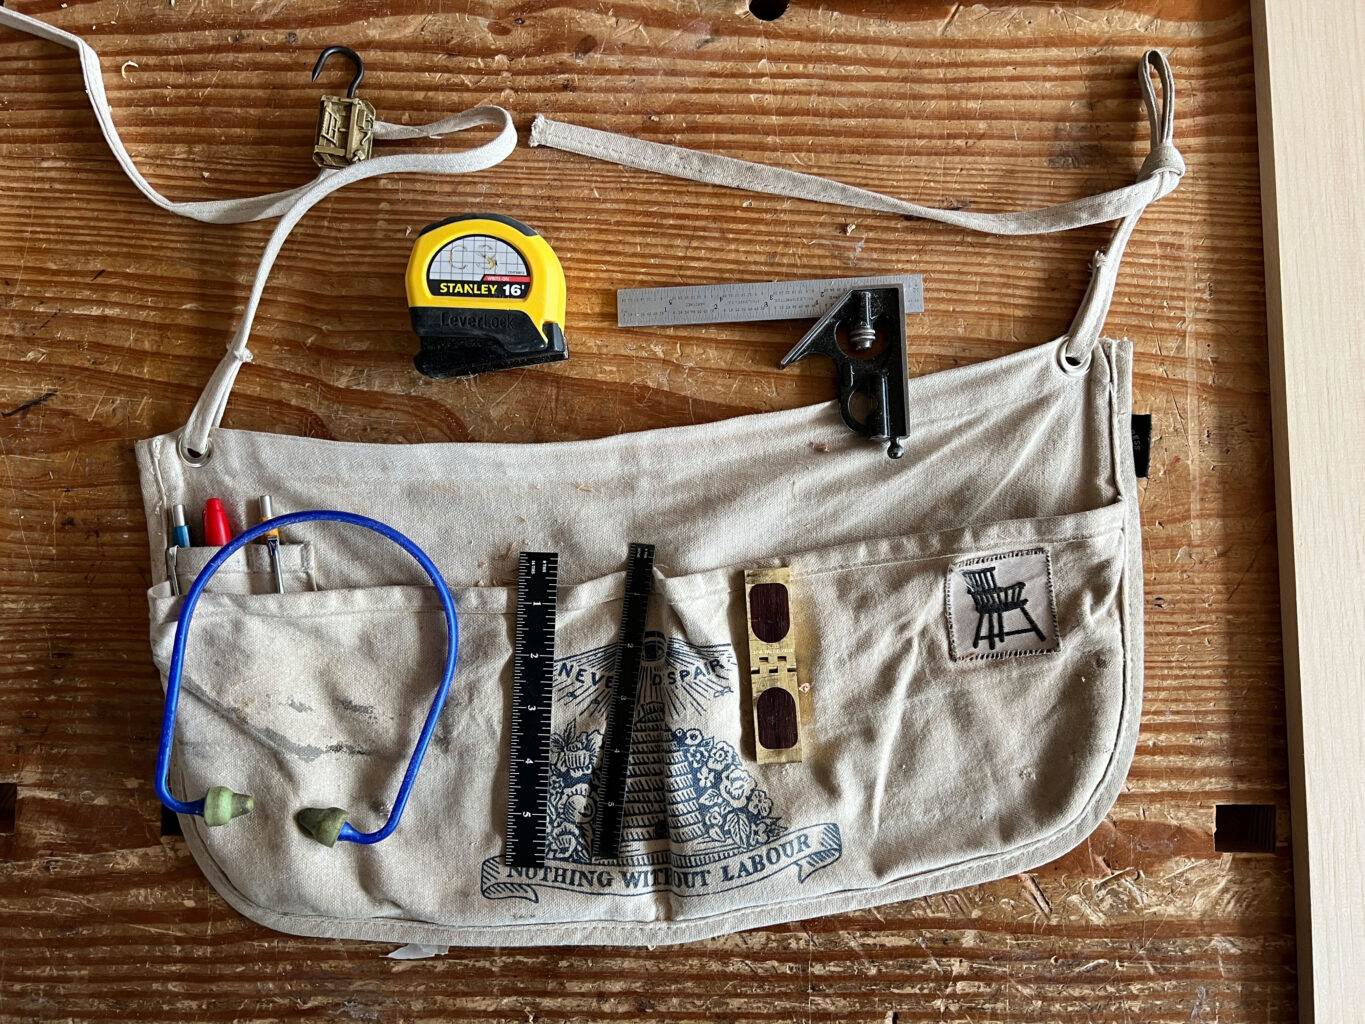
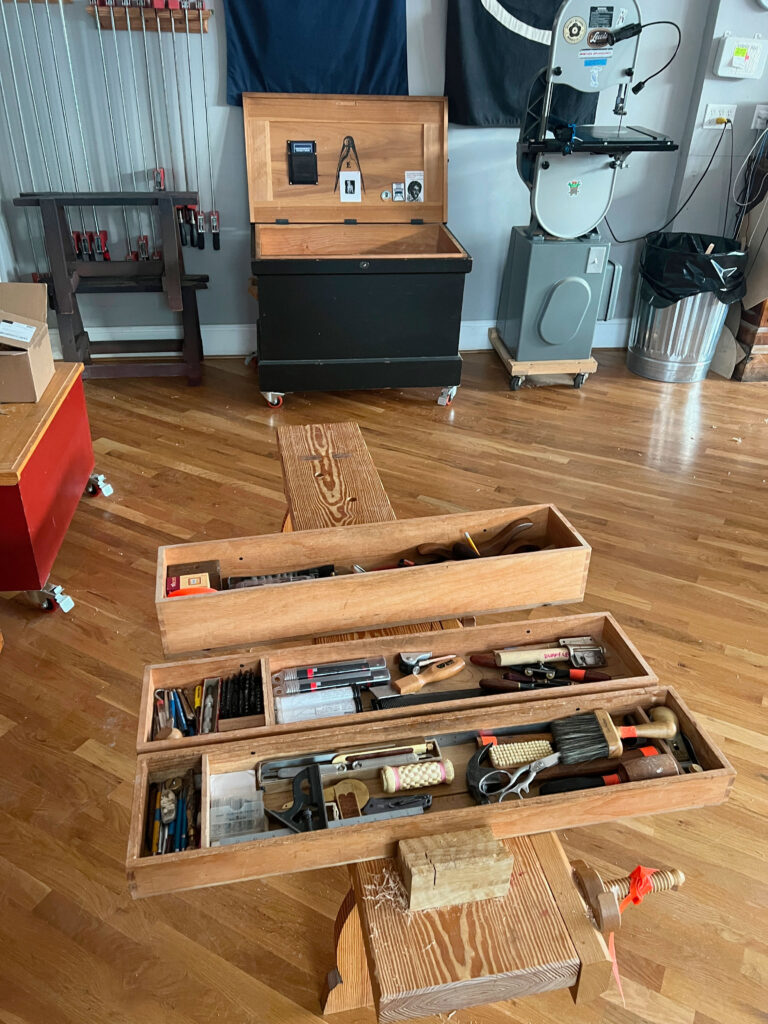
And I know some of you will ask: Why don’t you have a compass or pinch rods or….in your chest? The answer is likely that those tools are hanging on our communal tool wall or in my shop apron (both pictured above). The tool wall is used by me, Megan, instructors and students. In other words, I couldn’t just lock up this chest and sail to the New World to set up shop. I’d need to first throw in a few other tools. But I promise they would fit (along with my underwear).
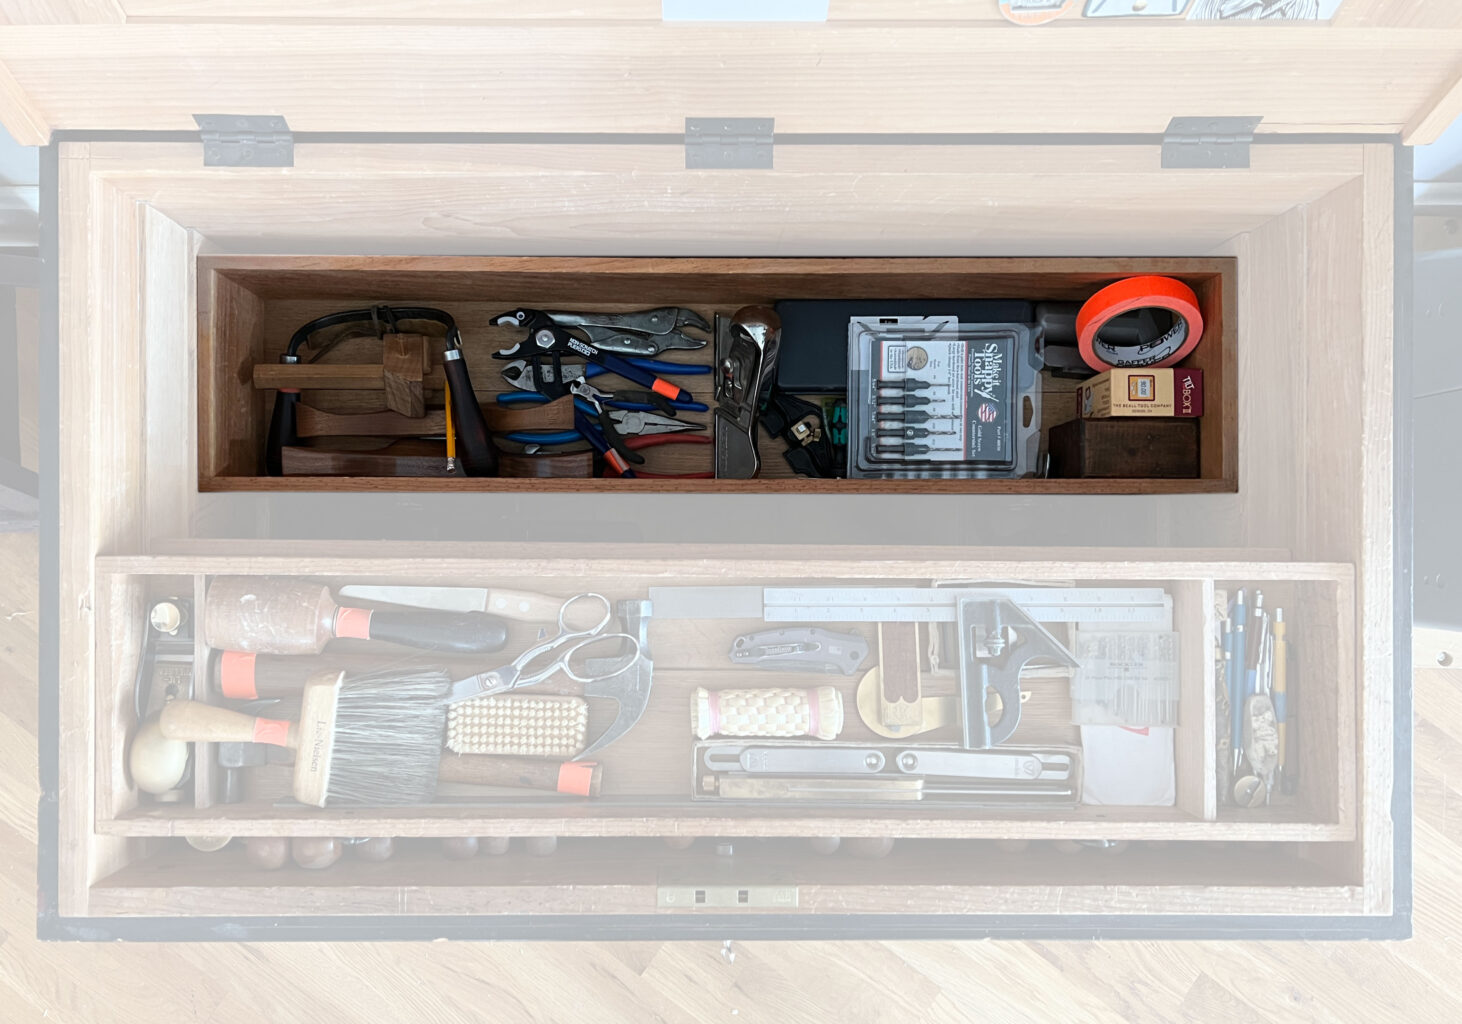
Let’s start the inventory with the top sliding till of my chest.
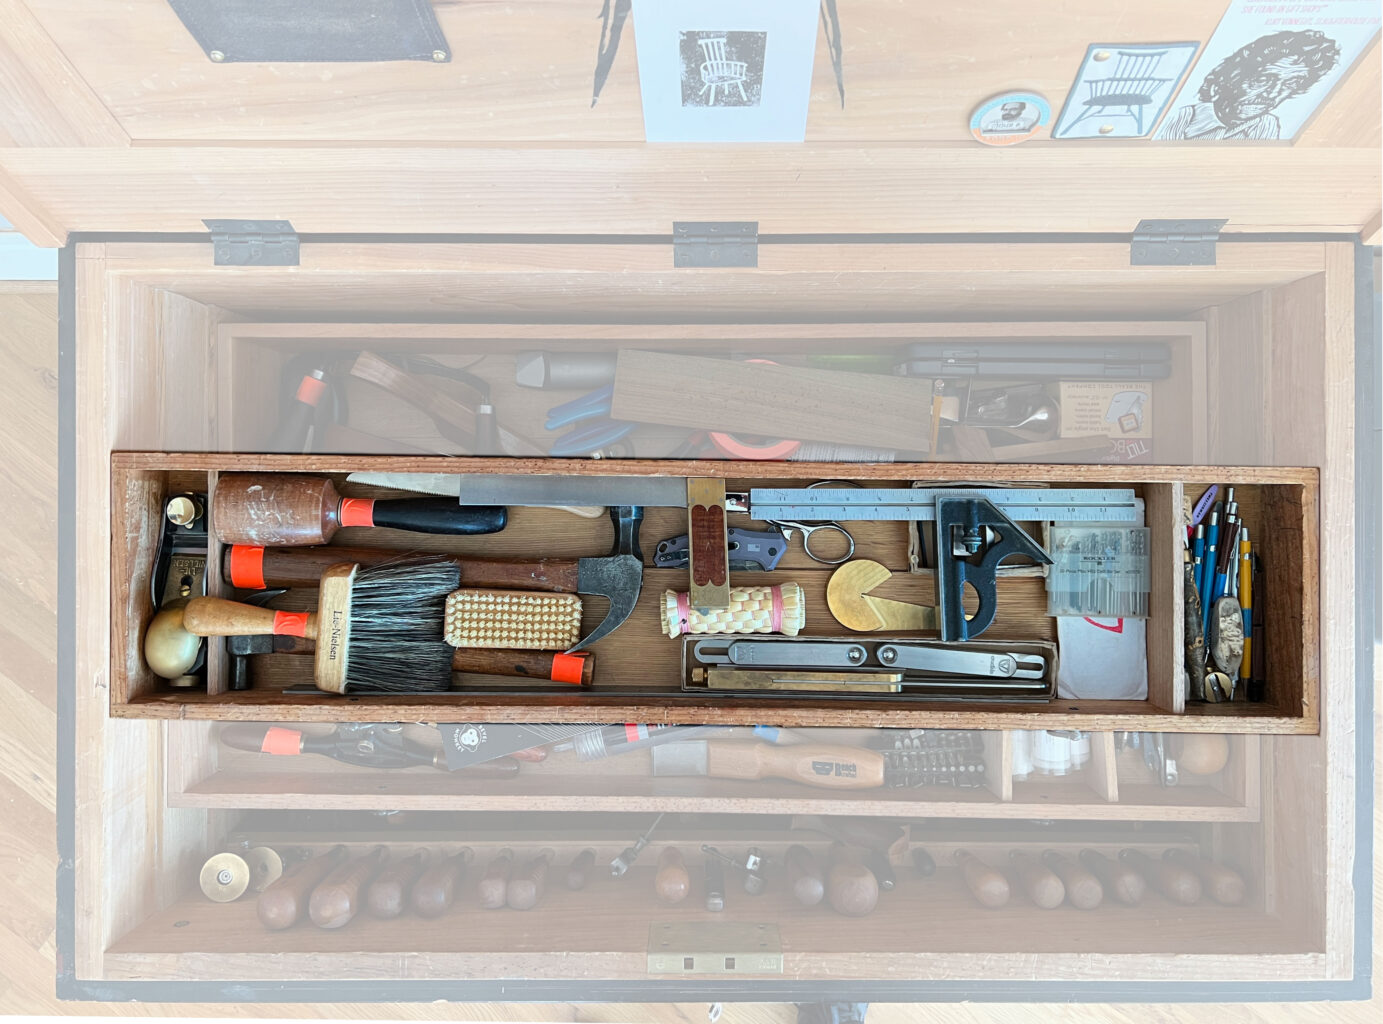
The Top Till
These tools have risen to the top of the chest because I use them many times a day. Think about it: A combination square wallowing at the bottom of a chest like a catfish will just slow you down. This till also gets the dirtiest and has suffered more wear than the others. Because of the wear, I added slick plastic “drawer tape” to the sides of the till to keep it from racking.
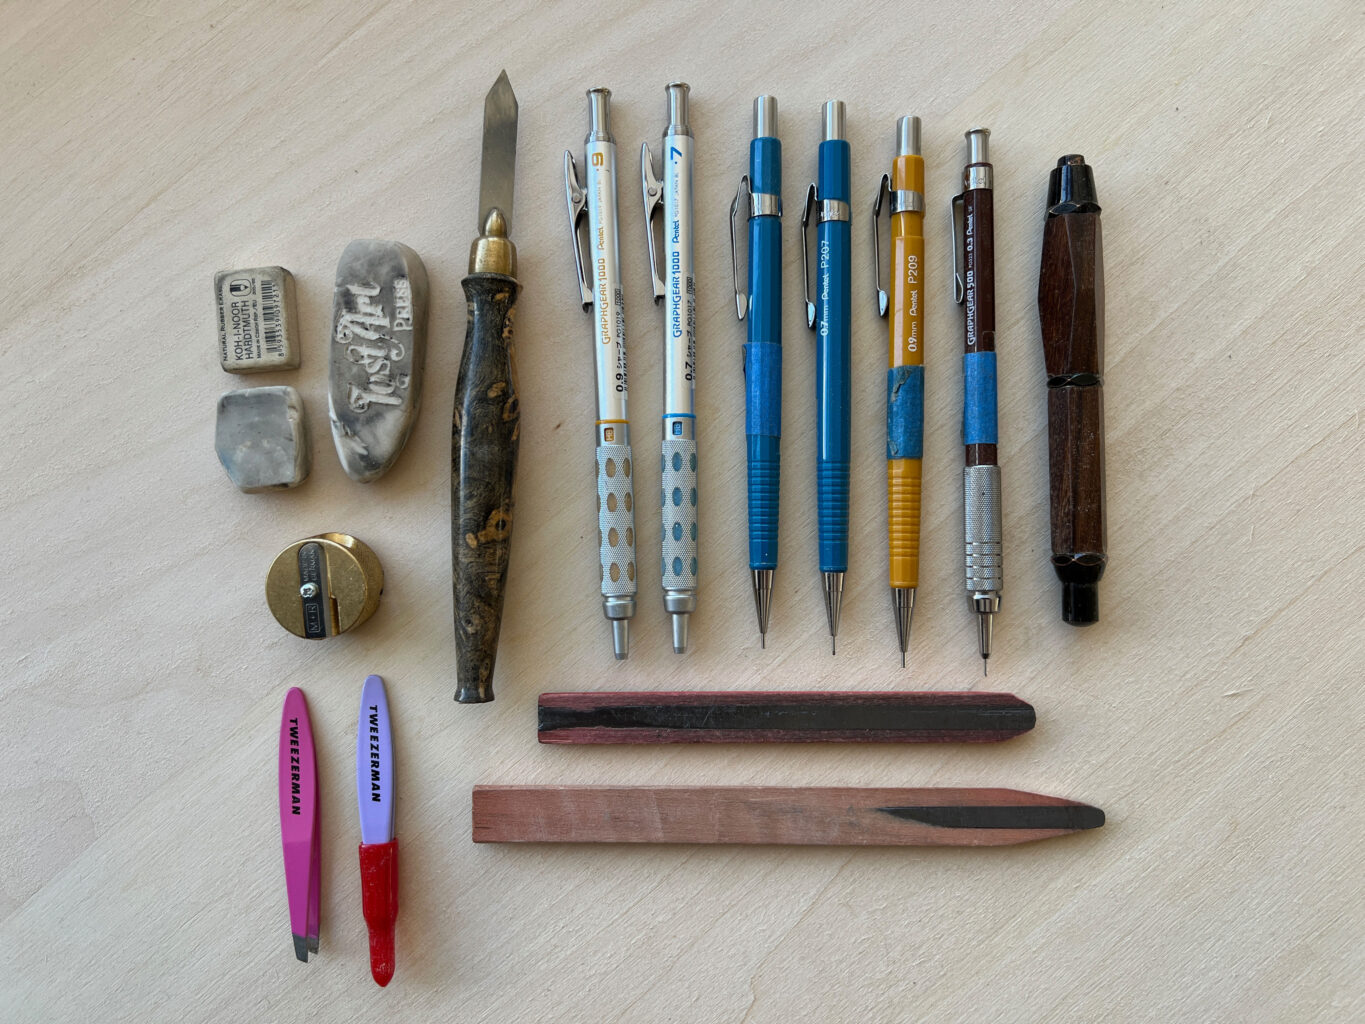
Marking & Flesh-digging Tools
The right-hand divider contains all my mechanical pencils, my half-pencils (everyone needs them) and my “unturned pencil” for marking out rough cuts. Plus artist’s gum erasers, my M+R pencil sharpener and a Blue Spruce marking knife with a broken finial. The knife is a personal thing. An Arkansas doctor sent me the knife, which is made from a wild burl that one of his patients had dug up. The patient, a long-time reader, asked the doctor to send me the knife before the reader died. I couldn’t say “no” to that. Finally, there are my Tweezerman tweezers, which are fantastic for digging out splinters.
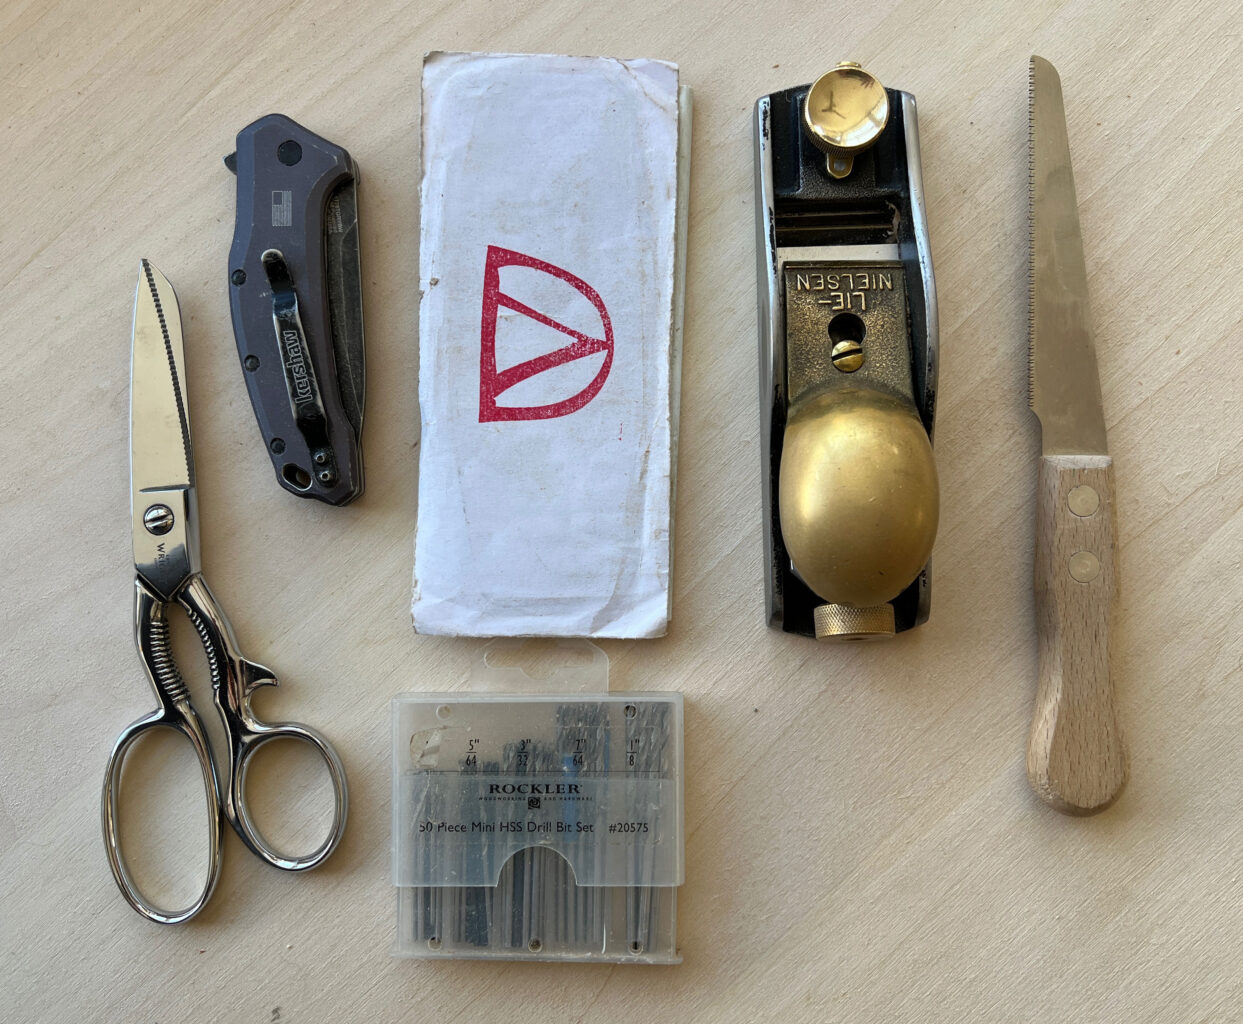
Cutting Tools
I was surprised at how few cutting tools are in the top till. The Ernest Wright scissors are from Sheffield, England, and are of insane quality (thank you, Matt!). The Kershaw pocket knife is inexpensive, made in the USA and damn-near unbreakable. Crucible Curved Card Scrapers – because they are the best (my boss made me write that). A collection of small drill bits in a handy case that I use constantly (get one from Rockler here). My Lie-Nielsen 60-1/2 block plane, because it is the best. And a small flush-cut saw from Lee Valley (choose “single-edge saw” on the drop-down to buy this one).

Beating & Scrubbing Tools
I know, it’s an odd grouping of tools. But here we are. The small hammer (11 oz.) is a no-name hammer that I use for driving pins and adjusting planes (yes, I hit only the metal bits with this hammer). The bigger hammer is a 16 oz. Plumb with an octagonal handle. After trying to reproduce my magical favorite nail hammer, we concluded that we couldn’t beat the old Plumbs in price or value. Get one. Plumb made millions of these suckers.
My 16 oz. Blue Spruce mallet is a long-term survivor. I chop dovetails and hinge mortises with the help of this guy. The polissoir is made by Cate Richards (I love the pink). The Lie-Nielsen brush is an essential and personal favorite for getting shavings and dust out of the mouths of planes. And the fingernail brush is used to clean the teeth of my rasps.
Oh, about the orange gaffer’s tape. I put that on tools that tend to wander during classes. Thanks to the tape, I can spot my tools across the room.
Measuring & Marking Tools
At top is my Starrett 12″ combination square, a faithful companion since 1997. Below that is a Chris Vesper try square, which is the ultimate arbiter of 90° in the shop. Worth every penny. A Starrett 24″ rule fits into the combination square and helps with big layouts. The Crucible brass center square is indispensable for chair work. Yes it marks centers on the ends of sticks. But it also allows you to mark radial lines on curved surfaces. The Crucible dovetail template is a natural fit for my work. The Vesper double square (based on old diemakers’ squares) gets inside joints to check their surfaces.
Below that are two Crucible Sliding Bevels and a larger Vesper Sliding Bevel. Sliding bevels are in constant use. I want good ones that hold their settings in a shop environment. Finally, a beloved Shinwa 12″ rule. Nothing special but immensely readable and useful.
Till Two
This till holds chairmaking tools, plus a bunch of bits, punches and other small items. These are tools I use almost as much as my top-till tools. But it has sort of a “junk drawer” feel at times (such as today).
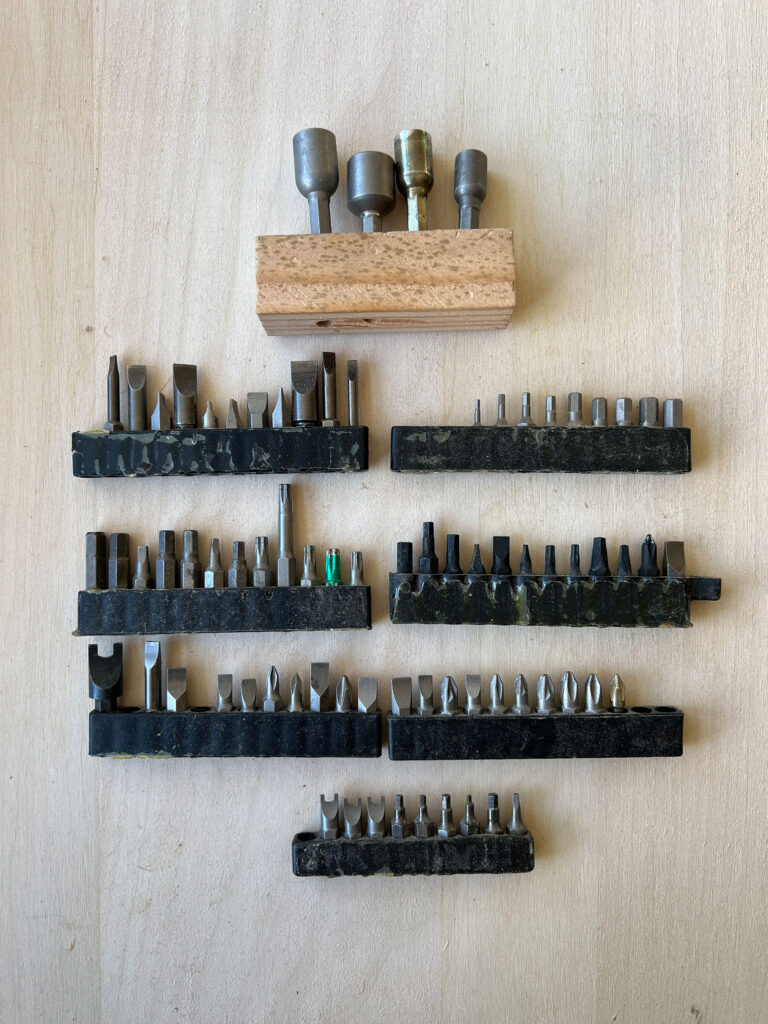
So Many Bits
At some point in my career, I decided I didn’t want to be a two-bit woodworking celebrity. I wanted to be a 142-bit woodworking celebrity. Hence, this photo. Having all this hex-shank tooling has saved my butt many times. Some of these are ground gunsmith bits. Some are cheap ones that fell into my hands and are great to loan out…. The nut drivers at top mostly get used for machinery maintenance. I once tried to epoxy all these bit holders together, but the epoxy flaked off like skin over a sunburn.
Chairmaking Tools
Here are some dedicated chairmaking tools. At top is a “dummy leg” for checking angles as I ream leg mortises. The three little dowel bits are what we call “Hinderpluggen.” We use them to assist in boring through-mortises in chair legs. And for knocking loose legs that have become stuck in chair seats.
Below that are three tapered reamers. There are three to help supply students during classes. Then a 5/8″ tapered tenon cutter, which has been beat to hell and back. The red line on it indicates the thickness of a typical chair seat. And the 5/8″ Wood Owl augers are used for leg mortises.
Miscellaneous Tools
At top is a hacking knife, made by Tom Latane, which splits small parts out for chairs, mostly short sticks and pegs. Below that is the Crucible Bevel Monkey, which is essential when describing chair angles in plans and books.
At bottom left is the Benchcrafted Skraper, a carbide scraper we use for terrible, horrible things I cannot say words about. And a Tooleypark scriber, perhaps the newest tool in the chest, which is used for scribing chair legs to length.
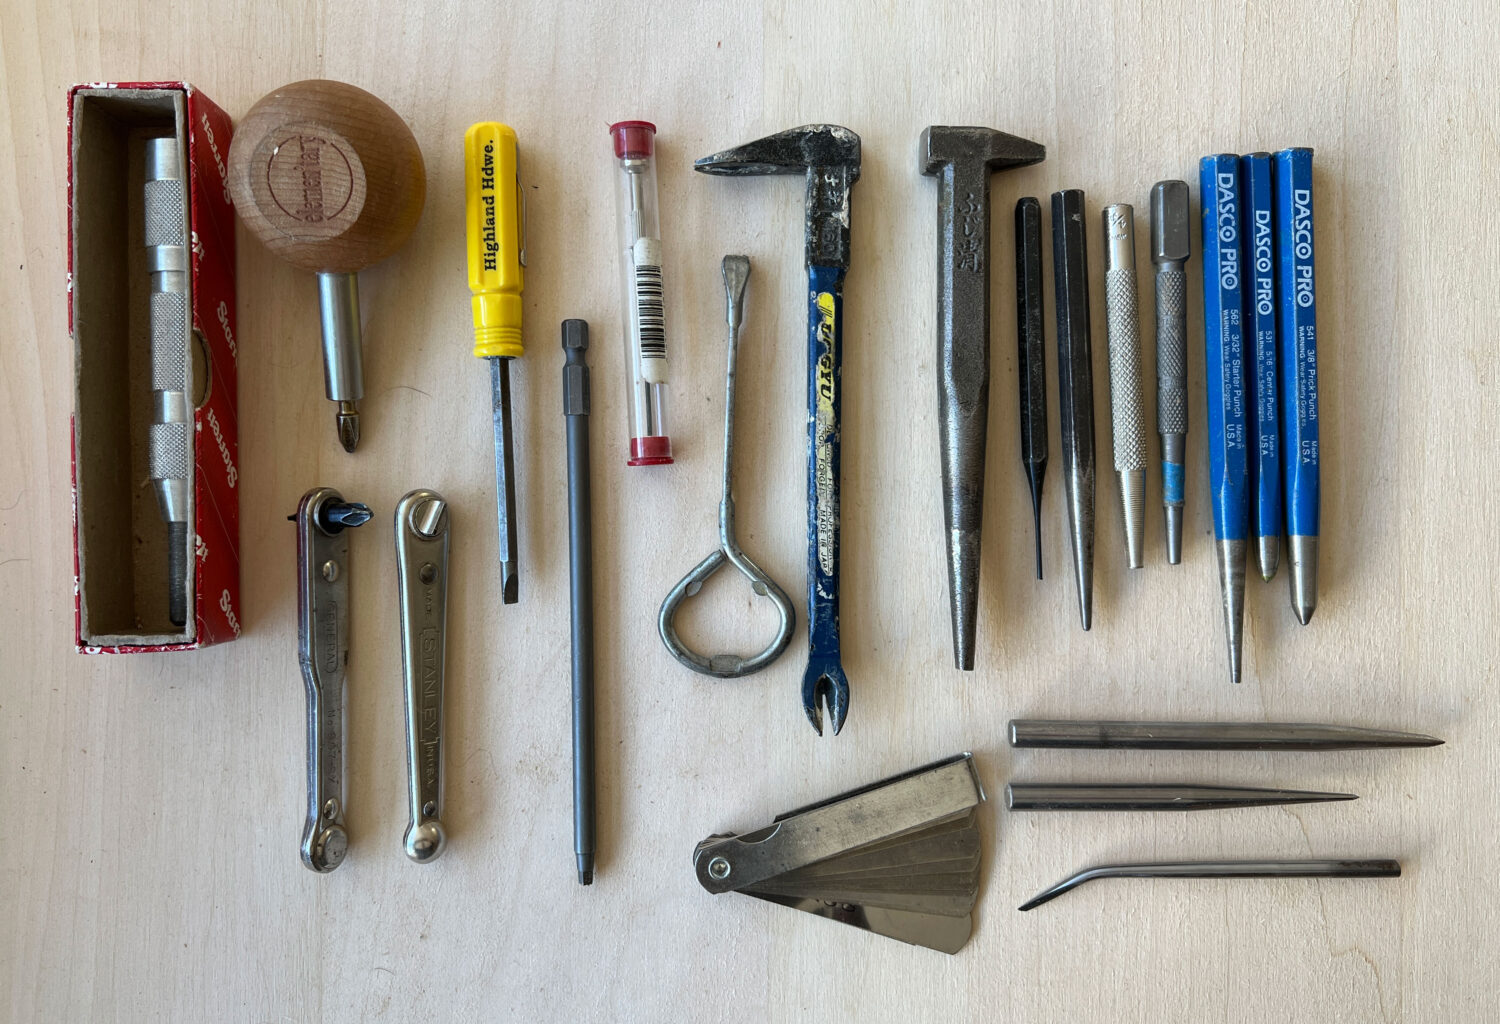
Punchy & Poky Tools
More “junk drawer” items that see a lot of use. The Starrett centerpunch is a constant companion for installing hardware. To the right of that are some of my “I can’t quite get there from here” stubby screwdrivers. Used mostly in emergencies.
There’s a paint can opener because we love paint in this shop. To the right of that is a Japanese cat’s paw, which helps pull headed nails. And a Japanese nail punch, which is so tough that it gets used for many unpleasant jobs in the nether regions (like the Skraper). Then we have a handful of punches. I modify these for different odd jobs, such as setting cut nails.
Below that are some extra compass points and my feeler gauges, for when I feel fancy like a machinist.
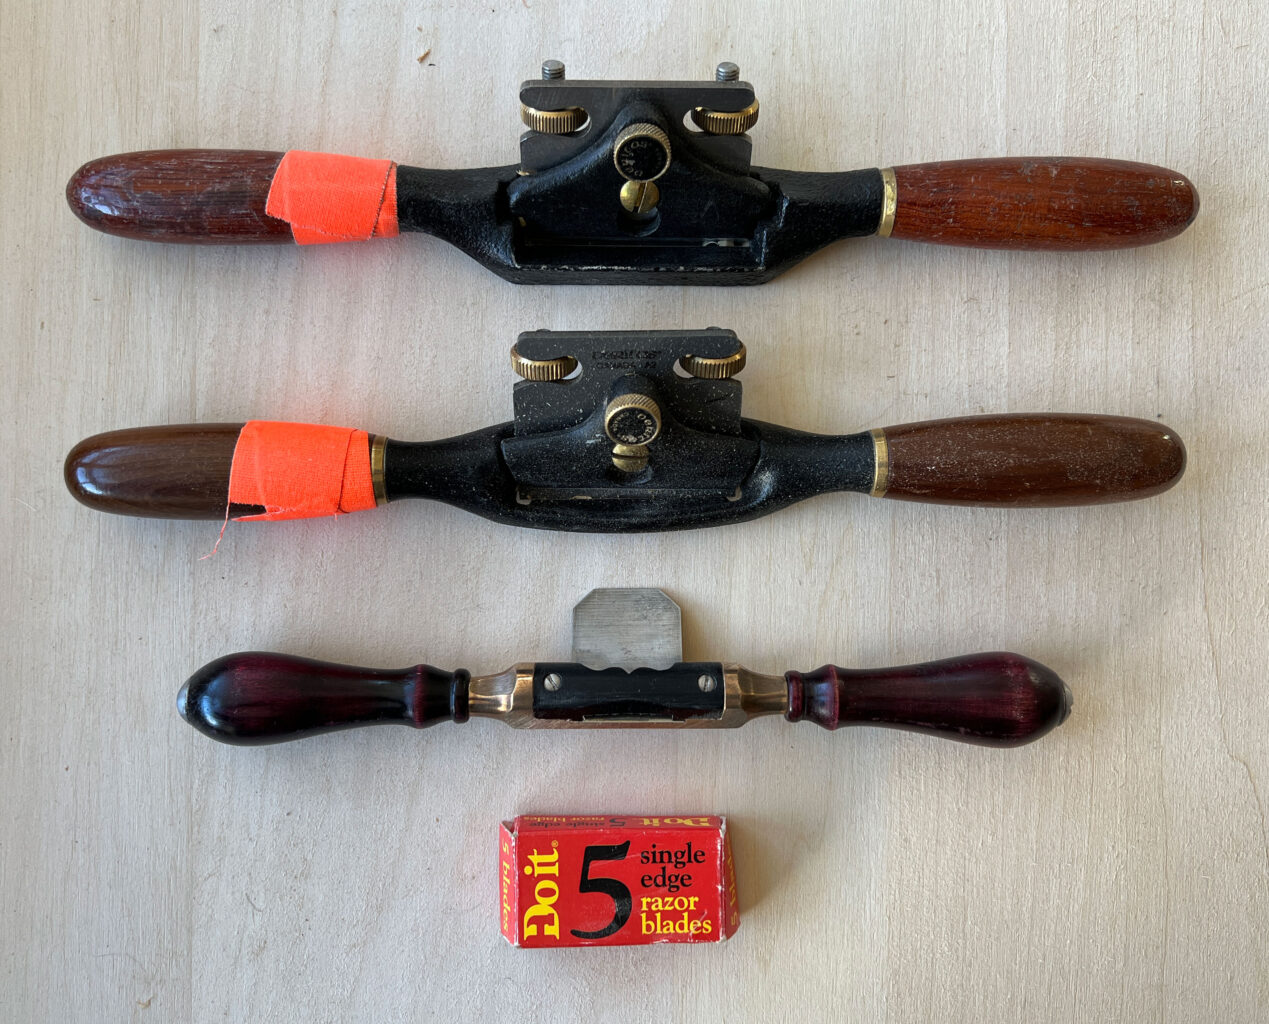
Shaves
My only two spokeshaves are from Veritas (I don’t have a spokeshave problem, unlike some chairmakers). Plus a chair devil from Eleanor Rose, which I adore for its functionality and gorgeousness. Oh, and some safety razors, which get bent to become tiny awesome micro-scrapers.
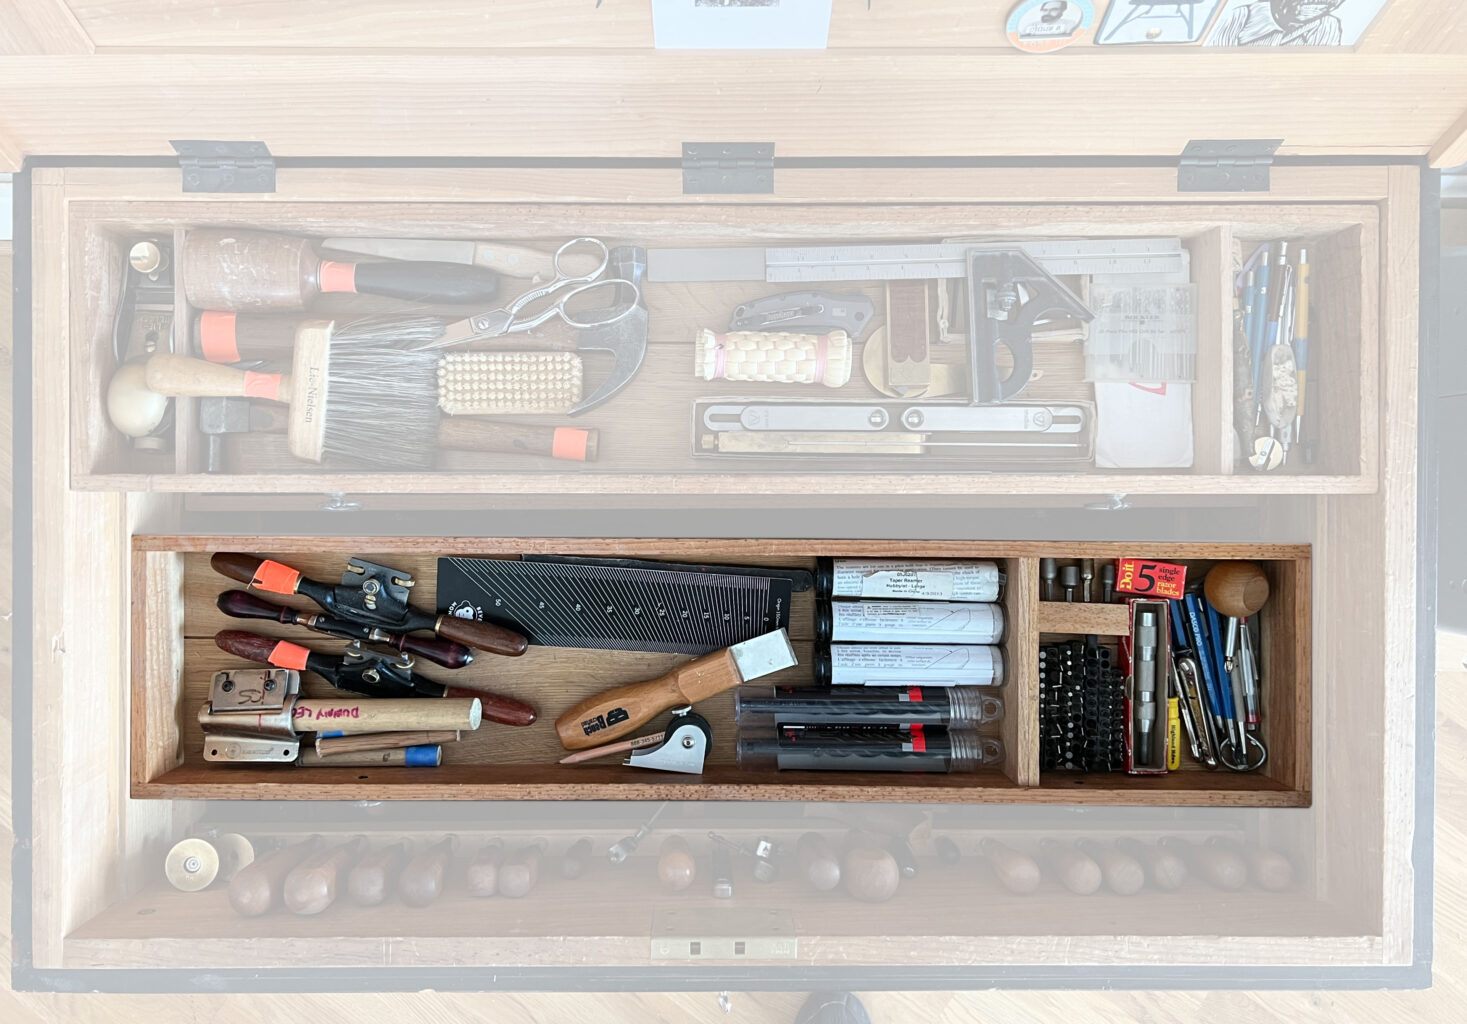
Till Three
Back in the beginning, this till was for bigger tools, such as a brace (now hanging on the wall as a communal tool) and an eggbeater drill (ditto) and auger bits (now in a tool roll). Today, this till is still for bigger tools, but mostly chairmaking stuff and all the grabby tools.
Chairmaking Tools II
At top is a scorp from blacksmith Lucian Avery, which is shaped perfectly for shallow seat saddles. Below that is a Tilt Box gizmo, which is used to “steal” angles from existing chairs or other furniture. Two travishers. The top one is a tight-radius travisher made by Allan Williams. I use it for the sharp transition at the rims of my seats. His travishers are stunning and work incredibly well. Below that is a travisher from Claire Minihan and Peter Galbert, back when they were making them together. I traded Pete a bunch of books for it and still adore it.
At bottom is a shop-made pencil gauge that is indispensable, especially for chairmaking. It works on flat edges, inside curves and outside curves. I wish we could make these for sale.
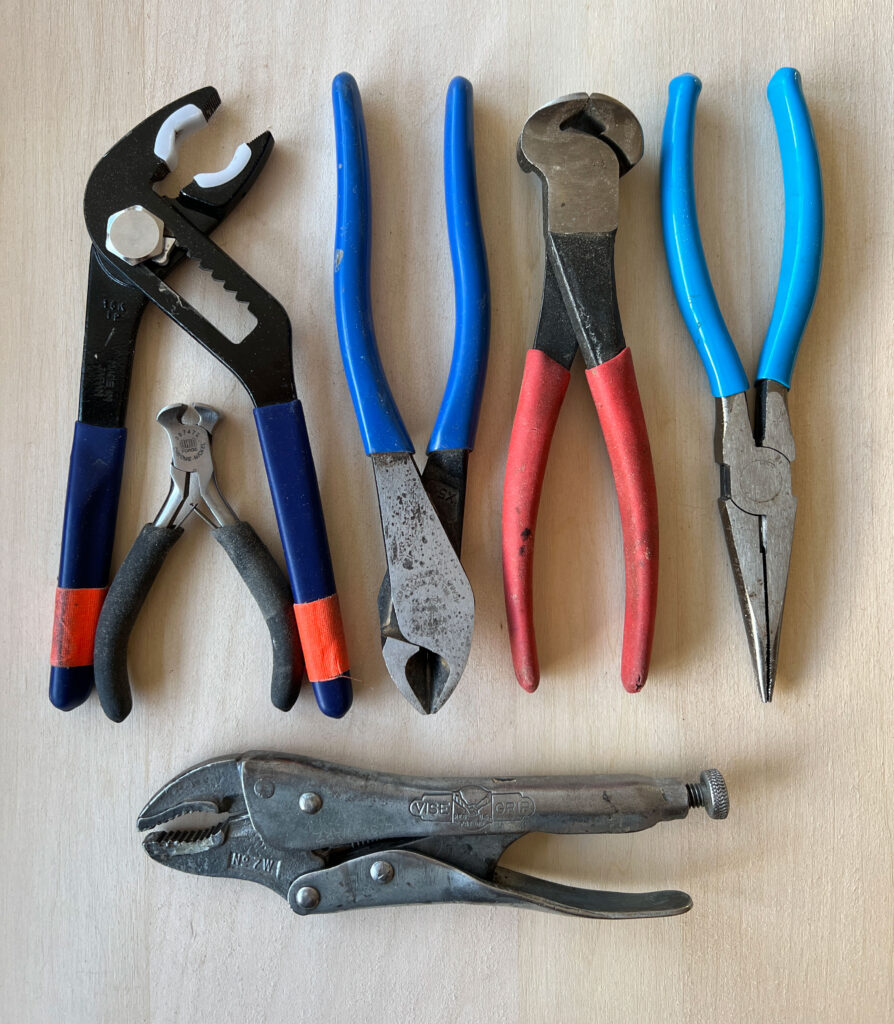
The Grabby Things
Most of these tools are obvious. The soft-jaw pliers are for compressing round tenons. The nail pullers are for … pulling nails. And the other tools are for their normal, listed-on-the-box uses.
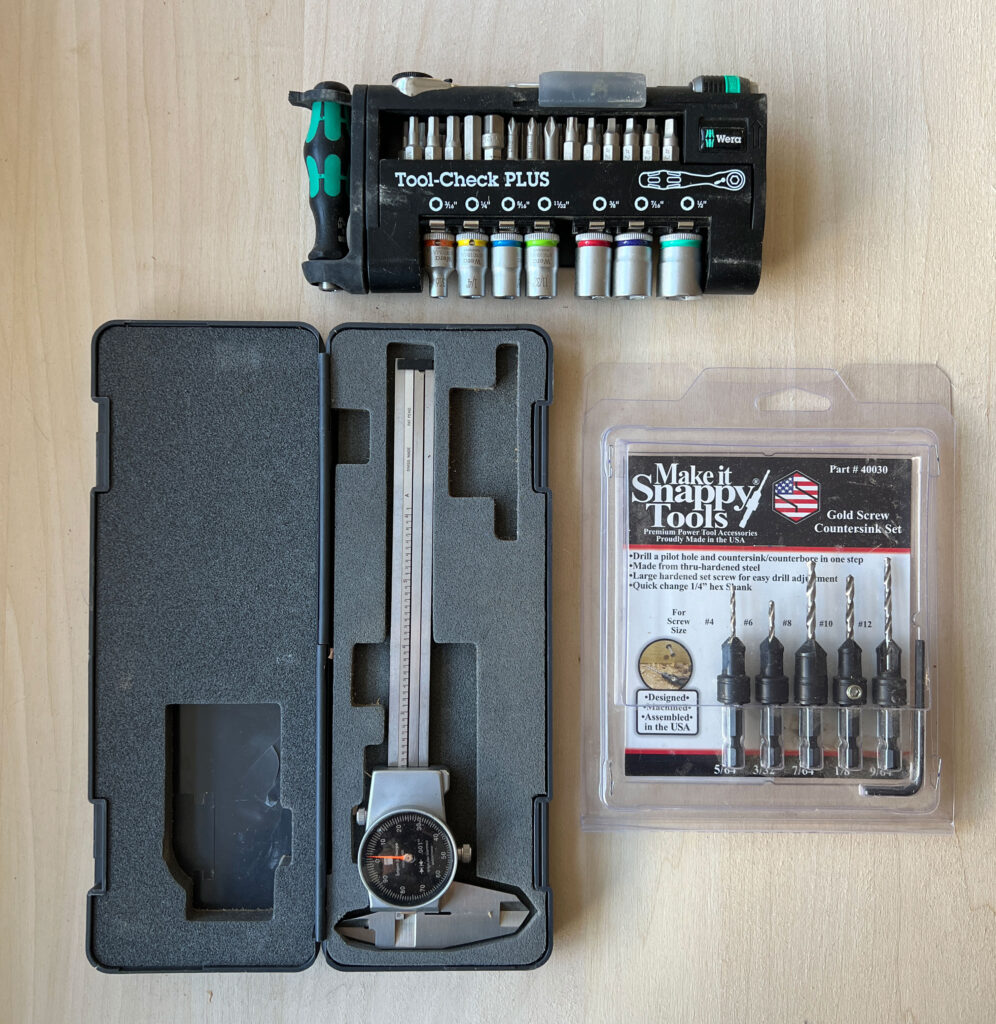
Machinist Tools & Bits
The Wera tool set is an emergency kit for when things go wrong in the bench room. Or when we need to go fix something on the car or in the house. The Brown & Sharpe dial caliper checks tenon sizes, tolerances when inspecting Crucible products and other machinist-like things.
And the Snappy bits are for when we need to run-and-gun to build a screwed-together something.
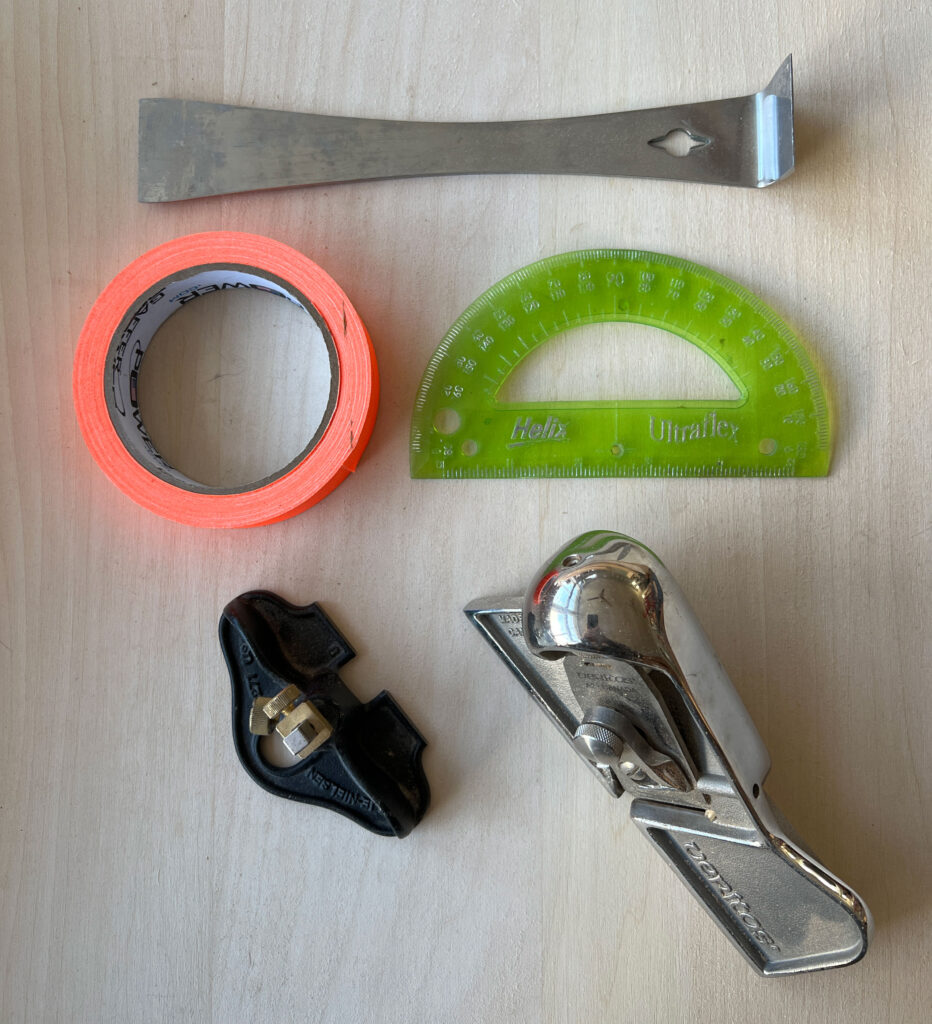
Miscellaneous Tools
At top is a thin pry bar (an iron crow), which gets a lot of off-label use. Below that is the hi-viz orange tape for marking tools. A flexible protractor for doing weird angled stuff on curves. Then there’s a Veritas edge plane, an occasional life-saver. And a Lie-Nielsen small router plane, which was in the top till when I wrote “Campaign Furniture” because of all the hundreds of bits of hardware I had to install.
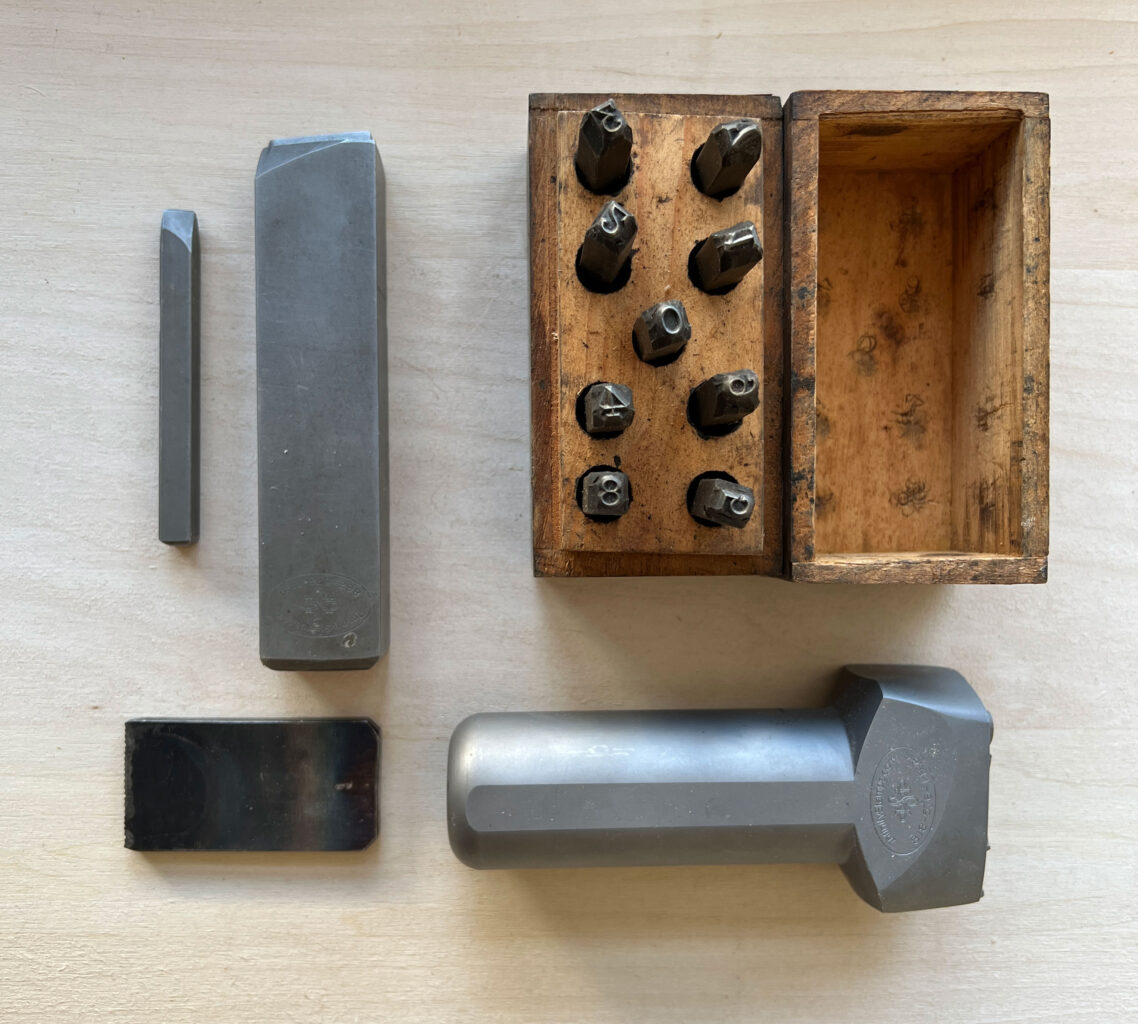
Name & Number Punches
The number punches stamp the year on my work. And they are used to identify parts in a complex glue-up. The other stamps are name stamps and shop stamps for a variety of purposes. Marking my work, tools and other objects that might walk. The three grey stamps are from Infinity Stamps, which does excellent work.
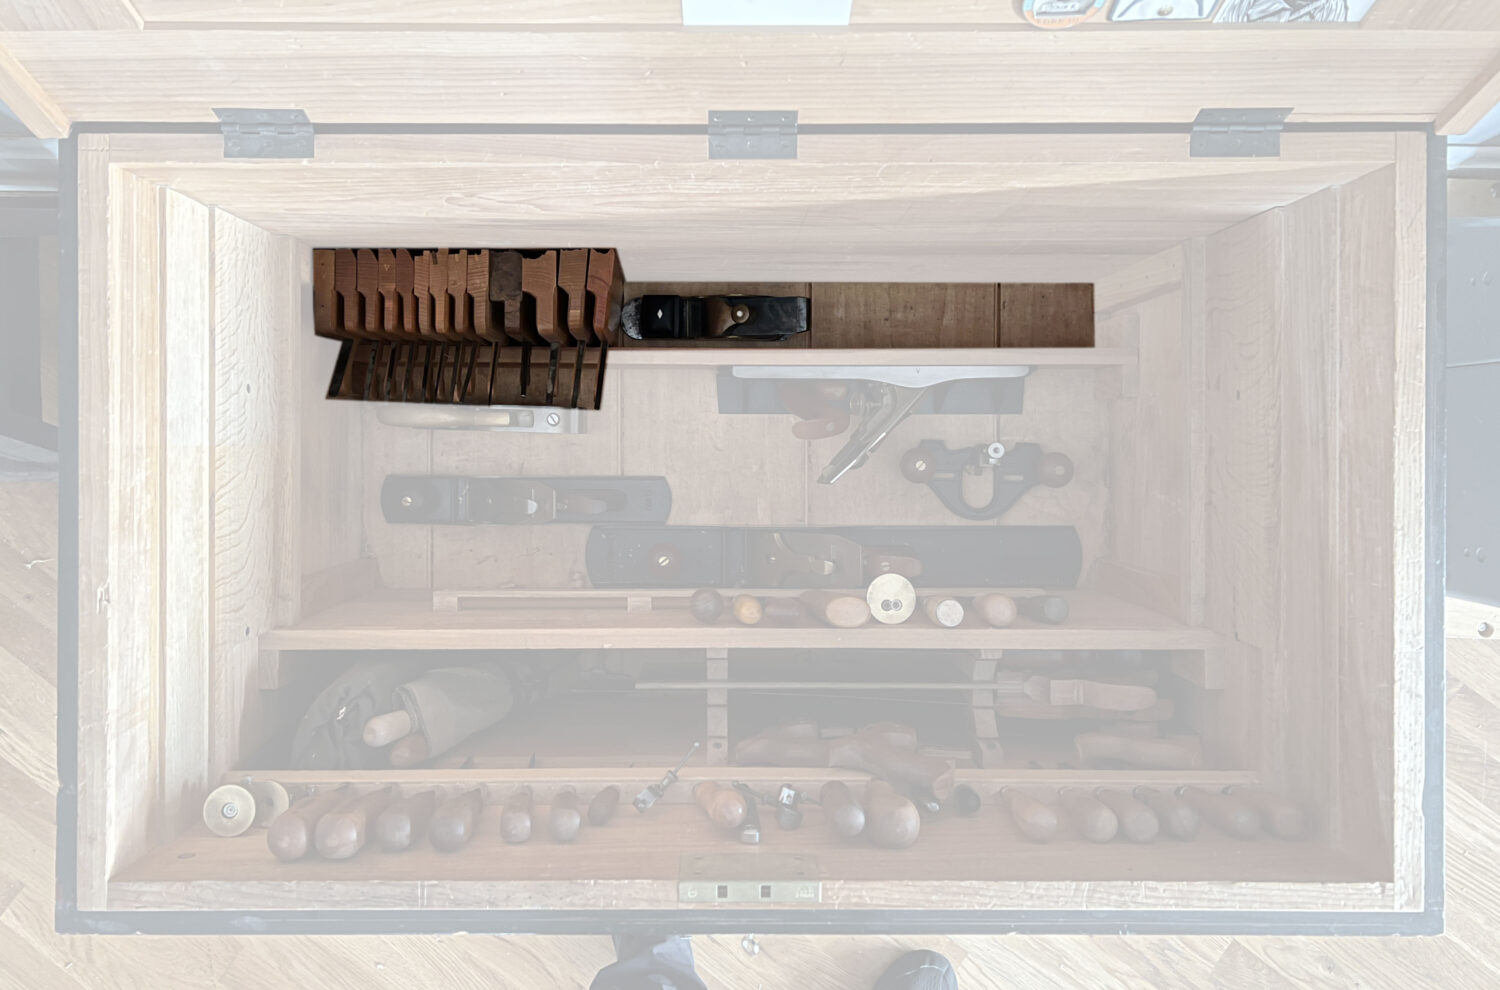
The Moulding Plane Corral
This area is like a little terrarium in the tool chest. It is a bit closed off from the rest of the chest because of the way the sliding tills interact with the tool racks. You have to slide all three tills all the way forward to get the moulding planes. Not a big deal, but it’s rare to go here unless you mean to. I used to have a lot more hollows and rounds. As I’ve gotten older I’ve settled into a few sizes and profiles that I like and use frequently in my work.
Do not take these tool choices as gospel for what you should own. My work varies wildly in style and period. Yours might not.

Straight Rabbet Plus Hollows & Rounds
The 7/8″ straight rabbet plane is from Clark & Williams (now Old Street Tool), which makes rabbets parallel to the grain of boards. These rabbets might be for joinery, or they might be to rough out the shape of a complex moulding.
I now have only two pairs of hollows and rounds in my chest. A pair of 7s and a pair of 9s. Both sets are by M.S. Bickford. Because I don’t make reproductions, I can usually press these two pairs into making what looks good. Also, my work is more on the vernacular side, so enormous stacks of crazy moulding isn’t my thing. I think that stuff is beautiful, but it’s not what I do.
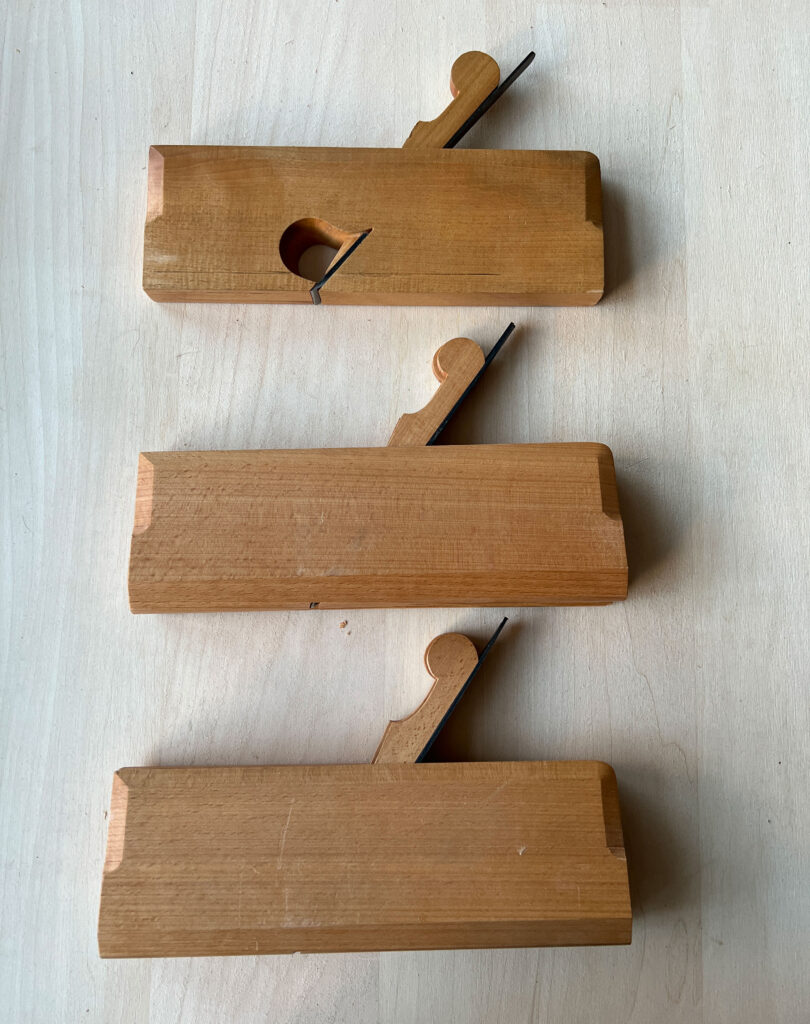
Beading Planes
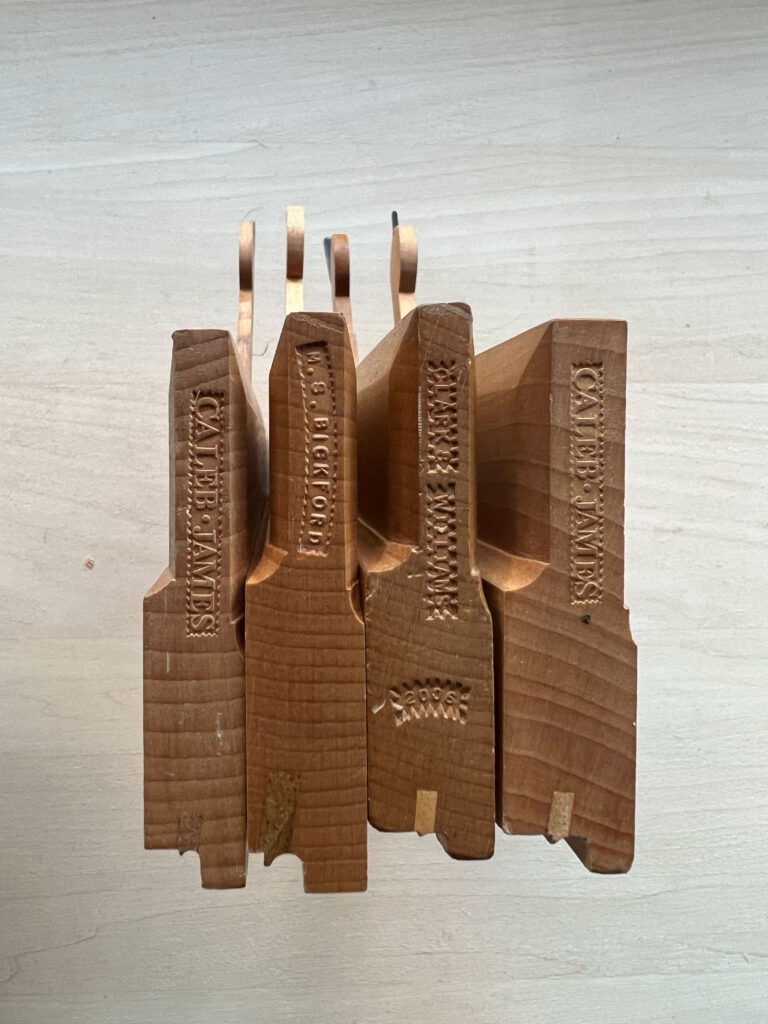
I do like to use beading planes on my casework. They produce a nice shadow line to separate a face frame from a door or drawer, for example. I have four of them, but I really only should have three. The 1/8″ beading plane is from Caleb James. There are two 3/16″ beaders. One from M.S. Bickford and one from Old Street. The 1/4″ beader is from Caleb James. If I had to own only one beader, it would be a 3/16″, which is a nice size.
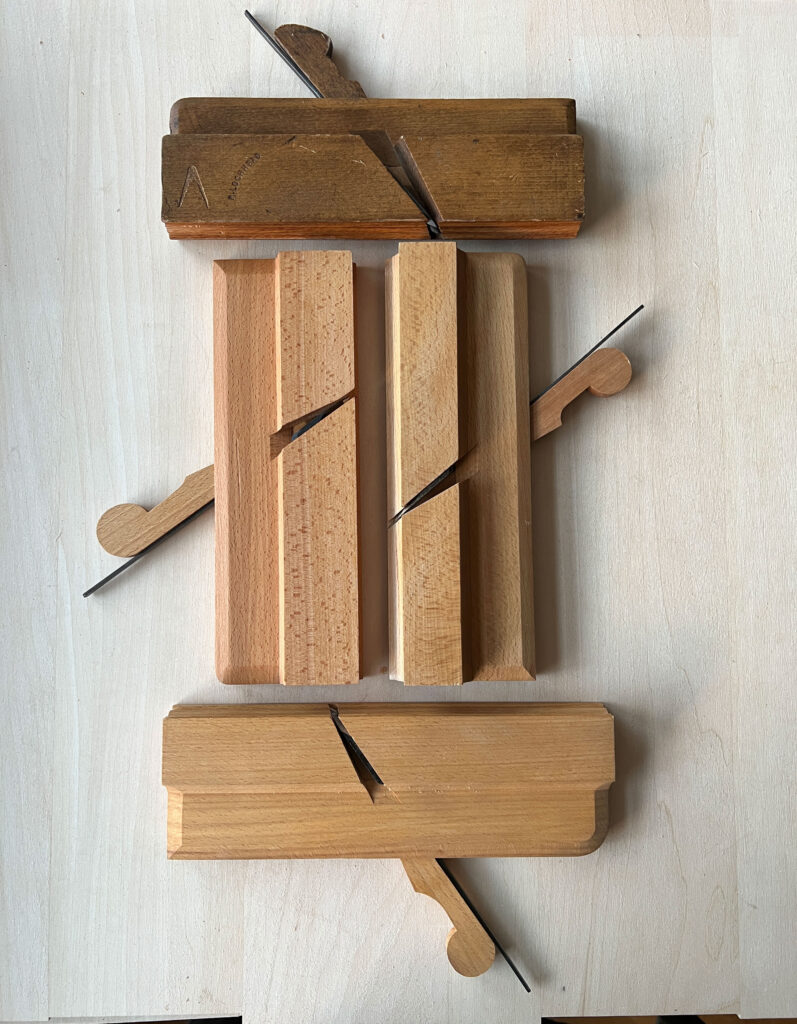
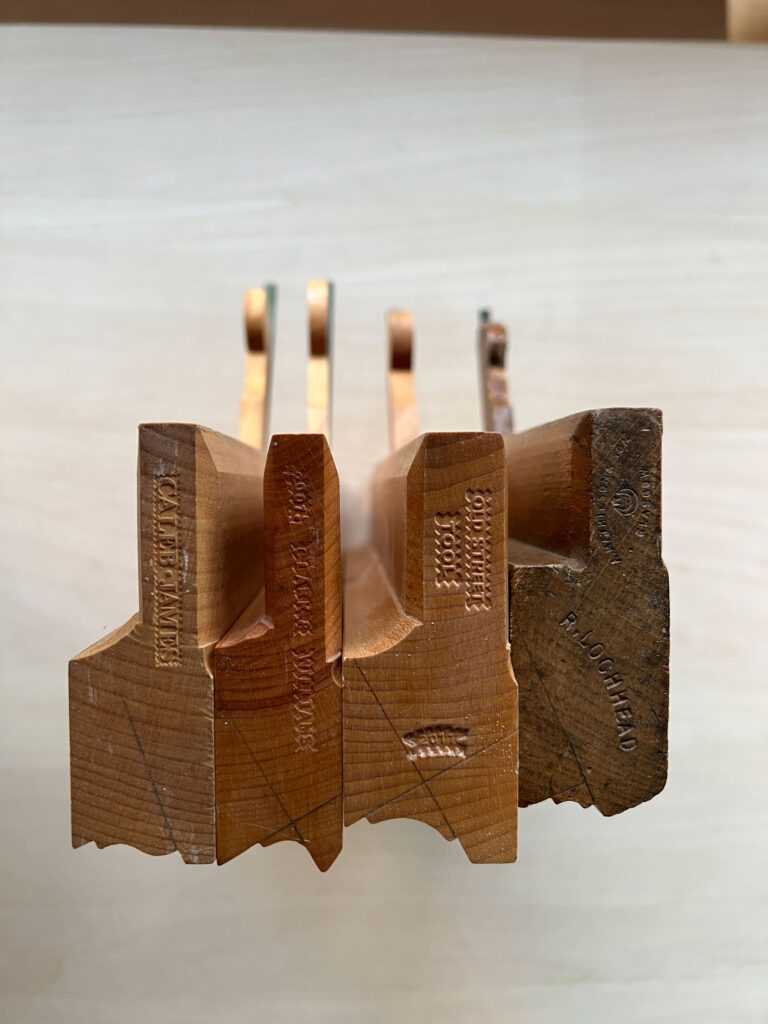
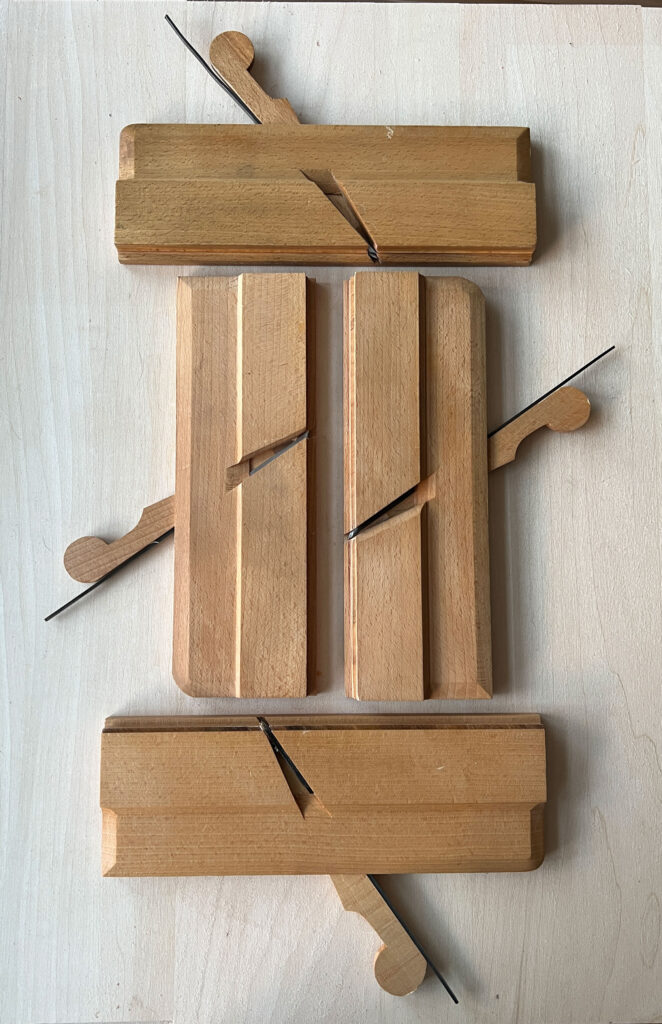
Complex Moulders
I use a few profiles over and over again. Call it consistent or call it boring – I do it so that I have fewer tools to sharpen and care for. (I prefer woodworking over tool maintenance.) At top is an A. Mathieson & Son square ovolo. It was made in Glasgow, which is where the Scottish side of my family comes from (or so I’m told by my spit). Below that is a bigger square ovolo by Old Street Tool. Then a thumbnail moulding plane, which is ideal for the edges of lids and chest tops. It was made by what is now Old Street. I could make that moulding with a straight rabbet and a block plane, but this plane is just so sweet, I keep it around. Finally there’s an ogee plane by Caleb James.

Miter Plane
With all the leftover room from trimming back my hollows and rounds, I have room for a long-time companion, a Wayne Anderson miter plane. This plane was stolen at a Philadelphia tool show. But I got it back after the thief had to sell his tool collection after it was wrecked by Hurricane Sandy (karma is a bitch, sir). It’s a long story, and one that I am not allowed to fully tell. This plane is the first infill I owned, and I love it to bits. Works great, too.
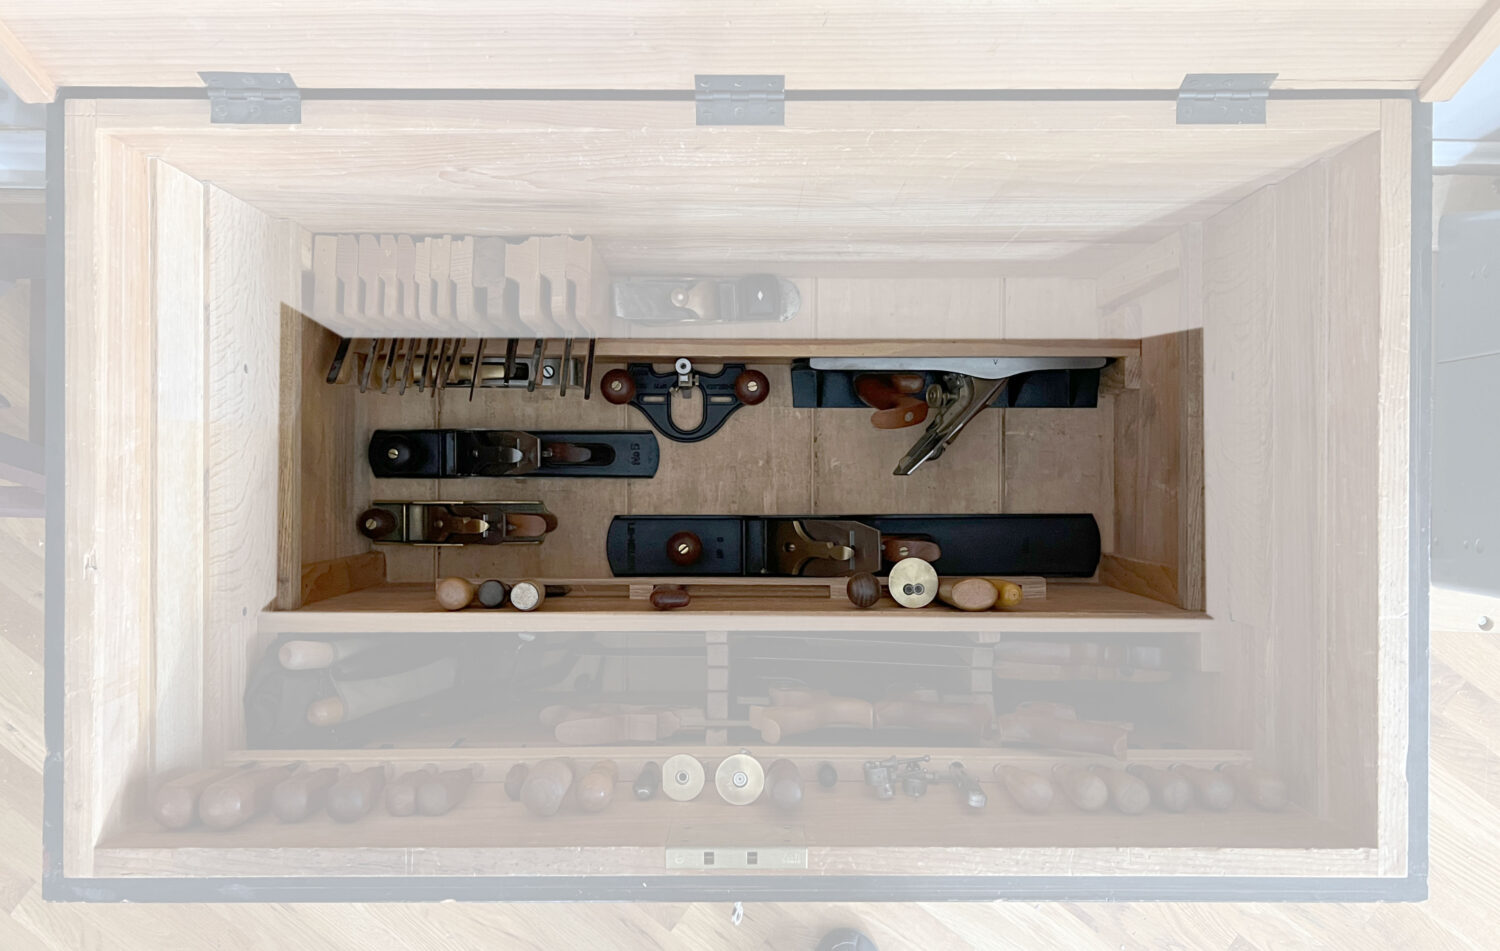
The Central Well & Small Tool Racks
This is the largest space in the tool chest, but it contains the fewest number of tools. When I peek into other woodworker’s chests, this area is usually crammed with bench planes (two No. 5s? Is one for formal outings, Biffy?). While the well looks a bit spare, it has been even more empty in past years. I finally succumbed to a shooting board plane. It’s a luxury. But I have the room, and we use it every week.
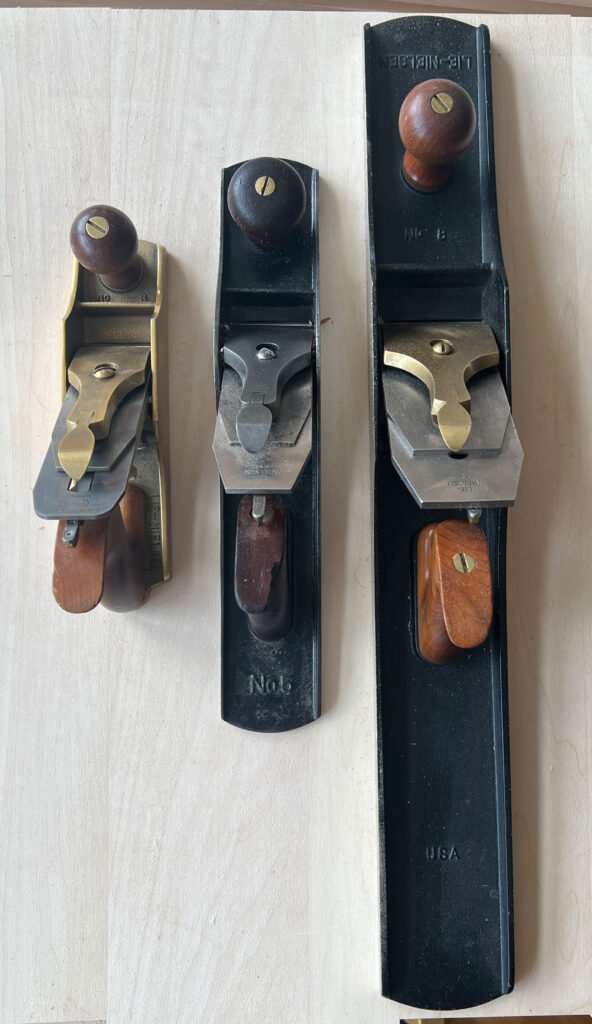
Bench Planes
No surprises here. I’ve owned these three tools since before I built the chest. There are Lie-Nielsen’s Nos. 3 and 8. And a Stanley No. 5 (Type 11). The No. 3 has the standard frog, plus a Veritas PMV-11 plane iron (my NAFTA plane). The No. 5 is on its third iron. I now have a Lie-Nielsen A2 iron in it (I had to file open the plane’s mouth a bit to make this work). The No. 8 is stock.
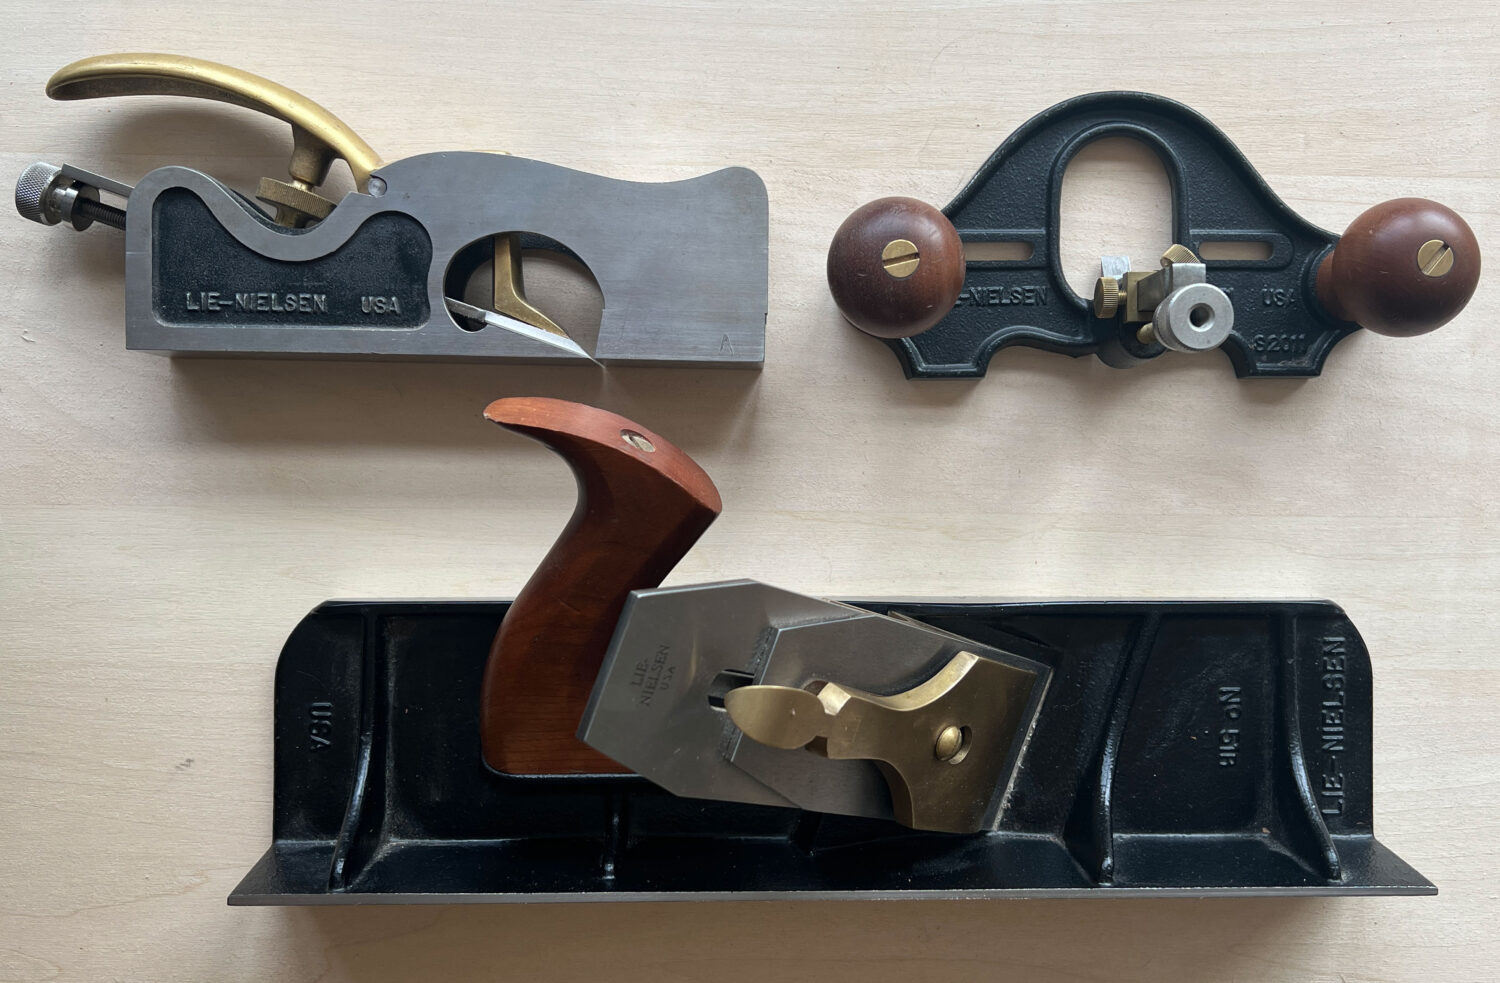
Specialty Planes
I have a few other specialty planes packed away because I haven’t used them much (especially my plow and moving fillister; but that’s going to change shortly). Here are the three currently have in the central well: A Lie-Nielsen 073 shoulder plane (I have never needed an additional size than this one). A Lie-Nielsen closed-throat router plane. And a Lie-Nielsen dedicated shooting plane.
Tool Rack Chisels & Stuff
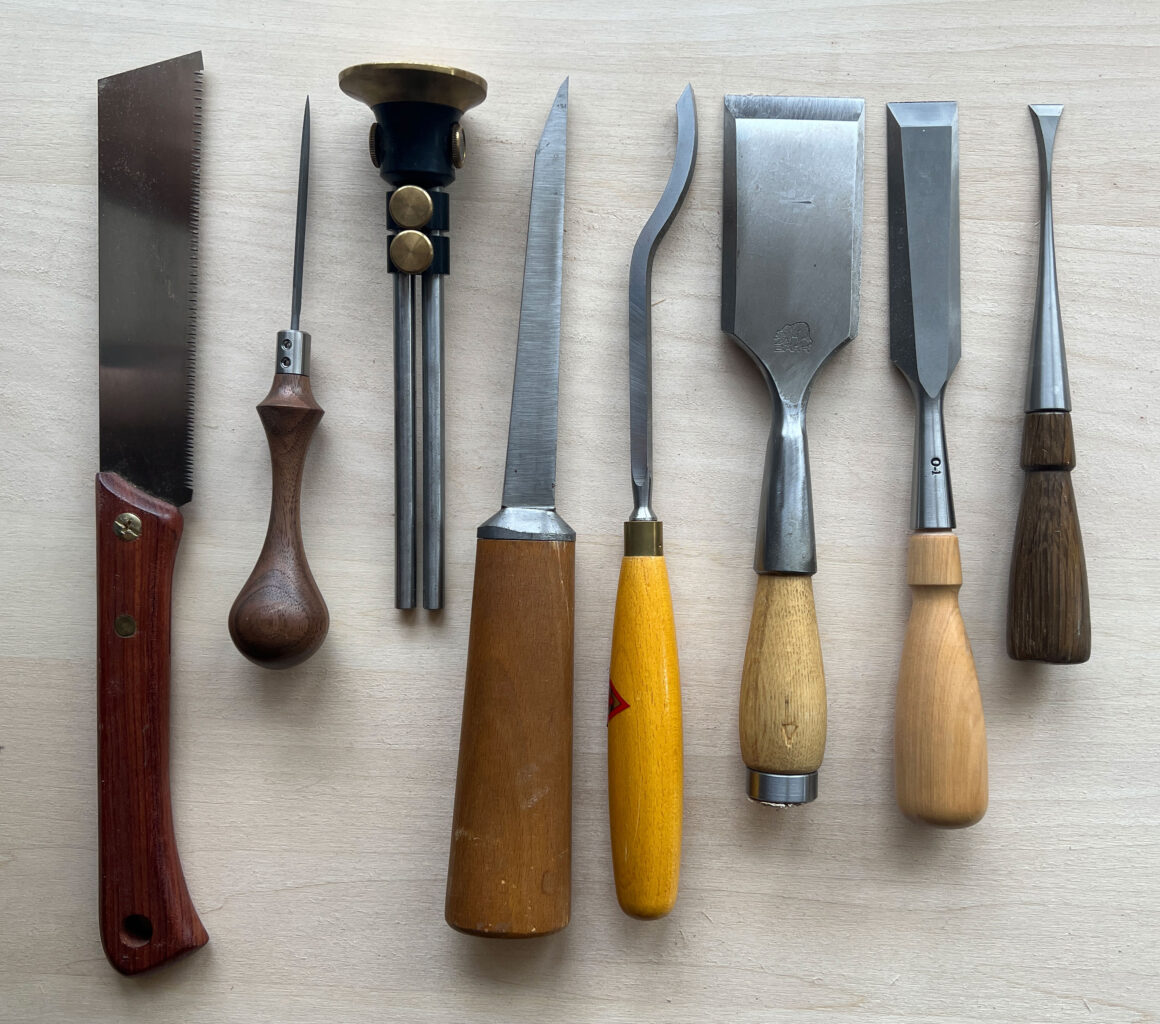
The rack right above the chest’s central well has some important specialty tools. The flush-cut saw, a tool holder from Mattias Fenner in Germany and a Veritas mortise gauge. Next to that we have the Ray Iles mortising chisel (1/4″) and a matching swan-neck chisel for de-crapifying the floors of mortises. Then there’s a massive and beloved Barr bench chisel, which is good for all sorts of nastiness. The steel is ungodly good. Then there’s a Lie-Nielsen 1″ chisel, which didn’t fit in the top rack, and a Lie-Nielsen dovetail chisel with a bog oak handle I turned.
Front Rack & Sawtill
This is a busy area of the tool chest as these tools are pulled out a dozen times a day. As a result, this area gets filthy, especially below the saws. There’s a lot to see.
Screwdrivers
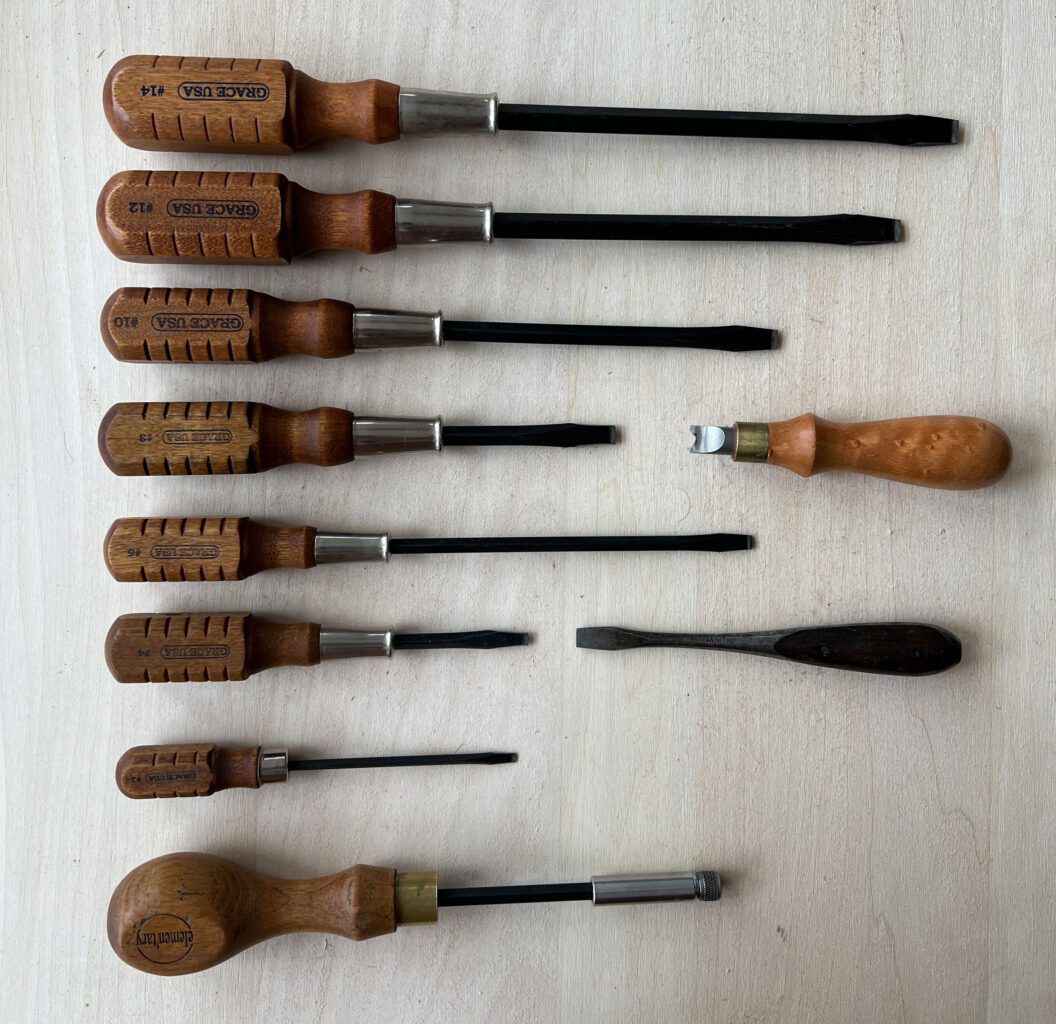
First is a full set of Grace USA straight screwdrivers (why, pray tell, is the No. 6 driver such a weird size? Must be a gunsmith thing). These are the best drivers. Ground tips. Tough as nails. At bottom is an Element’ary driver, which accepts all the hex-shank bits. And it has a locking/magnetic collar. Highly recommended. There’s a Lie-Nielsen screwdriver for tightening split nuts. It’s modified it to work with all our backsaws. And finally a Perfect Handle screwdriver bought for a $1 – perhaps the best $1 I ever spent. It is indestructible. I wish I owned a whole set (no, not the garbage ones that Garrett Wade sells).
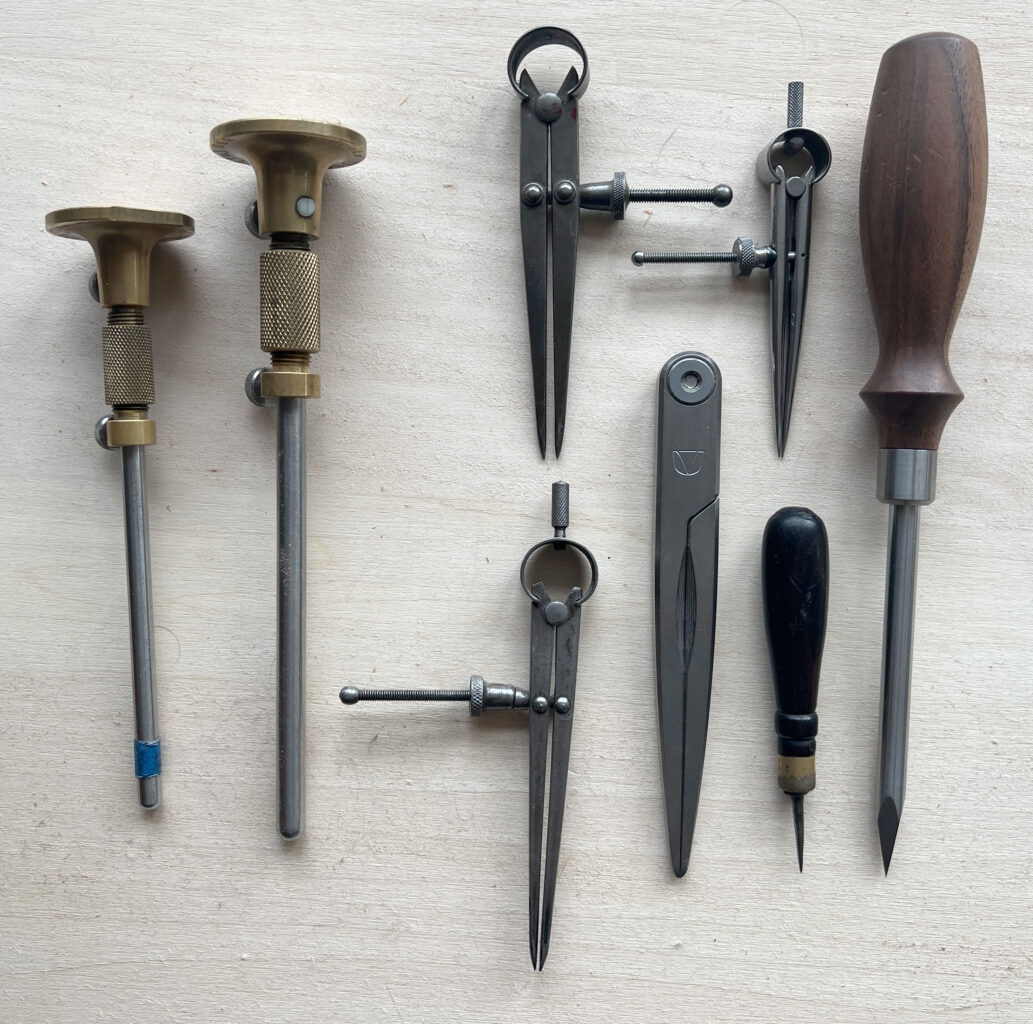
Slicing & Poking Tools
The two Tite-Mark gauges see continuous use. I cannot imagine working without them. Next to that are three pairs of vintage dividers and the Crucible dividers. These are used for laying out dovetails, chair spindles, executing olives and other tasks. The little awl was bought at a flea market in Maine (I think it was $3). I adore it. And a Mattias Fenner birdcage awl, the best one I’ve found (if you are awl-curious like me).

Bench Chisels
I’ll be honest: I don’t use all of these chisels. I could probably boil it down to three: the 1/4″, the 1/2″ and the 3/4″. But these guys grew up together and I’d hate to break up a family.
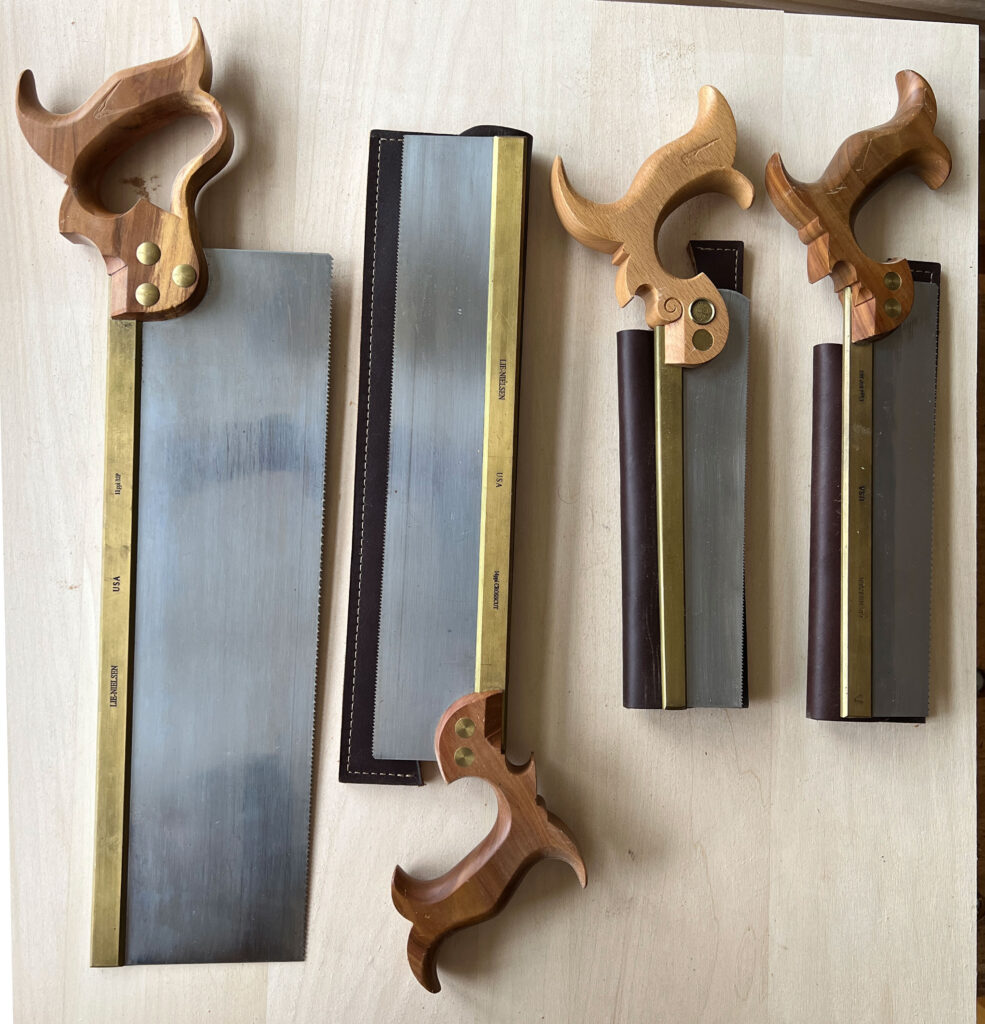
Backsaws
In the sawtill are my personal backsaws. I also have a few on the wall for communal use. Here we have the Lie-Nielsen tenon, carcase and dovetail saws, all with apple handles (a special trade that Tom Lie-Nielsen made for me). And an Eccentric Toolworks dovetail saw by Andrew Lunn – the best saw I’ve ever owned.
Panel Saws
Also in the sawtill are these two vintage panel saws. There’s a Disston D8 filed crosscut with 8 tpi. And a Spear and Jackson filed rip with 7 tpi. The handles are different colors so you can grab the one you need without thinking too much.
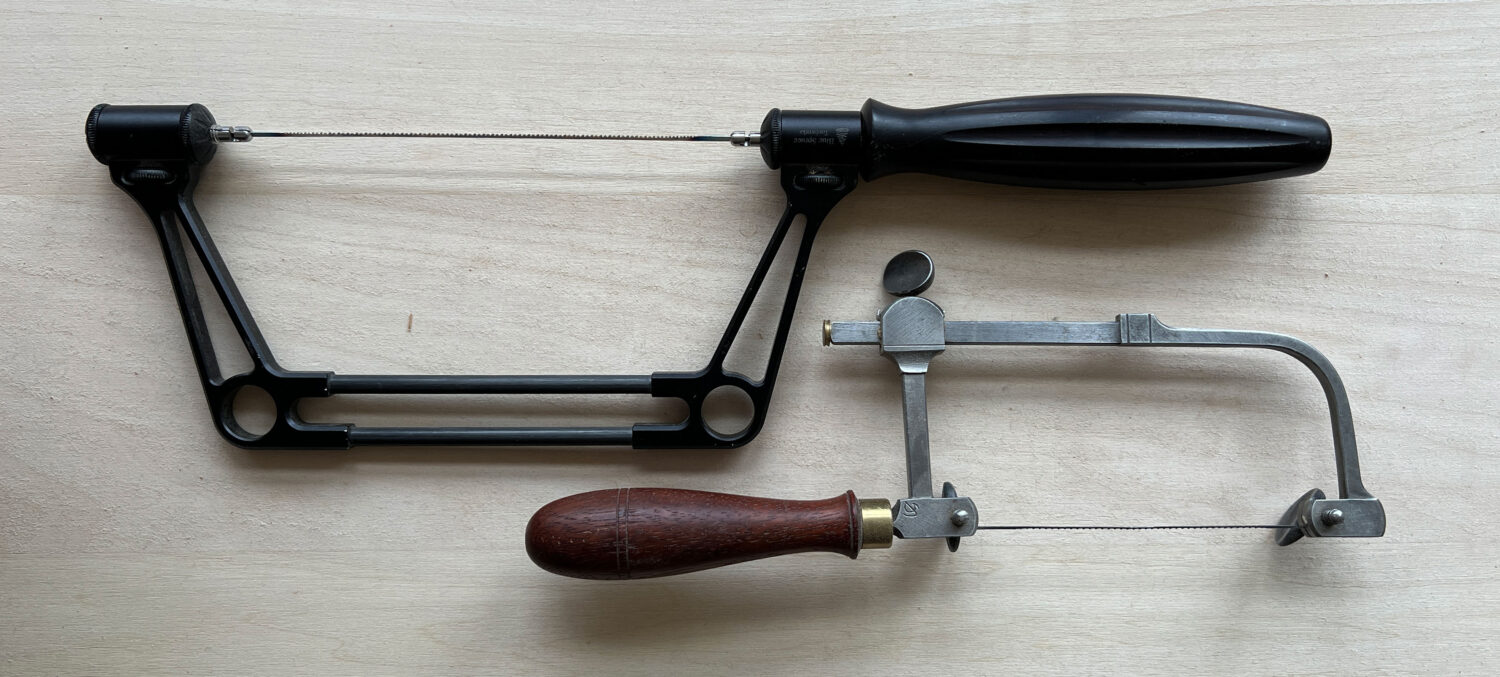
Frame Saws
I have a bowsaw packed away (I use a small band saw for big jobs now). But I still use the snot out of my Blue Spruce coping saw and my fretsaw from blacksmith Seth Gould.
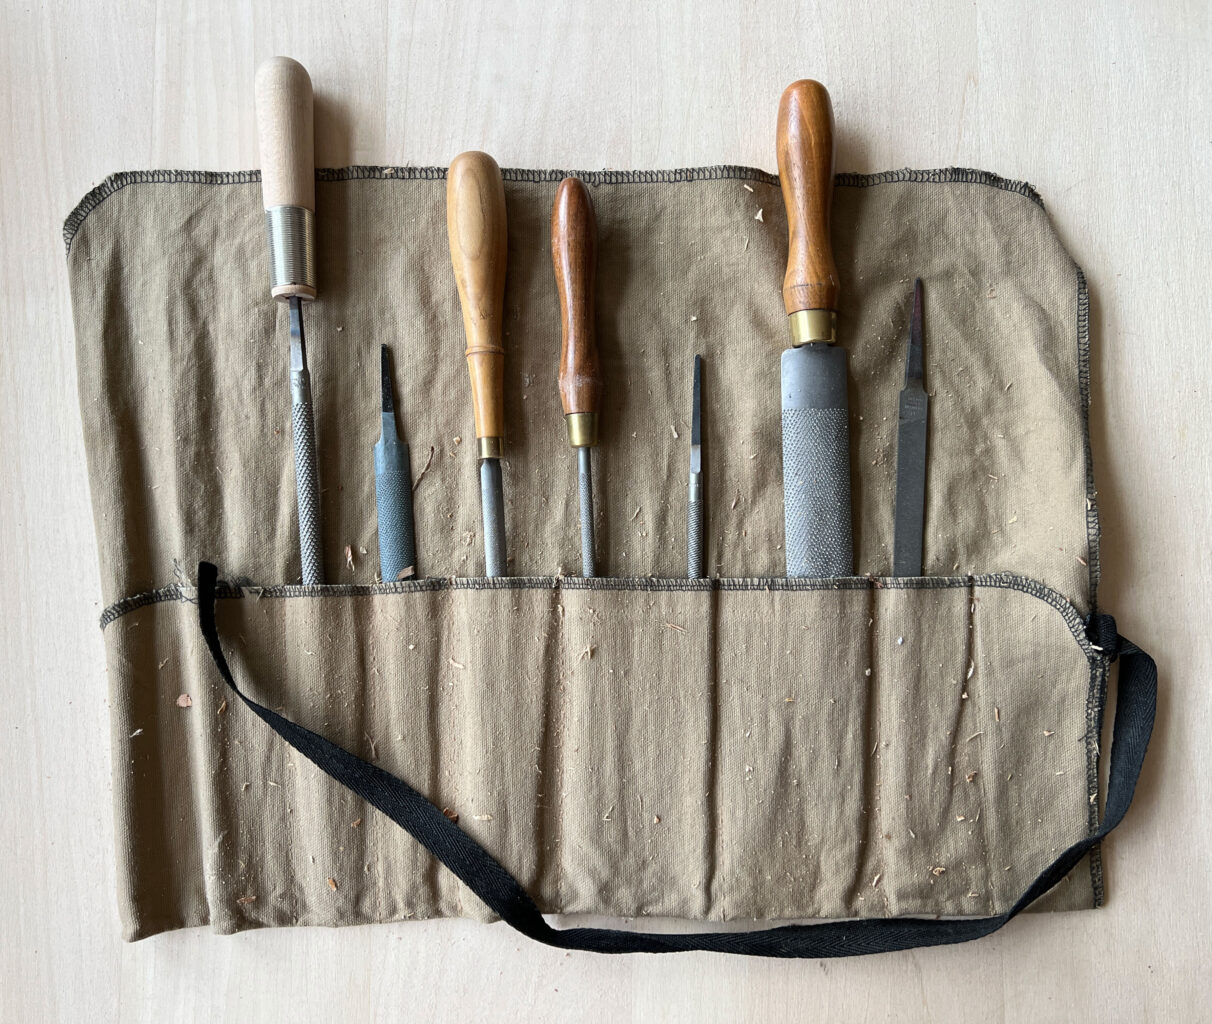
Rasps
The rasps and files are tool rolls that stand to the side of the sawtill. Most of these are Auriou, with a couple oddballs thrown in (including a file that sneaked into this tool roll). The Auriou cabinet rasp is a 9 grain. The Auriou modeler’s rasp is grain 15. The Auriou rattail is 13 grain.
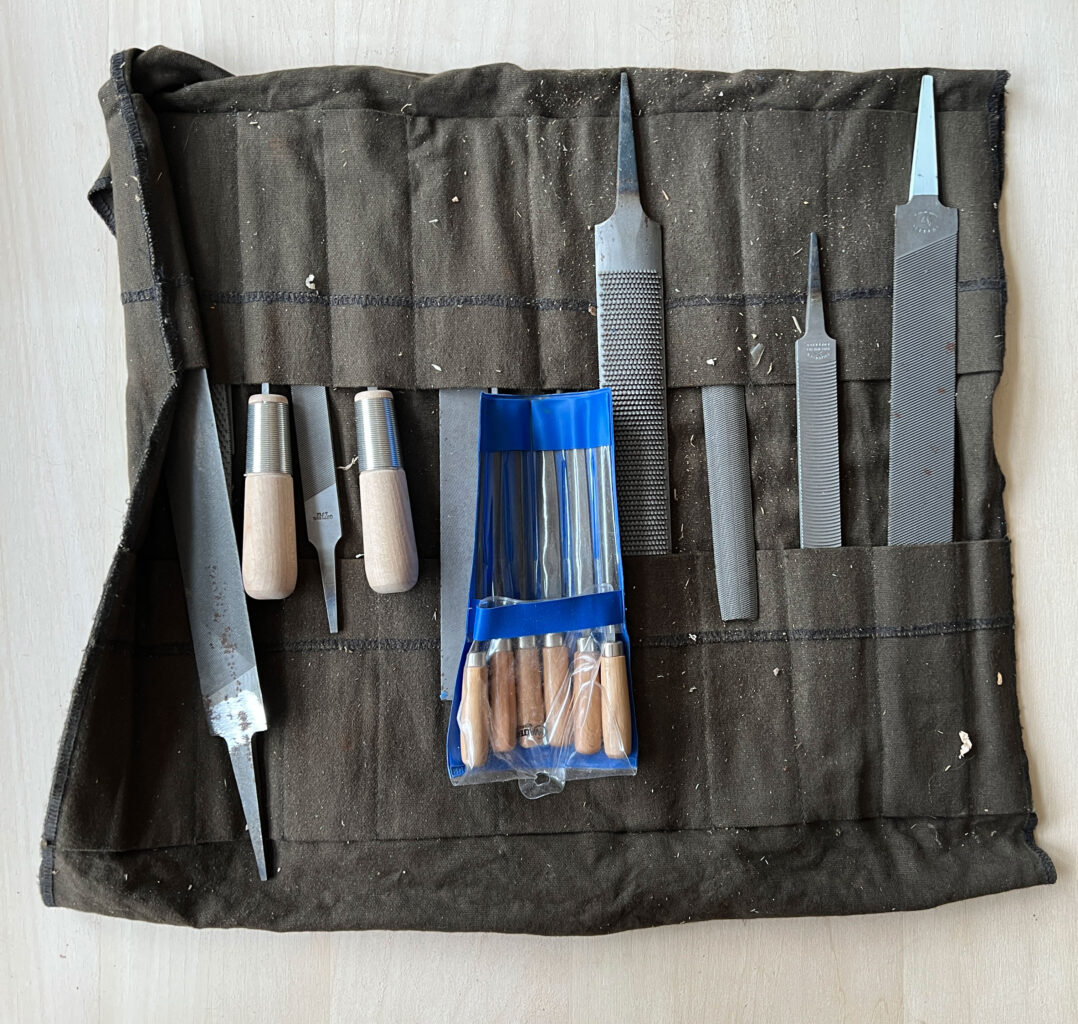
Files
I am surprised by how many files there are. They started collecting en masse when I wrote “Campaign Furniture” and I had to file a lot of brass hardware. Then we launched Crucible Tools, and files are helpful when making prototypes. And the needle files are essential for tool maintenance. Files don’t take up much space, so I have allowed them all to stay.
The Future
We receive regular messages asking what I would change about my tool chest if I built it today. The answer is: structurally, nothing. It is the right size. Built the strongest way. From an ideal wood (pine). Since building it, Megan Fitzpatrick and I have taught hundreds of others to build this chest, and we have come up with better ways to do some of the construction steps. Some of these are honestly good ideas. Others are simply more efficient ways to work when you have to build seven chests in a week.
We also get asked if I will ever update “The Anarchist’s Tool Chest” to build it with a more current tool set. An update is not a priority. Perhaps some day when I run out of new book ideas I’ll revisit ATC. But every time I pick it up and read bits of it, I’m happy with it overall.
Yes, if I were a “guy on the internet” I would take umbrage with a few choices and rationales in the book. But all in all, the book holds up, and we recommend it to new woodworkers without reservation.
We also get messages thanking us for publishing this book. That ATC changed the way they look at tools, woodworking or rampant consumerism. To that, I say: Thank you. The book changed us, as well. After “The Anarchist’s Tool Chest” was released in June 2011, it sold well enough that I didn’t have to get a job at Woodcraft or Rockler after leaving Popular Woodworking Magazine (which was my true plan B).
After I left the magazine, I felt the same thing was happening to my career that happens to many other woodworking editors when they quit or are fired. My phone stopped ringing. My email tapered off. People who I thought were friends turned out to be transactional turd birds.
But after this book was released, you were there. And you kept me from diminishing into obscurity by talking about this book. Recommending it to friends. And attending classes I taught.
And to that I say: Disobey m…. Nah…. just thanks.
— Christopher Schwarz
Editor’s note: Here are links to those construction updates mentioned above:
• Anarchist’s Tool Chest Update 1: Dovetails
• Anarchist’s Tool Chest Update 2: Bottom & Skirt
• Anarchist’s Tool Chest Update 3: Lid
• Anarchist’s Tool Chest Update 4: Tool Rack & Sliding Tills
• Chain of Tools
This is a fantastic update Chris, thank you. Same as many others in the woodworking community, I’ve been especially inspired by The ATC and continue to revisit it again and again. It is the book that keeps on giving.
By the way, you should check out the perfect handle screwdrivers made by Hand Tool Rescue. They come in three different sizes, and I have a feeling you would really like them.
Thanks to you for also being there. Really enjoyed this book and still plan to build this chest someday even though I made the 2-day version by necessity (which, by the way, I absolutely love and am confident will outlast me by several generations).
I will continue to “disobey me” out of respect. Happy New Year!
Wow
Happy New Year to you, Megan, and family! Hope our paths cross in a Welsh sort of way in 2023. Many thanks and good wishes for health and joy ahead.
great update. Handplane Essentials was the spark and ATC the accelerant that helped me discover i like hand tool woodworking best. i still reference ATC regularly. it’s the best tool guide I’ve seen by a mile. the rest are either too brand specific to last more than a few years, or are trying to sell you something.
2011? Has it been that long? Holy crap.
I took your ATC class at CVSW in 2013 and loved it. I had been procrastinating about building the chest for over a year, and the class took away all my excuses. I think I’ve built four since then, in several sizes.
My only complaint is that, in my tiny shop, it ends up being a finishing platform for small items, which then makes it impossible to get in to the chest. I’m going to add a Dutch chest, since the slanted top makes it impossible to load the top with crap. If only there was a book on the DTC . . .
I built a DTC almost two years ago, and wish I had built a bigger one. It has become overpopulated (think Soylent Green), and I usually have to move two things to get to the tool I want. Too many gouges, chisels, rasps, and files that could easily fit in a second tool rack, if there were room for one. Add 2″ front to back and 4″ height, and my problems would temporarily go away.
Great that you have a paint opener in there as well. Since it’s alternate purpose is to open beer bottles, I have several scattered in various drawers.
I think you meant to say “16 oz. Plumb with an octagonal head” – not “handle”. I have one just like it that belonged to my Father and it’s my favorite.
Alas, you left out the best and most favorite tool of the ATC. Hopefully you just forgot because it never leaves your hand. The Veritas low angle jack with fence that appears on page 304 of the ATC.
Are you listening to the NPR stories about books and book publishing this morning? I wish NPR had gotten around to your niche of publishing. You would have given an enlightening and entertaining interview. You are a different species of fish, the Schwarzhead salmon, which always swims upstream. Would have been good for your business too.
The NPR story is “Bookish” by On the Media. https://www.wnycstudios.org/podcasts/otm
I recently completed (except for one more till) a poor copy of ATC. One of my biggest problems was always looking for a tool. Now my it’s looking for a tool and remembering that it is in the chest. I suppose I might get over this eventually. Thanks for this inventory.
Wow, very nice collection of tools. I like how you keep and use the boxes of some of the smaller tools as compartments to keep them tidy and protected. Your photographic inventory is excellent, it was a joy to look at all of the pictures. Happy new year!
On the rail under the chalkboard.. 👀👀👀
Thanks Chris. I can say this book “saved” me. I had just finished remodeling my garage on a two-month paid sabbatical from work. I was broke from the remodel and needed to start saving for tools. I had planned to go full Norm Abrams. I grew up watching the New Yankee Workshop. Though I had seen many episodes of the Woodwright’s Shop, in my naiveite, I had assumed it was a show dedicated to how things were historically done rather than a viable way of doing things. Since I knew nothing about tool brands, I decided to spend a year researching what machines to buy. So, our course, I bought the ATC (yes, I am very sharp). Between reading your book and catching Paul Sellers videos on YouTube, working with hand tools clicked and I completely changed the way I wanted to do things. Seven years later and at least a thousand or two thousand hours at the workbench, I am happy as a clam. Thanks for writing this book.
Chris you are exceptionally generous with your output. I really enjoy this blog, these rare but very interesting lists and updates relating to the ATC. Thank you.
It’s wild and entertaining to see the differences in your tool choices over the years. I keep the 2018 round up bookmarked and refer to it as much as the ATC. I would be curious to learn how you store tools long-term outside of the chest, such as the tongue and groove planes or other joinery planes.
They are in the Dutch tool chest, which serves as overflow and a source of loaner tools for students.
Slaying! Do you offer a non-lethal model?
What are the inside dimensions on this? (roughly- don’t take the time to actually go measure it)
36-1/4 x 20-1/8
Fighting the urge to defile my shop broom and make as a polissoir – don’t know that I need one but that’s never stopped me in the past…
Of course, I had to G**gle it and found one your earlier posts with directions on making your own…https://blog.lostartpress.com/2019/08/08/make-and-use-a-straw-polissoir/
Thank for all you do! And Happy New Year!! ATC was my first LAP book when I was in college. At the time I could only afford the digital version, but it changed the way I looked at what I build. The concept of making my own furniture as a way to fight against rampant consumerism resonated with me in a way I hadn’t thought about before. My first project was a dining table that my wife and I still use everyday 15 years later. Hopefully one day I will make it in for a class!
🙂
I would’ve thought for sure the high angle Anderson smoother would be in there & I can’t help but to be envious of your ownership of Lunn’s saw.
I had to trade that high-angle plane to get my Wayne Anderson Miter back. Wish I could have both….
Ouch.
Great post! Loved seeing all the tools in the ATC…and your more than Welcome!
A wonderful post. Curious to know the approximate radius of the two travishers you mentioned.
Like so many others I was greatly moved and inspired by ATC and your aesthetic anarchist philosophy. I have the first edition, which I regularly consult. Thanks for sharing your evolution as a woodworker with us all.
I also must acknowledge three words in your post that are now part of what I resolve for the New Year:
Avoid “transactional turd birds” at all costs!
Best wishes for your New Year!
Ed Furlong
Thanks for the great read. Just out of curiosity, what are you using for a plow and moving fillister?
Plow: Record 043. Moving Filister: Veritas skew rabbet.
Thank you!
Hand Tool Rescue is making perfect handle screwdrivers in Canada. They’re not $1, but they are available.
Yup. I came across them months ago. I didn’t bite because a variety of the features on the driver were questionable to me (the tapered tips – in both directions; and the fact that the tip was rotated out of axis with the scales). The description indicates these have been changed. But the photos look like the old screwdriver…. I’ll have to ask….
Great post! If you are looking for a solution to keep all your hex bits together, a .22 ammo plastic container works pretty well for the shorter bits.
Thought you might be interested, I got the M+R pencil sharpener for christmas. It’s a different shape and size (aside from the actual hole) but it still works really well and feels really solid.
As I’m currently gearing up (very slowly, mind you, ‘cause that’s how my gear box works, but still) to build a tool chest in 2023, I very much appreciate these your further ruminations on yours! Helpful and inspirational at the same time – so the “thank you” very much goes back to you for writing the book in the first place, and all the follow-up thoughts and musings since!
Cheers,
Mattias
I’m curious if the Lie-Neilsen tenon saw is the thin plate version they used to make?
Best,
Sam
Thank you for the update! I was given the Anarchist’s Workbench book for Christmas and ATC is a must-have now.
Tangential question:
I’m ordering a stamp for my tool from Infinity. What size metal is your metal tool stamp?
5/16″ tall.