The good news: “The Woodworker’s Pocket Book” is shipping out from our warehouse in Indiana. This is the biggest batch of orders we have sent out since we started this company. So it will take some time to get all the books in the mail.
So if you haven’t received a shipping notification, don’t panic. It will come.
The bad news: We are almost sold out of the first print run of this book. Another press run is already in the works, however.
Now for some more good news/bad news.
The bad news: Our efforts to get a special slipcase manufactured that will install in your tool chest or tool cabinet have failed. The good news: We are working on a solution that is even better, and we will share the details as soon as we can.
A fascinating new lecture on travel to India in the 19th century, which focuses on how passengers traveled, the furniture they brought with them and the companies who supplied them, was recently given by Sean Clarke for the Stow and District Civic Society and is available here.
Sean and his brother, Simon Clarke, are the second generation to run Christopher Clarke Antiques, a shop founded in 1961 that specializes in military campaign furniture and travel items. Sean and Simon are considered leading historians and sellers of campaign furniture and were a great help to Christopher Schwarz when writing “Campaign Furniture.”
While the lecture is illustrated by pictures of campaign furniture, makers’ advertisements and passengers’ receipts, much of the lecture uses officers’ drawings and paintings as a guide to how campaign furniture was used in ships’ cabins.
When showing a series of sketches by Edward Hovell Thurlow, circa 1965, Clarke says, “Thurlow sketched throughout his career as many officers did. All were expected to have a degree in competency in drawing in the age before cameras but some also enjoyed it as a pastime in memory of their service.”
illustrated barracks, Stalag Luft III, WWII
This brought to mind another, more personal illustration, made by my husband’s grandfather, Martin Uhl, a pilot who was captured and held prisoner at Stalag Luft III during WWII. I looked at his illustrated barracks again, this time paying close attention to the furniture in those sparse, cramped conditions – the bunk beds, the tables and benches, the shelving – pieces built for a particular use. And then I thought of Monroe Robinson’s upcoming book about Dick Proenneke, and the wealth of information Dick’s well-photographed cabin contains. Although these images are from different times and places entirely, thinking about them reiterated the importance of documentation, whether painted, illustrated or photographed, of the everyday.
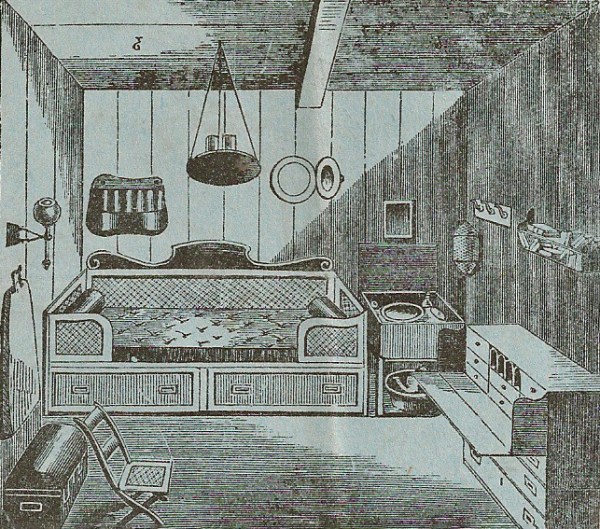
The artwork featured in Clarke’s lecture illustrates the cleverness and ingenuity of multi-use campaign furniture designed for portability and the volatility of life at sea. A secretaire’s iron handles were used not only for easy carrying but also for tying down once aboard the ship. Also featured are small portable bookcases that fold into a box; a ship’s table with flaps that extend, removable legs and a hinged board that reveals a mirror and compartments for use as a washstand; a Gimballed Candlestick; mahogany swing trays that hung from the cabin’s ceiling; and folding chairs.
In one slide an image of 4th Officer G. Webb’s cabin onboard the Asia E.I.C. ship in 1797 shows a cannon in his room, with furniture both built and situated so that it could be moved quite quickly should the sudden need arise to point the cannon out the cabin’s window.
The lecture, which is fewer than 50 minutes, includes a wealth of images and information, and is a delightful way to spend an evening in.
Over the past few months, Chris and John have graciously allowed me to commandeer their blog to announce availability of dividers on my site, regardless of the fact that at this point they have no financial stake in them.
Why? Without speaking for them, I would point out that to date, nearly all of our efforts to attempt to speed up production to match customer demand of the dividers have been, to say the least, somewhat ineffective. As a result, there have been quite a few would-be divider owners whose attempts at purchase have left them – to put it mildly – somewhat disappointed. And most – if not all – of those frustrated buyers are followers of the LAP blog.
Yesterday, I took about half a dozen sets of dividers to the Post Office, and shipped them off to the last few people whose email addresses were on the short-lived “dividers waitlist.”
When I got home, I finished work on a couple dozen more sets, and last night added them to the inventory (you can purchase a pair here). I take this as a strong indication that divider production is beginning to catch up with demand. Finally.
Right now, there are a few dozen sets of dividers in daed Toolworks‘ inventory – including a dozen sets of O1 tool steel. Over the next few days, I will be adding a few dozen more.
This week also marks the start of my annual shop culling, an annual tradition that I have not observed in at least three years. So, in addition to dividers, I’ll also be listing used, or “b-stock” tools for sale. For now, the first of these is a large cache of unassembled (but complete) plane adjusting hammer “kits.” The hammers were a design I finished just a few months ago, but while they are functionally quite good, I find myself less than enthralled with the aesthetics of the design.
So off to the chopping block they go, to make room for a redesigned hammer.
Although a back may not call for the high finish that is necessary for, say, a cabinet door, it needs to be strongly made and of a type to suit the particular job. “Craftsman” discusses here some of the points to be considered when deciding just what kind of back a job is to have. —Ed.
I AM afraid that many of us are inclined to let the backs of our cabinets take pot luck, as the saying goes. We make a job, say, in oak, possibly putting in oak drawer sides, and backs, but hesitate before going to the expense of oak for the back. The reason (or excuse, however you happen to look at it) is that it is seldom seen, has little or no wear to withstand, and that, since the cheap back answers the purpose just as well, it is clearly a waste to spend money on an expensive one.
Well, it is logical enough up to a point, and, providing that it is merely the material that is cheapened and not the method that is worsened, no great harm is done. In fact, there are many pieces of quite light woodwork in which a heavily built back seems almost out of place. Still, it is nice to have a piece of work in which nothing has been skimped, and the argument that a cheap back answers the purpose as well as a better one may not necessarily hold good, as we shall see later. The safe plan is to consider each piece on its merits, and give it the best back that it is worth.
BACKS OF OLD FURNITURE If one goes back into the past one comes across some curious anomalies. Many of the antiques of the Queen Anne and mahogany periods of which we think so highly had wretched backs. I myself spent a good many years in a repair shop, and I can speak feelingly of the hours I devoted to gluing strips of canvas across gaping splits in panels and across open knot holes. I have seen a mahogany chest of drawers of the Chippendale period with magnificent show work—serpentine shaped drawers, fine carving, and so on—with a back consisting of pieces of 1/4 in. pine nailed across. An extraordinary inconsistency. Apart from its having no strength, the whole thing was bound to shrink and split.
Yet when we come to that much abused period of Victoria, we find exactly the reverse. Probably no finer cabinet backs have ever been fitted into furniture. Open the door of one of those huge Victorian wardrobes (there are plenty of them knocking about in seaside boarding houses). You will find the mirror back more strongly made than many a modern wardrobe door, and the carcase back a finely panelled framework often with moulded stiles or flush panels.
Perhaps one reason why there has been a tendency to fit lighter backs since Victorian times (apart from the all-round cheapening of materials and construction) is the introduction of plywood. It seems such an obvious use for ply, a material which is free from shrinkage and obtainable in such large sizes. Undoubtedly it is perfectly suitable for the purpose, providing the carcase is strong in itself, and does not rely upon the back to make it rigid.
TYPES OF BACKS There are various considerations that affect the choice of a cabinet back. There is, for instance, the question of size. A single sheet of 3/16 in. plywood might make an excellent back for a little cupboard, say, 15 ins. high, but would obviously be absurd for a wardrobe. Apart from this, however, the first consideration should be: does the job rely upon the back for strength, or will the back serve merely to enclose a space? Fig. 1 shows the idea. At A the back is needed to prevent racketing and to stiffen the carcase generally. At B, however, the carcase is already strong, and only a light back is needed.
In the latter connection, of course, it is sometimes an advantage to build in the back with the carcase. Items such as sideboards are often made in this way. As a general rule, however, it is better to make the back separately, because it simplifies the subsequent fitting-up.
THE PANELLED BACK For a thoroughly strong back the panelled type is undoubtedly the most satisfactory. It is perfectly rigid and is free from all shrinkage complications. It should always be used for pieces such as cupboards with large, heavy doors, which are particularly liable to distortion unless provided with a stiff back. Fig 2 shows the usual form. The whole thing is put together with mortise and tenon joints, and the panels are grooved in. One point to note is that if there is a shelf in the cupboard, the middle cross rail should be arranged opposite to it if possible. It may not always be practicable, of course, but the advantage is that it gives a level surface against which the back of the shelf can face (see B, Fig 3). If this is not done there will be gaps opposite the panels as shown at A.
The same difficulty sometimes occurs in a bookcase or similar item, but owing
to the large number of shelves it is not practicable to arrange for many horizontal rails. The better plan is that in Fig 4, in which the panels are flush with the framework at the inside. It necessitates fairly thick panels, of course, but it gives a far neater result than cutting out the back edge of the shelf to fit.
MUNTIN BACKS A somewhat distant relative of the panelled back is the muntin type. It is nowhere near as strong, and is rather a doubtful member of the family. Like some relations, you can’t deny them (and they are useful sometimes), but you are a little shy about mentioning them in the best circles. It consists of a series of uprights, say 3/4 in. or 7/8 in. thick grooved at the edges to take thinner panels, as shown in Fig. 5. The ends of the muntins are cut away as shown inset, so that the panels can be fixed directly to the back of the carcase.
Now, as the panels are generally about 9—10 ins. wide, and of deal, it is inevitable that a certain amount of shrinkage will take place. Consequently it is a mistake to drive in nails right across the width because the wood would split in the event of shrinkage. The better plan is that in Fig. 6 in which nails are driven in near the centre only. The edges extending into the muntin grooves are free so that they can draw out. Note that the heart side is outwards so that the free ends are pressed tightly against the carcase by the natural twisting tendency of the wood.
If, owing to the presence of a number of shelves, it is desirable for the back to be entirely flush on the inside, the muntins can be rebated instead of grooved as shown in Fig. 7. The beads along the rebates are not entirely decorative, but they serve to render the gaps less noticeable in the event of the panels shrinking. All these details about shrinkage apply only when solid wood is used, of course. In the case of plywood it does not matter.
Speaking of plywood brings us to another variation of the muntin back. In its simplest form the plywood back is nothing more than a sheet of plywood nailed or screwed in a rebate. For quite light jobs this is satisfactory enough, but to give a neat finish the back in Fig. 8 is better. A series of grooved and rounded horizontals is screwed on. They can be arranged level with the shelves as shown. The plywood panels fit between them in the grooves. For a flush effect the rails can be rebated instead of being grooved (see D).
Fig. 9. Dresser back with tongued boards fixed directly to carcase.
DRESSER BACKS These are really in a class by themselves, for although they could be applied to pieces such as wardrobes, they are not so strong as a panelled back. One of two methods can be followed. That shown in Fig. 9 has the advantage of simplicity. The back is really a series of matched boards, tongued one into the other, with either a bead or a V worked at the joints. The boards are screwed or nailed directly to the top and shelves, and at the bottom to a rail specially fitted for the purpose. In the second method, Fig. 10, wide grooved rails are screwed at top and bottom and the matching fitted in the grooves. The wide rails give rigidity, the matching merely filling the space, so to speak. It can be either very thin as at A, or it can be stouter, the ends being tongued as at B.
Fig. 10. Dresser back with tongued board fitting in grooved rails.
Incidentally, a detail applying to all backs of any thickness is that the rebates in the ends should slope as shown at A, Fig. 11. If this is not done the projecting portion is liable to curl as shown at B.
Fig. 11. detail applying to all backs. At a the rebate is cut at an angle. This avoids risk of the projecting lap curling away as shown at B.
Sometime during 2018, in an auction room on viewing day, a piece of furniture caught my eye and for a moment there wasn’t another piece in the room. In fact at that precise moment there wasn’t another piece of furniture on the planet that I was faintly aware of. More interesting and more shocking to me was that the object was everything I’d trained my eye to ignore. Three-legged tables, or to use their vernacular term, cricket tables, have been on my radar and my bench ever since.
To begin with I should point out that cricket tables weren’t made to an existing plan by people who read the classics, let alone understood the principles of composition through an elaborate and arguably questionable formula. Instead, they were made by people in tune with something far less esoteric, something earthly and perhaps even divine: necessity and ingenuity. Fibonacci might be the talisman of choice for accountants, but that the extrapolation of number sequences that suggest a golden ratio can and should be used to design anything is, to my mind, unimaginative and restrictive to the point of being just plain dull. I know, I know, statements like this are bound to ruffle a few feathers – but just for a second consider the value of a system where perfection is the benchmark of success and eventually you’ll see that it’s neither precise or workable.
The dozen or so examples of cricket tables I’ve made to date have been either replicas of period pieces or interpretations of the form, and they’re helping me to understand what I enjoy most about this style of work. It’s required me to let go of a lot of concepts that were hard-wired into my methodology from an early age. Of course it’s therapy – I know that, and it hasn’t gone unnoticed that I’m both patient and therapist – but the results are still valid. For example, I’ve hit upon a few principles that nearly always lead me towards producing tables that appear slightly squat. I’m also at the point where I can predict a relatively harmonious blend of ratio and proportion, but thankfully still light years away from anything like perfection. In short, I guess I’m learning to embrace a process where mistakes are more valuable than perfection.
Maybe a year into experimenting with two basic designs I figured the information might be of interest to other makers, so I kept notes with the view of one day publishing them. I’m excited to say that day, sometime in the future but hopefully not light years away, will happen through Lost Art Press.
The core content shouldn’t come as a surprise to anyone that’s familiar with the LAP back catalogue. It’s aimed at encouraging you to engage with concepts involving furniture that might at first appear awkward, unfamiliar and difficult to reproduce. Cricket tables range from the most basic stick variety to complex joined examples that can only be resolved when you’ve broken free of 90° and square. I’ll talk a lot about techniques and the transition of one form to another, and of course I’ll offer my explanation for how cricket tables got their name. Spoiler alert – the gentle thwack of leather against willow doesn’t feature in the soundtrack to this story.