“Artisan Geometry” is the overarching term used to describe the design approach in the five Lost Art Press books by Jim Tolpin and George Walker. We often get asked to explain it, and to recommend one or more of their books with which to get started.
We decided those questions would be better answered by Jim and George themselves – so they wrote a brief explanation of the term, then gave us some summations of each of the books. Check out the new Artisan Geometry page in our online store for their thoughts.
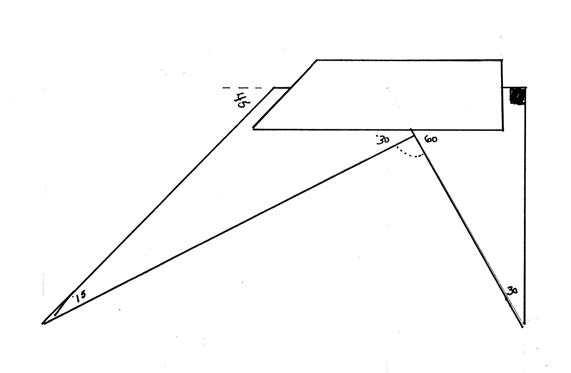
This is an excerpt from “Euclid’s Door” by Geo. R Walker and Jim Toplin. The book teaches how to make the tools from “By Hand and Eye.” At this point in chapter 7, a miter square that has a 15° tip is being constructed. This fragile corner of the tool has to be taken into consideration when choosing its placement on the grain of the board.
Fig. 7.13 The triangle on the left with its thin 15° tip poses a unique layout challenge
Many geometric layouts begin with just a given line. This has real practical value. It means we can construct the layout from just a small piece of the overall picture. This construction is a little more complicated than what we’ve done so far, so I suggest you work through this sequence on paper to get an understanding of it.
Fig. 7.14 The blade we eventually end up with has a clipped corner so we can have a 45° reference edge.
Case in point is this second triangle from our multi square, Fig. 7.13. The sharp blade that juts out to the left begins life as a 30:60:90 triangle that gets altered to include a 45° reference on one end, Fig. 7.14.
But that leaves us with a fragile, narrow point. We must lay out our triangle so that the hypotenuse is aligned with the long grain on our blank, Fig. 7.15.
Fig. 7.15 This layout is a challenge because our right angle is located up in the middle of the blade material. The only line we can know for certain is our hypotenuse located on the bottom edge.
So we need to lay out our triangle, but all we have to start our construction is the line that will be our hypotenuse. Before we proceed, let’s step back and take a look at a different geometric layout to get an understanding of how we get there. Here’s the construction we’ll base this on, Fig. 7.16.
Fig. 7.16 We’re going to use a few bits and pieces from this construction to reach our destination.
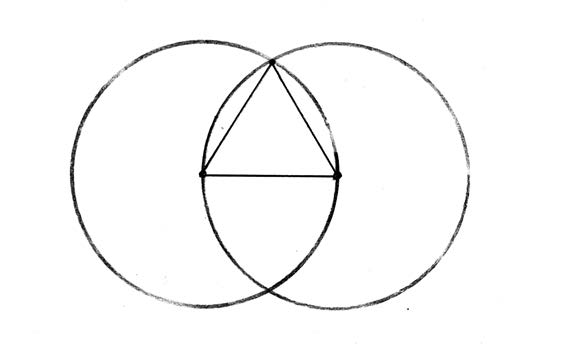
Let’s break it down into smaller pieces. We begin with Euclid’s first proposition, which is how to construct an equilateral triangle from a given line. Start by using the ends of a line to set the compass span and, using the end of the line as anchor points, draw two identical overlapping circles. Connect the top intersection where the circles overlap. Take note that the lines that connect the intersections also happen to share the radius of both circles. You just created a triangle with all sides equal which means all three corners are 60°, Fig. 7.17.
Fig. 7.17 The internal angles of all triangles always add up to 180°, so if our sides are equal, each corner must be 60°.
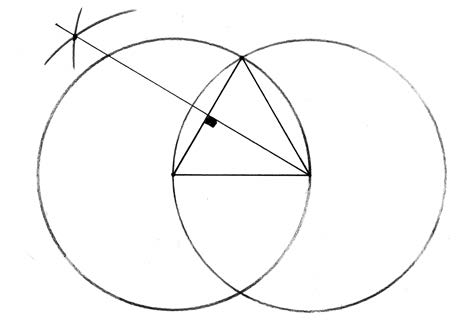
If you bisect this triangle, you get a pair of back-to-back 30:60:90 triangles, Fig. 7.18. It helps to see what you are after by superimposing this construction over our blade stock to see how it might apply, Fig. 7.19.
Fig. 7.18 (left) Note the hypotenuses of these two new triangles are facing out. Fig. 7.19 (right) In practice though, we don’t execute the entire construction, just a piece of it. It’s not really practical to draw this entire layout because much of it is out in space beyond our blade blank.
This is quite common in layouts at the bench. We don’t need to scribe every line, just the important ones that get us our result. Let the bottom edge of your blank be the hypotenuse of our triangle. Set a compass to span the length of your hypotenuse and strike an upward arc from the lower edge. Leave the compass at the same setting and anchor it where the arc touches the bottom of the board then strike a second mark across the arc, Fig. 7.20.
Fig. 7.20 The first arc is a portion of one of those overlapping circles. That’s all we need to execute our layout. The second mark defines the second side of the equilateral triangle.
Strike a line connecting these points then bisect this chord on one end of the triangle. Now you’ve created our 30:60:90 with the correct grain orientation, Fig. 7.21.
Fig. 7.21 Go back and compare this with our first layout. Does it come together for you?
We’ll use this construction to create our second blade with the proper grain orientation.
I’m always a bit surprised by what sells well each year. I look at our sales every morning, track inventory and try to figure out our next step. But rarely do I step back and look at the big sales picture. Except for today. Here are the 10 best selling Lost Art Press/Crucible products of 2023 by units sold.
“Sharpen This” This pocket book came out in September 2022, yet we’ve already printed 14,000 of these little suckers. It is my fastest-selling book (whatever that’s worth). If you buy it from us, I sign each copy personally and we include a PG-13 Slightly Naughty sticker.
“The Woodworker’s Pocket Book” Another surprise, really. This has to be the best woodworking book for the bathroom. You can flip to any page and learn something interesting about finishing formulas, wood species or 18th century mouldings listed by furniture style.
“The Handcrafted Life of Dick Proenneke” This book continues to sell thanks to the fact that 1) It’s a simply amazing read and 2) The incredible popularity of the PBS series about Dick. The author took care of Dick’s cabin for years and was the perfect (and authorized) person to write this book.
“The Essential Woodworker” We reissued this book in 2010 with the help of the author, Robert Wearing, and it is now in its 10th printing. This book continues to sell because you can read it in a short afternoon and it connects all the dots with handwork. It is simple (but not simplistic), perfectly illustrated and simply the right book for those who want to work with hand tools.
“Make a Gibson Chair” Video. This one isn’t a surprise. The video came out this year and shows how to make one of the most comfortable (and simple) stick chairs ever.
“Workshop Wound Care” Another great and much-needed pocket book. This book should be in every shop. Not because it will help LAP financially or make you a better woodworker, but because you will need its advice some day when things go wrong. Not if – when.
“Crucible Engraving Tool” We’ve sold more than 1,000 of these suckers, and I can’t wait to see what woodworkers do with them. We are out of stock this minute, but we have another 500 on the way in the next week or two. So sign up to get notified when we restock.
“Euclid’s Door” This book, released in 2021, had a slow start but picked up steam in 2023. “Euclid’s Door” teaches you practical geometry as you build some very useful and accurate wooden shop tools. It’s fun and eye-opening. And the next book in the series (coming in 2024) will bring even more fans into the “By Hand & Eye” fold.
“Karvsnitt” Jogge Sundqvist’s second book with Lost Art Press dives into the world of chip-carving, spells and color. Like all of Jogge’s work, this book is engaging, fun and inspiring.
“With the Grain” Again, what the heck? This book is in its seventh printing and continues to sell and sell. I think I know why: It’s a no-nonsense guide to what you need to know about wood technology at the bench. There are much more scientific books out there, but you won’t find a more practical one.
A set of try squares made by George Walker, co-author (with Jim Tolpin) of “Euclid’s Door” and other artisan geometry books. Leave a comment on this post, and you’ll be entered to win the set in a random drawing.
George Walker made the lovely set of walnut try squares shown above, following the step-by-step instructions in Chapter 4 of “Euclid’s Door.” (I don’t know if he had to refer back to his own writing or not…I know I sometimes do!) If you’re interested in adding them to your tool kit, leave a comment on this post by noon on Thursday, Sept. 21, 2023. I’ll pick a random winner from among all commenters that afternoon, and send them out as soon as I get the winner’s address. Below are the introductory paragraphs to the try squares chapter.
– Fitz
I spent my early years as a machinist in a bearing factory in Ohio. A string of red brick buildings that employed thousands of workers. Making bearings is all about precision and the heart of that was a department called the “Cold Room,” an island kept at 67°F and constant humidity behind a set of heavy double doors. The workers inside wore white shop coats and stood at benches with chrome-plated vises. They were the high priests who guarded that precision. Most of us regular shop rats avoided the cold room if we could. The factory was Africa hot in the summer and stepping in and out of the cold felt hellish. Reluctantly, I paid a visit one hot August afternoon. I’d just bought a precision engineer’s square and needed to get it certified. An engineer’s square has a steel fixed blade made to a high level of accuracy. A bored looking lab technician with tobacco-stained fingers took my square and placed it in a machine called an optical comparator – sort of an industrial microscope that projected the silhouette of my square onto a screen. He slid my square up against the side of a master square, a perfect steel cylinder with a mirror-like finish, and the comparator shined a light beam from behind to measure its accuracy. Any variation showed up as a sliver of light that the machine could magnify and measure.
That was years ago, but when I think about it now, a couple of things stand out. In a modern precision setting, we used essentially the same method to check for square that builders have used for thousands of years. Hold it up to a light and variation shows up glaringly. Secondly, the comparator exaggerated the error through some fancy optics to precisely measure variation from true. In this chapter we will go through the building of a set of wooden try squares and learn some geometric methods to create then test it. We can produce a tool that has an astounding level of precision.
If you order either of these titles before Oct. 1, you will receive a free pdf download of the book(s) at checkout. After Oct. 1, the pdf and book will cost more.
“Euclid’s Door” is Jim and George’s latest exploration of artisan geometry. In this new book they show you how to build a set of highly accurate and beautiful wooden layout tools using simple geometry and common bench tools. This practical application of geometry will train your hands and mind to use this ancient wisdom. And you’ll end up with a fantastic set of useful tools.
After editing all of George and Jim’s books, I thought I had a pretty good handle on the geometry stuff. I was wrong. This book blew my mind a few times with stuff I should have known. (And now I’m glad I do.)
The book is 8.5” x 11” and 120 pages. It is printed in the USA and is built to be a permanent book, with heavy cover boards and a binding that is glued and sewn.
‘Sharpen This’
My latest book, “Sharpen This,” is the book I wish I had when I was learning woodworking. It might have saved me hundreds of dollars of buying sharpening equipment I didn’t need. And saved me time in learning how to grind, hone and polish.
This book is a short and blunt treatise about common bench tools: chisels and planes mostly. (Exotic tools and saws need their own books, really.) It seeks to explain how sharpening really works and what you need to do the job well – and no more.
It is not about one sharpening system. It’s about all of them. It is not trying to sell you some stones or jigs or magic paper. Instead, it is trying to give you the foundational knowledge you need in sharpening so you can make good decisions and – perhaps more importantly – ignore the vast piles of sharpening crap that companies are trying to sell you.
The book is 4” x 6.5” and is 120 pages. The book is printed and bound in the USA using quality materials and a sewn binding. It is designed to last a lifetime. “Sharpen This” is the same trim size as “The Woodworker’s Pocket Book,” and easily fits in the slipcases made by Texas Heritage.