This Saturday we’ll be opening up the Lost Art Press storefront for business and for making a little bit of history.
We are in the final throes of editing “To Make as Perfectly as Possible: Roubo on Furniture” and are asking anyone who can rub two participles together to help. Come to the storefront (837 Willard St. Covington, KY 41011) at any time between 10 a.m. and 5 p.m.
We’ll give you some pages to edit and a red pen. You’ll get to read the text, look for typos and help us make this project as perfect as possible. Everyone who helps with the project will get free coffee, doughnuts, beer and pizza. And for every plate you edit we have a special Roubo postcard for you.
You are welcome to help edit the text for just one plate or even edit all day (that’s what we’ll be doing).
As per usual, we’ll also have all our books there, plus blemished books (50 percent off – cash only), T-shirts, posters and free stickers. Plus you’ll be able to check out the new Roman workbench I just completed and tinker with its workholding.
Almost two years ago Chris sent me a pre-publication copy of “The Book of Plates” and gave me free reign to color, cut-out and otherwise manipulate anything I found in the plates. Yesterday I started work on the index for “Roubo on Furniture” and now get to read the descriptions of each scene, tool and work method in the plates. Most of the plates that I transformed into dioramas and collages are from the furniture book and seeing them again was a reunion with old friends.
The plates have tremendous detail but having the matching text is like have the sound turned on. Part of Plate 4 is a description of proper storage of wood and protection from the elements. Roubo provides meticulous instruction on stacking the wood and how to achieve the angled “rain diverters” at the top of each pile.
Adding dimension and color to Plate 4.
In preparation for this indexing assignment I pulled my special china pattern out of storage. I like my china pattern to match the book.
Later in the week I’ll revive the Birds of Roubo and the trash-talking Chairs of Roubo.
During our next open day for our storefront, Aug. 13, we’re throwing a special “reading party” for the forthcoming “Roubo on Furniture.” You’ll get an advance look at the book and get to read some of the great stuff the authors have dug up from “l’Art du menuisier.”
At the party, we’re going to have the translated text for all 97 plates of “Roubo on Furniture” printed out plus a big jar of red pens. To help, we’ll also have a bunch of copies of “The Book of Plates,” the original 18th century French volumes and my library of woodworking books, which includes a French woodworking dictionary.
Oh, and we’ll have free beer and snacks.
The storefront is located at 837 Willard St., Covington, Ky., 41017. Our hours for that day will be 10 a.m. to 5 p.m.
If you can attend, we’ll set you up to look for typos or other errors in the text (we have found multiple cases where Roubo refers to the wrong figures in the plates and we are trying to clean that up). The text for each plate takes about 30 to 40 minutes to read carefully.
For every plate that you edit, we’ll give you a nicely printed commemorative postcard. And a free beer.
The text for this book has already been edited many times by the authors, Megan Fitzpatrick, Wesley Tanner and me. But we haven’t performed a final copy edit on the text where we root out all the nasty language gremlins. So your help with this will be greatly appreciated.
If you can attend, leave a note in the comments section so we know how much beer to bring.
I’m afraid we cannot do this over the Internet. We are not ready to send out this text into the unknown, where people can post it before it’s ready for the public. Apologies, but we’re immovable on that point.
I always felt odd building French workbenches using English (or worse) inches.
Anyone who has studied the history of measurement knows that there are as many systems of measurement out there as there are cultures and epochs. Surprisingly, many of them are similar because they are based on the human form. But they are all a little different.
Rather than whitewash these differences or convert them to metric, I try to incorporate them into my work in the same way you would never put a Roman ovolo on a Grecian piece.
At the vanguard of this curious approach is Brendan Gaffney, a woodworker and musical savant who has been taking a deep dive into alternative measurement systems. He recently made three rulers for sale based on Japanese, Roman and Egyptian systems. I purchased the Roman ruler and it is a work of great beauty. I plan to use it in constructing two upcoming Roman workbenches.
And now Brendan is exploring the 18th-century French measurement system.
After some back and forth, Brendan has constructed French “fathoms” that are based on A.J. Roubo’s plate 100 from “l’Art du menuisier.” Here’s Roubo’s description of the fathom:
“Woodworkers use fathoms as the fundamental unit for taking their measures. This is nothing other than a ruler of 6 feet in length divided into feet and one of these divisions into thumbs so as to be able to know how far each part they are measuring is in length. There are those who do not use fathoms but simply use a ruler of whatever length on which they mark their measurements.”
Brendan’s version, which goes on sale on Saturday, is faithful to that description. His fathom is made from flame maple, planed true, hand-marked and finished in Brendan’s workshop. If they are anything like his other rulers, they will be spectacular.
Do you need a fathom? No. You can make your own if you think you need one. But if you’d like to support a fellow explorer who is diving deep into waters that have been uncharted for more than 200 years, you can do that here.
I’m ordering one for layout work and to help interpret the drawings from our forthcoming book “Roubo on Furniture,” which contains lots of scaled drawings.
Plate 286. Different Sorts of Sections Appropriate for Infilling Panels
This is an excerpt from “Roubo on Marquetry” by André-Jacob Roubo. Translation by Donald C. Williams, Michele Pietryka-Pagán & Philippe Lafargue. The translators’ additions to the text are in brackets. Roubo’s asides are in parentheses.
Figure 4 represents a composition with dice or cubes, placed on a background of whatever color; these dice or cubes are hexagons, placed side by side, in a manner such that their points touch each other, as you can see in this figure.
Each of these hexagons, or figures with six sides, is composed of three lozenges of any colors assembled together to make the dice or cubes appear in relief. Lozenge C (which is the daylight side) is an example of the shape in question and is made in rosewood. Lozenge D, which is the top of the cube, is of grey or yellow wood. Lozenge E, which is the shade side, is of violet wood. The remaining space [unmarked but primarily horizontal] is of some other wood that one judges appropriate, provided that it differs in the color of wood that forms the cubes. The cubes should not only differ in color from that of the bottom, but also each lozenge comprising the cube should all be different from each other. One accomplishes this by choosing pieces darker in color from one side to the other, or even by passing them over hot sand, as I will teach later.
Figure 5 represents another section, which does not differ from that of which I just spoke, except that it does not have any remaining space or background like the last one. To the contrary, all the dice or cubes fit one inside the other without leaving any void space, which works quite well. However, it is good to observe when making this last type of section, to make a space or background between the cubes on top and on the bottom, as I have shown in this figure, which works much better than to see the ends of cubes cut up, as one does ordinarily, and which I have indicated by line F–G.
In general, whether the sections of which I am speaking are with a background as in Fig. 4, or without a background, as in Fig. 5, it is necessary to take great care when making the section that a whole number of cubes is found on the length, and that the uppermost end of these same cubes reach the banding or stringwork that surrounds them, as I have shown here. This is very easy to do since it is only necessary to adjust the proportions of the cubes according to the need, it not being absolutely necessary that the hexagon of the cubes be perfectly regular. Whatever way it can be done is the better way, and is so much easier to do when the three lozenges that compose the hexagon are of a similar shape, which does not ordinarily happen when the hexagon is of an irregular shape.
If one does not wish to make dice or projecting cubes, as in Fig. 5, one could make sections of cubes to fill the lozenges in a unified wood, which does not work badly when the joints are well made, as one can see in this figure. [This is in fact my favorite manner of preparing a composition such as this. I find the subtlety much more to my taste, especially when using a wood with a fine grain pattern with a noticeable difference from early wood to late wood, such as bald cypress on the radial plane.]
Figure 6 represents a section with mixed stars, which is a section that is very complex in appearance; however, it is only hexagons, as that of H, I, L, M, N, O, which approach and penetrate each other, so that the point of whichever star, becomes the center of another. It is necessary to observe in making these sorts of sections that one finds, as much as possible, a number of hexagons complete in height as is found in this figure, so that the bottom or void remaining at the points of the stars be similar at the bottom as at the top, which could not be if the section bordered by the line P–Q , of which the distance to the top-most stringwork of the section, contains only one-and-a-half hexagons in height. As for the length of this type of section, taken in the direction that is represented in Fig. 6, it is not important only that the number of hexagons be complete. It suffices that no points of the stars be cut along the same line, so that this section be as perfect as is possible to be.
These sorts of sections can be made with a projecting appearance, or be filled with segments of the same wood, which is equal for the form and disposition of the joinery, which is always given by the parallel lines, horizontal and perpendicular, and [rather than being comprised of lozenges] by equilateral triangles, of which the tops are opposite one another. Inspecting this illustration alone is by itself better than all the explanations that one can give.
Figure 7 represents another section, composed of octagons or figures with eight sides, placed in stars with eight sides, which all come to a point in the center. The stars that compose these sections touch each other on their perpendicular and horizontal faces at two points, which produces between them a squared space. This space is filled with the point of a diamond, as in the height of this figure, made from the background veneer. The other squared voids, which produce the return of the points of these same stars, being larger than those of which I just spoke above, are filled in by other stars with four points or some other element placed on the base, which distinguishes them from the rest of the work, as I have shown in the upper part of this figure, of which the stars as much as the points of the diamonds have an obvious [apparent] relief.


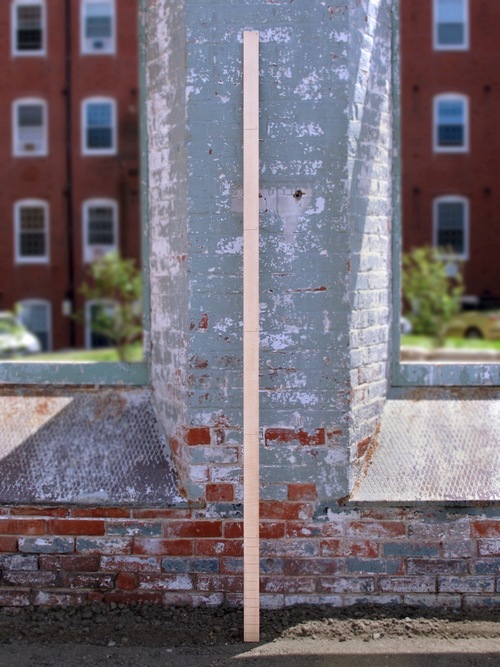
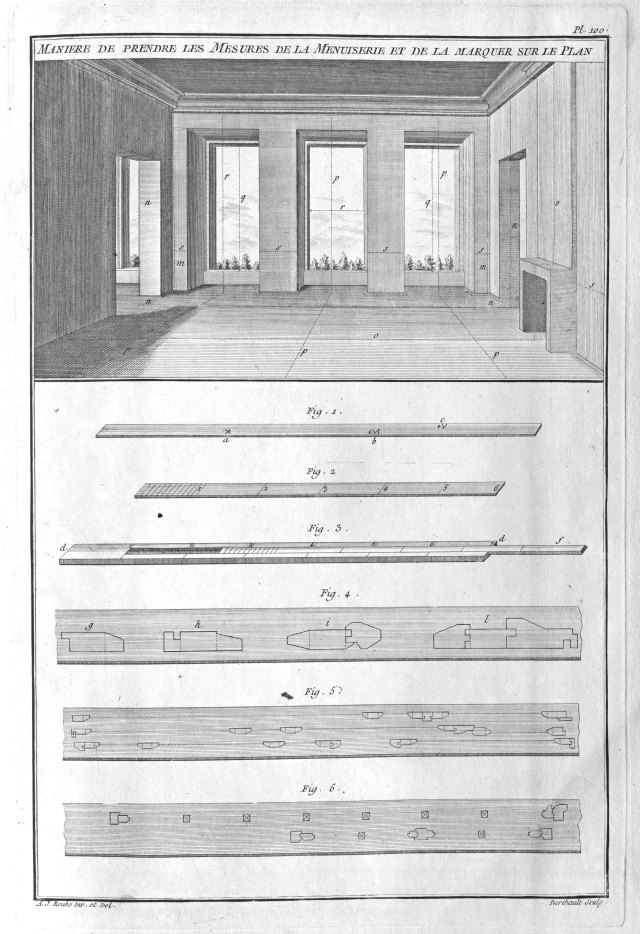


 Figure 7 represents another section, composed of octagons or figures with eight sides, placed in stars with eight sides, which all come to a point in the center. The stars that compose these sections touch each other on their perpendicular and horizontal faces at two points, which produces between them a squared space. This space is filled with the point of a diamond, as in the height of this figure, made from the background veneer. The other squared voids, which produce the return of the points of these same stars, being larger than those of which I just spoke above, are filled in by other stars with four points or some other element placed on the base, which distinguishes them from the rest of the work, as I have shown in the upper part of this figure, of which the stars as much as the points of the diamonds have an obvious [apparent] relief.