We are hosting a free Lie-Nielsen Hand Tool Event at our Willard Street workshop on March 7-8, 2025. In addition to all the Lie-Nielsen tools and our books, the show will feature planemaker Matt Bickford, author of “Mouldings in Practice.”
If you have never been to a Hand Tool Event, here’s what it’s like. You get to try every tool that Lie-Nielsen makes in a completely low-pressure environment. The staff is there to help educate you about woodworking techniques, including sharpening, planing and sawing.
We will be there with all our books, tools and apparel, and we are happy to answer questions, sign books or give you a tour of the shop. And Matt will have his moulding planes and will be there to show you how to put them to use at the bench.
Covington is an ideal place for these events (in my opinion). There is lots of good food within walking distance from our front door. Plus the city of Cincinnati (eight blocks away) is awash in museums, cultural events, good food and family entertainment (a world-class zoo and aquarium). So bring the family.
Plus, on the day after the show (March 9), we’re holding the grand opening event for our Anthe Building, which is our new retail store, fulfillment center and editorial offices in downtown Covington. If you donated to the restoration of the building, you’ll hear from us in the coming month about a special event for donors. If you just want to see the place, we’ll have it open to the public from 2 p.m. to 5 p.m. on March 9, 2025, at 407 Madison Ave., Covington, KY 41011.
Recently, Owen Madden started a book club, and he wants you to join.
A professional cabinetmaker from upstate New York, Madden works as shop foreman at Rowan Woodwork.
“At our shop, we have a monthly meetup, and I get to meet some of the most talented woodworkers and artists,” Madden says. “Most of the conversations anchor around something learned from a book, at which point I write down that book and add it to the endless queue. I found that the best nuggets of information come from the discussion and innovation around the text. Naturally, I wanted to create a more organized space for these conversations so I could garner as much as possible.”
Madden, whose past work ranges from historical preservation and replication to modern architectural millwork, says he enjoys the community aspect of woodworking, trading stories and techniques about the craft.
We at Lost Art Press love Madden’s idea and hope to support the club in the future with virtual visits from some of our authors during meetings.
“The first book was selfish,” Madden says. “Nancy is a hero of mine, and I find that book relates to anyone who wants to make great, lasting things that connect to the people we make them for.”
Here’s how the club works:
Madden will set up monthly meetings to discuss each book. Longer books may require a couple of meetings.
“I would love to have everyone involved in some sort of conversation, be it on Zoom, Discord or even in-person splinter groups in their own community,” Madden says. “It’s still so new the structure will probably build as we have some meetings.”
You can learn more about The Woodworker’s Book Club here. You can follow the club on Instagram here. And you can join the club’s Discord change here.
As for the next book?
“After this one, I’m going to do a poll and see,” Madden says. “I also think it would be cool if the guest moderator picked the next month’s book. It’s all fluid and new still, so we will just see what works and what doesn’t.”
Editor’s note: The third edition of “Cut & Dried” should arrive in February. You can sign up to be notified when it arrives here. In this post, author Richard Jones explains his update to Chapter 6.
Rombald’s Moor: The opening image to Chapter 6.
In 2021, I decided I ought to update “Cut & Dried,” and the third reprint of it at the end of 2024 was a good opportunity to do so. For a long time I had been aware of two ways to determine wood moisture content, i.e., the “dry basis” (db) and the “wet basis” (wb). In Section 6.6 Measuring Wood Moisture Content in the already printed book, I emphasised we woodworkers use only wood’s dry weight as the base weight to assess wood moisture content. This dry basis methodology wasn’t actually named in the book and nor was the alternative wet basis methodology named or described except the wet basis was hinted at in an exchange I had with a furniture student at the end of page 76 and into page 77.
However, since the last printing of “Cut & Dried” in 2019, things have evolved and environmental issues are ever more pressing. The drive is on to reduce carbon emissions, reduce particulates and pollutants etc. I am not here to proselytise on these issues but burning biomass fuel in the form of logs, wood chips, pellets etc. is one potential source of particulates and pollution. Many people and organisations around the world burn biomass fuel for heating homes, cooking, industrial boilers etc., and burning wet fuel is both inefficient and pollutant. The U.K. government, for example, created legislation to regulate the supply of biomass fuel, including setting the maximum moisture content levels for biomass fuel suppliers, and putting in place organisations to verify that such suppliers meet required government standards.
Crucially the authorised method of determining wood moisture content in the biomass fuel sector is the wet basis. It’s the case that the biomass fuel sector might be considered peripheral to us woodworkers with our focus on making things out of wood, and where we want to know its moisture content, but the biomass fuel sector, like use, require felled trees, so there is an environmental impact which deserves some discussion in “Cut & Dried.”
To illustrate the difference between dry basis and wet basis calculations for wood moisture content I’m including some text from the latest iteration of section 6.6 of “Cut & Dried,” but modified slightly for this blog post’s purposes.
A learner approached me with the following figures for a piece of wood both before and after oven-drying:
Wet Weight = 20 grammes
Oven-Dry Weight = 15 grammes
This learner questioned the calculated moisture content result. Using the formula already provided she calculated: ((20 – 15) / 15) X 100 = 33.3%MCdb. This learner, in trying to grasp the basis of the calculation, changed the formula to calculate thus: ((WW – ODW) / WW) X 100 giving the sum ((20 – 15) / 20) X 100 = 25%wb. We discussed the different results, i.e., 33.3 percent and 25 percent, and it is easy to mentally visualise a 5 gramme weight loss is a quarter of the 20 gramme wet weight of the sample, i.e., 25 percent. Similarly, it’s quickly apparent that a 5 gramme weight gain is one third (33.3 percent) of 15 grammes, the sample’s oven-dry weight. As soon as the learner understood the base line for the dry basis calculation is the dry weight of the wood, not the pre-dried wet weight, all was clear to her. She was then able to comprehend how, using the dry basis methodology of assessing wood moisture content wood MC figures such as 100 percent or greater were possible, e.g., wet weight, 200 grammes and oven-dry weight of 100 grammes.
This learner’s confusion had led her to unknowingly stumble upon the methodology for assessing wood moisture content referred to earlier, i.e., the “wet basis” (Forestry Commission, 2011). To calculate the wood moisture content percentage on the wet basis (wb) the formula given by The Forestry Commission (2011, p5) is:
“The MCwb = (the weight of water in a sample/ total initial weight of the sample) X 100.” MCwb as indicated earlier, means Moisture Content Wet Basis. Results are expressed as a percentage.
Further reading, if so desired, can be found at the following links:
Cutting patterns is a natural part of working wood with hand tools. For centuries, patterns and symbols have decorated simple tools and utensils. During long winter nights in front of the fire, symbolic patterns were carved into the wood. And with the tip of a sheath knife, a signature or house mark was added next to the year — a couple of slanted notches that have immortalized the object for posterity, a plowed furrow in the soil of time. Today, these objects glitter like treasure in museum archives and provide inspiration for those who want to develop a creative and authentic practice of pattern-carving in wood.
To me, contemplating what pattern to cut on an object — on a box, spoon or knife handle — feels like I’m being served dessert. I want to enjoy the process, allow the sketching time it needs to create a unique and ideal pattern: a decoration that I can cut at my leisure, safe in the knowledge that it will stand the test of time for many years to come. This is the feeling and experience I want to share with you. A big advantage of cutting patterns is that you don’t need many tools; a chip carving knife and a regular well-sharpened sheath knife will go a long way. Basic slöjd tools are needed to make the objects themselves, of course. But once this is done, you can bring your chip carving knife anywhere. Once you begin to familiarize yourself with techniques such as the fingernail cut, shallow relief carving and kolrosing, you’ll need to supplement your tools with a few gouges and a kolrosing knife. You may also need to fasten the material to a workbench or table with clamps to free up both hands.
There is great variety and freedom of choice in composing your own designs. Think of this book as a primer on technique, a source of inspiration and an invitation to create your own bank of patterns as well as your own unique style.
It contains many pictures of newly composed patterns and objects made and crafted specifically for this book. There are also pictures of older examples from folk art, captured in museums around Scandinavia. You can also read about cutting patterns in my previous book “Slöjd in Wood” (Lost Art Press, 2018), under the chapter on chip carving. This book offers a wider range of in-depth pattern ideas, additional inspiration, and suggestions on how to make various everyday objects the slöjd way.
You can read and use this book independently of “Slöjd in Wood,” though I occasionally refer to technical descriptions found in the previous title.
ROOTED IN A FOLK TRADITION OF PATTERNS
My journey as a woodworker began when my father put a chopping block in my childhood bedroom. Along the way, as I have adopted new techniques and materials, these experiences have been com-pounded into a knowledge that has shaped a special slöjd-inspired approach to my materials, tools and folk art. It has resulted in a practice that has gradually come to encompass work processes as well as cultural history in a never-ending exploration that is constantly growing both deeper and broader. Slöjd has become part of my profession, a kind of artistic vocation or a so-called métier. Traditionally, this has been common in many professions that involve working with one’s hands but has rarely been documented by the practitioners themselves, who are preoccupied with their work. Herein, I have gathered all my experience of cutting patterns in wood, and with this book I wish to pass it on to you.
My woodworking is marked by a quest to strike the perfect balance between opposites such as shallow and deep, burlesque and serious, as well as classical and folksy. Drawing inspiration from older slöjd, this has always been a stated aspiration in my work. When I admire traditional patterns, I’m often struck by all that the term “traditional” holds. It’s a loaded, heavy and somewhat boring word, often evoking preconceived conservative images imprinted on us by museums and history books. Yet for me, the opposite is true. Every time I return to the archives — as I like to call the thousands of pictures and drawings of old slöjd and patterns I have collected over the years — I am struck by a tremendous desire to work wood with my hands. When I study the patterns, I see the folk geometry, the rhythm, all the personal mannerisms and local variations. I feel like I become part of a long tradition of folk-art souls making slöjd. These explorations give me a deeper understanding of the conditions that governed how folk art was made, both the living conditions of the slöjd maker and the materials and tools that were used.
The choices and limitations — why a certain pattern has been carved — are influenced by the time in which the slöjd maker lives. Often, I see a personal and artistic style that offers a great freedom, which in my view approaches a folk-art definition of what slöjd is. To me, slöjd and folk art offer the freedom to express beauty, contradiction, naive delight and deep seriousness in my own unique way. I can’t wait to try out variations on what I have just seen. In slöjd, I get to explore new ways of expressing a different aspect of my personal style through sketching, drawing, reshaping and finally cutting the pattern. Together with the joy of having made a new object, to me the creative process is the greatest satisfaction in slöjd
Ale-drinking vessel, from the Norsk Folkemuseum in Oslo, Norway. The barely discernible face surrounded by rays underneath a crown became the spark that ignited my long interest in pattern-making in slöjd. At first, I was attracted by its crude yet refined simplicity. Only later did I become aware of the significance of the symbols. “IHS” was originally an abbreviation for the name Jesus in medieval manuscripts.
WHAT’S THE POINT OF CUTTING PATTERNS?
One of my earliest vivid memories of pattern-carving is from a visit to the Norsk Folkemuseum in Oslo in the early 1980s. The exhibition space is dark; only the light from the display cases illuminates the room. Some guksis (wooden cups)and burl bowls from the 17th century catch my interest. I try to take a picture, but suspecting it’s too dark, I take out my sketchpad instead and begin to draw the shapes and patterns from the outside of the bowl. I struggle to define which parts of the carved surface are raised and which are recessed. After staring and thinking, sketching and erasing for quite some time, the pattern finally emerges with greater clarity — as though I were developing a photograph in an analog darkroom. Shading with a pencil, I create depth and angles. How can I accentuate shallow and flat surfaces in relation to deep cuts?
By the time I have been sketching for an hour, I’m exhausted and my fingers are itching for a piece of wood and a knife; I want to have a go at cutting the pattern myself. Someone is speaking to me from behind the carved figures. The woodworker is inviting me to do the same: “Try it yourself! Put your knife to the wood and the rest will take care of itself.”
The below was written by our good friend Mattias Hallin, who lives in Belgium (though he would, I think, want me to let you know he is Swedish). You might recall that he is our non-resident expert in linseed oil paint, from this 2024 post (and he wrote for us about overseas ordering, for those few Lost Art Press items not available through our international stockists).
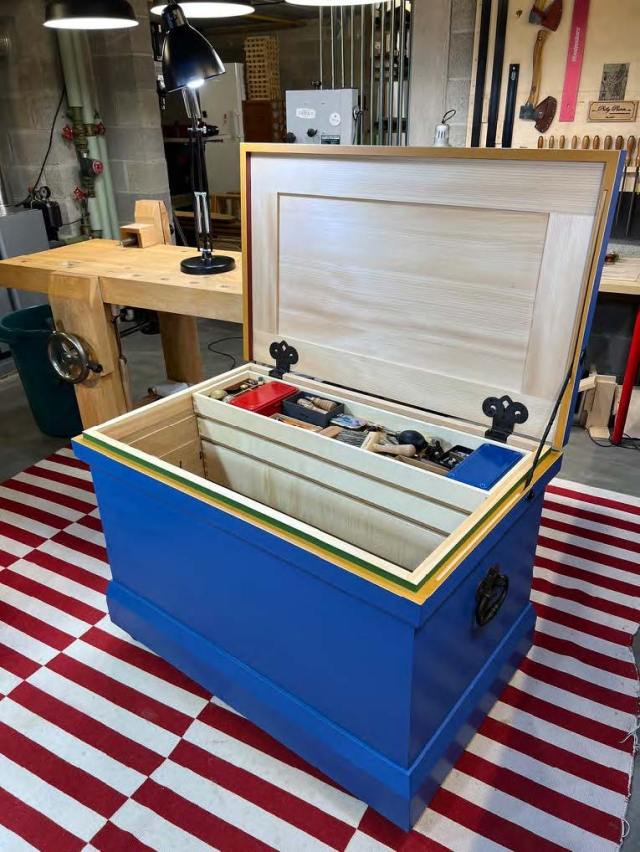
His tool chest – which we’re calling the Archivist’s Tool Chest because that’s his profession – is a study in meticulous planning of storage (and hardware). We asked him to write about it for the blog, and he kindly delivered.
I’ve posted an goodly excerpt below, with a link to download a pdf of Mattias’ entire write-up.
When I was in Covington for a chair class in 2022, Megan kindly lent me a Dutch Tool Chest (DTC) for temporary storage of all the tools I’d brought, and I found that I really liked working out of it. At the same time, I got a good, close-up look at Chris’ and Megan’s full-size Anarchist’s Tool Chests (ATC), and decided there and then to one day build an ATC myself (and a DTC, but that’s a different story) – except, in my case the A stands for Archivist, as that is what I do for a living, while I have nary an anarchic bone in my body.
And now I have built that chest.
This blog post, though, is not about the chest build as such, which, bar some personal tweaks and touches, is pretty much straight out of ‘the literature’ (The Anarchist’s Tool Chest and its addenda here on the blog and in Megan’s videos on the ATC interior and a traveling ATC). Rather, it is about how I approached designing the tool storage, and the ideas and solutions I came up with in that process, as these offer some ideas not suggested in the ATC book.
The Chest: Some Basic Facts
Before diving into my big box, though, just a few words about its general construction.
It is mainly built out of Pinus strobus, i.e. Eastern White or (as it is usually known over here) Weymouth Pine. Runners and till bottoms are oak (Querqus spp, probably robur). The sliding till walls and tool racks are hard maple (Acer saccharum), and finally there’s some boxwood (Buxus sempervirens) for boxing the lid stay slots, while the block plane cubby is pear (Pyrus communis).
Dovetailed carcase and skirts as per TATC. Through-tenoned lid frame, as per same. Bottom boards nailed on, as per, etc. and so forth.
The hardware (except a set of vintage cast iron casters, bought online) is blacksmith made, designed and forged by the fantastic Tom Latané.
The finish is Ottosson linseed oil paints on the outside, and the company’s oil/wax paste on the tills and racks.
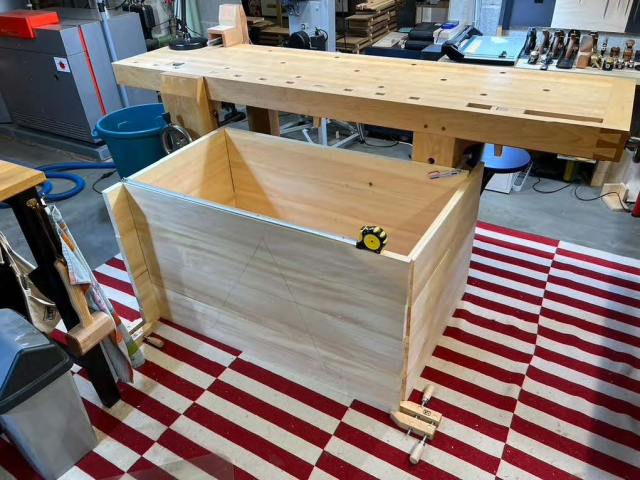
The internal space of the empty shell is 36-11/16″ long, 22-1/8″ wide and 23-15/16″ high. Nothing magical about those oddish numbers: they’re simply what aiming for 36-1/2″ x 22-1/4″ x 24″ ended up as.
Mock ‘em Up!
I barely know my way around SketchUp et al., and while I think I can safely say I’m not bad at figuring stuff out just in my head, for many things I also like to check that thinking by mocking them up. This is particularly true for anything three-dimensional.
Planning for tool storage in my chest began with a considered decision on the dimensions of the basic shell. The larger that shell, the more tool storage potential, so bigger may seem better. That, however, is not the whole story. For starters, a larger chest eats up more space in your shop and becomes more unwieldy to move about. Also, if it is too wide and/or too deep, it becomes hard to reach the bottom or the rear corners. And Chris and Megan warn from experience that the longer the chest, the more likely it is the sliding tills will rack.
So, my initial instinct to throw space at the problem and go large was quickly reined in.
The simplest way forward would have been to just go with the measurements from ATC, but in order not to box myself in too soon, I decided to make the rough panels well over size by some 5″ or so in both length and width. This let me show them to one another and get a much better feel both for how large different sizes of chest would be and how well (or not) I would be able to reach into them.
(Here, by the way, is as good a place as any to say that I mostly don’t work to a cutlist and try to use as few measurements as possible. I do almost all stock prep and dimensioning with hand tools, so usually work to the largest thickness commonly available between a set of parts and make them to fit each other rather than be exactly some pre-defined size.)
Showing the oversized panels to each other already at the rough stage gave me a feel for what might – and mightn’t! – be suitable dimensions and proportions.
Other than overall size and internal reachability, I also knew already at this stage that I wanted:
For the sliding tills to measure at least just over 8″ in internal width (because my woobie box is 8″ long);
to have full access to two sliding tills at a time with no overlap; and
to hang my backsaws between the front wall and the front tool rack.
I did not yet know the exact outer dimensions of the sliding tills, or the thickness of the surface-mounted hinge leaves, nor would I for quite a while, but to get 8-and-a-bit ” internal would likely mean 9″–9-1/2″ external width per till, so 18″–19″ for two tills to open with no overlap.
Add to that at least 2″ for the front rack with room behind for saws, plus a margin for the hinges, and I suspected that the 20-1/8″ internal width in the drawings in ATC would risk being a tad on the tight side.
For final dimensions I therefore decided that all four panels should be 24″ high (same as in the ATC), the front and back 38-1/2″ long (so 1/2″ more than in the book) and the ends 24″ wide (so 2-1/8″ more). Everything else would follow from there.
Thinking Inside the Box: Basic Premises
Lesson learned: when you plan to bevel a dovetail, don’t undercut the middle (cf. lower skirt right-hand corner). Filler and paint are your friends, if you do.
While things followed, and the basic carcase came together, I had plenty of time to think ahead and consider the basic premises for how I would want to organize the tool storage. On the one hand, I have a strong tendency towards a place for everything, everything in its place and the skates go in the fridge. On the other hand, I had no wish to French-fit the interior. To use an extreme comparison: I am in great awe and admiration of the Studley tool cabinet, but I wouldn’t have it if you paid me to.
In daily practice I will most likely put a tool back in more or less the same spot where I picked it up, but over time where that spot is may well move around.
Basic Premise #1: Tool storage should be flexible.
That said, my tool set is by now quite stable. I have acquired most of the tools I need or see a future need of. I have also sold or given away a number of tools that I either upgraded or didn’t expect ever to use (again). By now, I think what I have left are the keepers.
I will not be able to fit every single keeper into this chest, but then I never expected to. There are, however, keeper tools that I am as certain as makes no difference will live in this chest for the rest of my days. Some of those tools may as well have a permanent place specially fitted to them.
Basic Premise #2: There can be duly motivated exceptions to Premise #1.
Notwithstanding tool set stability, I am no exception to the general rule when it comes to mental shopping lists. That is to say, I have one. Mine may be much shorter than before (cf. stable tool set), but there are tools I know I shall want to get in the coming years. If I know that now, and that I shall want to store them in the chest, I might as well plan for that.
Basic Premise #3: Try to think ahead.
Then again, you never know, so racks and tills should be as easy to replace as is commensurate with safe and solid storage while they’re in use.
Basic Premise #4: Don’t over-fix the fixtures – they may have to come out.
Finally, no matter the solution selected for individual tools, they should come out and go back in easily, blocking each others paths as little as possible. The more frequent the use, the easier the access should be. Edges shall be protected, as shall fingers, hands and arms when rummaging through the depths of the chest. Space should not be wasted, though, but a happy medium sought between efficient storage and effective use.
Basic Premise #5: Aspire to conduct a well-balanced tool ballet.
With these premises clear in my mind, I could start to purposefully mockup dummy versions of the fixed racks and tills and put my ideas and these premises to the test.
Front Tool Rack
The first questions to which I sought answers were, what distance should there be between the front wall and the front tool rack to best store my backsaws, and how high should the rack be above the floor?
My longest backsaw is an 18″ tenon saw. It will live in the saw till on the chest floor, but I still wanted to make sure it could also hang behind the front tool rack if needed. On the other hand, that tool rack should not sit any higher than necessary for that to work. In part because some tool handles are rather long, but mostly to make sure there will be room enough above the rack to fit a crab lock to the inside of the front wall.
While it would have been possible to measure the saw handles and plates and calculate the answers, I am wary of that method, as mistakes won’t be caught early. A mockup with some scraps is quickly cobbled together, and this one let me test different distances and heights by adding or removing spacer blocks.
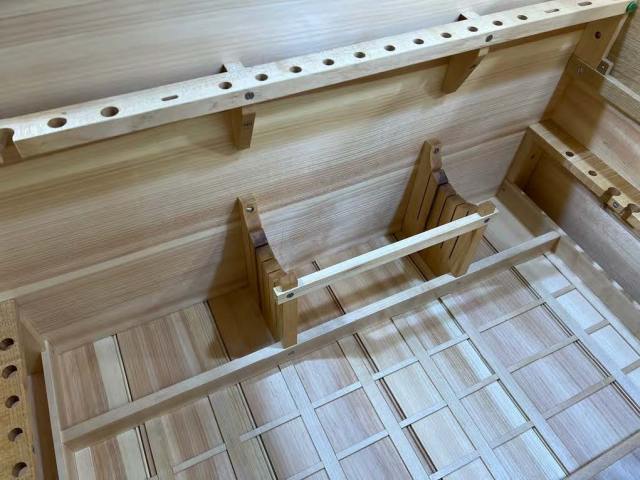
It turned out that 5/8″ was the ideal distance between wall and rack, and that with the top of the rack at 16-1/4″ above the floor my biggest backsaw would fit with 1/8″ to spare. I made a careful note of these figures.
I also wanted to know how wide the tool rack should be, what distance from the outer edge holes would be best for tool holes, and what sizes and shapes of holes would best work for different tools, in particular those that would have a permanent place?
Again, dummy racks made from pine offcuts was the perfect method for me. They were easy to run up from an ample supply of material left over from the panel prep, so I could test as many possibilities as I wanted. The “standard” tool hole suggested in the literature is 1/2″ diameter and is drilled with the center point 1/2″ in from the edge. The latter I found held good, but a 1/2″ hole is too small to hold certain tools as well as I wish. Thus, the socket of a Lie-Nielsen chisel seats perfectly in a 14mm (or 9/16″) hole, while a Blue Spruce chisel needs a 5/8″ (or 16mm) hole for the ferrule to go in deep enough that it won’t wobble in the rack. And for my set of Barr Tools cabinetmaker’s chisels, that have larger sockets, the perfect size hole turned out to be 19mm (3/4″).
(While I mostly work in customary/imperial units these days, I drilled some of these tool holes in the closest metric equivalent if that was the best drill bit for the job I had to hand.)
For my pigsticker mortise chisels, I tested elongated holes in different lengths and widths until I found the particular sizes that would best fit each one of them, taking into account the tapered undersides of the bolsters. And for my two paring chisels I went fully bespoke – but I’ll come back to that in the Photo Gallery below.
I also experimented a fair bit to find the ideal distance between centers but won’t go into any detail on that; suffice to say that, depending on the tools involved, it varied between 1-1/2″ and 2-1/4″.
As for the width of the rack, 1-3/8″ turned out to be right, giving a total width of 2″ including the space for saws. While that does not leave much room between the saw handles and the handles of tools stored in the rack, I tested the setup thoroughly and concluded I would be happy with it. I was in any case anxious not to have the front rack extend more than really needed in order to minimize potential interference with the saw till on the floor below.
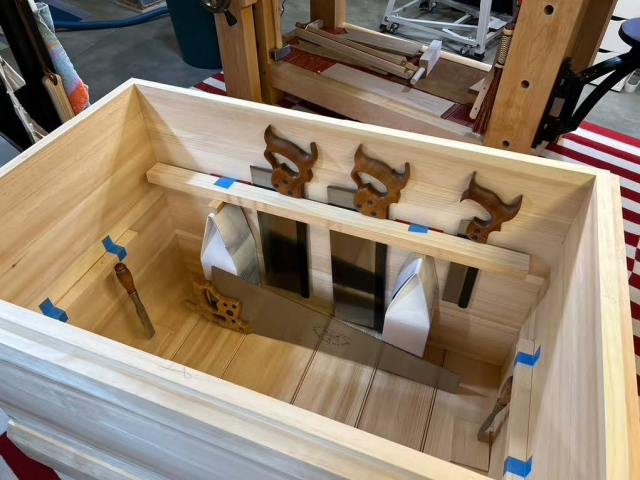
Saw Till
Speaking of the saw till, it took a fair bit of experimentation to find the right configuration. For starters, how many saws should it hold? I currently have two handsaws – a 26″ rip and a 24″ crosscut – and as already mentioned, I also wanted to store the 18″ tenon saw in this till. That’s three saws. However, on my shopping list are two short – 18″ or 20″ – handsaws, a rip and a crosscut, so I decided on a five-slot till.
With that made clear, there still remained a number of issues to sort out. The till needed to be roomy enough for ease of operation without gobbling up too much floor space. What would that mean in terms of distance between slots? On testing, I found 3/4″ too tight to allow the easy grab of a saw, 1″ fine but unnecessarily roomy, so 15/16″ turned out to be the Goldilocks number.
And would I want to store stuff below the saws? There’s potential space there, but only accessible by removing the saws, which is not very handy. I first thought it would be a good spot for my roll of saw files, which don’t come out all that often, but found that idea overridden by a more important consideration: the placement of the slotted till uprights should be in function of where the backsaw blades will hang.
The front rack has four spacer blocks to create the 5/8″ slot for backsaws, one at either end and two somewhere in the middle, through which the rack is also screwed to the chest wall. The two middle ones I located to optimize the available room to fit my particular set of backsaws, not forgetting to leave room in the middle for the crab lock.
The saw till uprights were then best placed immediately below the two middle spacer blocks to keep them from obstructing the space available for hanging saws. This turned out to mean an off-center placement, with the two uprights too close together for the file tool roll to fit, even on the diagonal. In the end I decided to leave 2-1/2″ underneath the saws: high enough that e.g. a Trusco box will fit in there if needs be, but not conceived to be a major storage space.
There is still about 1-1/2″ clearance between the top of the saw handles and the underside of the bottom sliding till, so in theory I could have gone an inch or so higher. But that would have had an unwanted effect on the interplay between the innermost slot and the tool rack above. For a saw to come out and go in with full clearance from longer tools in the rack, the slot has to be about 2-1/4″ out from the chest wall. Starting a set of five slots from there, though, would have made the whole till go a full 7″ into the central well.
I bought the 18″ tenon saw for my bench build. It did a great job on the massive tenons involved in that but is not in any way a daily user on furniture-size projects. I am not getting rid of it, but it can certainly be stored in a harder-to-reach spot. Thus, I decided to have the innermost slot at but 1-1/4″ from the wall, in effect between the hanging backsaws and the tools in the rack. To get a saw in or out of there, any long tools must first come out of the rack, but for the very occasional use of the 18″ tenon saw, that’s not a problem. The other four slots have good clearance, and the whole saw till, including the bracing rails, ends at 6-1/8″ into the central well, giving me a full 12″ of width for storing bench planes between the till and the molding plane corral.
The finished saw till, with the uprights in line with two middle spacer blocks behind the front rack above. The top cross brace is much shorter than what’s suggested in the literature, for a reason. Having it go all the way out to the side walls would not make the construction meaningfully stronger, but it would interfere with tool storage in the side racks.
To read more, download Mattias Hallin’s pdf below.