We just posted two bonus videos about the Swedish tool chest. These short videos, hosted by me, discuss where this chest comes from historically and also offers a tour of the finished chest with tools in it.
If you have purchased the “Make a Swedish Tool Chest” video, you should have received an email notifying you of how to watch and download them. We decided to also post them here for free so everyone can get a look.
I started writing “Set & File: A Practical Guide to Saw Sharpening” in 2015, but the background work started long before that in the early 2000s. For me, learning to sharpen saws was trial and error, and there wasn’t much to guide me. I looked for written instructions but was always left wanting. I had no teacher to direct me, and whatever texts I did find seemed vague and superficial like the author didn’t really file saws all that often or at all.
That said, during the last 20 years or so I’ve collected a small library of books that describe saw filing and care. The story begins with Joseph Moxon, of course, and continues through today. Some of these books are fascinating and entertaining, others are not, but they are all important to me. While reading and re-reading them over the years I started creating a mental list of what they got right, what they got wrong and what they missed all together.
As my book begins to make its way out into the world, I thought it might be fun to share some of my favorites. For simplicity, I’ll present the books chronologically as they were published, and separated into three general age groups: Really Old (authors wore wigs), Old (authors wore jackets and ties), and New-ish (authors wore shorts).
This is certainly not how I discovered and read them mind you, and this list is by no means all inclusive. I’m sure there are works out there I am not familiar with, and while I’d like to say that I have read (and know) everything there is about saws, my wife is sitting next to me on the porch as I write, and she won’t feed me dinner if I act up. So please do suggest other books or articles in the comments that you know of and find relevant. She would greatly appreciate you keeping my feet on the ground and my head out of my…..well, you know. 😉 Here we go…
Mechanick Exercises by Joseph Moxon, 1680(ish)
This is said to be the first book on woodworking written in English, and it is one of my favorites. It has a tangible charm in its prose, which is relatively simple to understand and (mostly) clearly written. And I love the old English long “s” that looks like an “f.” For some reason (probably linked to my warped reality), I like to imagine Moxon narrating the words to me with a slight speech impediment and actually pronouncing the long s’s as f’s like they appear. I think it adds to the charm and helps distract me from the fact that for all we know everything in the book is completely made up. Regardless, Joe does include a brief description on how to sharpen a saw in Section 26 of the Joinery chapter.
He writes, “…with a three-square File they (the Workmen) begin at the left hand end, leaning harder upon the side of the File on the right Hand, than on that side to the left hand; so that they File the upper side of the Tooth of the Saw a-slope towards the right Hand, and the underside of the Tooth a little a-slope towards the left, or, almost downright.”
Pretty clear, right? When I first read this, I twisted myself into a pretzel trying to find “the underside of the Tooth.” What, for the love of King Charles, is the underside of a tooth?!? No matter how many ways I turned the saw end for end I couldn’t find it. With that cleared up, he moves on to setting the teeth, which makes only slightly more sense. It’s pretty clear from Moxon’s use of ‘They,’ that he wasn’t talking about himself filing saws, and thus was established the important precedent of fancy white guys spouting off about things they know nothing about. Despite this, it actually is a fascinating early look at saw sharpening. It certainly raises more questions than it answers, but it’s just about as close as we can get to T=0 for saws. My first copy of Moxon was acquired years ago in a paperback reprint from my friend Gary Roberts at Toolemera Press, and I believe it is still available. I have acquired several other copies and reprints over the years including the first Lost Art Press book from Mr. Schwarz, “The Art of Joinery,” and the later Lost Art Press full-text version so I can learn bricklaying in my spare time, too.
With All the Precision Possible by Andre-Jacob Roubo, late 1700s
Across the Channel and a few decades later comes A.J. Roubo, hellbent on setting the craft record straight and not letting some English puddle chaser set the standard for woodworking. Like most, I didn’t read Roubo until it was translated into English a few years ago by LAP, but when I (we) finally could it did not disappoint. “Wow” is all I can say. What struck me most was Plate 5 regarding “The Sawing of Wood.” In the lower right-hand corner, tucked between figures 9 and 12 is a revelation. Clear as day are shown a row of teeth with alternating bevels at their points: fleam!
Roubo (translated) describes filing these teeth as such: “They are not filed squarely, but on an angle, each tooth in opposing direction one to the other. One must note that this angle is not present except in the leading edge and that the base is at a right angle, or squared, with the saw.”
Over the years I have been intrigued by an argument that I first learned of from Roy Underhill (if I recall correctly) that the joiners at Colonial Williamsburg do not file their saws with any tooth bevel, or fleam, as it is also known. The reason as I understand it (in chatting with the joiners at the Williamsburg cabinet shop) is that they cannot find any historical evidence that saw teeth were in fact beveled in the 18th century, and that they simply filed their saws straight across and with a raked back tooth for crosscutting. This argument has never made sense to me. It seems like the kind of logic that would suggest colonial English folk didn’t put jam on their toast because we haven’t found any toast from that period with jam still on it. Saws, like toast I would assume, would tend to get used up and erased as evidence, right? And tooth bevel is not all that complex as technical innovations go, either. For me, Andre ended the argument with Plate 5, but I imagine that 18th-century Englishmen are not so inclined to take direction from the French (unless you count plagiarizing their work…Moxon!). It is worth mentioning that Roubo was describing how a pit saw was filed, meaning a large frame saw for turning big slabs into usable planks, which curiously is a ripping operation and would not seem to benefit at all from a beveled tooth. As far as I can recall he doesn’t describe saw filing anywhere else, nor ever specifically the smaller saws used at the bench. And did AJ ever file a saw himself? He must have if he was a trained joiner, right? This certainly lends more credit to his saw descriptions in general, but it is clear that like Moxon this is not a description of how he files a saw, but how “they” file a saw. Similar to Mechanick Exercises this description is far from helpful, but it’s a solid second showing. Either way, it’s the oldest and most significant evidence that fleam was in common use on saws in the 18th century, at least in France.
Mechanic’s Companion by Peter Nicholson, 1812
To round out the early period of notable saw writings comes Peter Nicholoson some decades after Roubo and comfortably back across the Channel, thank goodness. He is said to have been a trained cabinetmaker so in addition to being an expert drinker we can confidently assume he had first-hand experience to convey about saw filing.
But no such luck. Pete does share some tantalizing descriptions of saw teeth as a consolation, but he seems to have prioritized a description of using basil when sharpening your plane iron (an odd lubricant if you ask me) over even the slightest mention of what kind of herb (or other medium) he recommends if your saw becomes dull. This is an odd oversight to say the least.
The chapter on Carpentry actually opens with a description of saws and he writes, “Some saws are used for dividing the wood in the direction of the fibre,…others are only employed in cutting in a direction perpendicular to the fibres…the former case requires the front edges of their teeth to stand almost perpendicular to the line passing through their angles…for otherwise the points of the teeth would run so deep into the wood, as to prevent the workmen from pushing the saw forward without breaking it.”
Nicholson is describing tooth rake, and in doing so provides the first written assertion I’ve found that saws need to be filed in different ways to accommodate either ripping or crosscutting operations. He continues in the Joinery chapter with specifics on types of saws used in furniture making and what kind of tooth spacing each saw should have. This is where things get really exciting, and by exciting I mean: Remind you of why you love your table saw.
Pete shares that, “The Ripping Saw Is used in dividing or splitting wood in the direction of the fibres; the teeth are very large, there being eight in three inches and the front of the teeth stand perpendicular to the line which ranges with the points.”
If you can do the math, that means this is a 2-1/3 tooth per inch (TPI) handsaw with zero tooth rake. Converted to points per inch (PPI) this is 3-1/3, which is fair to round up to 3-1/2 points. That’s one hell of a rip saw. If you’ve ever tried ripping with such a saw in something like oak or any other hardwood, you likely have a truer appreciation for the aforementioned drinking. I first acquired this book from Toolemera Press years ago in paperback. It may still be available there, but it has now also been reprinted by LAP with a proper Smyth-sewn binding and hardcover.
Next, in Part II of this three part series we’ll take a look at information from the golden age of western saw making, including trade propaganda and crazy people throwing saws off of roof tops. Stay tuned.
The following is excerpted from “Hands Employed Aright: The Furniture Making of Jonathan Fisher (1768-1847),” by Joshua Klein. In this book, Klein (founder of Mortise & Tenon Magazine), examines what might be the most complete record of the life of an early 19th-century American craftsman. Using Fisher’s papers, his tools and the surviving furniture, Klein paints a picture of a man of remarkable mechanical genius, seemingly boundless energy and the deepest devotion. It is a portrait that is at times both familiar and completely alien to a modern reader – and one that will likely change your view of furniture making in the early days of the United States.
The Desk & Bookcase The value of a minister’s library was substantial and, therefore, the fact that Fisher invested time in the construction of a desk and bookcase is not surprising. One biographer calculated that Fisher owned approximately 300 books, describing it as “not an inconsiderable store for a poor minister in a small village.” That Fisher valued reading is even seen in the plans for his house in which one of only two items of furniture depicted was a bookcase in the kitchen.
Though Fisher’s desk and bookcase is not explicitly mentioned in the surviving journal entries, attribution can be confidently made based on provenance, numerous construction features and the homemade wooden lock on the door.
The desk is constructed of pine and was painted (although the current paint is modern). The desk has three drawers and downward-extending lopers that provide a slanted writing surface. At the top of the writing surface, there is a small secret compartment with a sliding-dovetail lid for valuables. The bookcase has both full-length shelves as well as small compartments for letters, etc. The panel doors lap with a beveled edge when closed, and a homemade wooden lock secures the minister’s library from tampering. Despite the fact that the lock operated with a key that is now missing, there is an identical lock on the door to his clock face that still functions, operating by turning a knob. Fisher made many wooden latches in his house, all of which are fascinating, but these locks are particularly delightful. They are easy to overlook by assuming that they are the same metal locks Fisher might have purchased from Mr. Witham’s store at the head of the bay, but they are clearly Fisher-made and completely made of wood. Their delicateness and smoothness of operation add a touch of sophistication to an otherwise unassuming piece of furniture.
Fisher’s work has been sometimes compared to that of the Shakers because of its simplicity and conscious restraint. While the overall association stands, it is significant to point out that the primary difference between Fisher and the Shakers is their view of ornamentation. While classic Shaker work has little to no moulding, Fisher relished elaborate profiles. The cornice of this desk (as well as that of his wardrobe) sat like a crown over Fisher as he studied. His artistic vision of furniture design, though similar to the Shakers’ in its modesty, was less inhibited. Even as a young child, his mother, Katherine, taught him to value artistic expression. Katherine, whose drawings look so much like her son’s, saw a world in which chastity and artistic beauty were not mutually exclusive. Fisher was not afraid of flourish. His work fits much more squarely in the Federal vernacular classification than that of the Shakers.
The desk carcase is interesting in that it is constructed like a six-board chest, with the sides extending to the floor with bootjack feet. The dados are a scant 3⁄4″ wide, matching his surviving dado plane. The backboards are unplaned, rough-sawn boards nailed into rabbets in the sides. The drawers (with the exception of the bottom one, which is a replacement) are of conventional dovetail construction – half-blind dovetails at the front, and through-dovetails at the back. The drawers’ bottoms are beveled and fitted into grooves in the sides and front, and are nailed to the drawer backs
The overall composition of this piece illustrates the minister’s education. Even this simple desk was designed with classical proportions from his architectural training. Fisher’s fluency in this geometric layout is obvious from his college geometry notebooks in the archives. These notebooks are full of compass exercises to lay out complex patterns. Designing a desk was easy compared to the drawings he usually did. This “artisan’s design language” (as George Walker has called it) [6] must have been intuitive in Fisher’s cosmos of order and mathematical rationality.
The panels in the doors are interesting in their irregularity. Their flat sides face out in the Federal style and are beveled only where needed on the inside. The insides of the panels have heavy scalloping from the fore plane, even leaving behind evidence of a nick in the iron of the plane. This tendency to continue to use a nicked iron without regrinding the bevel is consistent throughout his work and concurs with the notion of pre-industrial indifference toward secondary surface condition. For the bottom two panels, he seems to have run short on material because the panels are only barely as thick as the 5⁄16″ groove and, even at that, both retain minor, rough-sawn texture. It appears he was scraping the bottom of the barrel to get those doors finished.
The insides of the doors have several inscriptions. “Willard” is written in red ink on one door, and “Josiah F” on the other. There are also compass-scribed circles on the inside of both doors whose randomness appears to have no significance beyond doodling. Even more perplexing, however, is the recording of “1 gallon of vinegar” on the inside of the door. This pattern of documenting purchases (and then crossing them off when paid) as well as notable life events is seen in several other pieces throughout the house. Jonathan seemed to have started the habit but Willard definitely took it far beyond his father. Willard’s name, agricultural notes and weather reports appear all over the house and his son, Fred, seems to have continued the tradition.
The Standing Desk
The standing desk is said to have been used by Fisher and is attributed to him. There are remnants of the light blue paint Fisher used extensively in his furniture, but there is no mention in the journals of his building the desk at all. Fisher did describe building a “high writing table” but this would be a surprising description for such a recognizable form as a desk on frame. Furthermore, Fisher was described as “below medium height.” Because the average height of a Civil War soldier was 5’7″, it seems reasonable to surmise Fisher was certainly no taller than 5’5″. If this were his desk, it would have been uncomfortably tall for him without a stool to stand on. Perhaps, though, the “standing stool” Fisher built soon after moving into his house was intended for that purpose.
6. Walker, Geo. R, and Tolpin, Jim, “By Hand & Eye,” Lost Art Press, 2013.
This chair is built using Honduran mahogany that is at least 50 years old that I purchased from a millwork and furniture shop in Norwood that was going out of business. I bought every scrap I could afford, and I used most of my stash to build the projects in “Campaign Furniture.”
The rest, I have decided, I will use to make stick chairs. I probably have enough wood for four or five more chairs. (Note that most true mahogany today is illegally harvested. If you are interested in working with it, I recommend you seek out old stock or recycle it from broken or discarded antiques.)
About the Chair
Because I don’t have a lot of thick mahogany, the seat is thin (about 1”) and the leg tenons are reinforced with battens below the seat that are attached with sliding dovetails. This makes the chair lighter in weight and in appearance. The seat is a single board of 16”-wide mahogany.
The seat is 16” off the floor, and the chair is set up for dining or office work. The seat is tilted 4°, and the back is tilted 14° off the seat. The overall height of the chair is 39-1/2”, with an overall width of 22-1/2” and depth of 22”. The splayed-out back sticks provide plenty of shoulder support. This is a quite comfortable chair.
All the joints are assembled with hide glue (that we make here). This means the chair will be easy to repair in the far-off future as the glue is reversible. The finish is blonde shellac with a coat of black wax.
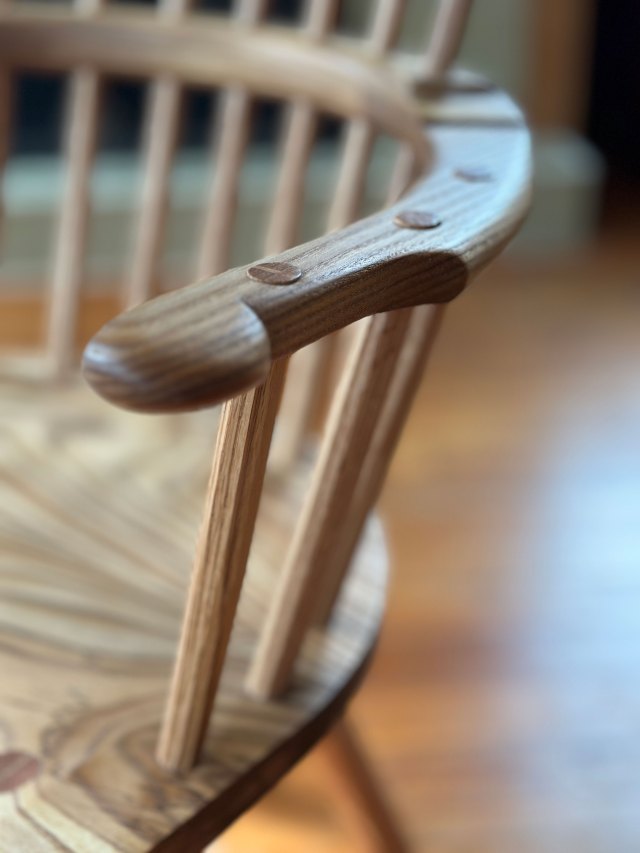
All the through-tenons in the undercarriage and arms are left slightly proud. They add texture (and a little strength) but they won’t snag your hands. I polished them and slightly rounded them over so they feel like a river pebble. All the short sticks are wedged into the arm above and below in the seat.
It might seem odd to make a folk chair from mahogany, but it is historically appropriate. Many seaside villages would build their furniture from cargo that washed up after shipwrecks (even though that was illegal to do).
How to Buy the Chair
I’m selling the chair via a silent auction. Crating and shipping are included in your price. As this is a private auction, there is no dealer fee. Your bid is what you pay to acquire the chair and have it shipped to you.
Bids start at $500. My chairs typically sell at auction for anywhere from $1,200 to $5,000, with most of them ending up in the $2,500 range.
If you wish to buy the chair, send an email to lapdrawing@lostartpress.com before 3 p.m. (Eastern) on Friday, Aug 23. Please use the subject line: “Comb Back” In the email please include your:
Bid
U.S. shipping address
Daytime phone number (this is for the trucking quote only)
If you have the highest bid, we will notify you. Alternatively, the chair can be picked up at our storefront. (I’m sorry but the chair cannot be shipped outside the U.S.)
I first met Whitney Miller when she was a reporter at WCPO-TV in Cincinnati, right as the pandemic was cranking up. Whitney worked with my wife, Lucy, and Whitney was really into making anything and everything.
She’d made her own dining table with the help of some friends. And she’s made almost everything else in her life – her clothes, curtains, sweatshirts for her friends, masks for people she knew, stickers for everyone. The woman just makes and makes.
She wanted to get better at woodworking, so she took a Dutch Tool Chest class with Megan. Whitney hadn’t done much hand joinery, but she has what we call “good hands.” Put a tool in her hands, and she will make it work. And work well.
During the class, Megan came to me and said: “Whitney’s form isn’t classical, but you can’t argue with the results.”
Her dovetails were fantastic. Her entire chest was crisp. Whitney might be a natural, or she might also be someone who works with her hands all the time and can make them do her bidding. (I vote for the latter.)
When we built a workbench for the Henry Boyd exhibit at the Cincinnati History Museum, Whitney led the way on its construction. She is simply an outstanding craftswoman – no matter what the tools she is using.
And her energy and enthusiasm for making things eclipses most of the goober YouTubers.
So when we thought about making a video on building a Swedish tool chest, we decided to make it for beginners and have it hosted by someone who wasn’t your typical over-trained and textbook-perfect woodworker. Someone who could get it done and make it look awesome (look at the dang photos) and wasn’t an intimidating host.
Whitney was my first choice.
We’ve been posting clips from her video on Instagram this month, and the response has been both great and depressing. Some people get it. Look at this bada$$ person putting this chest together, even without the classical education and the requisite stick up their butt. Awesome.
And others who make it about gender or race or denigrating Whitney’s work.
What does Whitney think of all this? She generally kills people with kindness, but I think you should look at her work. She might not hold a dovetail saw like you. Or plane boards like you. Or drive a chisel with the confidence of someone who does it for a living. But she knows what she is doing. And she knows how to get it done.
And if there’s not room in your world for people like that, please find another world.