Derek Jones will be visiting from England and in our shop Aug. 2-4 to teach a class in building a cricket table. Tickets for this new class go on sale Monday, May 15, at 10 a.m., on our ticketing site.
Cricket tables range from the most basic stick variety to complex joined examples* that can only be resolved when you’ve broken free of 90° and square. In three days, Derek will help you break free as you use hand tools to create joints for tops and bottoms and all the pieces in between to build a version of this historic form.
Derek – an outstanding teacher – runs the Lowfat Roubo site, where he sells tools and offers courses in the U.K. He is currently working on a book on the cricket table form for Lost Art Press, due out late this year. He is former editor of Furniture & CabinetmakingMagazine.
* Derek is also teaching a week-long class in a complex, joined version Aug. 7-11, as well as a 2-day Focus on Handworks class Aug. 12-13, at the Marc Adams School of Woodworking in Franklin, Ind.
One of my earlier Gibson chairs. This one without a saddle.
Megan and I are now filming and editing a long-form video about how I build a Gibson chair, one of my favorite Irish chairs.
The video, which should be released late next week, will include a pdf of the full-size templates needed to build the chair, plus drawings for the simple jigs I use, plus a cutting list and sources for all the tools and equipment shown in the video.
The video will be $50 for the first 30 days it is on the market. After that it will be $75.
Gibson chairs look unusual to people at first. They are low and have a back that rakes at 25° – a shocking tilt angle. It might seem like a chair for sleeping, but I assure you it’s not. It sits very much like a comfortable comb-back chair. In fact, in Ireland, these are sometimes called “kitchen chairs” because they are used for eating in the kitchen.
My version of the Gibson is a little different than the originals (we hope to do a book dedicated to the chair sometime in the future). Like almost all traditional Irish chairs, Gibsons have a flat seat. The seat in this video will be saddled, both for looks and comfort. I don’t think the form really needs a saddle, but it does look like a more expensive chair.
I’ve also made a few other small alterations here and there to the chair that I explain in the video.
I’ve tried to make the construction process as accessible as possible. All the mortises are straight holes (no tapered joints), so you can use augers you already own. The tenons are made with plug/tenon cutters chucked in a cordless drill, which are cheap and easily available. (Or you can use a Power Tenon Cutter from Veritas, which I also show in the video.) There is no steambending. You don’t need a lathe or a shavehorse. Most of the work is at the bench or the band saw.
Like all our videos, this one will have no Digital Rights Management (DRM) nonsense. So you will be able to download the video and put them on any of your devices, including your phone, laptop and pad.
— Christopher Schwarz
P.S. The next video will be on building my hobbit chair. I’ve convinced myself that it is different enough than Bilbo’s and I won’t be thrown into the fires of Mordor, which are filled with lawyers.
When I purchased our storefront here on Willard Street in Covington in 2015, I was certain of two things: 1) It was the final old building that I was going to bring back to life; 2) It would be the final resting place of Lost Art Press.
Until this month, I’ve never given more than 2 seconds of thought about what will happen to this company after John and I die. We’ll be dead, so we won’t care.
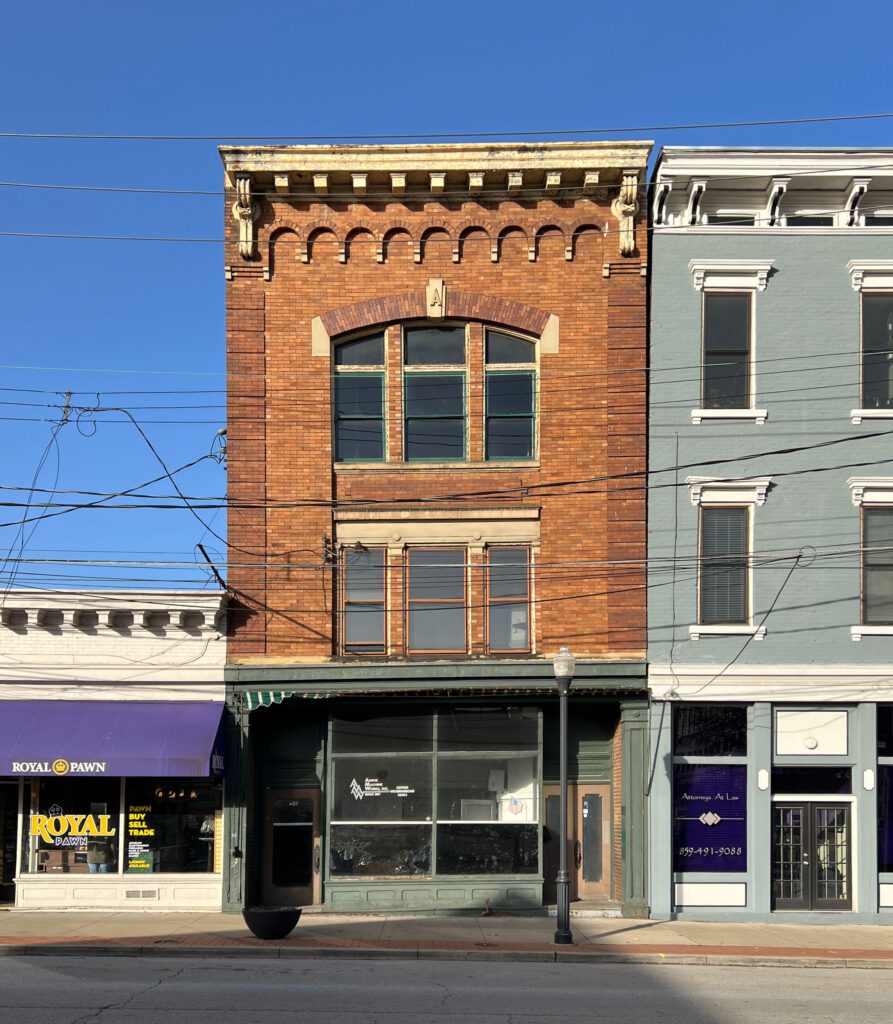
But this month, it looks like everything I wrote in the first sentence of this blog entry is incorrect. We have just purchased an old woodworking tool factory at 407 Madison Ave. in downtown Covington. This building housed the Anthe Machine Works, which made woodworking cutters from the time the company started in 1897 until it closed in 2019.
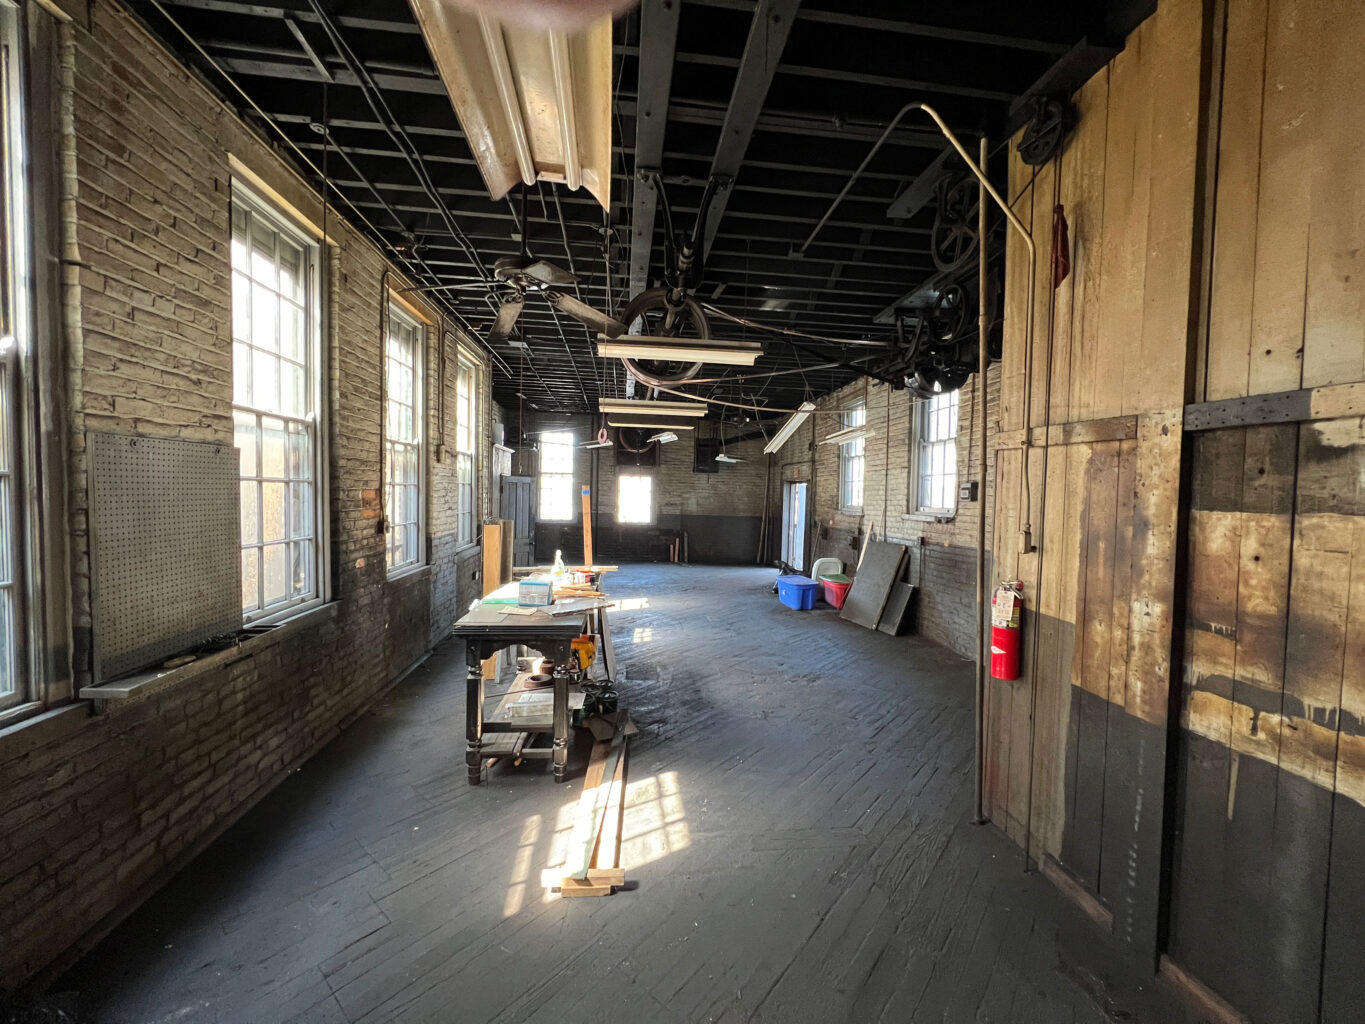
The first floor of the Anthe building behind the office. Note the lineshaft, which powers the elevator.
The building is a time capsule, with few modern improvements. Original floors, mouldings, elevator, windows, lineshaft and (yikes) toilets. It is a gorgeous space that is flooded with light. And it has no modern amenities.
The Anthe building has more than 5,000 square feet of space that is in need of preservation and restoration. And it is big enough that it now helps us see Lost Art Press as a multi-generational enterprise.
This building will allow us to bring our fulfillment operations here to Covington and have room to grow (if we want to). By June, all of our inventory will be on the floor of the Anthe building. And we will be able to mail out orders to customers with the same personal touch we bring to everything else we do.
We are thrilled by all this. But we are also a bit terrified.
In order to buy the building, we agreed to take on debt for the first time in our history. It’s not a huge loan. In fact, we will save money by transferring our inventory to Covington. But it is a debt.
More important is that we have taken on an obligation to this building, which is a historic structure with virtually no alterations. The storefront is all frame-and-panel woodwork surrounded by cast iron. The doors – all original. The trim around the windows? The original Greek key steel trim.
Though the building is in decent shape, it needs an almost endless amount of love. It needs a plan for its sensitive restoration. And it needs a lot of skilled help.
So this is the part of the blog entry where I do something I never wanted to do: show my ass.
The purchase of a huge building is something we’ve never done. And here is the other thing we’ve never done: ask for your help to restore it.
The first stage of restoring the Anthe building is to make the first floor a safe and comfortable working space. Plus maintain humidity levels to protect our books in inventory. That means we need to:
Add HVAC to the first floor (with plans for systems on the other two floors).
Pave the gravel drive to our loading dock to allow us to receive and send shipments.
Provide basic amenities. Offer a working bathroom. Add locks on doors that work. Fix the original stairs. Remove some modern “improvements” to the front office.
Get the freight elevator running.
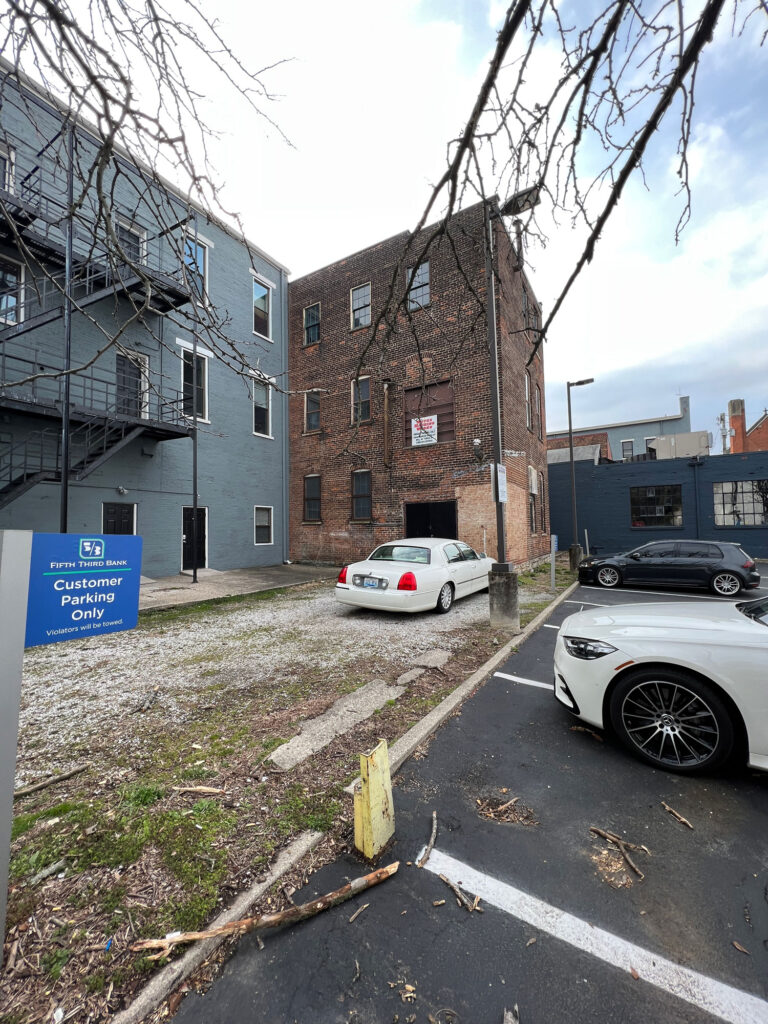
The gravel drive that allows us to load in and out. This needs to be paved.
The building’s original freight elevator. We love it.
To help pay for these initial projects, we are asking for your help. We have four tiers of support, and each tier offers something useful or beautiful in return. You can purchase any of these tiers in our store now. Links below and here.
* A special one-week stick chair class in February 2024 here in Covington. This will also be a food tour as all your meals and drinks will be included. Together we’ll each make a stick chair (you’ll get to pick the design) from some premium wood (not bog oak – I don’t have enough; think maple, white oak, walnut). We’ll have nice lunches brought in to the shop. And we’ll go out every night to one of our favorite places in Cincinnati or Covington. Oh, and there will be a Sunday bluegrass night the evening before. The exact date will be decided by the six students, so it is a little flexible.
* Signed copy of “The American Peasant” made out to you when it is released in December
* Invitation to our Opening Day Party in early 2024
* Signed copy of “The American Peasant” made out to you when it is released in December
* Invitation to our Opening Day Party in early 2024
If you can help, thank you. If you cannot, we totally understand. Simply being a customer of Lost Art Press helps support and sustain our work.
In the coming weeks I’ll write more about the building and our plans for the future of Lost Art Press – beyond this current generation. I can tell you one thing right now: We would sooner give it away than sell it to a venture capital firm.
So if you have children, start feeding them a steady diet of Roy Underhill and Charles Hayward. We might need them here in Covington.
— Christopher Schwarz
The top floor of the Anthe building. Everything is original. And everything needs love.
The Pirate Map used by the Visitor (before aging with tea, water, dirt, crumpling and folding). The Tropics of Newport are to the east; flying pigs, muddy banks and Larry the Ferryman are on the north bank. The swine whales live near the ‘O’s on the river. The visitor’s skiff has passed the Licking River and is between the ‘R’ and ‘I’.
My internet service was out for a while and I wasn’t able to respond to the comments to Chris’ reading of “A Visitor Comes to Covington” or to the backstory of the book. Thank you for the many very kind comments.
I wasn’t sure how the book would be received. In the letter sent with the book my suggestion was to put it on a high shelf in the library, push it well to the back and put something heavy on it. Alternatively, it could be buried in the basement. Fortunately, the Stick Chair Badge Approval & Distribution Committee (Chris and Megan) liked the book and I heard there was a bit of teary-eyedness when each had read the book. I didn’t intend to make anyone cry but have to confess I got a bit of moisture around my eyes when Chris read the book.
Below is a photo of my last cat, Bunky Beanie Bronzini. He was a big and solid 15-pounder capable of herding me towards the kitchen when he thought I might be headed in the wrong direction. If he had lived another few years he would gained another name or two. This was his “No, absolutely not,” expression.
The following is excerpted from Peter Follansbee’s “Joiner’s Work.”
If you like green woodworking, “Joiner’s Work” is doctoral thesis on processing furniture-shaped chunks of lumber from the tree using and axe, froe, hatchet and brake. If you are into carving, Peter dives into deep detail on how he festoons his pieces with carvings that appear complex but are remarkably straightforward. And if you love casework, “Joiner’s Work” is a lesson on the topic that you won’t find in many places. Peter’s approach to the work, which is based on examining original pieces and endless shop experimentation, is a liberating and honest foil to the world of micrometers and precision routing.
The book features six projects, starting with a simple box with a hinged lid. Peter then shows how to add a drawer to the box, then a slanted lid for writing. He then plunges into the world of joined chests and their many variations, including those with a paneled lid and those with drawers below. And he finishes up with a fantastic little bookstand.
Construction of these projects is covered in exquisite detail in both the text and hundreds of step photos. Peter assumes you know almost nothing of 17th-century joinery, and so he walks you through the joints and carving as if it were your first day on the job. Plus he offers ideas for historical finishes.
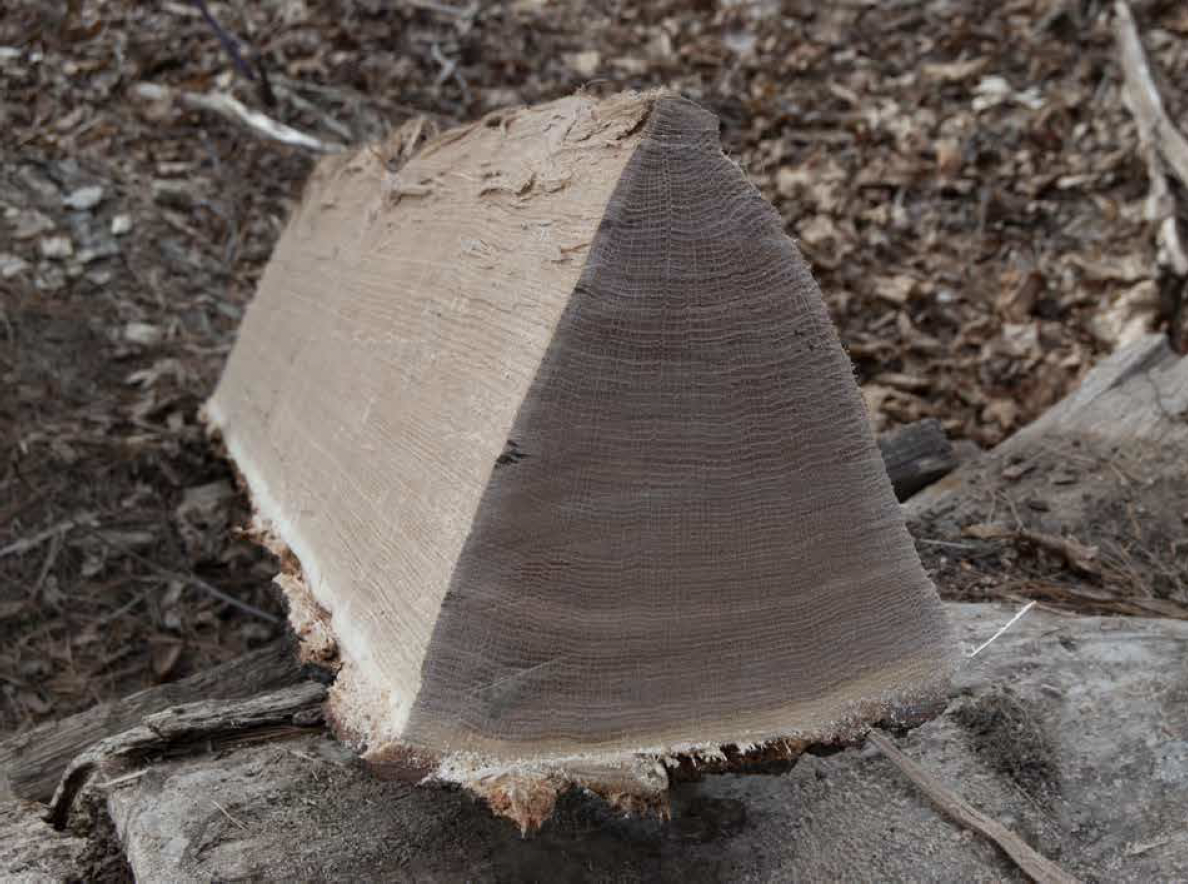
The primary material for joiners’ work is oak (I use white oak [Quercus alba] and red oak [Quercus rubra] interchangeably) that has been riven, or split, from the log.
This results in boards whose face is the radial plane, the most dimensionally stable surface possible. The stock is initially worked fresh from the log, a state we call “green.” After initial planing, boards are selectively dried some, then re-worked – the decoration and joinery are cut once the surface is dry enough to take a good finish, yet the interior of the stock retains some of that moisture, making it easier to cut than air- or kiln-dried stock.
Fig. 1.1 Here an eighth-section of an oak log is ready to become some perfectly quartered boards. Opening the log is always one of my favorite moments, when each piece reveals its potential.
When studying period pieces, I see that case pieces – boxes, chests, cupboards and related items – often display a mixture of riven and sawn stock. Usually the mill-sawn stock is the secondary wood, and in New England pieces this is often Eastern white pine (Pinus strobus). Other softwoods might appear as well. I’ve noted Atlantic white cedar (Chamaecyparis thyoides) riven into chest bottoms and drawer bottoms. It also appears as applied mouldings.
Fig. 1.2 Long sections of Atlantic white cedar are ideally suited for making applied mouldings. I don’t often get this wood, so I try to use every last bit of it when I do.
I’ve seen yellow pine (probably Pinus rigida or Pinus resinosa) in furniture from Connecticut and western Massachusetts. You can make the whole piece from riven oak, and many period works are just that, but when making case pieces, I prefer to use white pine for at least the bottoms, and often the lids, too. This is just a way to save some oak for future joinery work.
Fig. 1.3 This chest with two drawers has a relatively broad range of woods. The carcase is red oak; the lid, floor, drawer bottoms and rear panels are white pine; the applied mouldings are Atlantic white cedar; and some panels and one drawer front have plaques of black walnut.
While I am quite content using oak for most any piece of furniture, you might want some variety in your work. Black walnut (Juglans nigra) and ash (various Fraxinus species) are perhaps the most commonly found non-oak timbers I have seen in period joinery. I have used them and some other woods, too. I’ve seen Spanish cedar (Cedrela odorata) in some 17th-century joiners’ work from Boston, and other timbers besides. And recently, I’ve been using some Alaska yellow cedar (Cupressus nootkatensis) for carved boxes. Try what you have. I’d say the single-most important feature is straight grain. If nothing else, keep that in mind. Recently a friend gave me several sections of riven black walnut. They were short lengths, but just right for a joined stool. My previous experiences with walnut were a mixed bag. I often joke about being a personal monoculture; I have used oak so much for so long that I had no reference point for most other timbers. But it wasn’t until I used the riven walnut that I could truly appreciate this wood.
I used to think “it’s not for me” – but that was because I came at it the wrong way. I knew that for oak, riven green wood was the ideal. Why I thought it would be different for walnut is just one of those mental blunders that hit us all from time to time. I was judging this wood based on cuts that I would never deal with in oak. My first walnut project was a wainscot chair, made from kiln-dried wood, complete with grain run-out and all manner of un-straight fibers. Next up was a board chest, this time in air-dried wide boards. Nice, but expensive. It worked so much better than the previous project, but the chest had few details, and I really didn’t get much out of it.
Fig. 1.4 Straight-grained riven walnut was a revelation for me. This joint stool is the second non-oak example I’ve ever made. I’d do it again if the wood came my way.
Then it all clicked perfectly with the riven green wood. A nice straight-grained walnut log is a dream to work, easy to plane and to chisel – and the axe work in walnut makes you feel like Superman. Turning it is especially satisfying. When it came to carving, I had to lighten up my mallet blows. When I used my usual approach, I blasted the walnut to smithereens. Less mallet work, more hand-work and it cut fine. Live and learn. Now I have to take back all the horrible things I’ve said about walnut. Riven, straight-grained, green, free – that’s the way I like my walnut.
Around southern New England where I live, the ash tree most commonly found is white ash (Fraxinus americana). I have used this wood for furniture almost from my very first projects. When I made ladderback and Windsor chairs, ash was a favorite riving wood for parts. It is lightweight, strong and splits well – an all-around great hardwood. It has a short shelf-life in the log, though; it can go bad pretty quickly if you don’t get to it. Seventeenth-century turned chairs were often ash, but some joined work was, too. You work it just as you would oak. I have found it’s somewhat stringy, and when very fresh it can tear out badly under the plane. But if you work it green then let it sit a while, it will work very well afterward. The color is pretty bland, and there’s no figure on the radial face as in oak. So carve it up then paint it, and no one’s the wiser. Nice wood.
The Way I Work Some woodworkers keep a stockpile of lumber on hand, and draw from their stacks as they begin a new project. Others buy enough lumber (with some extra) for each piece they are planning to build, often working from a list that includes all the pieces in a given project and their rough dimensions. I work in a different way. I start with a log and split out almost every piece of oak that I use at the bench. Starting with the log is a lot of work, but it’s fun. This approach usually results in me starting several projects at once, then I leapfrog back and forth among them. Sometimes I have quite a few pieces underway, usually limited by shop space. As I write this, I have a joined chest, a chest with drawers, a chest of drawers, two wainscot chairs, a long table and several joint stools in progress. I just finished a carved box in the midst of all these.
It’s not an attention-span problem. It’s what happens when I open the log. I have an idea of what I want from a given log, but the tree has ideas of its own. I might be preparing stock for a joined and carved chest, but end up with more narrow framing parts than I need. These get shuffled over to the next project. Panels in a chest range from 7″-12″ wide, usually only about 14″-16″ long. Some logs offer wide panels that are longer than that, but are still too short to get two lengths out of them. These are ideal for carved boxes whose long front and back boards are usually around 20″-24″ long. It goes on and on.
Fig 1.5 This bedstead is now more than 15 years old. When it was new, the color difference between the various woods was obvious. Now they have blended rather well. There are white oak muntins, red oak panels, and the long rails and stiles are white ash. The finish is linseed oil.
Selecting the Timber If you are going to split your stock, it starts with the log. Finding the right log isn’t half the battle, but it’s a good chunk of it. Ideally, you’ll work with an oak that grew dead-straight, is clear, or free of knots, bumps and branches, and is large enough in diameter to yield wide boards along its radial plane. With all those criteria met, you can get even more demanding and look for an oak log that meets all these demands and is also slow-growing. In some places, you can find this timber at sawmills and log merchants, and sometimes even firewood suppliers will have short sections that fit the profile.
If you’re skipping the log-splitting aspect of this work, you can come close to this material if you look for straight-grained quartersawn boards. When using sawn stock, I prefer air-dried to kiln-dried. To me, the kiln-dried stuff seems stiffer and less cooperative. Air-dried is harder to find, but it’s out there. Flat-sawn boards can be used in joinery; they certainly are prevalent in surviving English work of the 17th century. They require some careful planning and much more effort in working, but you can make joined work with flatsawn stock – it just won’t be as much fun as working with riven stuff. When using riven stuff, you’ll be working the wood green, or unseasoned. If you have flat-sawn stock, it needs to be seasoned. The general rule of thumb is one year of air drying per inch of thickness. When I use sawn oak, I like to air dry it outside, then bring it in the shop for a few months before breaking it down to rough-size pieces.
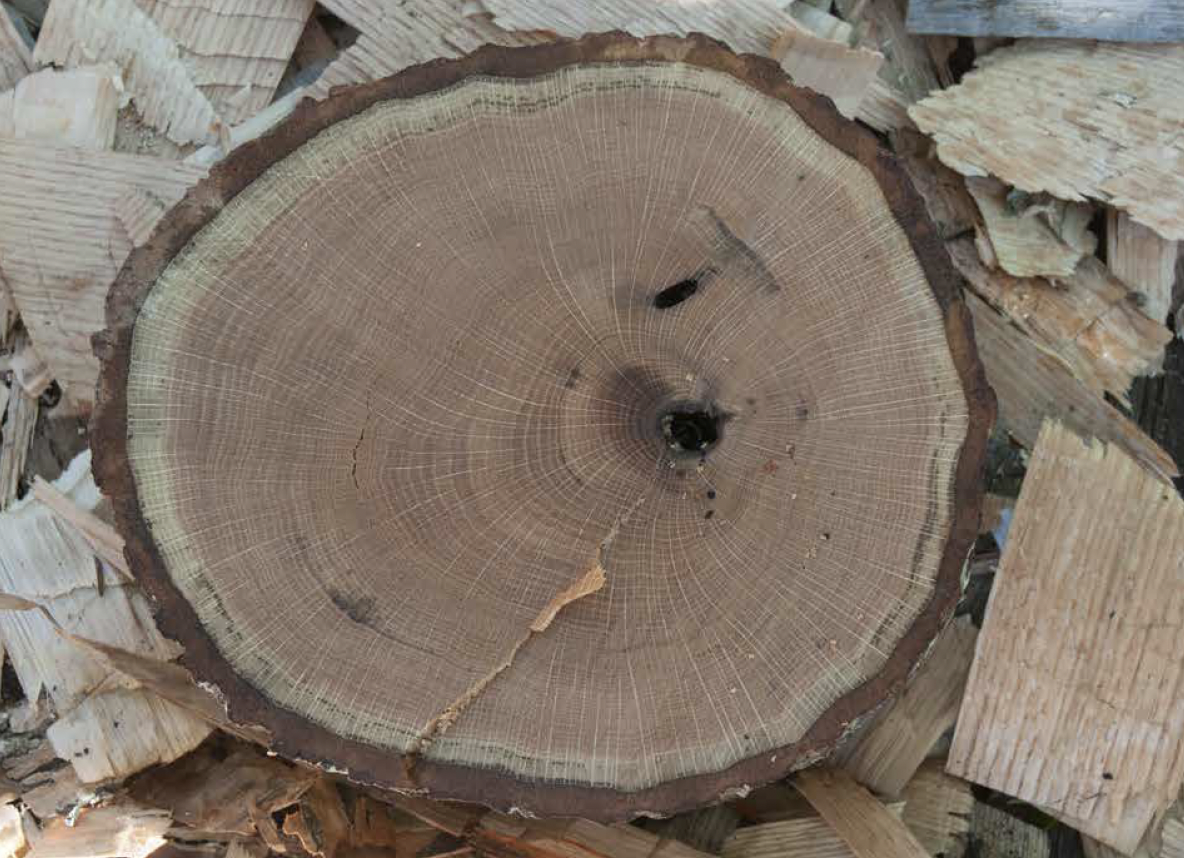
Oak Most of the oaks are ring-porous hardwoods, meaning their growth rings are comprised of two different types of cells. The material that grows in the spring is generally more porous than that from summer growth. This results in a distinct division between the spring or “earlywood” and the summer or “latewood.” Also visible on the end-grain view are the ends of the medullary rays. These are cells that radiate outward from the log’s center, or pith, toward the bark. Ring-porous hardwoods, with only a couple of exceptions, split predictably both in line with the growth rings and perpendicular to them, along the medullary rays.
Fig. 1.6 This section of end grain is strictly firewood, but the structure of the oak shows clearly. Just inside the bark is a narrow band of greyish-white sapwood, then the bulk of the material is the darker-colored heartwood. Radiating out from the center are the ends of the medullary rays, showing up as almost silvery bright lines. Concentric growth rings encircle the very center, or pith of the tree, in this case rotten and bug-eaten. This one has almost everything that can go wrong with a log; the pith is off-center, the log is out-of-round, the medullary rays are twisted and bent and there’s insect damage. There’s also cracking along the growth rings and injury to the tree at a couple of points in its life. Burn it.
The end grain of a large oak shows two distinct colors in the wood. The outer inch or so (just below the bark) is the sapwood. This material is the part of the tree that conducts the sap. It is more prone to decay and infestation, and is considered weaker than the darker-colored “heartwood.” In oaks, the greater proportion of the tree’s diameter is taken up with the heartwood. A young sapling is all sapwood, but over time as the tree grows, there is a transition in which the inner layers of sapwood undergo a chemical change into heartwood. For our purposes, the principal difference between sapwood and heartwood is the greater resistance to decay that heartwood exhibits. In woods such as ash or maple, most of the usable stock is sapwood. In the oaks, the sapwood is generally discarded, and the heartwood is the stuff of choice.
When splitting out oak stock for furniture work, the radial face is the best one to use for a number of reasons. The primary benefit is the dimensional stability of boards oriented this way. In a straight-grained example, there is little shrinkage across this radial face, thus little to no distortion, either. Another feature of this radial plane is the ease of working it – the wood cuts more easily on this face than on the adjacent tangential face. So the carved work is always done on the radial face. Mouldings are often cut in this plane, also. When using riven oak, the stock is usually oriented so the radial faces compose the front of the piece.
The material nearest the center of the log is called juvenile wood. Formed when the tree was a small sapling, this wood is often very fibrous and can include twisted grain. There is no clear distinction between where the juvenile wood leaves off and the workable heartwood picks up. Each log is different. If the innermost fibers appear straight-grained, you can try to keep as much of that stock as possible. One place where you might push your luck with the juvenile wood is when you are trying to split out the widest panel stock you can get. (I’ll cover that in detail when we get to splitting and working panels.)