The following articles on lapped and double-lapped dovetails (aka “half-blind” and “blind” dovetails) are excerpted from Volume 3 of “The Woodworker: The Charles H. Hayward Years.”
The third book in our “The Woodworker: The Charles H. Hayward Years” series covers all types of woodwork joints, including how to design them, cut them and fix them when things go awry.
It’s difficult to overstate the importance of the book “Woodwork Joints” by Charles H. Hayward (1898-1998), which was first published in 1950 then reprinted many times and in several different editions of varying quality.
The compact 168-page book is beautifully illustrated by Hayward and contains the kind of spare prose that made him the best woodworking author of the 20th century. Like a good woodworking joint, Hayward’s text contains nothing superfluous and lacks nothing important to the task at hand.
In addition to Hayward’s take on joinery, this volume also contains the perspective of other British writers of the day that Hayward published in The Woodworker, including J. Maynard, Robert Wearing, K.J.S. Walker and C.A. Hewett.
A WOODWORKER SUPPLEMENT – LAPPED DOVETAIL JOINT
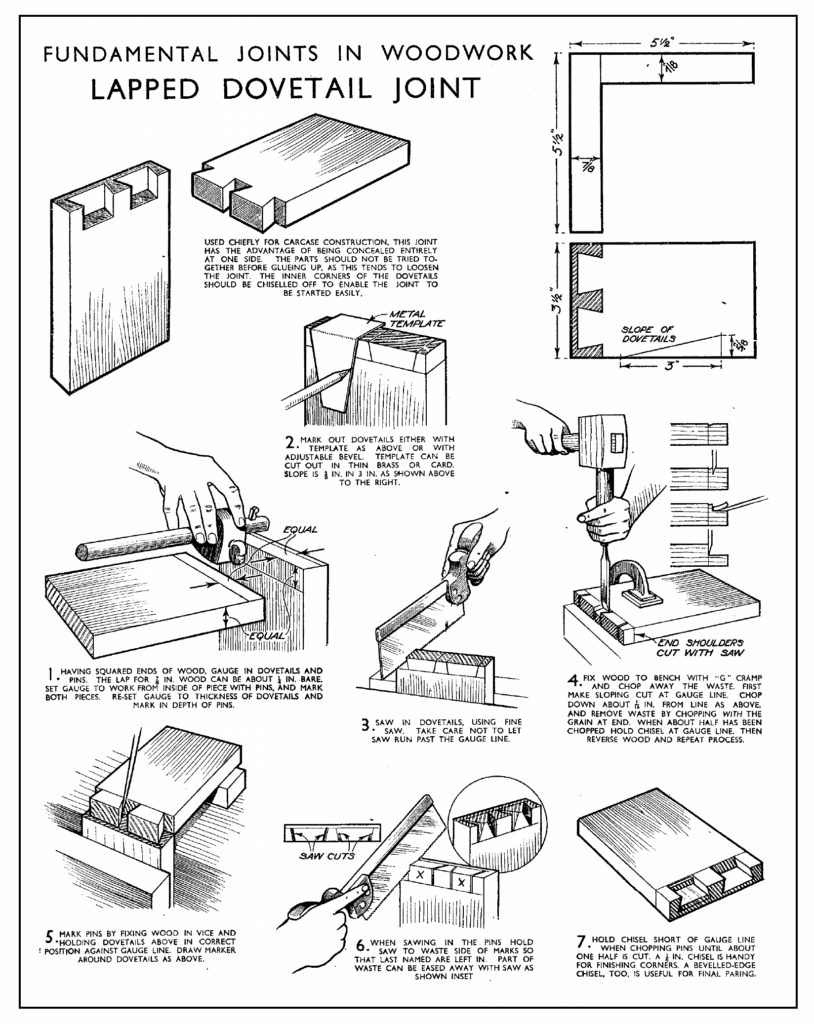
This joint is used chiefly for carcase construction and has the advantage of being entirely concealed at one side. To enable the joint to be started easily the inner corners of the tails can be chiselled off. The ports should not be joined together too often before gluing as this tends to loosen the joint.
Square the ends, and with a cutting-gauge, gauge dovetails and pins. The lap should be between one quarter and one third thickness of wood. For the pins set gauge to work from inside face. Mark both pieces. Re-set to thickness of tails and mark depth of pins.
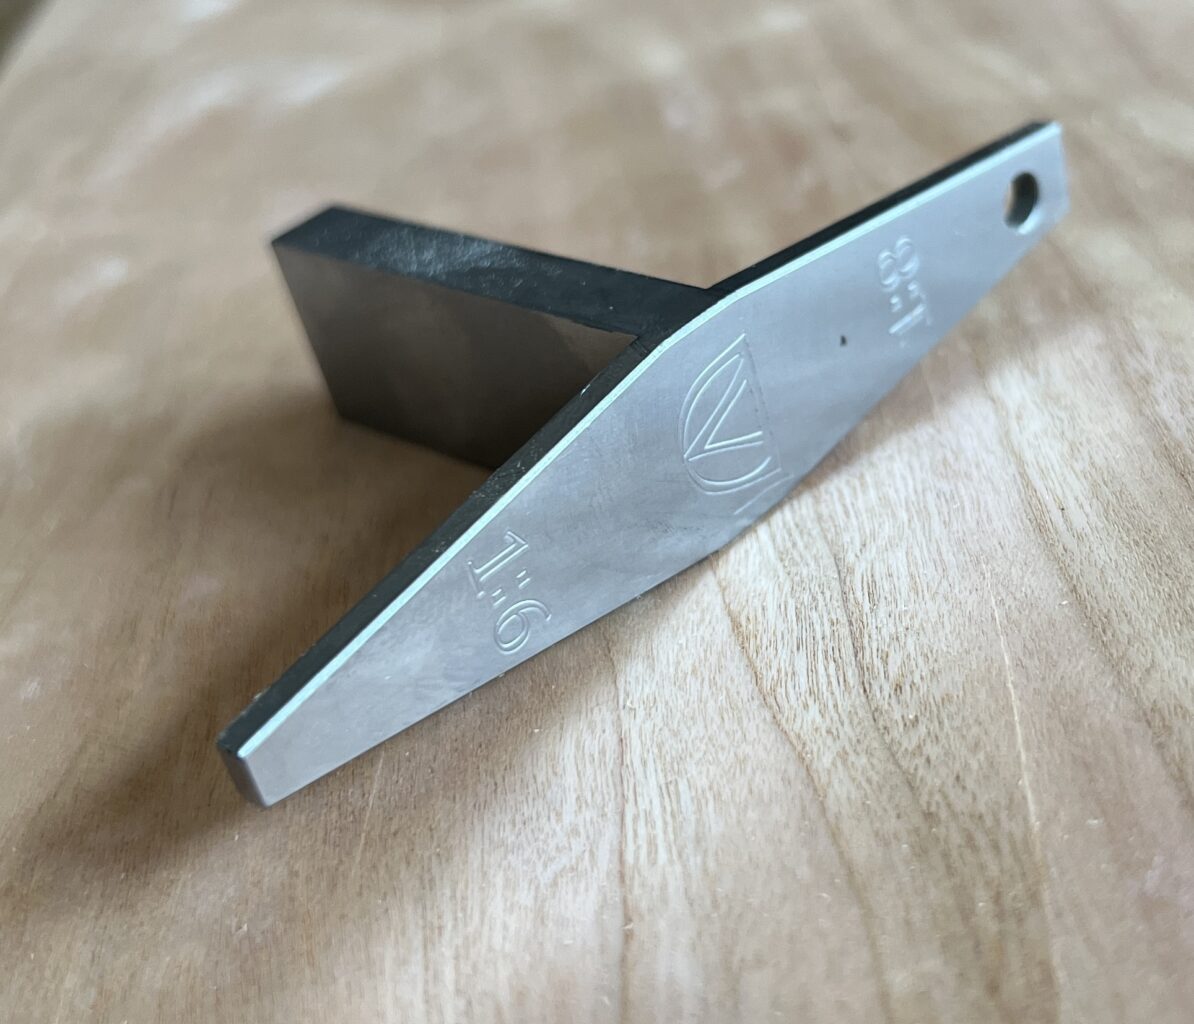
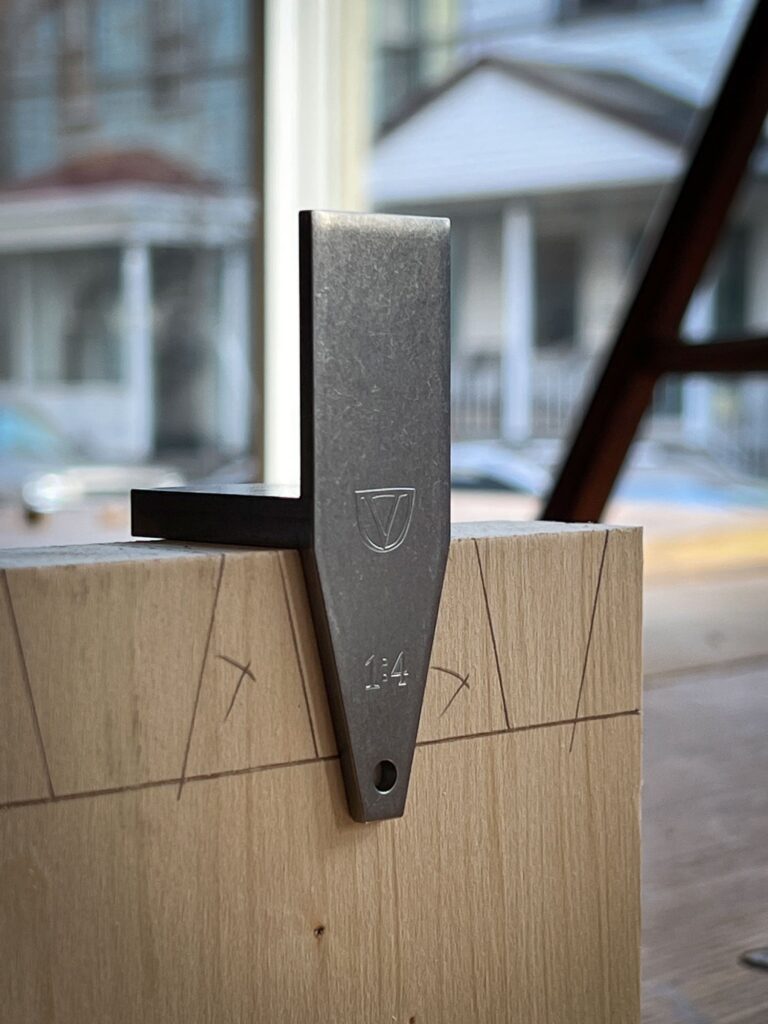
Mark out dovetail with template or sliding bevel.
Using a fine saw cut dovetails. Do not let saw run past gauge line. Some find it easier to fix wood so that cut is vertical.
Clamp work to bench and make a sloping cut at gauge line. Chop down 1/16 in. from line, and remove chips by chopping in from the end. When about half way pare down to gauge line Reverse wood and repeat process.
To mark pins fix wood in vice and, with dovetails in correct position, scribe round as shown.
When sawing the pins hold saw to the waste side of marks. Inset shows part of waste cut away with saw.
With chisel slightly in front of gauge line chop down, and remove waste by chopping with the grain from the end. A 1/8 in. paring chisel is used for the corners and a bevel edge chisel for final paring.
Editor’s note: The image at the top of this blog post corresponds with the numbers above.
HOW TO CUT THE LAPPED DOVETAIL
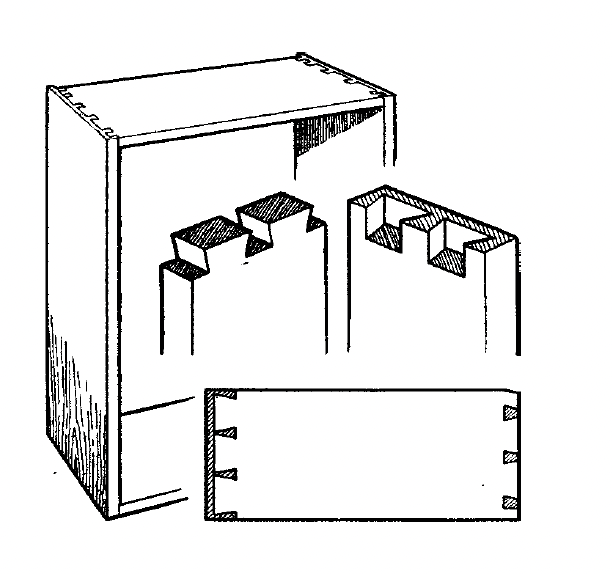
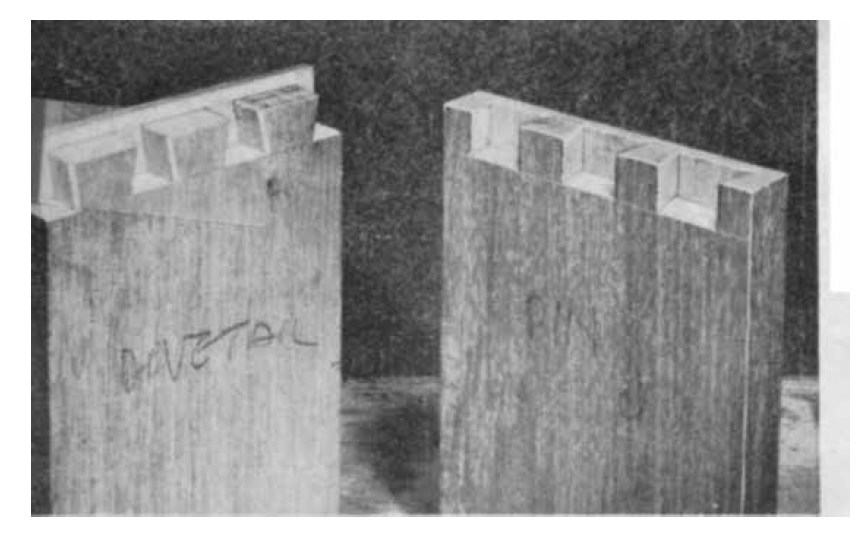
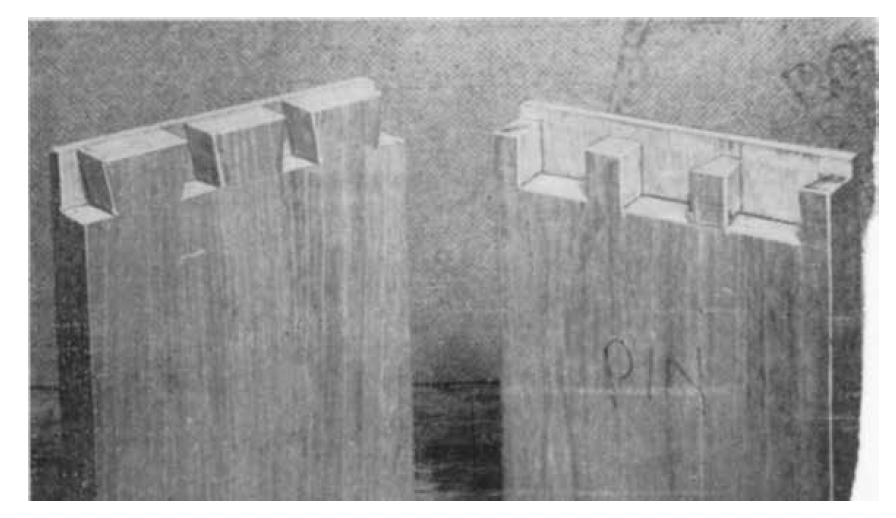
The great advantage of this joint is that it is entirely concealed on one surface and at the same time is extremely strong. This gives it a special value for carcase work since the joint does not show at the sides. The top and bottom surfaces where the dovetails are exposed are out of sight Drawer fronts are also lap-dovetailed (though the spacing is rather different), and here there is the added advantage that the wedge formation of the joint resists the pull which is the chief strain the drawer has to withstand.
It makes no difference whether the dovetails or the pins are cut first; it is mostly a matter of personal preference, though choice may be determined by other considerations. For instance, the top and bottom may have to be glued up to make the width, and it would then likely be convenient to cut the pins in the ends whilst the joints are setting.
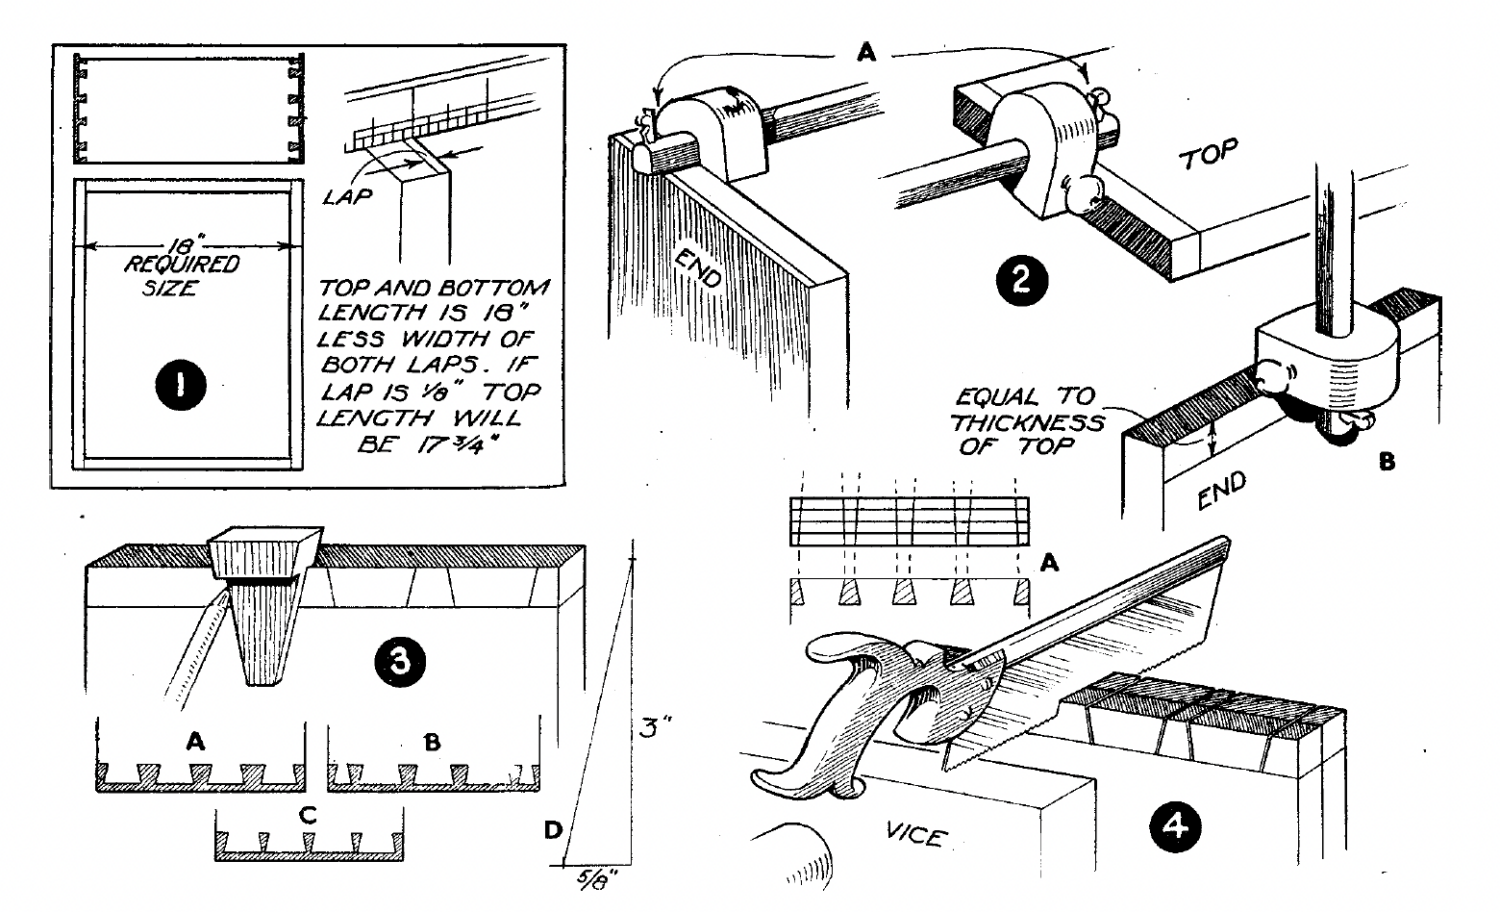
Marking out. Trimming the wood to size is the first procedure. The ends in which the pins are cut are obvious; they are the finished size of the carcase as shown in Fig. 1. It is clear that the top and bottom must be short of the over-all width by the combined thickness of the two laps in the ends. This lap size has therefore to be decided straightway. In Fig. 1 the required over-all width is 18 ins. Assuming that the lap is to be 1/8 in. it is clear that the top and bottom will have to finish 17-3/4 ins. long.
Use the cutting gauge to mark the extent of the joint as shown in Fig. 2. Set the gauge to work from the inside of the ends, the required lap projecting beyond, and mark both sides of top and bottom as well as the edges of the ends (see A). In this way the pins are bound to be the same size as the dovetails. Since the top and bottom sink their full thickness into the ends, the gauge is now re-set the thickness of these and the inner surface of the ends marked as at B, Fig. 2.
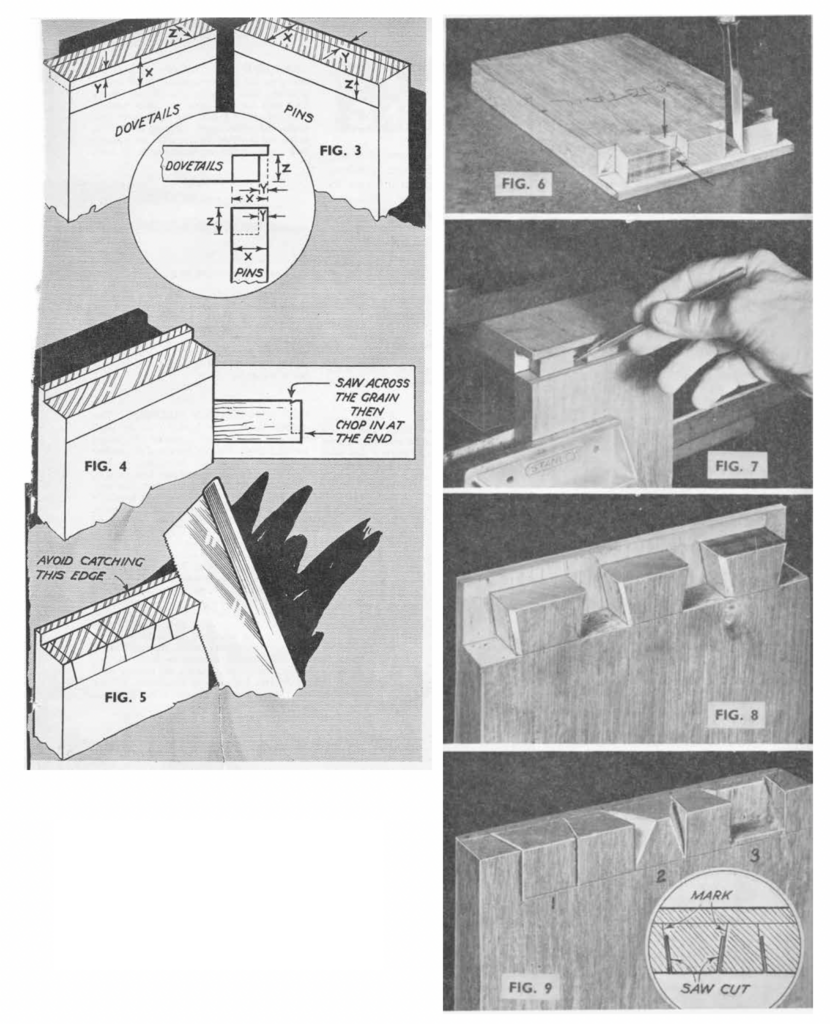
FIG. 1. HOW LENGTH OF TOP AND BOTTOM IS CALCULATED. Size of lap has to be fixed first as shown here. FIG. 2. MARKING OUT WITH THE CUTTING GAUGE. This works across grain without scratching. FIG. 3. MARKING DOVETAILS WITH SPECIAL MARKER. The marker is a simple home-made appliance. FIG. 4. SAWING OUT DOVETAILS IN PAIRS. Be careful to keep the edges flush.
Dovetail positions. The tradesman usually roughly pencils in the dovetail positions and then saws straightway. Practice enables him to cut the true slope without exact marking out. The inexperienced man should either make the simple marker given in Fig. 3, or set an adjustable bevel to the slope (5/8 in. in 3 ins.). The spacing for normal small work is given at A; B is suitable for a wide carcase in which the small end dovetails resist any tendency for the ends to twist away at the corners. Drawer front dovetails are given at C.
Sawing the joints. Fig. 4 shows the dovetails being sawn. If the wood is 3/4 in. or more thick it is advisable to cut each joint individually, but in thinner wood two or more pieces can be fixed together in the vice and sawn together as shown. Most men saw straight across dead square and it is necessary to mark out first with the trysquare. Some prefer to make a slight taper fit and then the saw is taken at a very slight angle as at A—not more than the thickness of the pencil line. If this is done it is obviously important that all face or outer sides are to the front. Otherwise, instead of showing a close joint there will be a gap. A, Fig. 4, is given in exaggeration for clearness.
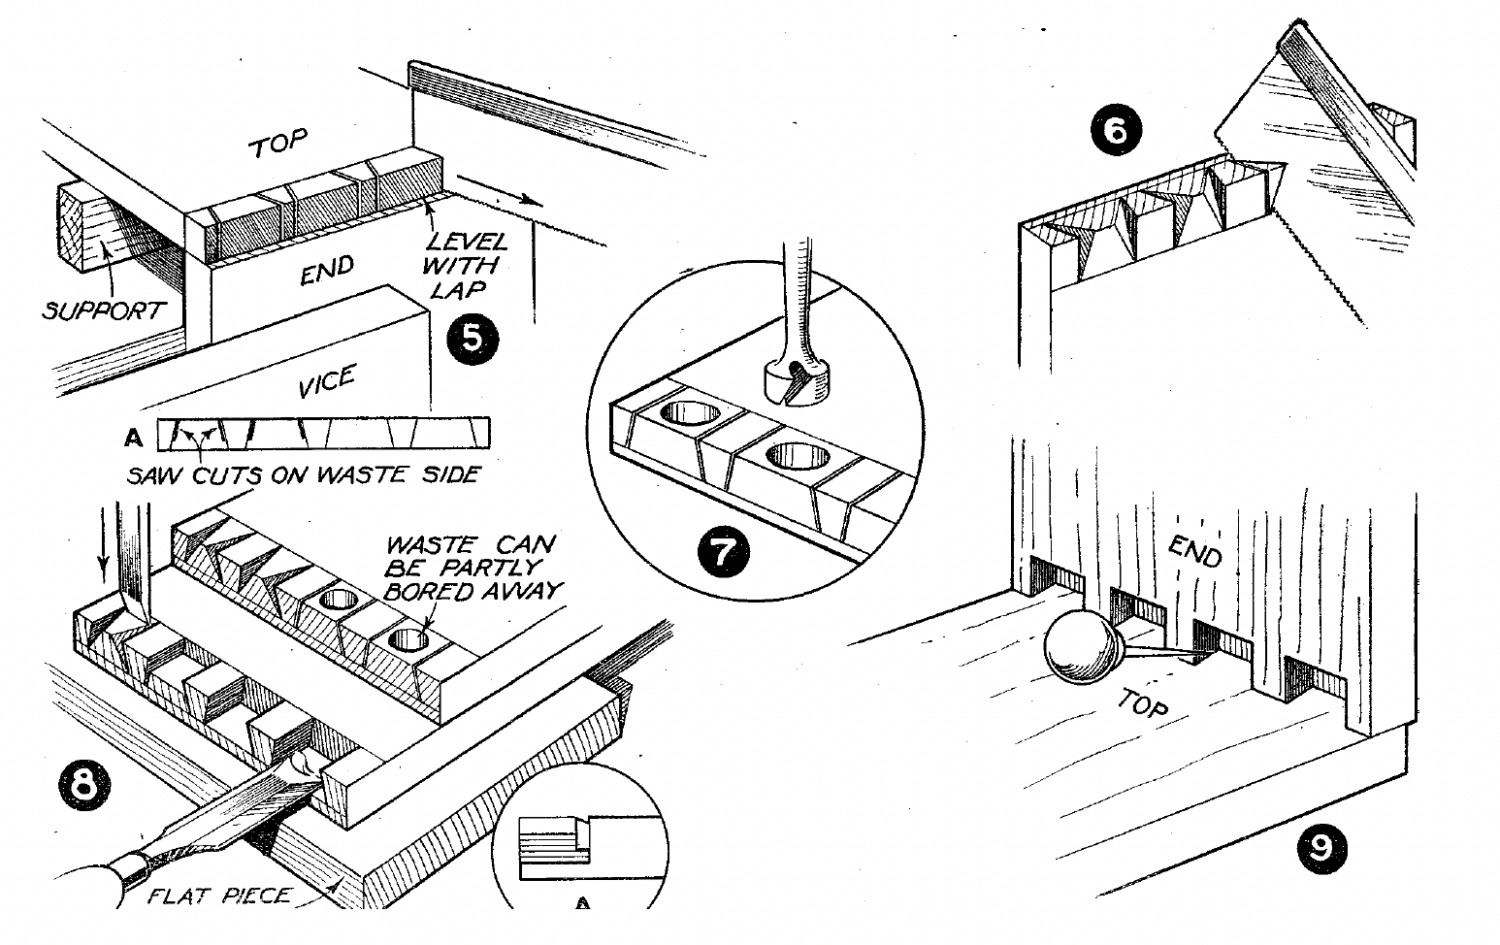
Marking the pins. Before the waste is chopped away the pins are marked out. Fix the end in the vice, and place the top upon it in the relative position it is to occupy. The inner end can be supported upon a block of wood of suitable thickness. Hold the top firmly down with the left hand, and, placing the saw in each kerf in turn, draw it backwards as in Fig. 5, so leaving a mark which corresponds exactly with the dovetail.
FIG. 5. MARKING PINS FROM DOVETAILS. Saw is drawn through each kerf. FIG. 6. SAWING PINS. Part of waste can be sawn as shown here. FIG. 7. BORING THE WASTE. Use the Forstner bit. FIG. 8. CHOPPING SOCKETS OF PINS. Fix wood down with cramp. FIG. 9. MARKING THE DOVETAILS. The awl is used.
Sawing. When sawing the pins be careful to place the saw on the waste side of the mark as at A, Fig. 5. Don’t overdo it, but just leave in the marks. This will ensure tight joints without forcing. Judgment on this point is probably the most important point in the whole procedure, and it is something which comes with experience. The thickness of the saw has to be taken into account, far less allowance being necessary for a fine saw than a coarse one. Beginners are strongly advised to cut an experimental joint using the same saw that will eventually be used for the actual joint, and try it together. They will learn more in this way than reading a dozen articles.
Of course, the saw can only be taken down diagonally as shown in Fig. 6, and here again the inexperienced man should mark down with the trysquare first. Part of the waste can be sawn away as also shown in Fig. 6. It all helps to lessen the chopping-out with the chisel.
Another way of reducing the waste is to bore it partly away as in Fig. 7. Except for the thickest wood it is seldom practicable to use the centre or twist bit because the centre point is liable to emerge through the lap, but the Forstner bit is ideal as shown in Fig. 7. It has scarcely any centre point.
Chopping. The procedure is given in Fig. 8. Clamp down the work on a flat, spare piece of wood to avoid bruising, placing it over a solid part of the bench such as a leg. At each socket make a small sloping groove against the gauge line, and then chop downwards about 1/16 in. short of the line. Ease away the waste at the end with the grain, and repeat the process. Finally put the chisel right on the gauge line and cut down.
For clearing out the corners a bevelled-edge chisel will prove invaluable because it will work close in. Many men keep an old stubby bevelled edge chisel specially for the purpose. A, in Fig. 8, shows how the waste is gradually removed. Note that if the chisel were placed on the gauge line at the outset it would be forced in beyond the latter because of its wedge formation.
The dovetails are chopped in the same way, but of course, the chisel is used from both sides. The waste at the corners can be sawn away. When the pins are cut first the marking of the dovetails is done with an awl as shown in Fig. 9. Once again the saw must be used on the waste side.
To enable the joint to be started easily the inner eDges of the dovetails can be pared off. This will permit the joint to be partly put together to see that it fits. It should not be driven right home until it is glued as this is liable to loosen it. Place a piece of waste wood over the joint when knocking it home and strike this. Otherwise the wood may split owing to the local pressure, and in any case it may be bruised.
THE DOUBLE-LAP DOVETAIL
FIG. 1. THE JOINT MOST GENERALLY USED. Here the projecting lap is on the piece with the dovetails. It is immaterial whether the dovetails or pins are cut first
FIG. 2. ALTERNATIVE SOMETIMES USEFUL. Here the projecting lap is on the piece with the pins. In this case the pins should be cut first
THIS IS SLIGHTLY more complicated than the single-lap joint, but is simpler than the mitre dovetail in that there is no mitre to bother about. In fact, the experienced man can glue up the two parts straightway without first assembling them dry. This is risky in the case of the mitre dovetail because almost inevitably a certain amount of trimming at the mitre is unavoidable.
The joint can be in either of the forms given in Figs. 1 and 2, and to an extent it depends upon the stresses to which the joint is most liable to be exposed, because the dovetail shape resists the The joint can be in either of the forms given in Figs. 1 and 2, and to an extent it depends upon the stresses to which the joint is most liable to be exposed, because the dovetail shape resists the pull more in one direction than the other. The more usual joint is that in Fig. 1, in which form it is often used for cabinet carcases. At the top the joint is entirely hidden, and at the side shows only as a thin line of end grain.
Preparation It is immaterial whether the dovetails or pins are cut first in the joint in Fig. 1, but in Fig. 2 the pins should be cut first as otherwise it is difficult to mark the one piece from the other. Whichever method is followed, the first essential is to square up the wood to the finished size, remembering to allow for the lap when calculating the length of the parts. This scarcely arises when just an isolated joint is cut, but in the case of, say, a carcase the sizes are obviously important. The rule to remember is that the piece with the projecting lap is always trimmed to the finished size, whereas that with the flush lap is less in length by the thickness of the lap on the other piece.
Marking out Assume that the joint in Fig. 1 is to be cut. The first stage in marking out is that of gauging as shown in Fig. 3, because until the thickness of the projecting lap is decided it is impossible to trim the wood to the finished length. Set the cutting gauge to the dovetail thickness (Z), which is the thickness of the wood less the thickness of the lap. Mark the end of the piece with the dovetail, the gauge fence working against the inner surface of the wood, and also the inner surface of that with the pins. Decide on the thickness of the flush lap (it is usually the same as the other), and mark the inner face of the dovetailed piece, and the end of that with the pins (see Y). Lastly set the gauge to the thickness of the wood with the pins, and mark the inner face of the dovetailed piece (X).
FIG. 3. HOW PARTS ARE GAUGED FIG. 4. THE PROJECTING LAP CUT ON THE PIECE TO BE DOVETAILED FIG. 5. SAWING THE DOVETAILS FIG. 6. STAGES IN CHOPPING DOVETAILS FIG. 7. MARKING PINS FROM DOVETAILS FIG. 8. CORNERS OF DOVETAILS CHISELLED AWAY AFTER MARKING PINS FIG. 9. STAGES IN CUTTING PINS
Cutting the dovetails The outer mark on the inner face and the end mark give the extent of the rebate to be worked on the dovetailed piece. Saw down across the grain and remove the waste by chopping with the chisel at the end. It may be necessary to trim the rebate afterwards with the shoulder plane. Note the sloping channel chiselled on the waste side of the line as shown inset in Fig. 4, to provide a convenient path for the saw. Mark out the dovetails and saw down as far as it is practicable to cut as in Fig. 5, taking care not to let the saw touch the projecting lap as any such marking would show badly later.
The rest of the work must be done by chopping with the chisel as in Fig. 6, and for this a bevelled-edge chisel is desirable to enable it to reach into the corners. Follow the usual practice of chopping down first short of the gauge line (see top arrow), and do not bring the chisel right on to the line until the majority of the waste has been removed. The latter is done by chopping in from the end (lower arrow). Since the saw cannot reach right into the corners owing to the projecting lap, it is necessary to cut down on the line of the dovetail, but only light taps with the mallet should be given as otherwise the wood may split. Clean out the corners and make sure that the bottom is level.
Marking the pins Transferring the marks to the pins is the next job. The one piece is held in the vice and the other placed upon it as in Fig. 7. A block of wood to the rear will make sure that the wood is level and is steady. Press firmly down to make sure that there is no movement, and pass a marking awl along each side of every dovetail.
The process of cutting the pins is given in Fig. 9. The saw is held immediately to the waste side of the mark, and is taken down as far as the diagonal. Part of the waste can be sawn as at (2), but finally it is chopped away as described last month. The stages are shown in Fig. 9, but it will be realised that each socket is not completed individually before the next is sawn. Rather, all sawing is done, then all chopping.
Finally the inner corners of the dovetail are lightly chiselled away to ease the assembling of the joint as in Fig. 8. Be sure to do this after the marks have been transferred. If the parts are lightly started together it will be obvious whether they fit or not. It is better to avoid knocking completely together dry before gluing.
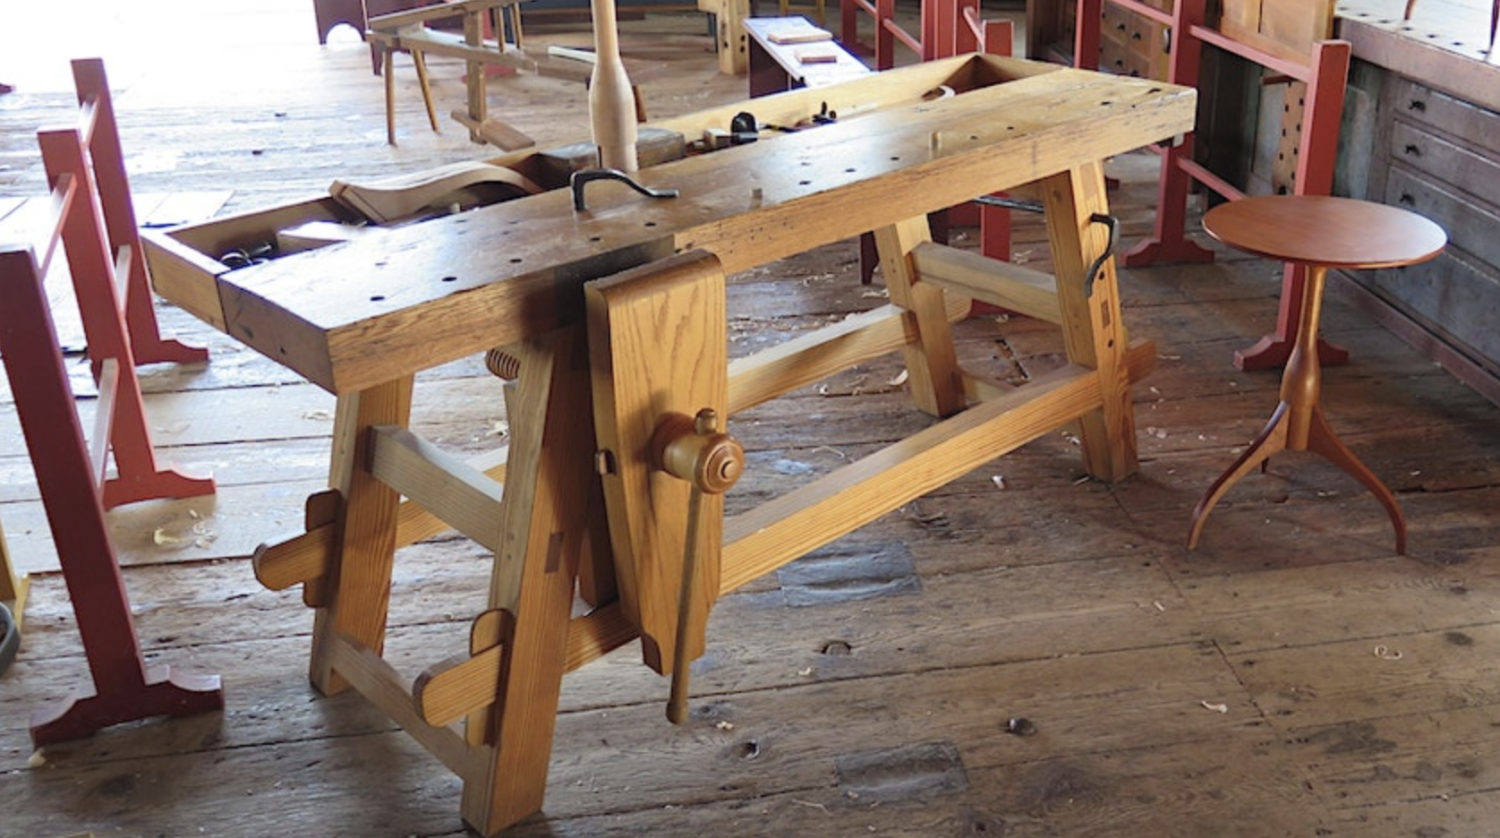
As I write this, there is still room in Will Myers’ June 26-30 Build a Moravian Workbench class at the Pine Croft School of Woodworking – and that surprises the heck out of me. We get asked all the time if we’ll teach a workbench class, and the answer is a firm no. We don’t have the room or equipment for such shenanigans here – Pine Croft does (plus Will is a lot younger and stronger than we are, and funnier!). So if you want to build a solid bench – one that breaks down for travel – and have a good time doing it, sign up now!
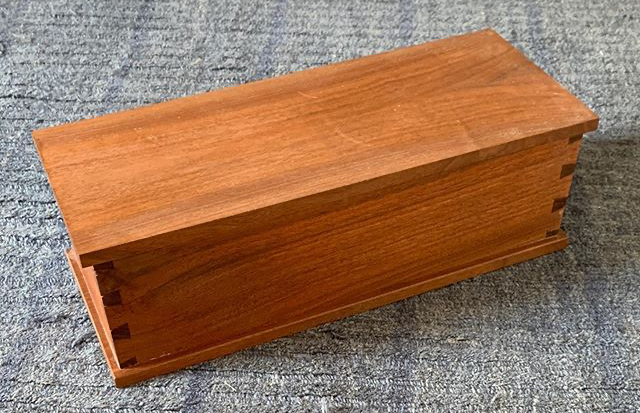
And tomorrow at 10 a.m. (Saturday, Apr. 15) new sessions go on sale, including my October 14-15 Dovetailed Shaker Tray class…but I’d take the Oct. 7-8 class from the guy who first taught me dovetails: Kelly Mehler. He’s teaching a Dovetailed Candle Box – the very class I took with him two decades ago!
The candle box I made with Kelly’s instruction lo these many years ago. My dovetails look better now, but this box lives on my dresser to remind me every day that even gappy dovetails with chipped-off corners will stay together just fine. (And that practice really does lead to improvement.)
p.s. For those who don’t already know, Berea College bought Kelly Mehler’s School of Woodworking, so the classes are in that purpose-built shop, which is nestled into the foothills of the Appalachians, just south of Lexington, Ky., and close to Shaker Village at Pleasant Hill. In other words, it’s in a gorgeous location, and there’s plenty to do and see in the area, in addition to the classes.
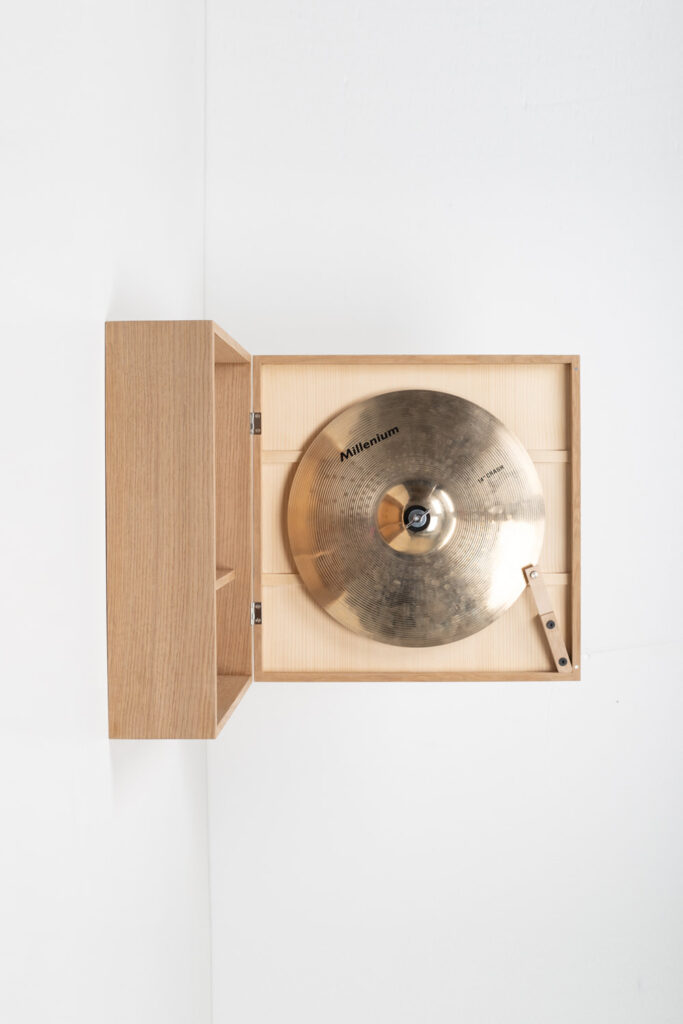
One of Hemmo Honkonen’s Audible Cabinets, from his website that features videos of the cabinets.
Core77 recently featured furniture designer’s Hemmo Honkonen’s series of audible cabinets. Honkonen writes on his website, “The cabinets are a study in mechanically produced sound, movement and interaction. Each cabinet has its own sound that is triggered by opening and closing the doors.”
You can see photos, watch – and listen – to the doors being opened, here. Sounds include a triad, bass triad, cymbal (which is actually fantastic if you want to shock unsuspecting snoopers) and scale. (Oh, and there are audible chairs, too!)
A fun party trick when people visit perhaps, but while reading (and listening) to all of this I was reminded of something my grandma once said. For years she would grow weary of the sound of her screen door being slammed, open and shut, all day long, especially with six kids during the summer months. And then? Once all the kids had moved out, she missed that wooden racket.
There’s an antique dresser in my childhood bedroom, now a guest bedroom. A couple years ago my mom asked me to get something out of it and as soon as I pulled the drawer out, and heard that familiar swish, and felt that familiar hitch in that one spot that requires you to lift up just a bit, I felt like a teen again, looking for one of my T-shirts.
Steve Shanesy turned a large maple bowl for my husband and me as a wedding gift and anytime anyone in our family hears the familiar thump it makes when it hits our dining room table they know we’re having a salad, one of the hundreds that bowl has held (if not more).
Every dog and child knows the sound of a front door opening when a parent is returning home and most kids know someone is hiding under the cellar door when they hear that particular bang during hide-and-seek.
I know the sound that the fallboard makes when someone is about to play the piano, and when it’s late at night and I hear that familiar kitchen floorboard creak, I know that someone is hungry (or sneaking a treat). I know someone is cold and looking for the wool blanket when I hear a struggle with the latches on our antique bedroom trunk, and I know someone needs a pen or a pencil when I hear the lid on the old wooden pencil box slam shut. I know someone is dragging our stool instead of lifting it when I hear a particular rasp across our pine floor and I know someone is starting up the mantle clock again when I hear the delicate open and close of that small, sweet wooden door.
The following is excerpted from “The Intelligent Hand,” by David Binnington Savage. The book is a peek into a woodworking life that’s at a level that most of us can barely imagine. The customers are wealthy and eccentric. The designs have to leap off the page. And the craftsmanship has to be utterly, utterly flawless.
How does one get to this point? And how do you stay there?
One answer to these questions is in this book. Yes, the furniture can be technically difficult to make. But a lot of the hard labor involves some unexpected skills. Listening. Seeing. Drawing. And looking into the mirror and practicing the expression: “And that will cost 20,000 pounds.”
As you will see, it’s a personal struggle – like the production of this book. On the day David began work on his manuscript, he received a cancer diagnosis with a grim prognosis. He wasn’t sure what the book was going to be about or if he could finish it. But David attacked the work with the fervor of a younger, healthier man.
So what is it about? On the one hand, “The Intelligent Hand” is the story of a boy with a stammer who became one of the leading furniture designers in the U.K., working for clients all over the world, including Saudi Arabia and China. It’s a story of extreme failure – bankruptcy – and how he built a new life using the debris from the broken one.
It’s a practical and iconoclastic guide to getting started in woodwork. David has always had pointed opinions about the tools and methods his students should use to get good results. And he shares – in great detail – his recommendations for tools, sharpening, cutting dovetails and building a proper workbench.
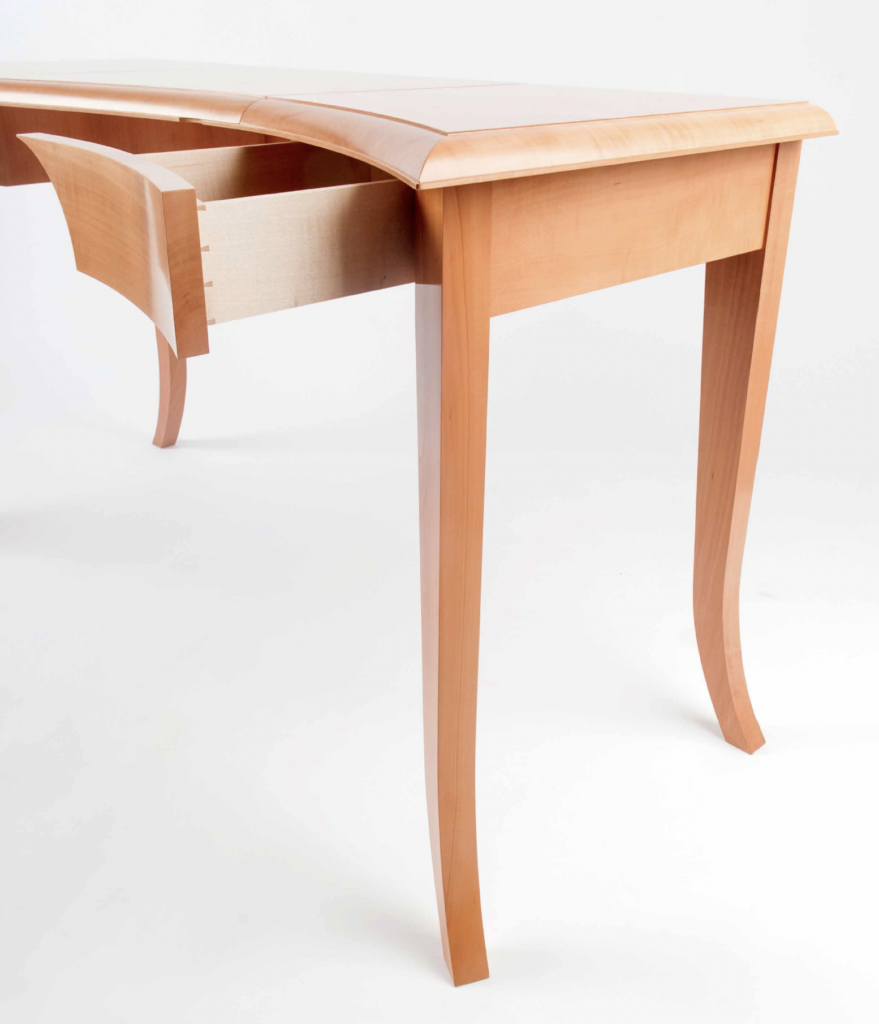
There are times when I wonder what is going on. That’s a pretty usual state of mind for me. I seem to get nearer and nearer to waving my stick at the seagulls and shouting at passing cars. But when it comes to “making,” this disconnection usually involves piles of expensive jigs and the spindle moulder (or shaper, as you guys call it). I see a pile of jigs made beautifully and look at the product – in this case four desk legs – and wonder why the desk legs were not made by hand, just as quickly.
I have never been able to win this argument with Daren, and my last workshop sought to become more efficient by making more jigs. We even had a room full of these useless implements. “Ah we should keep the jigs; we may make a chair leg very similar.” That’s how the argument goes, but by that time three things have happened. One, you can never find all the bits of jig for the necessary complex and clever sequence of machining; they are hidden beneath the pile of subsequent jigs. Two, the maker who invented this clever contraption has long since moved on and exactly how these bits of MDF fit together moved with him. Three, your old jig never quite does the new shape and you end up making a new jig.
Many makers love making jigs. Jigs keep us out of the firing line. Making even four identical forms by hand, can of course be done, but when there is a machine that will replicate shapes, most makers will dive for the cover that a jig provides. And jig design enables us to show how clever we are. Well, here we go.
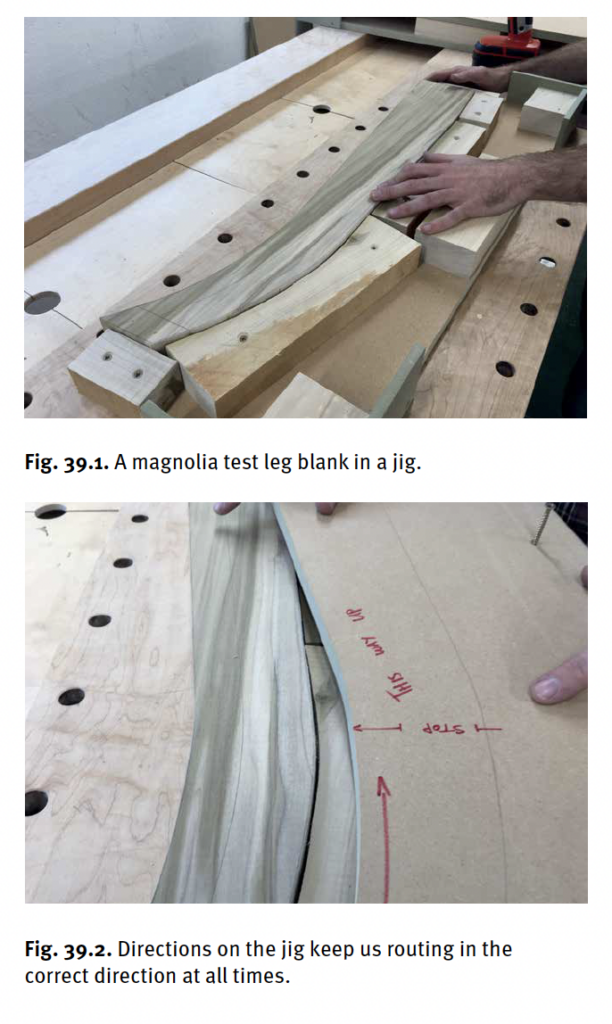
Steve has made a box jig (so-called because it looks a bit like a box and the job fits inside it). The idea is clever and sensitive to the material and the design. (Note that in the photos above, Steve is running a test leg in magnolia, which is why it looks greenish.) In this case we have legs that curve out at the bottom. This means that the grain of the pear would be roughed up if machined in one direction. So, he made this jig, which enables him to turn the job over and machine the short curved ankle from one end and the long straight leg from the other direction. That is because he has two identical guiding surfaces, one directly above the other. You can see in the photos the red line that tells him to stop and turn over. Clever jig, this be.
The photo above shows the cutter block running above a guide ring. The jig is in contact with the guide ring, and the cutters trim the job above to the exact size.
Spindle moulders really are great tools. They do the same thing as a router inverted in a table, but they do it better. The heavy mass of the cutter block provides heft through the cut, so the block spins at lower speed than a router and gives a cleaner cut.
Don’t look so surprised, Steve (see above). Handwork was called “Workmanship of Risk” by David Pye in his wonderful book “The Nature and Art of Workmanship” – what you are doing is “Workmanship of Certainty” – this is the industrial process of replication coming into small workshops.
OK – back to the bench shop. This pair of legs with two rails is what we are after; these will be the outer frames joined by a rail at the back. Each of the two frames has two side rails – a bit of overkill, but our structure is potentially wobbly in the middle so we need stiffness at the side structures, and we need to transfer that stiffness to the centre. We will do that with the addition of the drawer carcases joined to the leg frame. We don’t know for sure that it will be stiff enough – had we made a maquette we could have checked that out – but we are pretty confident. Furniture makers don’t have structural engineers to tell us the tensions involved. We only go on what we have done before, the stuff that hasn’t yet fallen down.
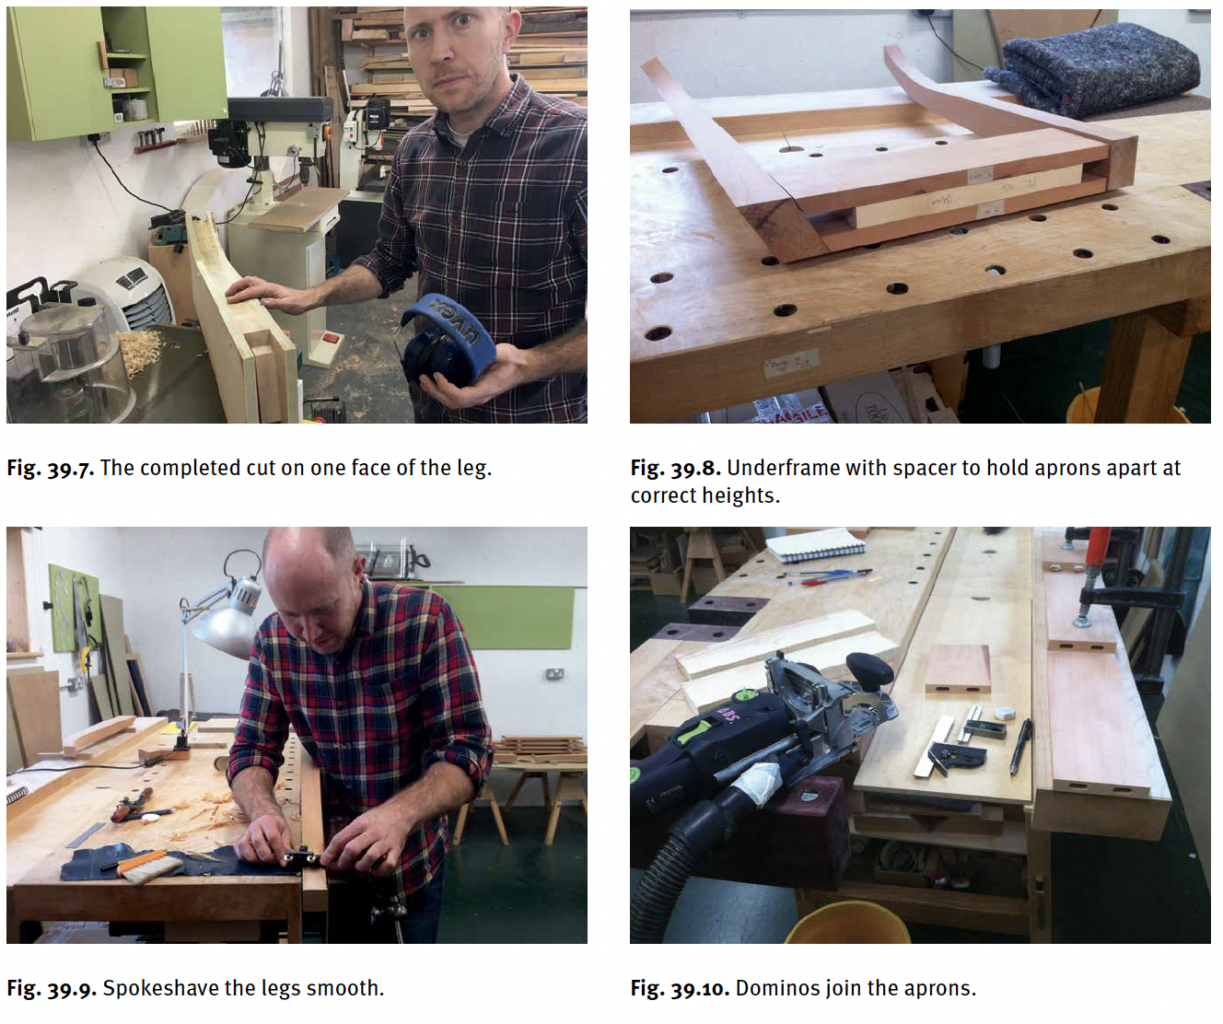
First Steve has to take the machined surface off the legs. Above, he’s working on the twisted surface of the front leg. Careful shaping with a spokeshave is needed. The components are joined together with Festool Dominos – small loose tenons. They give us enough strength for the joint and eliminate a deal of semi-complex joinery.
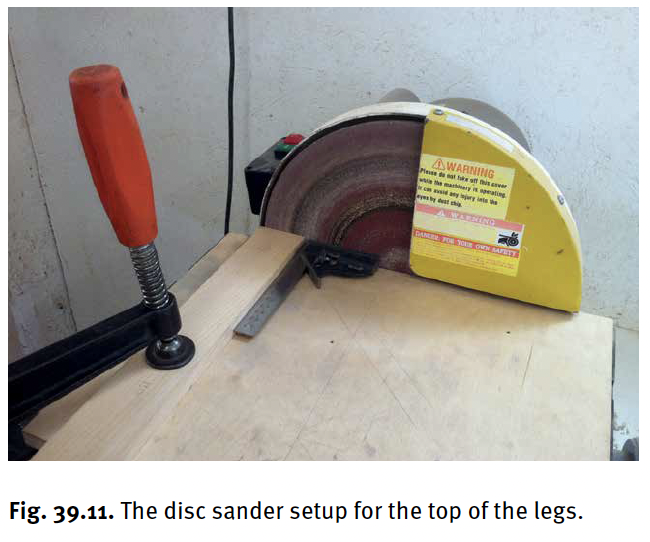
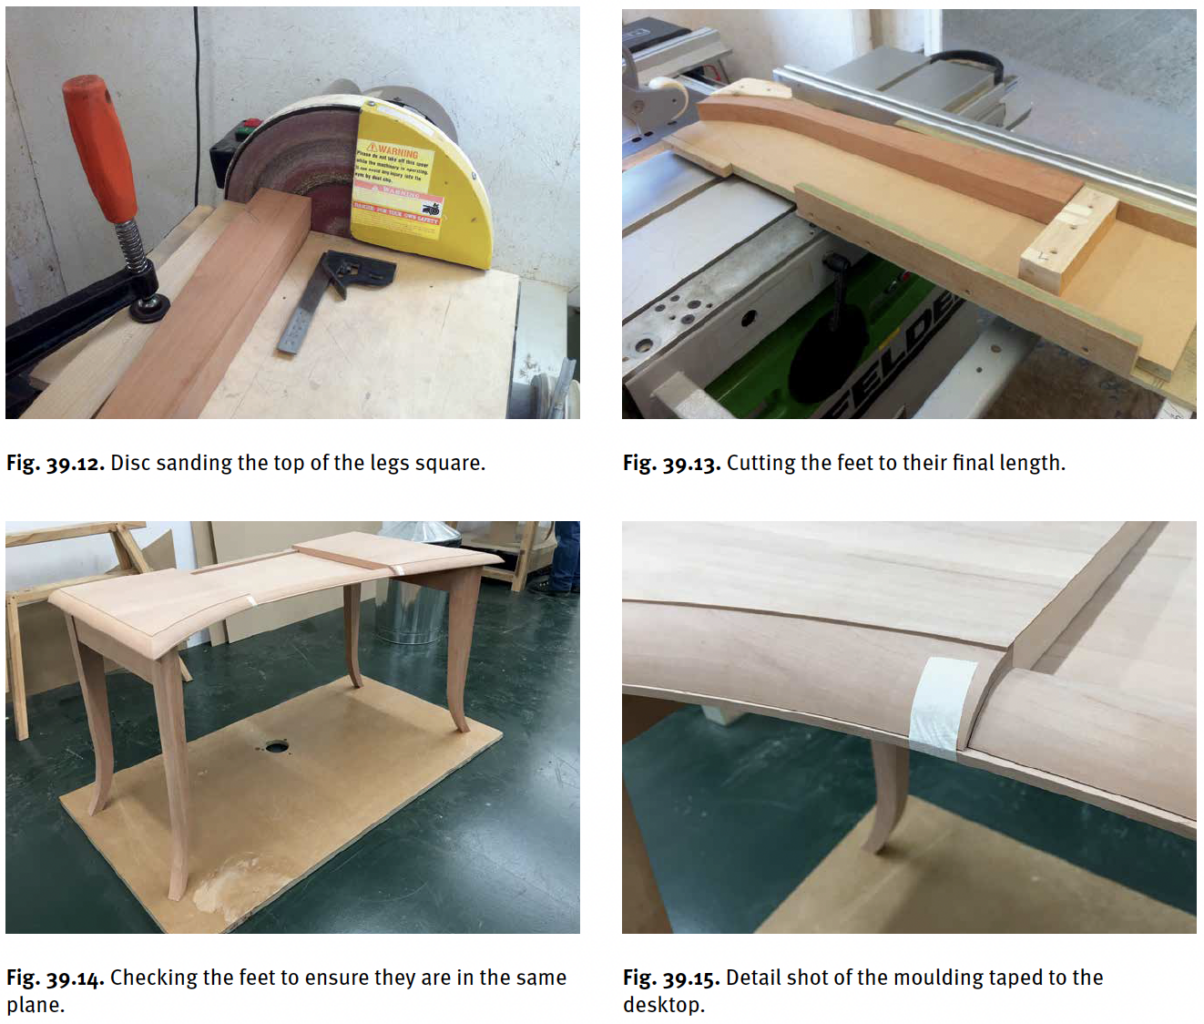
This, at right [above], is our disc sander, which gets a lot of use. Steve sets it up square to sand the top of a leg component, as shown. He then takes the leg to the table saw and puts it in another jig to cut the foot to length. All the legs will be cut in this jig, so it is essential that the stop’s end is sanded square so we get accurate Leg lengths. We learnt this by making batches of two dozen chairs that didn’t wobble!
This is a big moment – getting the job to stand on its own feet so you can have a good look at the proportions and see what needs fixing. So far so good, but we next need the drawer compartments made and fitted. The exhibition date is looming large, and both Daren and Steve are working weekends – my wages bill is eyewatering. But Daren has not yet booked the van to deliver the piece to the exhibition, which worries me. When he does that, I will know we are going to make it.
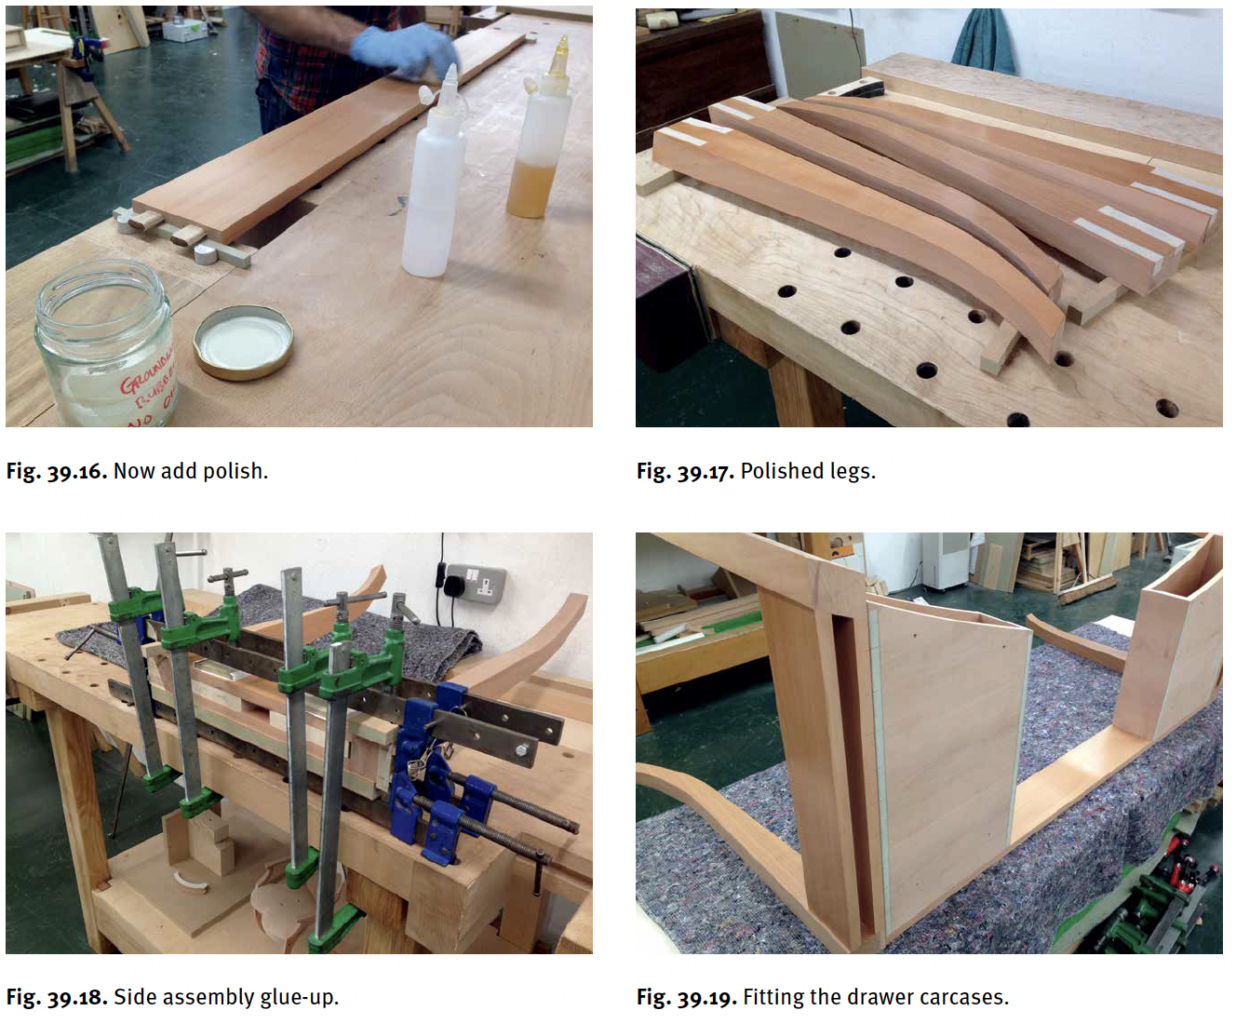
OK, last lap. Now it’s on to the final joinery and polishing before assembly. This is critical; you do not want to be polishing into corners if you can avoid it. Above, Steve using our standard shellac and wax finish for secondary and inside surfaces; apply it with a rubber that is kept in a glass jar. The rubber has a lambswool or wadding interior and fine cotton exterior. This holds the polish. As Steve moves the rubber and presses down, the polish is released. The shellac polish in the small bottle is very dilute, maybe less than a 1 lb.-cut (one pound weight of shellac dissolved in one gallon of alcohol). The other bottle contains mineral oil – use just a small dab to keep the rubber moving.
The aim is not a full shine, but to seal the surface and finish with a good wax polish. This is a quick and easy finish in the workshop, as shellac flashes off very fast. You wouldn’t want to polish with someone sanding on the next bench, but you can generally polish in the workshop without too many special measures. If I had a high-shine job to do, I would try to find a dust-free room, or I’d do the polish at the weekend when the dust had settled.
Let’s take a careful look at the glue-up above. There are eight cramps and only four components. Look at the angle-cramping block at the top of the far leg. Notice the support blocks between the double rails to stop them from bending under pressure. Notice also the small paper-faced cramping blocks to stop the blocks from marking the new polish. Ye Gods – the care these guys are now taking as they get near to the finish line.
Now we can see the drawer carcases fit. These are critical to the structure, providing stiffness to the front of the desk. Note how we avoid work that is not necessary; lippings on MDF components that are never seen after assembly are omitted. If, however, this area would be visible, even to a 4-year-old crawling underneath, it would get lipped, then veneered and polished. That 4-year-old could grow up to be a customer.