“Mechanic’s Companion” is one of the foundational English-language texts in woodworking and the building trades. First published in 1812, “Mechanic’s Companion” is an invaluable and thorough treatment of techniques, with 40 plates that provide an excellent and detailed look at the tools of the time, along with a straightforward chapter on the geometry instruction necessary to the building trades.
If you work with hand tools, you will find useful primary-source information on how to use the tools at the bench. That’s because Nicholson – unlike other technical writers of the time – was a trained cabinetmaker, who later became an architect, prolific author and teacher. So he writes (and writes well) with the authority of experience and clarity on all things carpentry and joinery. For the other trades covered – bricklaying, masonry, slating, plastering, painting, smithing and turning – he relies on masters for solid information and relays it in easy-to-understand prose.
Having now mentioned the principal tools, and their application, it will here be proper to say something of the operations of Carpentry, which may be considered under two general heads; one of individual pieces, the other the combination of two or more pieces. Individual pieces undergo various operations as sawing, planing, rebating, and grooving, or ploughing: the operation of the pit saw is so well known as hardly to need a description; planing, rebating, grooving, or ploughing, are more frequently employed in Joinery, and will be there fully described. The other general head may be sub-divided into two others, viz. that of joining one piece of timber to another, in order to make one, two, or four angles, the other that of fastening two or more pieces together, in order to form one piece, which could not be got sufficiently large or long in a single piece; there are two methods of joining pieces at an angle, one by notching, the other by mortise and tenon…
Fig. 1 the manner of cocking tie beams with the wall plates fitted together. See § 25.
Fig. 2 shows the manner by which the cocking joint is fitted together, No. 1 part of the end of the tie beam, with the notch to receive the part between the notches in No. 2, which is a part of the wall plate. See § 25.
Fig. 3 dove-tail cocking; No. 1 the male or exterior dove-tail cut out on the end of the tie beam: No. 2 the female or interior dove-tail cut out of the wall plate, to receive the male dove-tail. See § 24.
Fig. 4 the manner of joining two pieces together to form a right angle, so that each piece will only be extended on one side of the other, by halving the pieces together, or taking a notch out of each, half the thickness. See § 26.
Fig. 5 two pieces joined together, forming four right angles, when one piece only exceeds the breadth of the other by a very short distance: No. 2 the socket of one piece, which receives the neck or substance of the other. This and the preceding are both employed in joining wall plates at the angle; but the latter is preferable, when the thickness of walls will admit of it.
Fig. 6 the method of fixing angle tics: No. 1 part of angle tie, with part of the wall plate: No. 2 the wall plate, showing the socket or female dove-tail. Though the angle tie is here shown flush with the wall, in order to show the manner of connecting the two pieces together; the angle tie is seldom, or never let down flush, as this would not only weaken the angle tie, but also the plate into which it is framed. See § 27.
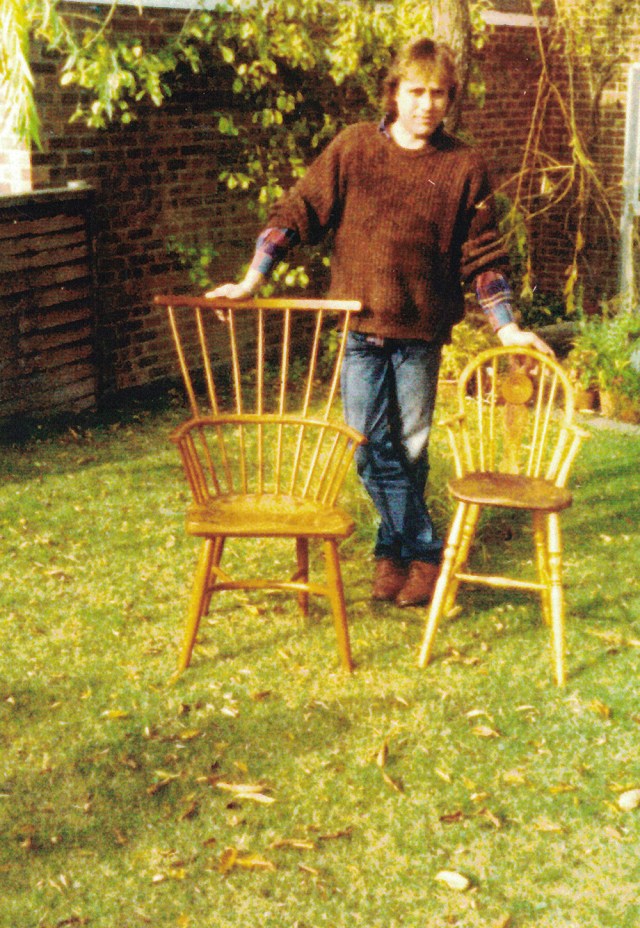
John with his first stick chair, elm and yew, 1987, and a child’s highchair, also elm and yew, 1988.
Early on John Porritt (author of “The Belligerent Finisher“) enjoyed playing around with bits of wood in his spare time. In the early 1970s, he carved a face into a piece of hazel and strung it onto leather as a necklace. He used a heated rod to create and carve a pipe. During a difficult period in his life, he made a carving out of soft maple based on Edvard Munch’s “The Scream.”
In 1979, John attended Shrewsbury Technical College (now Shrewsbury College) for one year. At first, they refused him a grant, but John appealed and won, “which was marvelous,” he says. He studied fine furniture making with John Price who trained with Edward Barnsley in the Arts & Crafts tradition.
“I remember the first week I virtually shook with nerves about being in the college and being back in school because I didn’t have great experiences in school and it felt odd being there,” he says. “John Price came by, and he looked at my work and laughed. And I said, ‘Don’t laugh; show me what I’m doing wrong. Show me – go on. After that, we started to get on, and it was grand.”
John loved his time at Shrewsbury College. He remembers playing football at lunchtime (and a woman from Liverpool, nicknamed Carol Keegan, who was studying ceramics, beating them all every time) and an exhibition they had at Shrewsbury Castle. John showed a cabinet based on Chinese forms.
A cabinet John built while attending Shrewsbury. Walnut, ash, ebony and silver. 1980.
“At Shrewsbury, the finish we used (this was between 1979 and 1980) was polyurethane thinned 50/50, and put on really thin with a clean, well-washed rag,” he says. After several coats we gently cut back with flour paper, then applied a couple more thin coats, burnishing with a taut cloth pad as we went. This gave a great finish. I remember saying to the design lecturer, after using it on a cabinet, What a fine finish! He said, There is no such thing as a fine finish. There is only a finish appropriate for the job. This shut me up. He was a serious, definite man given to pronouncements; however, over the years this thought does come back to me – that’s just another can of worms. But I suppose we all decide what is appropriate – it is fluid after all.”
John says he loved his time at Shrewsbury. After Shrewsbury, John worked briefly as a carpenter then, in 1980, he went off on his own, working out of his parents’ single-car garage, trying to get commissions.
“And that was very hard,” he says. “I was very naïve about it, really. It was hand-to-mouth as I recall.”
Zippo the Clown and his assistant Tommy. A prop John made in collaboration with Alfie Van Derplank in 1981 as a prop for a theater show for kids about energy.
In 1982, he got a commission from Winchester Cathedral, “which was quite something,” he says.
The piece was to be used as a stand for The Book of Remembrance in the Epiphany Chapel in the cathedral. John designed the piece within about three minutes of the meeting. The cathedral, he says, which was built from 1079 to 1532, is a mishmash of styles.
“I tried for a few days to find other designs, but the first one was the best. The cathedral has a stunning roof, and it’s got superb columns and mouldings. And I designed this piece as three columns, two in the front and one in the back, as a symbol of Calvary.”
The Book of Remembrance Stand, designed by John, 1982 to 1983. The silver gilt lettering was designed and made by P.C. (Phil) Craze.
The columns, made out of brown oak, are held together with laminated curves of soft maple designed to echo the ribs in the roof. John used Indian ink to gradate the stain of the rails from blue to purple and back again, carrying the colors of the chapel’s stained glass windows designed by Edward Burne-Jones with William Morris & Co.
John hoped more work would come from this commission than did. People did, however, start to ask him about restorations.
“And I really didn’t want to do restoration work,” he says. “I hadn’t trained for it, I didn’t know a lot about it. But I did it. And as time went on, I got somewhat better at it. And I had help from two great guys, my friends Spike Knight and Johnny Gould. I started to understand color and texture, and surface. And that was a wonderful thing and that’s added to what I do. And that has come back again, to my interpretations of the Welsh chairs.”
In 1981, John had met Keith Rand, who trained as a cartographer, went on to art school then studied sculpture in Scotland. Keith made fine sculptures and occasionally chairs for a living, as well as teaching. Keith and John ended up becoming good friends and shared a workshop for a while; he was John’s best man at his wedding. John taught Keith about tools – how to sharpen them, how to work them – and Keith taught John how to better understand and explore form.
“For a while, we were embryonic chairmakers,” John says. “He worked from leaning seats onto chairs inspired by agricultural forms using tines. Then years later onto beautifully realized Windsors with very few components. They really worked so well. Mine were firmly in the country furniture mould, inspired by the yew-wood Windsors that I was often restoring. Keith was a great man to know and share with.”
In the early ’80s, John became interested in paint, particularly industrial paint. A friend, Phil Craze, an artist and inspiration, showed him the joy of coral and turquoise together. He partnered pigments and created stunning effects. He put the colors onto plywood and made simple, geometric objects. Phil had designed and made the silver gilt lettering for the Book of Remembrance stand John made for Winchester Cathedral.
Paint samples, Hammerite and cellulose, 1982-1983.
“One thing that did come from this commission was that Phil and I were invited to an aluminum anodizing plant to experiment with different effects using color and shape on the raw aluminum,” John says. “This was actually a lot of fun. We kept some of the work, and they kept some for their gallery.”
John tried to do craft fairs, selling things like mirrors made out of thin plywood, but he had trouble selling fine furniture or colorful things. He did, however, successfully sell a cricket table at a fair in the Guildhall Winchester. However, he made it as a joke.
“I made a small top and then I had three legs coming out of it at odd angles and then an even smaller base so it was actually quite unstable,” he says. “I did the top blue like a sky and I did the legs white in ash and the base green. I got a turned piece of wood and I colored this up red so my cricket table was like the three stumps and a ball in a game of cricket. I made a couple of bales on the base that were knocked off so the guy was out. And it got me on the front page of the local paper. The headline was ‘John Bowls the Maiden Over.’ It was a play on words which in Britain people do a lot and I’ve always enjoyed. A ‘maiden over’ is six bowled balls with no runs made from any of them.”
Mirror frame photographed with the sky, soft maple, green copperas with Indian ink and enamel paint. John says Dexion industrial shelving served as inspiration. 1983.
In 1983, John’s father died, “which was as huge blow for me,” he says. “It was huge.” In his grief he carved a massive head, shaped liked a world, and painted it blue, with rockets going off all over it.
“My mum said, ‘What are you doing that for?’ And I remember saying, ‘I have just got to do this,’” John says.
Falling in Love in Paris, Making a Life in England, Moving to the States
In 1984, John went to France. Sue, an American who was in Paris studying art, was standing outside of a hotel on the Boulevard Saint-Michel. They talked. They fell in love. Eventually, John had to get back to England to make some more money. They planned to meet next outside the Leaning Tower of Pisa in Italy. The meeting spot was a lot bigger than they each realized, and they spent a lot of time walking around, looking for each other.
“When we finally bumped into each other I had my one small bag filled with clothes and she had massive amounts of luggage,” John says. “We traveled over northern Italy together, discarding bits of her luggage along the way.”
A simple table inspired by the massive oil platforms on the North Sea, 1985.
A flat-top table base John made during his first trip to the U.S. in 1985. Everything was purchased at a local hardwood store: plywood, yellow pine and maple dowels. The top looked like it wasn’t flat, but it was. John says he was inspired by military aircraft, “the wonder and the horror.”
John and Sue got married in 1987 and moved to Shrewsbury, England, where they lived for 20 years and had a daughter who is now 18.
“I never thought I’d have a child,” John says. “It’s like having a room opened, another room in your life, full of stuff you never realized. It’s an astonishing thing. It’s not really explainable.”
Davenport desk, early Regency design, 1988, commissioned.
A chair based on West Country forms, ash, colored with caustic soda (lye), 1988.
John built three of these chairs. This is the second one and he still owns the first. Yew with burr elm seat, 1988.
Welsh-inspired cricket table, burr elm and ash, 1989.
Windsor chair based on Michael Dunbar’s C-arm design, 1989.
Around this time John got into spoon carving. He liked the idea of creating things with small tools and bits of wood that he could carry around, a traveling workshop of a chisel, small axe and a couple of knives. He liked the simplicity.
A spoon that John made in the Catskills. Hard maple, 2009.
“I think spoon carving is a fantastic thing for people to do and gain a better understanding of line and form,” he says. “I look at the spoons that people make today and some of the work is just lovely. Wonderful, wonderful things.”
John’s mother died in 2006.
“It was almost inconceivable that my mum died,” he says. “We were very close. She was always very encouraging about whatever I was doing. And she’d always like coming out to places with me and meeting different people. That was good.”
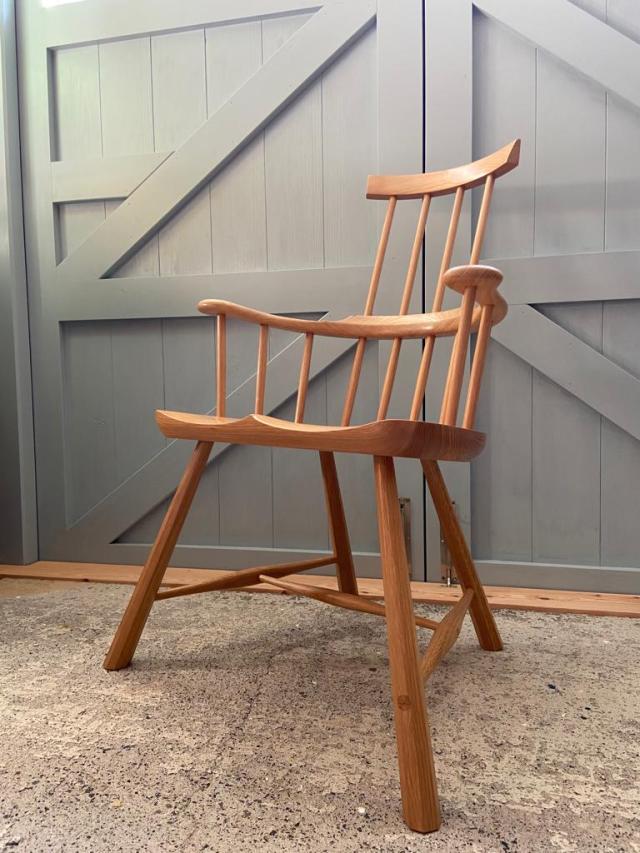
Welsh-inspired 10-stick chair, oak and ash, 2004. “I enjoy this one a lot,” John says.
Gothic-attempt chair, soft maple and yew from the owner’s estate. The chair is situated in Pontesford House, a regency mansion in Shropshire, England. The home’s arch gothic window inspired the back of the chair. “I’m glad I made it,” John says. “It is almost successful, like a lot of things in life.”
John and Sue decided to be nearer to her family so they moved to the U.S. in 2008. They lived in the Catskills for a year and then bought an 18th-century house with a red barn situated next to a picturesque stream in Spencertown, New York, near the Shaker Museum in Chatham. Sue loves to help John with advice on color.
“There are a lot of great people here,” John says. “I’ve got a couple friends here who I wouldn’t agree with on very many things other than our friendship and our woodwork. They have completely different views from me but they’re great people. It’s an interesting thing to think of the different ways people see things. Celebrate the similarities and enjoy the differences, where possible.”
Photographs Spilling Out of a Book: How ‘The Belligerent Finisher’ Came to Be
John has done a lot of restoration over the years for well-known English and Welsh antique collectors and dealers, including Tim Bowen and Richard Bebb. Tim suggested John send pictures of his chairs to “a lad down here who likes stick chairs.” So, John did.
Nicholson plough plane, restored 2012. This restoration project launched John’s career as a tool restorer in the U.S.
“Many, many years later, I got a phone call completely out of the blue,” John says. “And it was Chris Williams. And he said, ‘Why all those years ago did you send me those pictures?’ And I said, ‘Because Tim Bowen told me you were interested in chairs and I just wanted to share them with you, reach out, for the camaraderie.’ And he stuck them in a book and completely forgot about them. And then many years later, Chris Schwarz came to see him. He was looking at a book and these pictures fell out. And they had a look at them. And that’s how Chris Schwarz heard about me, I think.”
Around the same time, Chris Williams heard about John again through Tim. Tim and Richard had separately been talking about restoration projects John had done and they couldn’t work out how John had done them.
And then the COVID-19 pandemic hit.
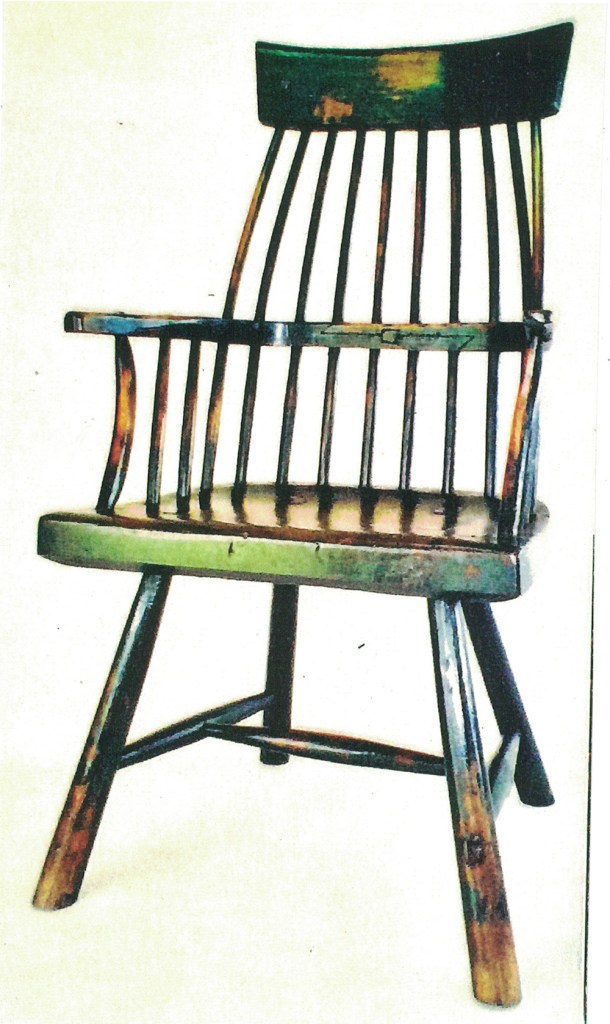
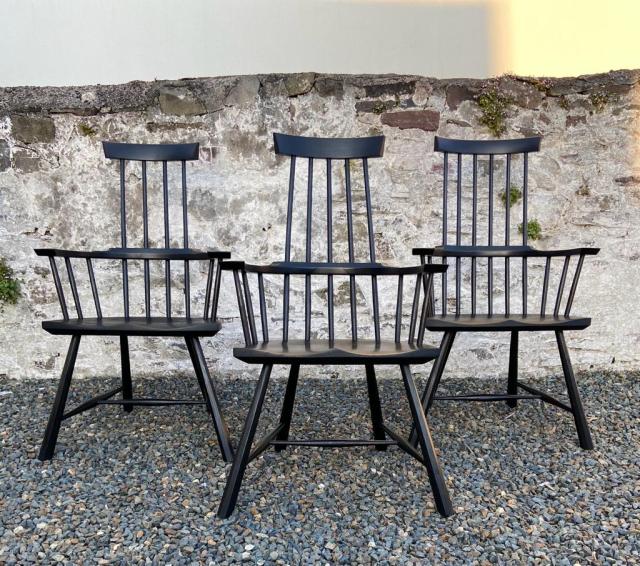
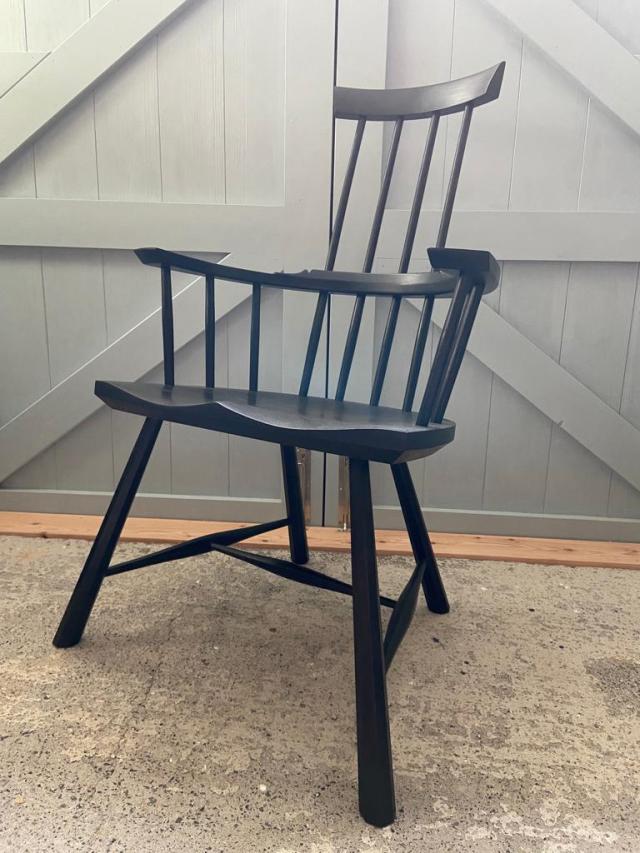
“I thought to myself, My god, this could be it,” John says. “We could die from this. I didn’t know what to expect or think. So I decided I’m going to go out and do stuff I really want to do that I put off that I couldn’t afford to do or that I didn’t think people wanted. So I made the chairs that are featured in the book. Starting with the black North Walian four stick chair, and I’m really glad I did that. It’s hard to make speculative stuff and run a business as well.”
John sent pictures of these chairs to Chris Williams who then sent them on to Christopher Schwarz. And that’s how “The Belligerent Finisher” was born.
“Some of them are good I think,” John says, when talking about his chairs. “I’m not vain but I know some of them are good. Because I’ve looked at a lot of stuff I’ve made that isn’t good. I’ve always felt that the only person I’m in competition with is me. I’m inspired by other people and occasionally disappointed by them. But I’m not in competition with them. To create, a person’s got to be honest with themselves, look at something they’ve done, assess it, praise it, destroy it even (this decision is often better slept on), whatever, but really be honest about it and walk away and move on and think about the next thing. You learn from what’s happened.”
Talking about the chairs he’s making now, John says: “They almost frighten me because they’re quite hard to do, to get the proportions together. They have to look right and be comfortable. You know, I think I’ve made two or three really comfortable chairs, ones that you want to sit in and just not move from and a lot that are OK and some that aren’t that good. I have to make all my chairs, regardless of what they look like, comfortable. And that’s not always an easy thing to do.”
John currently has chairs on order. He’s also working on restoring Cesar Chelor planes for a collector and, for another collector, he’s restoring a 1696 handsaw with the help of his friend Tom Curran. Also there’s a rare, small, Holtzapffel miter plane that needs attention. But what he most wants to do is build – and finish – chairs. John recalls one comment he saw in response to his book, from a professional finisher, who said, “When I saw this, I was initially appalled.”
John says, “I love that phrase. He was ‘initially appalled.’ The fact that I made someone initially appalled, I like! But I would also agree with him. He went on to say that now that he’s looked at the book, there are things he wants to try.”
While in the states during Covid, John thought a lot about the places he has loved throughout his life. In his head he’d re-walk the hills and lanes in Shropshire and mid-Wales, and spend imaginary time in the meadows around Winchester.
“I would think about some of the things I have come across, seen and enjoyed,” he says. “I wanted to get that feeling, that flavor. I wanted to touch that. That’s really why I make those chairs.”
John says the finishing techniques he used on his chairs in the book and today are not an attempt to create fakes.
“They’re not even copies of antiques,” he says. “They’re interpretations of ideas, ideas of how a chair and finish could be. And some of them are successful and some of them aren’t quite successful. I think the black one, the first one I did that seemed to flow through me, is very, very successful. I loved that. And the green one, the big green one. And there’s a red one on the next page that’s very good. And there are some good effects on the others. I try to get an effect like grading color, like when you see a sky in the evening and it’s changing. That is in my mind, as well as the look of worn furniture surfaces. You see that a lot in England during October and November. The light and the color and the amount of water in the atmosphere. The color and the sharpness— but also the mystery. I’m trying to get that. I’m trying to get a good depth of color. I’m trying to get texture, with the wood having refraction and depth.
“I just wanted to find something to do,” he says. “That was really important to me. I wanted to find something that had value. And I think I found it. I don’t think I’ve always worked on it. I think I spent a lot of time paying bills. But now I want to pay bills with these chairs.
“Enthusiasm and encouragement. The following was said to me by a woman at a show in Upstate New York, and it still makes me smile and laugh. She sat in the North Walian four stick chair with a worn finish, looked up and said: Harmony for my cheeks. I said, That’s it.”
Funky Winkerbean kinda looks like the Tasmanian blackwood cat carving.
There are but three days remaining to donate to the Nancy Hiller Ranch Cat Rescue Memorial Fund, and be entered in our raffle to win a gorgeous cover carving from Nancy’s last book, “Shop Tails,” and a copy of the book.
Ten percent of net profits from “Shop Tails” – a tribute to the many four-legged friends (and one feathered friend) whose lives were intertwined with Nancy’s – go to The Ranch Cat Rescue, in Bloomington, Ind., a non-profit run by Alison Zook that is funded solely by donations. To help Nancy’s favorite cat charity just a little more, we’re asking for $5 donations via this PayPal link (while the fundraiser is channeled through my personal account – all donations will of course go to The Ranch Cat Rescue).
Not only are you helping to support Alison’s work in Nancy’s name, with your $5 (or more) donation you’ll also be entered to win one of two fabulous prizes in a random drawing. First prize is the beautiful fiddleback Tasmanian blackwood cat carved by Australian wood artist and teacher Carol Russell for the book jacket. Second prize is the book we used as the art for the audio version of the book (which Nancy performed). The fundraiser runs through March 13; I’ll the announce winners on March 14.
We are thrilled to welcome Welsh chairmaker Chris Williams back to Lost Art Press this summer to teach two week-long chairmaking classes in our storefront. Chris worked with John Brown making chairs for almost a decade, and Chris has continued making chairs in this Welsh tradition ever since.
A class with Chris is about as close as you can get to working with the late, great John Brown.
The two classes run June 5-9 and June 12-16 here in our Covington storefront. Each class is limited to six students. Chris will lead the instruction, with Christopher Schwarz and Megan Fitzpatrick assisting the entire week.
Registration for the classes will open at 9 a.m. March 15 (Eastern) through our registration portal. If the classes fill, we recommend getting on the waiting list as cancellations do occur.
Students will each build a comb-back stick chair using traditional hand-tool methods and American woods under the guidance of Chris Williams. In the spirit of these chairs, students will personalize their chairs with different stick arrangements, undercarriages, arm shapes and combs.
In the end, no two chairs will come out alike – just as it was with antique Welsh chairs and the ones made by John Brown and Chris.
It’s also worth noting that this chair class is unlike many others taught today. There are almost no jigs or specialty tools used. There are no tenon cutters or jigs to guide you as you drill the mortises for the sticks. Chris doesn’t use sightlines or resultants in his drilling. Instead, he relies on simpler, more direct methods.
Instead of jigs, Chris will show you how to make these chairs using mostly a jack plane, block plane and spokeshave, plus a few auger bits. We will use a band saw at times (freehand) to speed up some sawing operations due to the time constraints of the class.
Chris, the author of “Good Work,” has dedicated his life to making these chairs to an extremely high level. If you would like a taste of these methods and this kind of life, a week-long class with Chris will set you on this path.
Also, Chris is an absolute wealth of knowledge when it comes to antique stick chairs, plus he has a thousand stories about working with John Brown and as an independent chairmaker for most of his adult life. The class is about way more than making tenons and sticks, it’s about immersing yourself in a difficult, creative and beautiful lifestyle.
Note, because of the intense nature of these classes, we ask that all students have some prior experience at chairmaking. Students should be confident in maintaining and working with edge tools. This is a class for intermediate and advanced woodworkers.
The class fee is $1,800 per student, which includes the wood and all other raw materials needed to make the chair.
The last cabinet Krenov made at the school, the “Pearwood Drawer Cabinet.” David Welter pointed out that this leg shape, with its tapered and faceted shaping, was a new style for Krenov. “Jim often said that it was curiosity that kept him going,” noted Welter. Photo by David Welter.
The following is excerpted from “James Krenov: Leave Fingerprints,” by Brendan Bernhardt Gaffney. After years of research and more than 150 interviews, Gaffney produced the first and definitive biography of Krenov, featuring historical documents, press clippings and hundreds of historical photographs. Gaffney traced Krenov’s life from his birth in a small village in far-flung Russia, to China, Seattle, Alaska, Sweden and finally to Northern California where he founded the College of the Redwoods Fine Woodworking Program.
While the school [what is now the Krenov School of Fine Furniture]was preparing for his withdrawal, [James] Krenov, too, was making plans for his life after the program. His craft practice had been uninterrupted in his last year, in spite of the turbulent conditions of his departure. He completed three cabinets, even venturing into a new form, a “drawer cabinet” whose interior was occupied by an array of drawers, with little or no open space inside the carcase. As he prepared to leave the school, unsure if he would or could return to the facilities, one student remembers that Krenov spent a sizable amount of time preparing and sawing materials for the cabinets he hoped to make when he returned home. The students, too, helped with Krenov’s move. Along with helping him with the physical move of his materials, the students built him a going-away gift of a veneer press, smaller than the school’s but sized to Krenov’s smaller scale of work.
Erik Owen, a student from the class of ’96, worked with the family to build an addition to the cabin behind the house on Forest Lane, to serve as a small workshop reminiscent of his Bromma basement workshop from Sweden. Into the shop they moved his workbench, a few small machines and his still ample supply of wood, all he needed for the construction of his small veneered cabinets on stands.
The move home was turbulent, and after leaving the school, it would be several months before Krenov would complete a cabinet in this diminutive space. But his family and friends also were careful to help see that Krenov would not have to endure too long a separation from his daily routine, for both Krenov’s and their own sakes. Tina remembers that Britta knew it was time for her husband to retire, having seen his demeanor and attitude with the school worsen, but was saddened to see it happen on terms not entirely his own.
Krenov’s ultimate critique of the school he gave after his retirement, now coming out from under his 20-year tenure, was that it could not bring the students to a place of maturity, both as technically solid craftspeople and capable designers. Krenov had never shied away from helping those students who sought his help, and many of his favorite students had come to the school without any background in furniture. Krenov had delighted at bringing many of those students far past a point of accomplishment that they themselves had thought possible. But he had long used an analogy that he had overheard Arthur Rubinstein, the famed Polish-American pianist, give when addressing the talents of his students.
“For example, you cannot teach a person to be musical,” he told Oscar Fitzgerald, just a few years later. “You can teach them to play, but you can’t teach them to be musical. I was in New York and I came back to my hotel room and they were having the 80th birthday concert by [Arthur] Rubinstein – Carnegie Hall, the whole ball of wax. And they were interviewing him in the intermission and somebody asked him … about the students of that time. He says, ‘Oh, such technicians, such skills. Oh, sometimes I ask one of them, when are you going to make music?’”
Krenov lectures from the bench in his back room at the school in 2002. Photo courtesy of the Krenov School.
In May 2002, Krenov officially retired from the program, after his 20th year at the school. Burns remembers that the last day was cathartic. Knowing that their time as colleagues was over, he and Krenov had a final argument, one that was their last conversation. However turbulent Krenov’s last years had been, the school’s faculty, with the addition of Hjorth-Westh and Smith, would forge ahead without Krenov, and the school continued outside of his presence on staff.
Krenov himself would not retreat, in totality, from the school for a few more years. He returned on occasion in subsequent years to see and advise on student work, suggest or offer up a board of wood for a certain project and, sometimes, to fill his pockets with dowels from the boxes in the machine room. The school’s students, too, would not cease to visit Krenov. Laura Mays, a second-year student in the first year without Krenov in residence, remembers that many of her classmates, even those who hadn’t studied under Krenov, would make frequent trips to the Krenovs’ house for tea and conversation. And alumni, those who had stayed in the area or who returned for visits, would come to their teacher’s home to check up on the aging cabinetmaker. Krenov would even weigh in on some students’ attempts at recreations or reinterpretations of his own designs; as late as 2008, Krenov advised one student, Tom Reid, on his version of Krenov’s “Carved Curves” cabinet, and gave Reid the compass plane he had made decades earlier for his own construction of the cabinet.
Krenov’s departure began the last chapter of his life. In those years, visitors to his home remember his fondness for Dylan Thomas’s poem “Do not go gentle into that good night.” Krenov, with failing eyesight, arthritis, body pains and faltering hearing was moving toward the end of his life, but retirement was never an option for the 82-year-old. From his small world on Forest Lane, he would still host a rotating cast of visitors, friends and well wishers, reach out into the world by phone and written word, and continue to pursue a craft practice by any means necessary.