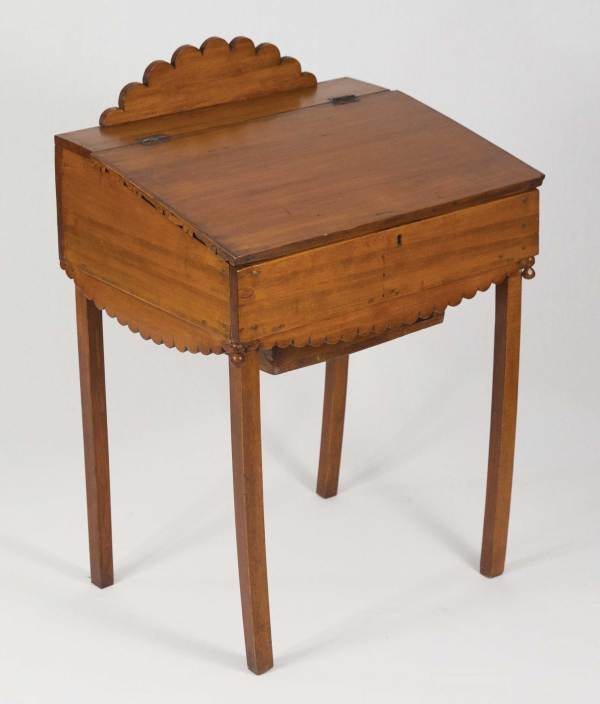
Included in his investigation of the life, tools and a detailed look at the furniture of Jonathan Fisher (1768-1847), a rural Maine minister and craftsman, author Joshua A. Klein also presents an overview of 38 pieces built by this Harvard-educated renaissance man. Below is number 10, a charming child’s desk, from “Hands Employed Aright.”
Wood(s): maple or birch; legs are an unknown hardwood (possibly beech)
Inscriptions/stamps: sticker on cubby lid “Desk made by Rev. Jonathan Fisher Blue Hill, ME. (1791-1847) Lonnie E. Davis got it in 1948-9 fr. James Fisher bequest to MA Dodge 1955”
From the collection of: Jonathan Fisher Memorial
Construction: The desk is made of butted and nailed construction. The legs protrude up through bottom as corner reinforcement and were nailed from the outside. Everything is nailed together through the adjacent face. The nail holes appear to have been puttied. The top has a hinged scalloped decoration. The apron also has scalloped decorative pieces nailed to the undersides of the front and sides. The desk lid’s hinges are face mounted. The writing surface end grain is covered by a 1⁄4″-thick decorative carved strip. There are turned balls on the front corners. The top-hung drawer is butted and nailed with cut nails. The drawer runners are nailed from the bottom up into the desk with cut nails. The inside cubby is divided into four compartments. The small hinged cubby door is on wire cotterpin hinges. The writing surface has a lock attached with nails. The bottom is nailed in place from all sides. There is yellow paint residue in cracks and dark yellow putty in the nail holes. On and around the hinges are remnants of red paint. Red pigment is visible on the drawer underside. The desk underside has pink chalky residue.
Tool Marks: There is considerable tear-out on the inside of one of the legs. There are some sash sawmill marks on the desk bottom. The bottom was planed with a fore plane. Most surfaces are smooth (perhaps due to later sanding during refinishing). The apron scallops have chisel facets and there is a saw kerf visible between scallops. There are divider center points on the scalloped details on the aprons. There are fore plane marks on the drawer face. The drawer bottom is rough and irregular. There are chisel facets on the top scalloped detail.
Some of you will recall that I began work on “The Anarchist’s Finishing Manual” a few years ago, then abandoned it. Dropped it like a hot turd I did.
I’m sure that some of you think that “Big Poly” fingered me. Or I’d huffed too many VOCs (volatile organic compounds) to do the job. Here’s the real story.
For about two years, I read a lot of scientific papers and (for practical perspective) safety manuals for art schools that use finishing materials. Plus, I had many conversations with a dear friend who has devoted her life to this sort of industrial hygiene. And then I came to a conclusion.
I am not the guy to write this book. And, in fact, it might not be a book that is urgently needed for this audience.
Most of the people who read my stuff are devoted amateurs or run a woodworking business on the side. Few of my readers are professional finishers or professional woodworkers who use a lot of exotic finishing materials. Because of this, most of you are unlikely to encounter enough dangerous solvents and heavy metals to be terribly concerned.
If you simply follow the safety instructions on the can, work in a well-ventilated area (that’s key!) and aren’t finishing 10 hours a day or week, the risks are low.
Despite everything I’ve just written above, however, I still advocate that people reduce or eliminate as many VOCs and heavy metals from their shop as possible. And that is why I am posting this blog entry today.
The following manifesto – for lack of a better word – was the starting point for my aborted book. It’s how I feel about finishing. I don’t much use the word “feel.” I prefer the words “think” and “force poop.” My feelings are based on decades of living with finishing materials.
I started with spray finishing when I was about 19, but I am not an expert finisher. But I have worked with people who take finishing seriously, especially Bob Flexner and Steve Shanesy, both with Popular Woodworking Magazine. My take on the craft of finishing is different than theirs. They both came from the world of professional finishing and refinishing, where durability and surface perfection are important. As you’ll see, I live in a different quadrant.
In the end, I decided to put this opinion piece out for public consumption because I think it is the minority view. But I think it is valid, and so I’ll take my licks and continue to listen, experiment and try to become a better finisher.
And live a long damn time.
A varnish mixed with some oil.
Finishing for the Long %^&%$#@ Haul
When I talk about finishes with customers and fellow woodworkers, most are concerned about impenetrable, absolute durability. That is, how much toddler can the varnish on this table take? One toddler? Perhaps 2.3 toddlers?
I’ve always struggled when having this conversation because my opinions are upside down compared to most commercial shops, factories and (sometimes) home woodworkers. They favor polyurethane, lacquers and other hard film finishes as the armor against the army of the babies, the platoon of hot pots and the rivers of fingernail polish remover and spilled chardonnay.
Me, I prefer finishes that can be easily repaired, that look better with some miles on them and (here’s the downside) require routine maintenance and care.
I dislike finishes that form a seeming impenetrable surface film. Why? When these “highly durable” film finishes fail under duress, they tend to fail spectacularly with ugly chipping, crazing and scuffs. And repairing these durable film finishes can be difficult or impossible. Sometimes you have to remove the stuff (a health hazard), re-sand (a lung hazard) and reapply another finish (another opportunity to bathe in VOCs).
Put another way, using “durable” lacquers, varnishes and polyurethanes is like buying cheap clothing. It looks great for a while, but in a few years, it won’t be good enough for even a Goodwill donation.
So, when I choose a finish, I ignore the industry-standard scratch and adhesion tests. Instead, I separate finishes into two buckets:
Finishes that look incredible immediately but look like crap in 20 years (the short-run finishes) vs. finishes that look incredible when worn/abused (the long-run finishes).
Finishes that want me dead vs. finishes that I can apply while buck naked.
If you like math stuff, you could create an X-Y axis with four quadrants and place every finish into one of the quadrants. Perhaps I’ll do this. Or maybe it’s best if you do some of the work yourself as you ponder your favorite finishes. For now, let’s talk about what each of these categories means.
Many spray finishes look fantastic immediately.
Finishes That Look Fantastic Immediately (Short-run Finishes)
My first woodworking job was at a factory that made high-end exterior doors. While part of my job was to cut rails and stiles, most of the time I worked in the finish room. Our goal was to make doors that looked great on the showroom floor and could endure the indignities of sun, rain and snow.
So, we used lots of pigments and glazes to color the wood. Plus, lots of two-part high-tech film finishes to protect the color and wood below. This finish was so nasty you couldn’t even go into the automated spray booth without a protective suit on. (What exactly was the finish? They wouldn’t say.)
But when the finished doors came out of the booth, they were stunning. Though I didn’t own a house at the time, I wanted one of these doors.
I think it’s fair to say that a spectacular finish is one of the two key ways to impress a customer (the form of the piece is the other). Customers aren’t (in general) a good judge of joinery or wood selection. But they do know smooth and shiny – thanks to plastics.
As a result, most people prefer finishes that offer the feedback of a Tupperware bowl. And commercial shops prefer finishes that are fast to apply. Combine both properties – smooth and easy – and you have a winning commercial product.
Lacquers, shellac and varnishes (including polyurethanes) all offer that plastic feel with minimal effort in the workshop, thanks to spray equipment and solvents that make them easy to apply. These finishes are, in general, quite durable in the short run. They are not likely to scratch or scuff – at first. Most are water-, heat- or alcohol-resistant – at first. And they offer low maintenance – until they cross a magic tipping point where they fail and become super ugly.
There is, of course, also the question of what the piece of furniture is used for. If you use these short-run finishes on a picture frame, an honored cabinet or decorative object that rarely gets touched, it will likely look good in 100 years if it lives in a climate-controlled environment. This is true no matter what finish you use.
So, it’s easy to see why many woodworkers prefer these short-run finishes. Heck, I loved them for many years. They look great immediately (everyone’s happy), they are fairly easy to apply (the woodworker is happy) and they take a beating for a decent amount of time.
And to be 100-percent fair, there are times when I use these short-run finishes, too. Some pieces are reproductions and need a shellac finish to be true to the original. Sometimes a customer insists on a lacquer or polyurethane – even after I explain the downsides. I’m in no way a purist. (Purity is for soap and lucky bastards with trust funds.)
Some finishes that look fantastic immediately: • Shellac • Lacquers of all sorts • Varnishes of all sorts (wiping, spar, brushing etc.) • Polyurethane (it’s also a varnish, but most people don’t know that) • Danish oils that contain varnish • Water-based film finishes, such as water-based lacquer and “poly” (a misnomer, but whatever) • All-in-one stain and finish products (actually, I don’t know if these ever look “fantastic”) • Acrylic paint • Oil-based paint
Mixing a soap finish.
Finishes That Look Fantastic in 20 Years (Long-run Finishes)
If you love antique furniture, you probably prize patina – the gentle wear and tear that a loved object develops after years of use. I think of patina as a combination of natural oils (from you, plants and other animals), grime, wax, paint, UV, scrubbing, scratching and burnishing.
Some finishes are ideal for building patina. Oils, waxes and soap are all finishes that tend to accumulate patina rapidly because they offer little or no protection from the real world. Interestingly, I find these finishes can be less impressive when first applied (though some people love them). For example, a soap finish on a beech chair looks like a beech chair that doesn’t have any finish on it – perhaps a little bleached. An oil finish doesn’t develop any real sheen until you apply lots of coats, such as with a gunstock finish. And wax finishes fade quickly and can get worn away.
If you want these basic non-film finishes to look great, you need to put in the hours. That means more work and more coats as you apply the finish to achieve an initial “wow” response, plus more hours of maintenance with high-wear items, such as dining tables.
But if you stick with the program, reapply a yearly coat and stay away from the dip tank and spray booth, you will end up with furniture that is as inexplicably beautiful as a weathered face.
Finishes designed to look better with age (after years of maintenance) can be difficult to sell to a spouse or customer. And that’s why our family’s dining table is covered in pre-catalyzed lacquer and – after only 10 years – is a mess of ugly flakes and crazes. The wood’s figure is almost completely obscured by the deteriorated finish.
Yes, I hate myself for this.
Finishes that look fantastic in the long run: • Oils of all sorts (linseed, tung, walnut and other true oils that don’t contain varnish) • Waxes of all sorts • Oil and wax blends • Soap • Milk paint (be aware that a “milk” paint can be an acrylic paint) • Paints • Scrubbed finishes – bleach, lye and soap
Homemade milk paint.
Sidebar: Paint Covers Everything
One of the interesting exceptions to this taxonomy is paint. Paint can fit into every category, but that’s because there are so many different kinds of paint. It can look stunning when first applied, such as an automotive finish, then look bad when it fails. Or it can look great in 20 years, such as a real milk paint finish or a homemade linseed oil paint.
Likewise, paint can be safe enough to eat – you can make it from raw linseed oil (or eggs) plus a little dirt and beeswax. Or it can wreck your body when it’s loaded with lead.
Because we can’t make many blanket statements about paint, we’re going to need some adjectives when we talk about this finish. Latex (aka emulsion) paint is a different animal than casein paint (usually called milk paint). Oil paint is different than powder coating. Each paint has its own risks and rewards, so we’ll take a closer look at paints later in the book. (Haha, no we won’t.)
Most commercial boiled linseed oil contains heavy-metal driers.
Finishes That Want You Dead or Sick – or at Least Irritated
The truth is that most of the cured finishes on the furniture in your house are inert and mostly harmless. The resins, waxes and oils in the finishes are derived from natural ingredients – wood, flaxseed, beeswax – and would do little harm if you ingested them.
The problem, then, is the solvents and additives – the chemicals that allow the finish material to flow, to be applied to the wood and to assist the finish in drying quickly and beautifully. Solvents can be mostly harmless (water) or frightening (benzene, xylene or toluene). When I consider how “safe” a finish is, I’m mostly worried about the solvents and drying agents.
Let’s take linseed oil as an example. It’s derived from the harmless flax plant, and you can buy it at the grocery store to use in salads, soups and dips. It’s not going to hurt you. In fact, it might be healthy. But when you buy linseed oil at the home center, it can be a different story.
“Boiled linseed oil” is not simply flaxseed oil that has been heated so it will dry in a reasonable amount of time. (If it were, that would be nice.) Instead, boiled linseed oil has been doctored with heavy-metal drying agents (such as cobalt manganese salt) so the oil is convenient for woodworking or painting. The drying agents turn this grocery store item into something that can make you feel sick if you breathe in too much.
Added to that is the problem that most people thin linseed oil with mineral spirits (paint thinner) to make it easier to wipe on than Mrs. Butterworth’s pancake syrup. Mineral spirits are distilled from petroleum and contain forms of benzene, which has been shown to cause cancer in animals. Mineral spirits are also an irritant to your eyes, ears and respiratory system. So even stuff that seems natural and harmless isn’t necessarily so. You have to dig a little deeper.
In the shop, my goal is to use finishes that won’t make me sick or shorten my life. That might seem like an easy task. The problem is that most off-the-rack commercial finishes are at least a little poisonous.
I wish I could list every brand of every finish here and rank them from mostly harmless to a HAZMAT. Unfortunately, finish formulas change, environmental laws change (for the better and for worse) and commercial brands come and go. When you consider buying a finish that is new to you, my advice is to look up its Material Safety Data Sheet (MSDS), sometimes called the Safety Data Sheet (SDS). These are available from the finish manufacturer and are widely published on the Internet.
Read them over and keep in mind that it’s the finish manufacturer that fills these forms out. (In other words, it’s like reading the side effects of prescription medicine). If the MSDS doesn’t scare the living crap out of you, it might be worth a go.
Oh, and there are a lot of finishes that are flammable. You’ll find that out on the safety data sheets, too. That’s also bad.
Finishes that want you dead, sick or at least irritated: • Shellac with methanol • Solvent-based lacquer (especially catalyzed and pre-catalyzed lacquers) • Polyurethane and varnish thinned with mineral spirits • Oils treated with heavy-metal drying agents • Cyanoacrylate (super-glue) finishes • Finishes thinned with turpentine
A beeswax and organic linseed oil finish.
Finishes I Can Apply Buck Naked
I wish this were a huge category of finishes for you to explore. It’s not. Many waxes have harmful solvents. Most oils contain some heavy-metal driers. So, I have to say that most of the safe finishes are ones you make yourself. Or they are finishes that are basically raw ingredients that get applied with cleverness.
There are some manufacturers that specialize in making finishes without VOCs or other harmful ingredients. I have experience with finishes from Tried & True and Sage Restoration, though I am sure there are other manufacturers out there (or, I hope there are). The bottom line is that when searching for any finish, it’s always eye-opening to read the safety data sheet (the MSDS or SDS). Just because a label says the finish is “all natural” doesn’t mean it’s safe. Venomous spiders are all-fricking natural as well.
I’m going to be honest and say that most of the finishes in this category require a little more skill or effort to apply. They all require maintenance (if the finished object is regularly handled). And they might not be the always-shiny finish that reflects every sunbeam.
But I still love these finishes.
Many of them are rooted deep in our history and have been largely forgotten. One of my favorite finishes in this category is a pure beeswax finish applied with a “polissoir.” A polissoir is a stiff bundle of abrasive sticks – usually rush or broom corn – that is used to burnish the wooden surface with some beeswax until it is impossibly tactile and lustrous.
The downside? It’s a lot of work to burnish a large object with what is basically a bit of a broom. If you did this in a high-volume commercial shop, two things would happen. First, you’d go out of business because finishing a table this way would take a day or more. (But your pecs would look awesome.) Second, your one customer would complain the first time he or she abused the table with heat or alcohol. It’s a finish for a special type of customer (usually yourself).
Other safe finishes have yet to leap a cultural barrier. In many places in Europe, furniture and floors are regularly finished with plain old soap. Yes, the same thing you use in the shower (minus the detergents etc.). It’s a great finish for light-colored woods. But soap requires regular maintenance and doesn’t offer any significant protection.
Me, I think these finishes are worth the effort. We live in a world where everything has been formulated – processed foods to target a sweet tooth and plastics to surround us with slick smoothness. Heck, some casinos even pump their halls full of chemical smells to mask the harmful tobacco smoke and trick your brain into doing something really stupid in Las Vegas. With a donkey.
Your furniture shouldn’t be like that. It’s made from trees. It’s built with your hands. Why should we slather it at the end with synthetic chemicals that harm us? Because let’s be honest: It’s the woodworker who bears the brunt of the VOCs and heavy-metal driers. By the time the project gets to the customer, most of the harmful stuff has evaporated.
There’s one other benefit to these finishes that might not be obvious. Many woodworkers are worried about the future of the craft. As the older generation dies out, it’s uncertain if there will be younger woodworkers out there to replace them. By using safer finishes, you’ll do something to extend the craft – you’ll live longer.
Finishes you can apply buck naked: • Natural waxes without VOCs • Natural oils without driers or solvents • Soap • Oil and wax formulas (without VOCs) • Casein paint (aka milk paint) • Linseed oil paint (without VOCs or driers) • Any paint that is a natural oil with safe pigments (yes, there are both safe and unsafe pigments) plus a dab of beeswax • Some water-based finishes (check the safety data sheets) • Shellac dissolved in ethanol (though some of you will debate me)
Shredded beeswax and a polissoir.
Most of All, Be Reasonable
I won’t lie to you, I use finishes from all four quadrants. I make a lot of different pieces of furniture for customers who have their own set of desires when it comes to a finish. I think that’s OK – it’s the woodworker who bears the brunt of the VOCs.
So, it’s up to you to know the risks of applying a finish. You need to buy – and use – the right protective gear. Avoid shortcuts. And if you ever start to feel intoxicated while finishing, know you are doing something wrong.
Also know there are always ways to make a particular finish less toxic. Substitute ethanol for methanol. Use odorless mineral spirits instead of turpentine or regular mineral spirits. Use stand oil (pure linseed oil without metallic driers) instead of boiled linseed oil.
Most of all, however, you can make your life a lot less chemical and volatile by simply opening your mind to different ways of working. A good oil-and-wax finish is easy to apply, is incredibly tactile and can be practically non-toxic. Try soap. Make your own paint. And always read the safety data sheets for the stuff in your shop. Though the safety sheets can be confusing and difficult to interpret, it’s pretty easy to determine if a finish is scary or drinkable.
My goal is build things that endure, and that allow me to endure as well. I know too many woodworkers whose bodies have been wrecked by the heavy lifting and the chemicals of our craft. I know too many who have had scares with unusual cancers. And I’m haunted by stories of fellow woodworkers who dropped dead suddenly.
I don’t want to be that person. I want to die at a very old age, in a bed I made that is finished with an oil and wax I cooked up myself.
If you have the same sort of urge, these ideas are where to begin.
A detail of the 1888 photograph seen earlier shows a chimney as well as windows in the chamber (upper floor) of Fisher’s shop. Approximately 60 years earlier, there was a small windmill on this roof to power his sawmill, lathe and grindstone. – Jonathan Fisher Memorial.
Who better to write a book about Jonathan Fisher, a late 18th century/early 19th century Maine woodworker and preacher, than Joshua Klein? Like Fisher, Joshua and his family are homesteaders in rural Maine, doing their best to live completely off the land. And Joshua is using in his own shop many of the same types of tools that Fisher had in his collection (not a surprise to those who know Joshua as the founder and editor in chief of Mortise & Tenon Magazine, a periodical that celebrates the preservation, research and recreation of historic furniture). As the crow flies, the Kleins live about 7 miles from Fisher’s Blue Hill farm.
In November 1810, Fisher began building a model of a “wood house.” Never one for technological stagnation, Fisher envisioned a building next to his house that was dedicated to producing lumber on a wind-powered sawmill that would also power his lathe. As a lumbering town, Blue Hill had numerous water-powered sawmills in Fisher’s days, but on his property at the top of the hill, Fisher had no access to a river or stream. What he did have, especially after years of clearing his property, was wind.
Although the memories of New England’s windmills are nearly faded, their abundance, especially along the coastline, is well documented. (2) As early as the 17th century, windmills (primarily for grinding grain) were being built in areas of New England without direct water access so they were not an unusual sight by the early 1800s.
As commonly known as they were, however, the construction of such a mechanism was beyond the skill of most craftsmen. One author has noted that the millwright’s job required a precision and care equal to the shipwright’s. The vision of a rural farmer building a windmill to saw his own lumber is quixotic. It seemed a project doomed to fail.
Although water mills were much more common in Maine, New England, as a whole had many windmills, especially along the coast. – Drake, Samuel Adams, Nooks and Corners of the New England Coast, Harper & Brothers, 1876, p 344.
Reading through the journals during the two-and-a-half-years of construction of the mill is agonizing, especially as the recorded tally of his investment that included his own labor rises at $1 per day (the same rate as Joseph Murphy, a cabinetmaker of South Berwick (3) ) in the midst of numerous frustrated attempts at sawing.
We know the mill was generating power as early as April 1812, because Fisher recorded having his grindstone running “by wind.” After investing substantially and working on it for more than two years, Fisher recorded on April 19, 1813: “Worked upon saw gear and made an attempt to saw wood. Broke the [?]. Greatly disappointed in my hopes. Endeavored to resign to the will of God but found it a hard trial. I doubt not, however, but God intends good by this cross. Expense of wood house, etc. = $215.50.” The next day all that is recorded is: “Made a new experiment to carry my saw for sawing wood by wind – discouraged in it. Laid it aside = $216.50.”
Despite his discouragement, Fisher carried on and a few days later wrote, “first commenced sawing wood, with some, though small, good effect.” From here, only periodic sawing is recorded. The anticlimactic success of the sawmill is startling after so much labor and expense.
The roof of this Estonian spinning wheel shop was equipped with a small windmill for powering woodworking machinery. Fisher’s was probably similar. – Courtesy of Lost Art Press.
The wind power was also harnessed to drive the lathe. June of that year, Fisher documented: “Worked upon turning gear and set my lath a-going by wind.” Powering lathes with water power was common in production shops but wind-powered lathes were much less common. It’s hard to envision the practicality of such a setup. The irregularity of the wind must have been a challenge to deal with for the turning he was doing. The idea is not unprecedented, however. Windmill historian, Roy Gregory, has documented the use of an 8.5′-tall tower mill in a Lancashire, England, shop that powered a lathe and circular saw. The mill is described as having four 8′ long common sails with gears for regulating speed (4). Ants Viires, a historian of Estonian woodcraft, has photographed a small tower mill attached to the roof of a mid-20th-century spinning wheel workshop. It is likely that Fisher’s was similar in size.
The design of the wood house’s lathe is unknown. In Fisher’s room-by-room probate inventory taken in 1847, it listed a lathe and its chisels in the barn of which his son, Willard, was half-owner. Because two of the existing poppets do not fit the surviving lathe, it is assumed that Fisher had another lathe in the shop that was discarded when that building was taken down. Because no lathe (or any workbenches, for that matter) are listed in the probate inventory, it may be that these shop fixtures were built-ins. Often, probate inventories exclude these items because they were considered part of the shop building.
Although we know Fisher built at least two lathes, this is the only one that has survived.
It is apparent that Fisher achieved his primary goal with this windmill project because he was able to generate lumber to some degree. But it must not have revolutionized his production enough because in June 1821, he disassembled the tower of his mill, never to speak of the mill in action again. Neither the 1824 Morning View painting nor the 1888 photograph of the wood house show any evidence to testify to the existence of the mill.
The up-and-down “sash” saw marks from the mill can still be seen on the inside and backside of much of Fisher’s casework.
That Fisher referred to a least a portion of his wood house as his “shop” suggests that he eventually moved his tools out of the barn and into this dedicated space. The transition between workspaces must have been gradual because the installations of a new workbench and lathe are carried out over time amidst other woodworking projects. It is also conceivable that there always remained a small shop space in the barn for convenience sake.
In June 1823, Fisher was busy setting up his “shop chamber.” He moved his grindstone to a new location, built a “cupboard” for tool storage, constructed a portable workbench and installed a new stove. The reconfiguring of this workspace was likely due to his feeling “the infirmities of old age creeping stealthily upon him.” Perhaps this rearrangement facilitated his work.
This detail from Fisher’s A Morning View of Blue Hill Village shows the arrangement of the Fisher homestead from the side. Moving from left to right, we see the original barn, the hog house and some other outbuildings, the original red house attached to the yellow 1814 addition and finally the black “wood house.” – Jonathan Fisher, A Morning View of Blue Hill Village, 1824, oil on canvas, 25-5/8″ x 52-1/4″, Collection of the Farnsworth Art Museum, Rockland, Maine; Museum Purchase, 1965.1465.134.
2. Lombardo, Daniel, Windmills of New England: Their Genius, Madness, History & Future, On Cape Publications, 2003. 3. Burch, Abby, By His Account Rendered: The Business of Cabinetmaking in York County, Maine, 1815-1840, a modified master’s thesis, 2008. 4. Gregory, Roy, The Industrial Windmill in Britain, Phillimore & Co., 2005.
At long last, “The Anarchist’s Workbench” is back in stock and shipping from our warehouse. The price for the USA-made hardcover is still $27. The price for the pdf is still free. You can download the free pdf easily here.
The second printing features a couple changes we made after the first edition refused to pass through the birth canal without using its claws and teeth. We made slight changes to the paper to avoid some weird inking problems on the web press. I also changed the diestamp on the cover and spine.
The diestamp for the first printing was supposed to be the image above of my bench’s planing stop (which was made by Tom Latane). But, true to form with this book, I couldn’t get it to look right after many attempts. So I used dividers instead as the diestamp.
We also experimented with a blind deboss. And, of course, we couldn’t get the stamping machine to make it as deep as we wanted.
For this new printing, I decided on a whim to draw the diestamp one more time. I grabbed a Sharpie and nailed it on the first try. To avoid the problems of the blind deboss, we used a white ink for the deboss.
Sorry for all the manufacturing details, I should have just said: It’s back!
With this printing, everything went smoothly, and I am pleased with the result.
Other Book News
In the next couple weeks we will begin taking pre-publication orders for “The Workbench Book” by Scott Landis. This classic text has been out of print for a while. And we worked with Scott to make a beautiful hardcover edition with manufacturing details that this great book deserves. More details on this technically difficult (but fun) project in the days ahead.
I – and possibly Bean – will be on @bench.talk.101 today from 3:30-4:30 p.m. EST to talk about my enduring love for tool chests (and current obsession with the Dutch tool chest form in particular) and cats. You can join the conversation by clicking: https://us02web.zoom.us/j/81164688577?pwd=b1ZOOWgzQi9ZeExsVDYyWkJMNXdkQT09 at about 3:30.
Or click on the link in the @Bench.Talk.101 Instagram bio, which will appear 5 minutes before the meeting is about to start.
P.S. These meetings are recorded and published on the Bench.Talk.101 YouTube channel, so by joining the conversation, you are giving permission for the talk to be recorded and the recording to be made public for all to enjoy. You can watch previous episodes on the Bench.Talk.101 YouTube channel.