Katherine has cooked up another big batch of Soft Wax 2.0, a safe and beautiful finish that I use on all my chairs and much of my casework. It is available for sale in her etsy store.
Katherine makes the wax in our machine room using a waterless process and then packages it in durable glass jars with coated metal lids. The result: no rust or discoloration.
As always, Katherine has Bean the Shop Cat by her side. Here he is playing with his new (thank you, Megan) scratching post. This is not the most flattering photo of the poor boy, but….
Instructions for Soft Wax 2.0
Soft Wax 2.0 is a safe finish for bare wood that is incredibly easy to apply and imparts a beautiful low luster to the wood.
The finish is made by cooking raw, organic linseed oil (from the flax plant) and combining it with cosmetics-grade beeswax and a small amount of a citrus-based solvent. The result is that this finish can be applied without special safety equipment, such as a respirator. The only safety caution is to dry the rags out flat you used to apply before throwing them away. (All linseed oil generates heat as it cures, and there is a small but real chance of the rags catching fire if they are bunched up while wet.)
Soft Wax 2.0 is an ideal finish for pieces that will be touched a lot, such as chairs, turned objects and spoons. The finish does not build a film, so the wood feels like wood – not plastic. Because of this, the wax does not provide a strong barrier against water or alcohol. If you use it on countertops or a kitchen table, you will need to touch it up every once in a while. Simply add a little more Soft Wax to a deteriorated finish and the repair is done – no stripping or additional chemicals needed.
Soft Wax 2.0 is not intended to be used over a film finish (such as lacquer, shellac or varnish). It is best used on bare wood. However, you can apply it over a porous finish, such as milk paint.
APPLICATION INSTRUCTIONS (VERY IMPORTANT): Applying Soft Wax 2.0 is so easy if you follow the simple instructions. On bare wood, apply a thin coat of soft wax using a rag, applicator pad, 3M gray pad or steel wool. Allow the finish to soak in about 15 minutes. Then, with a clean rag or towel, wipe the entire surface until it feels dry. Do not leave any excess finish on the surface. If you do leave some behind, the wood will get gummy and sticky.
The finish will be dry enough to use in a couple hours. After a couple weeks, the oil will be fully cured. After that, you can add a second coat (or not). A second coat will add more sheen and a little more protection to the wood.
Soft Wax 2.0 is made in small batches in Kentucky using a waterless process. Each glass jar contains 8 oz. of soft wax, enough for two chairs.
Our “Family Tree of Chairs” letterpress poster is now available in our store. There are only 200 available. So if you want one, don’t tarry. If these sell out, we will consider doing another run in a different ink color, such as green or brown.
Also, our next generation of woodworking pencils are also available today here. A box of five in a nicely printed box is available for $12. These pencils are made to our specifications in the USA. We have been testing different pencil configurations for months. These pencils are robust, make a good mark and sharpen easily.
Finally, some customers have asked to purchase replacement handles for our lump hammer, mostly to have a spare on hand in case the handle ever breaks. The hickory handle is a custom shape that requires both turning and handwork. It ships with oak and metal wedges for installing the head. You can read the details here.
Note: This entry has been updated to fix an embarrassing geometry mistake. The repaired paragraphs are in italics.
Wedges for stick chairs must absorb a lot of shock so they don’t snap when you install them. So I steer clear of weak (sycamore) or brittle (ebony) woods.
Most of my wedges are oak or ash, species that are plentiful and inexpensive. I don’t think I’ve ever snapped an oak or ash wedge, even when I’ve struck them at odd angles. I have used walnut and cherry wedges at the request of customers. They work, but you have to be deliberate when hammering them in because they will snap.
The grain in a wedge should run along its length, from its thin tip to its fat end. For chairs, I use wedges that are 1-1/2″ long. The fat end is between 1/8″ and 1/4″ thick. The tip comes to a sharp point. If I need a blunt tip for some reason (say the tenon is loose and shallow), I’ll snip off the pointiness.
The angle of the wedges I use is usually somewhere between 4° and 10°. The shallower angles are easier to hammer in, but the wedge is more likely to crack. A wedge with a larger included angle can cause the wedge to bounce out of the tenon when you hammer it in. The solution is either to hit the wedge harder until the wedge hopefully grabs, or switch to a wedge with a smaller included angle.
Wedges with included angles smaller than 4° can work, but the wedge is even more likely to snap off when struck.
Wedges With & Without a Sled
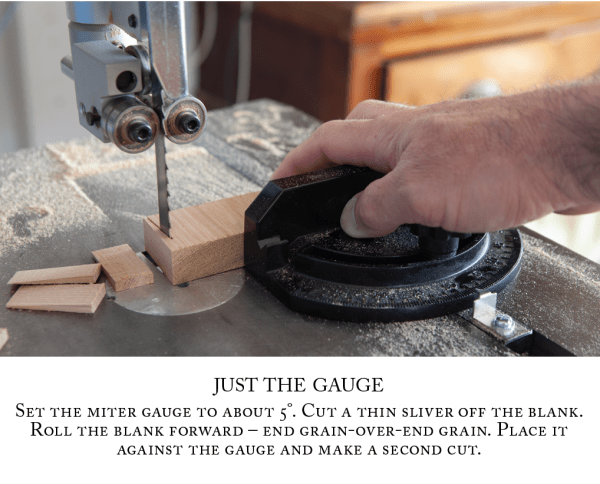
You can make wedges without a jig on the band saw by using the saw’s miter gauge. Crosscut a 5/8″ x 1-1/2″-long chYou can make wedges without a jig on the band saw by using the saw’s miter gauge. Crosscut a 5/8″ x 1-1/2″-long chunk off a board that is about 6″ wide. Set the saw’s miter gauge to cut on-half of the angle you desire (i.e. 5° off 90° for a 10° wedge). Put the chunk on the miter gauge and cut off a thin sliver. Flip the chunk over – end grain-for-end grain. Slide the chunk toward the blade and make another cut.
You will quickly figure out where to place the chunk so that you make a perfect wedge. You can make wedges with thin points and blunt points.
Keep flipping the chunk over and over. Make wedges until your chunk is so small that it feels dangerous to make the cut while so close to the saw’s blade.
You can also make a dedicated wedge jig for the band saw’s miter slot that has zero clearance to the blade. This jig is shown above. It is permanently set at 5° off 90° and makes it easy to position the chunk of wood and slice a perfect 10° wedge.
The disadvantage to both of these miter-gauge methods is also its advantage. The technique makes it easy to make different wedges. By moving the chunk of wood left or right on the miter gauge, you can make wedges that are fatter or skinnier.
The Peggy Shepherd Pottery Collection (at least, most of it) now lives in Nancy Hiller’s office. The whisk brush was made by Aspen Golann.
After a small flurry of emails this past weekend related to the dust jacket in which Nancy, Christopher, Megan and I discussed word choice, the number of lines, the space between “Shop” and “Tails” and more, “Shop Tails” is now at the printer.
Makers, whether of a dust jacket, a book, a spoon or a kitchen, tend to eschew materialism, or, at least certain types of materialism. And yet we make material goods. As Nancy writes below, the “things vs people” dichotomy can be false and destructive, and that holds true whether you’re talking about a person on a factory production line or someone working in a one-person workshop.
In this excerpt from Chapter 11, Winnie (1996-2010), Nancy addresses the concept of materialism, and suggests considering a new way of looking at objects – appreciating how things embody important characteristics of their makers, as well as memorialize others.
— Kara Gebhart Uhl
When Winnie, William, Lizzie, Tom and I officially moved into the house next to my shop in the winter of 2004-2005, I kept the dogs confined to the laundry room and kitchen instead of giving them free run of the house. Not only was I loath to see any repeat of the destruction at my bungalow in town; I had begun laying the hickory floors in my spare time, and it was an unimaginably slow job, done on my hands and knees.
Alan had kindly loaned me a flooring nailer. It was the manual type you whack with a dead-blow mallet. I tried it repeatedly, but the hickory was so hard it just bent the nails. Once a nail was bent, it was far more time-consuming to remove from the dense wood than it would have been to drive by hand. A pneumatic nailer might have done the trick, but I didn’t have one, so I bought several pounds of large finish nails and recalibrated my expectations. I had to pre-drill the tongue of each board about every 18 inches along its length to keep it from splitting. I drove the nails with a hammer and finished with a nail set. It took a week of spare time to lay the floor in the 13 x 18-foot living room, but as I watched the hickory spread slowly across the OSB subfloor, I was thrilled by the transformation in my surroundings.
After the living room I moved down the hall to the bedrooms, then hired my friend John Hewett to sand the floors. I applied two coats of Waterlox Original tung oil just before driving to Florida with a kitchen full of cabinets for Maggie and her husband – the tung oil was so heavy on the solvent that I didn’t want to be in the house while it cured.
Considering how much work the floors took, I was not about to see them scratched up by the dogs’ claws, so I decided to confine them to the kitchen and laundry room, rather than allowing them the run of the house.
***
Every so often someone complains that I’m too protective of material artifacts, whether the floors in my house, the top of our kitchen table or the quilt made by our friend Kim, a gift when Mark and I were married – “Use the delicate cycle! Those are Kim’s hand-sewn stitches!” These criticisms, which are often veiled, pit things against people (or things against dogs, in the case of my floors), implying that I value the former over the latter.
I get it. When I was around 10, Esse, gave me a melodica, a hybrid between a wind instrument and a keyboard. You blew into a mouthpiece, pressing keys to produce different notes. The resulting sound struck me as artificial, and the instrument itself was mostly made of plastic. It didn’t seem like a serious instrument. I had no idea back then that the melodica was good enough for the coolest of professional musicians, like Jon Batiste on “The Late Show with Stephen Colbert.” I was touched that she’d bought it for me, but not that interested in learning to play it.
The gift of the melodica coincided with the influx of hippies living in our yard. From them I learned that attachment to material things was bad. “You gotta let it go, man. Free yourself,” they’d say – not about my melodica, but about other, grown-up things. Their happiness living with few possessions impressed me. I wanted to follow their example. So one Saturday morning, when a couple mentioned they were going to a swap meet to divest themselves of still more possessions, I asked if I could join them. It would be an exercise in renunciation.
I set the melodica down with a bunch of other people’s stuff on a fold-up table in a dusty parking lot cooked by the Florida sun. I think I priced it at $25. Eventually someone haggled me down to $8. The money wasn’t important; what mattered was that I was letting go of another object I didn’t use. I was training myself to avoid attachments. I overrode the pang of guilt as I took the cash – my dear grandma had given the instrument to me – and told myself to grow up. When I told my grandma, she was hurt. “I bought that for you,” she said. “It was a gift.” She wasn’t trying to make me feel bad; she was expressing how she felt. I’ve been troubled by my superficial take on the melodica ever since.
As I thought about that experience over subsequent years, I came to see “things versus people” as a dichotomy that’s false and destructive. You can’t even have things without people; we’re interdependent. People make things, whether they do so on a factory production line or in a one-person workshop. Then other people put them to use. Beyond this, things are more than mute material; they express their makers’ dreams and values. This connection between maker and made object is most visible in artifacts crafted by individual makers to their own designs, or designs they’ve adapted significantly – think Megan Fitzpatrick’s Dutch toolchests, or Danielle Rose Byrd’s bowls. But even anonymous workers on the production line at Toyota or General Electric are expressing their dreams of a good life, albeit less directly, as they cut, weld or assemble parts to other peoples’ designs using tools and equipment they don’t own.
Material artifacts are also repositories of memory. They keep people and places alive. In my office I have a Victorian bamboo étagère, its shelves filled with antique ceramics. The stand and all of its contents – a Dutch urn resembling an antique from Greece; two sugar-and-cream sets from Japan; pitchers and vases from Germany, Romania, England – once stood in the entryway of my friend Peggy’s house, a converted timber-frame barn. She’d bought the barn in pieces and made it into a home filled with character and natural light. I always coveted the pottery collection (and kicked myself for doing so, because it was hers). After Peggy died, her daughter held a barn sale. I bought the shelf and the ceramics – not only because I loved them, but to keep those things together as the Peggy Shepherd Pottery Collection. Peggy lives on in these artifacts, as well as many others in our home: the curvy black metal chair she gave me at Christmas in 1998, the funky painted cabinet a former boyfriend of hers had cobbled together, the beautifully upholstered chair she gave me after I built cabinets for her barn-house kitchen. “You didn’t charge me enough,” she said. “I want you to have this.”
The World War II-era sofa in our living room, which I bought from Peggy many years ago, reminds me to be thankful that we’re not hiding in bomb shelters while subsisting on tinned meat, chicory “coffee” and other rations. The salvaged leaded-glass window I built into our bathroom wall carries forward the legacy of a client’s family home that was demolished as part of an airport expansion. The ceramic model of a terraced house on my office bookshelves reminds me of my first woodworking boss, Raymond, who gave it to me when Patrick and I were married, adding “You’ve always said you want a house of your own.”
When we buy things from those who make them, we not only support those craftspeople, we also do our part to keep craft traditions alive. In the factory-made Arts & Crafts-style cabinet I bought tenth-hand from a back room in a Bloomington grocery store in 1995 lies a silver cheese knife made by Hart Silversmiths in Chipping Campden, England, the lone surviving enterprise from Charles Robert Ashbee’s Guild and School of Handicraft. Mixed in with blue-green ceramics bought at yard sales and junk shops is a vase bought for me by my former husband, Kent, and his wife, Mary, on a visit to the Van Briggle Pottery & Tile. There are small pieces by Ephraim Faience that I purchased at The Omni Grove Park Inn and a Granny Smith green cabinet vase I bought from Scott Draves of Door Pottery in 2015, when we were in neighboring booths at a show in Chicago.
Even mass-produced artifacts deserve more respect than we generally give them, at least in the States. We have a famously materialistic culture in which too few people have more than the most superficial, consumerist understanding of material objects. As Elaine Scarry pointed out in her 1985 book, “The Body in Pain,”
…anonymous, mass-produced objects contain a collective and equally extraordinary message: Whoever you are, and whether or not I personally like or even know you, in at least this one small way, be well…. Whether they reach someone in the extreme conditions of imprisonment or in the benign and ordinary conditions of everyday life, the handkerchief, blanket, and bucket of white paint contain within them the wish for well-being: ‘Don’t cry; be warm; watch now, in a few minutes even these constricting walls will look more spacious.’1
Instead of “things versus people,” it would be more fitting to appreciate how things embody important characteristics of their makers, as well as memorialize others.
The things we live with also shape us in ways we often don’t even see. They impose their own demands on our behavior: We have to learn how to use the new email platform, drain the compressor, grease the sander’s gears, prime the pump. Many things, from the humble kitchen whisk to the thickness planer, bicycle or car, become extensions of our bodies, magnifying our abilities, for better or worse, and sometimes leading us to imagine ourselves more powerful than we are. (All it takes to prove the validity of this statement is a power outage.)
Workshop systems have come a long way since this welter of equipment was installed in the John Grass woodturning shop in Philadelphia.
The following is excerpted from “The Workshop Book,” by Scott Landis (first published in 1991), which remains the most complete book about every woodworker’s favorite place: the workshop. This new 216-page hardbound edition ensures “The Workshop Book” will be available to future generations of woodworkers. Produced and printed in the United States, this classic text is printed on FSC-certified recycled paper and features a durable sewn binding designed to last generations. The 1991 text remains the same in this edition and includes a foreword by Roy Underhill.
Like a house, the workshop is a complete environment. It provides shelter and basic human needs like heat and light, comfort and safety. The shop must therefore account for all of the same structural requirements as a house – a floor, walls and ceiling (along with a foundation, windows, doors and a roof, if it is freestanding). Beyond that, the dedicated, functional nature of the workshop and the equipment that is used in it embrace a whole range of issues and specific requirements – electric power, dust collection, task lighting, solvent storage and vapor extraction – that are only peripheral in most houses.
Unfortunately, in too many workshops, these critical support systems are accorded scant consideration. After spending so much time, energy and money on the workshop structure and equipment, we’re too often willing to put up with an inadequate, even unsafe or unhealthy, work environment. But, as Donald Williams, furniture conservator for the Conservation Analytical Laboratory (museum support center for the Smithsonian) told me, these systems should be nonnegotiable. “They may seem extravagant to the person who’s scraping by in the basement,” he said, “but for me that’s where it starts. You do without a table saw if you need to.”
In this chapter I will outline the basic systems that are common to most shops. To attend to them all would require the diverse talents of a small corps of professionals – an architect, a builder, a mason, an electrician and a plumber, among others. You may have some of these skills yourself, or be able to crib enough information from the literature to undertake much of your own construction. If not, you may prefer to hire (or barter for) a professional to do the job. Electricity, in particular, can be dangerous – even deadly – so do not undertake any electrical operation about which you are at all uncertain.
In any case, entire books have been written about each aspect of the subject, covering everything from roofing and insulation to electrical wiring; and there are federal, state and local building codes that apply to just about any structural situation you can imagine. Refer to these sources (a few of which are listed in the Bibliography) or to a licensed professional for more detailed information. And contact your local fire marshal or insurance representative to make sure that what you are about to do is not only safe, but legal, and will not adversely affect your insurability.
Structure Purpose-built workshop buildings come in every shape and size and in every conceivable type of construction, from poured concrete and rammed earth to log, timber-frame and standard balloon framing. Converted shops are at least as varied. In this book you’ll find comfortable shops that are located in a pole shed, several old mill sites, the granite bowels of an industrial building, a Chevy bookmobile and hewn out of a chicken coop. I know of one Arizona sculptor who works in a hogan, the traditional earth and timber longhouse of the Navajos.
Wood paneling has practical as well as aesthetic advantages. It is sturdier than drywall, it helps absorb sound and it provides some additional insulation.
So many different types of buildings and construction methods are used to build shops successfully, that I won’t attempt to discuss them all here. There are, however, several structural considerations worth mentioning, whether you’re building from scratch or working in your basement.
Insulation Insulation is as important for comfort and energy efficiency in a shop as it is in a home. What’s more, insulation absorbs machine noise, making the shop a more pleasant place to work in and to live next to.
After roasting for much of six years in an uninsulated tin garage, Roger Heitzman took action before moving his California workshop into a corrugated-steel, light-industrial building. He attached a separate 2×3 stud wall to the inside of the steel frame with screwed-on brackets. Then he stuffed fiberglass insulation in the furred walls and ceiling and he sheathed the inside with 1/2-in. drywall. The effort paid off. Heitzman’s half of the 2,400-sq. ft. building hovers around a pleasant 70° F during most of the summer, while it sizzles at 100° F in the uninsulated cabinet shop in the other half. During the three cool months of the year, auxiliary heat is supplied by two portable kerosene heaters (10,000 Btu).
Different construction situations and budgets call for different insulating materials. Fiberglass and polyurethane foam are two of the most popular, although Homasote panels and ceiling tiles are also used to advantage. A few timber-frame shops I visited were fitted with stress-skin panels, in which foam insulation forms an unbroken vapor barrier around the skeletal frame, effectively reducing drafts and heat transfer through the walls. Stress-skin panels are expensive but they are installed quickly (the interior wall covering and exterior sheathing are built into each panel), and reduced heating costs will make up for at least some of the initial investment.
Interior paneling contributes to the sound and thermal insulation of the workshop, and several shops I visited were either completely paneled or combined a wood-sheathed wainscoting on the lower portion of the wall with a drywalled surface above. Wood paneling creates a warm, cozy atmosphere and provides a rugged, puncture-resistant surface to which tools and shelves may be easily attached. Drywall is relatively inexpensive, easy to install and is usually painted white for a bright working environment, but it is readily gored by an errant swing of a board, and fastenings must be driven into supporting studs or attached with special anchors. (I always feel more secure with a nail, screw or dowel in wood than with an anchored screw in drywall, particularly if the fastening must cany any amount of weight.)
In a large space, a dropped ceiling will aid significantly in retaining heat and absorbing sound and will reduce the risk of fire that comes with the accumulation of fine sawdust on studs, wiring and lighting fixtures. Of course, these advantages must be balanced against the loss of headroom.
Details like this lumber-camp door latch lend a practical, homespun character to Harold Payson’s Maine boat shop. The latch is so simple people don’t know how to use it. Payson nailed a 3/4-in. by 1-in. by 2-ft. long stick of limber hardwood to the door, far enough from the rounded end to allow the stick to bend as it hits the notched catch, which is mortised into a hole in the casing. A slight pull or push opens or closes the door and, as Payson notes, “a little oil in 36 years is all this simple door latch has asked for.”
Doors It is important to remember that workshop doors frequently must accommodate more than just people. A standard 2-ft. 8-in. wide interior door is too small to comfortably allow movement of machinery and materials, much less a large piece of furniture or a small boat. Even a 3-ft. wide exterior door will prove too narrow for many workshops. The best access is provided by an insulated, custom-made door at least 4 ft. wide, or by a larger sliding door, such as the one shown in the photo above. In many garage workshops or freestanding structures, a standard overhead garage door makes it possible to open up an entire wall of the shop. This access to fresh air creates a pleasant work environment during mild weather and makes it easy to move equipment and materials in and out of the shop.
Garage doors and large sliders are difficult to insulate and seal, however, so they may create problems in cold weather. Since most heat loss in a building takes place around the windows and doors, good insulation is important not only in the construction of the door but in proper weatherstripping. A tightly sealed door will also help contain noise and dust, which is especially important if the shop is located inside the house.
A 14-ft. wide sliding door allows easy movement of wood and machinery in Joel Seaman’s timber-frame shop (left), and opening it on nice days provides plenty of fresh air. The door is framed with 2x10s, 2x8s and vertical 2×4 stiles. Spaces between the frame and stiles are filled with I-in. thick rigid foam, and a layer of Tyvek beneath the cedar clapboards prevents drafts. (Photo by Joel Seaman.)
Martha Collins’s versatile door-within-a-door design (shown above) offers several different options for access. Daily entrance is provided by either of two 28-in. by 83-1/2-in. double-glazed doors. Opening both doors creates a 56-in. wide opening, big enough for most large objects. These doors are, in turn, hung within a pair of larger doors. Though Collins rarely opens them now, the big doors proved useful when she moved in; the 94-in. by 94-in. opening was almost as large as the end of the 45-ft. trailer that delivered her shop equipment. Unlike most overhead garage doors or horizontal sliders I’ve seen, these doors are well insulated and sealed, and she only has to open as much door as she needs.
By hanging two narrow doors within two larger doors, Martha Collins can create four different openings to accommodate movement of objects large or small.
Floors Debate persists among woodworkers over the ideal workshop floor surface. Most shops have either a concrete or a wood-frame floor. The former is the rule for basements, garages and many small outbuildings. It has the obvious advantages of ease of construction, low maintenance and great strength, and its smooth, solid surface makes it easy to roll machinery or other carts and fixtures around the work space. What’s more, the concrete stays cool in the summertime and it is one less combustible material in a shop full of dry tinder.
But concrete has some serious disadvantages over the more forgiving plywood or solid-wood surface. Concrete is often cold, damp and slippery, and it’s hard on dropped tools (and coffee cups) and harder still on feet, legs and back Without a substructure of floor joists, there’s no way to run wires or dust-collection pipes beneath the floor, unless they’re installed in the slab, thus committing you to the original layout. And last but not least, because concrete is a poor insulator and a good conductor of electricity to ground-a much better conductor than wood-it increases the risk of electric shock if your machinery leaks power.
To cope with these realities, the people I visited who work on concrete have adopted several strategies, which vary greatly in their complexity and expense. Some simply cover the concrete with vinyl floor tiles or with rubber-mat runners in high-traffic areas, such as the bench/tool-chest corridor and in front of machinery and assembly tables. You can purchase hard rubber or cushioned mats, which are easier on the feet, but I know of at least one shop that does just fine with oversize truck mud flaps. Of course, any kind of floor mat will interfere with rolling carts and machinery, but this is a small price to pay for the greater comfort they provide.
If you are installing a new concrete floor, it can be made relatively warm and dry with proper site preparation and the addition beneath the slab of gravel, foam insulation and a good plastic vapor barrier. For the ultimate in thermal comfort, consider installing radiant-heat pipes in the concrete when you pour.
A number of woodworkers I visited covered their concrete floor with wood. Curtis Erpelding laid 2x2s on 16-in. centers, insulated between them with sheets of Styrofoam and covered it all with particleboard. (Plywood would make a more rugged, if more expensive, alternative.) He ran conduit between the 2x2s to service outlets on short posts located at each machine. Erpelding wanted to use flush-mounted electrical fixtures, but the Seattle fire department specified off-the-floor receptacles that would not be vulnerable to a splash of coffee. In practice, Erpelding figures they’re also easier to keep clean and easier to reach.
This sort of in-floor wiring is rather permanent, but Erpelding explains: “I had a pretty good idea of how I wanted things laid out.” Plywood ramps bridge the height difference between the wood platform and surrounding concrete floor and make it easy to roll his shop vacuum and production carts around. The built-up floor underlays the entire bench area and part of the machine space, thus retaining the practical advantages of concrete in the assembly and storage areas and around some of the machinery.
A wood floor makes a “friendlier” work surface than concrete, but it is not without drawbacks. When built above bare earth, it is also subject to moisture. Covering the earth with a good vapor barrier and perhaps a skim coat of concrete over gravel will improve drainage and reduce moisture infiltration. The insulation must not be exposed or it will eventually deteriorate, either as a result of moisture or nesting critters. Wood is obviously more susceptible to fire. Aware of this danger, Peter Axtell poured 2 in. of concrete atop the plywood floor in his spray booth.
Considering the weight of machinery and the activity that takes place in most workshops, a wood floor must be heavily built. Kelly Mehler’s wood floor supports heavy industrial machinery with full-cut 2×12 floor joists on 12-in. centers, sheathed with three layers of tongue-and-groove oak flooring. The floor creaked a bit when Mehler installed his 2-ton planer with a forklift truck, but it never sagged. Mehler’s shop was a car dealership in another life, and the floor is overbuilt for most workshops, but 2×10 joists on 12-in. centers (and more support posts and beams than you think you need) would probably not be excessive. Plywood floors should be protected with a good-quality epoxy paint or a porch-and-deck enamel. (Choose a light-color paint to keep the shop bright.) Solid-wood floors can be oiled, painted, varnished or left bare to develop a rich patina.