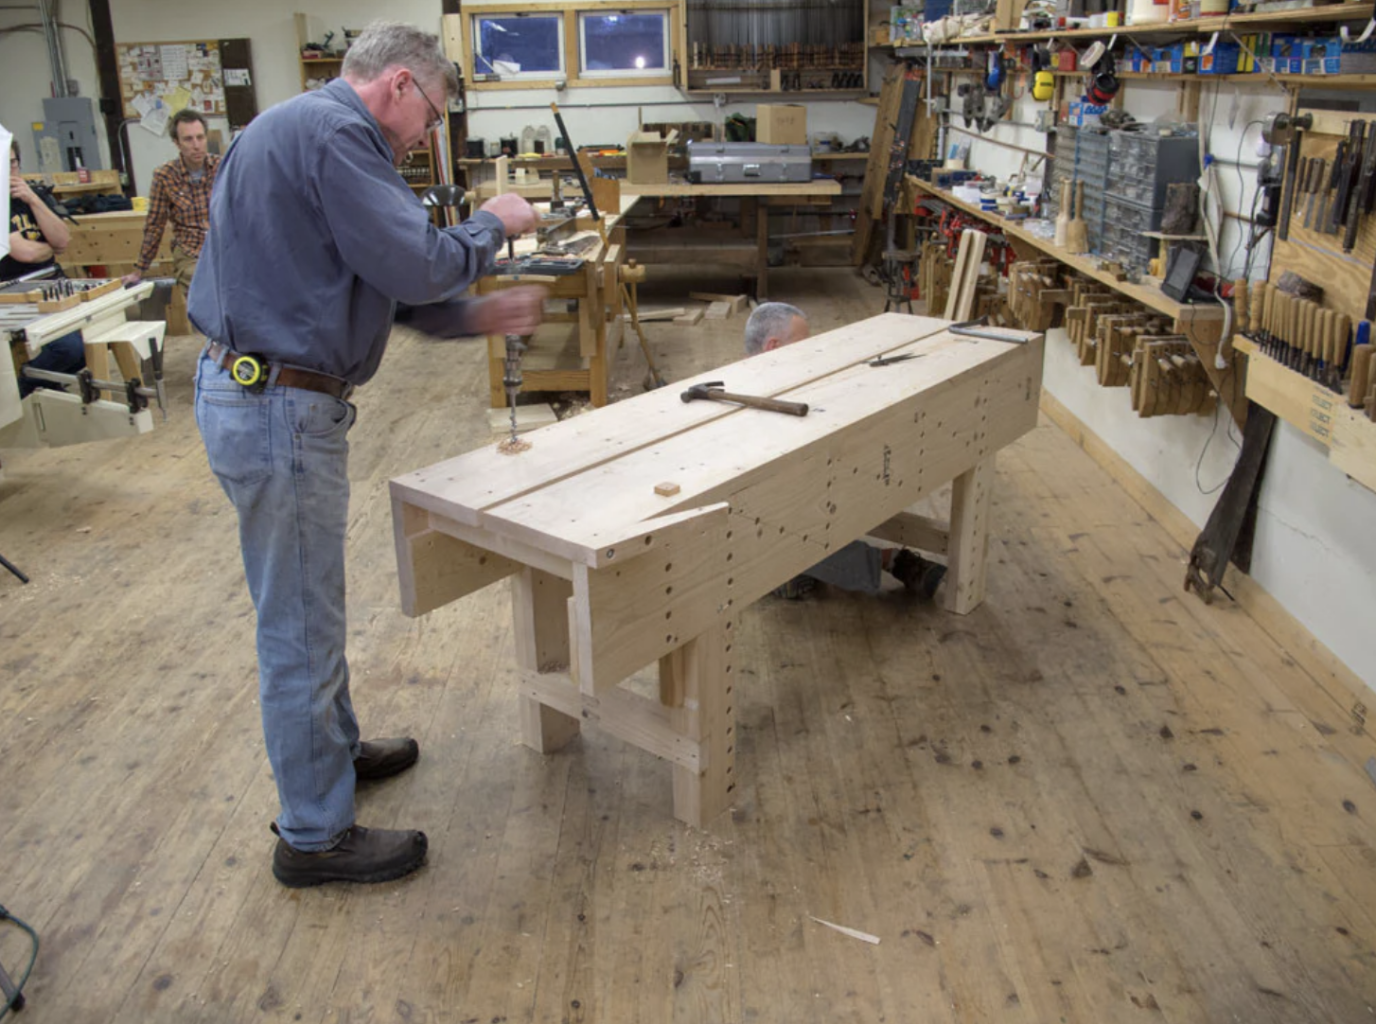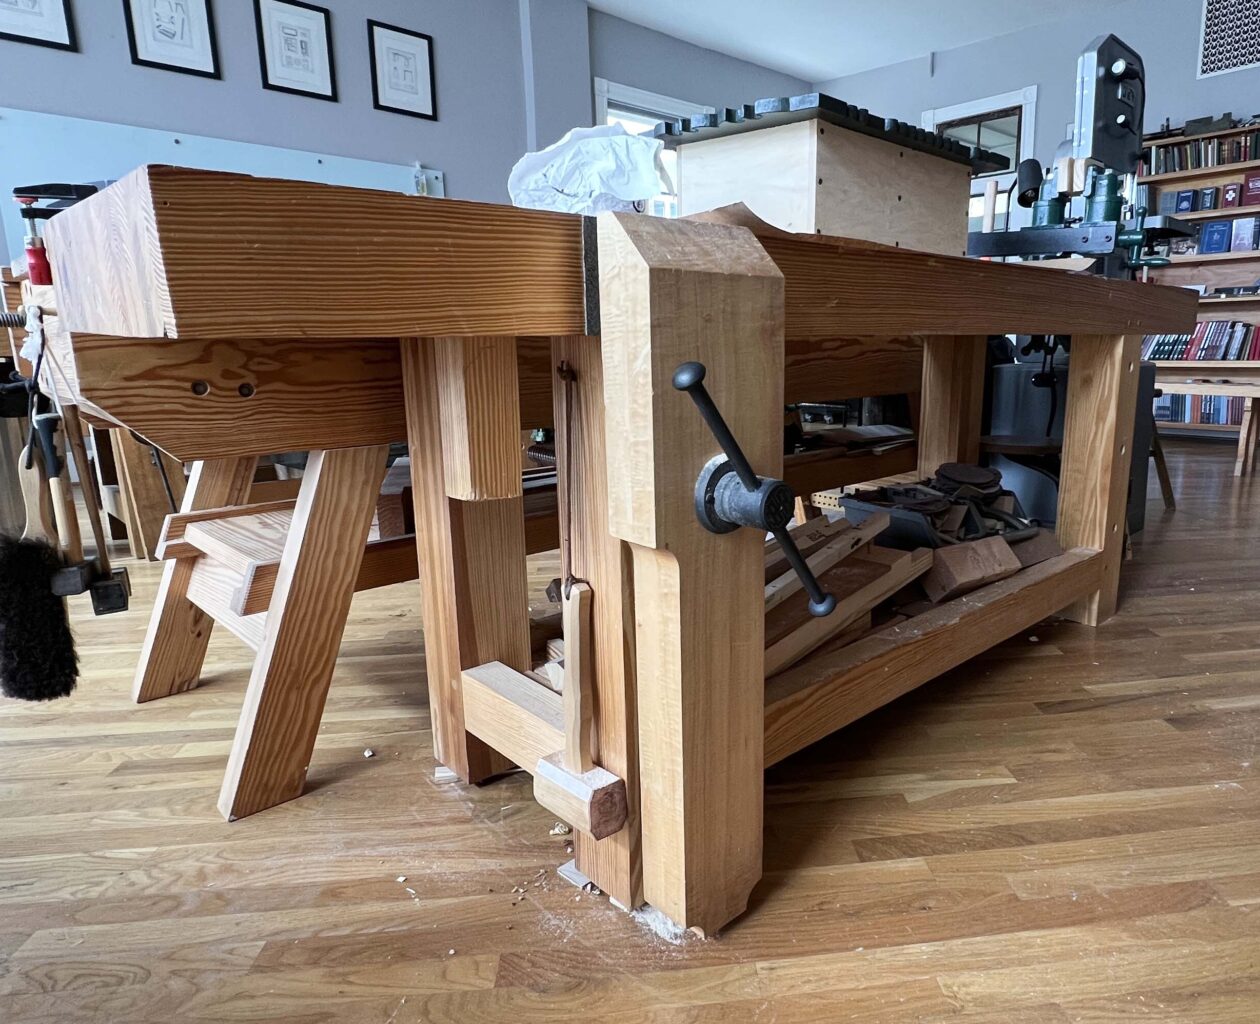
I don’t always build a chest alongside with my Anarchist’s Tool Chest classes – after all, I already have two full-size tool chests (one at the Lost Art Press shop and one at home), and there are only so many I can sell. But during my early December class, I decided to make one…partially at least. I always end up having to cede my bench and/or tools to students. Plus once the skirts are on, I spend a lot more time walking around than cutting my own joints. I’m terrified someone is going to send a flesh-cut flush-cut saw into a hand as they trim off protruding pins on the angled bits of the skirts. (The joints are cut before the bevel, so once the skirts are glued on, the “ears” get cut off.) I’ve cut into my own thenar eminence (that fleshy mound at the base of the thumb) more than once during this very operation. (I don’t mind my own blood, but I certainly don’t want to see student blood!)
So, I have sitting on my bench right now a glued-up carcase with the rest of the bits stacked on top. Once I finish the chest exterior (hopefully this week), we’re going to film kitting out the interior with what we consider the standard tills and racks:
• three dovetailed tills and their runners • hole-y rack for thin pointy tools (chisels, screwdrivers and the like) – both with and without a rack behind it for hanging backsaws • saw till on the floor for panel saws and longer handsaws • moulding plane cubby
We might also show installing the hardware…if time allows and if I can stomach being on screen for that much longer.
I expect we’ll have the video available sometime in February.
Also, I’ll have a full-sized ATC for sale soon-ish – shoot me an email if you’re interested. (I’m thinking of painting it blue.)
The following is excerpted from “The Essential Woodworker,” by Robert Wearing. In our opinion, “The Essential Woodworker” is one of the best books on hand-tool usage written in the post-Charles Hayward era. Wearing was classically trained in England as a woodworker and embraced both power and hand tools in his shop and in his teaching.
He begins with a table. As you read the chapter on building a table, Wearing connects the dots for the hand-tool user by showing how all the tools are used in concert to produce accurate work. It’s not just about sawing a tenon or planing an edge. Instead, it is about how to gather these skills and apply them to building furniture – tables, doors, carcases, dovetailed drawers, plinths, etc.
The book is filled with more than 500 hand-drawn illustrations by Wearing that explain every operation in a hand-tool shop. His illustrations are properly drafted, drawn in perspective and masterfully clear.
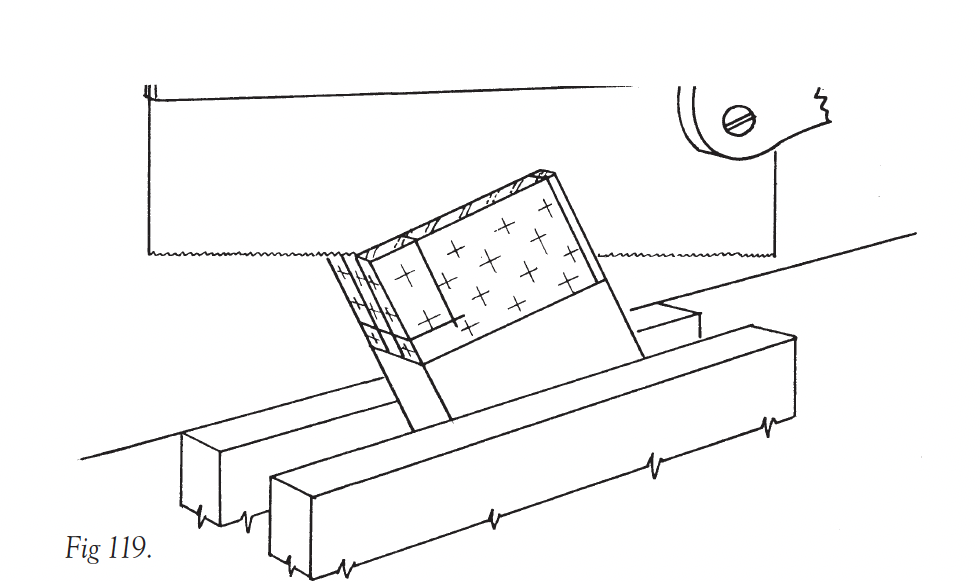
The accurate sawing of tenons (Fig 119) is a vital skill. They should be sawn with confidence and should fit from the saw. To saw clear of the lines, for safety, is not recommended since whittling an overthick tenon to size is both more difficult and less accurate than sawing correctly in the first place. A 250mm (10in.) tenon or backsaw is the most commonly used for this purpose. Frame saws are used in Europe and by some workers in the USA, but they have never been popular in Britain since the manufacture of good-quality backsaws, and beginners usually find them rather clumsy.
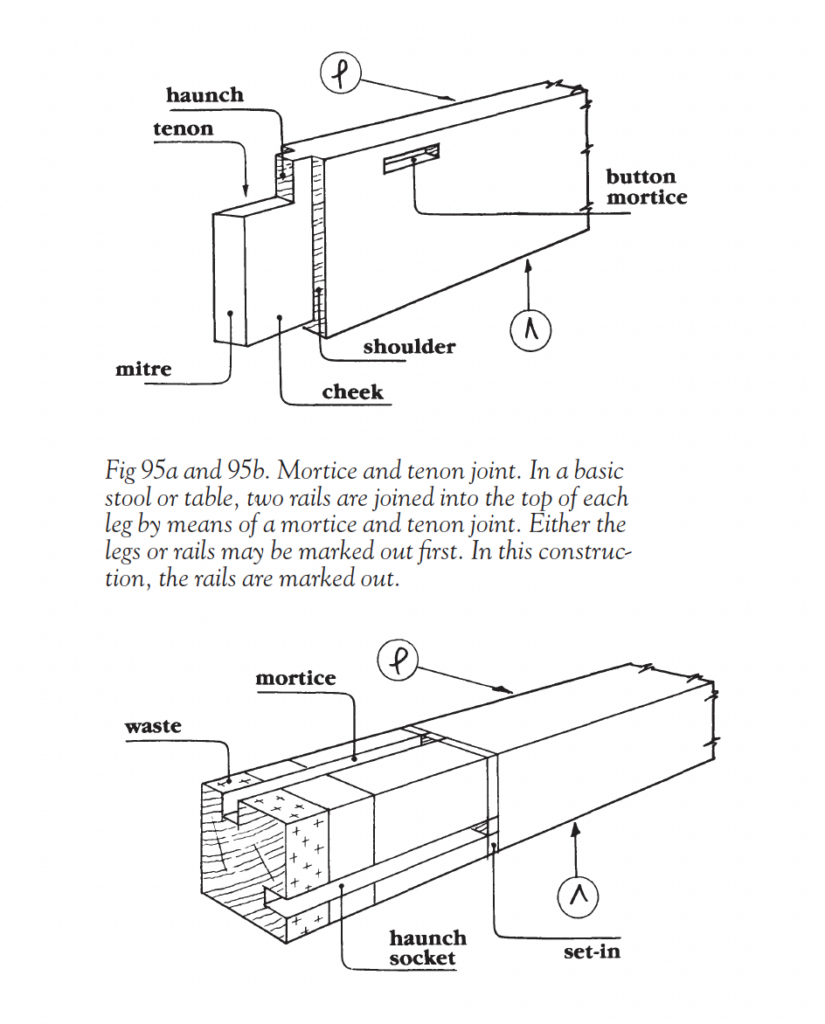
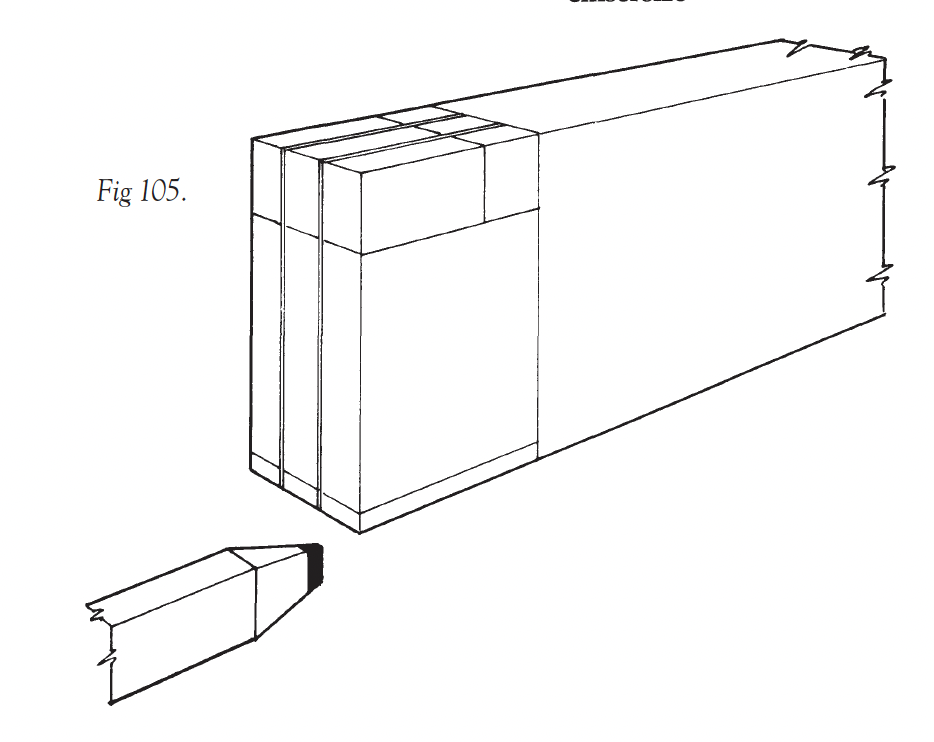
Before starting, check over the names of the parts on Fig 95 [top] and shade in the waste. While there is little chance of throwing away the wrong piece, it is essential that the sawdust should be removed from the waste and not from the tenon. That is, the ‘kerf’ (the sawcut) should be in the waste and just up to the line. Beginners using the thick pencil aid in Fig 105 [see bottom of post] should saw away one pencil line and leave the other intact. The technique is not difficult if the following guidelines are followed: do not saw down two gauge lines at a time; do not saw to a line which is out of sight. (A modification to the saw is described in Appendix B.)
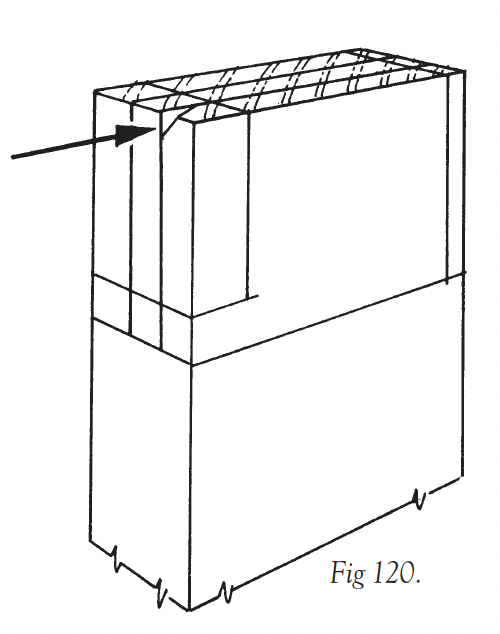
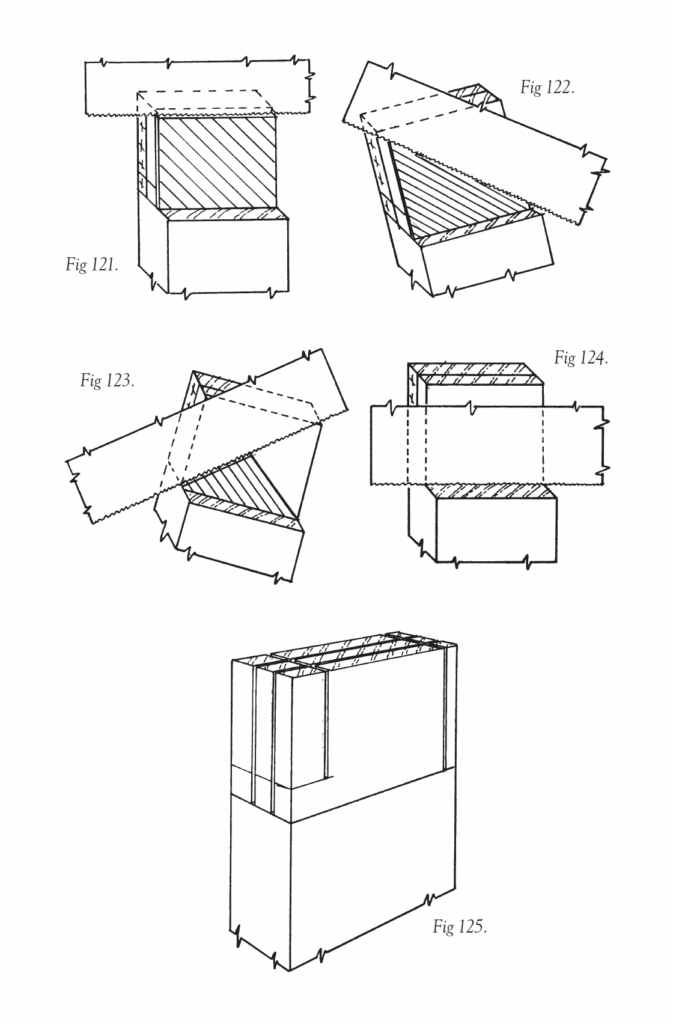
Start sawing always at the farther corner not the nearer one. Beginners may find it useful to chisel a triangular nick there to start the saw accurately (Fig 120). With the rail held vertically in the vice, start to saw at that far corner, slowly lowering the handle until a slot is cut about 3mm (1/8in.) deep (Fig 121). Now tilt the workpiece (Fig 122) and, keeping the saw in the slot, saw from corner to corner. Then turn the work round, or stand on the other side, and saw again from corner to corner, leaving an uncut triangle in the centre (Fig 123). Now grip the work vertically and, running down the two existing sawcuts, remove this last triangle, sawing down to the knife line, but no farther. Keep the saw horizontal (Fig 124).
If there is a set-in or haunch, saw this next. Repeat these stages on all the other tenons (Fig 125). The haunch may be sawn right off now or later.
Sawing the shoulder is most important as this is the piece left exposed. Except on wide rails, which may be planed, the shoulder should go up from the saw.
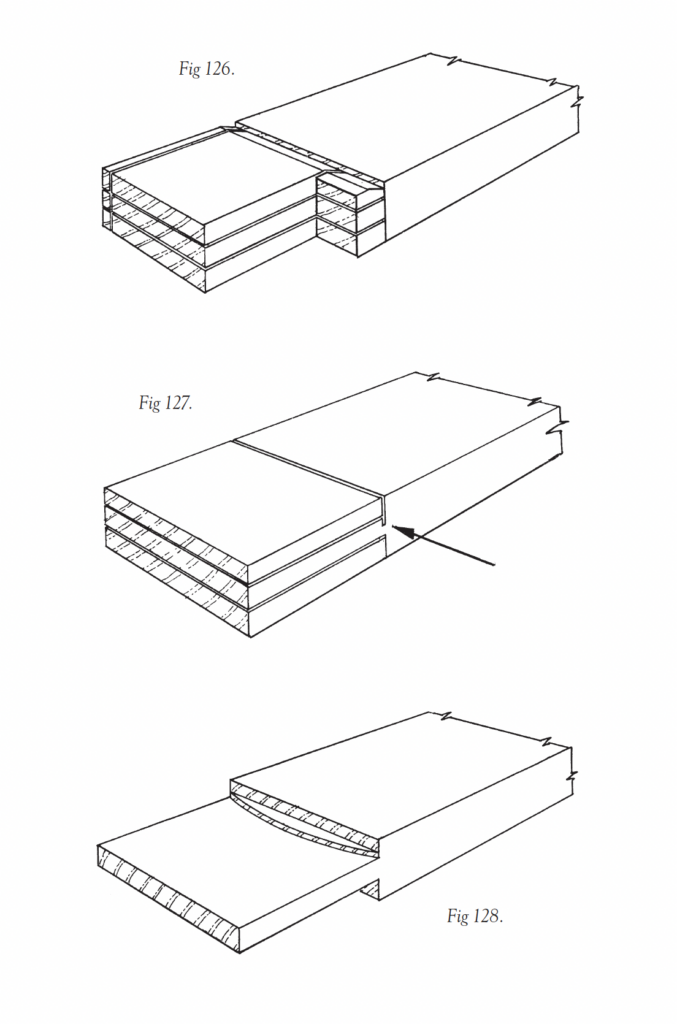
Cramp to the bench, deepen the knife cut and chisel a shallow groove (Fig 126). Lay a very sharp saw in the groove and draw it back a few times to make a kerf, then saw off the cheek. Take the greatest care not to saw into the tenon (Fig 127), which would then be severely weakened. Should the waste not fall off, the cheek has probably been sawn with an arc-like motion, leaving some waste in the centre (Fig 128). Do not saw the shoulder deeper. Prise off the waste with a chisel, then gently and carefully pare away the obstruction. Saw off the haunch if not sawn previously.
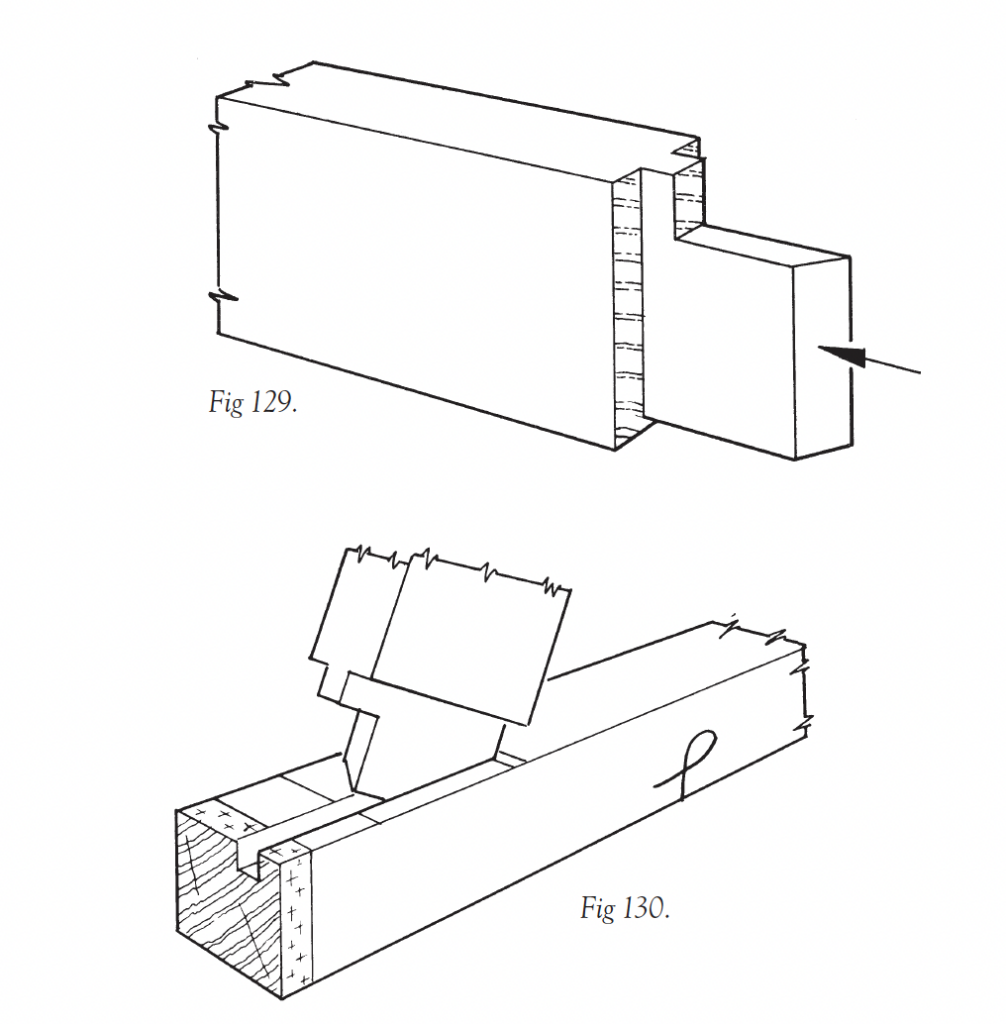
Saw off the set-in with a little to spare, and trim this back to the knife line with a chisel only just wider than the tenon size. This avoids damage to the corner of the shoulder. Finally saw the mitre (Fig 129). The tenons should be lettered or numbered to identify them with their mortices.
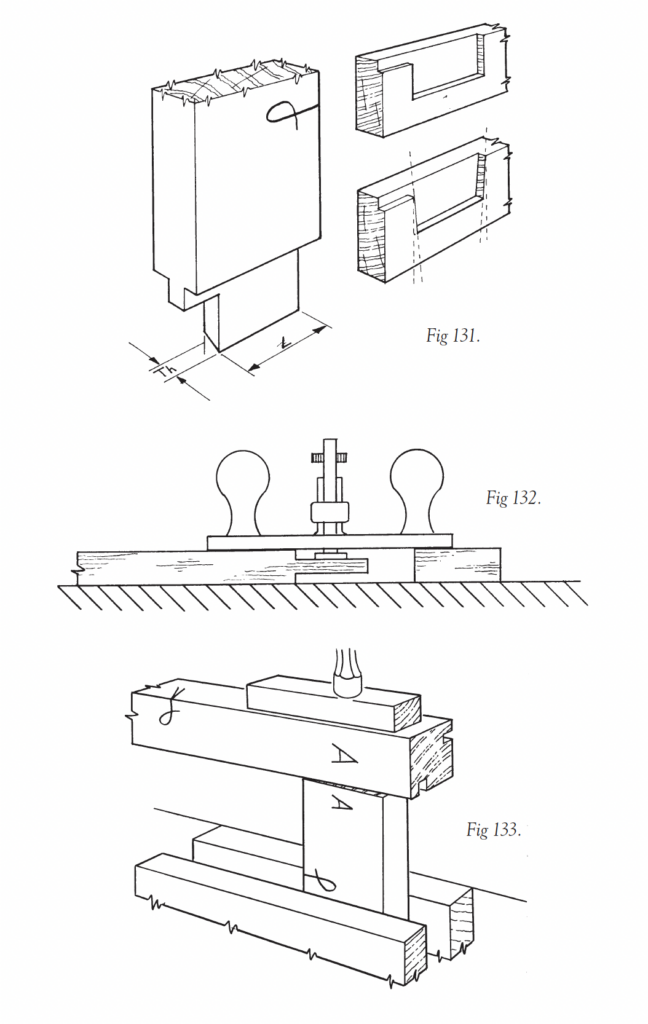
Make a preliminary fitting of the joints. The tenon may be too wide or too thick. Check for the latter by inserting it diagonally into the mortice (Fig 130). A tenon may be wrongly thought to be too thick when in fact it is too wide. It may have been sawn too wide or the mortice may have been chopped tapered (Fig 131), in which case trim it square. The most accurate way to correct an overthick tenon is to use a router plane, to the sole of which has been screwed an offcut of rail material (Fig 132).
Having checked that the tenon will enter the mortice, grip the rail in the vice and tap on the mortised member using a woodblock and hammer (Fig 133). The hammer face is small and makes it a more precise tool than the mallet. Check every joint in this way. If the shoulder does not close, either the tenon is too long or the haunch is too long, and either of these problems can easily be corrected. But a badly sawn shoulder can only be corrected by re-squaring and taking back with a shoulder plane.
Megan is finishing Matt Cianci’s book “Set & File: A Practical Guide to Saw Sharpening,” and I’m polishing “The American Peasant.” Both books will go to the printer within the month, and then we will turn to our next publishing projects.
Here’s what is coming up.
Megan is (still) working on her Dutch tool chest book, and she’ll also take the reins on Jim Tolpin and George Walker’s next book, “Good Eye.” Their early drafts have convinced me this will be their best book. For this book, George and Jim are deconstructing pieces of furniture to show their underlying patterns and language.
Also in the works: Kale and I just began filming a long-form video on building and using a Roman workbench.
And I will dive into the next issue of “The Stick Chair Journal.” I have been working on the second issue off and on, and I promise it will be out before the end of 2024. The delay on “The Stick Chair Journal” has not been due to a lack of enthusiasm. Quite the opposite. My list of stories for the second (and third) issues grows every week.
Mostly, I have been stalled by our 11-month-long restoration of the Anthe building, our new fulfillment center. Finally, work on the Anthe building is winding down. This week we’re repairing the basement stairs and waterproofing the second-floor doors over the loading dock. These little projects are much easier to tackle than say: pay for a new roof, sunlight, gutter and reconstruction of the rear masonry wall.
Aside from the Anthe building, one of the obstacles to the next issue of “The Stick Chair Journal” is which chair plan we will publish in issue two. I have seven designs I’ve been working on:
Comb-back with a plywood arm and comb Settle/Settee The Shortback Irish writing chair Peasant chair The Stout Lad chair (a chair for larger body types) Hobbit chair
I want to build them all. And given enough time, I will. Since writing “The Stick Chair Book” (a free download), I have been moving chair-by-chair to a particular chair form in my mind. The two chairs on my bench right now (shown above) are a significant step forward to that chair – both in form and the natural dye I’m cooking up.
Or maybe I’m just fooling myself and “that chair” will always be on the horizon.
We now have a dedicated page at our store for our popular pocket book series. You can reach it anytime under the Books menu in the store. You’ll also find other helpful collections of books there. Want to know what are our best selling books? It’s there. (We don’t control what is there – it is determined by sales numbers.)
Megan and I are planning out our next pocket books for the series. Here is a short list of ideas we have. If there are any that you really like (or hate) please let us know in the comments. Or if you have an idea for a topic, please share it. (Keep in mind these books have to be pretty narrow in scope. The pocket book of Universal Furniture Design would be impossible. Or horribly inadequate.)
By the end of this week (assuming no more disasters), we should have a clutch of our new Exeter-pattern Furniture-maker’s Hammers for sale, as well as – finally! – “Principles of Design” (we thought we’d have it in June, but we’ve been bedeviled by cover problems at the bindery).
“Principles of Design” is our title for a reprint of “Industrial Arts Design” by William H. Varnum. It was first published in 1916 to help train industrial arts instructors to teach design. The book deals with furniture, ceramics and metalwork. All three crafts are regulated by the same rules laid out by Varnum in absolutely crystal-clear detail.
If you’ve been building or studying furniture for a while, there are some of these rules you know by instinct but not by conscious thought. By laying out his simple principles, Varnum makes the basic design process rational and not regulated by the dark arts of inspiration or creativity.
In many ways, Varnum’s rules prepare you for creative leaps. Here, he says, are the rules established by hundreds of years of furniture making. You can work within this comfortable envelope, or you can deliberately step outside his guidelines.
His approach is compatible with George Walker and Jim Tolpin’s writings on design. In fact, many of their ideas from “By Hand & Eye” (such as whole-number ratios) integrate easily with Varnum.
So keep an eye out for those two new offerings later this week.
And keep an eye out in early November (barring printer delays) for my book, “Dutch Tool Chests.” It will be available directly from us (yes, we will have signed copies), and we hope from our retail partners (as always, it is up to them whether or not to carry a book). In the meantime, here’s a taste of what’s inside, excerpted from Chapter 5: Dados. Below is my favorite way to cut them, though I offer other options in the book, including some that – GASP! – use electricity.
– Fitz
Saw With a Fence My preferred way to cut a dado is with a crosscut saw, followed by a chisel and a router plane to clean things up. With just a little experience, it’s easy to nibble your way back on the layout line with a crosscut saw to cut a shallow kerf. Once the kerf spans the board, you can use that kerf to guide the tool as you saw more aggressively down to the baseline.
If this is your first dado, or if you’re not yet comfortable sawing to a line, you can use a fence to help guide you. (Again, one of the skids can come in handy for this purpose – or any other piece with a straight edge that is no longer than the width of the side; otherwise, your saw handle might run into it.)
Clamp the fence down along your layout line (clamping the workpiece down simultaneously), with the waste to the inside. And here is why I like a 0.5mm pencil: if you use a fat pencil, the range of where across the line’s width to clamp is too great. A 0.5mm pencil is the perfect size for covering about half the line, leaving just enough of it to show along the edge of the fence. (If you can’t see the line, how do you know you’re sawing the line?) Make sure to arrange the clamps or holdfasts so that they aren’t in the path of your saw. Or your knuckles.
Now grab your crosscut saw (backsaw or handsaw – it doesn’t matter much when you have a fence) and push the plate against the fence with a flat-sided block of wood held in your off-hand. If the block of wood is long enough, you can simply hold it in place to help keep the plate at 90° to the workpiece as you saw. With a shorter piece, it helps to move the block in tandem with the sawplate. Saw down to your baseline – and check to make sure you’ve hit it on the far side, too. Then lift the saw at a slight angle and make a few short cuts to deepen the center of the kerf. It’s possible you’re sawing below the baseline there … but more likely you’re removing waste in the middle that you missed. Either way, you’re making the waste easier to remove.
Do not move the fence. I repeat: Do NOT move the fence.
Grab your shelf board and match up the marriage marks on the shelf to the mark on the side piece. (Both should be on the front edge and facing up.)
Press the shelf to the fence – on the waste side of course – and pencil a mark at the front and back edge. If the board is rocking at all, press it tight at one edge and make the mark, then rock it to press tight at the other edge and make a mark.
Now you can remove the fence.
To cut the second dado wall, you’ll need to approach the work from the other side to keep your hands in the right place for ease of sawing. So if you can’t access your bench from both sides, turn the workpiece 180° before clamping the fence in place to the lines. As before, cover as much as possible of the lines, leaving just a hairsbreadth showing in the waste.
Double-check that the waste is to the inside of the fence, and that your clamps or holdfasts are far enough to the side so as not to impede your sawing. Now triple check. All good? OK – saw as before.
If you’re making a two-bay chest, go ahead and saw the walls of the second dado the same way. If you used the method above, I’ll bet after two cuts you’re already sick of that fence. And if you’ve made four cuts (for two dados), you’re definitely sick of that fence.
Saw Faster (No Fence) Now, you might be worried about messing things up without the training wheels of a fence – but if you’ve cut a dado or two, trust me: You’re ready to just saw. And (most) mistakes can be fixed.
Start with just the end of the saw – no more than an inch or two – on your layout line and take small bites as you work back along the line, blowing away the dust as you go so that you can see the line. Continue to gently nibble and blow for good results.
Once you’ve cut a shallow kerf across the entire board, drop the sawplate into the kerf and use it to guide the tool as you saw more aggressively down to the baseline. Do your best to keep the saw perpendicular to the work.
Once you become comfortable with that method, you can go faster still by starting the cut the same way as above, but lowering the saw into the kerf and taking longer and longer strokes to deepen the cut all the way across, using your first, nibbled kerf to guide you. (You’ll reach the baseline more quickly at the far side, so adjust your stroke as required to reach full depth all the way across.)
Note that sawing without a fence – and doing it aggressively – is easier with a backsaw because the back, or spine, help to keep the cut straight. But most backsaws have smaller teeth than a handsaw (a saw without a spine), so if you’re feeling both brave and in a hurry, grab a crosscut handsaw.
Now let’s say you started sawing without the training wheels. How, then, to mark the second wall of the dado? You could measure and mark, but that’s more likely to introduce error than simply holding the shelf in place on the waste side of the kerf, and marking at each edge of the board. Align the shelf so it just covers the full width of the kerf (you’ll be able to see it on the edge). Align it at the other side to make the mark there (just in case the shelf is not dead flat). Then use a pencil against a combination square to connect those lines.
Saw again – this time cheating just a hair toward the waste on the inside of your line. This will likely result in a dado that is too tight – but there’s a fast an easy “fix” that all but guarantees a nice, tight dado. I almost always shoot for too tight.
With all the kerfs cut on one side, you can show it to the other side and use a marking knife in the kerf to transfer the location to the interior of the second side (check those marriage marks!). If you marked the layout on both at the same time, check that your cuts on the first side match up to the lines on the second side. If not, erase the layout lines, transfer the new location and re-mark.
I prefer to put the two front edges together as I do the above, simply because that means the marriage marks are touching, and it’s easy to tell you have things facing the right way (at least, until you butt the boards together and can no longer see the marks).
Now saw the dado walls on the second side, same as before (or, if you used a fence on the first side, try it without now!).
Bash Out the Waste With the walls cut, we’re ready to remove the waste between them, down the baseline.
Grab the widest chisel you have that will fit between the dado walls. (A 3/4″ chisel is in theory the perfect size; in reality, you might need a narrower chisel. Especially if you cheated the cut toward the waste maybe a little too much.)
Hold the chisel flat to the work (bevel up), about halfway or a little farther down into the waste, and knock out as much as you can across the width. Repeat, this time just above the baseline. (You might be able to get it all out in one go, depending on the wood species, dado depth and your tolerance for fear.)
Flip the piece and work in from the other edge. You might be able to reach the middle with your chisel bevel up for all the work. But if you can’t, flip the chisel bevel down to remove the remaining waste in the middle. Bevel down is faster, but the tool wants to dive in more deeply in that orientation, so stay alert.
Get close to the baseline with the chisel. Or, finish the dado with chisel cuts if you like, taking small bites at full depth for a clean dado floor. But it’s easier to get a nice, smooth bottom by using a router plane. Use the baseline to set the router plane blade to the final dado depth. Make sure there are no chips under the plane’s sole, then simply zip out the remaining waste, working in from both sides so you don’t blowout as you exit the cut (blowout is never pretty).
Why not use the router plane to remove all the waste, lowering the blade with each pass? You can, but that’s a lot slower, and you miss out on mallet fun. Also, the router plane blade is more fussy to sharpen than a chisel – so I’d rather my chisel take the brunt of the waste removal.