Update: Comments are now closed. Join us again on Dec. 14.
If you have a woodworking question, post it in the comments below. Chris and I are holding Open Wire today between now and 5 p.m. Eastern and will do out best to answer everyone (in between finishing a chair and a tool chest – guess who’s doing which…).
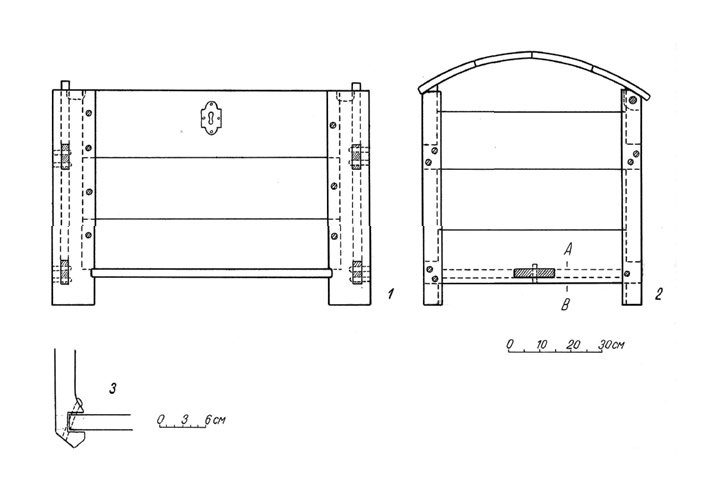
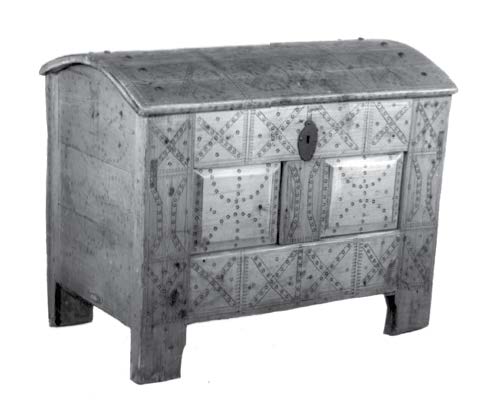
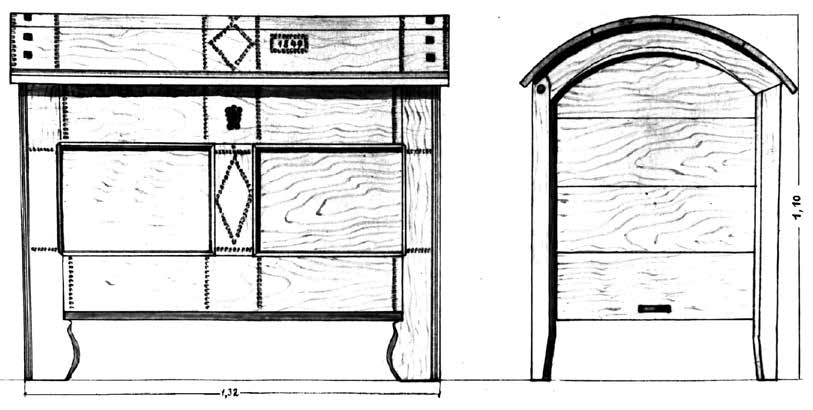
FIG. 221. Chest, dated 1724: 1. Front view; 2. Side view; 3. Transverse section A–B, Pilistvere, Kõo vald, ERM A 350:11.
The following is excerpted from “Woodworking in Estonia.”The author, Ants Viires, devoted his life to recording the hand-tool folkways of his country without a shred of romanticism. Viires combined personal interviews and direct observation of work habits with archaeological evidence and a thorough scouring of the literature in his country and surrounding nations.
If all this sounds like a dry treatise, it’s not. “Woodworking in Estonia” is an important piece of evidence in understanding how our ancestors worked wood and understood it more intimately than we do. Viires records in great detail everything from the superstitions surrounding the harvesting of wood (should you whistle in the forest?) to detailed descriptions of how the Estonians dried the wood, bent it, steamed it and even buried it in horse dung to shape it for their needs.
Viires covers, in detail, the hand tools used by the Estonian, including many that will be unfamiliar to moderns (a beehive turner?). He then discusses all the different products Estonians made for their own use and for sale in the markets, including bent-wood boxes, chairs, chests, tables, sleds, carriages, spinning wheels, spoons, tobacco pipes, bowls and beer tankards.
Of older products of woodwork, the coffin and chest merit special mention, since already in feudal times a variety of methods were being employed for joining their sides, legs and the lid.
Priidu Anise (b. 1854) from Kaarma makes the following interesting comments concerning coffin and chest production.27
“They were always made of spruce or pine, which was soft and smooth. Chests were made to order by the village carpenter from wood supplied by the customer. The boards were also provided by the peasant placing the order.
“There were some people who made the complete chest at home. But clothes chests were a carpenter’s job; it always had to be more accomplished and so it was. I used to charge a basket of rye for making a grain chest; for a clothes chest – one and a half baskets of rye. The wood was provided by the customer…. The trunk of the pine was split in two, and if it was a thick one, the halves were split in two again. Of these you could get two wide boards and two narrow ones, for lids…. Such boards were put on the block and the edges cut clean, first one then the other.…”
The split boards were left to dry for a couple of years, first on the bathhouse and, just before use, in a room near smoke. This kept them from warping. The dried boards were taken to the carpenter “who went over them with a plane.” If the boards were wide, two were enough for the side, or base, of the chest. “I planed the sides of the boards until they were even, knocked in the tenons, and joined them together. Once the sides and the bottom were thus assembled, I marked the legs and cut the grooves and the holes for them.” (In cutting the groove “the work was done with the gimlet, and a chisel was used for cleaning up.”)28
“Now I put the whole thing together, first the ends, then the base and the front and back.“ Then came the making of the joints, which had to be strong enough to hold up the chest.
“The joining proceeded thus: The board which went through the leg was cut into and a wedge made of spruce was driven in…. This was an old method. In my time they began to put in tenons and join it that way.29 A hole was cut across the tenon with a fine gimlet, and the joint was sealed with a peg made of oak.” (“The bottom of the chest was placed so that the board on the side was ridged, or grooved, and thus it was joined (see Fig. 221). In larger chests an additional cross-piece was inserted, which went through to both side boards. If large tenons – 4″ (10 cm) in size – were used, it was not necessary to apply a cross-piece.”
To secure the top “the two rear legs were made higher, and cut so that the top would be forced onto them. Here also, oak pins were used…. Oak pins were strong and kept the top in position. Two more pins about 2″ (5 cm) in size were placed, and then the top rested firmly.”
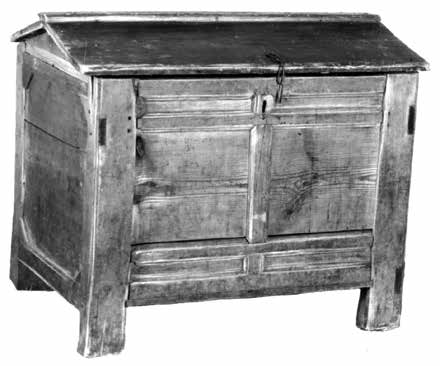
FIG. 222. Chest with gable-type lid, presumably made before the Northern War. Rõuge, Kasaritsa vald. Somi village, ERM A 101-40.
The last stage was the smoothing and cutting away of all protruding ends. “All were cut away, from the top and the legs, with a sharp knife and a small plane where necessary.”
Altogether the work was completed with a minimum of tools, available in every peasant household: “An axe, knife, chisel, gimlet and an occasional plane… the edges were cleaned with a draw knife.” For making clothes chests a curved chisel was needed, and a special plane for the mouldings. The moulding planes in Kaarma came into use in 1870.
“It was first seen in the tool shop of the estate carpenter.” But it must be assumed that carpenters used such planes already in the early part of the 19th century, or even previously, for chest making; the museums abound in exhibits with moulding on sides and legs, obviously made by moulding planes.
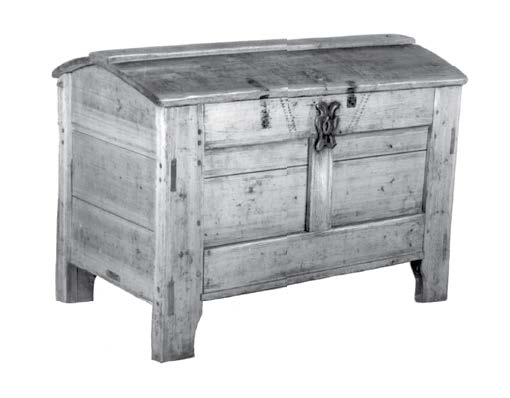
FIG. 223. Chest with curved lid. Tõstamaa, Seli vald. ERM 4933.
The above methods of chest making must be considered general for the whole of Estonia, since the same features are found in all chests in the country, beginning with the oldest known one (1724) as may by be seen clearly in Fig. 221.
Chests with pillars in the four corners were common in Mediterranean countries in ancient times, from where they made their way through the Balkans and Central Europe, reaching as far as Scandinavia in the north. In the northern countries chests of the model described above appeared already in the 12th century.30 In Sweden, farmers made their own grain and flour chests until modern times.31
In the Baltic countries pillared chests are not commonplace. Apart from Estonia they were known to some extent among the Votyaks, as in Livonia and northern Latvia (Vidzeme).32 In other parts of Latvia, as well as in Lithuania and Belarus, the board chest with a lid that could be locked was popular until well into the 19th century. Specially decorated chests were used for clothes.33 Only in Pskov, where there was a strong element of Baltic nationals, was a variety of chests to be found, including the Estonian type. It is not unlikely that the chests reached Pskov parallel with their development in Estonia in the 19th century. In other parts of Russia chests of a different structure (“sunduk”) dating to the 17th century were used.34
FIG. 224. Lid with ridge on the top. Tartu-Maarja, Väägvere village. ERM vv.-akt 234:1.
The term for the pillar-cornered chest is closely linked in all Baltic-Finnish languages (Estonian – “kirst;” Finnish, Votyak – “kirstu;” Karelian – “kirsto;” Izhorian – “kirštu;” Livonian – “kiršt”), and was carried over into Old Russian – “kersta;” Latvian – “šķirsts”).35
On the basis of the ancient terms and in the light of archaeological discoveries in Scandinavia, it may be assumed that the type of chest as described above was known in Estonia before the 13th century.
Our impression of the Estonian chest so far is somewhat incomplete. We have admittedly noted that the basic structure of chests in Estonia was fairly uniform throughout the country; however, certain distinctions in detail and outward appearance exist between various districts. The most significant differences concern the lid. In the 19th century the gable-type lid was most in use in southeastern Estonia (Fig. 222). This type was produced by the Haanja home industry until the trunk and commode made their appearance in the 1880s. This was also the case further south, in Vidzeme.36 Similarly, in Pskov and other Peipus areas, as well as further north among the Votyaks, it was equally popular. The origin of the kind of lid can be traced back to ancient sarcophagi, and it is therefore considered to be the oldest type of lid in Estonia.37
FIG. 225. Chest (bridal chest). Pöide. Ardla village, Drawing from Archives of State Committee for Building and Architecture.
Chests with a curved lid, which in central Europe were associated with the Gothic period, predominated in Estonia in the 19th century. They were already popular in the early 18th century (see Fig. 221).
Various methods were employed for the decoration of these lids, and chests generally, including poker work (Fig. 223). In eastern Estonia, e.g. in the former Tartumaa region, it was customary to cover the top of the lid with a narrow board forming a ridge in the center (Fig. 224). In Saaremaa and Hiiumaa the edges of the chest were covered with ornamented boards (Fig. 225), which is obviously a characteristic feature of Swedish origin.38 This meant that the cross-piece was also on the outside, while the chest construction on the mainland placed the cross-piece inside the chest. All these distinctions, however, are not confined only to certain territories, and the same features may be found anywhere in the country.
27 Description taken from KV 79, 108-121. The additions in the parentheses date from KT 71, 45 onwards. Both the descriptions have been noted down by A. Toomessalu.
28 There were also more specialized tools, such as the croze and the grooving planes, but only a few village carpenters had them (Cf. p. 68 and Fig. 51:2).
29 Actually, use of pins was typical even at the oldest coffins (see Fig. 221). They have already been used in the Swedish 12th century coffins (Svensson, Figs. 5, 19-20, 34–36).
30 Erixson, Möbelkultur, pp. 126–128; Shoultz, p. 6; Karlson p. 91 and the following.; Svensson, Figs. 1–5, 17–21, 31–38.
31 Erixon, Möbelkultur, p. 127.
32 LE, p. 931; data received concerning Vidzeme from L. Dumpe, a scholar of the LVM.
33 Bielenstein, p. 235 onward; Figs. 166–168; Бломквист, p. 424 onward. Fig. 116; data of V. Milius, a Lithuanian candidate of history.
34 Бломквист, p. 426 onward.
35 Kalima, Balttil. Lainasanat, p. 118; Toivonen, p. 200; Aben p. 206.
36 LVM, chests with gable-type lid 21246 (Valga County), 21246 and 21247 (unknown origin); also LVM archives, folder 2440 (chests from Cēsis County).
37 Põldmäe, pp. 42-44.
38 See Erixon, Möbelkultur, p. 127; Schoultz, p. 10 and Fig. 10.
After more than a year of struggling to get our inventory under control, we did a little rearranging of things in our warehouse and figured out that we have enough open floor space to build our storefront, editorial offices and a new tool assembly area.
We were shocked that our plan worked.
For the last month, we have been building out the storefront and offices on the first and second floors. It’s going quickly because we had done a lot of prep work during the agonizing first phase of repair and restoration.
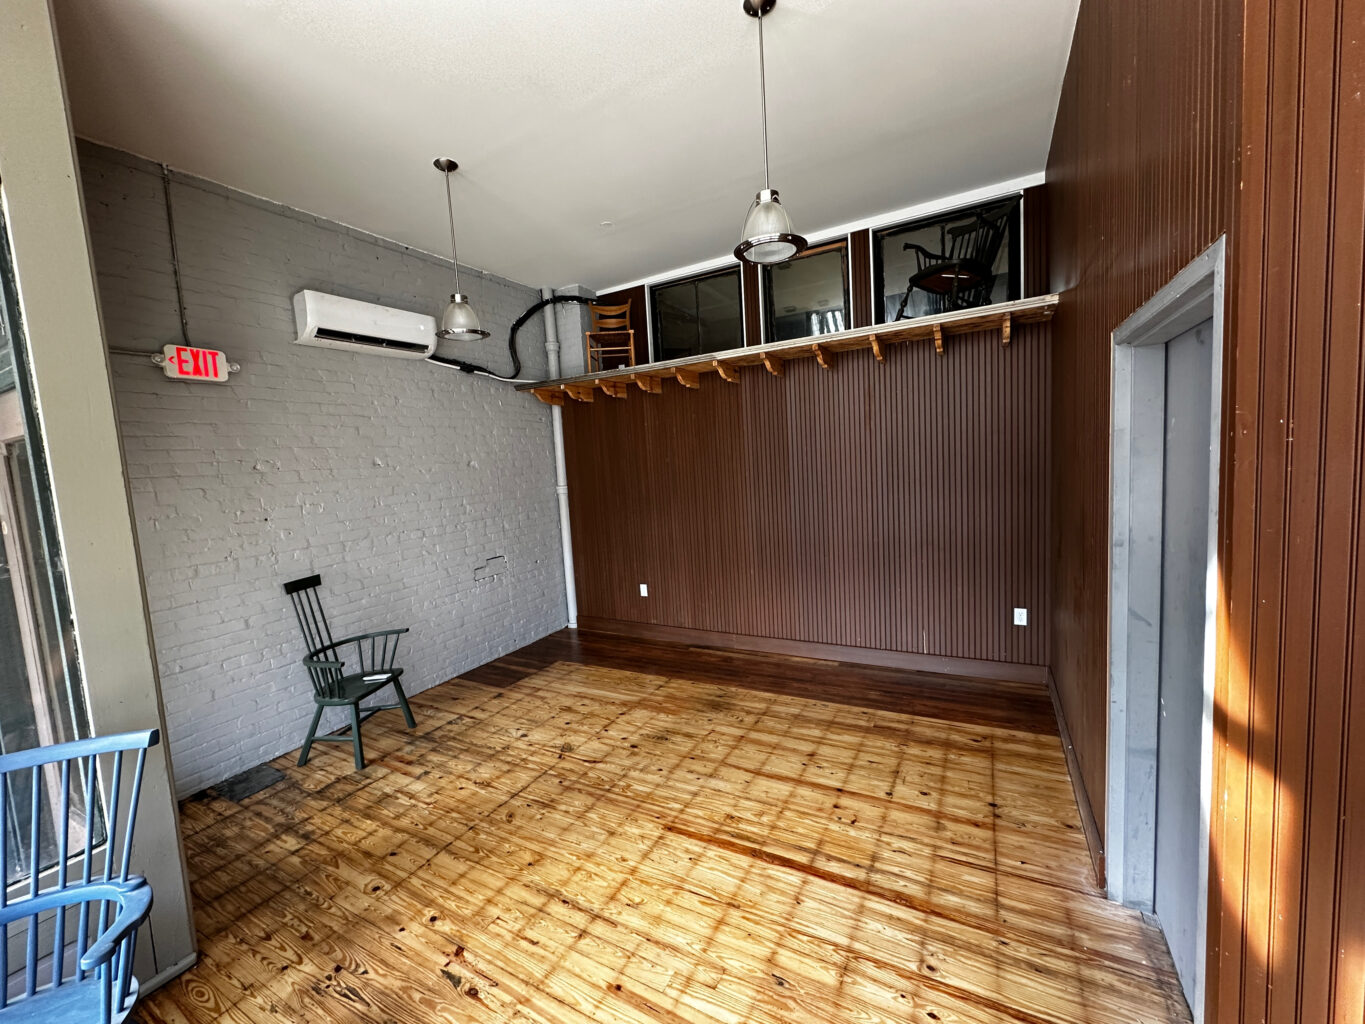
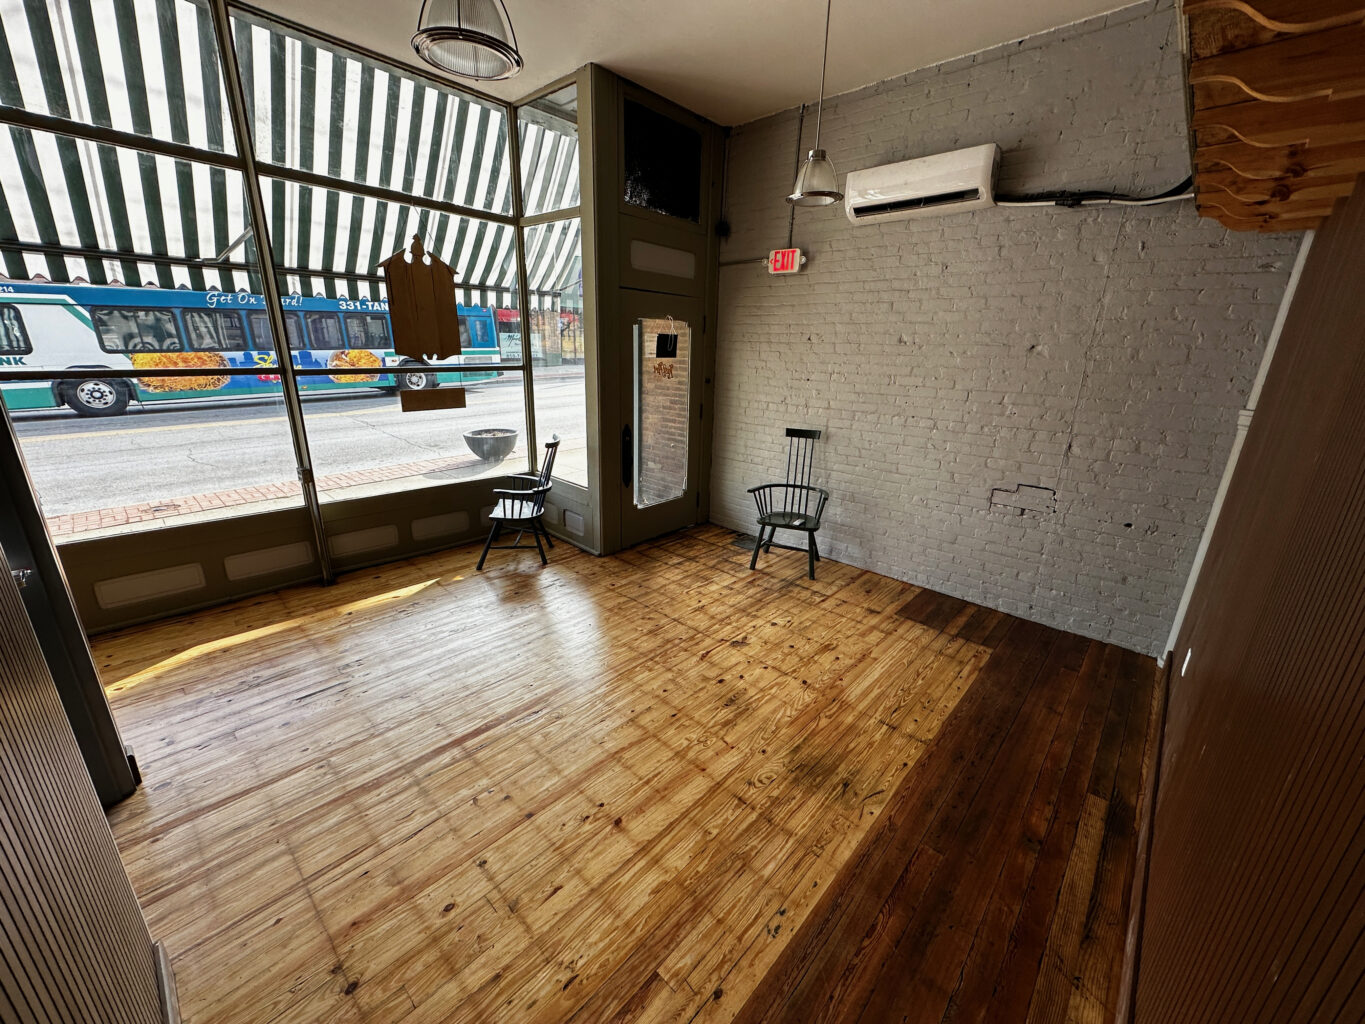
Our plan is to hold our Open Day on Nov. 23 at our current storefront at 837 Willard St. After that, we will move all our retail and editorial offices to the Anthe Building at 407 Madison Ave., about a half-mile away.
Here’s how that looks: We’ve finished building the walls in the storefront area at the Anthe Building, refinished the floor and have almost finished the interior painting.
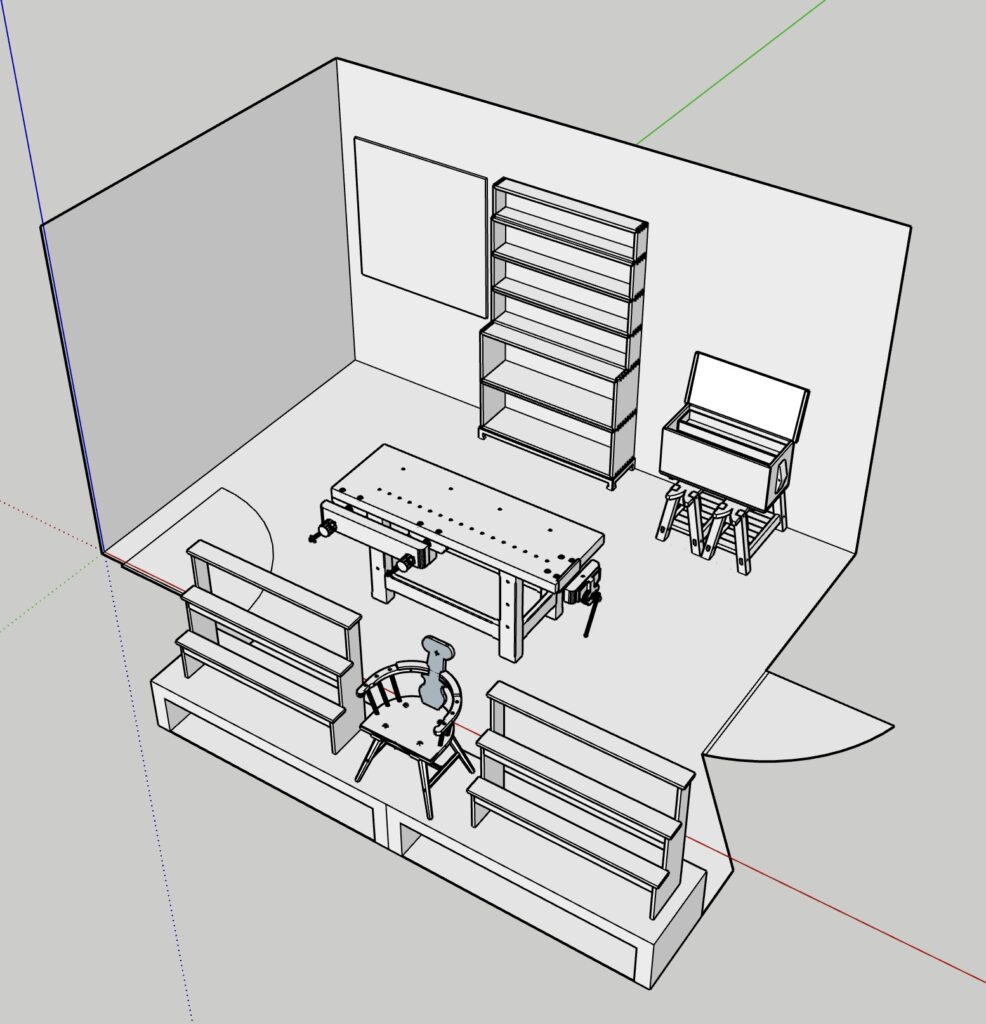
When we move our retail operation there, we will have all our books displayed on the Monticello bookcase. We are building a tool chest that will be used to display our tools. Our apparel will be pinned to a big corkboard on the wall. And a Holtzapffel workbench will be in the center of the room for demos and trying out the tools.
The front of the storefront will be built out like a 19th-century store. We’re building a platform at window height that will fill the enormous window bay that faces Madison Avenue. On top of that platform we will have two large stair-step risers (4’ wide x 3’ tall) that will allow us to display our books, tools and apparel to passers-by. Between the two risers, we’ll have space to show off a project. The risers and platform are all mobile, so we can easily rearrange things for a holiday display (get your elf hat on, Megan).
We are still working out where to display the blemished books and tools. That will come after we get the other fixtures in.
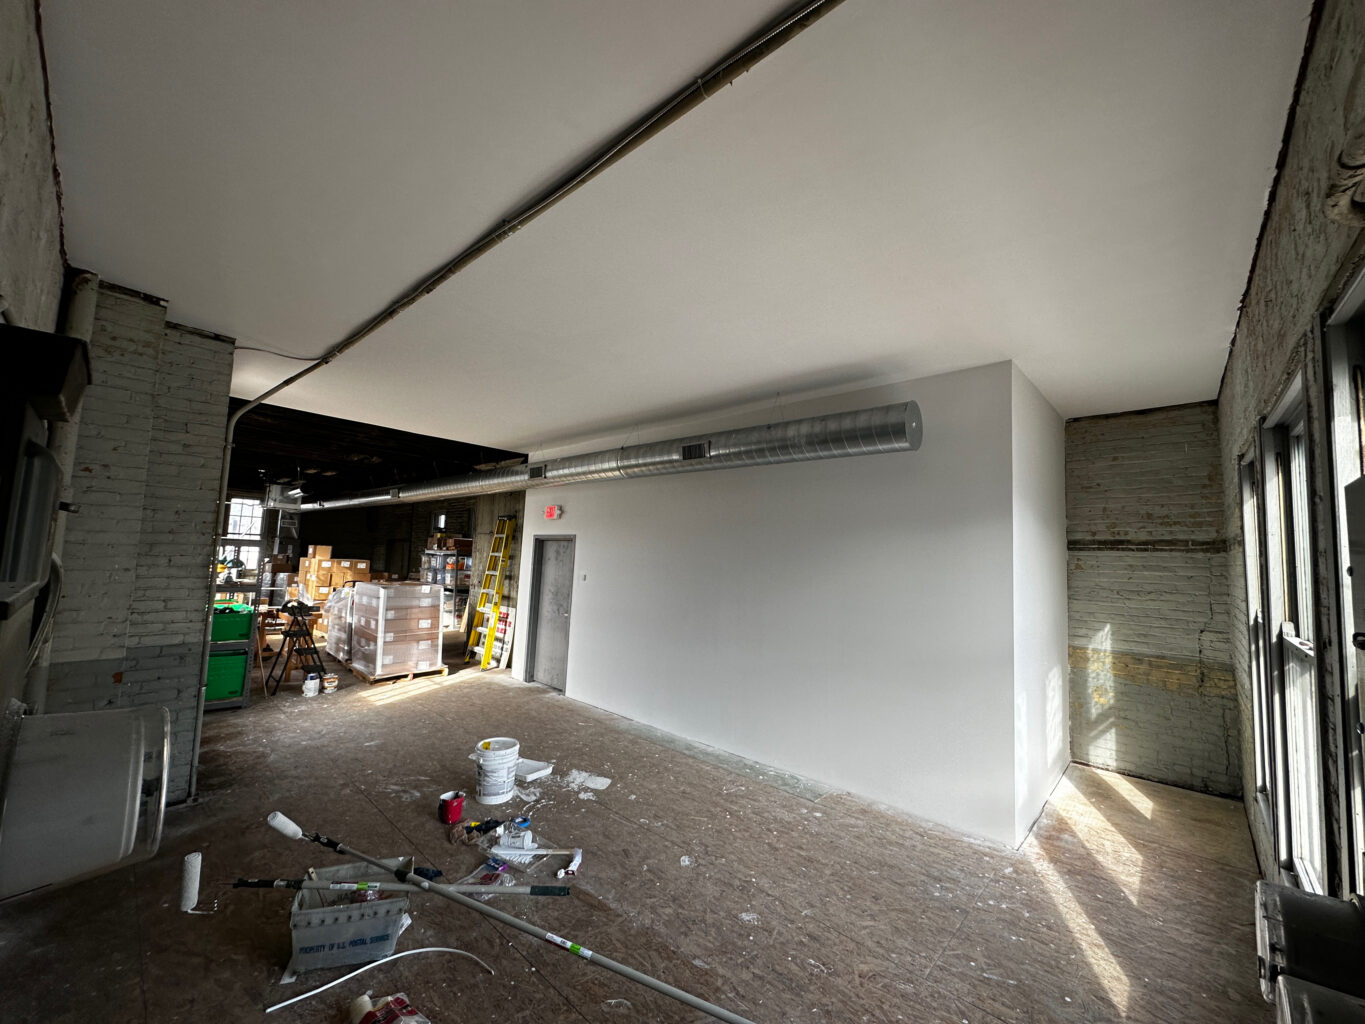
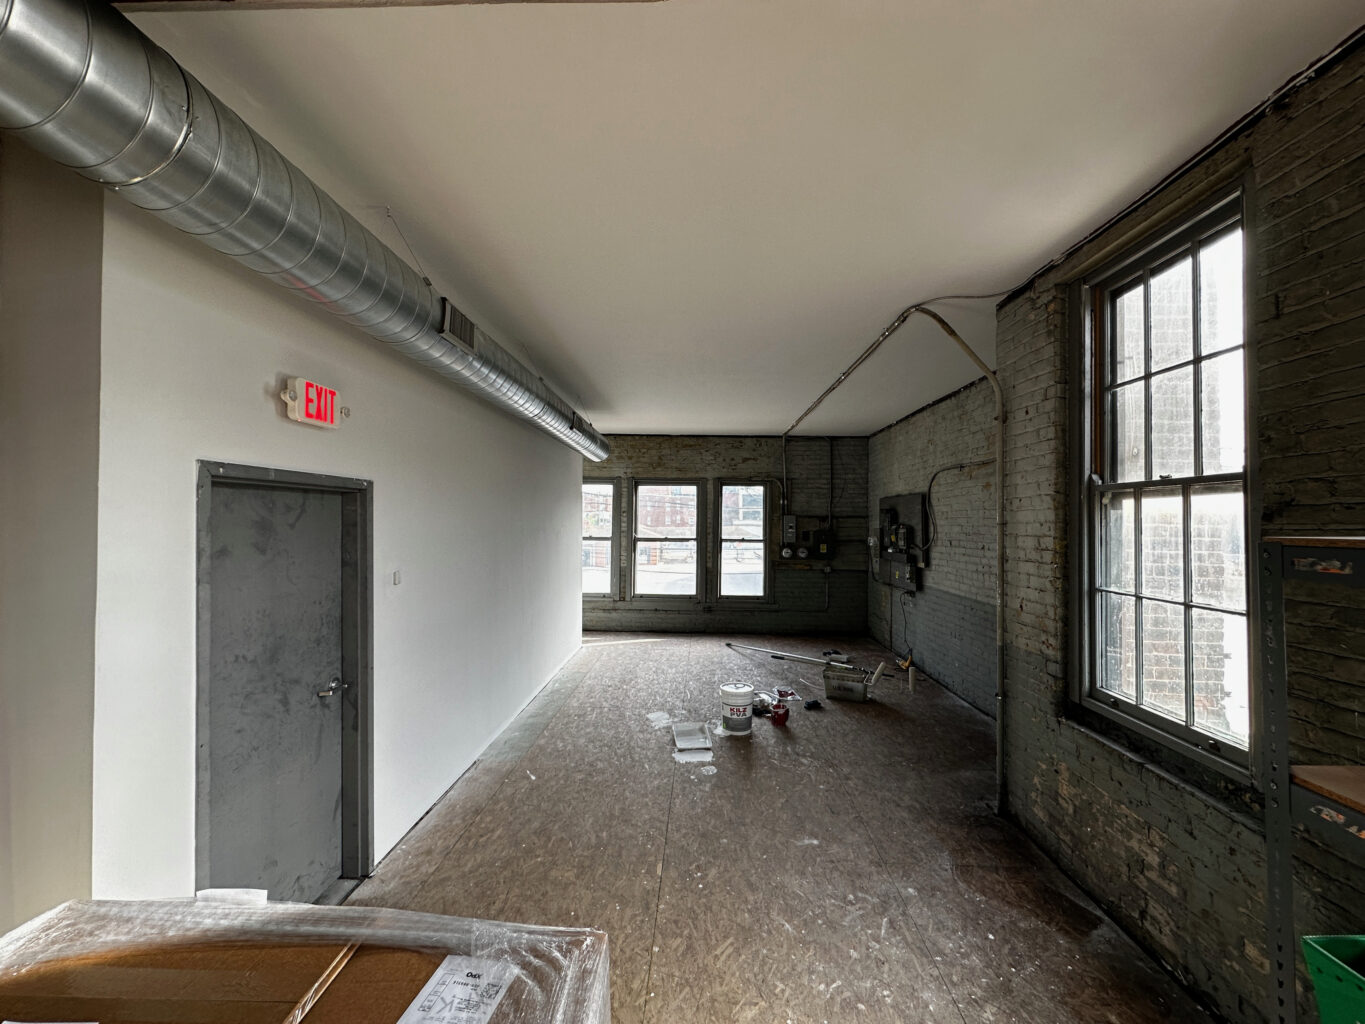
Offices
On the second floor we are building our offices and tool-assembly area. The walls of the front third of the building have been scrubbed to remove the old dirt and grease. The fireproof drywall (at the county’s order) has been mudded, sanded and primed. We have a heat pump system installed on the second floor. We just need a little paint, a little electrical and some yellow-pine flooring installed over the original old flooring (which is too delicate for us to use, but we are preserving it).
What About Willard Street?
As most of you know, Lucy and I live above the shop at Willard Street, so this will reduce the hustle and bustle below for us. The first floor will remain exactly as it is now – except for the fact there will be no retail sales there.
The bench room will remain the same and be used for classes. The mechanical library will be intact. And the kitchen and biergarten will remain the same for students and our employees to enjoy.
The machine room won’t change at all. All the machines are mine personally, anyway. So there’s no plan to move those.
Megan, Kale and I will work at both locations, depending on the day. I’m sure we’ll find a rhythm eventually.
And Then…
There is still tons of stuff to do at Anthe. We need to restore the exterior and make storm windows for the third-floor windows. And eventually we will have a break room on the third floor (or maybe the second floor) for employees.
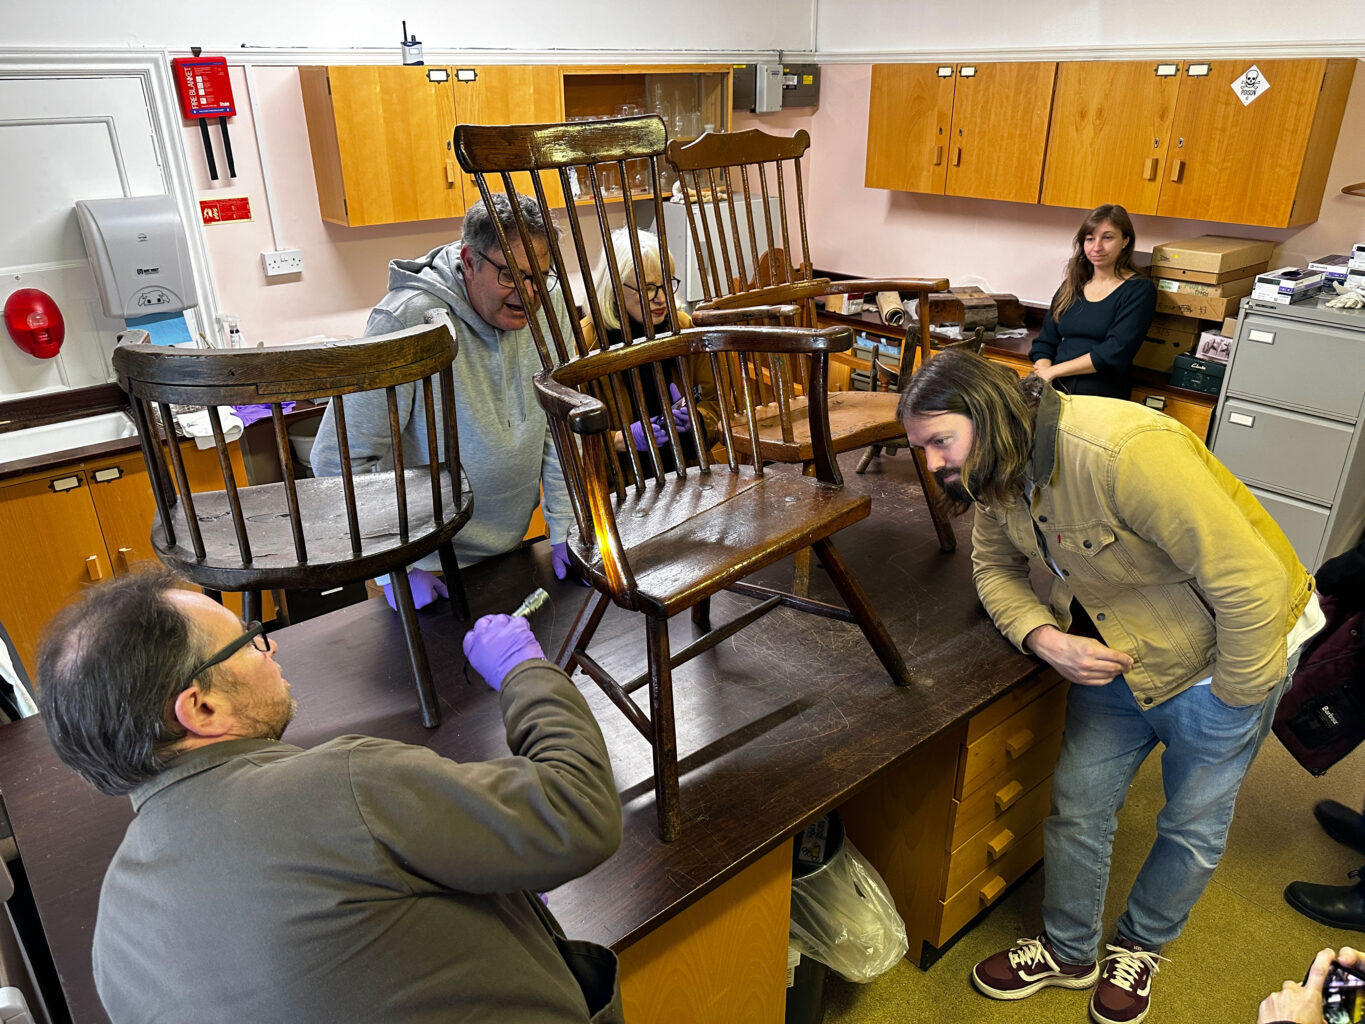
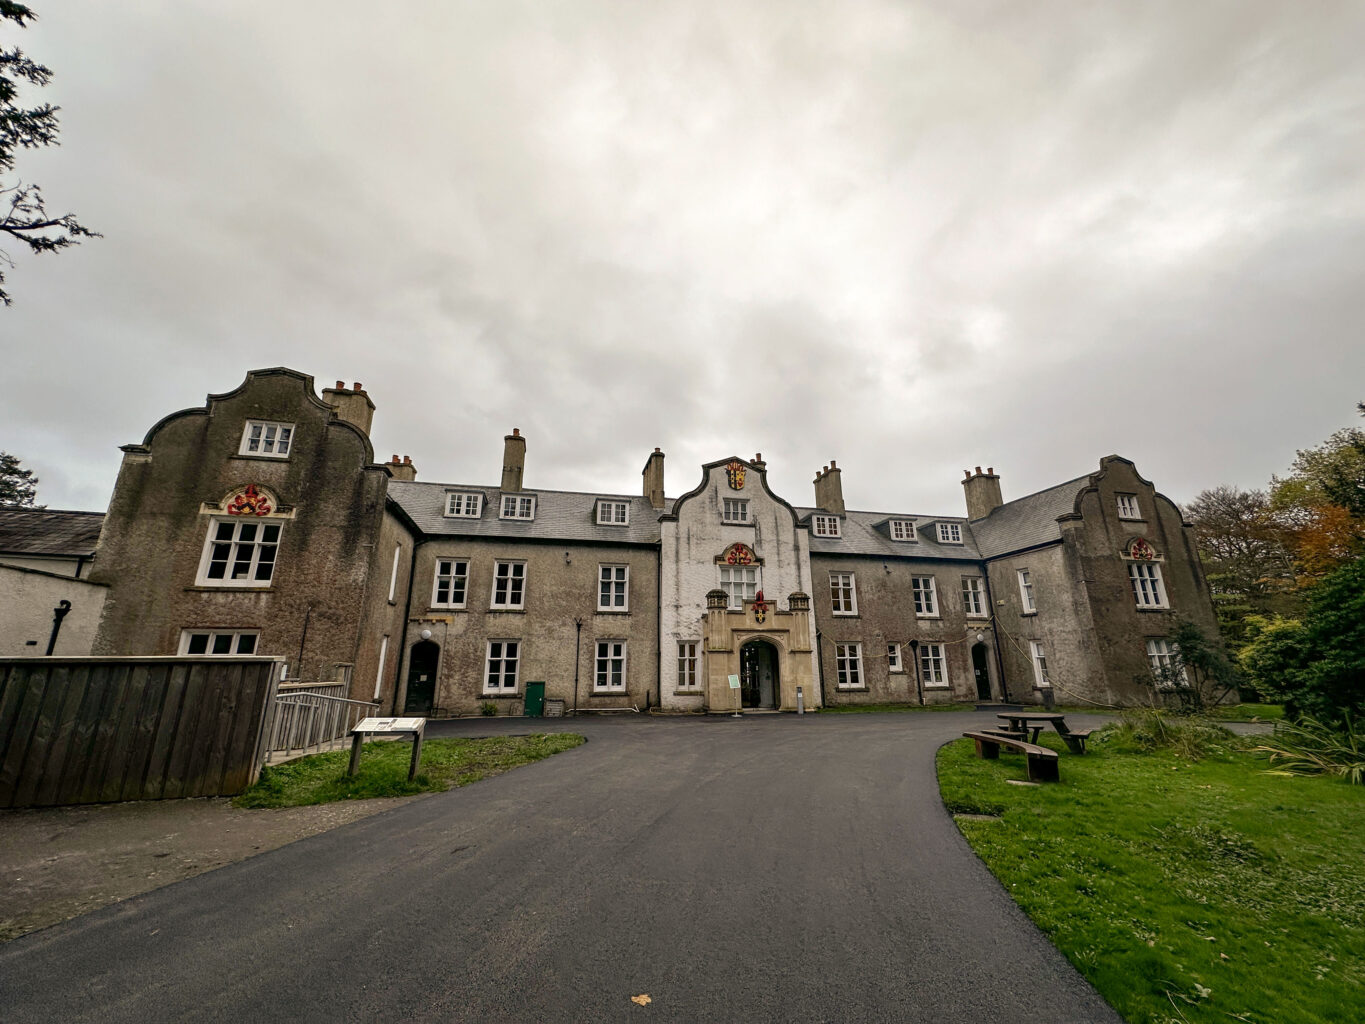
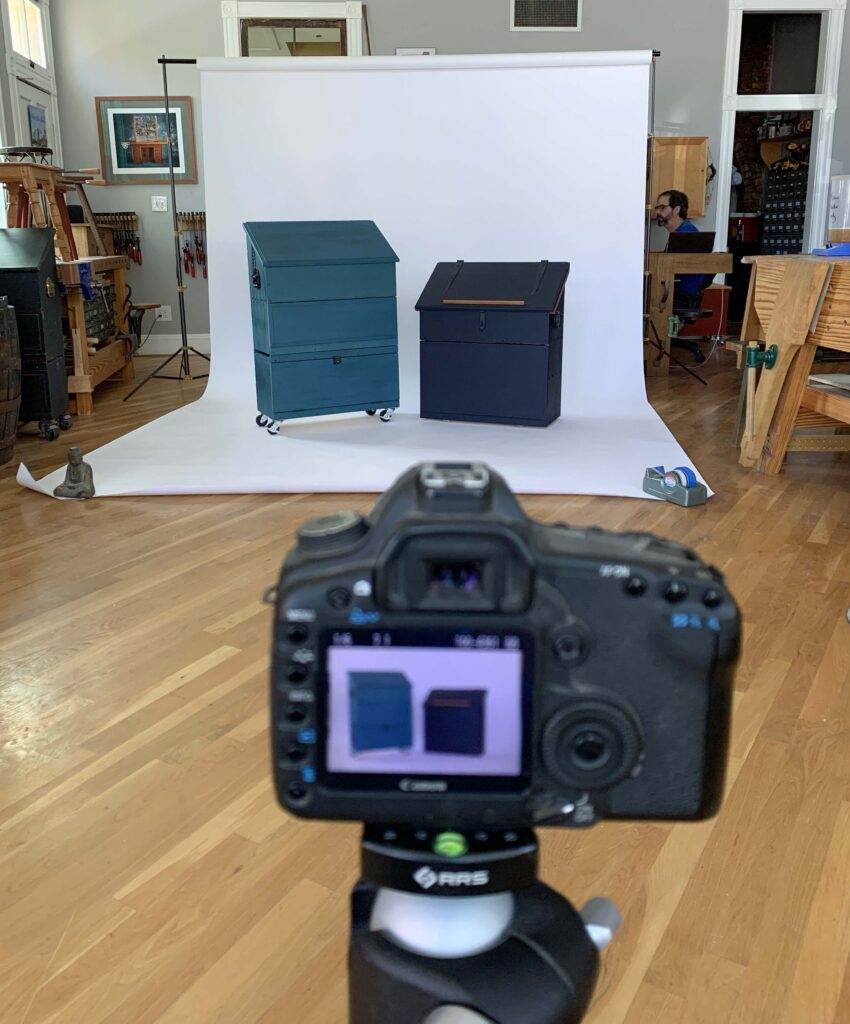
The curators (one is standing in the rear of the photo) were pleasantly bemused by us.
I love books, photos and drawings, but if you want to quickly learn a lot about making and designing chairs, there is one path: Study the suckers in person every chance you get. Up close and slowly.
Last week, Welsh chairmaker Chris Williams arranged for me and some friends to study four old stick chairs in the collection at the Carmarthenshire Museum. Only one of these chairs was currently on display, so it was a chance to see some chairs that aren’t in the public eye. In addition to Chris and me, we had Megan Fitzpatrick, Kale Vogt, Ryan Saunders plus Tim and Betsan Bowen of Tim Bowen Antiques. Lots of eyes, both fresh and old.
This entry is a close look at these four chairs, and some of what I learned from them. There’s no way this blog entry can replicate my in-person experience. But it’s cheaper than a trip to Wales. Note, I didn’t take measurements of these chairs, so don’t bother asking for them. For me, the proportions and angles are far more important than eighths of an inch.
The short sticks were the first thing we investigated.
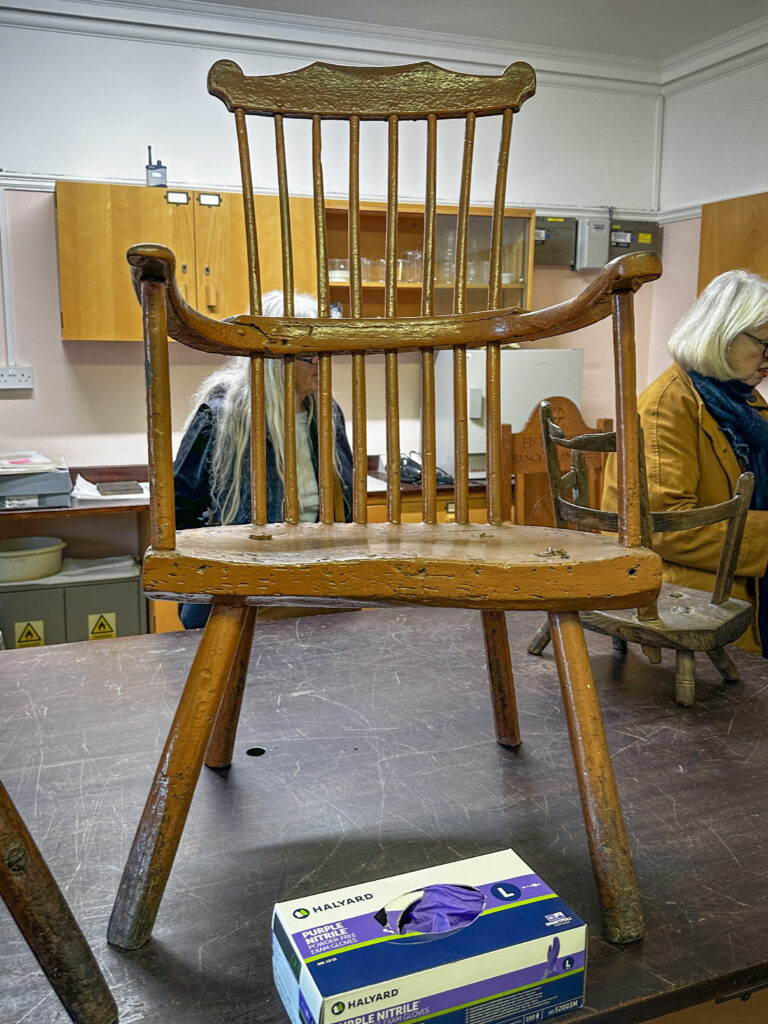
Brown Comb-back
This is a massive and well-proportioned chair that has a low stance and some curious details.
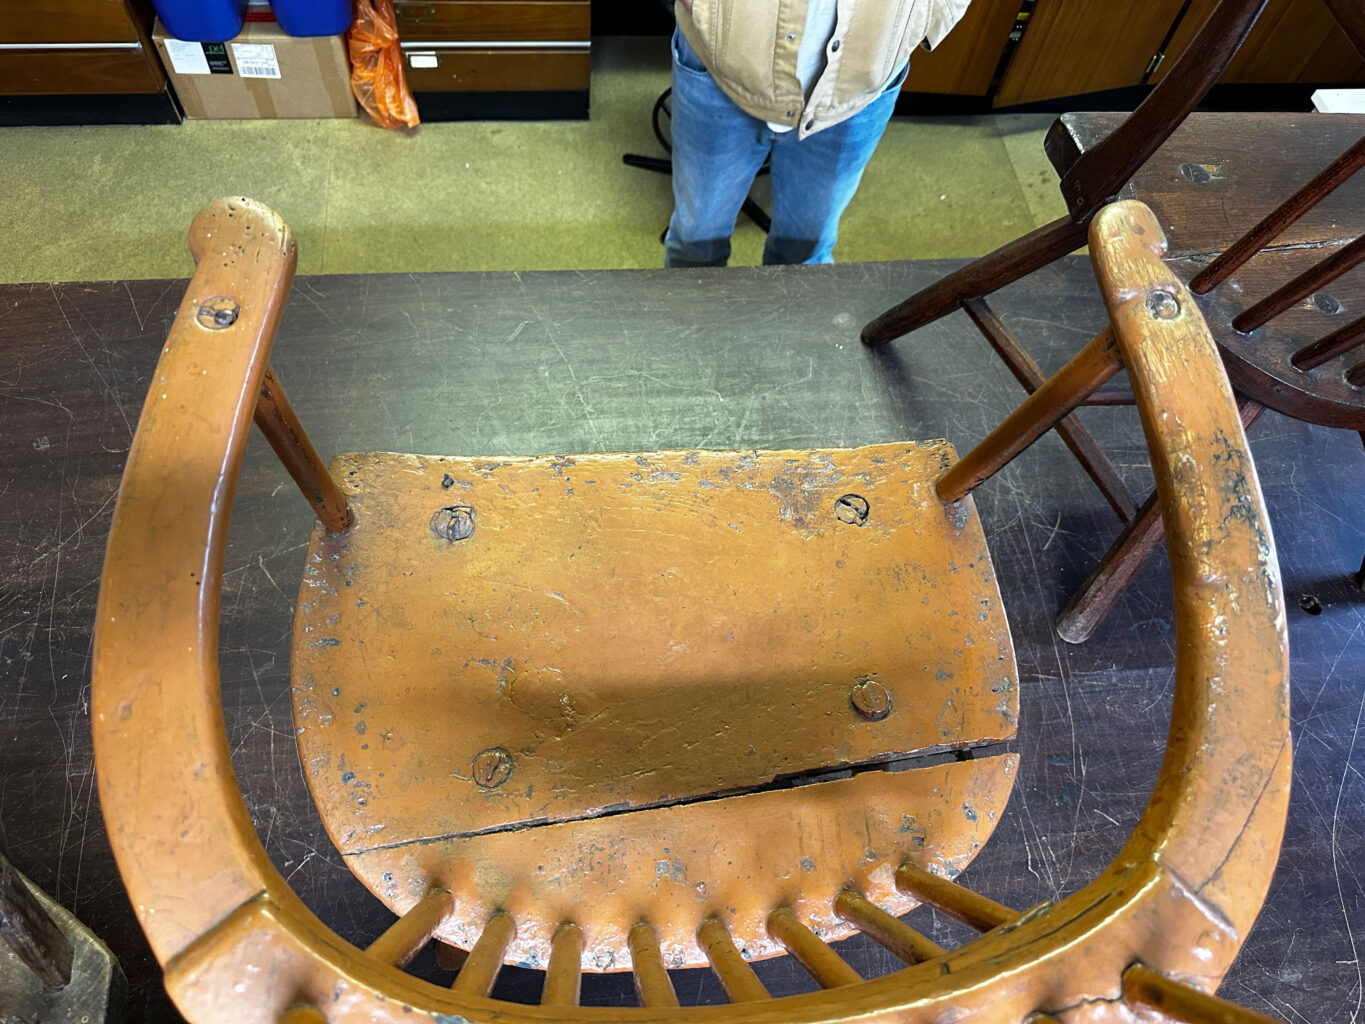
Let’s start with the obvious: it has only two short sticks holding up the armbow. That’s a rare configuration for a comb-back, so we immediately took a closer look. The thick brown-yellow paint (one of several colors) didn’t show any evidence of missing short sticks. But turning the chair over showed us the truth.
Though the underside of the arm was painted, raking light from a flashlight showed evidence of at least two more sticks that were missing under each arm. This was a relief in some ways, as the single stick under the hand was tempting me to try something stupid in a future chair.
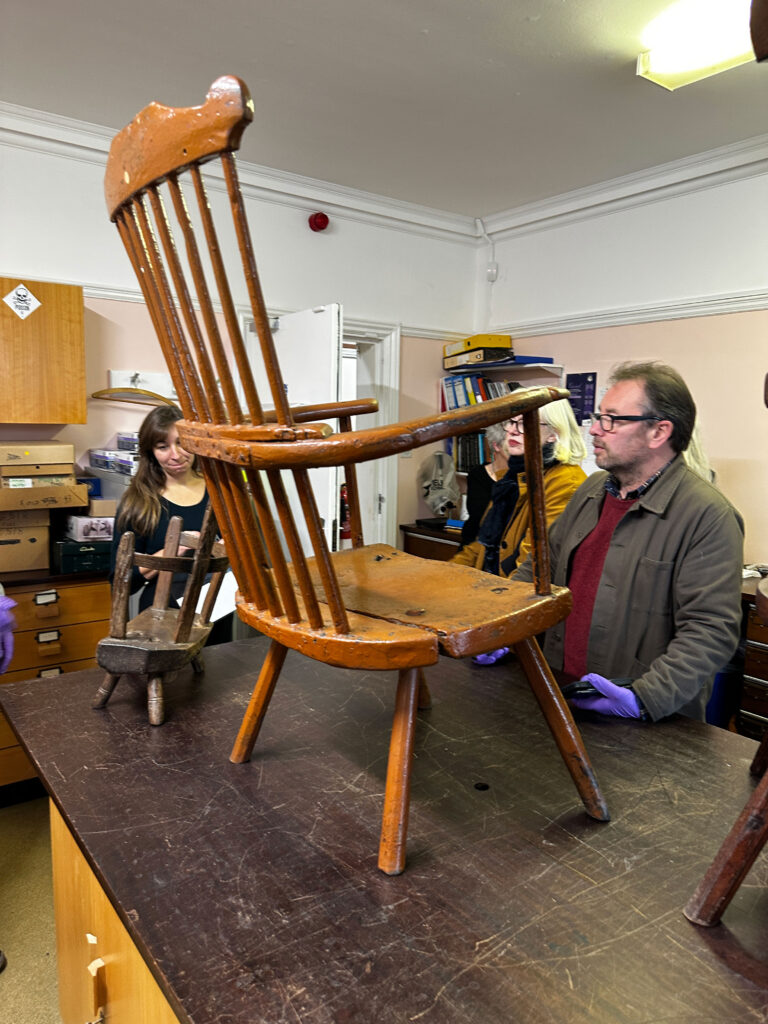
Here you can see how the seat and arm curve inward toward the front of the seat. Also, note the two different hand shapes.
Next, we looked at the seat. Despite what I’ve seen in the past, I’m always surprised by how thick the seats on these chairs can be. I’ve seen them as thick as 3”. This one is a full 2” thick, with a generous bevel on the front of the chair that lightens the visual load (the “vertically striped shirt” of the chair world).
The seat looked like a typical D-shaped seat until we took a look from the rear of the chair. The sections of a D-shaped seat that are usually straight weren’t straight. They curved in toward the front edge of the seat.
When we looked at the shape of the armbow, this made sense. The armbow also curved inward toward the front of the chair. Many Welsh chairs begin with an arm shape, with the seat shape flowing from that. Perhaps the arm was made from a curved branch. Perhaps not. The paint wasn’t telling.
Other interesting details: The hands of the arm were not identical. This happens more than you might think. I don’t think the builder intentionally made two separate hands. I suspect that the hand shapes were determined by the wood itself, its defects or voids.
Note the repair on the arm – a common feature on these chairs and nothing to be ashamed of.
The legs were shaved round – you could still feel the facets.
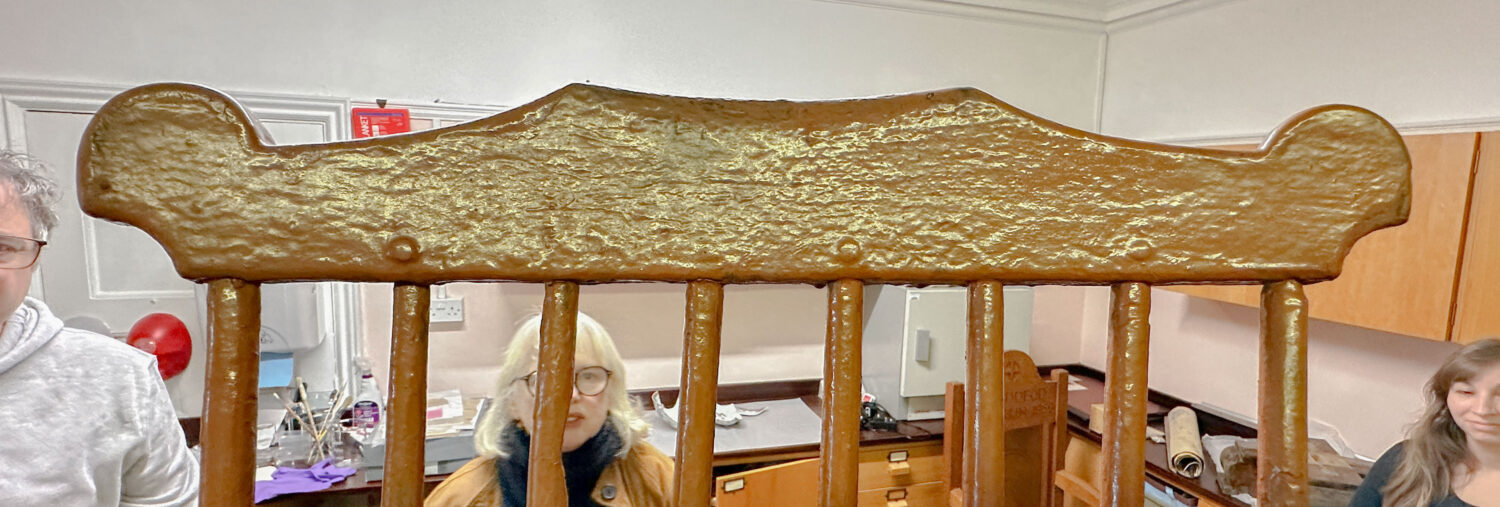
A straight-on shot of the comb (you’re welcome).
My favorite part of this chair is the playful comb. Its basic shape is common: two Mickey Mouse-like ears on the ends with a raised area between them. But the chair’s builder went further. The ends have a delightful cove on the underside. And the top of the comb has a nice convex curve. The whole thing looks like a crown.
Despite the bark on the front seat, this is a well-considered chair.
Lowback
This tidy lowback has some secrets, some of which we were able to suss out.
First, look at the front edge of the seat. Yup, that’s bark. Wide boards have always been difficult to come by, so they didn’t waste any width on this one.
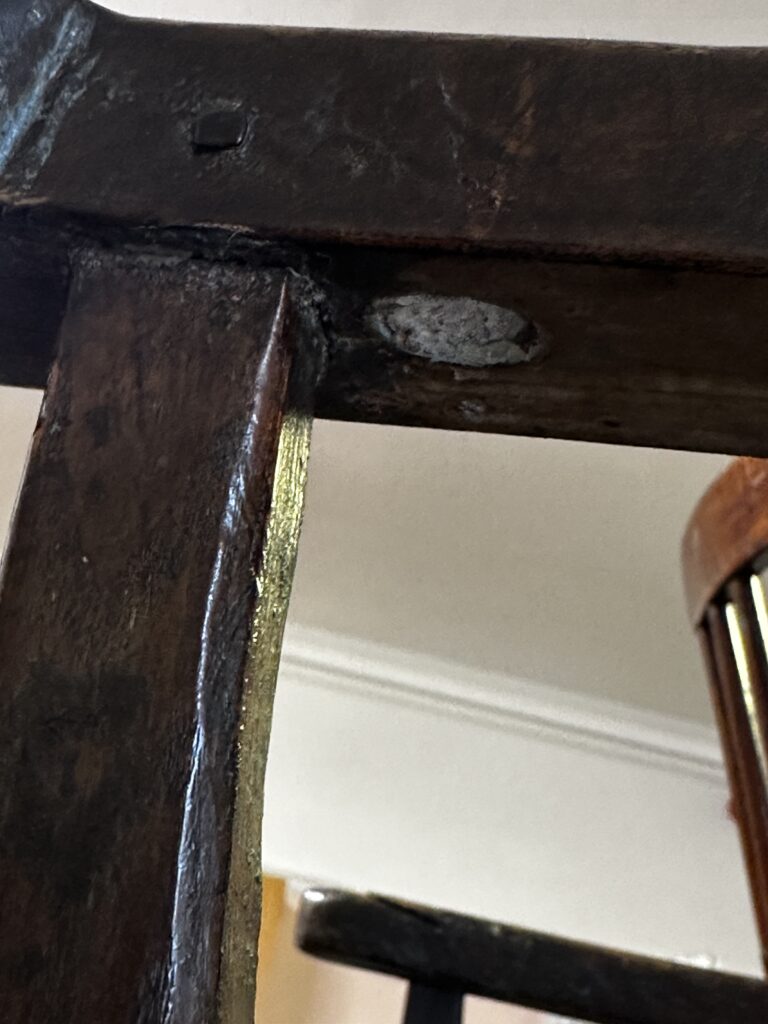
Evidence of a replaced stick.
The front posts were curious. They looked more English or West Country to my eye. They were joined to the chair with square mortise-and-tenon joints, while the rest of the joints in the chair were cylindrical. A close look under the arm showed us the shadow of a round mortise behind the square front posts. Likely the front posts are a replacement.
Also curious: None of the tenons for the short sticks poke through the armbow. They’re all blind. This feature is isn’t unique to this chair. It got me thinking how the mortises were drilled when the chair was built.
All the mortises through the seat were through-mortises – not blind. I think there’s a chance that some of the mortises were drilled from below the seat and then directly into the arm. The sticks all seem to lean back the same amount. So, it’s possible. Who knows?
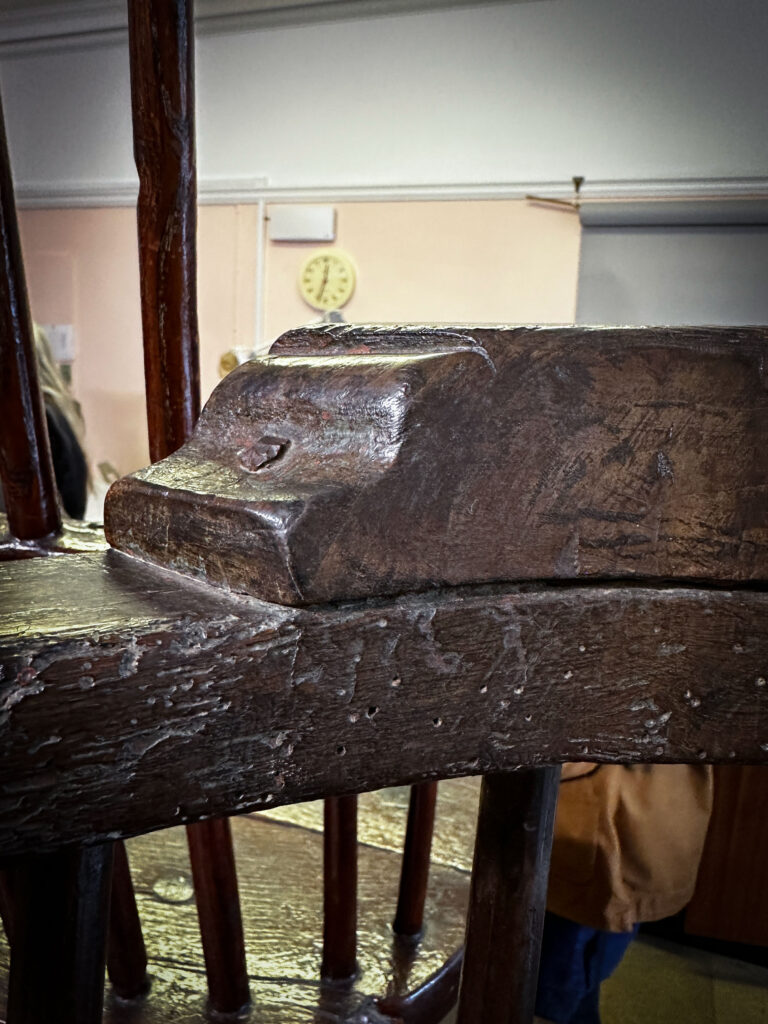
Nice shoe. Some would call this a “swan’s neck.“
Finally, take a look at the beautiful shoe. The detail on its ends – an ogee and fillet – are nicely proportioned. And the hands are also tidy. I think this chair was made by a skilled hand.
This piece deserves its own investigation.
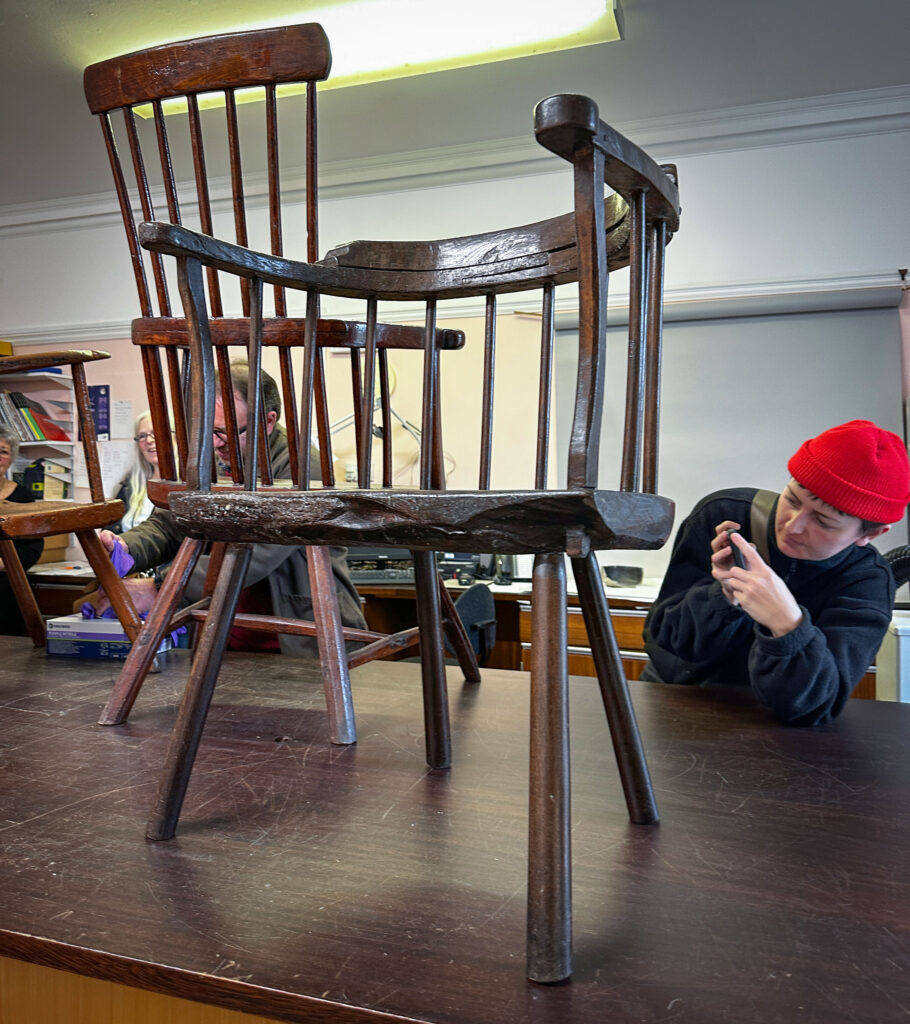
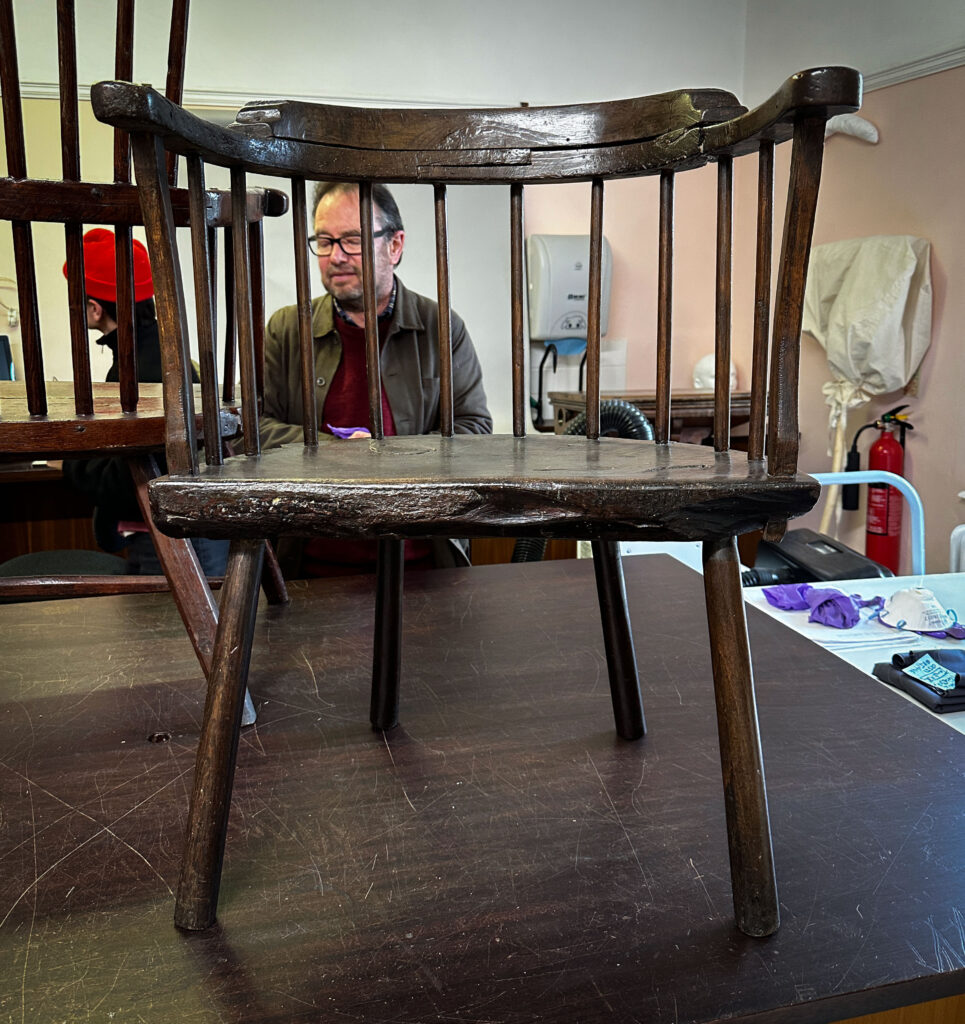
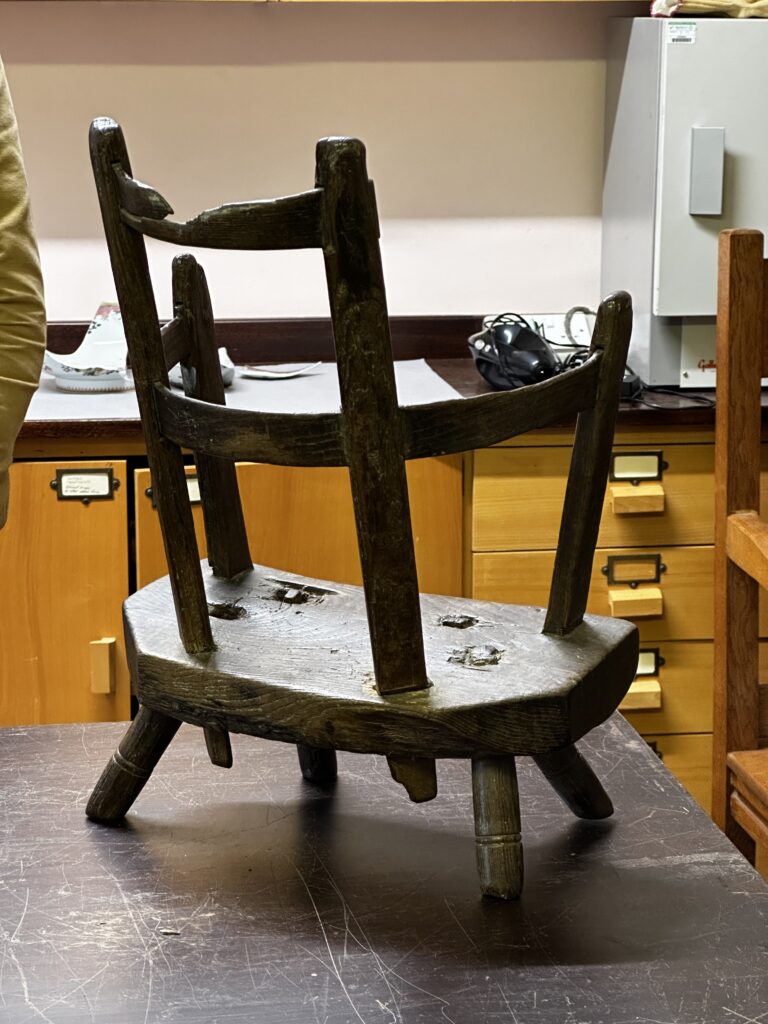
Unusual Child’s Chair
The third chair is one I didn’t spend much time with because of its odd construction. You see this in chairs in Ireland and Scandinavia more than Wales. I kinda wonder if it’s an import. The turned legs and insanely thick seat added to its curious stance.
I forgot to ask the curators about the provenance on this chair. Perhaps that will give us some answers.
The charmer of the group (both the chair and Chris Williams).
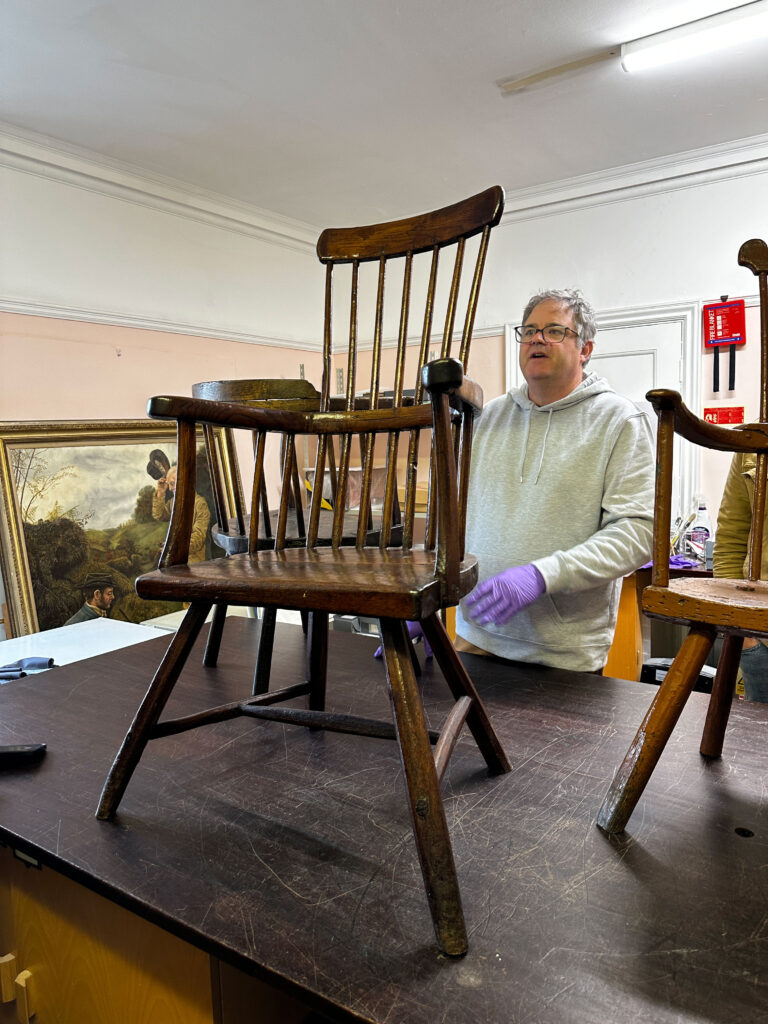
The Best of the Bunch
The final chair in this group was my favorite (I wasn’t alone). All the details point to the fact it was made by a trained woodworker. The provenance of the chair supported this idea.
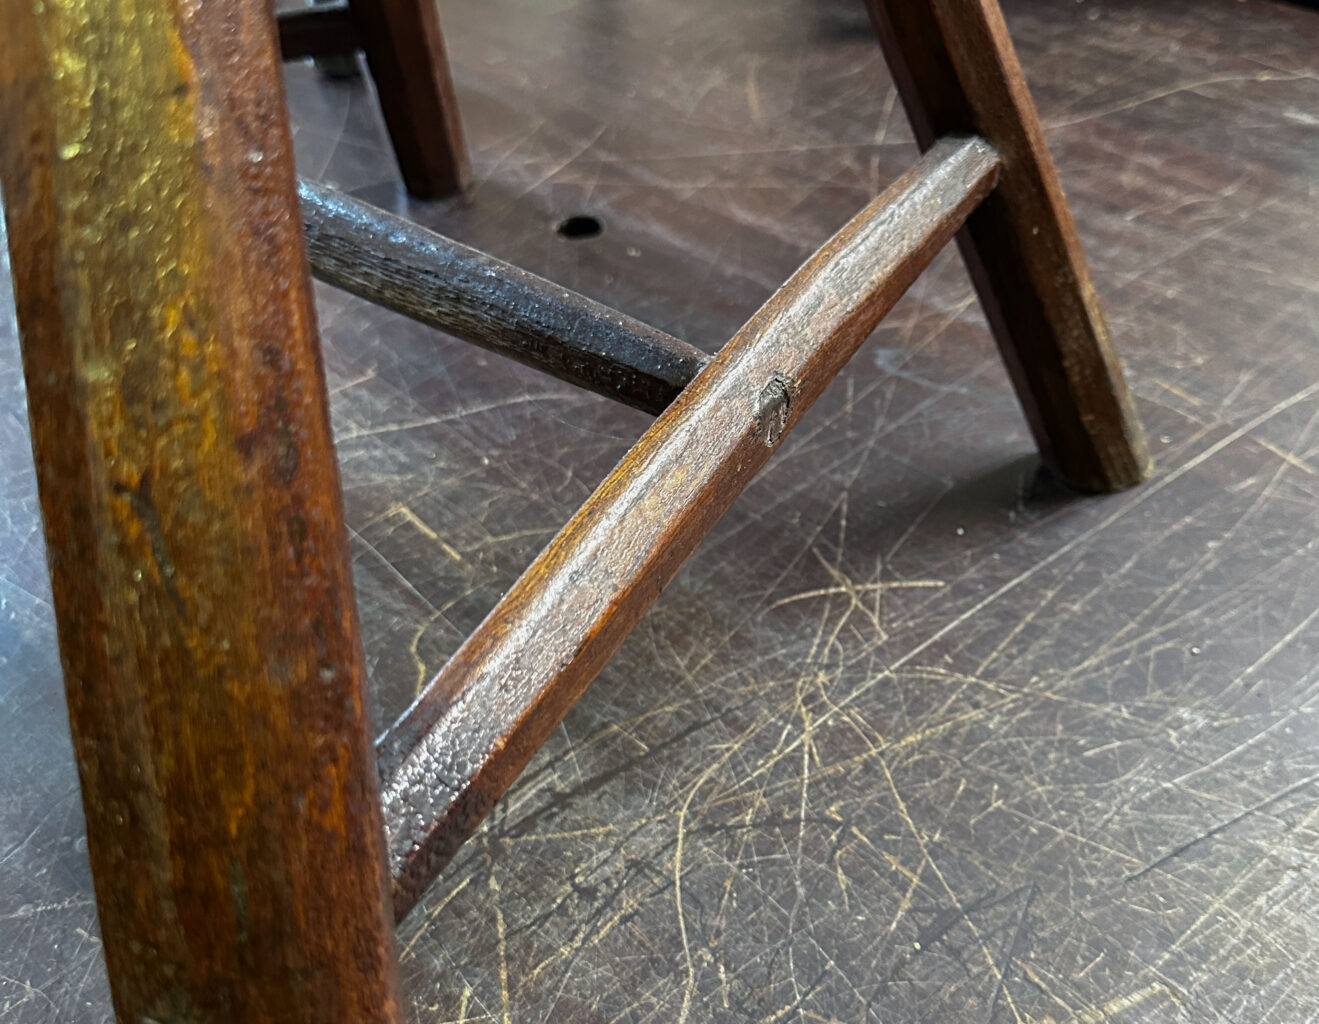
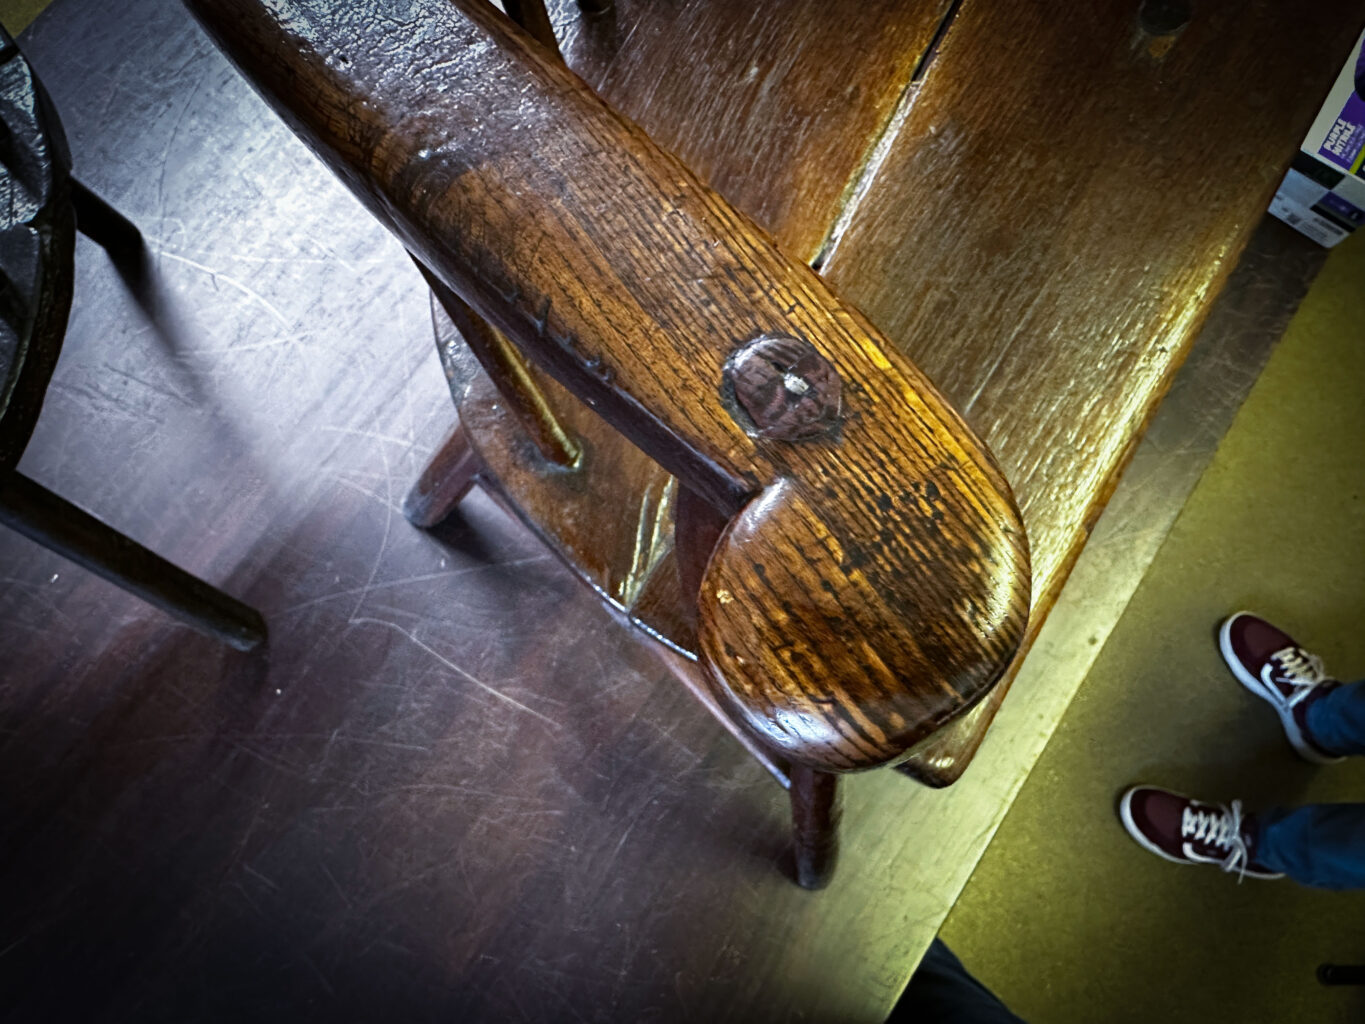
A clever and attractive stretcher arrangement.
First, take a look at the undercarriage. The side stretchers are tapered octagons. What is (somewhat) unusual is that they are ovals in cross-section. The stretchers are thicker than they are wide. It’s a trick that allows you to use a thicker tenon for the medial stretcher without adding bulk. I’ve seen this detail before, but not this well executed.
I’ll be stealing that idea.
The hands.
The hands on this chair aren’t identical, but they are close and crisply executed.
Compared to the other chairs in this group, the rake and splay of the legs is dramatic, adding to the overall dynamic stance of the chair. Also, take a look at the long sticks and the comb. The long sticks splay out perfectly. When paired with the undercarriage, the chair has an attractive hourglass shape.
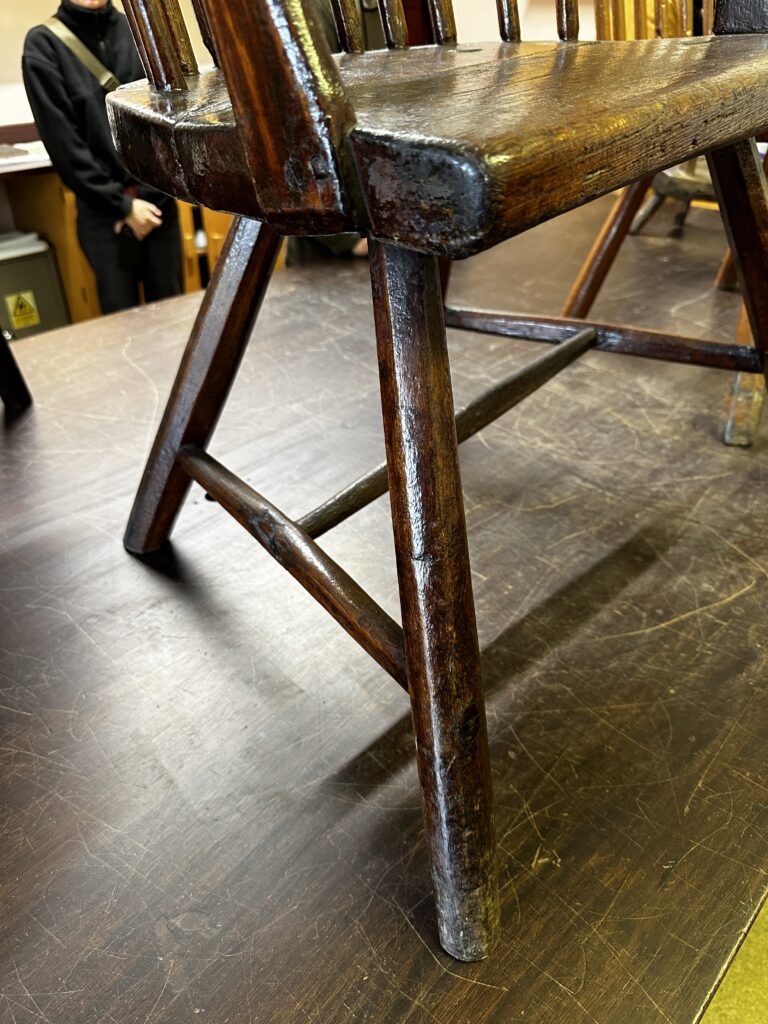
Note how the arm is attached (and another shot of the undercarriage).
The most unusual aspect of the chair is its front posts. They’re tenoned into the arm but then lapped onto the seat and reinforced with screws. It’s another of the joiner-like touches on this chair that points to a trained maker.
This chair is the one the museum has on display for the public. I agree with their choice. This is a special chair.
This one has been a long time in coming. On May 31, 2020, I announced here that I was writing a book on Dutch tool chests. Today, November, 8, 2024, “Dutch Tool Chests” is finally in our warehouse and available for order. (Surprise! – the cover is blue.)
Inside the book, you’ll find in-depth instruction to help you build your own slant-lid chest, from soup (choosing the wood) to nuts (and bolts – which I suggest you use to attach the chest handles). There are plans and cutting lists for two different chest sizes, as well as for a rolling base that adds storage and convenience for moving it around the shop.
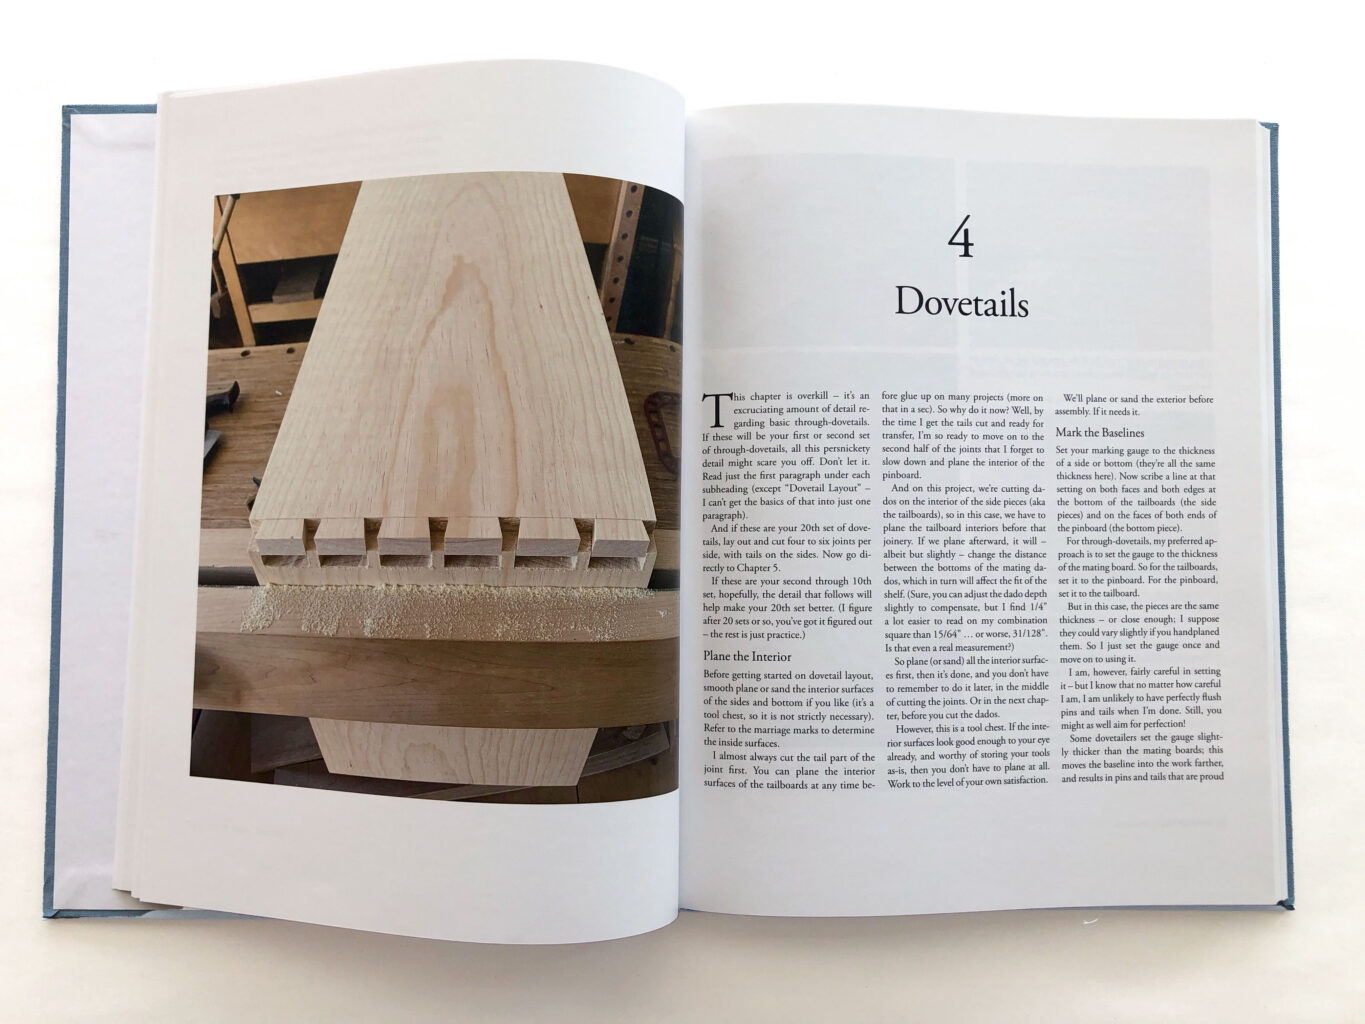
I love these chests – and have built more than a few! I find them to be great additions to the workshop and for hauling tools hither and yon when I drive somewhere to teach. (And, thanks to the fun of the “hidden” bottom compartment, these also make excellent toy chests for kids!) But more valuable in the long term (if I do say so myself) than the chest are the detailed lessons on some fundamentals of hand-tool woodworking: dados, rabbets, through-dovetails and more. My intent is that in building this chest, you’ll learn skills that will serve you well in all your hand-tool projects to come.
The chapter on through-dovetails, for example, includes just about everything I know about cutting (and teaching) this joint.
Plus, you’ll find a foreword from Roy Underhill, and a gallery of chests from 43 other makers (my favorite part of the book) that shows clever interior (and a few exterior!) modifications. Unique solutions that set them apart, and can be adapted for your own tool storage needs.
“Dutch Tool Chests” is 192 pages and is printed on 8-1/2” x 11” #70 matte-coated paper in Tennessee. The pages are folded into signatures, sewn, glued and reinforced with fiber-based tape to create a permanent binding. Enclosing the signatures are heavy (98-pt.) blue-fabric-covered boards. The cover and spine are adorned with a silver foil die stamp.
The book is $39 and comes with a free pdf if you order it from us by December 11. And all copies ordered direct from us will have my illegible scrawl of a signature in the front of the book. (We don’t know which of our retailers will carry it; I and my cats sure hope they all do! For complete information on that, click here.)
Note: Orders placed today (Friday, Nov. 8), will ship on Tuesday, Nov. 12 because of the holiday.
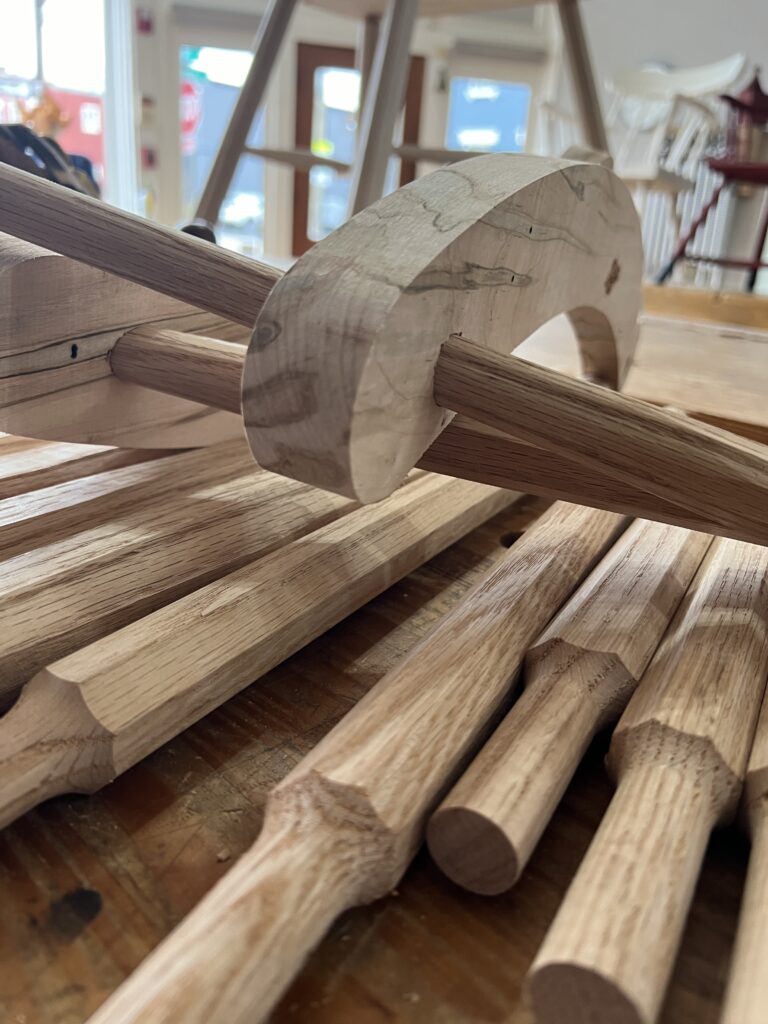
A bevy of brand-new DTCs (lids still to be attached) from a recent class in London.
Table of Contents:
Foreword 1
1. Let’s Go ‘Dutch’ 5 2. Materials 11 3. Parts Prep 23 4. Dovetails 29 5. Dados 49 6. Shelves 57 7. Top Angles 61 8. Assembly 65 9. Lock & Batten Notches 71 10. Bottom Lip 75 11. Front 79 12. Fall Front 83 13. Backboards 91 14. Lid 97 15. Hardware 111 16. Paint 121 17. Interior 127 18. Mobile Base 133 19. Gallery 139
Acknowledgments 185
– Fitz
p.s. Because someone always asks: Fully loaded with my tools for any given class, my white pine chest weighs less than 50 lbs. For now, I can still get it into the back of my car by myself (though it was easier for me four years ago when I first began writing “Dutch Tool Chests“).