Mark just retired from a career as a carpenter and general contractor, so what better way to commemorate the transition than by turning our own home into a construction site with a full-blown remodel of our bathroom?
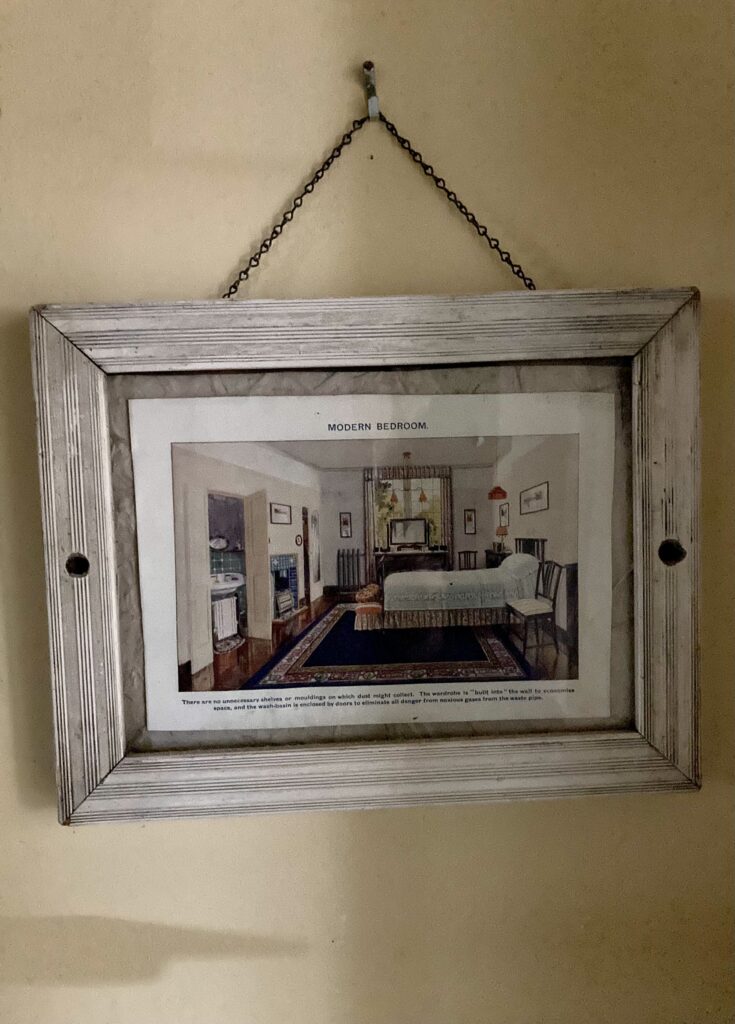
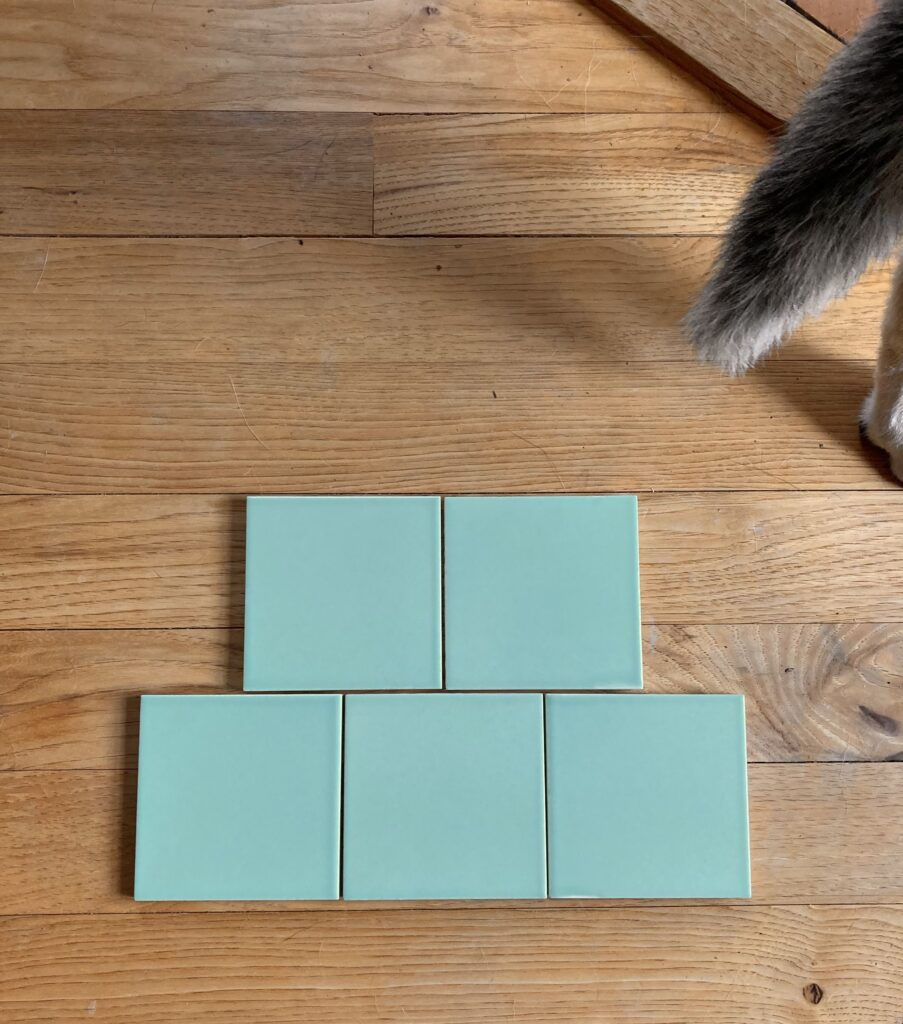
This potential marriage breaker domestic disruption has been a long time coming. It was prompted by our recognition that as we, along with many of our family members and friends, have reached the stage of life characterized by the occasional discount on a cup of bad coffee or condescendingly raised voice from pharmacy staff, it would be advisable to replace our high-rimmed, impossible-to-make-presentable clawfoot tub that I bought from a pile outside an antique store in 2004 with something less likely to cause us to trip and fall. What finally set our wheels in motion was the Hallelujah Chorus of stepping into the newly completed bathroom of our clients Nick Detrich and Kathleen Benson, who tiled their walls in seafoam green – a shade that, while not for everyone, proved the perfect evocation of 1930s camp for me (and luckily, for Mark as well). They’d ordered too much field tile and were hoping to sell it. We were happy to oblige.
The actual color is somewhere between how it appears here and how it looks on the Heritage Tile site at the “seafoam green” link above.
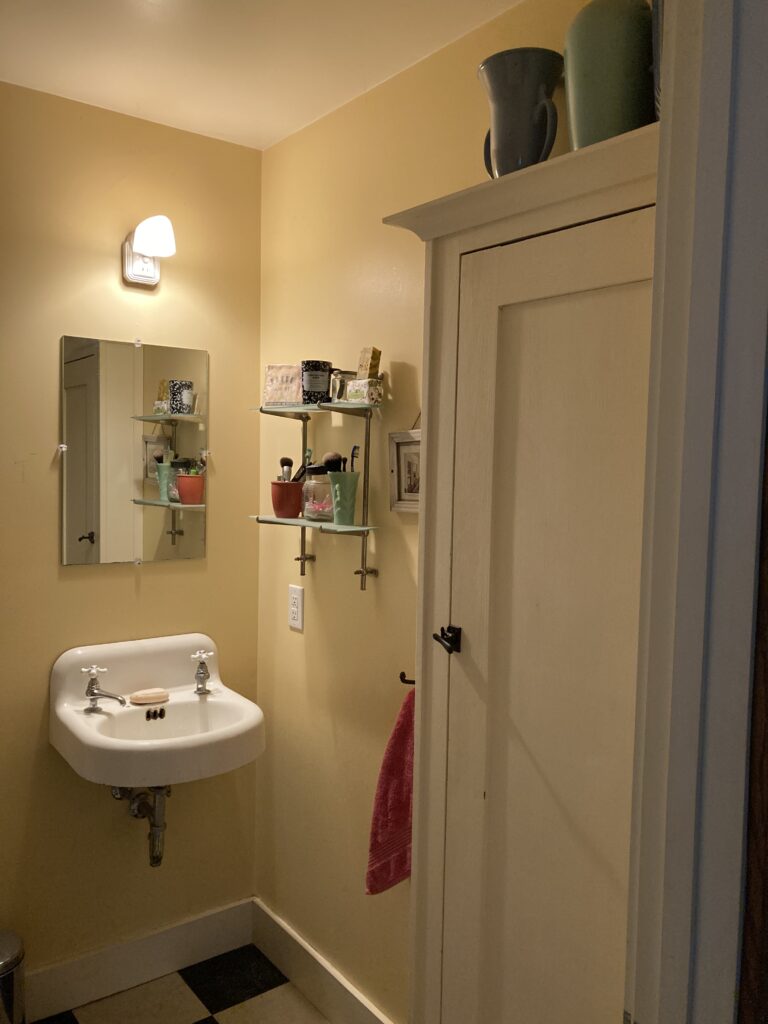
From the start, we agreed on most of the details. A built-in cast-iron tub, an exhaust fan that’s quieter and more effective than the cheap-motel-circa-1972 model we currently have and a wall-hung basin with intact enamel. The tall shallow cabinet I built years ago with a salvaged door and hardware will stay, as will the shuttered window-like opening that lets light in through the laundry room.
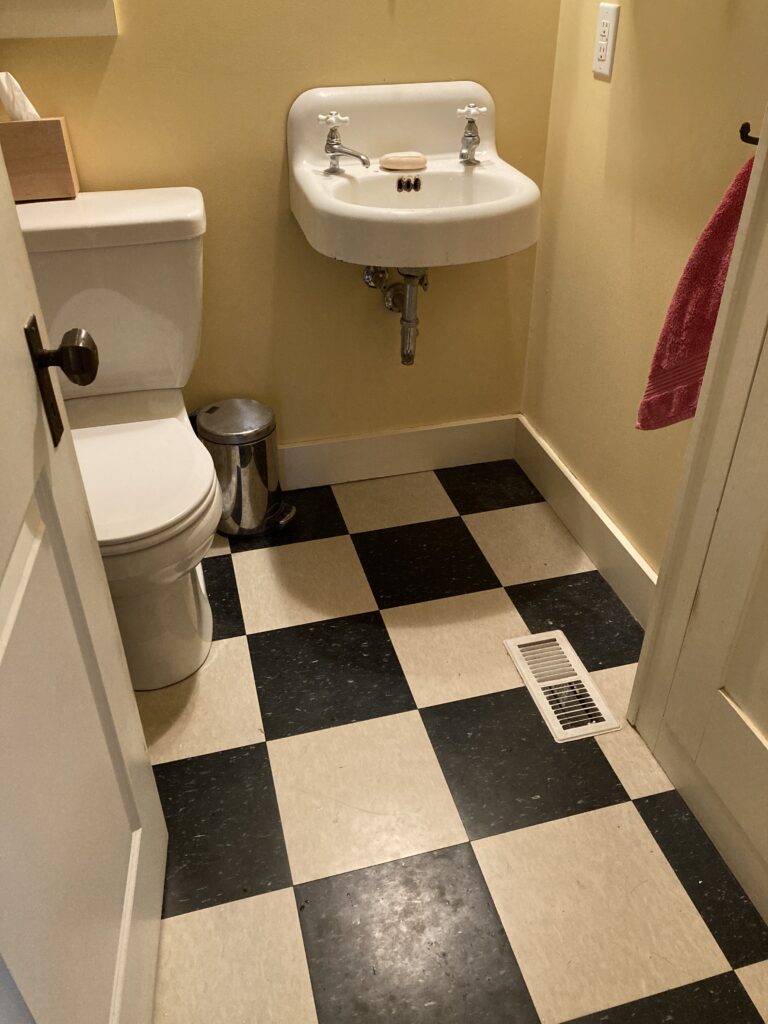
Don’t look closely. I haven’t cleaned properly for a while. We’ll reroute the floor vent through the cabinet barely visible here at right. I kept extra flooring for patches in just this kind of situation.
Then there’s the floor. I wanted to keep the black-and-white checkerboard of 12”-square commercial-grade vinyl composition tile that I installed when I first moved in, inspired by a room that Sharon Fugate and Peggy Shepherd had finished in their eclectic home-furnishings store, Grant St [sic.], in the early 1990s.
Mark wanted ceramic tile or unglazed porcelain mosaic. “It’s the highest-quality finish,” he insisted. “It’s thicker and more durable.” Exactly what I would have told customers 20 years ago. And considering that we’re tiling the walls up to about 5’, he said, we should also do away with the baseboard so that moisture condensing on the vertical surfaces wouldn’t drip down onto the square top edge. Hmm, I thought. I have never seen water pool on the baseboard, other than just behind the clawfoot tub, where the wall sometimes gets sprayed when certain tall people (one in particular) take a shower – and that condition will be eradicated when we install a built-in tub.
The wall-mounted basin, along with the tub and light fixture seen here, came from the former Foursquare Antiques in Bloomington, Ind. The sconce still has its price, “$15,” in china pencil script, written by our artist friend Margie Van Auken, who worked at the store.
The idea of a tiled floor didn’t feel right to me for this house. It’s a funky house built and finished on a shoestring budget. The funkiness is its charm, and I know the story behind nearly every house part, from the salvaged sink that lacks a mixer faucet to the gate I made to keep our dog in the mudroom and the lamp my maternal grandma made from an antique hand-cranked coffee grinder. I have never been concerned about using the “highest quality” offerings just because they’re widely considered superior; I don’t want to live in a house where my surroundings are dictated by other people’s often-uncritical judgments. I have always worked with budgetary constraints – at $1 per square foot for a commercial-grade flooring product, my VCT tile reflects a necessarily skinflint period of my history that I have no desire to forget. I feel more at home when surrounded by things that hold meaning for me.
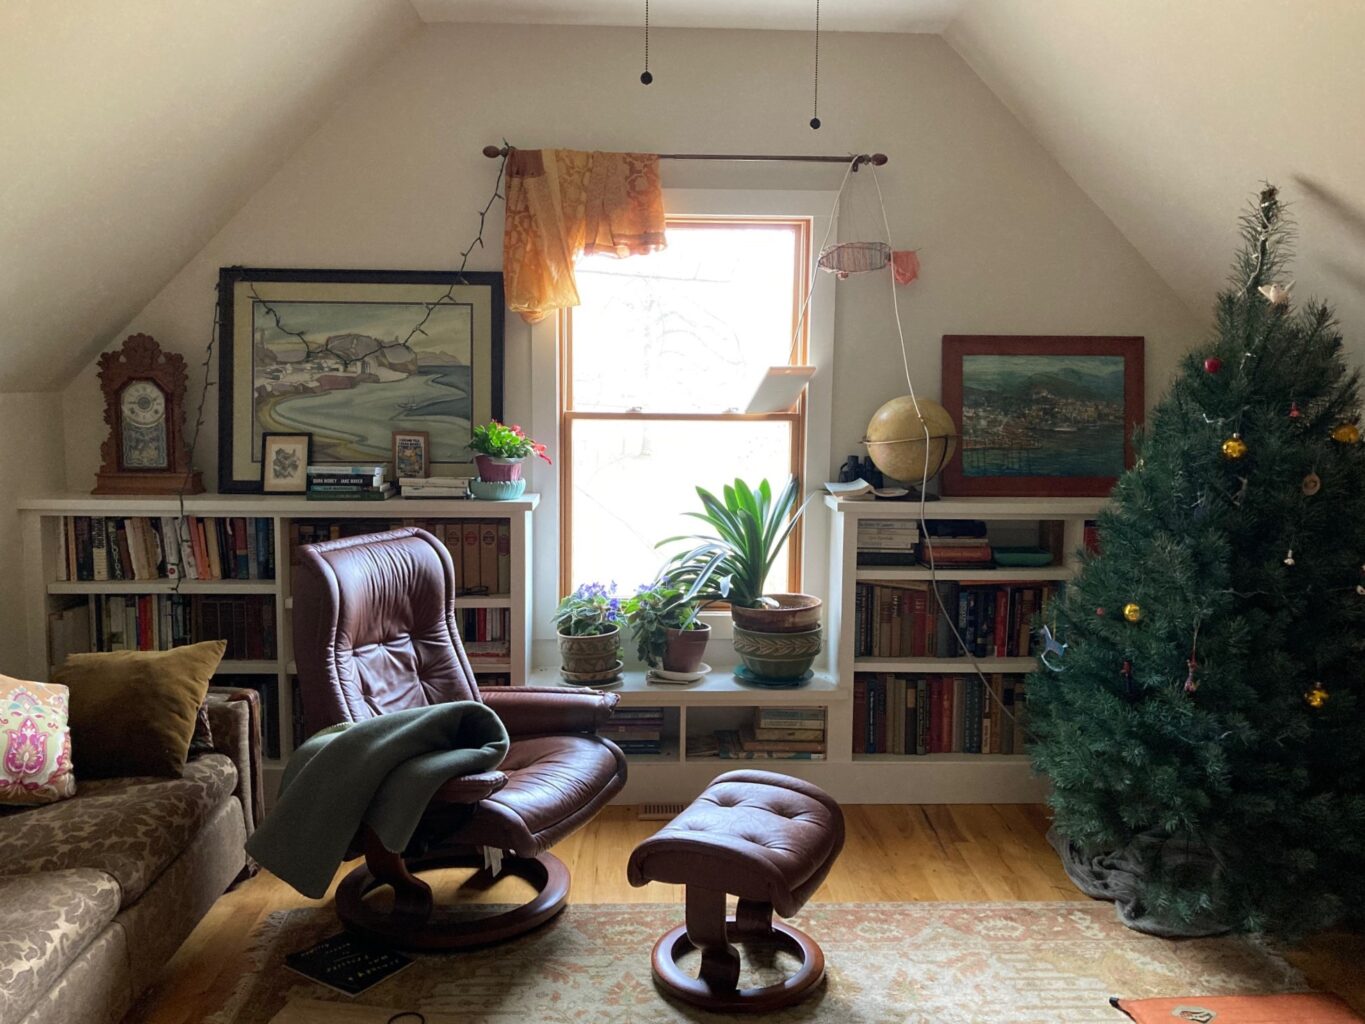
I said it was funky. Simple bookshelves hold paintings by our friend Chris Blackwood, a clock that belonged to Mark’s grandparents, binoculars (for visitors to the birdbath outside) and an increasingly outdated globe for locating countries. The dirigible by the window is one of Jonas’s creations, made from telephone wire (is that still a thing?) when he was little; it even has a pilot compartment on the underside, though the purple pilot has disappeared.
Ceramic and porcelain tile floors are hard. From a purely sensual perspective, I find them unwelcoming, though I have installed plenty of them in rooms where they were period-appropriate. Tiled floors are also cold. If we lived in a tropical climate I might value this characteristic, but we live in a place that has winter. Of course we could address the cold with under-floor heating, but that, too, strikes me as luxurious overkill, at least for our home. So you’re cold when you get out of the shower – dry off and put some clothes on. A little discomfort is good for us; it reminds us we’re alive. For our house, installing under-floor heating as a way to make tile more palatable also seemed a bit like the logic of building houses so tight and well insulated that you need a heat recovery ventilation unit to bring in fresh air. At some point, from a cradle to grave perspective, the efficiency arguably becomes inefficient.
Also, I like the bathroom baseboard, even if its interruption of the transition between a tiled wall and floor may not be typical in contemporary high-end bathroom construction. Does it work? Do we like it? Is it easy to keep clean? The answers to these and similar questions matter more to me than some industry stamp of approval, not least when I remind myself that such stamps appear on many cabinets made with ½” MDF carcases held together with staples and hot-melt glue.
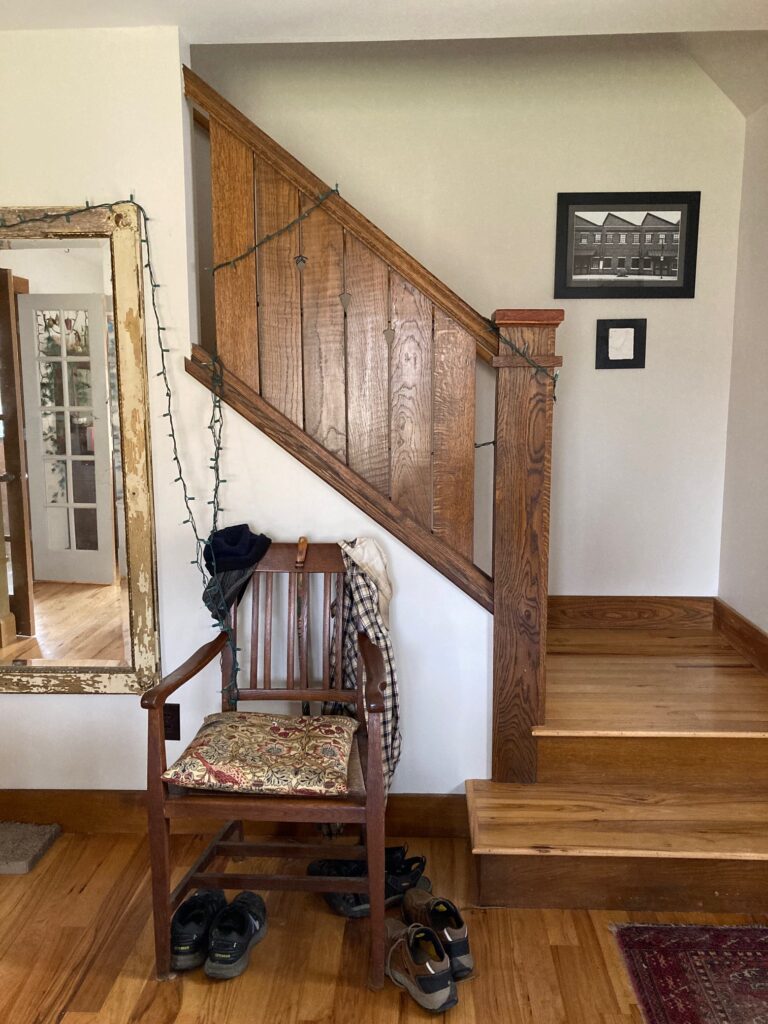
A chair and mirror from a pair of now-shuttered antique stores in town, shop-made stair rail and house trim, a hickory floor I laid on my hands and knees. The framed photograph on the wall is by Kristen Clement, and the tile below was a gift from our stone-carver friend Amy Brier.
Vinyl composition tile is by definition synthetic – a product of the plastics industry.[i] At a prima facie level, this inclines me to view it with disapproval; it certainly raises all sorts of questions, from which chemical constituents went into its production to the possibility of toxic off-gassing over time.[ii] By comparison, the 1” hexagonal porcelain ceramic tile mosaic we’ve been considering seems more traditional, and so (in theory), safer – it was used in many a late-19th-century bathroom floor, at least in higher-end residences. (The majority of homes occupied by “working people” in that era did not have indoor plumbing.) I thought back to some recent news reports about cases of silicosis among workers in the composite stone countertop industry; even though ceramic and porcelain tile seem closer than VCT to their naturally occurring components, the dust from decanting, mixing and applying the cement and grout, as well as that produced by cutting tile, presents its own dangers to health. And when you’re talking about the industry that mass-produces ceramic and porcelain tile, you’re in the world of heavy materials that have to be mined and transported, often internationally, then processed with complex equipment at temperatures only achieved with significant carbon inputs, coloring additives, glazes and more – in other words, a highly energy- and resource-intensive product in its own right. So much for any “green” advantage, at least insofar as I can make out.
As for durability, while the 1’ x 2’ sheets of mosaic we were thinking of using are somewhat thicker than VCT, the latter is far denser than the resilient sheet flooring most people associate with vinyl; that’s how VCT came to be the flooring of choice for grocery stores around the country during the 20th century (even if acres of the stuff are now being scraped up in favor of an unapologetically bare, polished concrete floor). When properly installed, VCT will last for decades.
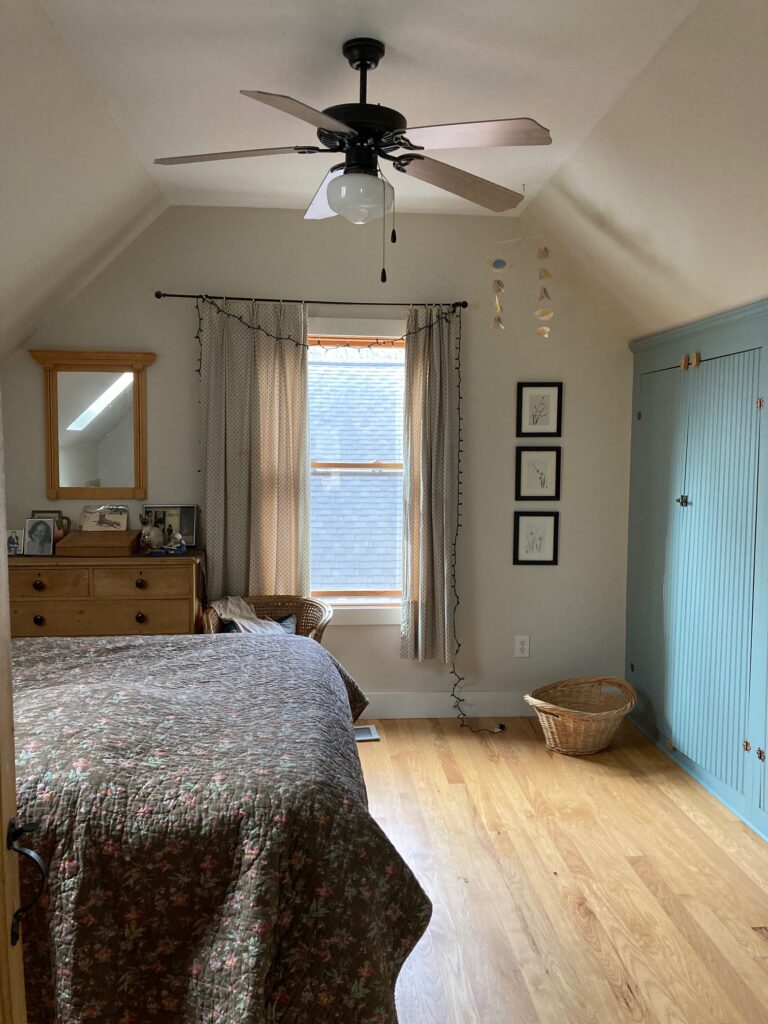
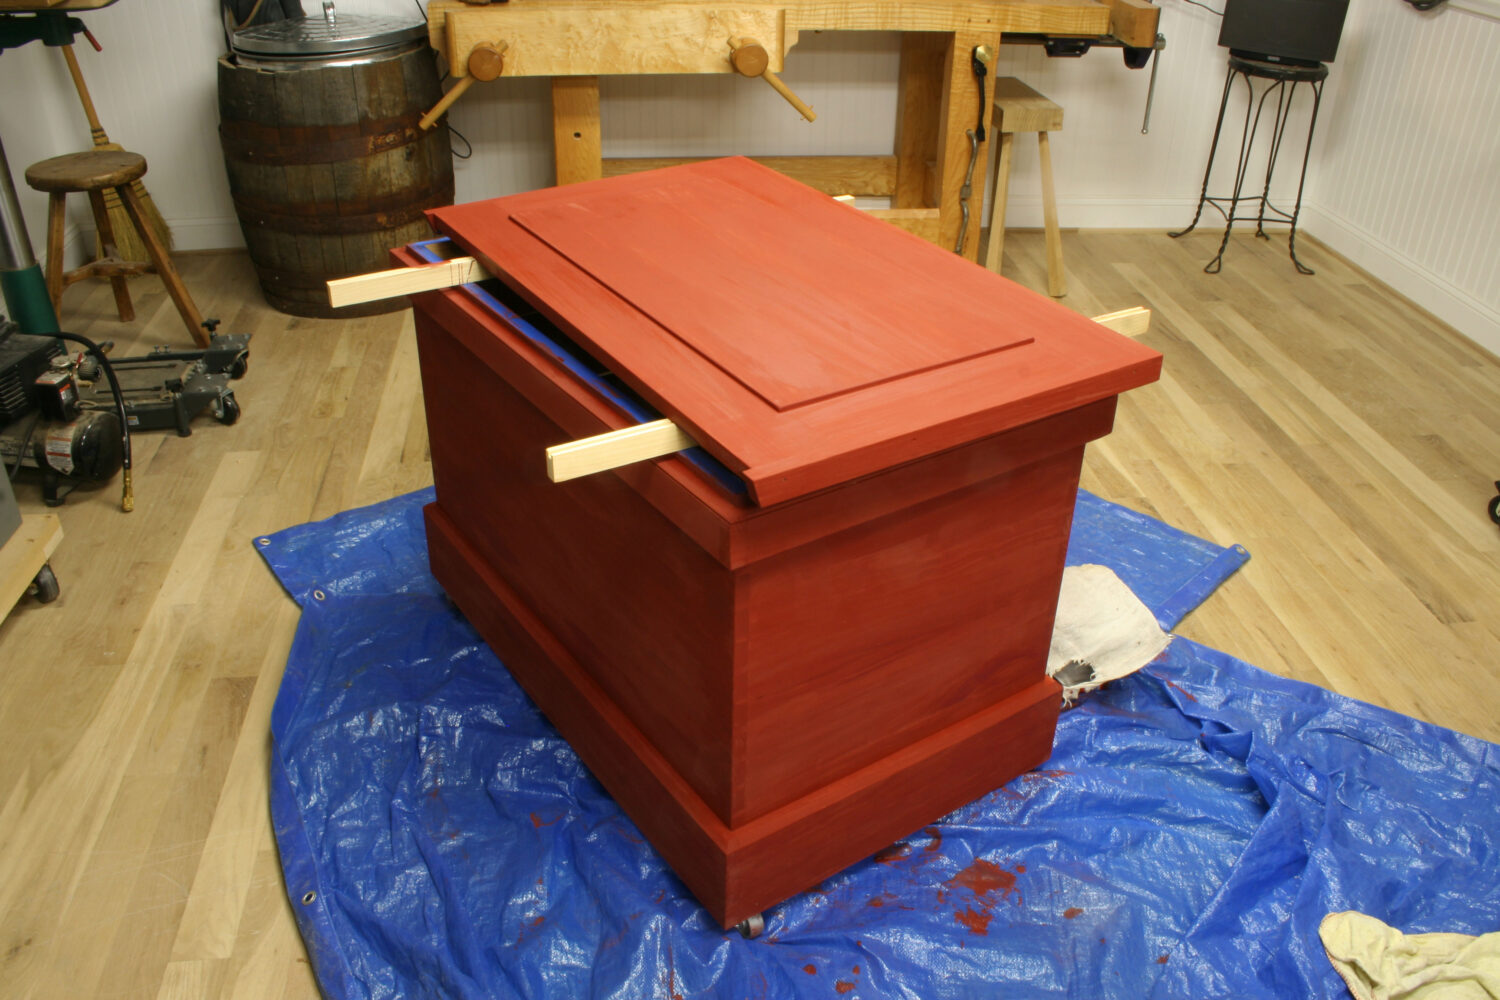
Our bedroom is furnished mostly with stuff we’ve made or had for years, such as the chest of drawers, once painted, that I bought from a shop in the English town of Reading circa 1982, a mirror frame and sloped-top box I made decades ago, homemade curtains and a Siamese cat that my paternal grandma gave to my parents when they got married. The mobile is by Karina Steele.
“But tile is more waterproof,” said Mark, invoking a common belief. Really, though? Water can’t get through 1/8”-thick VCT. Granted, there are joints where water could in principle penetrate to the underlayment and subfloor. Then again, there are many more potentially permeable joints in a floor made with the 1” porcelain hexagonal mosaic we were considering. Sure, if we installed a waterproof membrane beneath it, the tile floor would be waterproof in a meaningful way – as long as the membrane remained intact. But we use a bath mat when we step out, and how often does a sink in our house overflow or a toilet go bonkers and leak all over the floor? Neither has happened in the 17 years since the house’s construction, and with the two of us aging tradespeople who regularly clean out the gutters, mop up spills, and keep things reasonably well maintained, neither is very likely. Besides, should we design every feature of our homes with a view to its ability to survive a rare and potentially devastating scenario? I’m not talking about basics such as anchoring a structure to keep it on its foundation in an earthquake zone, or bracing it to resist high winds; this is a matter of interior finishes.
You can answer that for yourself, but my answer is no. In aesthetic terms, to make one room of our house State Of The Art would be an affront to the spirit of the entire place. It would also be a concession to dogma – “tile is better because harder, more permanent, more expensive” – the kind of prejudice I think it’s important to make my customers aware of on principle (because you know a friend or relative is going to ask them why they chose what they did, regardless of what they did), but that I don’t think should be the ultimate deciders.
And the VCT floor is already there, in perfectly good shape. Why rip it out and send those materials to the landfill?
For decades, the ethos in the building trade has been “tear out what’s there and upgrade” – more luxury, more comfort, more image-conscious “curation.” Maybe I have just been around for enough years that I recognize the motivations underlying so many real estate and construction industry recommendations, which too often boil down to “buy more.” My life and home have been shaped as powerfully by what I’ve rejected as what I’ve embraced. Mark is persuaded. (It helped that keeping the current floor will mean spending significantly less money.)
[i] Although the word “synthetic” is commonly used to connote poor quality, it simply means that something made by putting constituents together. Strictly speaking, few things we live with, wear, or eat are not synthetic.
[ii] I should add that there was no discernible smell to this flooring, even when it was new. It’s a different product from sheet vinyl flooring.
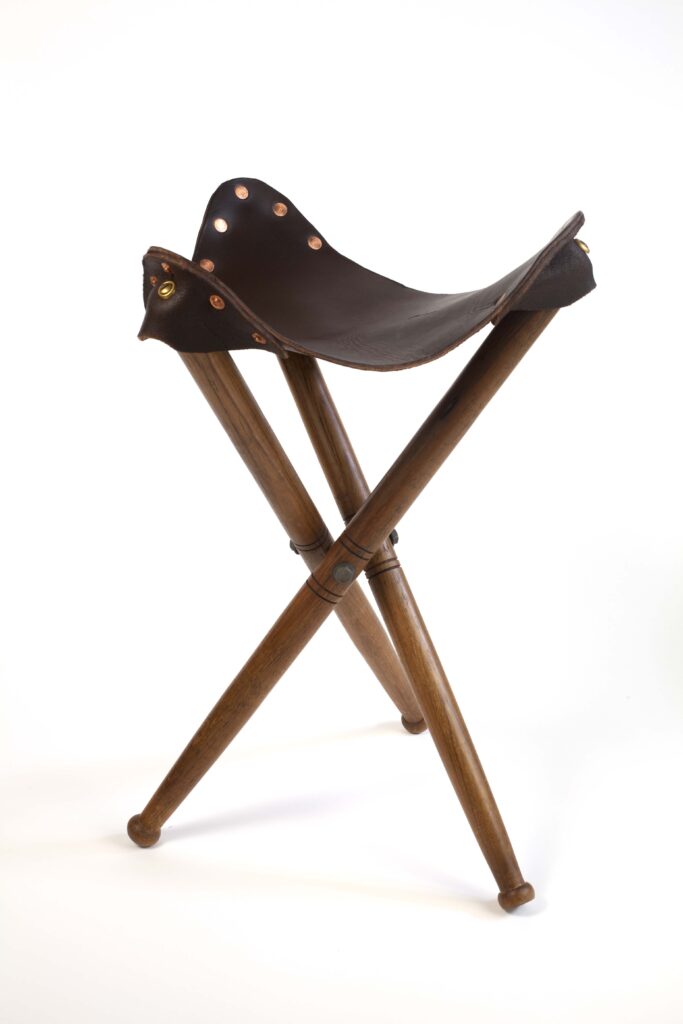
I have one of these stools, and use it every year at my neighborhood’s storied Fourth of July Parade and other community events. And it’s seen almost weekly use at outdoor gatherings during the last 18 months or so – the addition of a carrying strap made it particularly comfortable and convenient to sling over my shoulder as I walked to various neighbor’s houses for socially distanced gatherings; the strap left my hands free for carrying bourbon.)
— Fitz
Three-legged folding stools appear in many Western cultures, including the French, English and American. They have been popular with soldiers, sportsmen, campers and artists for at least two centuries.
This stool is a great introductory project to campaign furniture, especially if you are new to turning or working with leather. There are only three pieces of wood, four pieces of leather and some metal hardware. You can easily build one in a day.
Choosing Materials I have seen some of these camp stools built using dowels, and they are strong enough to hold most people. However, I like to build them from mahogany, teak or ash that has dead-straight grain. I’ve had nightmares about getting a stick stuck in my backside from a stool disaster.
If you can build the stool with riven stock (oak or ash are good choices), it will be quite strong. Many original stools used 1″-diameter legs. However, my recommendation is to use stouter stock. I have built reproductions with 1″-diameter legs, and they felt too springy under my 185-pound frame.
You don’t need to make the legs baseball bats, but try for something between 1-1/8″ diameter to 1-1/4″ diameter. The leather can be almost anything 7 ounces (just shy of 1/8″ thick) or heavier. Vegetable-tanned leather that you dye yourself is a particularly strong choice.
You also will need rivets to join the leather pieces – unless you are skilled at hand-stitching. While hollow rivets (sometimes called rapid rivets) are inexpensive, easy to find and strong enough, I prefer the look and unerring permanence of solid copper rivets. I used No. 9 rivets with posts that are 1/2″ long.
To attach the leather to the wooden legs, you’ll need three No. 10 x 1-1/2″-long brass screws plus matching finishing washers.
Finally, you’ll need the hardware that allows the legs to open and shut. Traditionally, this was a three-headed bolt that once was easy to find. Now, that hardware is rare in North America. If you are a blacksmith or have access to a good welder, making a three-way bolt is straightforward. I have seen a couple of these bolts for sale in England, but the price with shipping to the United States was more than the cost of the bolt itself.
So I looked for a different way. Luckily, the Internet is good for something other than photos of cats playing keyboards. One maker of custom stools uses some off-the rack hardware to make an effective three-way bolt and shares that information freely on his web site.
Here’s what you need for legs that are up to 1-1/4″ in diameter:
• A hex-headed bolt with a 5/16″ shank that is long enough to pass through two of the legs and protrude out the other side by 1/2″. A 3″-long hex-head bolt will work with 1-3/16″-diameter legs. • An eyebolt with a 1/4″ or 5/16″ shank that is long enough to pass through one of the legs and protrude out the other side by 1/4″. (Note: You can hacksaw any of this threaded hardware to length. An eyebolt that has a total length of 2-1/2″ should be sufficient.) • Two acorn-headed nuts. • Three washers. • 15 No. 9 copper rivets.
Parts • 2 Legs, 1-1/4″ dia. x 23-3/4″ l • 1 Seat, 7 oz., 13-1/2″ w x 13-1/2″ l • 3 Lips, 7 oz., 3″ w x 8″ l
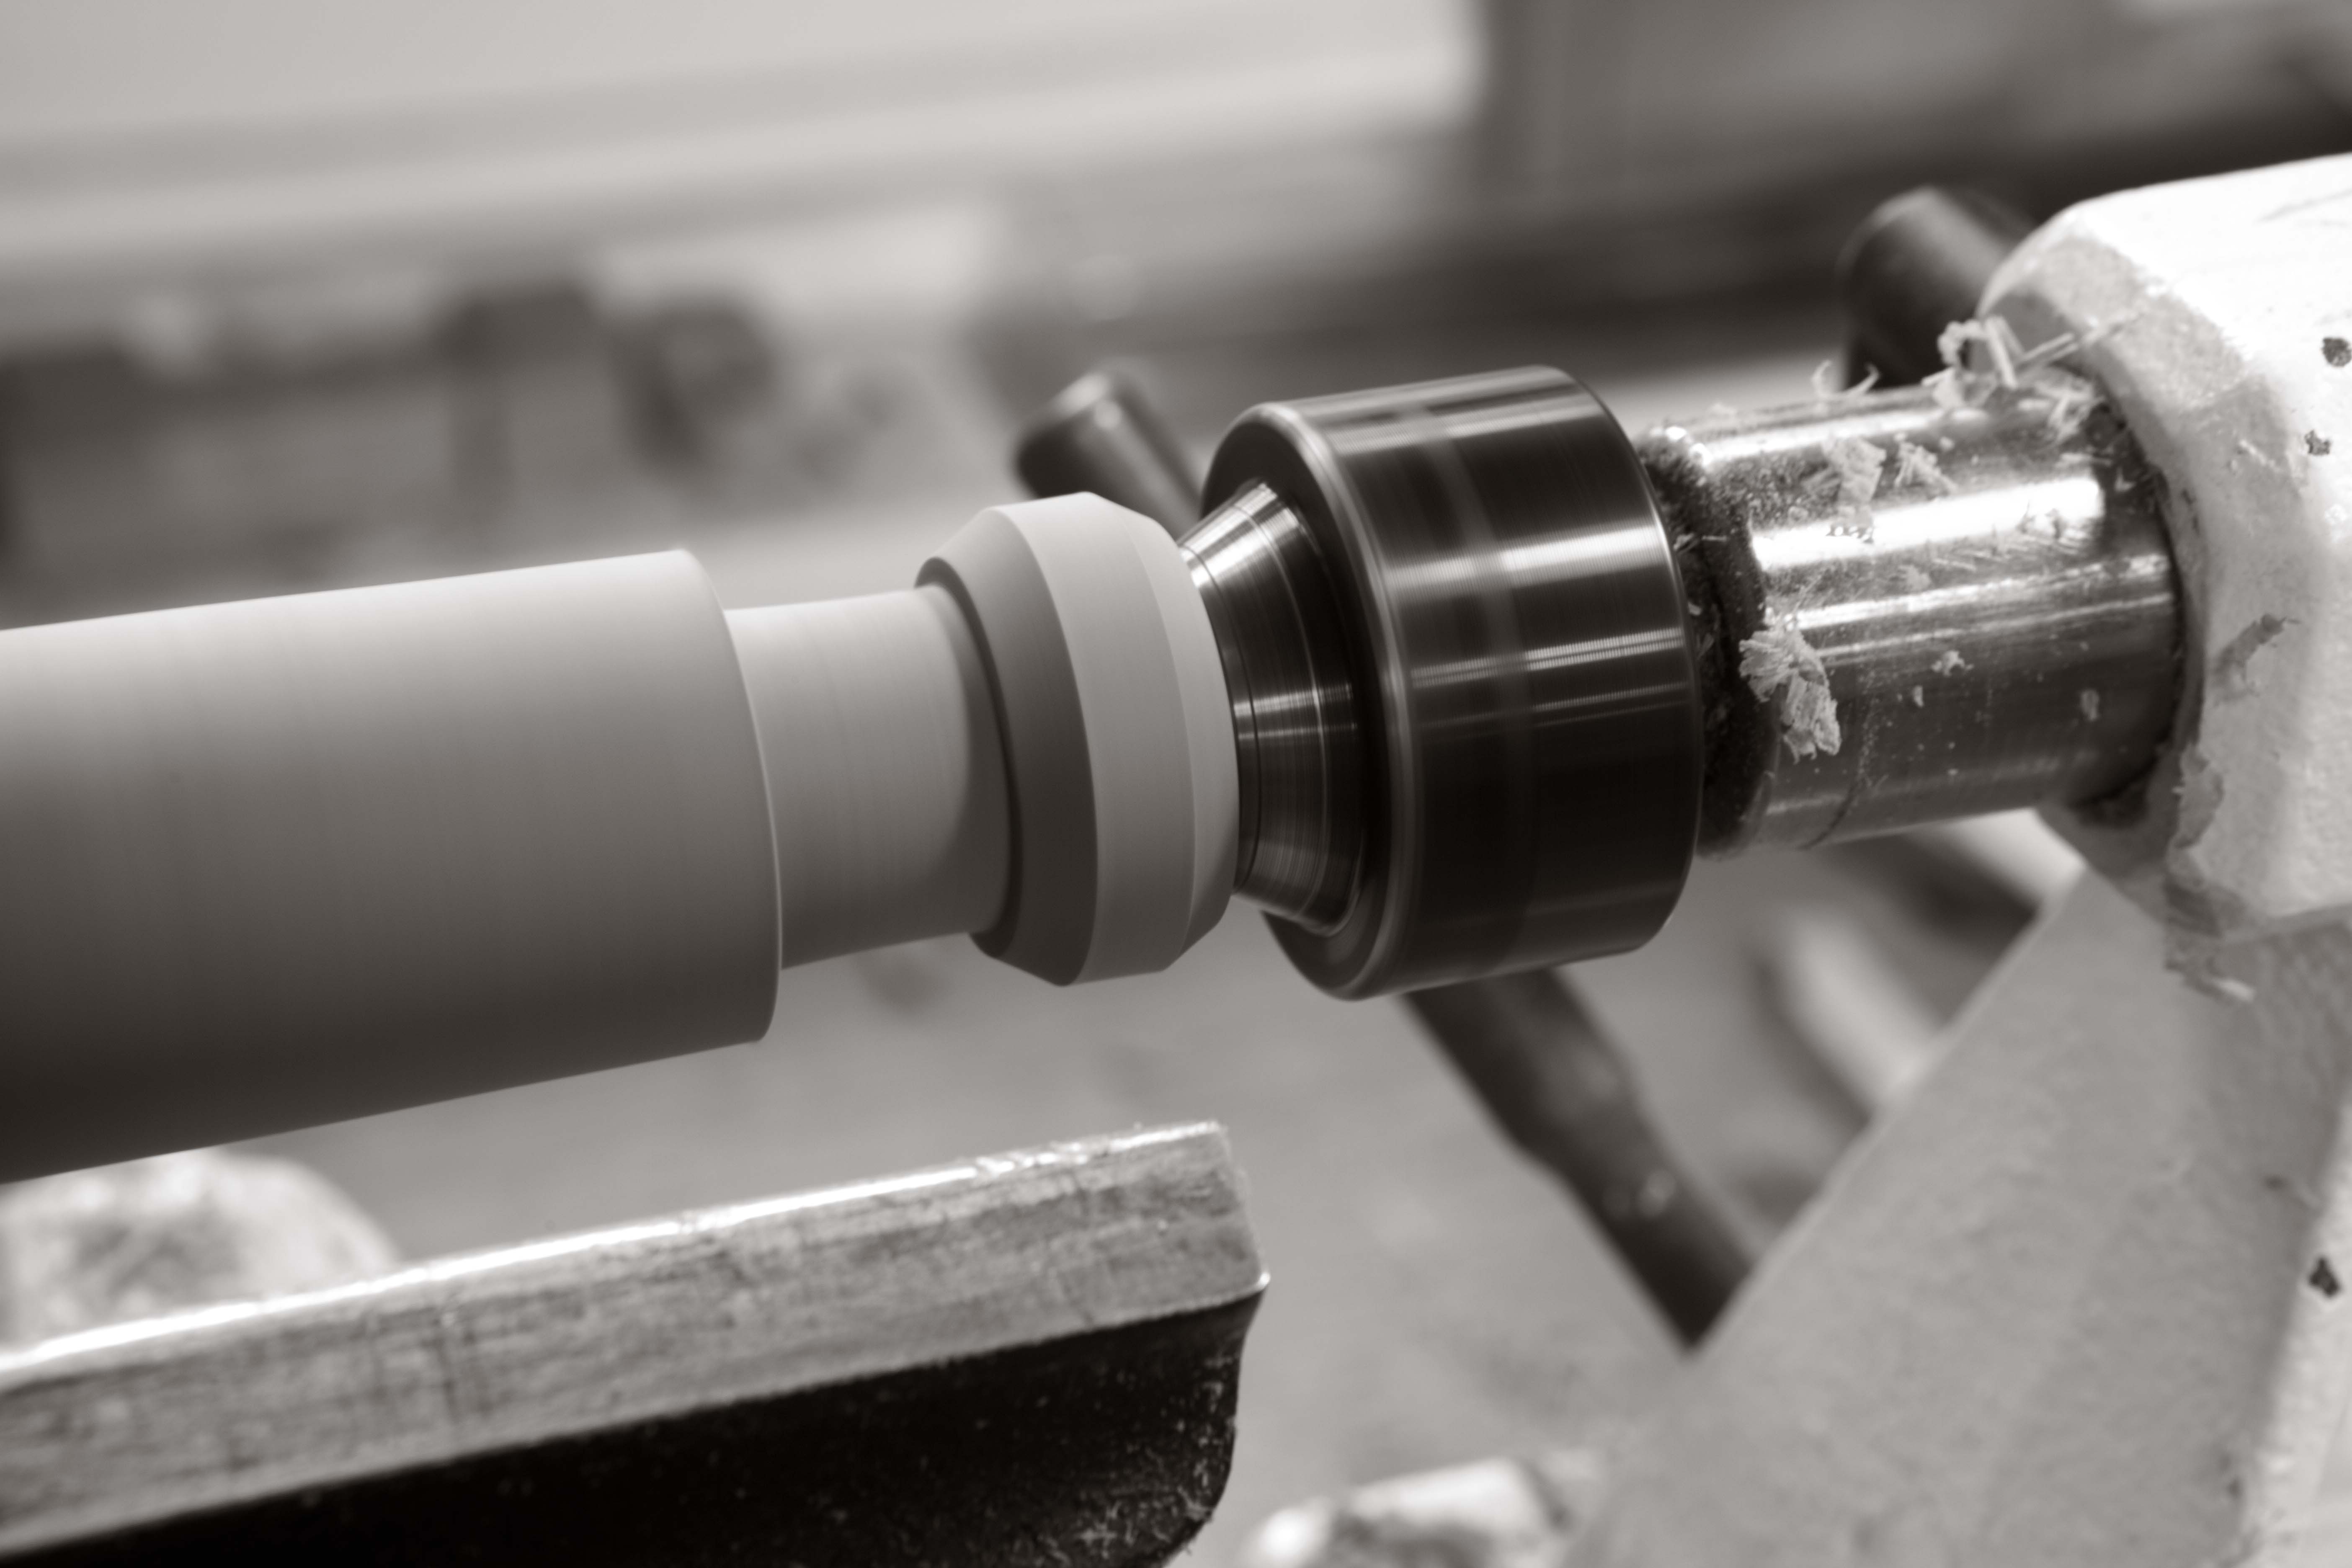
Turn the Legs The three legs are easy to turn, even if your favorite turning tool is #80-grit sandpaper. Turn the legs to round using a roughing gouge or carbide-tipped roughing tool. Create a smooth, clean cylinder of about 1-1/4″ in diameter with a skew or other finishing tool.
The feet shown are 1-3/16″ in diameter and 5/8″ tall. Make the feet by turning down the foot. Then turn the ankle to 7/8″ in diameter. Round the foot, then taper the rest of the leg down to the ankle. The taper should begin 6″ from the bottom of the leg.
A bulbous foot. The foot can be almost any shape, from a bead similar to the foot of the Roorkee to this teardrop.
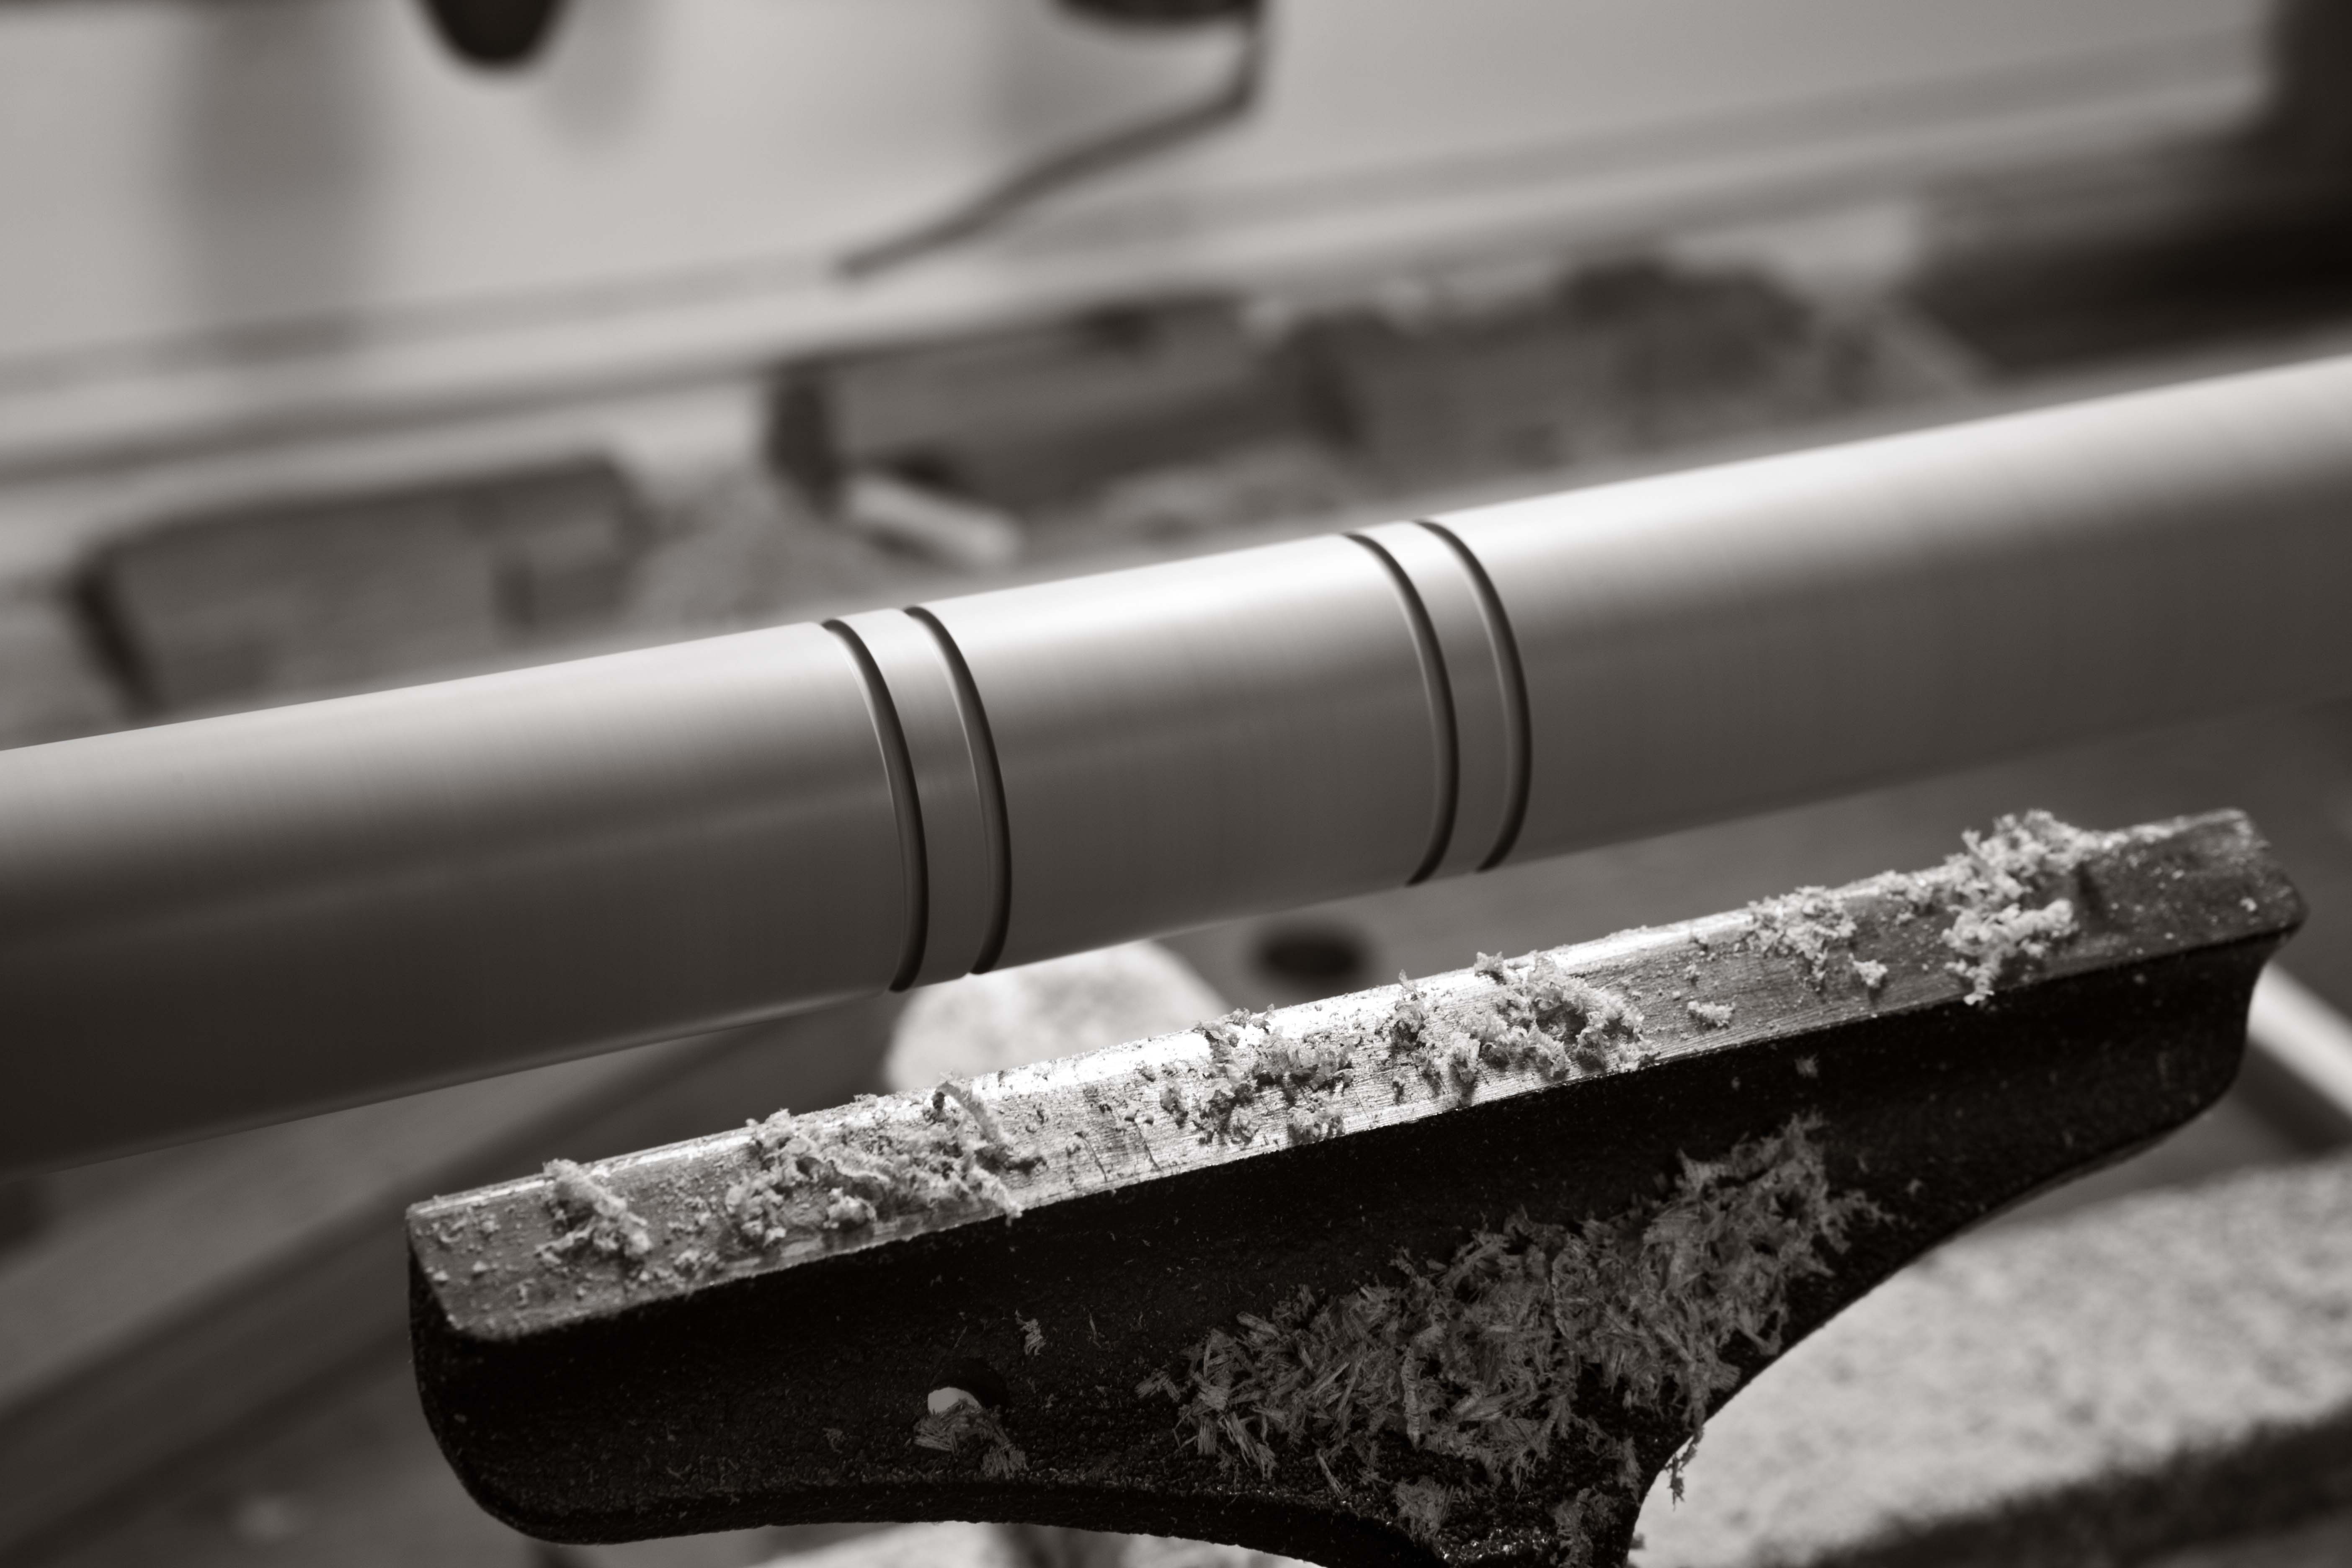
I added four small grooves where the hardware holes will go – two above the hardware and two below. Little details such as these grooves and beads make the legs look like something fancier than three store-bought dowels.
Not original. These little grooves add some visual interest to the joint. However, they’re not a detail I found on any original stool. So skip them if you are going for authenticity.
Sand the legs to remove any rough tool marks. I finished the legs on the lathe. First I burnished the surface with a “polissoir” (a French polishing tool made from tightly bound broom corn). Then I applied beeswax to the legs with the workpiece spinning. I used the polissoir to drive the beeswax into the pores of the wood (again, while the lathe was spinning). Then I used a rough cotton cloth (I’d like to be fancy and say it was muslin, but it was an old bag that held corn grits) to buff the wax. Then I applied another coat of wax and buffed that.
If you want to add a little age to the wood, apply a coat of black wax and push it into the grooves and pores. Let the wax set up then buff it.
Wax is not a permanent finish, but it is easily renewed or repaired if your stool is for the drawing room instead of the campsite.
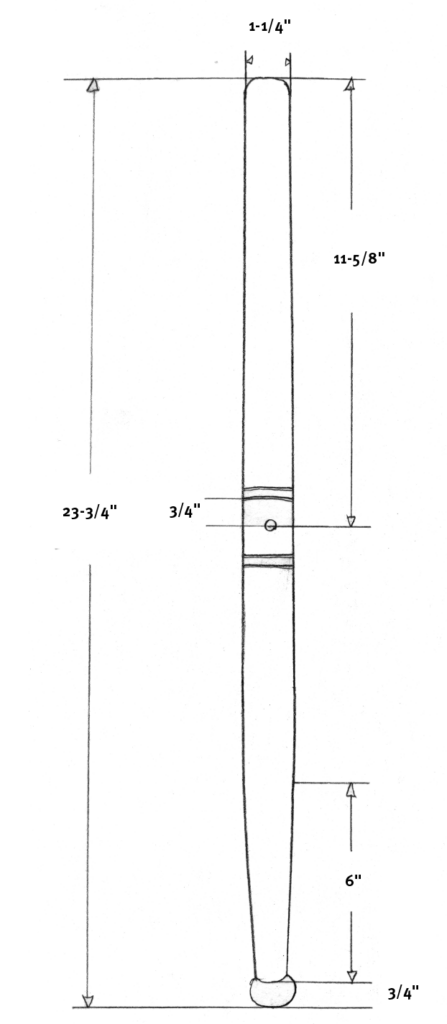
Leg Elevation
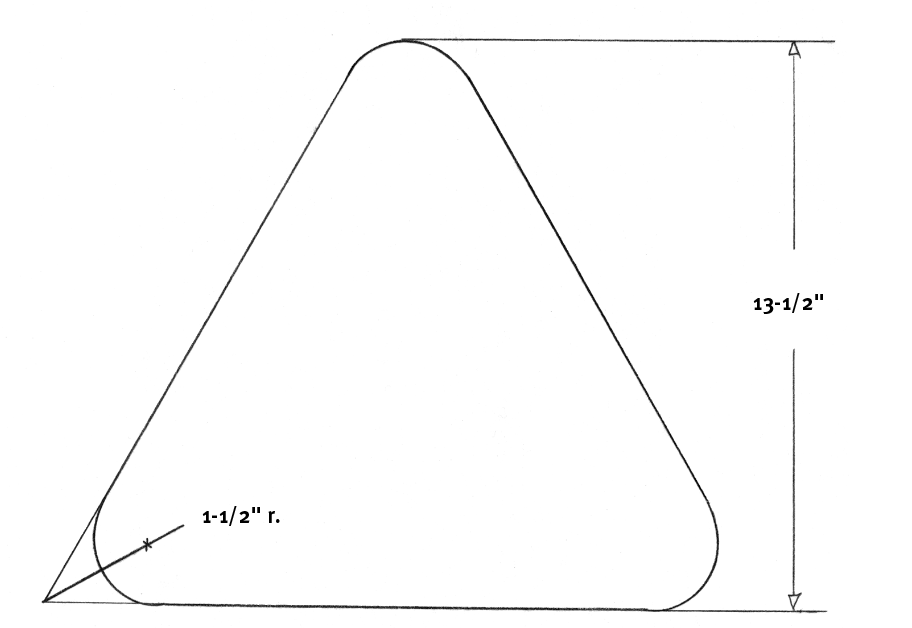
Seat Plan
Lips Plan
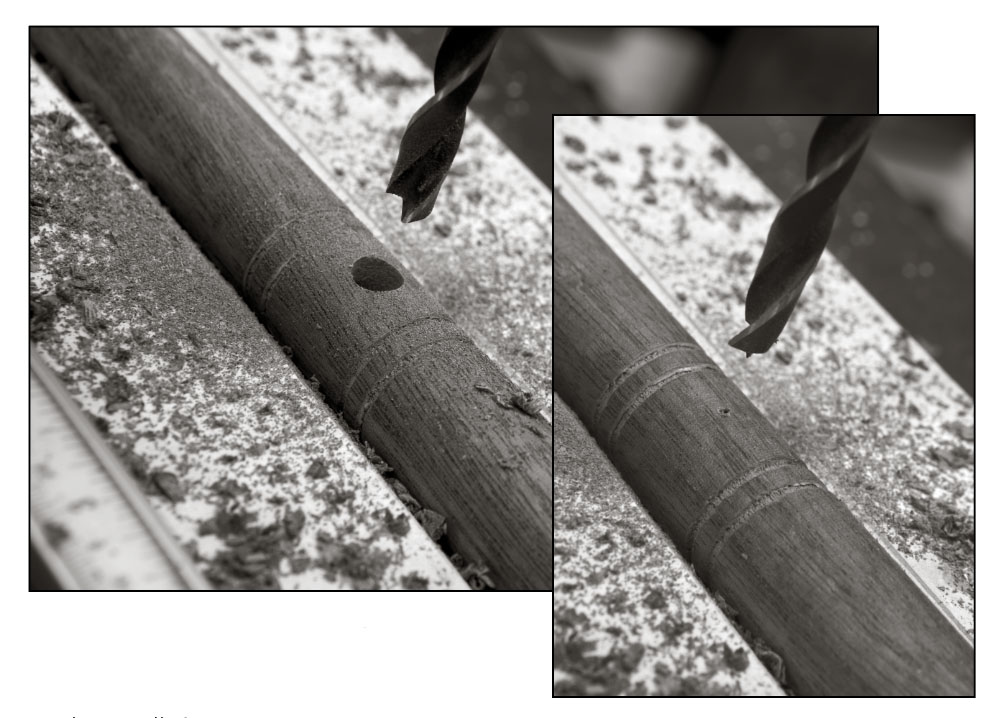
Bore Three Holes All three holes are located in the same spot on each of the three legs and should be the same diameter – just big enough to allow the hardware to pass through. The holes are located 11-5/8″ down from the top of the legs.
The best way to bore these holes is with a drill press or hand-powered post drill. You want the hole to be dead straight and pass through the middle of the leg. If you are a whiz with a hand drill or cordless drill then go for it.
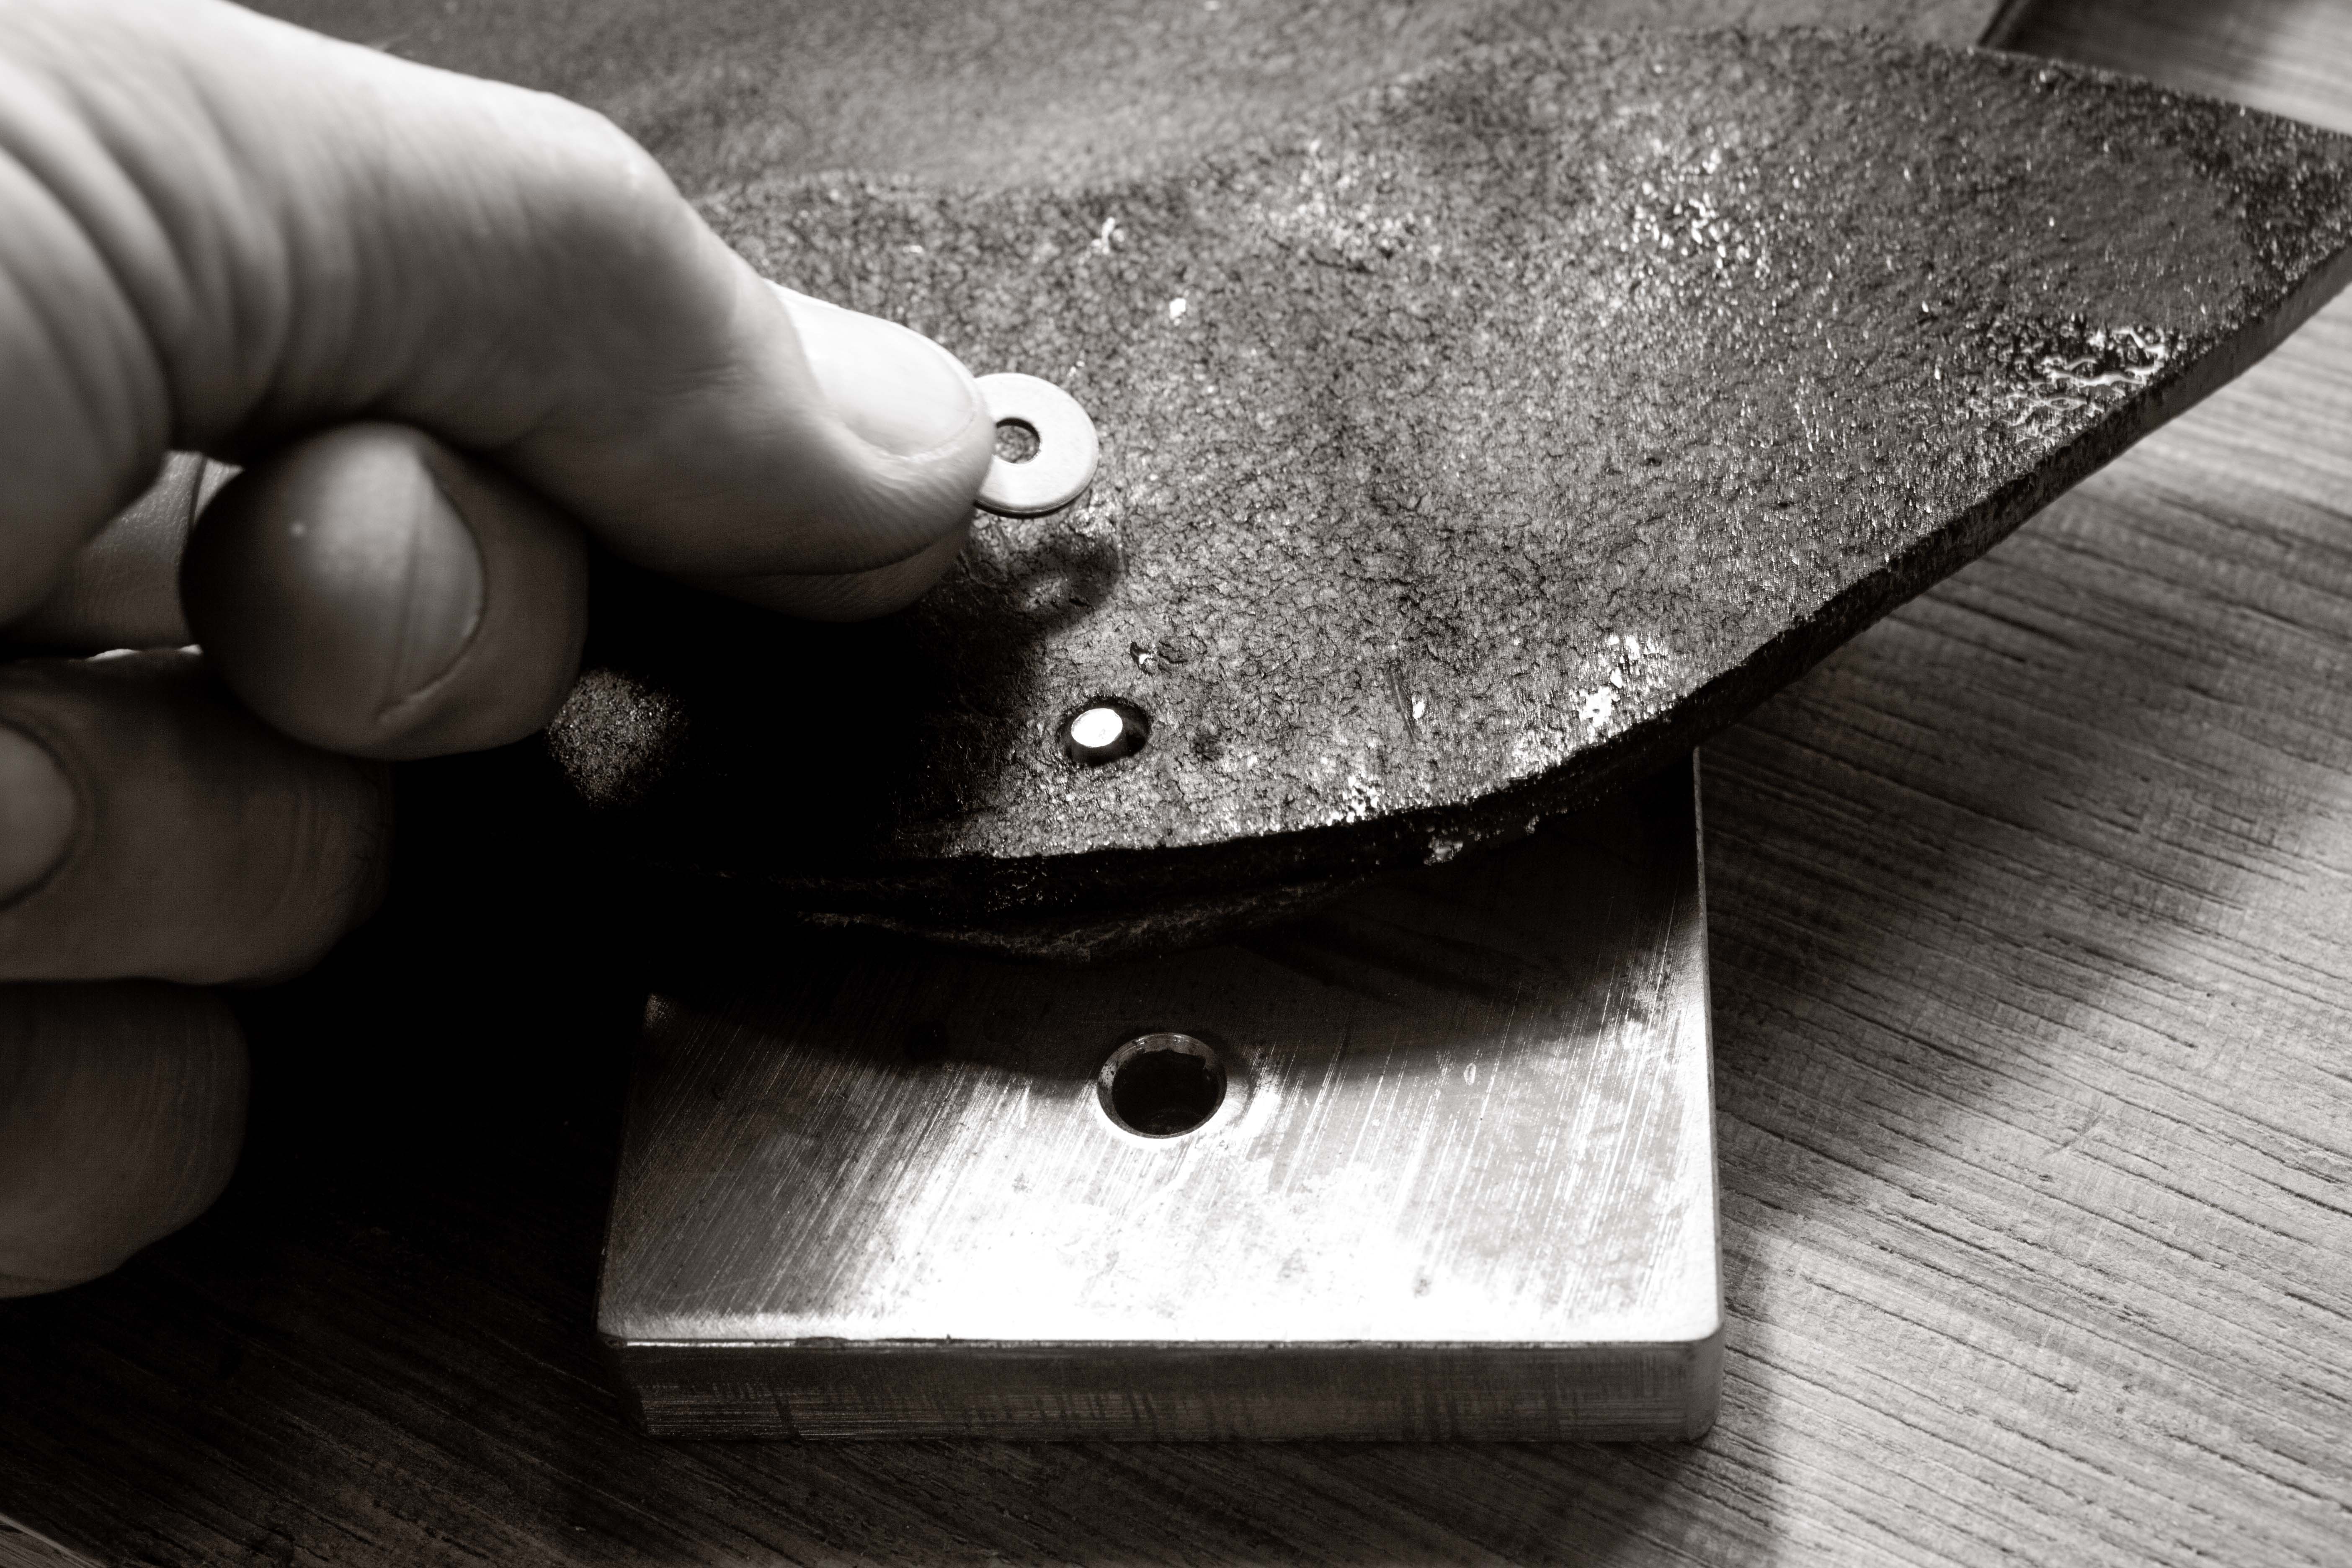
Dead center. The holes for the hardware need to be bored through the middle so the leg isn’t weak. A cradle helps hold the legs for drilling, no matter how you make the hole. Drill the hole so the brad point of the bit barely pokes through the leg (right). Rotate the leg so the tiny hole left from the brad point is facing up. Finish the hole.
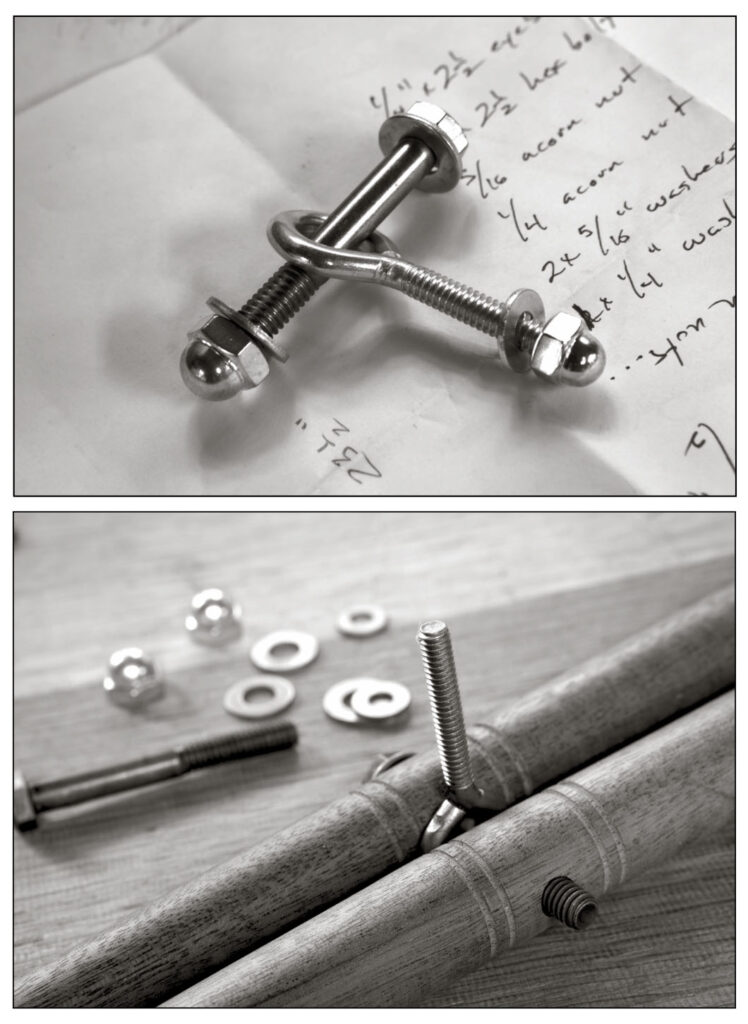
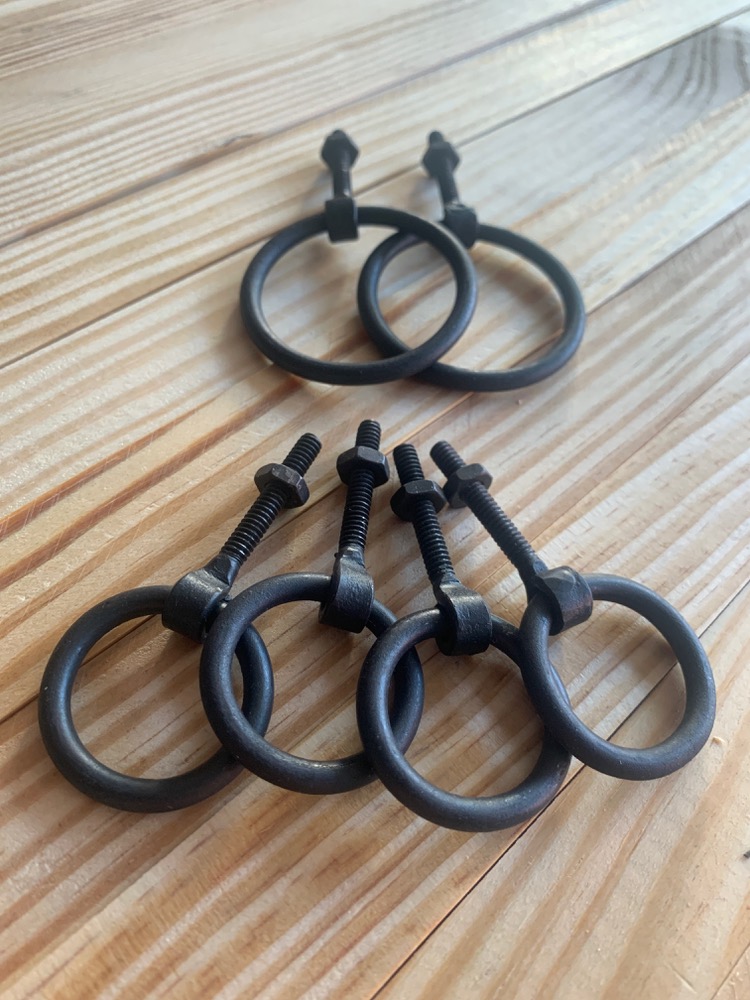
Install the Hardware Strip the hardware of its zinc if you like – I use a citric acid solution for this. Here’s how the hardware goes together:
• Put a washer on the bolt. Push the bolt through one leg. • Place the eyebolt on the post of the bolt. Put the other leg on the bolt. • Add a washer to the end of the bolt, then drive on the acorn nut. • Push the post of the eyebolt through the third leg. Add a washer and acorn nut.
Drill pilot holes that are deep enough to receive the No. 10 screws into the top ends of the legs.
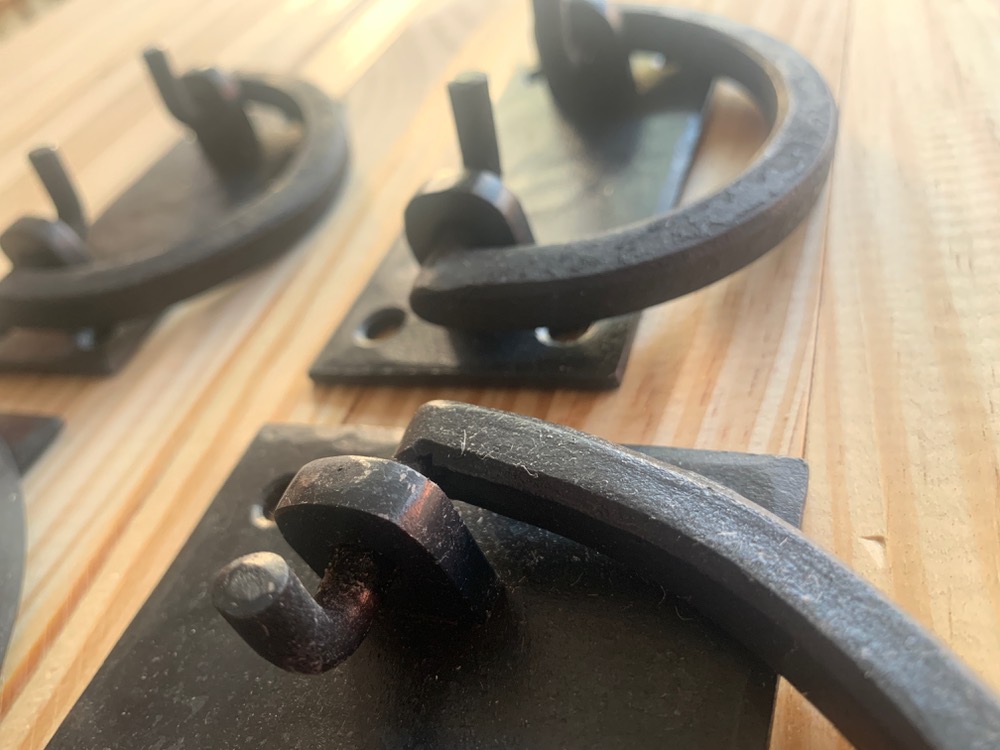
Common hardware. The bolt, eyebolt, washers and nuts are all items found easily at a half-decent hardware store.
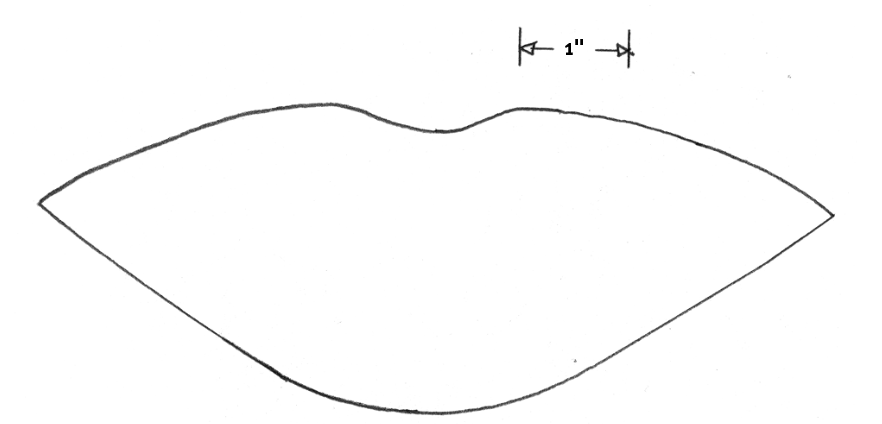
Leather Seat The seat is four pieces of material: a triangular seat and three pockets that look a bit like lips when you cut them out. When I cut out leather, I make patterns for my pieces from thin MDF or hardboard – usually 1/4″-thick material.
Knife work. You will probably make more than one stool, so make plywood patterns of the seat parts and cut them out using a sharp utility knife.
Put the patterns on the leather and cut out the seat and three lips using a sharp utility knife.
You can hand-stitch the lips to the seat. If you aren’t up for stitching, rivets work well and give the project a military flair.
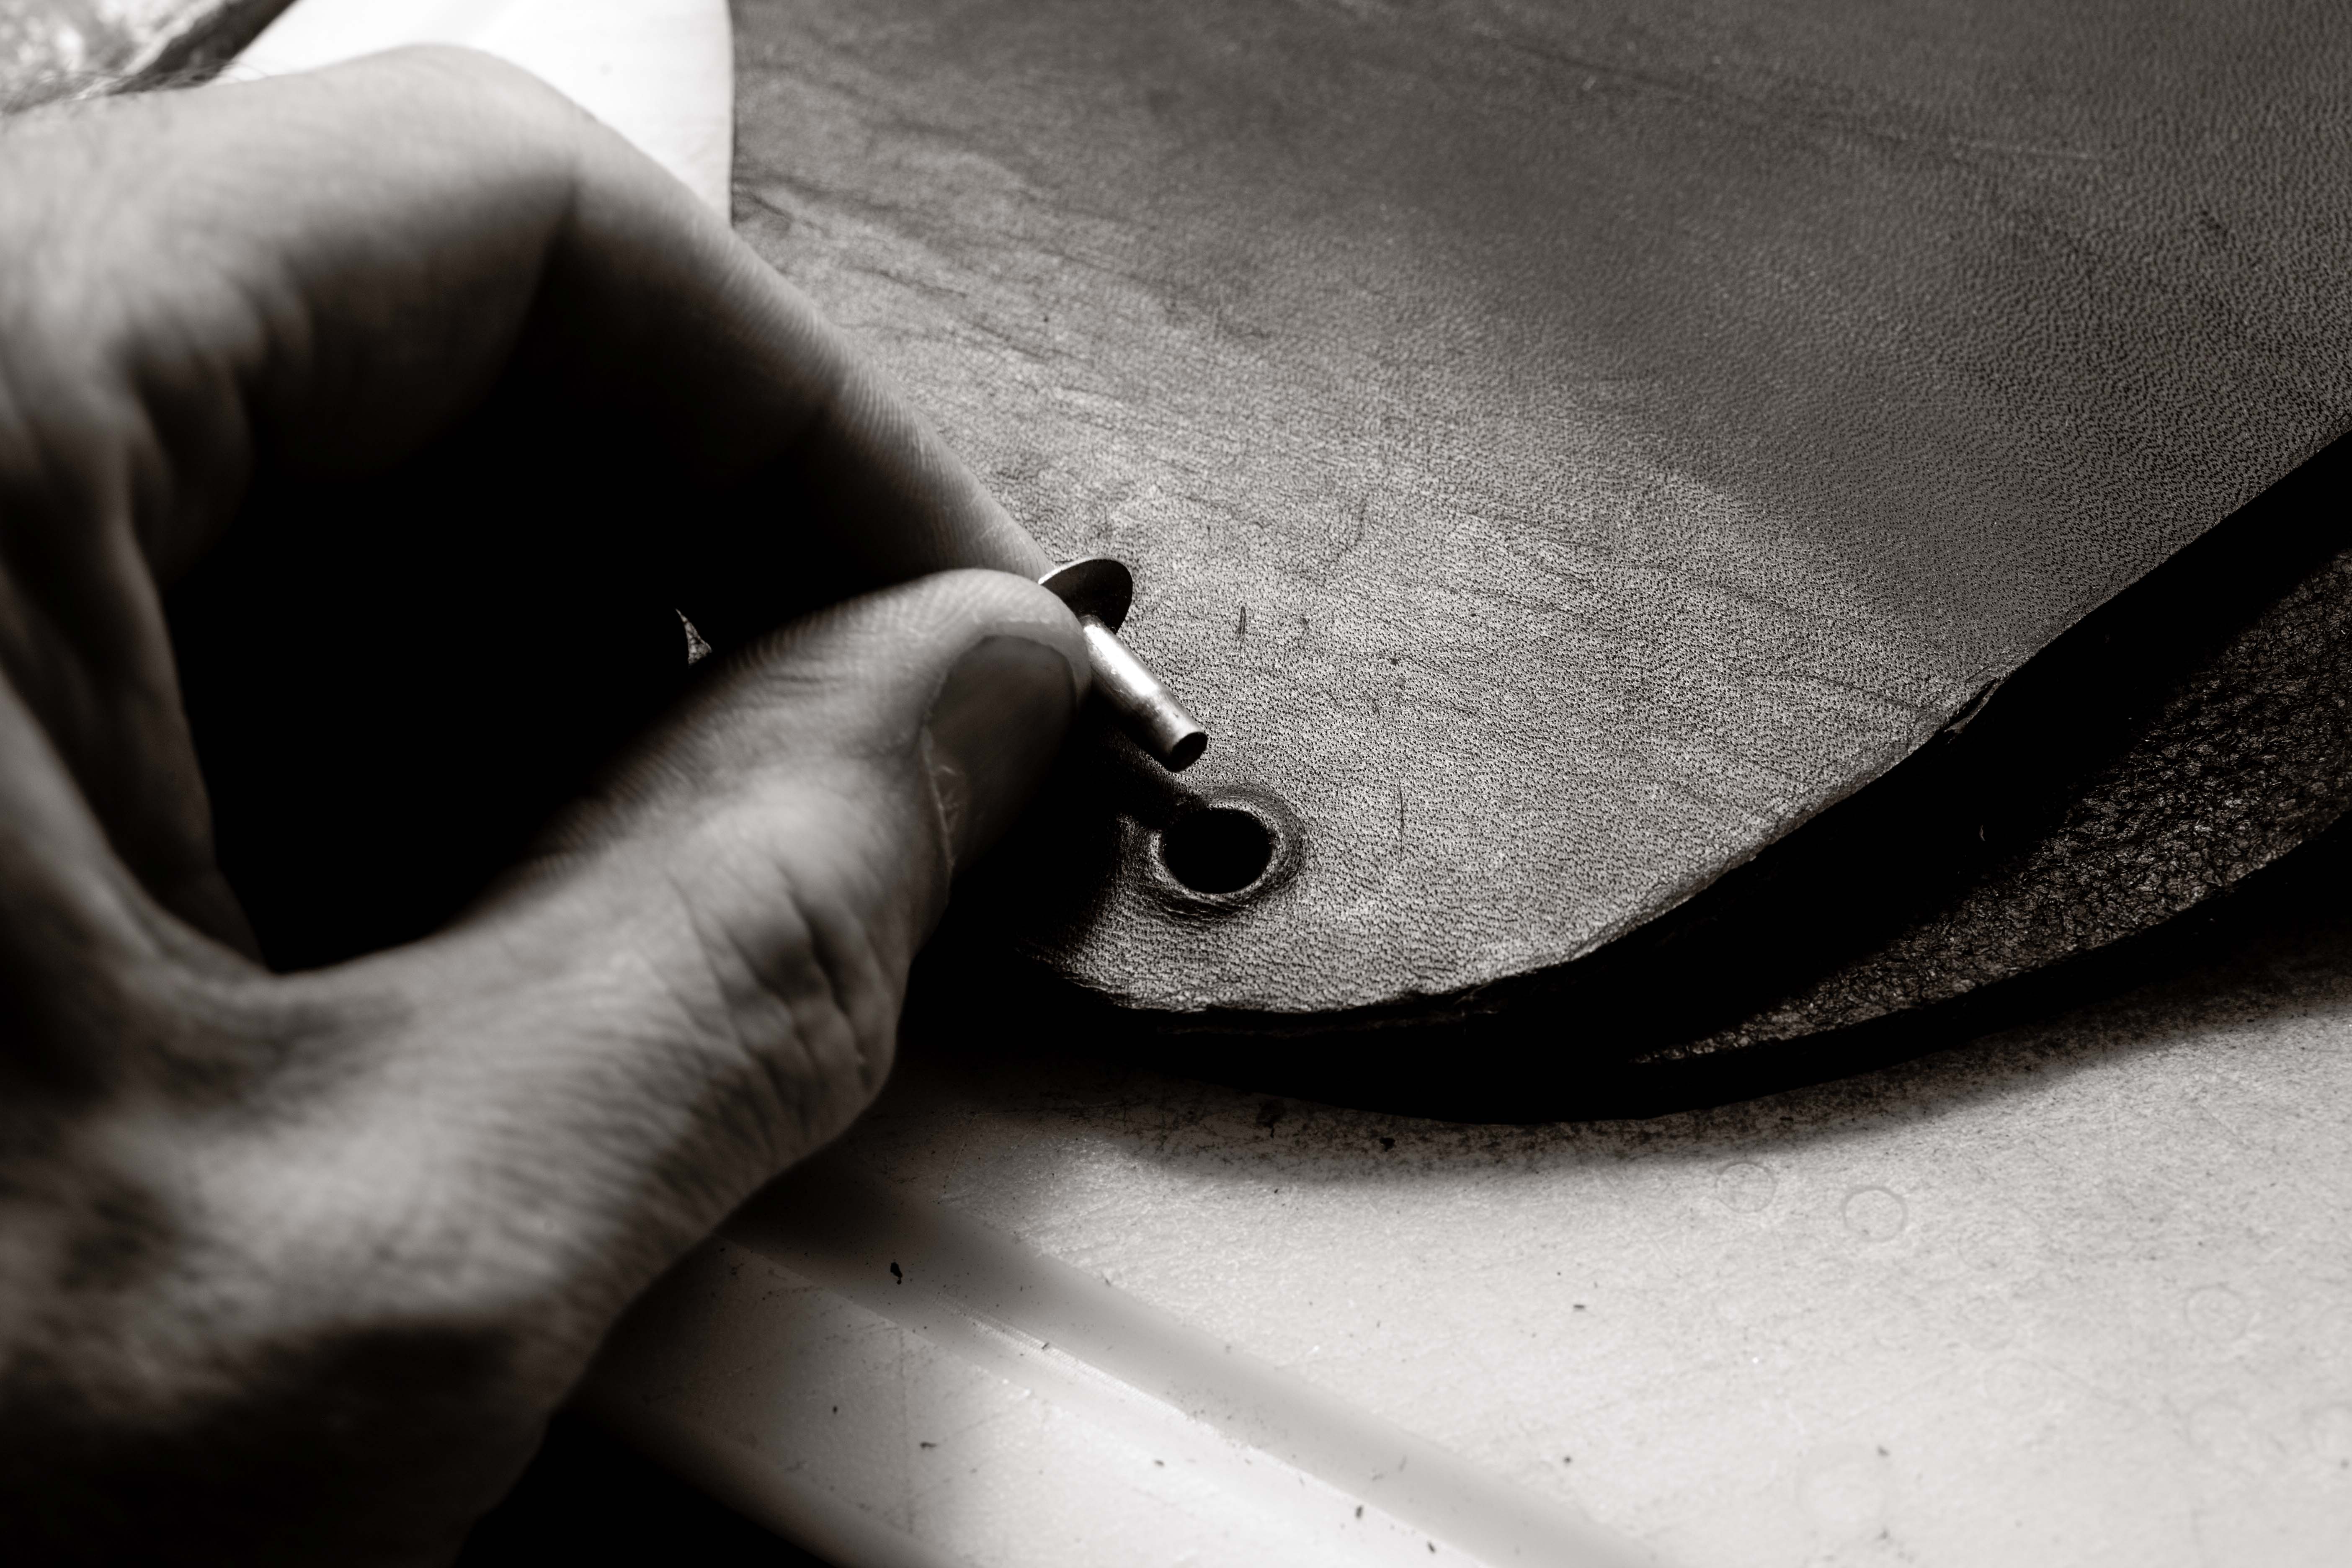
First punch. Using a leather punch, make a hole through the seat and pocket piece. I’m using a kitchen cutting board as a backer.
Secure each lip to the seat first with one rivet at one of the tips of the seat. Punch a snug hole for the rivet through both pieces of leather, drive on the washer or “burr,” snip off the excess and peen the post over the burr.
Insert the rivet. Put the rivet through the holes. The flat face of the rivet should be on the top surface of the seat.
Now bend one end of the lip up and rivet the end to the seat about 1/4″ from the end of the lip. Repeat for the other end of the lip. Finally, add two more rivets between the three existing rivets. Repeat the whole process for the other two corners.
Like a washer. The “burr” part of a traditional rivet is what pinches the leather. Place it over the post. Then drive it on the post with a rivet setter.
One quick note on neatness: Be sure to put the burr so it faces the floor for all these joints.
After the pockets are riveted, use a sharp utility knife to trim any little bits of the pocket that aren’t flush to the seat.
If you purchased undyed leather, finish the leather with a dye, oil and wax. Burnish the edges with a piece of wood and a little spit (water will do nicely as well).
Attach the seat to the legs. Punch a clearance hole through each lip that will allow a No. 10 screw to pass. Screw the leather to the legs with a finishing washer under the head of each screw.
That’s all there is to it. You can make the tool easy to transport by making a belt that will go around the girth of the closed stool and screwing that belt to one leg. Or you could make a canvas bag embroidered with your football team’s logo. After all, when going into battle, it’s always best to fly your colors.
A new kit of forged hardware for a three-till tool chest from Horton-Brasses, displayed here on an end piece for an ATC (7/8″ x 21-7/8″ x 24″), so you can get a sense of scale.
We got our hands on a set of new hardware for the “Anarchist’s Tool Chest” (or any large chest, really) from Orion Henderson at Horton Brasses – he’s calling it “The Anarchist’s Tool Chest – Reforged” – because it is hand forged for the company by a blacksmith. (The company is still offering the original kit, too.)
The kit includes two surface-mount chest lifts (HF-46; 6″ wide x 3″ tall) with square-head bolts included, two hinges (HF-49; 1-1/2″ x 2″ x 1/8″; fits stock 3/4″ to 7/8″ thick) with matching black screws, two sets of small ring pulls (HF-51) for the top two tills and one set of large ring pulls (HF-52) for the larger bottom till. (All the components are also available separately.)
A close-up look at the lifts.
This is some beefy, beautiful stuff. I think its rugged handsomeness will look great on a traditional tool chest, and I hope to order a set to install on the almost-finished ATC that is awaiting my return to the Lost Art Press shop. (I’ll be selling that chest, so the hardware and other finishing touches will be up to the buyer, of course).
And you might be wondering why only two hinges instead of the usual three Horton Brasses PB-409 hinges I’ve been using on these chests: These are substantial enough that two ought to be plenty strong. Christopher Schwarz assures me this is so, and he has made a number of ATCs with but two Peter Ross hand-forged hinges of various designs, so he would know. (For the record, I still think Peter Ross’s chest hardware is the cat’s meow – but this nice set is a fraction of the cost.)
Ring pulls.
Horton is also offering a smaller version of the chest lift (HF-45; 3″ wide x 2″ tall) that I think would look great on a Dutch tool chest.
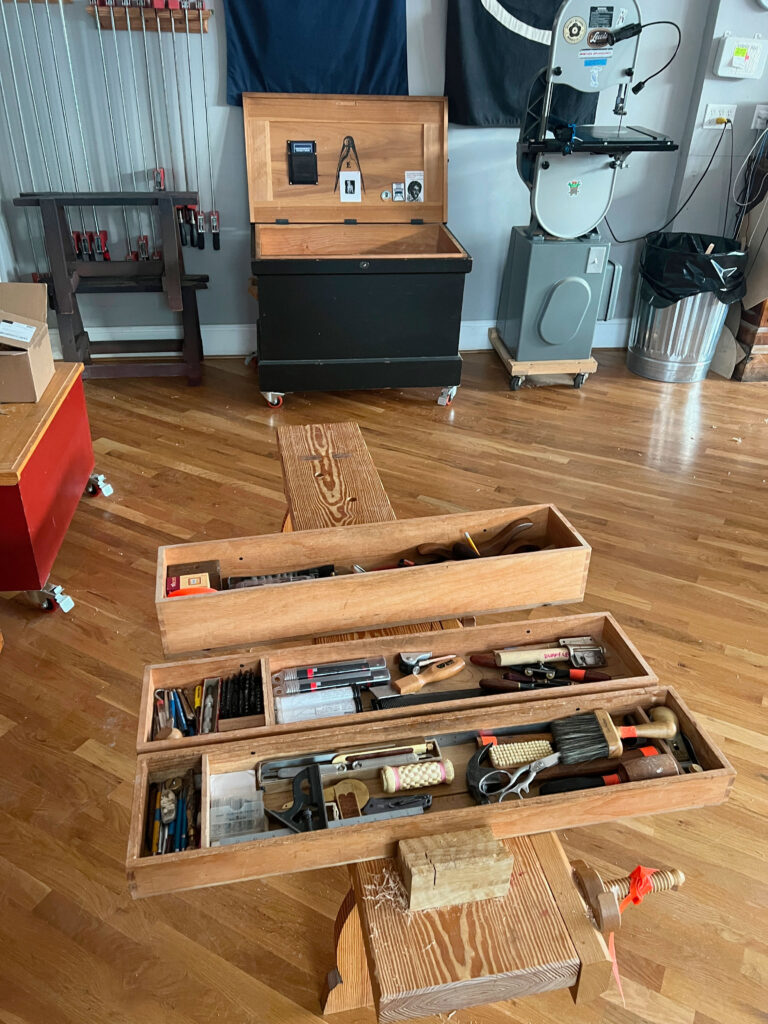
We receive almost-weekly requests for a current inventory of my tool chest. Usually, I am too swamped with work to take a complete inventory. Luckily, I had a couple days of downtime last week and took the opportunity to clean out my chest and take stock.
Not much has changed in terms of the chest’s structure since the publication of “The Anarchist’s Tool Chest” in 2011. I have nailed in a few dividers in order to corral small tools – plus I added a couple tool racks. But that’s about it. The chest continues to age gracefully, and I am just as grateful for it as I was the day I finished it in December 2010.
The tools have changed a bit as I now make more chairs for sale. In 2010, I was making only three or four chairs per year. This year I made almost 20.
This inventory is arranged first by location (the top till, middle till etc.). Then tools in that location are grouped by function (measuring, bashing, reaming, poking, slaying).
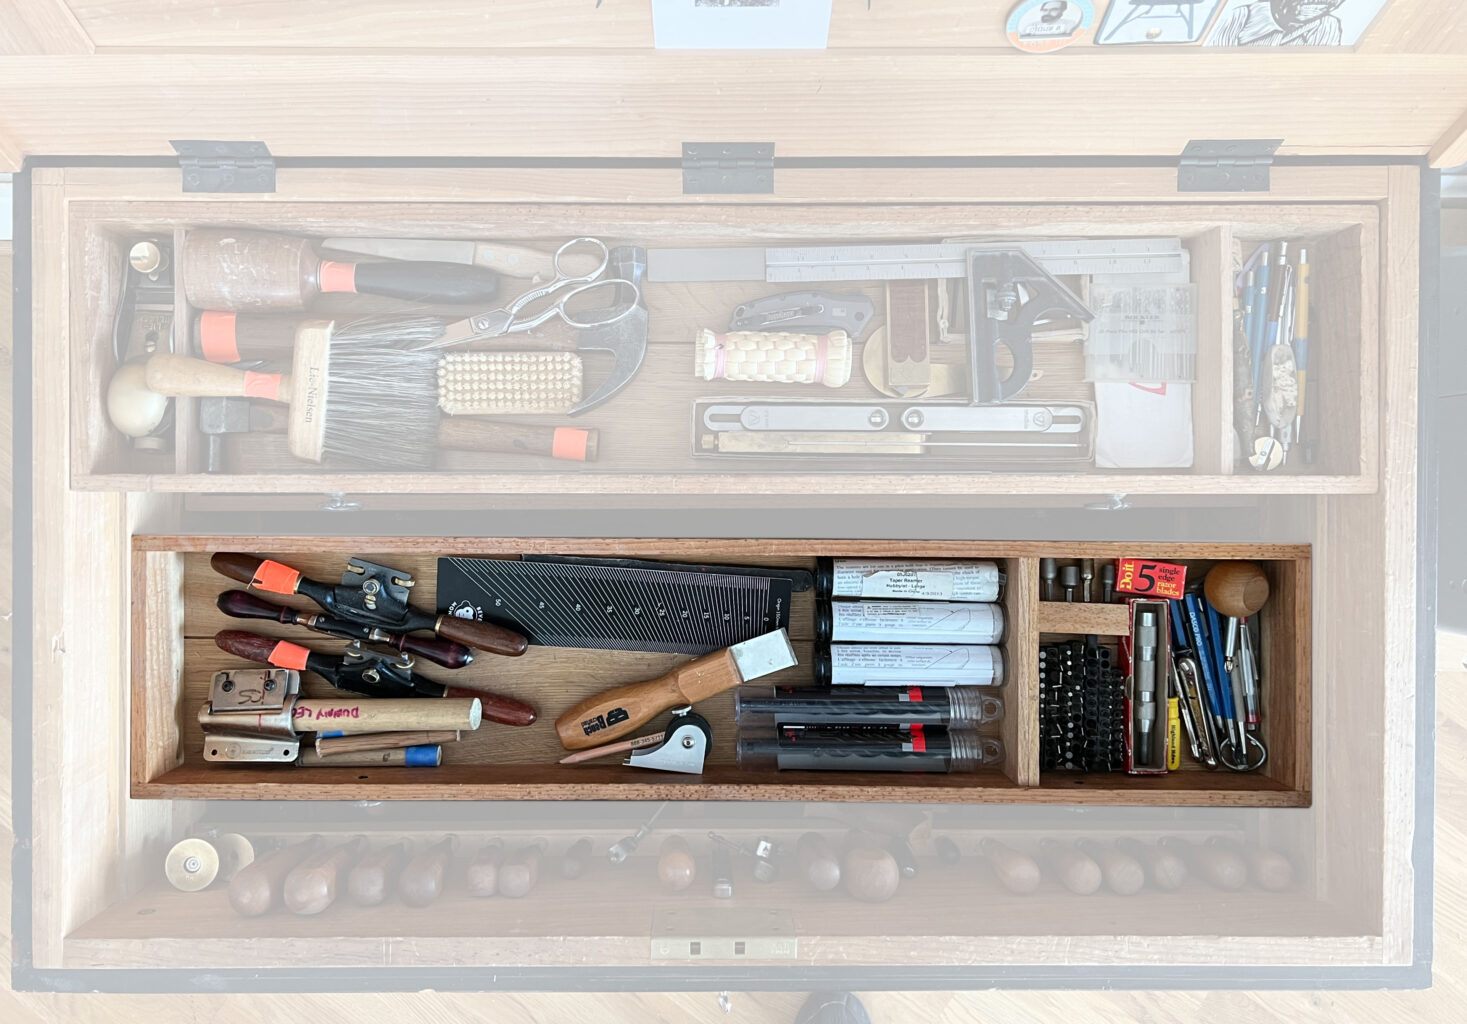
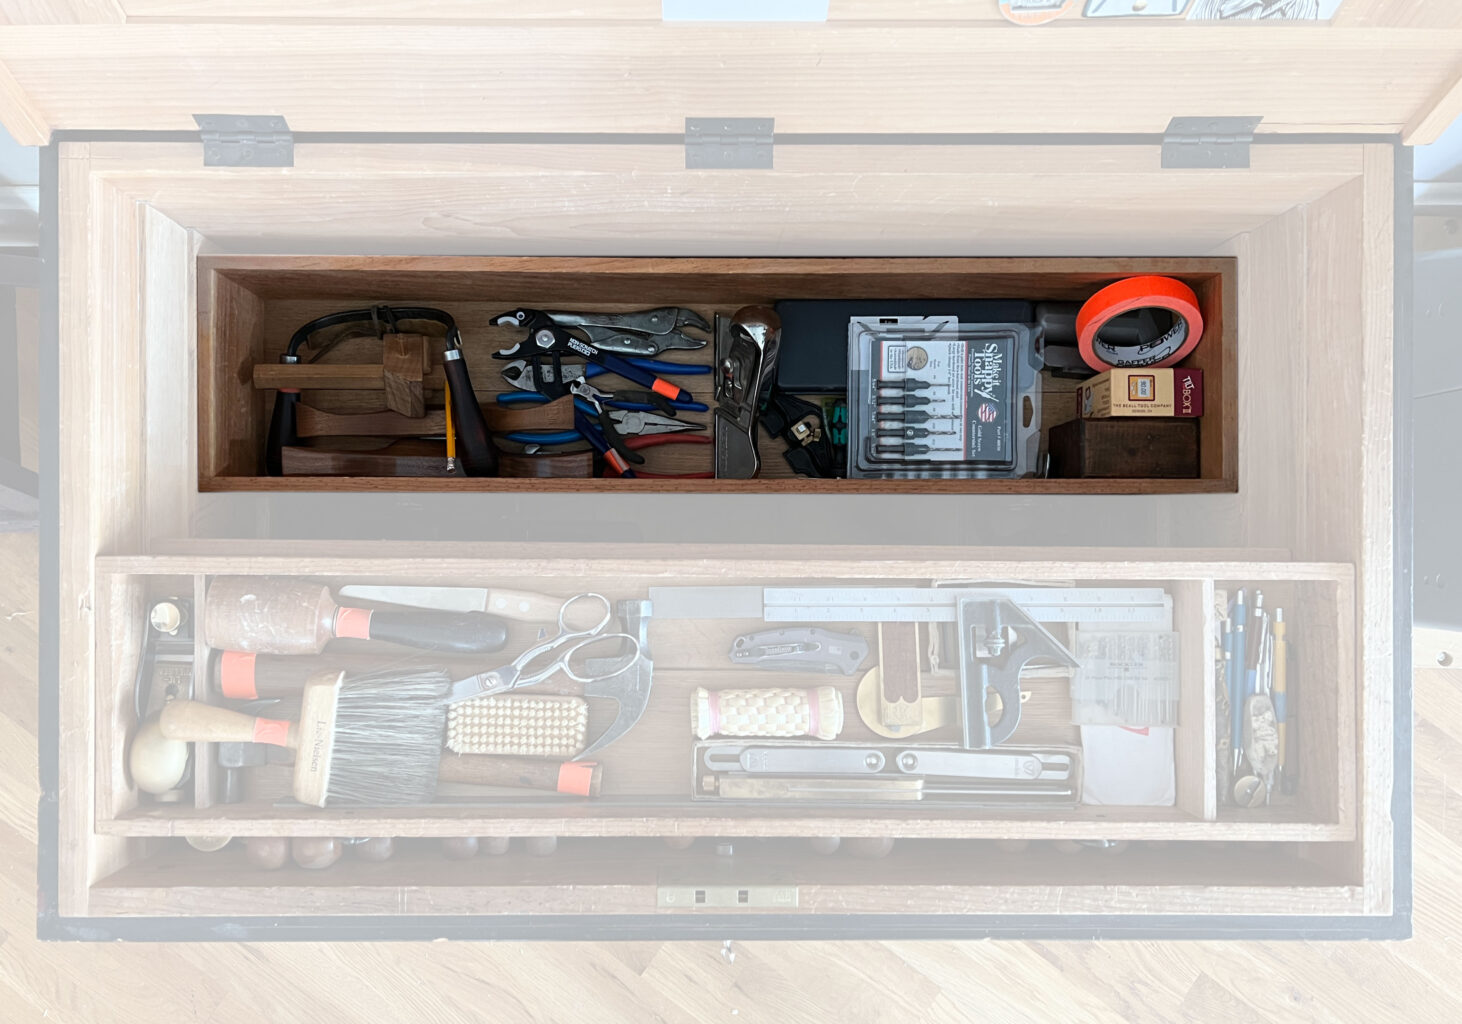
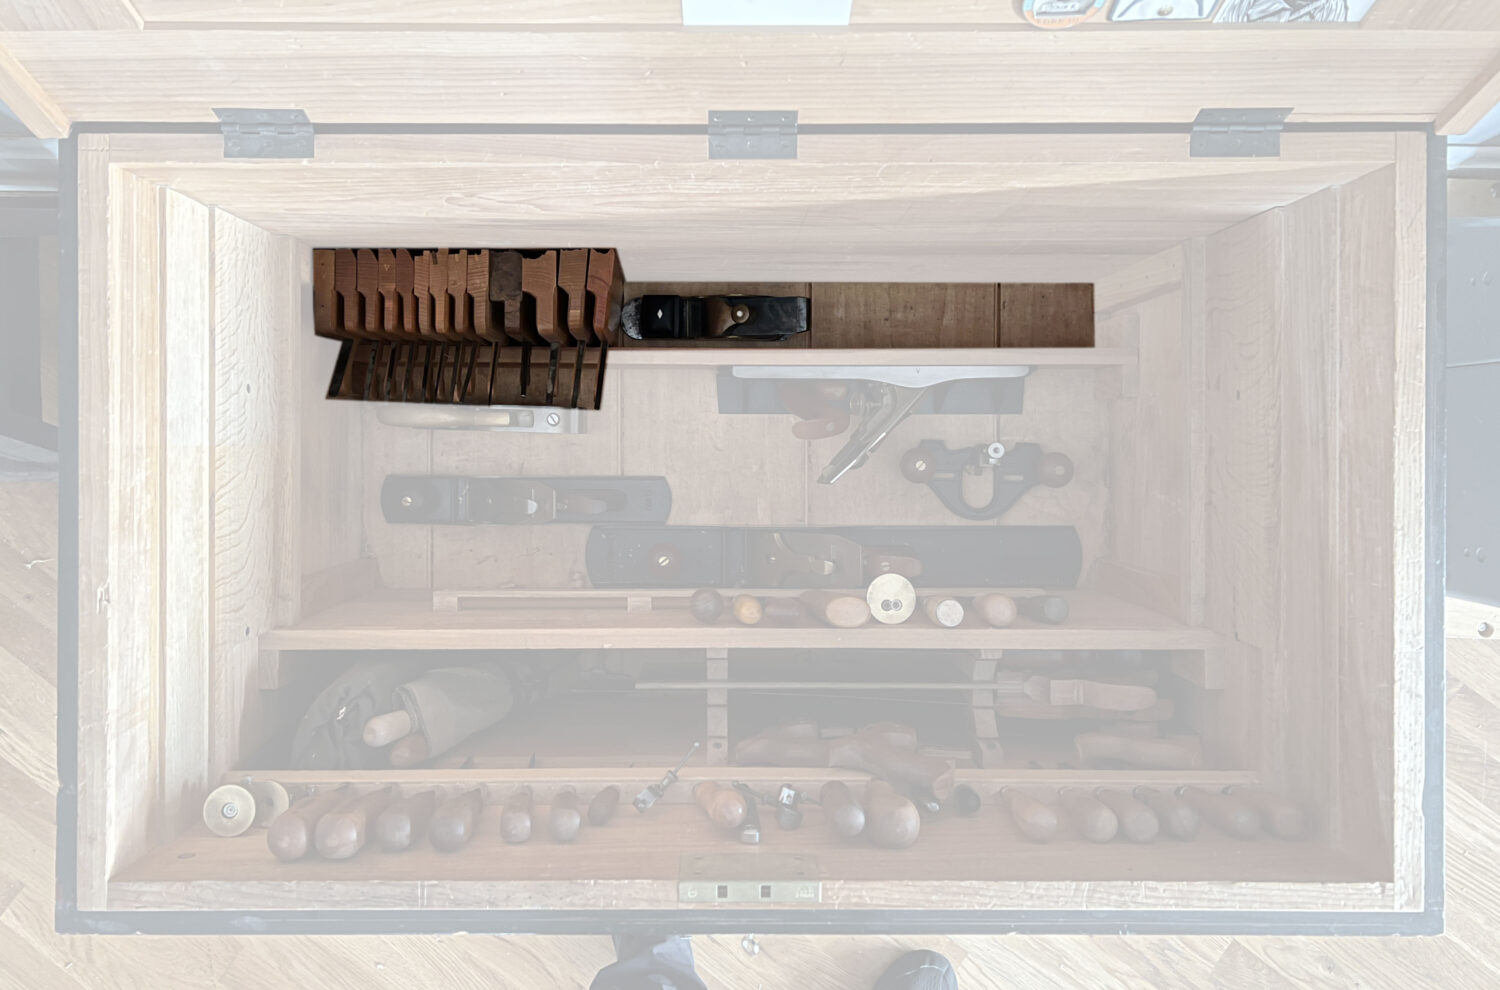
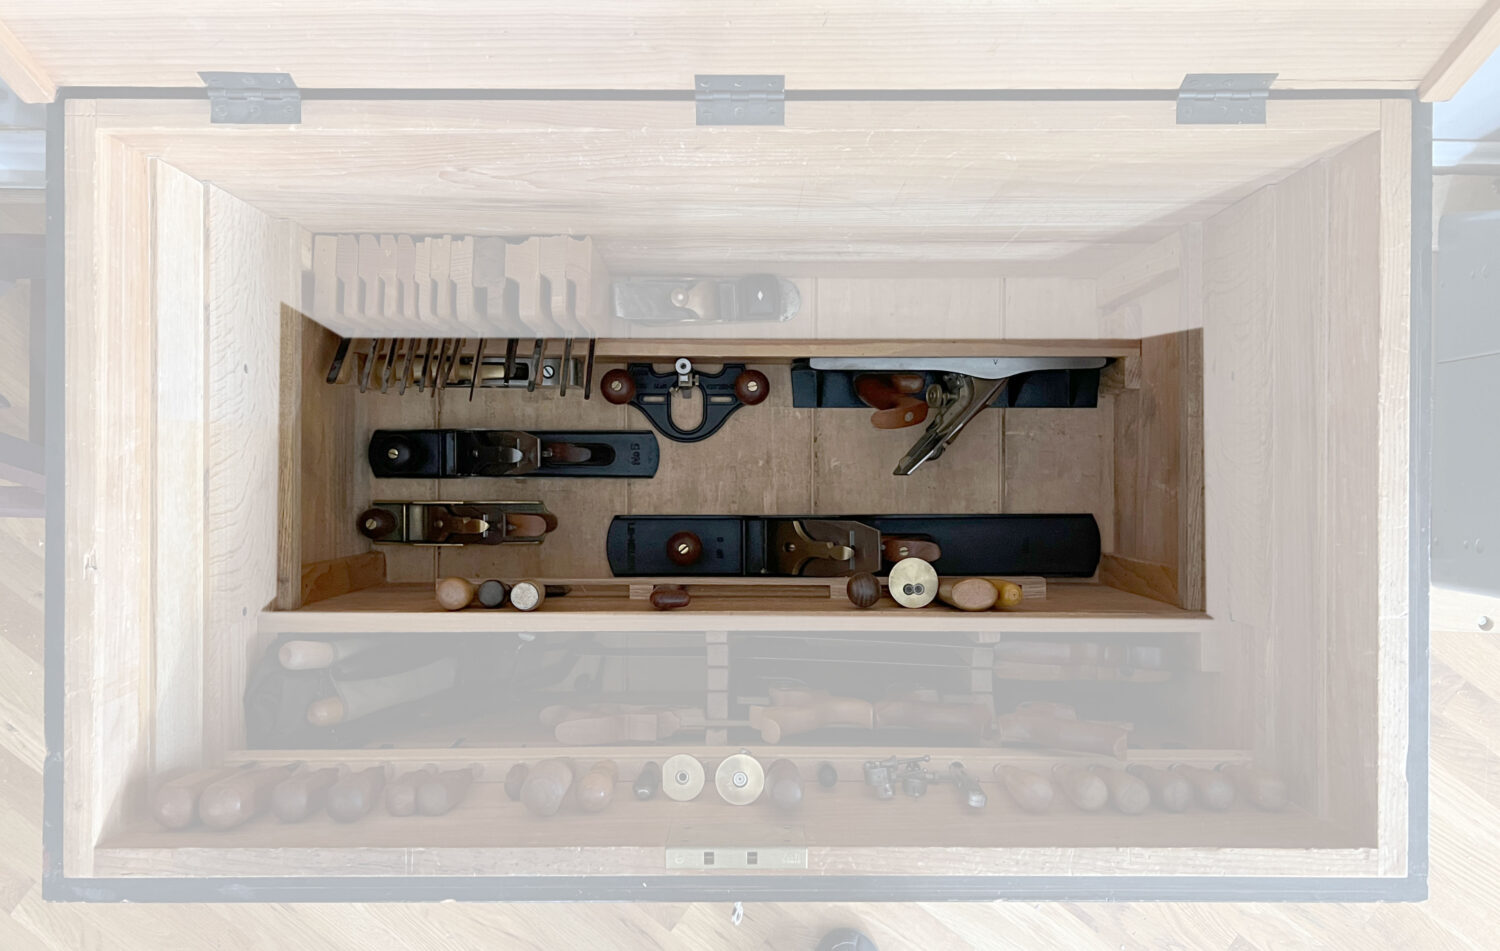
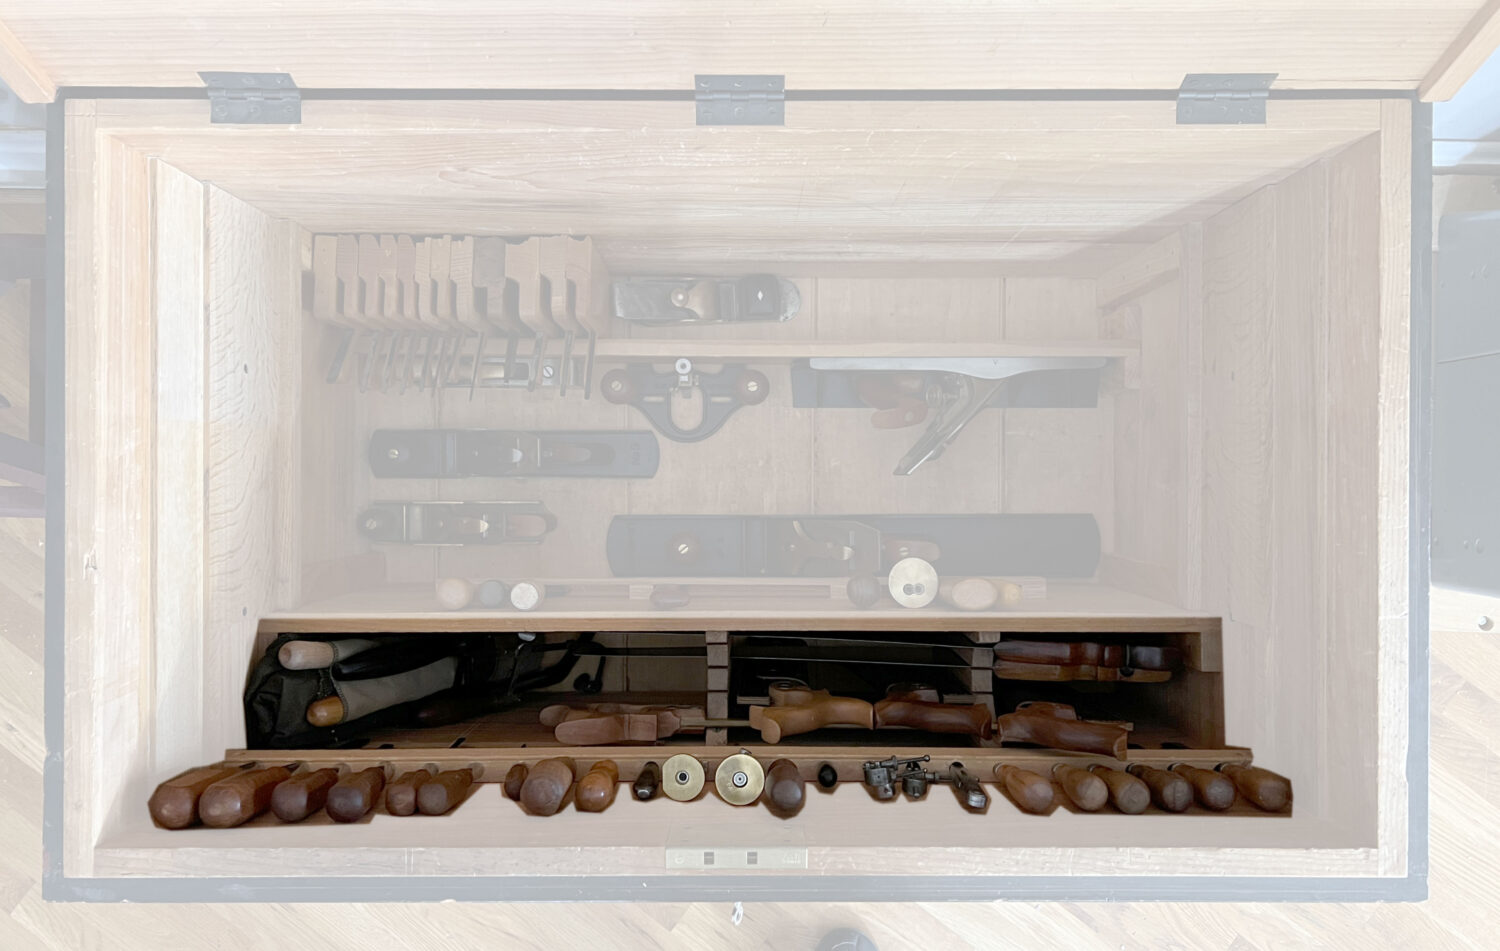
My tool chest on Dec. 28, 2022, during the inventory.
I hope this inventory is useful in some small way. I know there will be questions about why I own “particular tool A” instead of “particular tool B.” There are a handful answers to those questions. Let’s get them out of the way.
This is a tool I have had for decades. There might be better/newer ones out there, but I am happy with this one.
This tool was made by someone I have a strong connection to or someone I admire.
We make this tool. Of course I like it.
I have no clue why I own this tool.
It is the ideal tool for the kind of things I build.
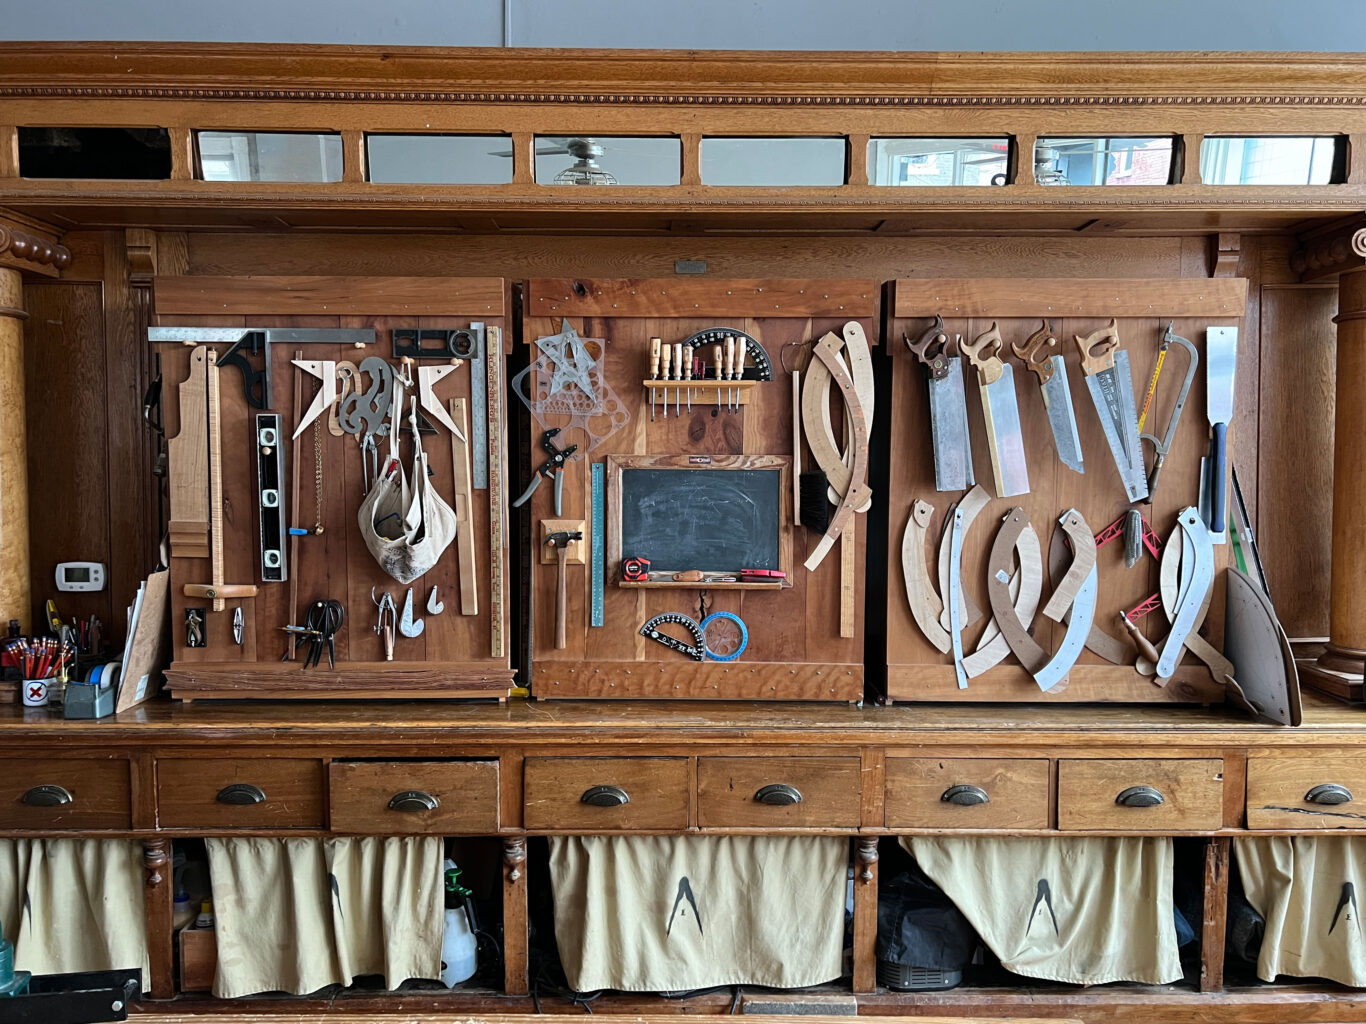
The communal tool wall.
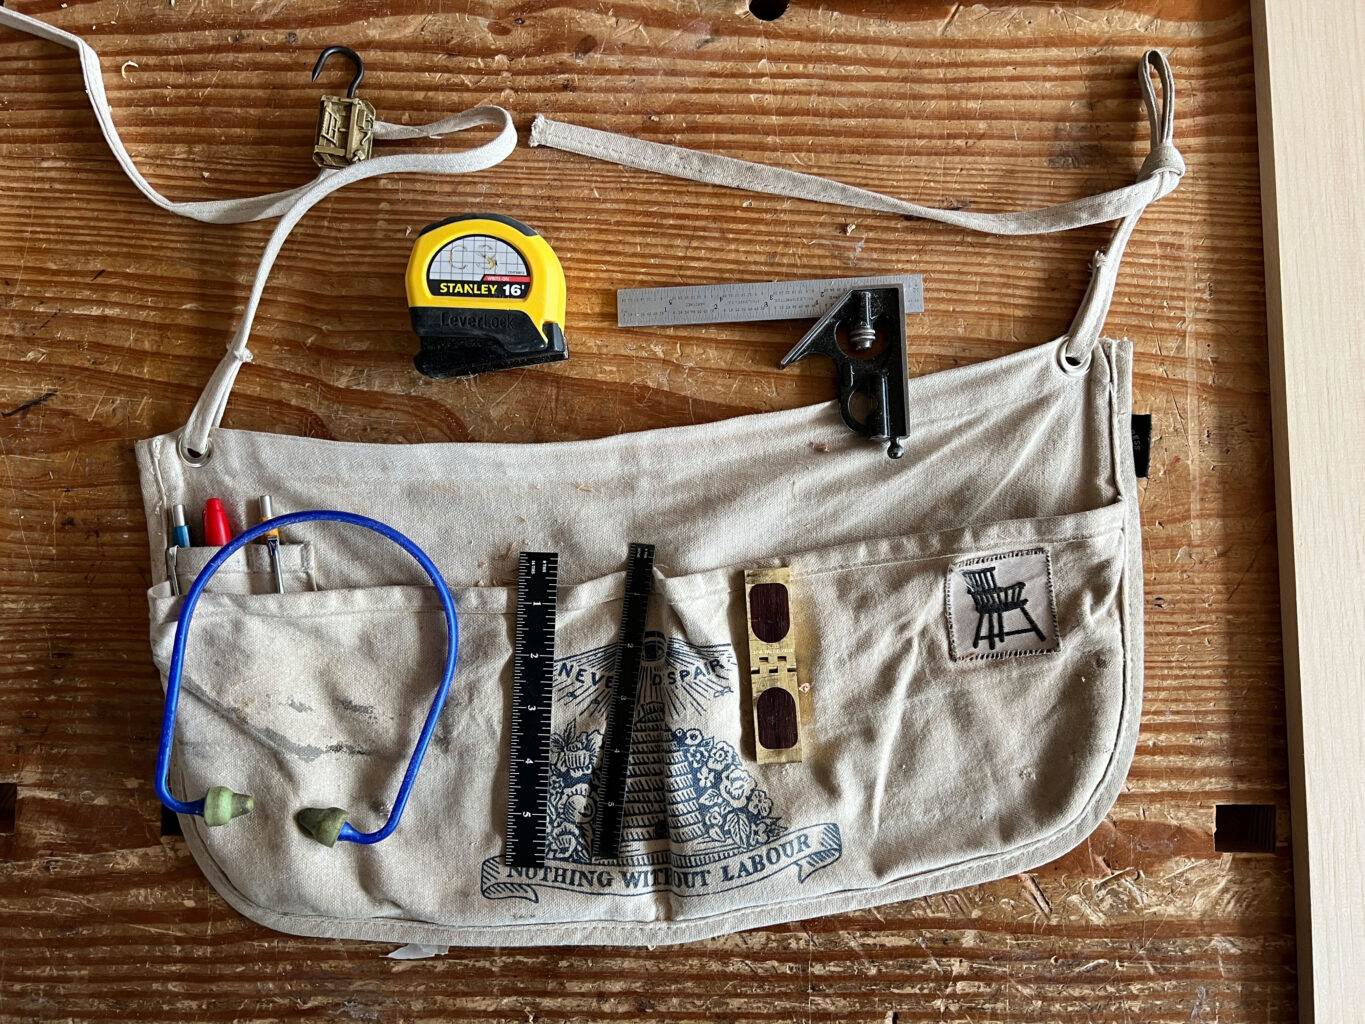
My waist apron.
And I know some of you will ask: Why don’t you have a compass or pinch rods or….in your chest? The answer is likely that those tools are hanging on our communal tool wall or in my shop apron (both pictured above). The tool wall is used by me, Megan, instructors and students. In other words, I couldn’t just lock up this chest and sail to the New World to set up shop. I’d need to first throw in a few other tools. But I promise they would fit (along with my underwear).
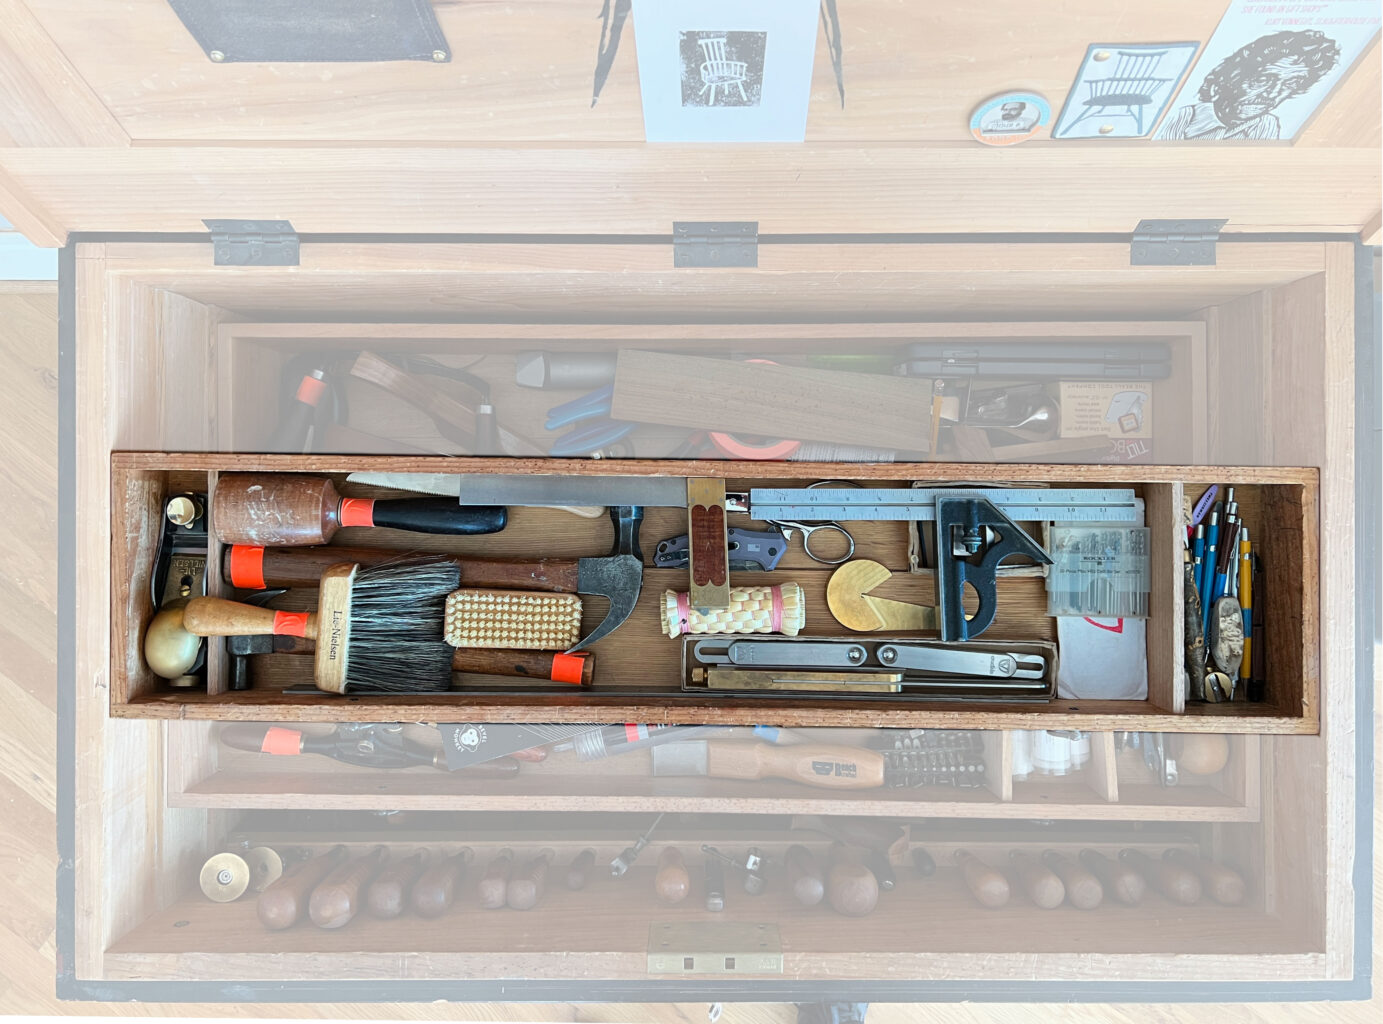
Let’s start the inventory with the top sliding till of my chest.
The Top Till
These tools have risen to the top of the chest because I use them many times a day. Think about it: A combination square wallowing at the bottom of a chest like a catfish will just slow you down. This till also gets the dirtiest and has suffered more wear than the others. Because of the wear, I added slick plastic “drawer tape” to the sides of the till to keep it from racking.
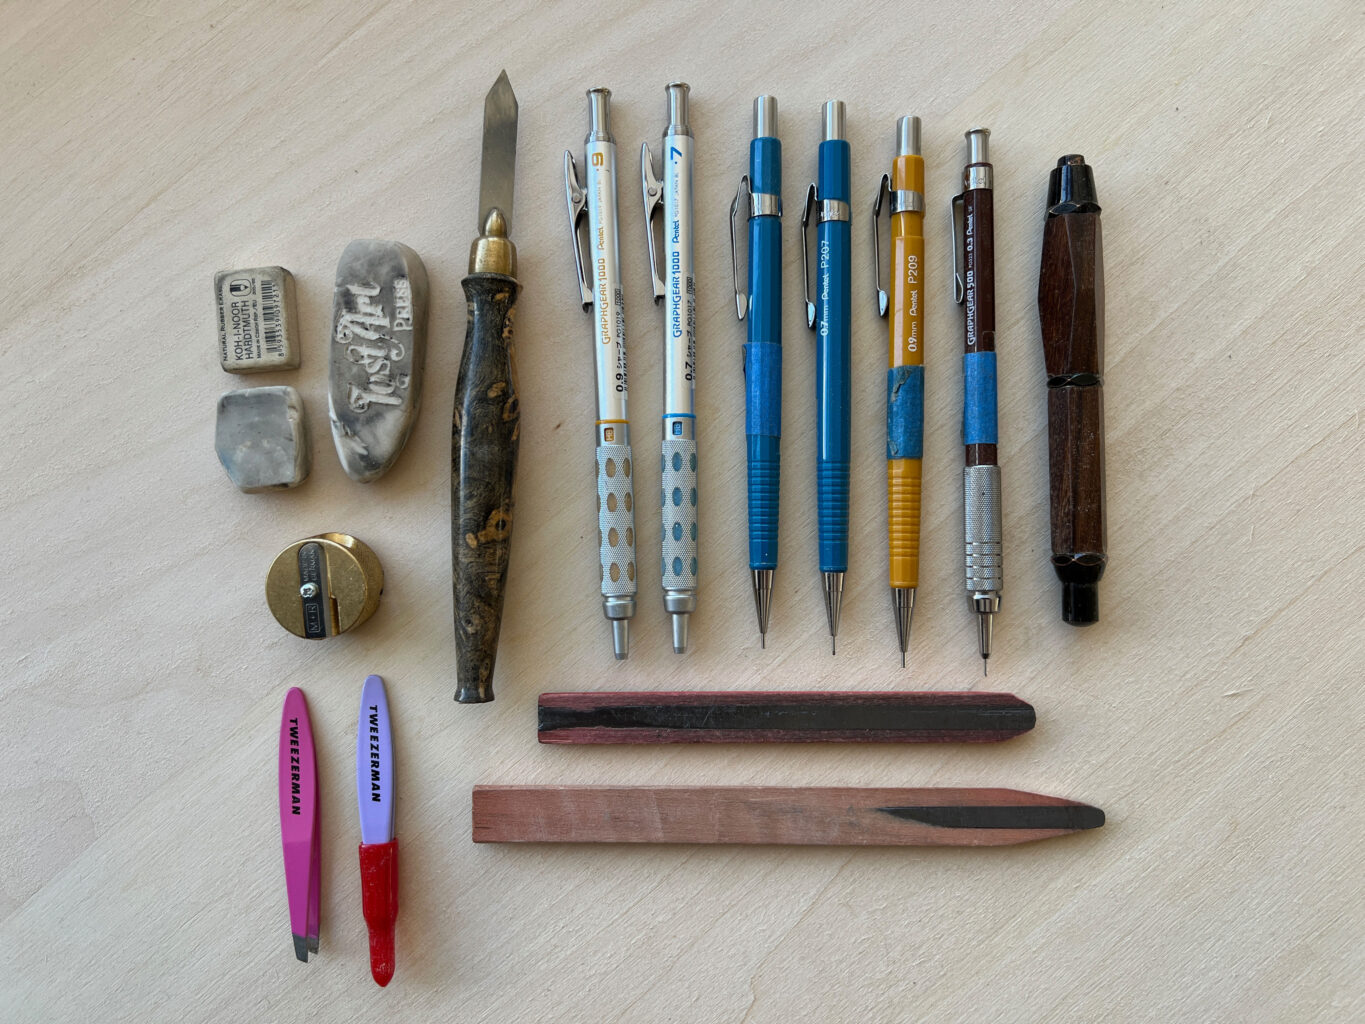
Marking & Flesh-digging Tools
The right-hand divider contains all my mechanical pencils, my half-pencils (everyone needs them) and my “unturned pencil” for marking out rough cuts. Plus artist’s gum erasers, my M+R pencil sharpener and a Blue Spruce marking knife with a broken finial. The knife is a personal thing. An Arkansas doctor sent me the knife, which is made from a wild burl that one of his patients had dug up. The patient, a long-time reader, asked the doctor to send me the knife before the reader died. I couldn’t say “no” to that. Finally, there are my Tweezerman tweezers, which are fantastic for digging out splinters.
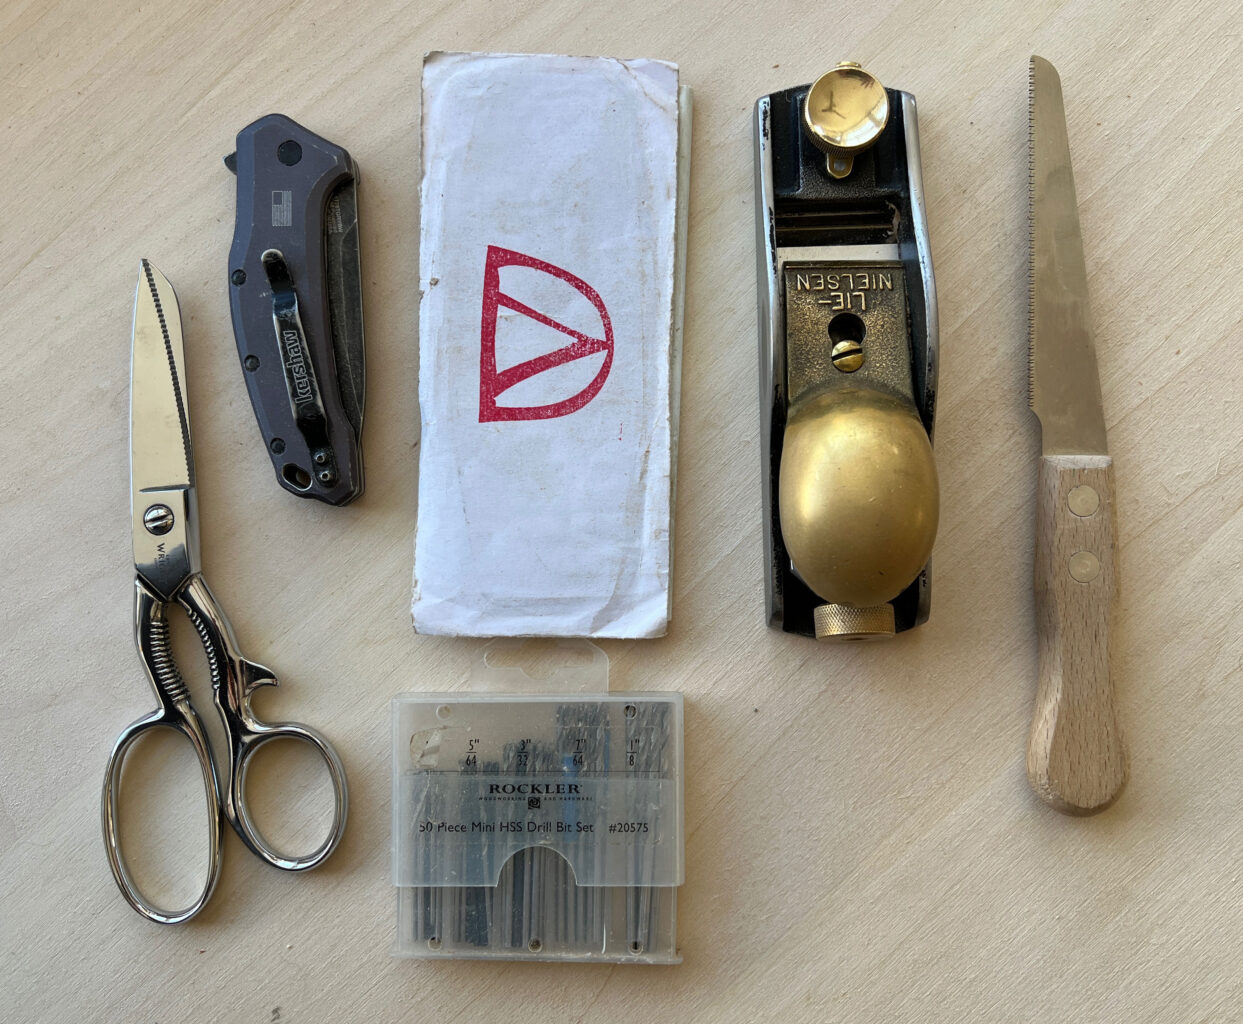
Cutting Tools
I was surprised at how few cutting tools are in the top till. The Ernest Wright scissors are from Sheffield, England, and are of insane quality (thank you, Matt!). The Kershaw pocket knife is inexpensive, made in the USA and damn-near unbreakable. Crucible Curved Card Scrapers – because they are the best (my boss made me write that). A collection of small drill bits in a handy case that I use constantly (get one from Rockler here). My Lie-Nielsen 60-1/2 block plane, because it is the best. And a small flush-cut saw from Lee Valley (choose “single-edge saw” on the drop-down to buy this one).
Beating & Scrubbing Tools
I know, it’s an odd grouping of tools. But here we are. The small hammer (11 oz.) is a no-name hammer that I use for driving pins and adjusting planes (yes, I hit only the metal bits with this hammer). The bigger hammer is a 16 oz. Plumb with an octagonal handle. After trying to reproduce my magical favorite nail hammer, we concluded that we couldn’t beat the old Plumbs in price or value. Get one. Plumb made millions of these suckers.
My 16 oz. Blue Spruce mallet is a long-term survivor. I chop dovetails and hinge mortises with the help of this guy. The polissoir is made by Cate Richards (I love the pink). The Lie-Nielsen brush is an essential and personal favorite for getting shavings and dust out of the mouths of planes. And the fingernail brush is used to clean the teeth of my rasps.
Oh, about the orange gaffer’s tape. I put that on tools that tend to wander during classes. Thanks to the tape, I can spot my tools across the room.
Measuring & Marking Tools
At top is my Starrett 12″ combination square, a faithful companion since 1997. Below that is a Chris Vesper try square, which is the ultimate arbiter of 90° in the shop. Worth every penny. A Starrett 24″ rule fits into the combination square and helps with big layouts. The Crucible brass center square is indispensable for chair work. Yes it marks centers on the ends of sticks. But it also allows you to mark radial lines on curved surfaces. The Crucible dovetail template is a natural fit for my work. The Vesper double square (based on old diemakers’ squares) gets inside joints to check their surfaces.
Below that are two Crucible Sliding Bevels and a larger Vesper Sliding Bevel. Sliding bevels are in constant use. I want good ones that hold their settings in a shop environment. Finally, a beloved Shinwa 12″ rule. Nothing special but immensely readable and useful.
Till Two
This till holds chairmaking tools, plus a bunch of bits, punches and other small items. These are tools I use almost as much as my top-till tools. But it has sort of a “junk drawer” feel at times (such as today).
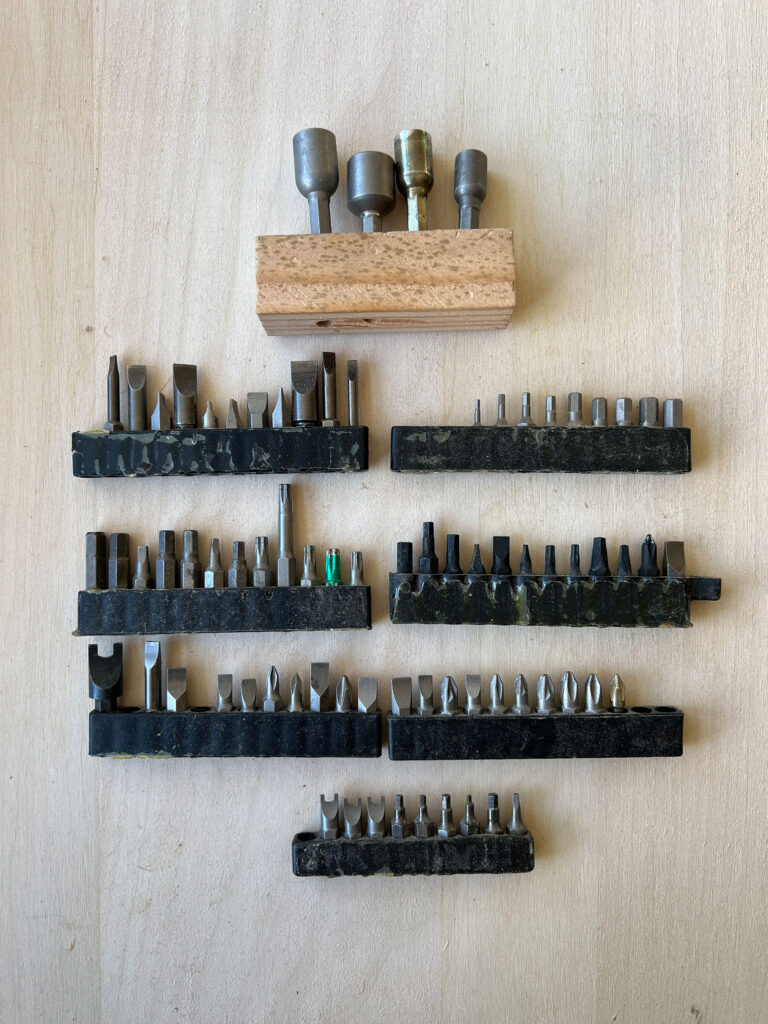
So Many Bits
At some point in my career, I decided I didn’t want to be a two-bit woodworking celebrity. I wanted to be a 142-bit woodworking celebrity. Hence, this photo. Having all this hex-shank tooling has saved my butt many times. Some of these are ground gunsmith bits. Some are cheap ones that fell into my hands and are great to loan out…. The nut drivers at top mostly get used for machinery maintenance. I once tried to epoxy all these bit holders together, but the epoxy flaked off like skin over a sunburn.
Chairmaking Tools
Here are some dedicated chairmaking tools. At top is a “dummy leg” for checking angles as I ream leg mortises. The three little dowel bits are what we call “Hinderpluggen.” We use them to assist in boring through-mortises in chair legs. And for knocking loose legs that have become stuck in chair seats.
Below that are three tapered reamers. There are three to help supply students during classes. Then a 5/8″ tapered tenon cutter, which has been beat to hell and back. The red line on it indicates the thickness of a typical chair seat. And the 5/8″ Wood Owl augers are used for leg mortises.
Miscellaneous Tools
At top is a hacking knife, made by Tom Latane, which splits small parts out for chairs, mostly short sticks and pegs. Below that is the Crucible Bevel Monkey, which is essential when describing chair angles in plans and books.
At bottom left is the Benchcrafted Skraper, a carbide scraper we use for terrible, horrible things I cannot say words about. And a Tooleypark scriber, perhaps the newest tool in the chest, which is used for scribing chair legs to length.
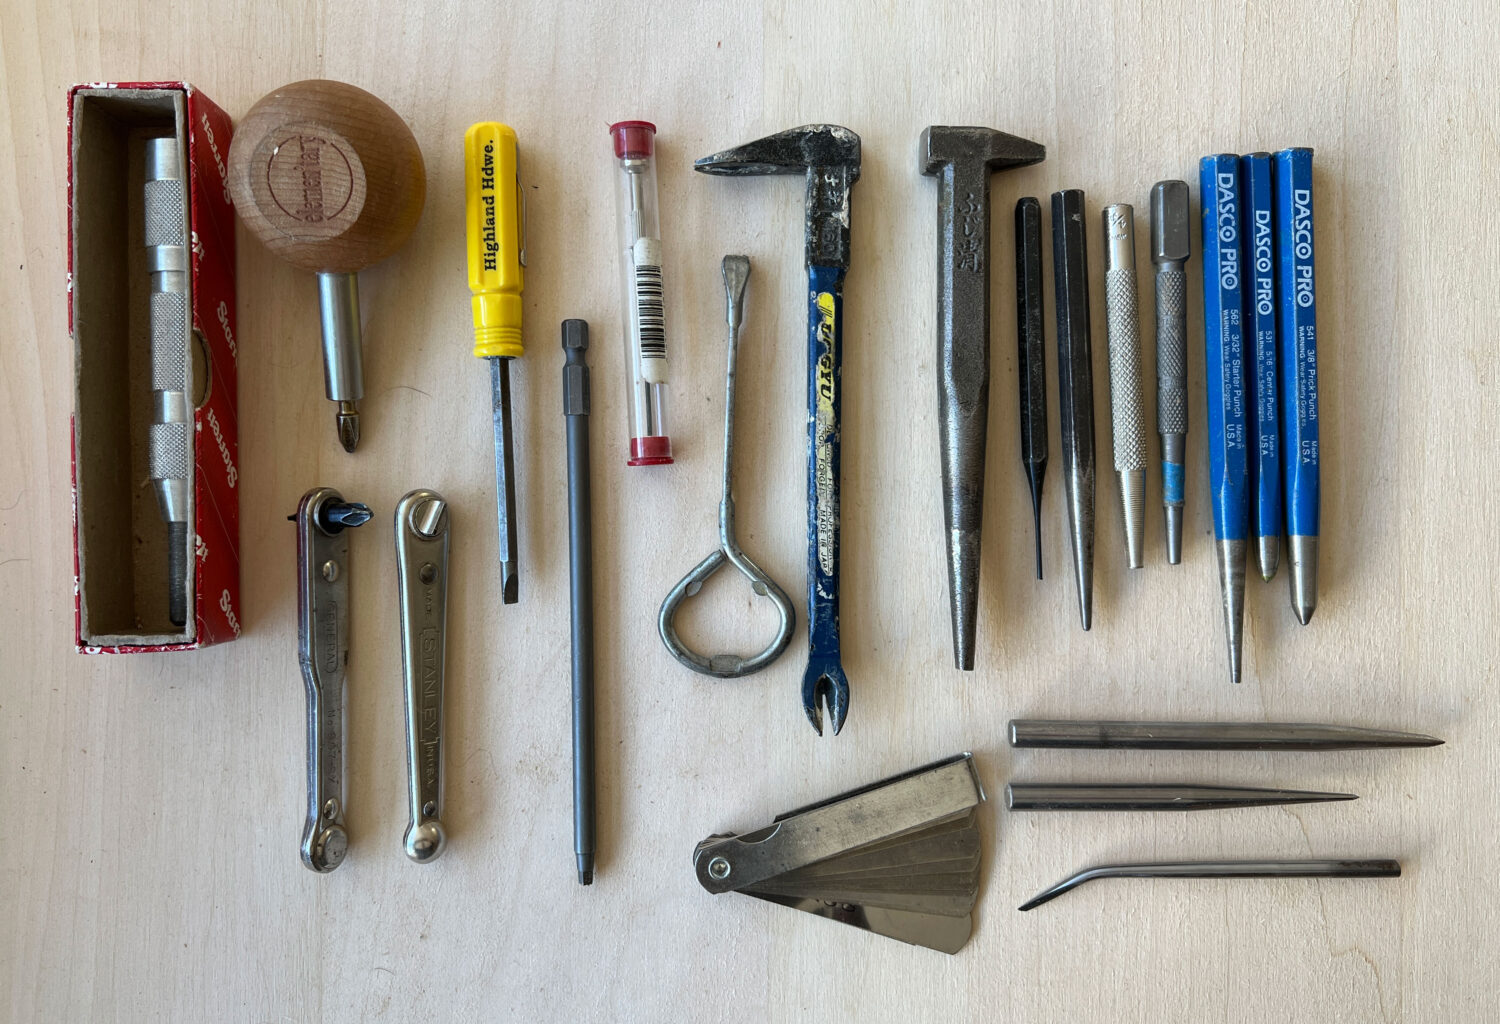
Punchy & Poky Tools
More “junk drawer” items that see a lot of use. The Starrett centerpunch is a constant companion for installing hardware. To the right of that are some of my “I can’t quite get there from here” stubby screwdrivers. Used mostly in emergencies.
There’s a paint can opener because we love paint in this shop. To the right of that is a Japanese cat’s paw, which helps pull headed nails. And a Japanese nail punch, which is so tough that it gets used for many unpleasant jobs in the nether regions (like the Skraper). Then we have a handful of punches. I modify these for different odd jobs, such as setting cut nails.
Below that are some extra compass points and my feeler gauges, for when I feel fancy like a machinist.
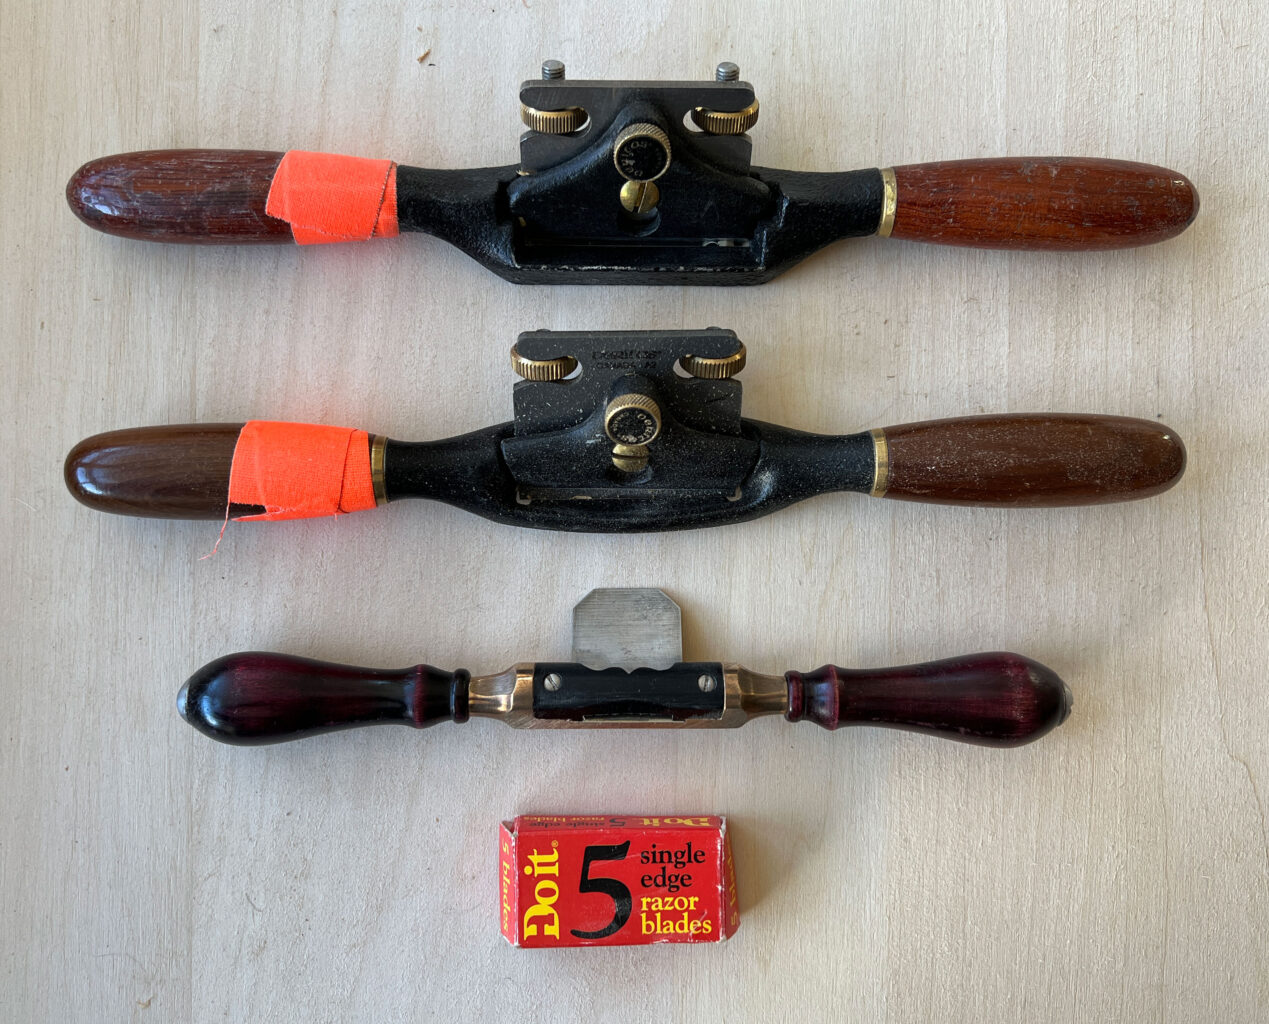
Shaves
My only two spokeshaves are from Veritas (I don’t have a spokeshave problem, unlike some chairmakers). Plus a chair devil from Eleanor Rose, which I adore for its functionality and gorgeousness. Oh, and some safety razors, which get bent to become tiny awesome micro-scrapers.
Till Three
Back in the beginning, this till was for bigger tools, such as a brace (now hanging on the wall as a communal tool) and an eggbeater drill (ditto) and auger bits (now in a tool roll). Today, this till is still for bigger tools, but mostly chairmaking stuff and all the grabby tools.
Chairmaking Tools II
At top is a scorp from blacksmith Lucian Avery, which is shaped perfectly for shallow seat saddles. Below that is a Tilt Box gizmo, which is used to “steal” angles from existing chairs or other furniture. Two travishers. The top one is a tight-radius travisher made by Allan Williams. I use it for the sharp transition at the rims of my seats. His travishers are stunning and work incredibly well. Below that is a travisher from Claire Minihan and Peter Galbert, back when they were making them together. I traded Pete a bunch of books for it and still adore it.
At bottom is a shop-made pencil gauge that is indispensable, especially for chairmaking. It works on flat edges, inside curves and outside curves. I wish we could make these for sale.
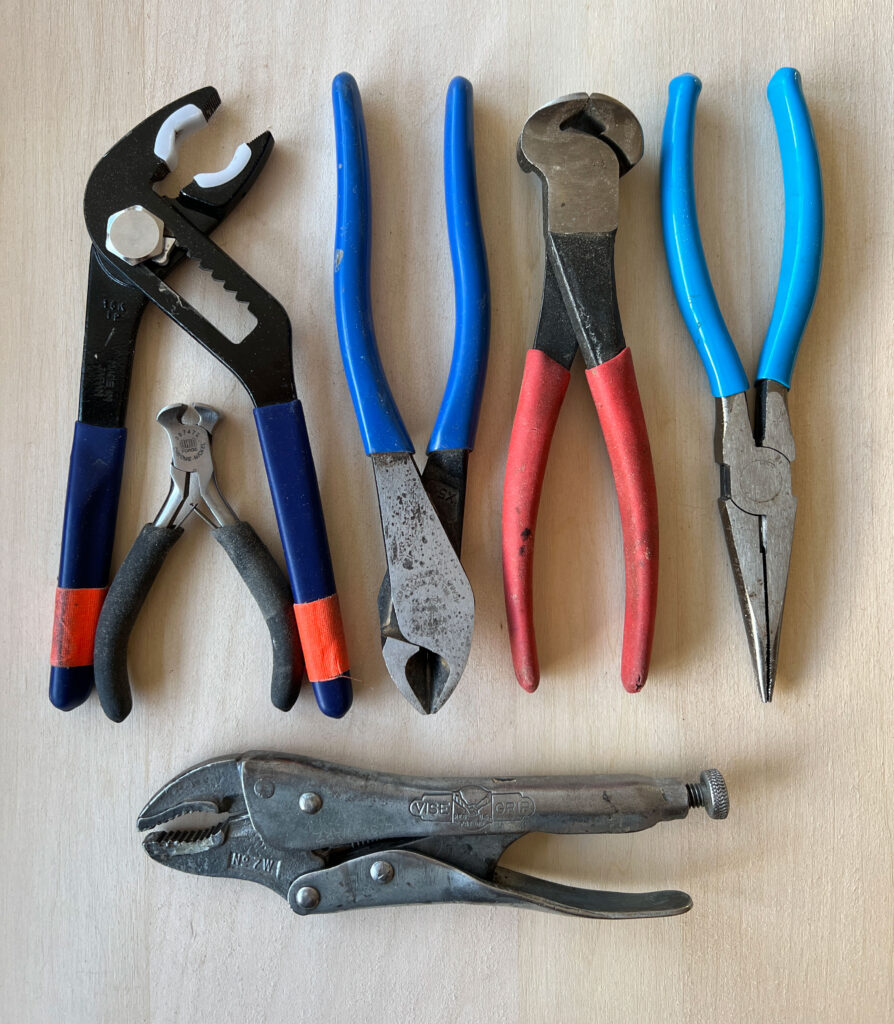
The Grabby Things
Most of these tools are obvious. The soft-jaw pliers are for compressing round tenons. The nail pullers are for … pulling nails. And the other tools are for their normal, listed-on-the-box uses.
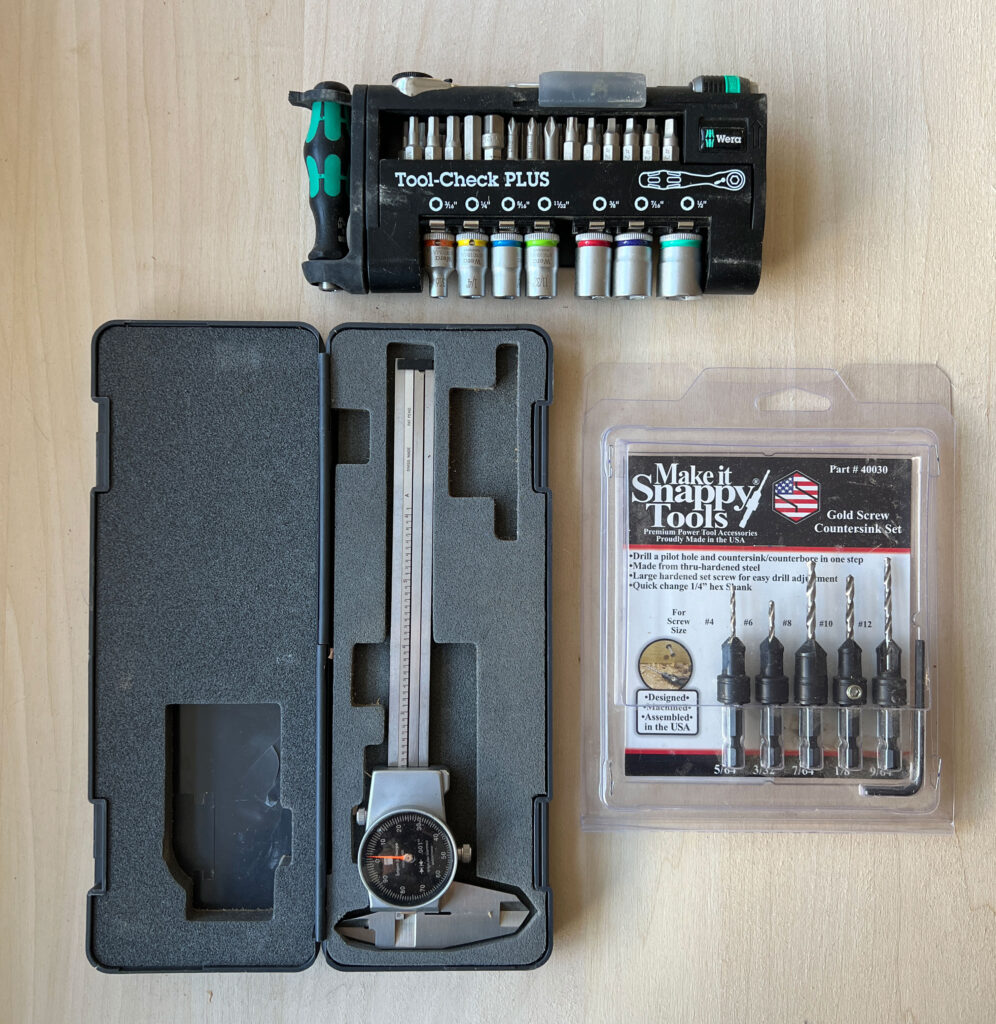
Machinist Tools & Bits
The Wera tool set is an emergency kit for when things go wrong in the bench room. Or when we need to go fix something on the car or in the house. The Brown & Sharpe dial caliper checks tenon sizes, tolerances when inspecting Crucible products and other machinist-like things.
And the Snappy bits are for when we need to run-and-gun to build a screwed-together something.
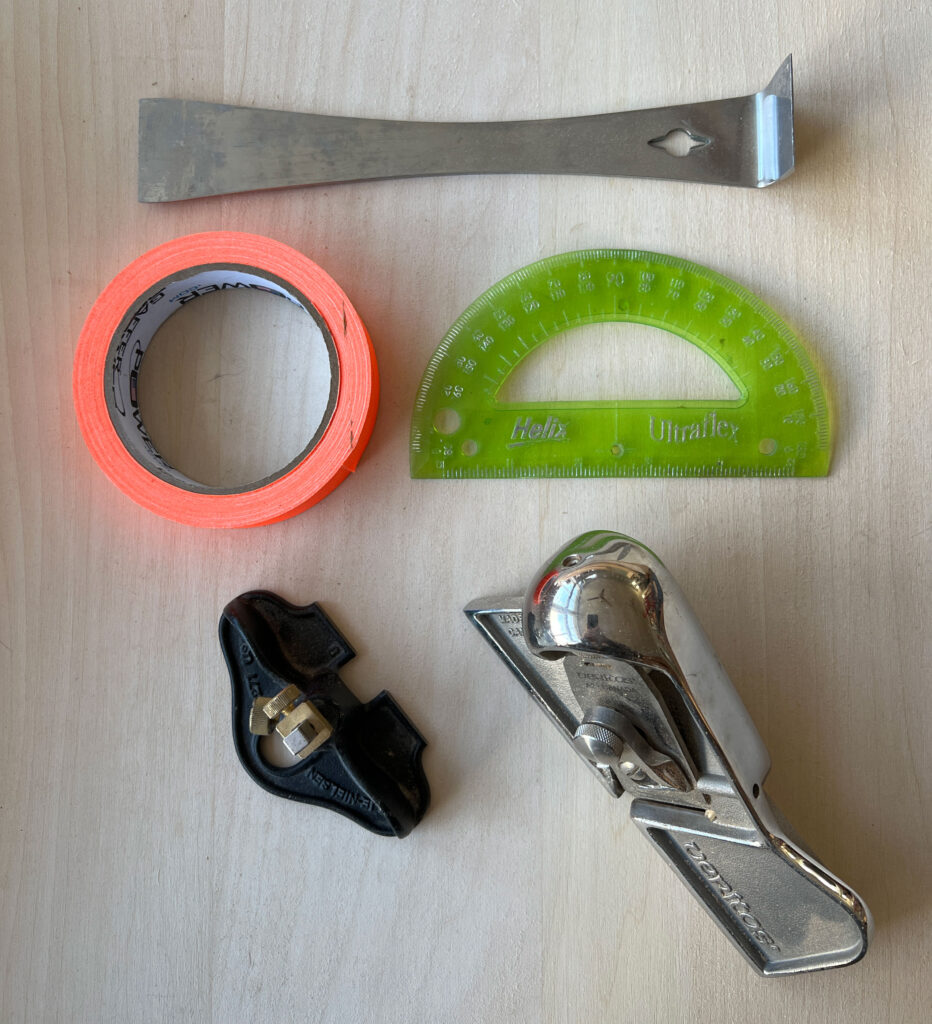
Miscellaneous Tools
At top is a thin pry bar (an iron crow), which gets a lot of off-label use. Below that is the hi-viz orange tape for marking tools. A flexible protractor for doing weird angled stuff on curves. Then there’s a Veritas edge plane, an occasional life-saver. And a Lie-Nielsen small router plane, which was in the top till when I wrote “Campaign Furniture” because of all the hundreds of bits of hardware I had to install.
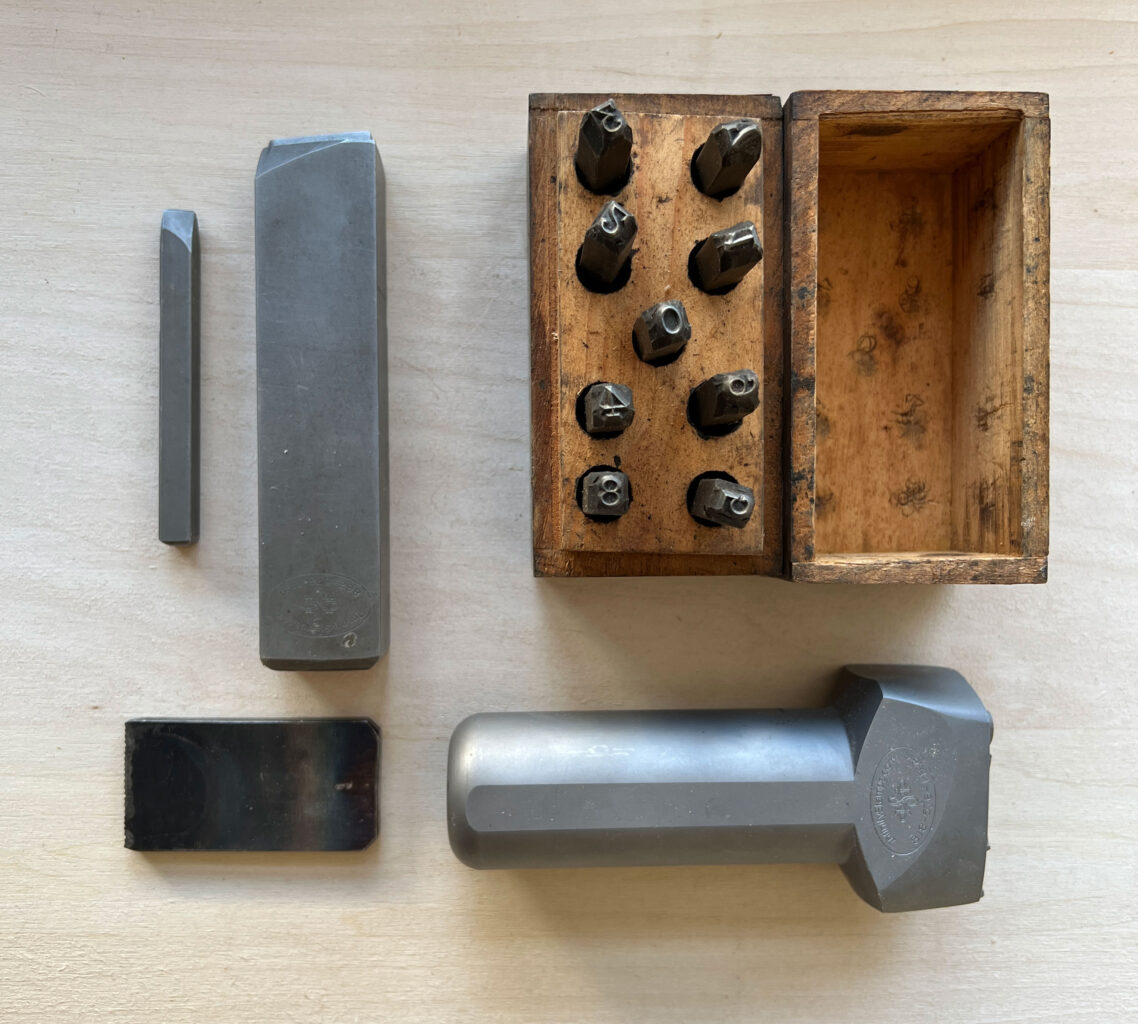
Name & Number Punches
The number punches stamp the year on my work. And they are used to identify parts in a complex glue-up. The other stamps are name stamps and shop stamps for a variety of purposes. Marking my work, tools and other objects that might walk. The three grey stamps are from Infinity Stamps, which does excellent work.
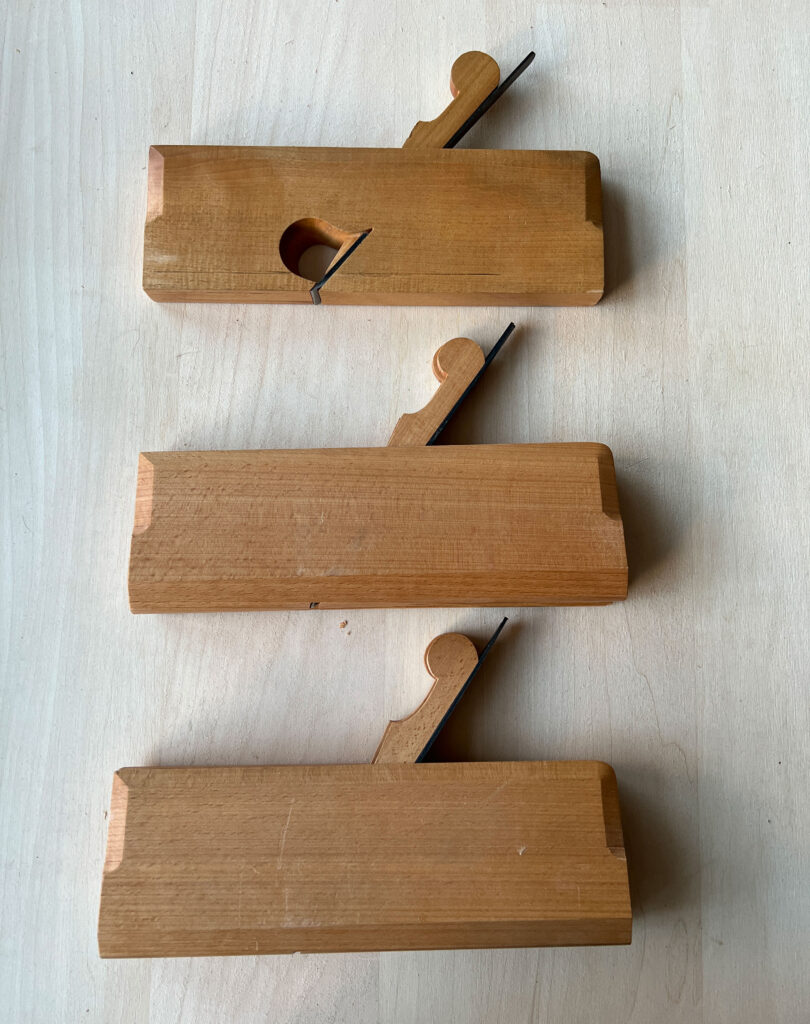
The Moulding Plane Corral
This area is like a little terrarium in the tool chest. It is a bit closed off from the rest of the chest because of the way the sliding tills interact with the tool racks. You have to slide all three tills all the way forward to get the moulding planes. Not a big deal, but it’s rare to go here unless you mean to. I used to have a lot more hollows and rounds. As I’ve gotten older I’ve settled into a few sizes and profiles that I like and use frequently in my work.
Do not take these tool choices as gospel for what you should own. My work varies wildly in style and period. Yours might not.
Straight Rabbet Plus Hollows & Rounds
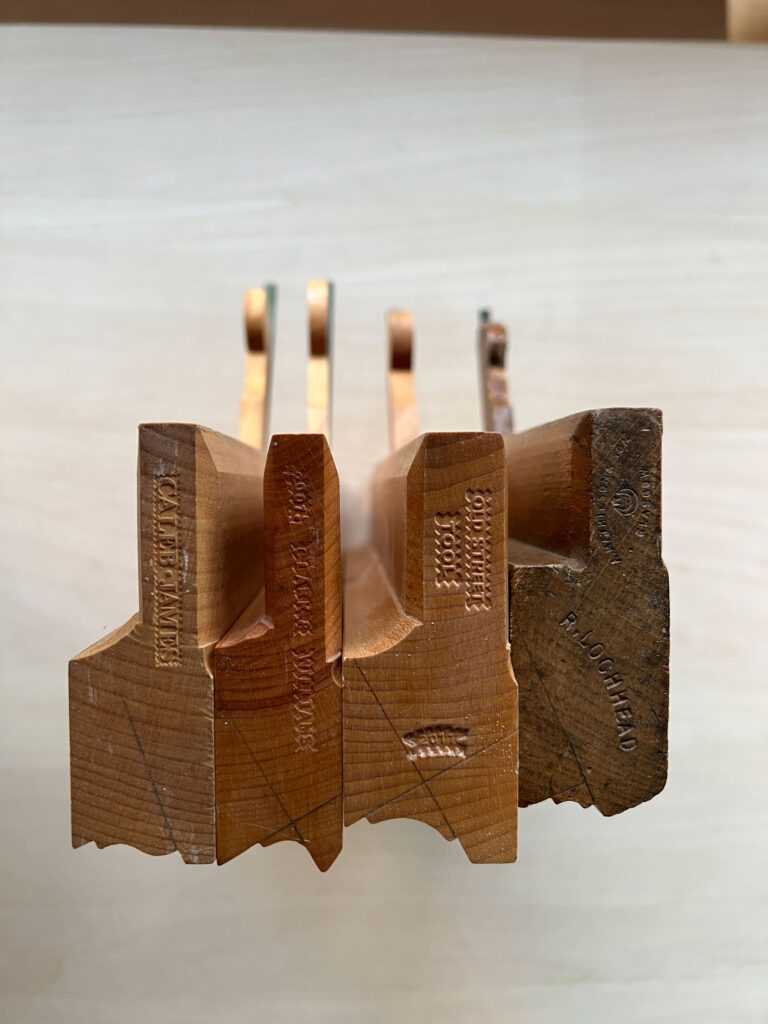
The 7/8″ straight rabbet plane is from Clark & Williams (now Old Street Tool), which makes rabbets parallel to the grain of boards. These rabbets might be for joinery, or they might be to rough out the shape of a complex moulding.
I now have only two pairs of hollows and rounds in my chest. A pair of 7s and a pair of 9s. Both sets are by M.S. Bickford. Because I don’t make reproductions, I can usually press these two pairs into making what looks good. Also, my work is more on the vernacular side, so enormous stacks of crazy moulding isn’t my thing. I think that stuff is beautiful, but it’s not what I do.
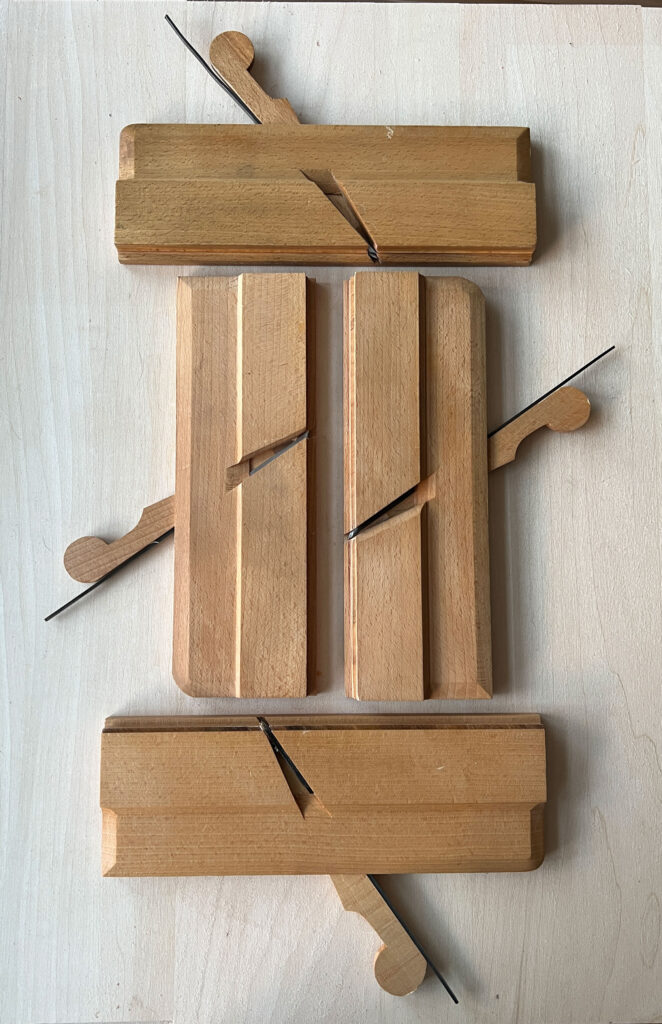
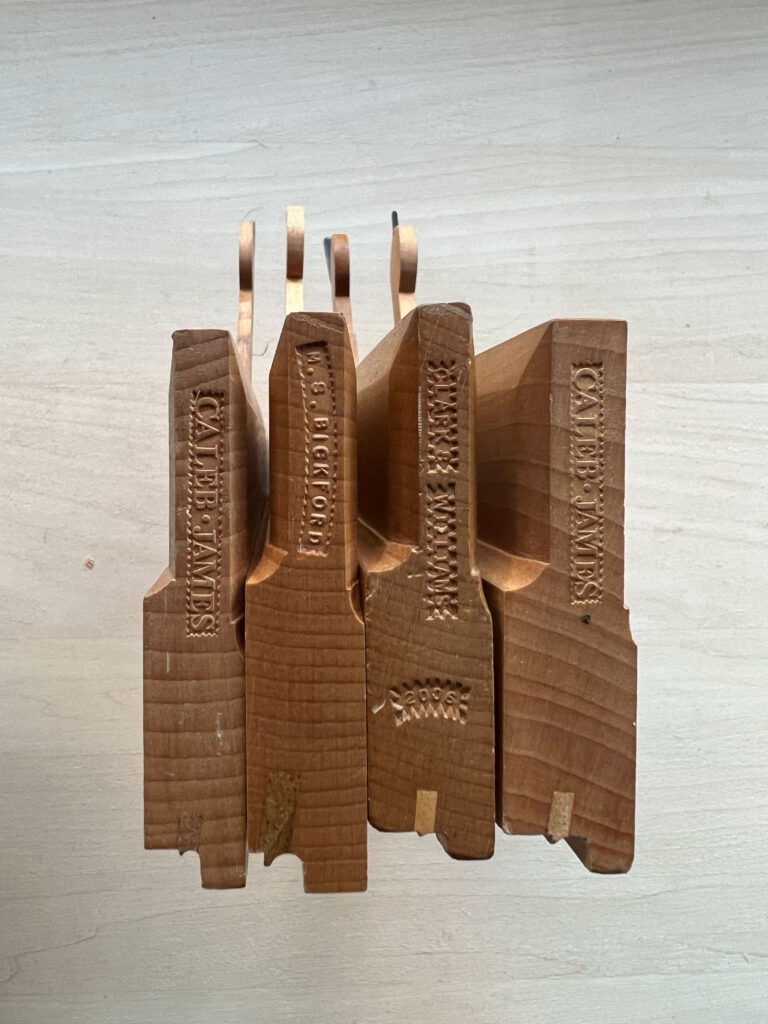
Beading Planes
I do like to use beading planes on my casework. They produce a nice shadow line to separate a face frame from a door or drawer, for example. I have four of them, but I really only should have three. The 1/8″ beading plane is from Caleb James. There are two 3/16″ beaders. One from M.S. Bickford and one from Old Street. The 1/4″ beader is from Caleb James. If I had to own only one beader, it would be a 3/16″, which is a nice size.
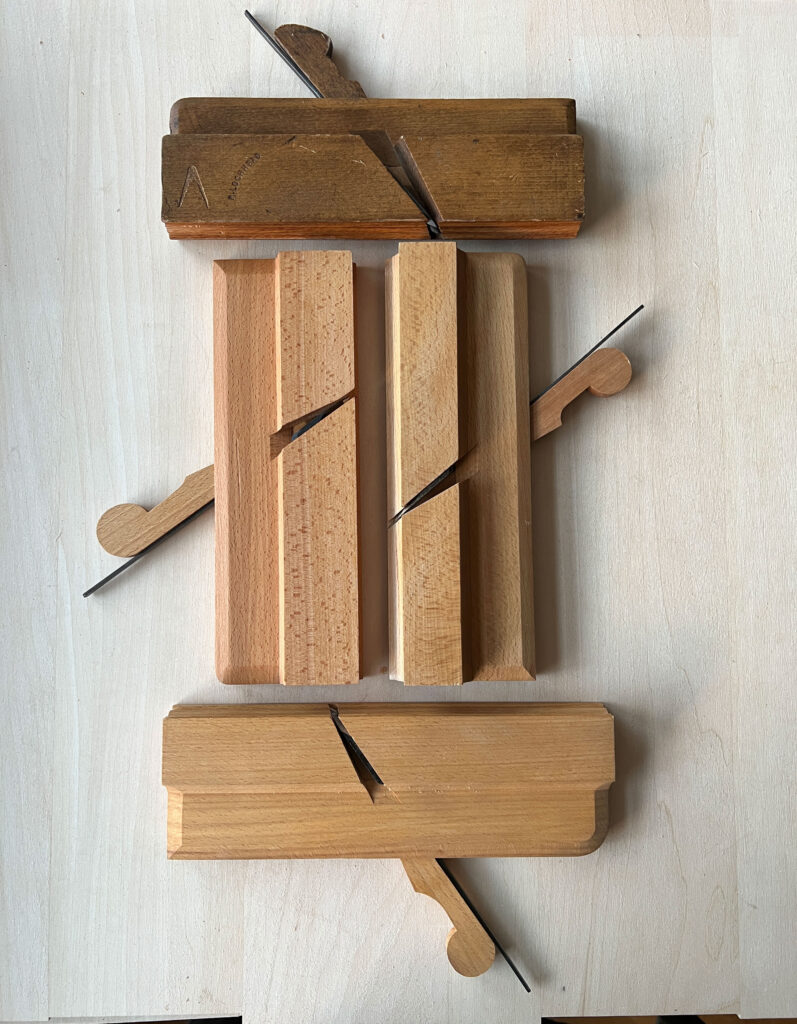
Complex Moulders
I use a few profiles over and over again. Call it consistent or call it boring – I do it so that I have fewer tools to sharpen and care for. (I prefer woodworking over tool maintenance.) At top is an A. Mathieson & Son square ovolo. It was made in Glasgow, which is where the Scottish side of my family comes from (or so I’m told by my spit). Below that is a bigger square ovolo by Old Street Tool. Then a thumbnail moulding plane, which is ideal for the edges of lids and chest tops. It was made by what is now Old Street. I could make that moulding with a straight rabbet and a block plane, but this plane is just so sweet, I keep it around. Finally there’s an ogee plane by Caleb James.
Miter Plane
With all the leftover room from trimming back my hollows and rounds, I have room for a long-time companion, a Wayne Anderson miter plane. This plane was stolen at a Philadelphia tool show. But I got it back after the thief had to sell his tool collection after it was wrecked by Hurricane Sandy (karma is a bitch, sir). It’s a long story, and one that I am not allowed to fully tell. This plane is the first infill I owned, and I love it to bits. Works great, too.
The Central Well & Small Tool Racks
This is the largest space in the tool chest, but it contains the fewest number of tools. When I peek into other woodworker’s chests, this area is usually crammed with bench planes (two No. 5s? Is one for formal outings, Biffy?). While the well looks a bit spare, it has been even more empty in past years. I finally succumbed to a shooting board plane. It’s a luxury. But I have the room, and we use it every week.
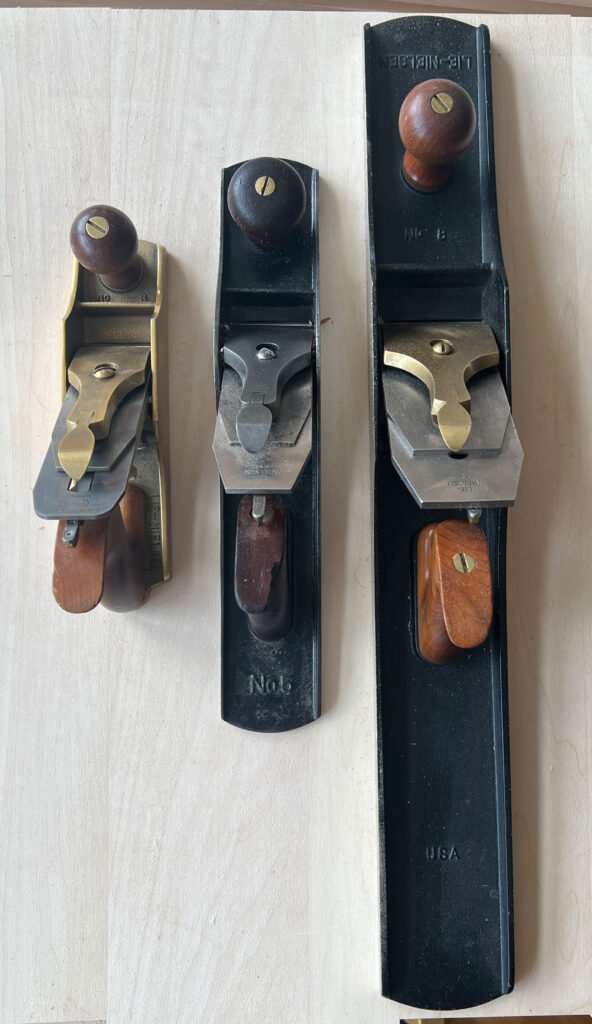
Bench Planes
No surprises here. I’ve owned these three tools since before I built the chest. There are Lie-Nielsen’s Nos. 3 and 8. And a Stanley No. 5 (Type 11). The No. 3 has the standard frog, plus a Veritas PMV-11 plane iron (my NAFTA plane). The No. 5 is on its third iron. I now have a Lie-Nielsen A2 iron in it (I had to file open the plane’s mouth a bit to make this work). The No. 8 is stock.
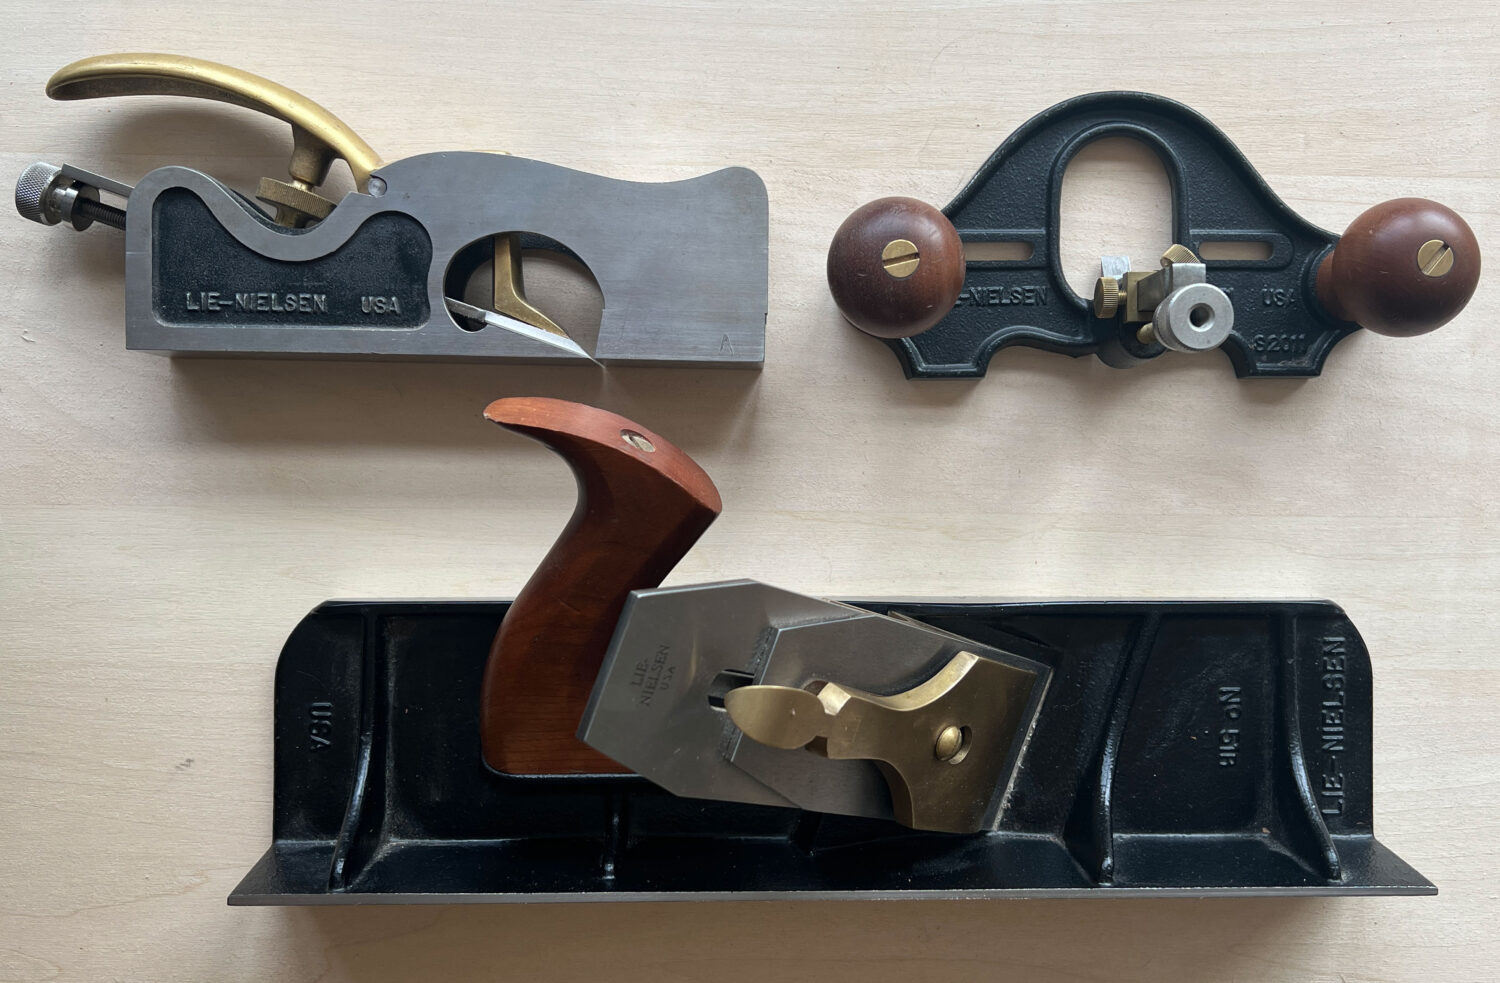
Specialty Planes
I have a few other specialty planes packed away because I haven’t used them much (especially my plow and moving fillister; but that’s going to change shortly). Here are the three currently have in the central well: A Lie-Nielsen 073 shoulder plane (I have never needed an additional size than this one). A Lie-Nielsen closed-throat router plane. And a Lie-Nielsen dedicated shooting plane.
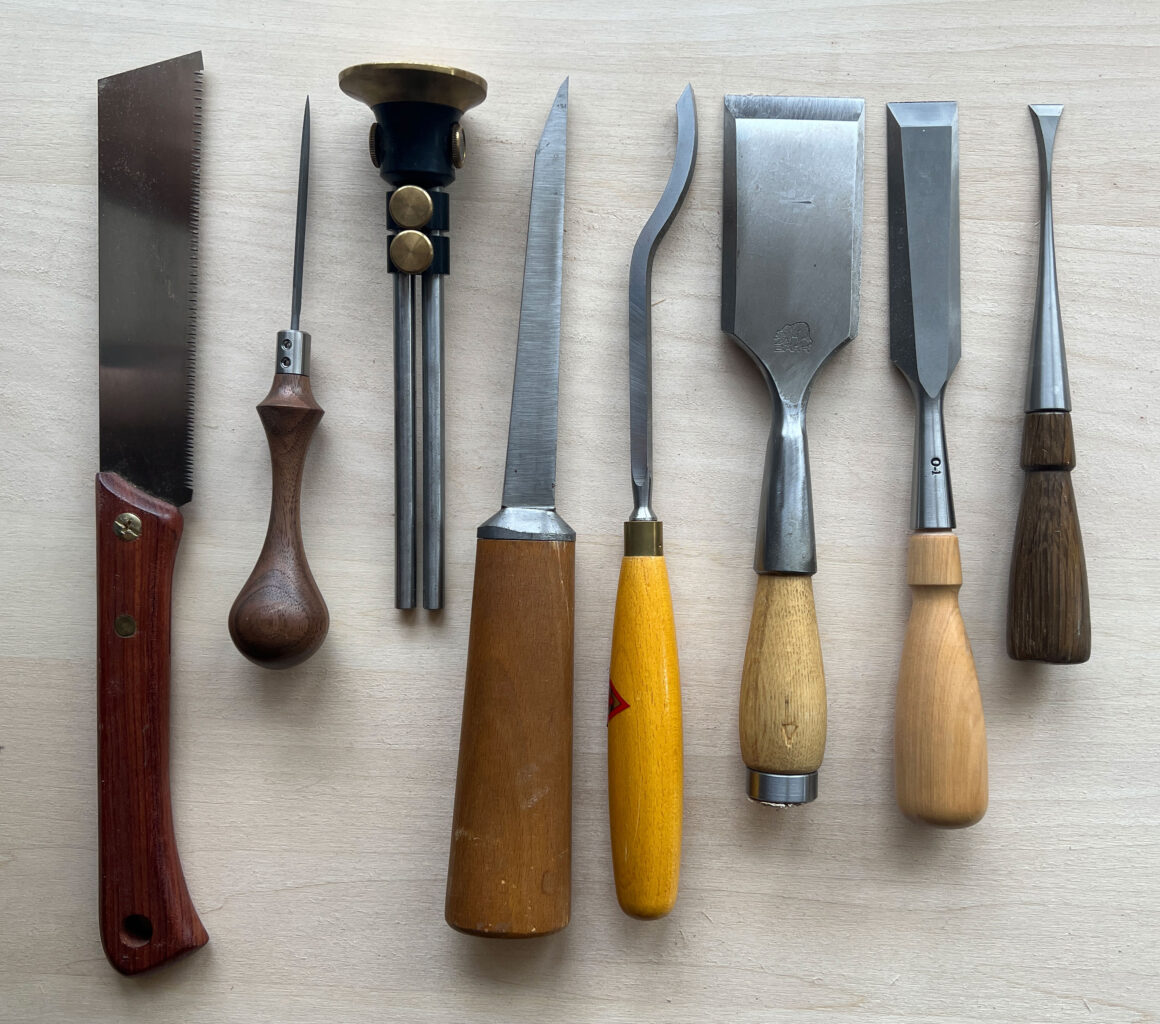
Tool Rack Chisels & Stuff
The rack right above the chest’s central well has some important specialty tools. The flush-cut saw, a tool holder from Mattias Fenner in Germany and a Veritas mortise gauge. Next to that we have the Ray Iles mortising chisel (1/4″) and a matching swan-neck chisel for de-crapifying the floors of mortises. Then there’s a massive and beloved Barr bench chisel, which is good for all sorts of nastiness. The steel is ungodly good. Then there’s a Lie-Nielsen 1″ chisel, which didn’t fit in the top rack, and a Lie-Nielsen dovetail chisel with a bog oak handle I turned.
Front Rack & Sawtill
This is a busy area of the tool chest as these tools are pulled out a dozen times a day. As a result, this area gets filthy, especially below the saws. There’s a lot to see.
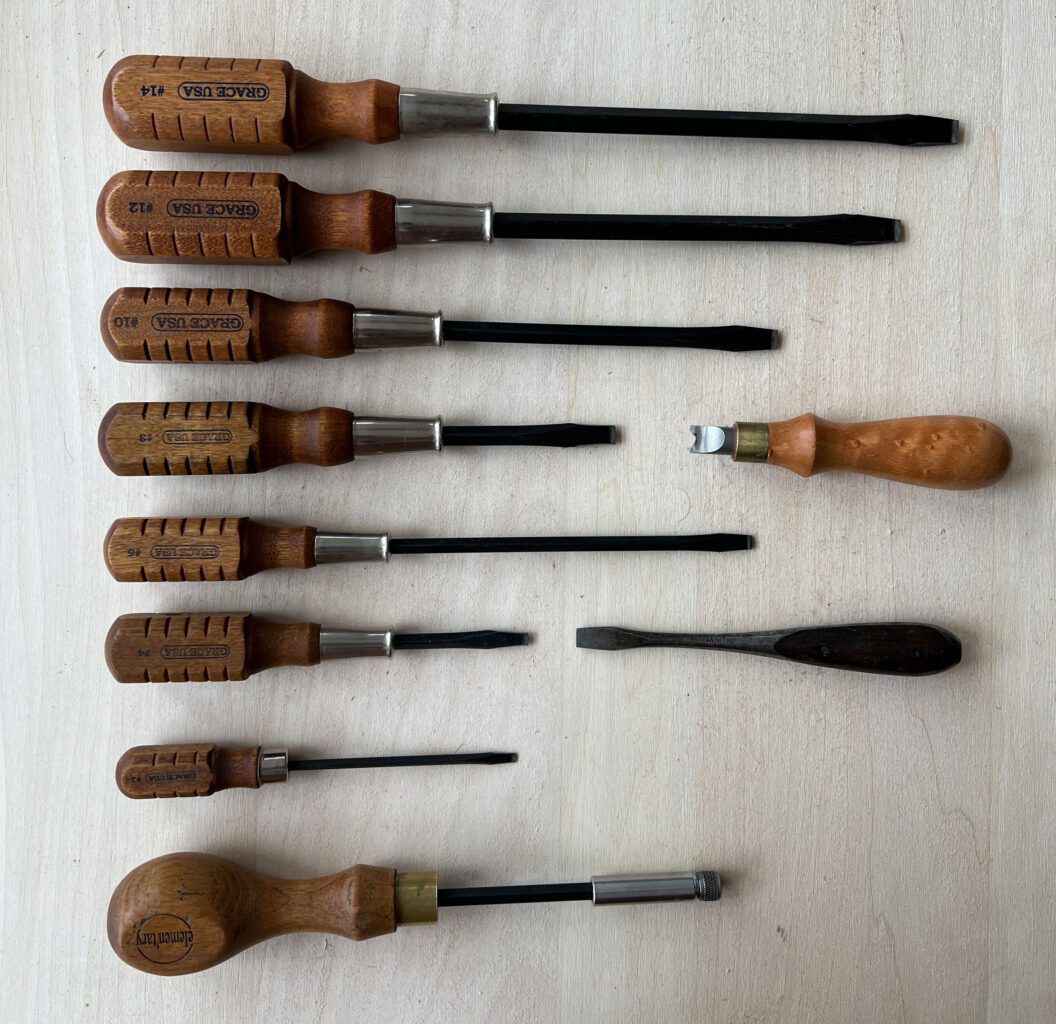
Screwdrivers
First is a full set of Grace USA straight screwdrivers (why, pray tell, is the No. 6 driver such a weird size? Must be a gunsmith thing). These are the best drivers. Ground tips. Tough as nails. At bottom is an Element’ary driver, which accepts all the hex-shank bits. And it has a locking/magnetic collar. Highly recommended. There’s a Lie-Nielsen screwdriver for tightening split nuts. It’s modified it to work with all our backsaws. And finally a Perfect Handle screwdriver bought for a $1 – perhaps the best $1 I ever spent. It is indestructible. I wish I owned a whole set (no, not the garbage ones that Garrett Wade sells).
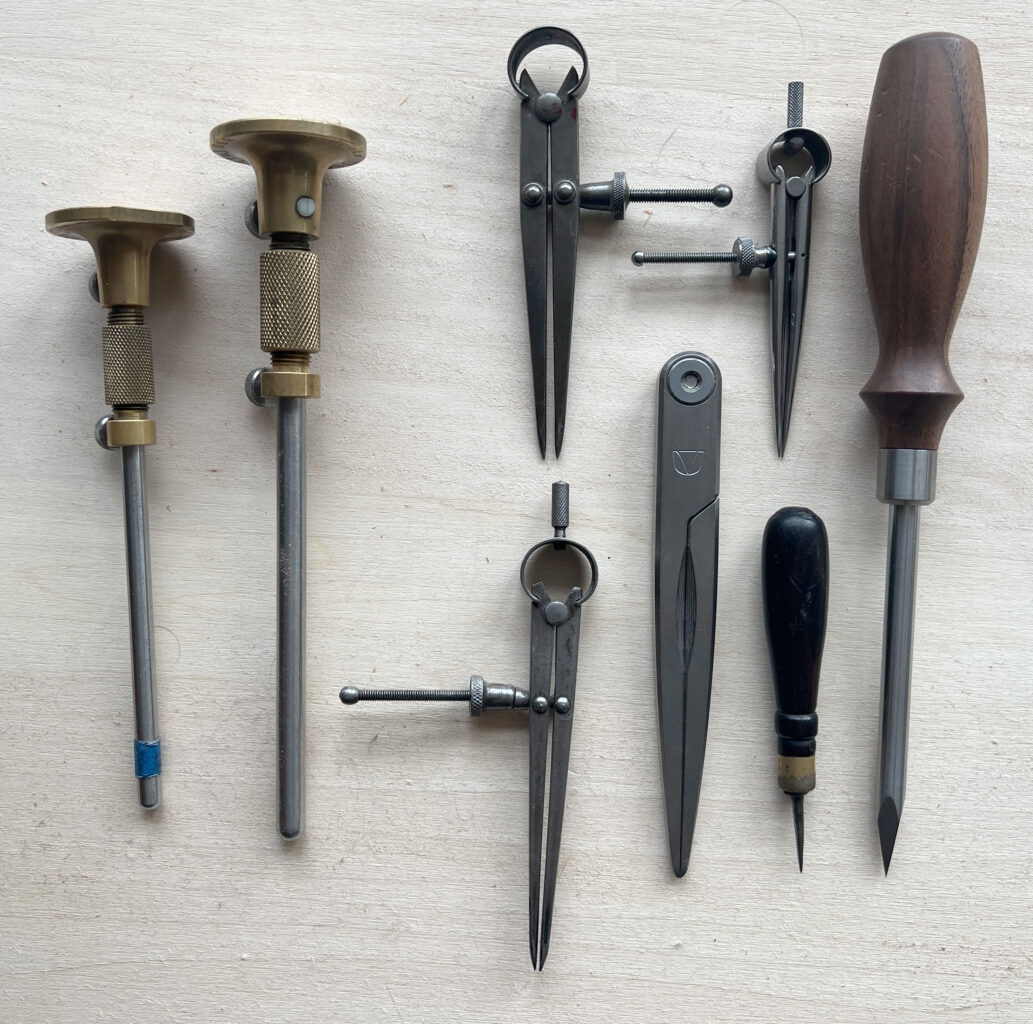
Slicing & Poking Tools
The two Tite-Mark gauges see continuous use. I cannot imagine working without them. Next to that are three pairs of vintage dividers and the Crucible dividers. These are used for laying out dovetails, chair spindles, executing olives and other tasks. The little awl was bought at a flea market in Maine (I think it was $3). I adore it. And a Mattias Fenner birdcage awl, the best one I’ve found (if you are awl-curious like me).
Bench Chisels
I’ll be honest: I don’t use all of these chisels. I could probably boil it down to three: the 1/4″, the 1/2″ and the 3/4″. But these guys grew up together and I’d hate to break up a family.
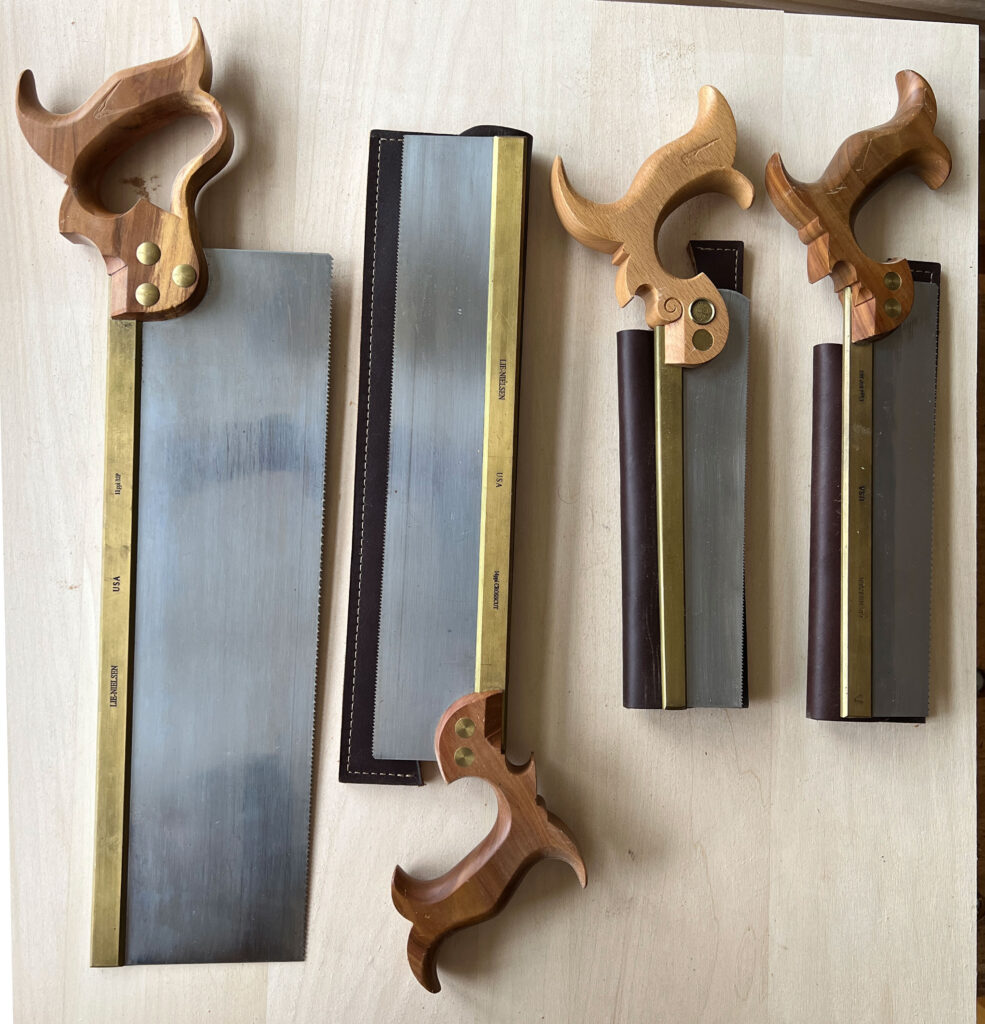
Backsaws
In the sawtill are my personal backsaws. I also have a few on the wall for communal use. Here we have the Lie-Nielsen tenon, carcase and dovetail saws, all with apple handles (a special trade that Tom Lie-Nielsen made for me). And an Eccentric Toolworks dovetail saw by Andrew Lunn – the best saw I’ve ever owned.
Panel Saws
Also in the sawtill are these two vintage panel saws. There’s a Disston D8 filed crosscut with 8 tpi. And a Spear and Jackson filed rip with 7 tpi. The handles are different colors so you can grab the one you need without thinking too much.
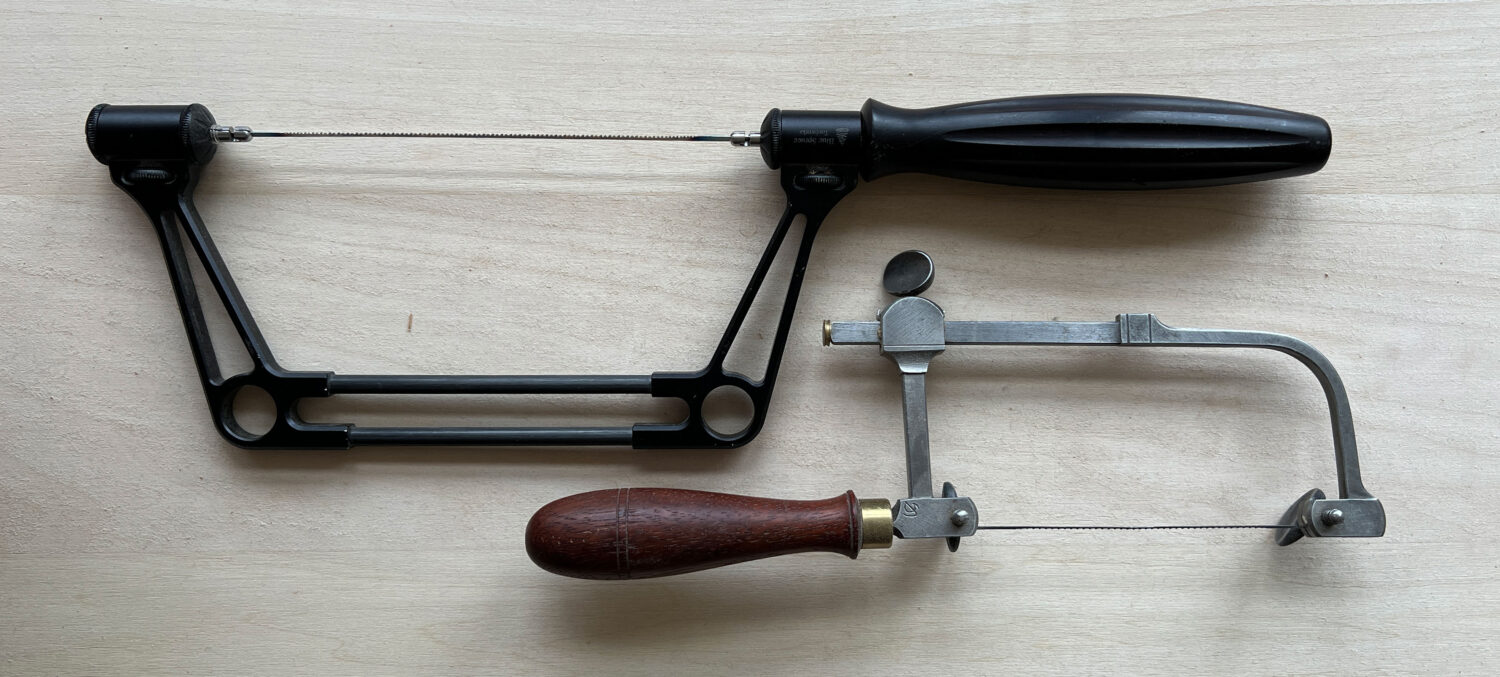
Frame Saws
I have a bowsaw packed away (I use a small band saw for big jobs now). But I still use the snot out of my Blue Spruce coping saw and my fretsaw from blacksmith Seth Gould.
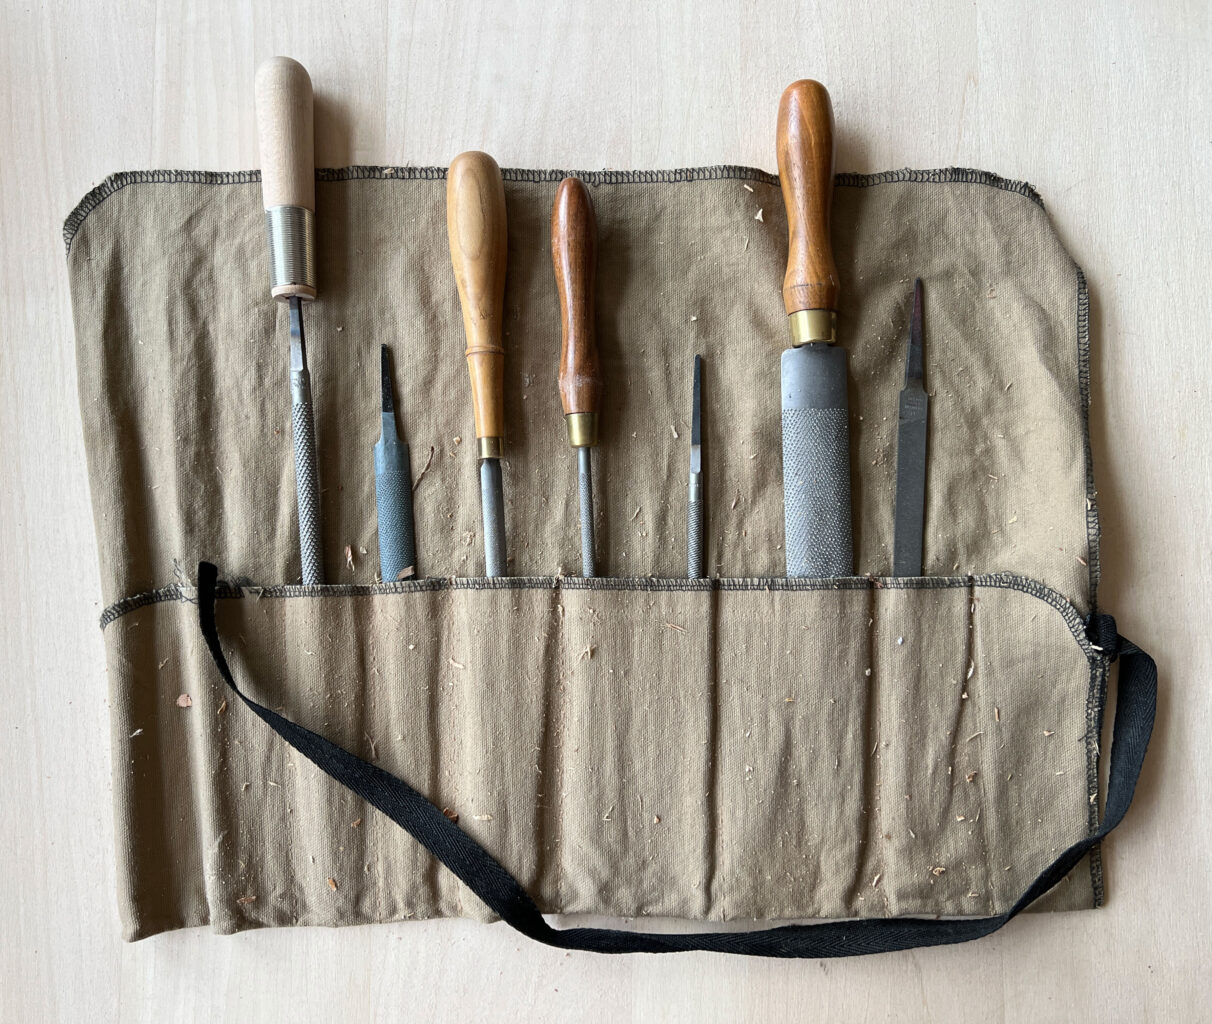
Rasps
The rasps and files are tool rolls that stand to the side of the sawtill. Most of these are Auriou, with a couple oddballs thrown in (including a file that sneaked into this tool roll). The Auriou cabinet rasp is a 9 grain. The Auriou modeler’s rasp is grain 15. The Auriou rattail is 13 grain.
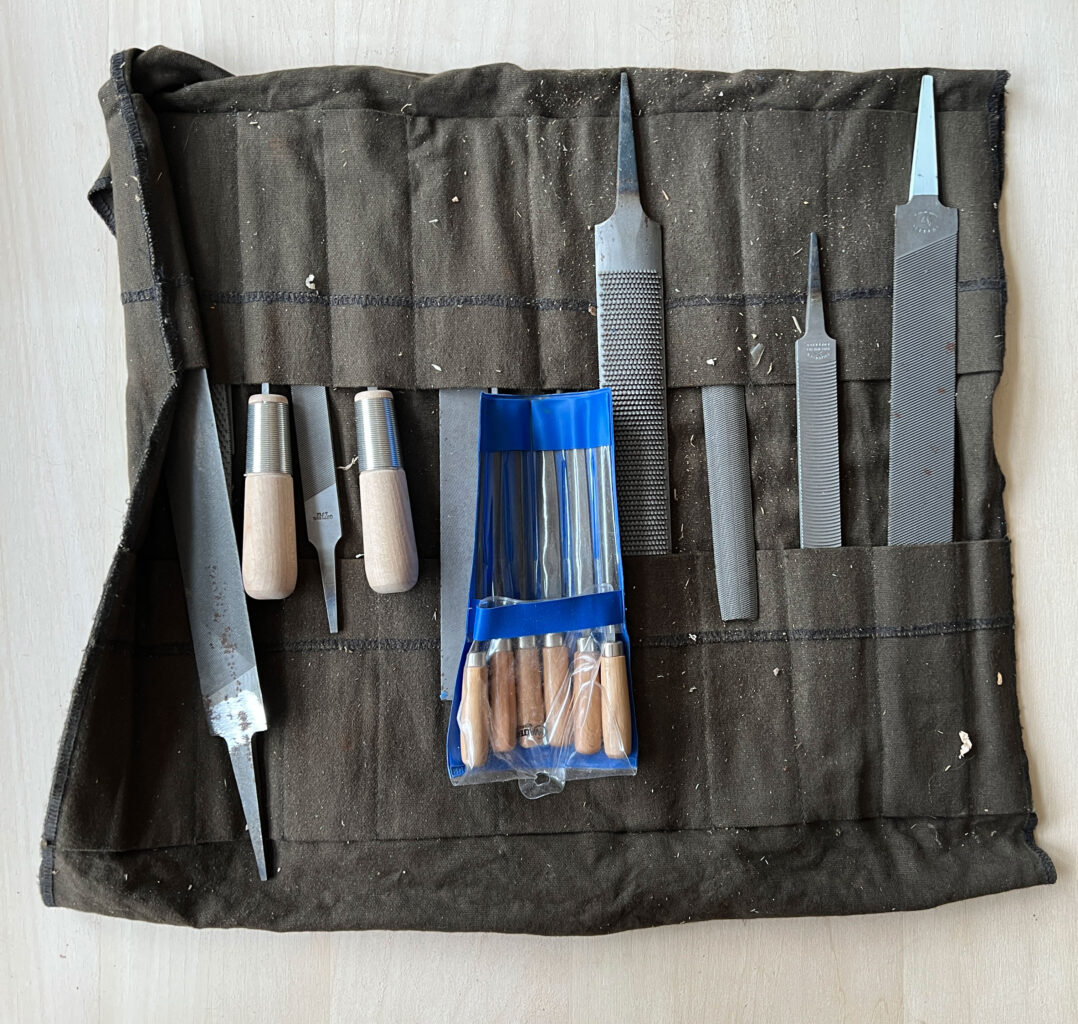
Files
I am surprised by how many files there are. They started collecting en masse when I wrote “Campaign Furniture” and I had to file a lot of brass hardware. Then we launched Crucible Tools, and files are helpful when making prototypes. And the needle files are essential for tool maintenance. Files don’t take up much space, so I have allowed them all to stay.
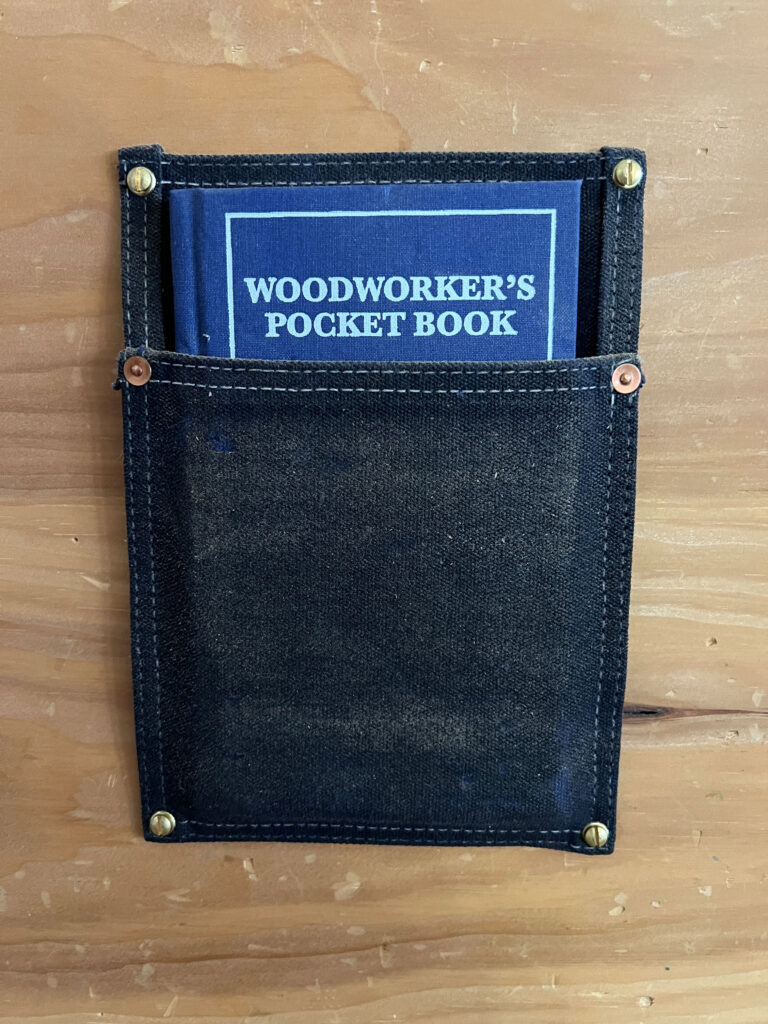
On the lid of my chest is our “Woodworker’s Pocket Book” in a handsome slipcase from Texas Heritage.
The Future
We receive regular messages asking what I would change about my tool chest if I built it today. The answer is: structurally, nothing. It is the right size. Built the strongest way. From an ideal wood (pine). Since building it, Megan Fitzpatrick and I have taught hundreds of others to build this chest, and we have come up with better ways to do some of the construction steps. Some of these are honestly good ideas. Others are simply more efficient ways to work when you have to build seven chests in a week.
We also get asked if I will ever update “The Anarchist’s Tool Chest” to build it with a more current tool set. An update is not a priority. Perhaps some day when I run out of new book ideas I’ll revisit ATC. But every time I pick it up and read bits of it, I’m happy with it overall.
Yes, if I were a “guy on the internet” I would take umbrage with a few choices and rationales in the book. But all in all, the book holds up, and we recommend it to new woodworkers without reservation.
We also get messages thanking us for publishing this book. That ATC changed the way they look at tools, woodworking or rampant consumerism. To that, I say: Thank you. The book changed us, as well. After “The Anarchist’s Tool Chest” was released in June 2011, it sold well enough that I didn’t have to get a job at Woodcraft or Rockler after leaving Popular Woodworking Magazine (which was my true plan B).
After I left the magazine, I felt the same thing was happening to my career that happens to many other woodworking editors when they quit or are fired. My phone stopped ringing. My email tapered off. People who I thought were friends turned out to be transactional turd birds.
But after this book was released, you were there. And you kept me from diminishing into obscurity by talking about this book. Recommending it to friends. And attending classes I taught.
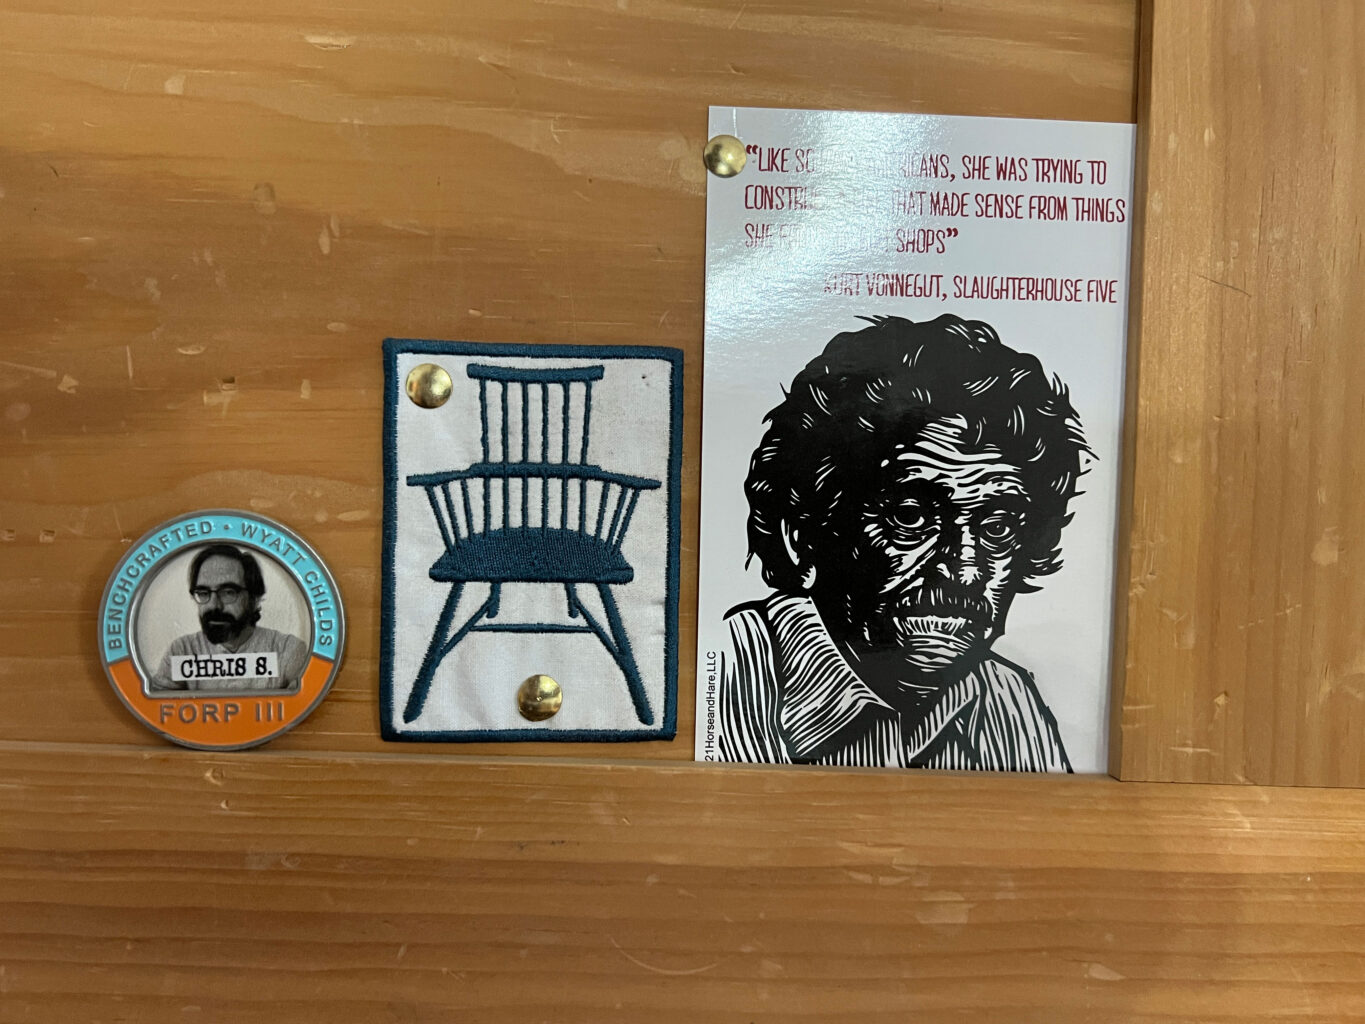
If you’ve ever visited our storefront, you might have noticed that we wallpaper the men’s room with all manner of woodworking paraphernalia, from posters to old advertisements to poems.
I haven’t put anything up in the women’s room except a portrait of Juliette Caron. Every time I think to hang something in there, I ask Megan: “Is this too creepy for the women’s room?” And the look on her face says: Yes.
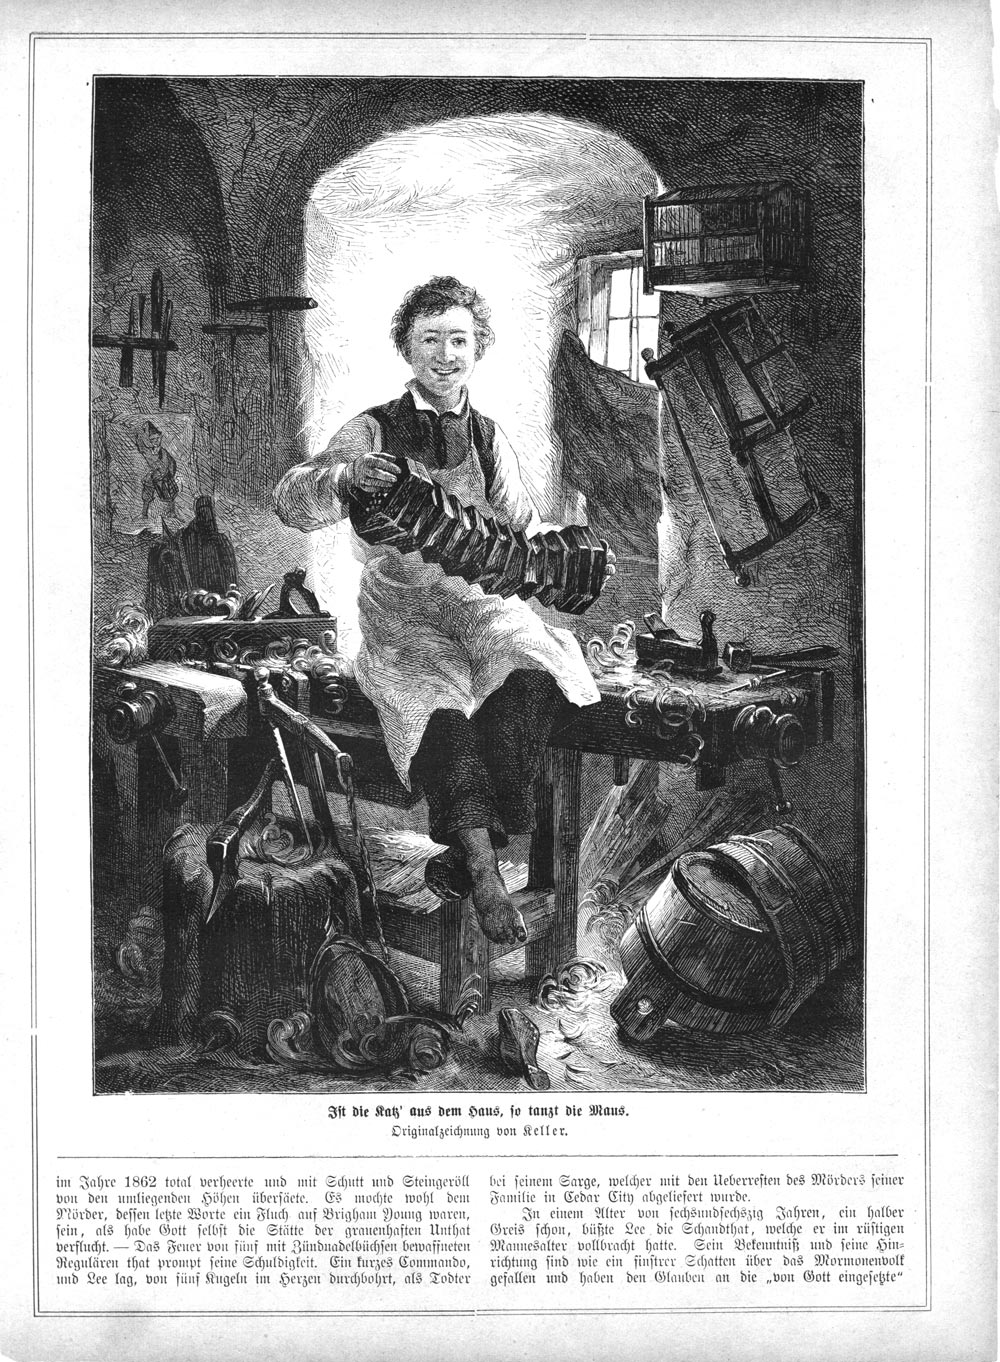
Case in point this vintage German newspaper I just purchased after a tip from Suzo “the Saucy Indexer” Ellison. Do I want this guy smiling at me when I do my business? Probably not, but it’s going in the men’s room anyway.
I hope (government mandates permitting) that you can come see the bathrooms for your own self. We still hope to open the doors to the public on June 13, 2020, for a special open day.
What’s going to be special? Blemished books. We are trucking 14 boxes of damaged and returned books to the storefront for the occasion. They will be 50 percent off of retail – cash only. (No, we cannot put them online. Sorry.) I don’t yet know what titles we’ll have. When I get them here I’ll post a list. But I do know we have a significant number of the now-discontinued “Book of Plates.”
We’ll also have our full line of new books and all the Crucible tools. We can take any form of payment for new books and tools – cash, check or credit.
So get healthy and hope for the best. If June doesn’t work, we’ll reschedule the open day for as soon as it is safe for everyone.
— Christopher Schwarz
P.S. What’s the image above about? Not sure. The blocks of text below it are from an unrelated article. The caption on the image is, according to a translation from Rudy Everts, basically, “When the cat’s away, the mice will play.” Even so, I’m not hanging this one above the Lost Art Press urinal.