I think that writing a good song or designing a nice chair is a skill you can learn.
The problem is that learning to write or design is not like memorizing the capitals of the 50 states. For me, that sort of rote learning is like gathering up a good collection of bottle caps and stashing them in a drawer.
Learning to design and write, on the other hand, is more like building a bottling machine when you’ve never even seen one before. You have to assemble lots of unfamiliar parts and get them working in concert.
One common piece of advice is to visit lots of other bottling plants to see how their machines work. In other words, listen to a lot of really good music to learn to write a song. Look at a lot of really beautiful pieces of furniture to learn to design your own pieces.
I give that piece of advice all the time. But it leaves out an important first step. You first need to learn to see and to listen. And learning to see or listen is damn hard.
That’s because when we look at a piece of furniture or listen to the radio, our brain simplifies the stimulus into a single object or sound, when it really is a combination of a bunch of complex shapes and sounds.
How do you force yourself to see? Here’s how I do it.
It came by accident when I was working on “Campaign Furniture.” Many of the drawings in that book are tracings that I made of photos I’d taken in years prior. As I traced each piece, I was forced to examine the shape of every turning, moulding and component. I had to draw both the major forms and all the minor details. In other words, it forced my brain to stop seeing the whole piece and focus on all the small elements.
As I traced more than 100 pieces, I began to see obvious patterns. The handles of campaign chests were spaced above the centerline of each drawer. The stacking chests had drawers that refused to graduate (Fibonacci is a fibber). Sometimes the pieces got away with awkward drawer arrangements that looked dang good.
I also noticed so many little details. The best chests used drawer blades that were hidden – a detail I missed until I started drawing them. And I got a great feel for the beads and tapered cylinders that made up the feet of the chests.
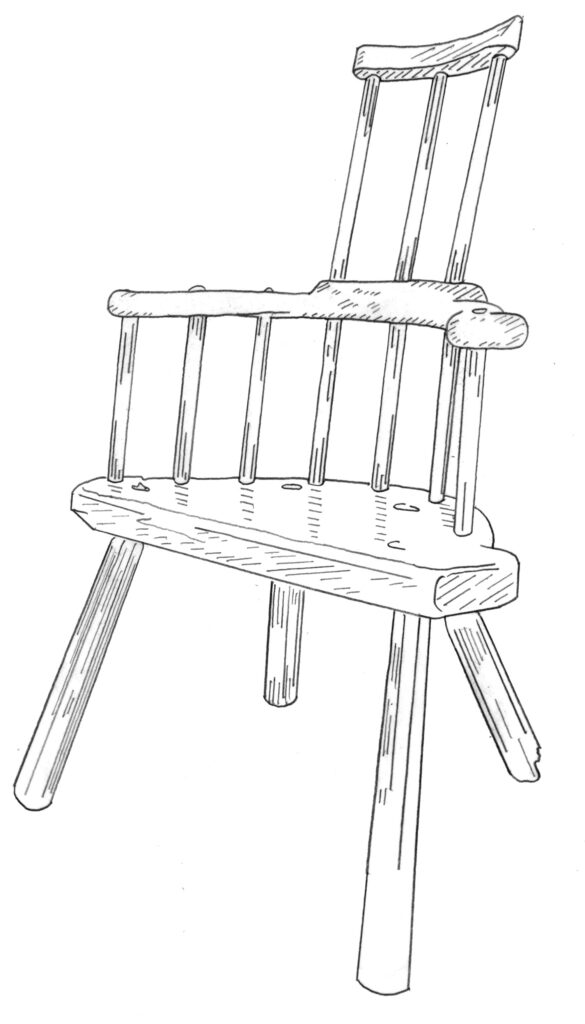
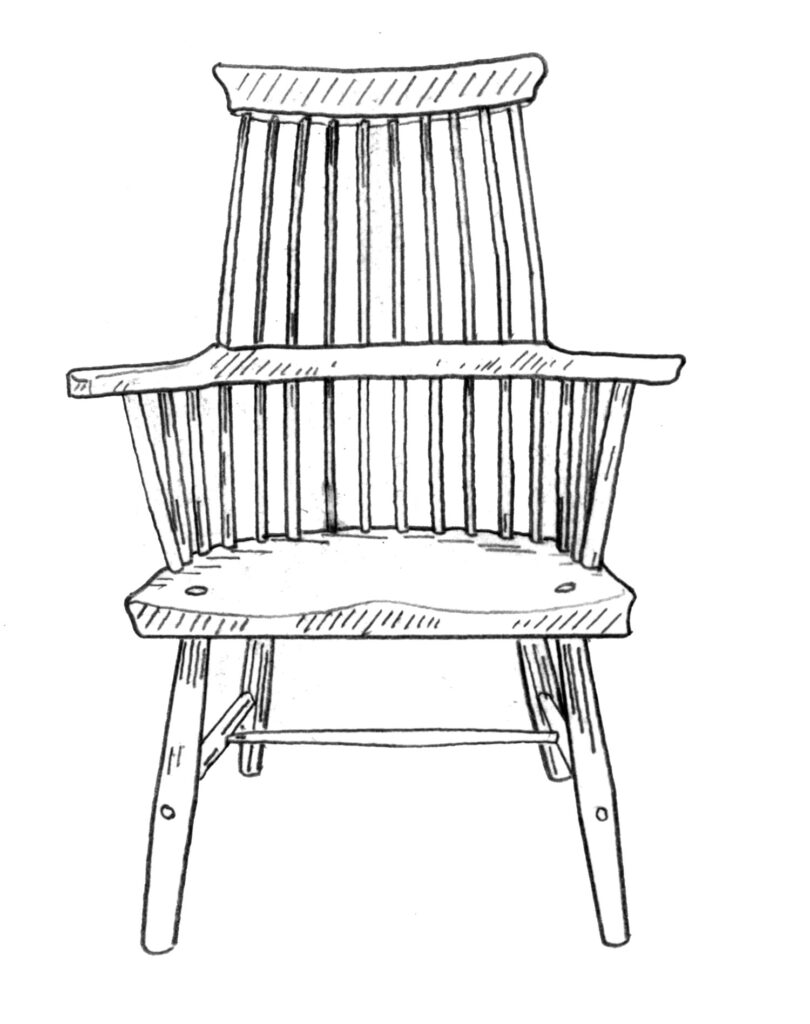
So when I decided to stop copying old stick chairs and strike out on my own, my first step was to buy a pad of tracing paper at the grocery store. I then opened the enormous folder on my laptop of chairs that I love, picked the 50 best and printed them out. Then I began tracing them.
To be honest, once I started tracing chairs, it was difficult to stop. My pencil forced me to see so many things I had glossed over before. Chair shapes that I thought were complex were reduced to the squares, circles, rectangles and arcs I learned at Robin Wood Elementary.
I saw – for the first time – how certain elements were grouped together. Many beginners think that a design element should be carried throughout the entire piece. Matchy-matchy – like Garanimals. That’s how we got the California Roundover style, the nadir of furniture during my lifetime.
Instead, I learned how circles and rectangles worked together with the occasional irregular curve to make something that looks right.
I know, this is a boring and arduous way to learn design. There’s no Zen koan. Instead, it is a gradual revealing of the structure behind our world – one pencil stroke at a time.
— Christopher Schwarz
P.S. And if you want to learn to write a good song (and to learn to listen), try this.
One of the bright parts of this year has been working with Aspen Golann and The Chairmaker’s Toolbox to lend a hand to budding toolmakers who are underrepresented in our craft (female, NBG and BIPOC).
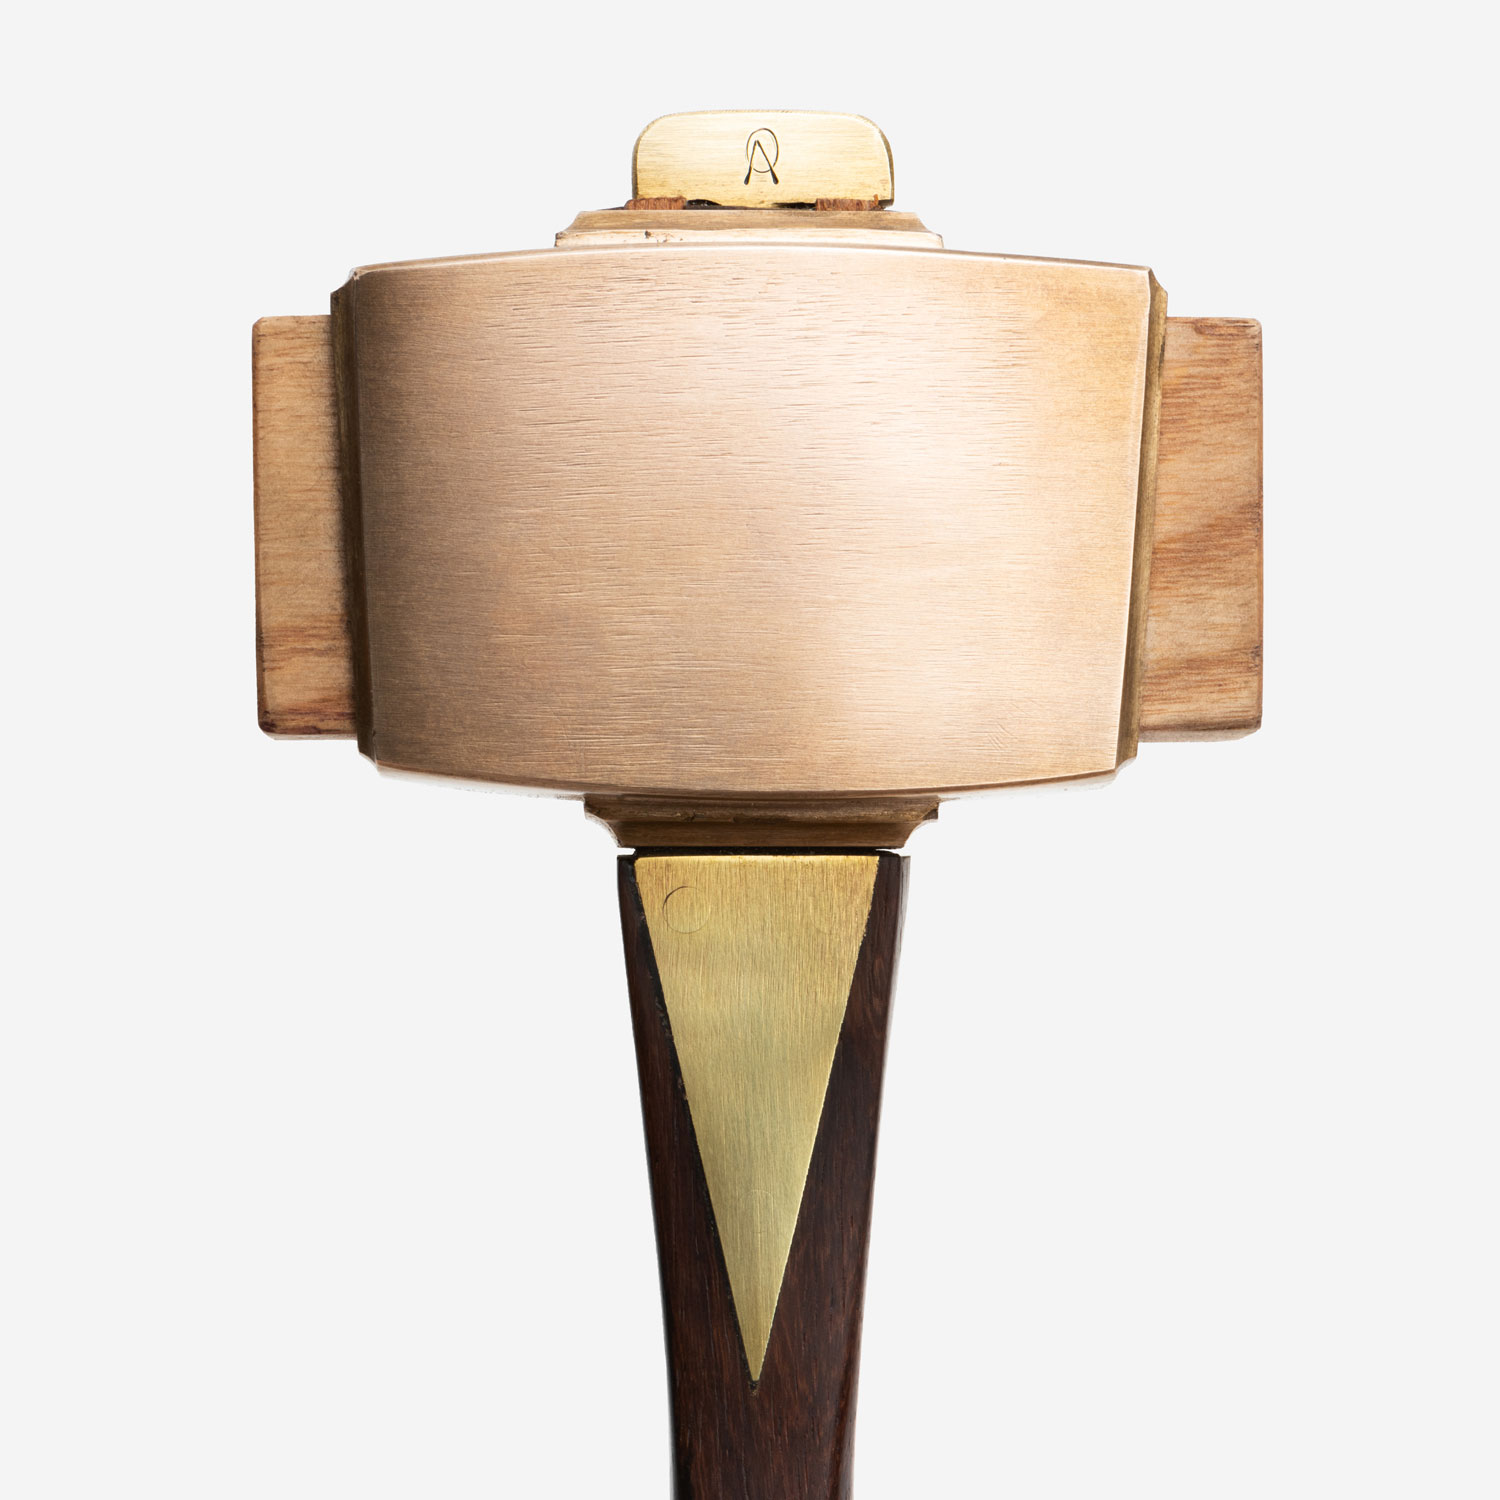
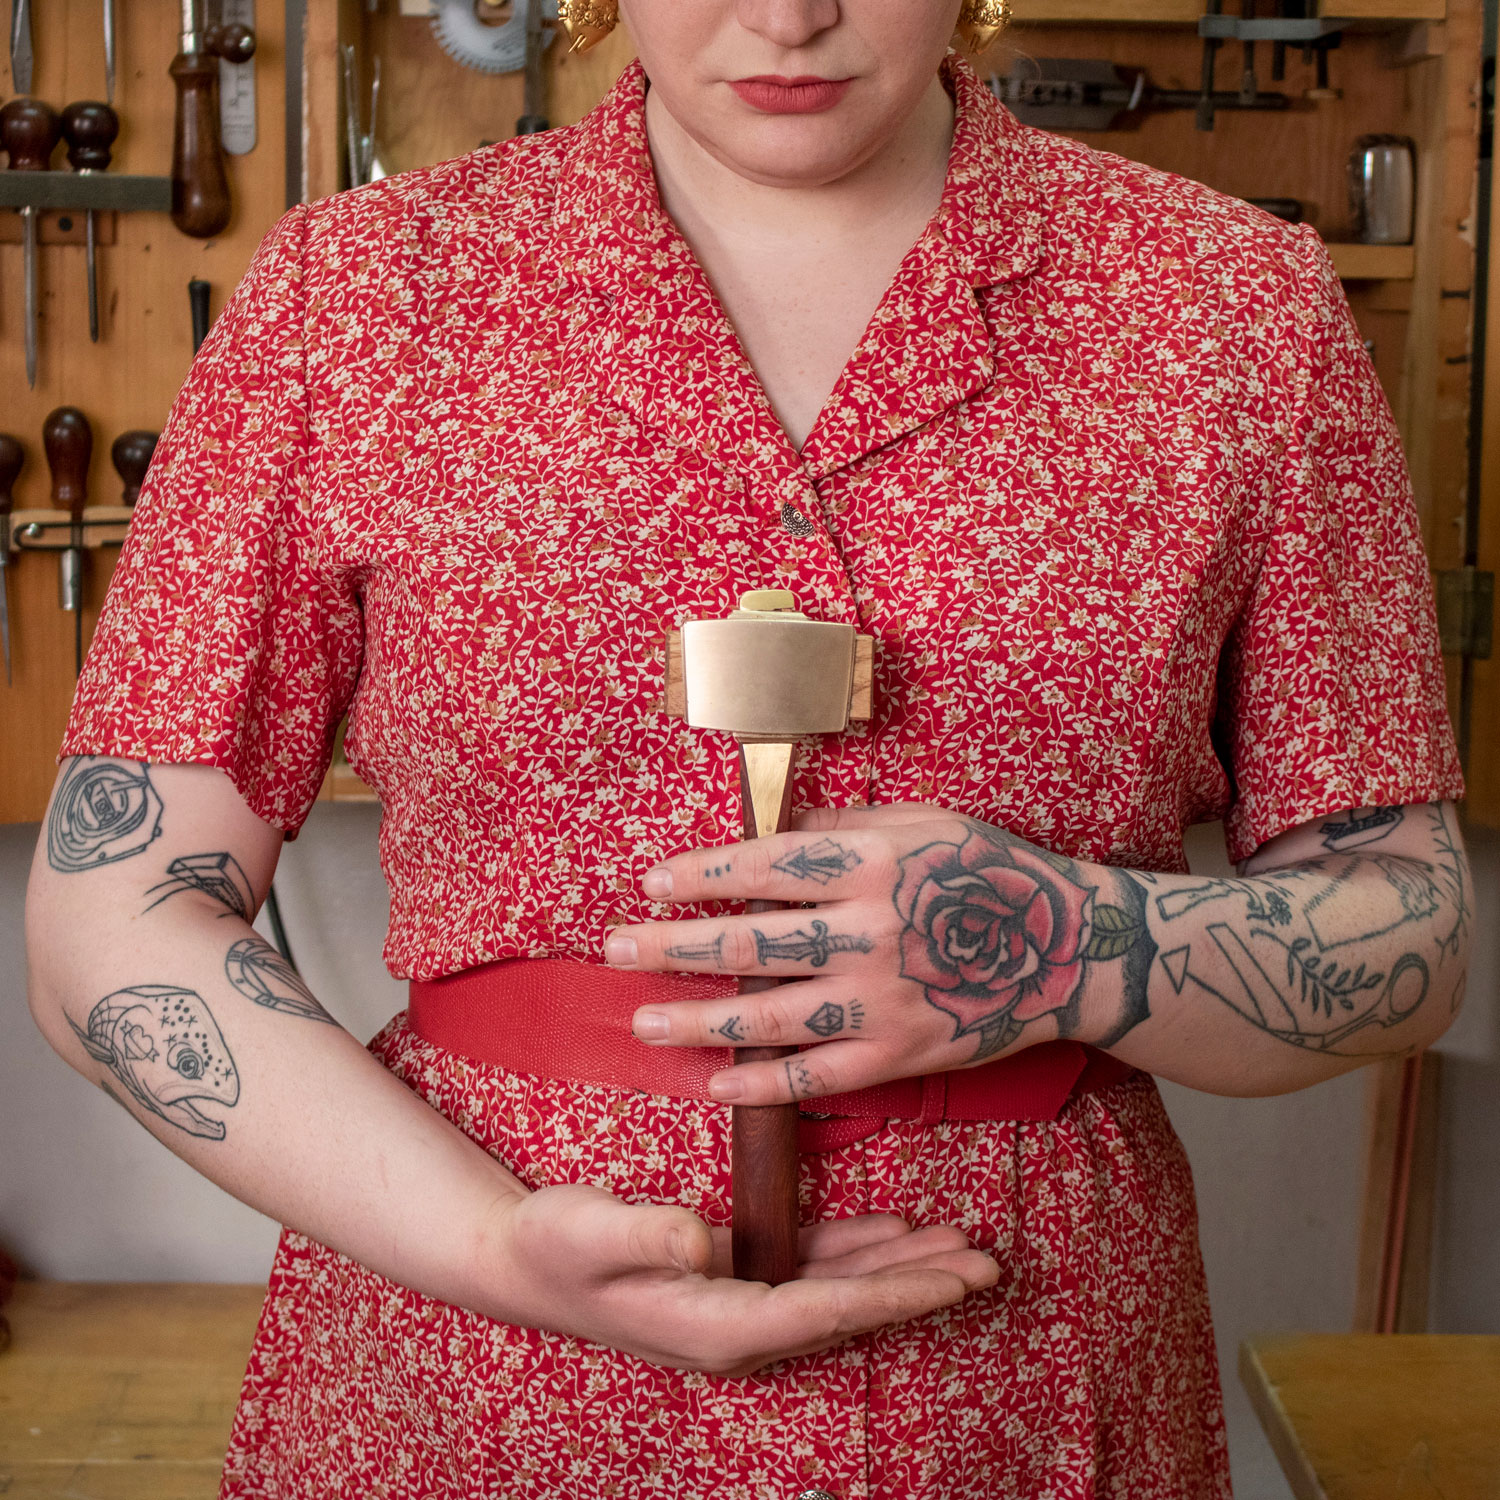
My role was tiny: I consulted with Eleanor Rose on developing a fantastic chair devil and a reproduction of the H.O. Studley mallet. Eleanor didn’t need much help from me, but I am happy to shine a light on her work, and I hope we get to work on another project that might become a production tool.
As someone who has handled/fondled/might-have-licked the Studley mallet during photography for “Virtuoso,” I know exactly how the mallet should feel and look, even close up. Eleanor’s version takes a small liberty with the handle material (to save the rosewoods), and she improved an interior structure. I think Studley would be pleased with the result. (I bought two of hers.)
Her chair devil immediately became one of my favorite chairmaking tools. Yes, you can easily make your own, but it won’t look this nice, or have the same nimbleness. Last I heard, Eleanor is still tooling up to make a run of these. You might want to send her a message to let her know you want one. I bought the first sample she sent me.
When I think about the things I would grab from my shop during a fire, my chair patterns would be at the top of the list. The patterns I own have evolved during the last 18 years and began with some tracings I made during my first chair class.
These patterns are still my jumping-off point for all my existing and new chair designs.
In order to help readers of “The Stick Chair Book” begin their own collection of patterns, we’ve made five sheets of full-size patterns for all the major components in the five chairs in “The Stick Chair Book.” NOTE: If you have bought the Early Adopter Digital Package for this book, you already have these patterns in your possession. No need to buy them twice or thrice.
We are selling the patterns two ways.
For $20 plus shipping, you will receive five 22” x 34” sheets printed on lightweight paper used for architectural drawings. These can be easily cut out and stuck to thin plywood to make templates. The patterns include mortise locations for the legs and sticks. And the sightlines for drilling the leg mortises.
For $10 you can download a pdf of the five sheets, which you can get printed out at your local copy shop, reprographics firm or office supply store.
A couple other updates: We have restocked on Crucible Type 2 Dividers and have another big load on the way to the warehouse.
Also, we were hoping to launch our Lost Art Press beer steins this week, but we hit a snag. We didn’t receive our full shipment of them. So we decided to hold off on launching them until we had our entire order. Stay tuned.
Robert Wearing’s “The Essential Woodworker” was the second Lost Art Press book, and it was a lesson for us in how badly publishers treat authors. First, let me say that Wearing’s book is one of the most important books on out there on hand-tool woodworking (read about my first encounter with it here).
The original publisher of the book had let it go out of print. When that happened, they were supposed to return the photos or drawings to the author. But they didn’t. And then they claimed they had lost all the original materials – breaking one of the essential covenants of publishing. Wearing, in the meantime, was living on a fixed income in an assisted-living facility.
So John and I went to work. We wrested rights from the original publisher and set about to rebuild the book without any of the original materials. We typed the entire book back into the computer, scanned and edited every illustration and recreated all the photos that had been lost. And we created an entirely new layout.
The process took a couple years, but we are proud to say that Wearing then received a royalty for every one of the 37,000 copies we’ve printed since 2010. And his estate now receives these royalties.
For me, “The Essential Woodworker” was the landmark book that connected all the dots about hand-tool woodworking into a cohesive explanation as to how the craft works. You can read it in an afternoon, but its lessons will stick with you for the rest of your life. The illustrations are brilliant.
Bringing Wearing’s book back into print led us into our first massive republishing project: The Woodworker series by Charles H. Hayward. You can read more about that series of important books here.
The following step-by-step instructions on how to hinge a door are perfectly indicative of Wearing’s clear instructions and illustrations. We miss Robert, but we are happy that his book lives on to help others.
— Christopher Schwarz
Hingeing a door
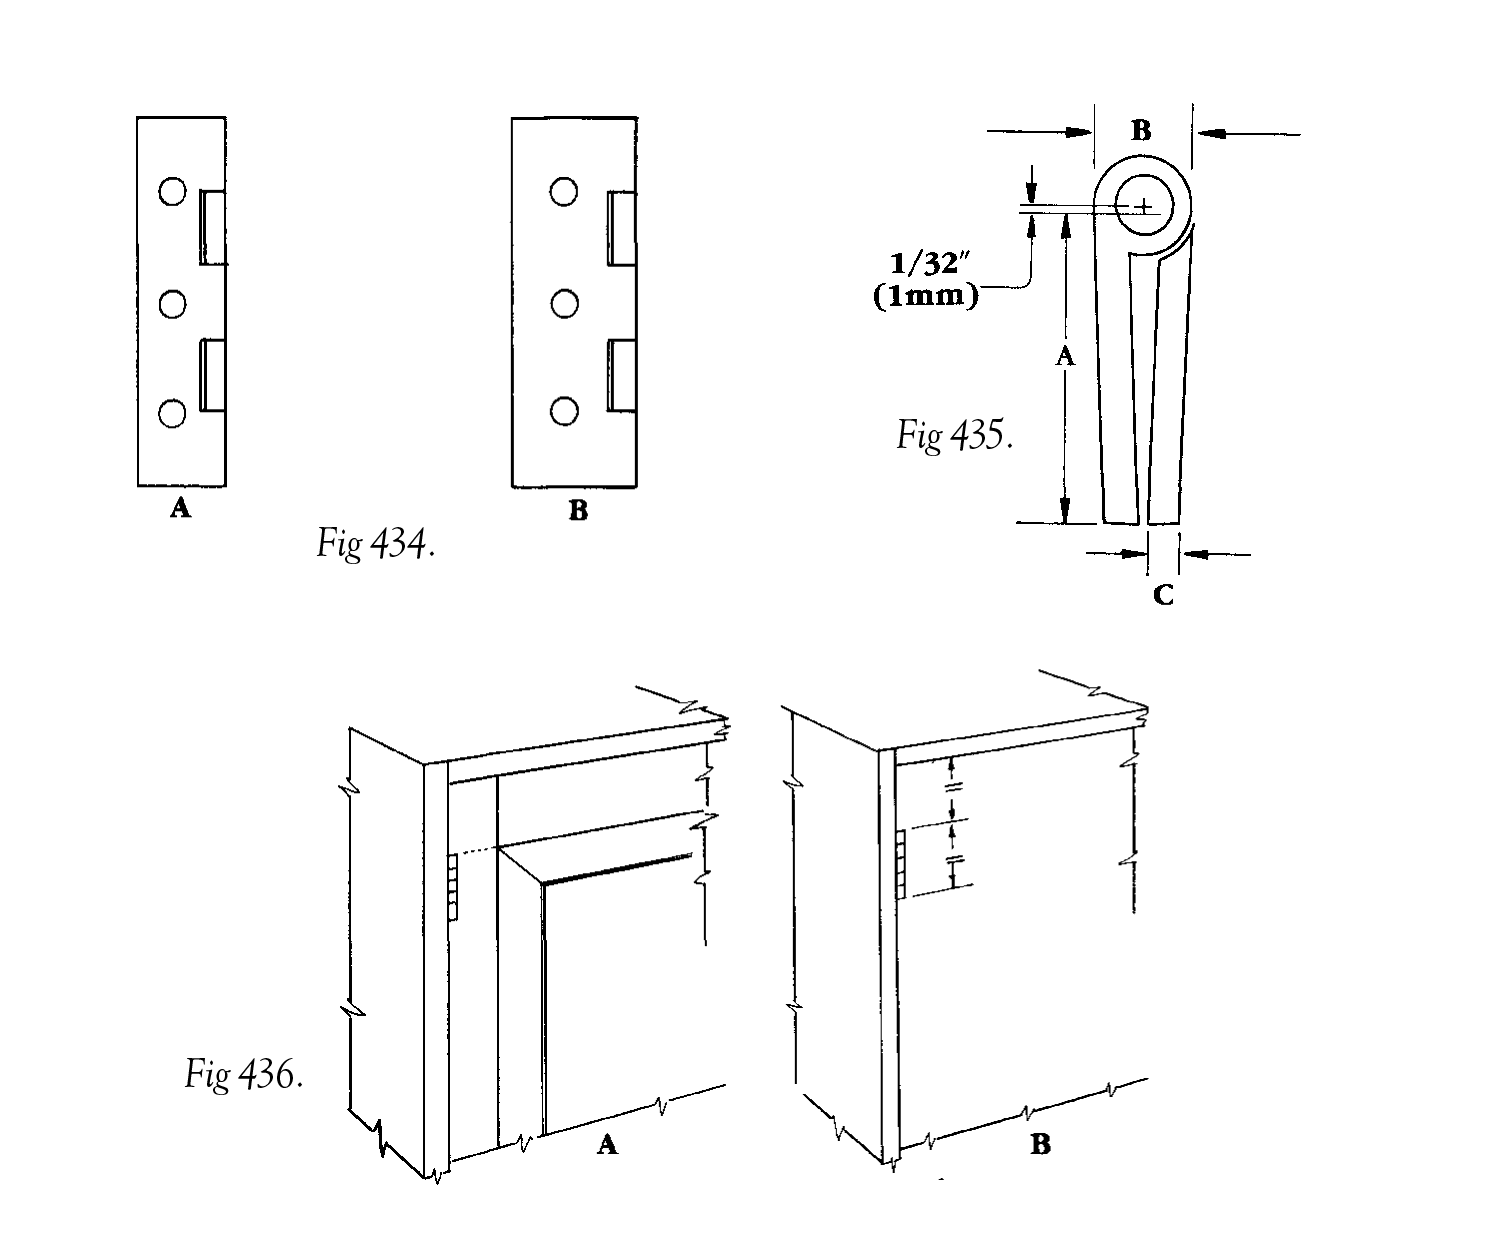
The majority of doors are fitted with butt hinges (Fig 434) – for best-quality work they should be solid drawn brass not folded or merely plated. The illustration shows the two styles: the manufactured, broad suite (B) and the narrow suite (A), the second being more commonly used for furniture. The broad suite type is useful when a door is slightly outset, because in this case if a narrow suite hinge is used, the screws are liable to come too close to the carcase edge.
Three gauge settings will be used in the marking out (Fig 435, A, B and C). Three separate gauges, though not essential, save time and re-setting. Note that in setting A the gauge point should be just short of the hinge pin centre; 1mm (1/32in.) is about right.
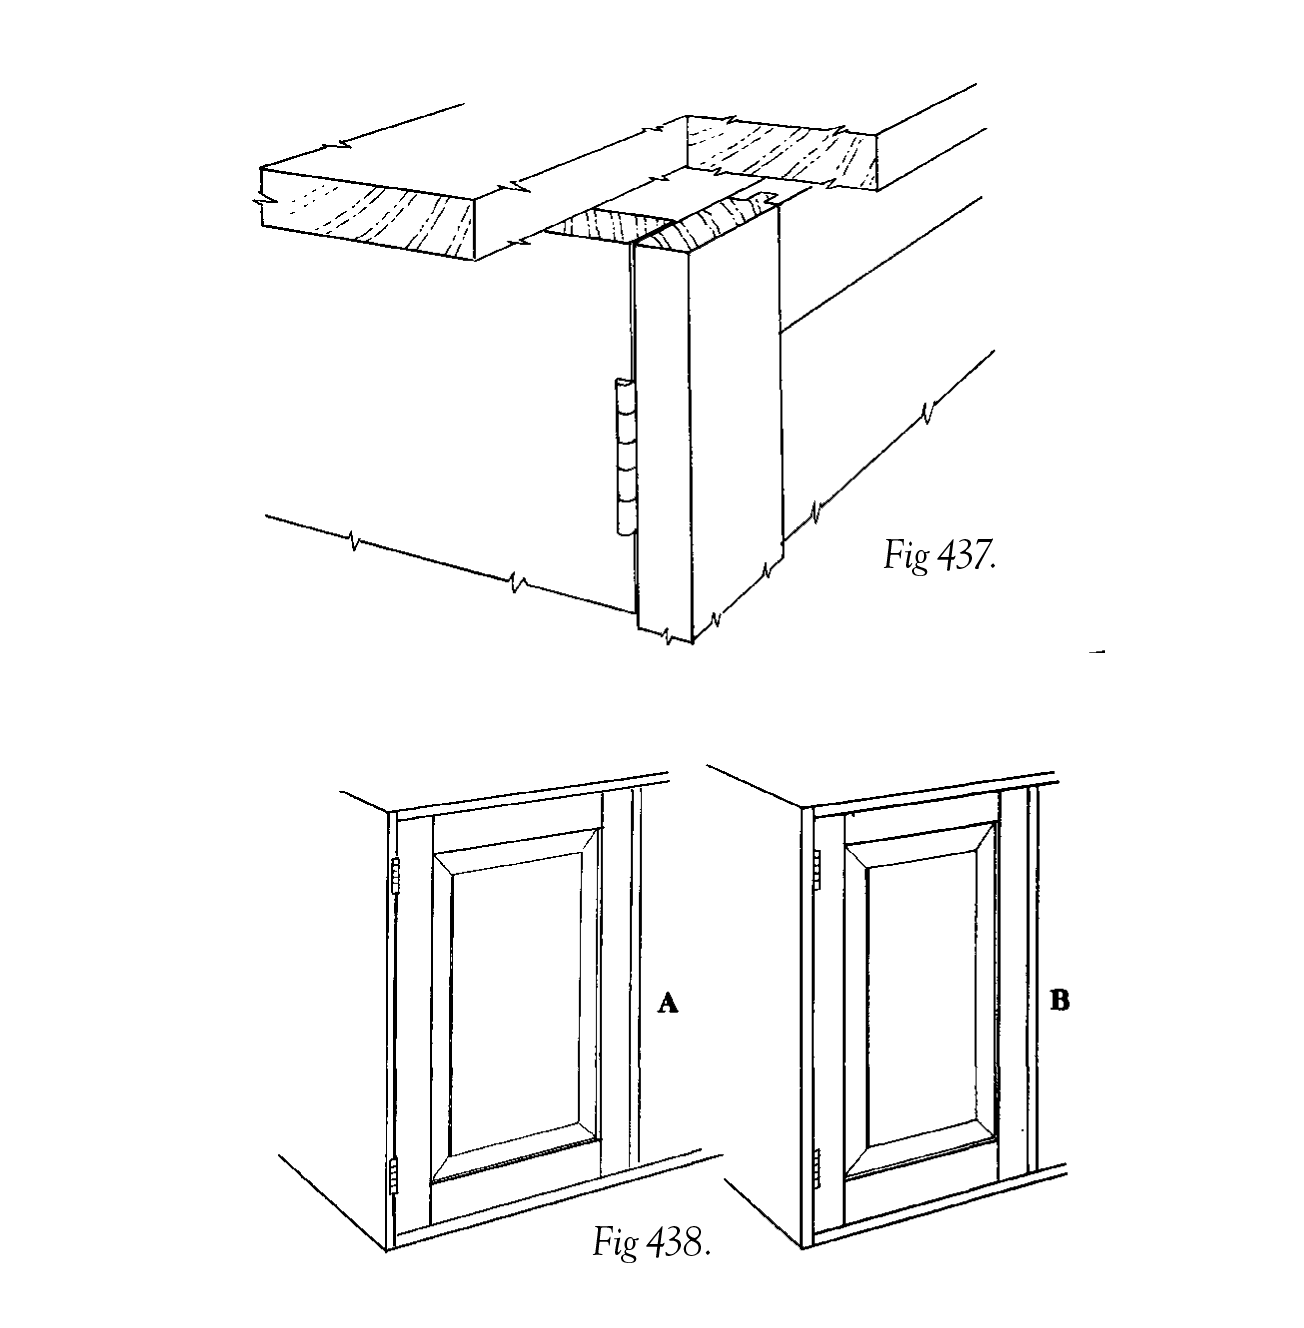
The location of the hinges is important, particularly for their appearance. On a framed door the hinge lines up with the inside edge of the rail (Fig 436A). On a flush door the hinge is generally placed at its own length from the end (Fig 436B). The same rules apply to the hinges on a planted door (Fig 437). Hinges let into both door and carcase (Fig 438A) interrupt the straight line between door and carcase. In Fig 438B the hinge is let into the door only, preserving the continuous line, a more pleasing effect.
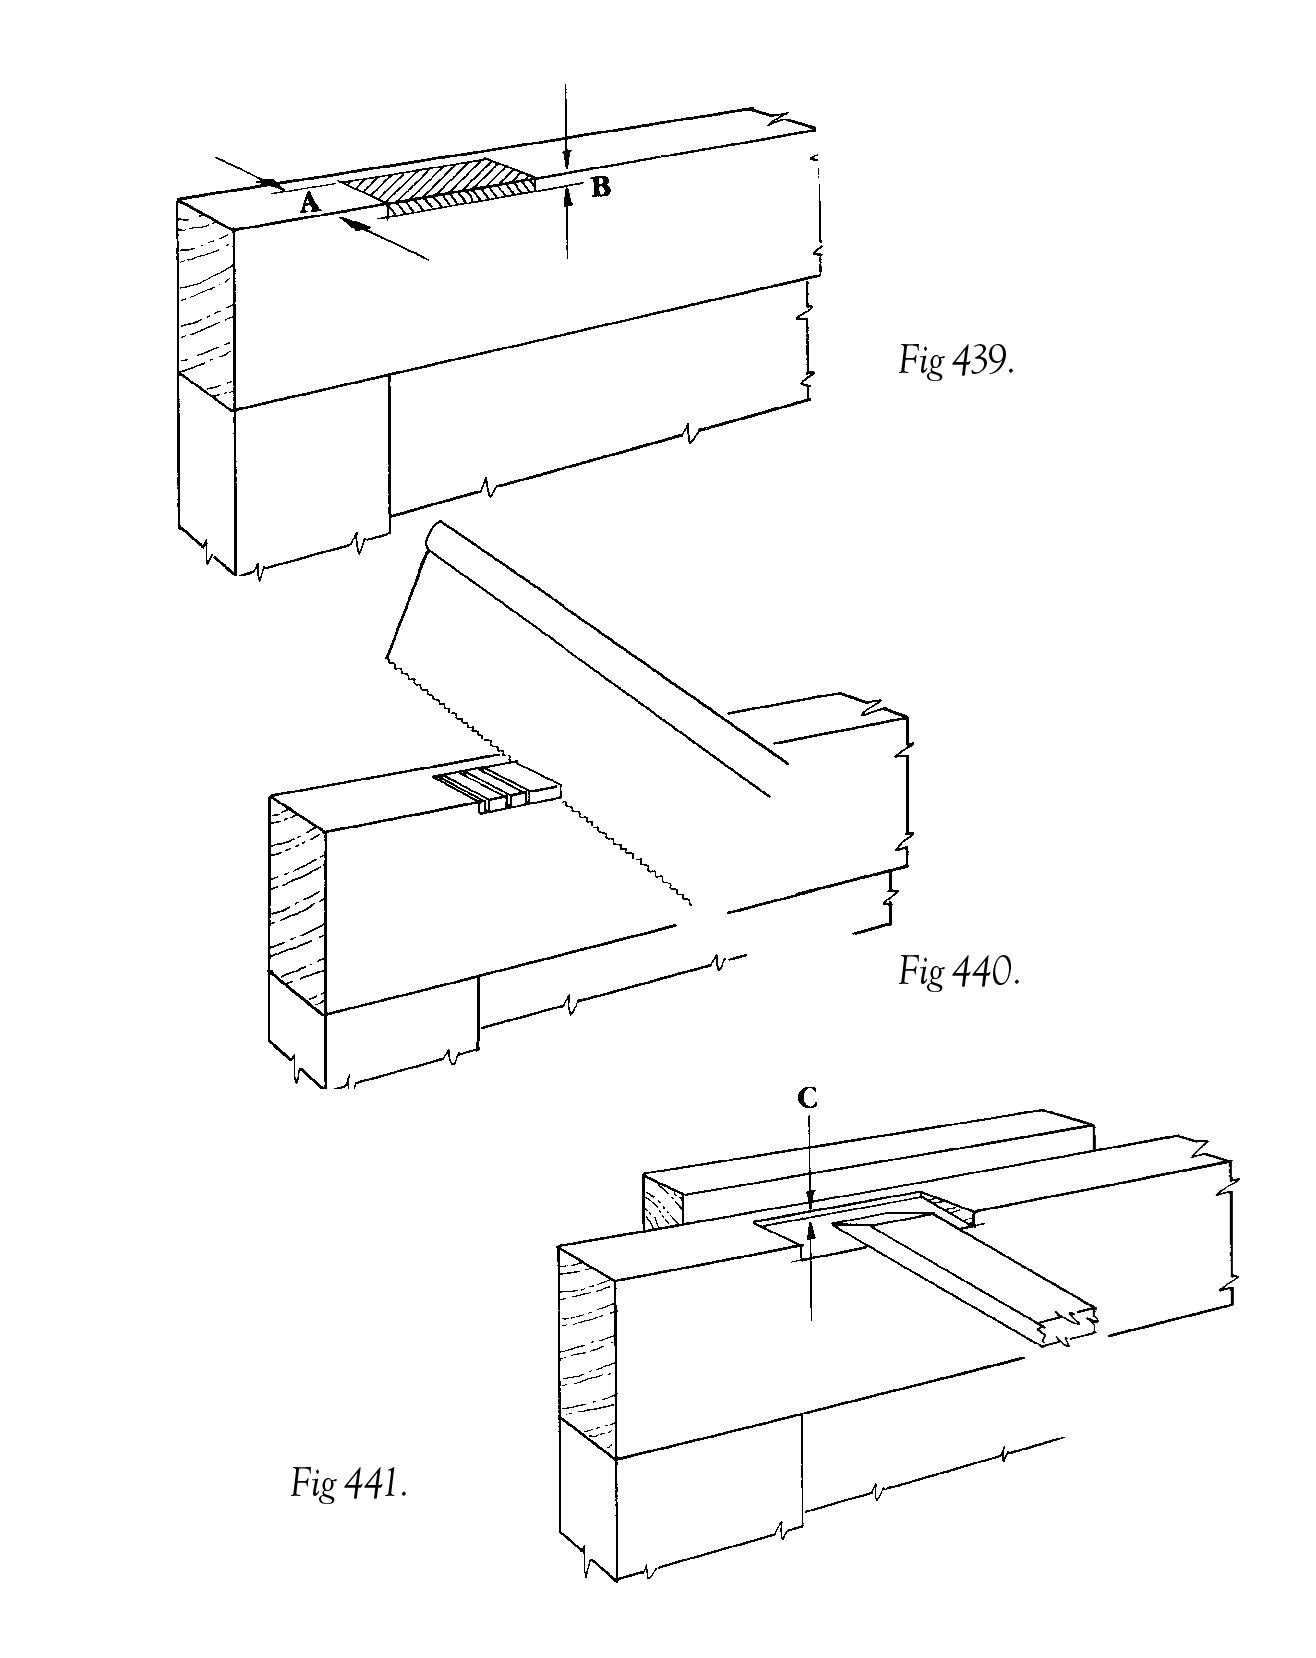
Mark the door first (Fig 439). The length is taken from the hinge itself and marked with a knife and square. Gauge the hinge width, A, on the edge and from the outside, i.e. the true face. Gauge the thickness, B, on the face. It is vital that this size is not exceeded otherwise the door will not close fully; if it is slightly undersize, the lesser evil, there will be a gap between the door and carcase which can be corrected. An overdeep socket will need packing up with veneer or card, or filling in and a fresh start, all unsightly.
The socket is formed by making a number of sawcuts (Fig 440) then removing the waste with a broad chisel (Fig 441). Notice that the socket reduces in depth towards the back where it finishes to a depth C, the thickness of the hinge leaf. Obviously this cannot be gauged, it must be found by trying the hinge. A socket too deep here will not affect the door closing but only its appearance. However the knuckle end is most critical as has already been mentioned. A block cramped to the door will prevent the chisel from accidentally bursting through.
Brass hinges need brass screws. With very hard woods it is easier to insert steel ones first, preferably one gauge smaller; these are replaced by brass when the hingeing is completed. Hinges sometimes need extra countersinking to ensure that the head does not stand proud. Provisionally fit the hinges to the door with only one screw in place.
The door with its hinges is located in the carcase, standing on one thickness of the packing card. Mark the hinge position on the carcase and remove the door. Square these marks onto the inside and gauge the hinge width, A (Fig 442). Chop a chisel lightly across the grain in the manner of the sawcuts in Fig 440, remove the bulk of the waste and trim back the socket carefully to the lines. The maximum depth (Fig 443B) is the total hinge leaf thickness (Fig 435B). Again slight excess will not harm the fitting. Nothing must be removed at the carcase edge. Fix the hinge with one screw. Note that pilot holes for the screws must be drilled at right angles to the sloping bottoms of the sockets not to the face of the carcase.
Try the door for fit; a strip of thin paper should just pass down between the hinge stile and the carcase. The closing stile may now need easing, at a slight angle. The odd shaving may still be needed elsewhere but with accurate marking and careful working this should be minimal.
For the best-quality work the hinges should now be unscrewed and rough scratches removed from the knuckles with successively finer grades of emery cloth, then metal polish. At the final screwing on, use brass screws and line up all their slots the same way.
If a stop is needed it can be made in the same manner as a drawer stop.
Common faults when fitting doors are that either the door is ‘screw bound’ where protruding screw heads prevent the hinge from closing, or ‘hinge bound’ where the socket has been cut deeper than the total hinge thickness.
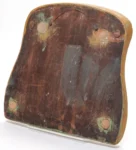
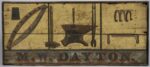
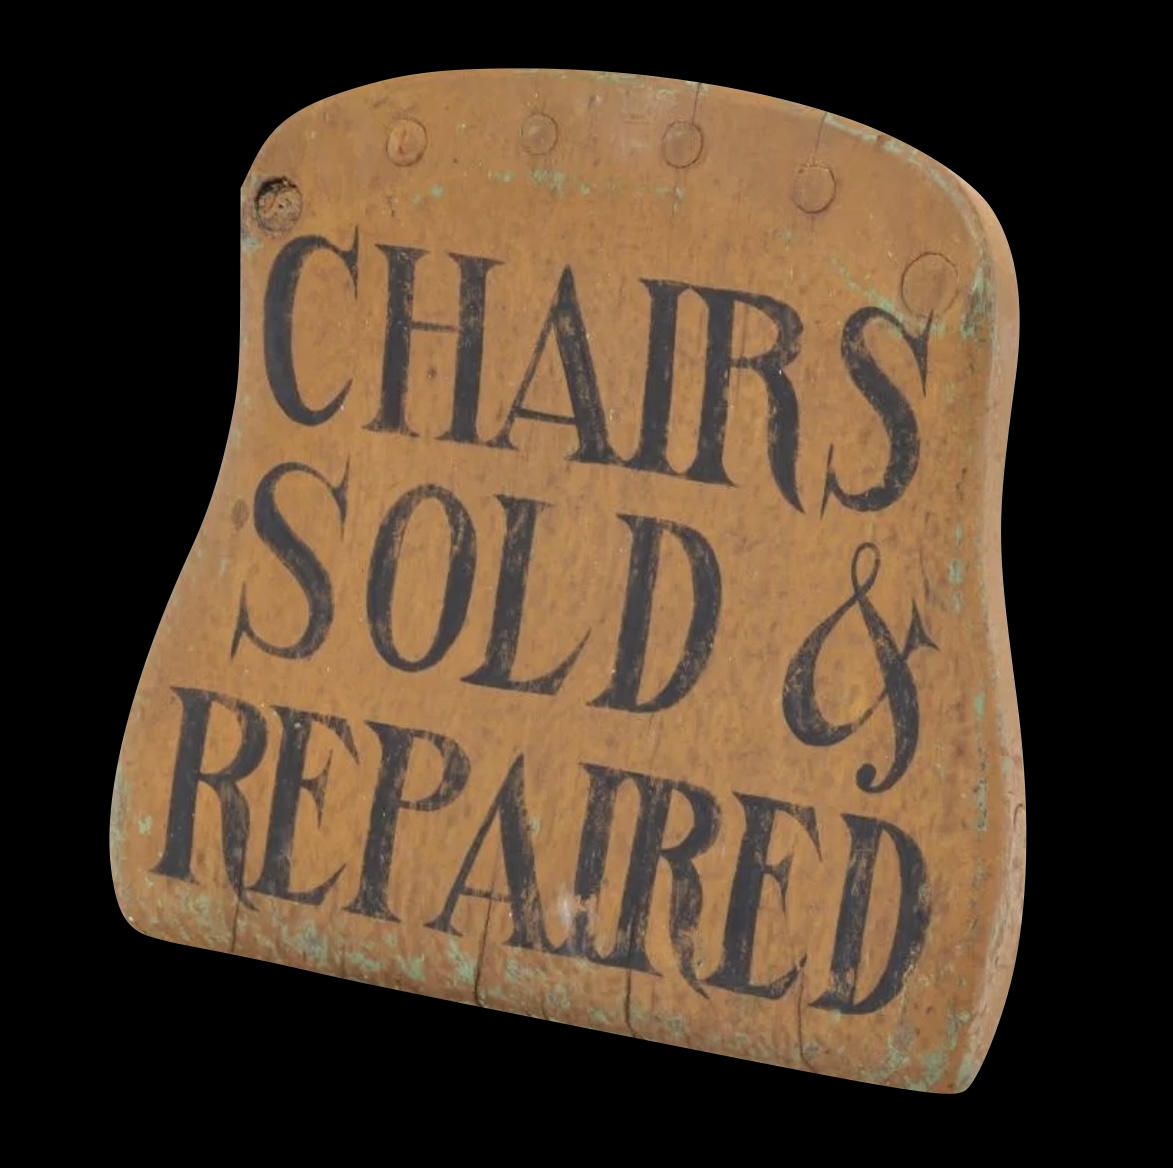
A plank chair seat with spindles and legs sawed off and repainted to make a sign. Possibly Pennsylvania-German. Photo: Garth’s Auctions, Columbus, Ohio.
While working on a research project earlier this year I had the opportunity to delve into 19th-century business directories. For some tradesmen using newspaper ads and business directory listings was the only effective means of advertising their goods and services to the public. For those newly arrived in town the local business directory provided maps, locations of city offices, churches and where to find merchants selling all manner of goods. For present-day researchers, from economists to those tracing their family history, old business directories provide valuable information on American life from the late 18th century to early in the 20th century.
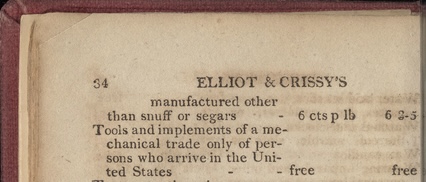
A business directory for New York City in 1794 included a list of goods on which a customs tax had to be paid. An exception was made for the tools belonging to persons involved in one of the mechanical trades. This was one way to attract badly needed skilled mechanics to the new Republic.
Let’s take a look through advertisements placed by tradesmen associated with woodworking. The ads are from the 1830s to early 1880s with the majority from the “western cities” of Cincinnati, Columbus, Pittsburgh and St. Louis. All business directories were found in the collections of public and university libraries.
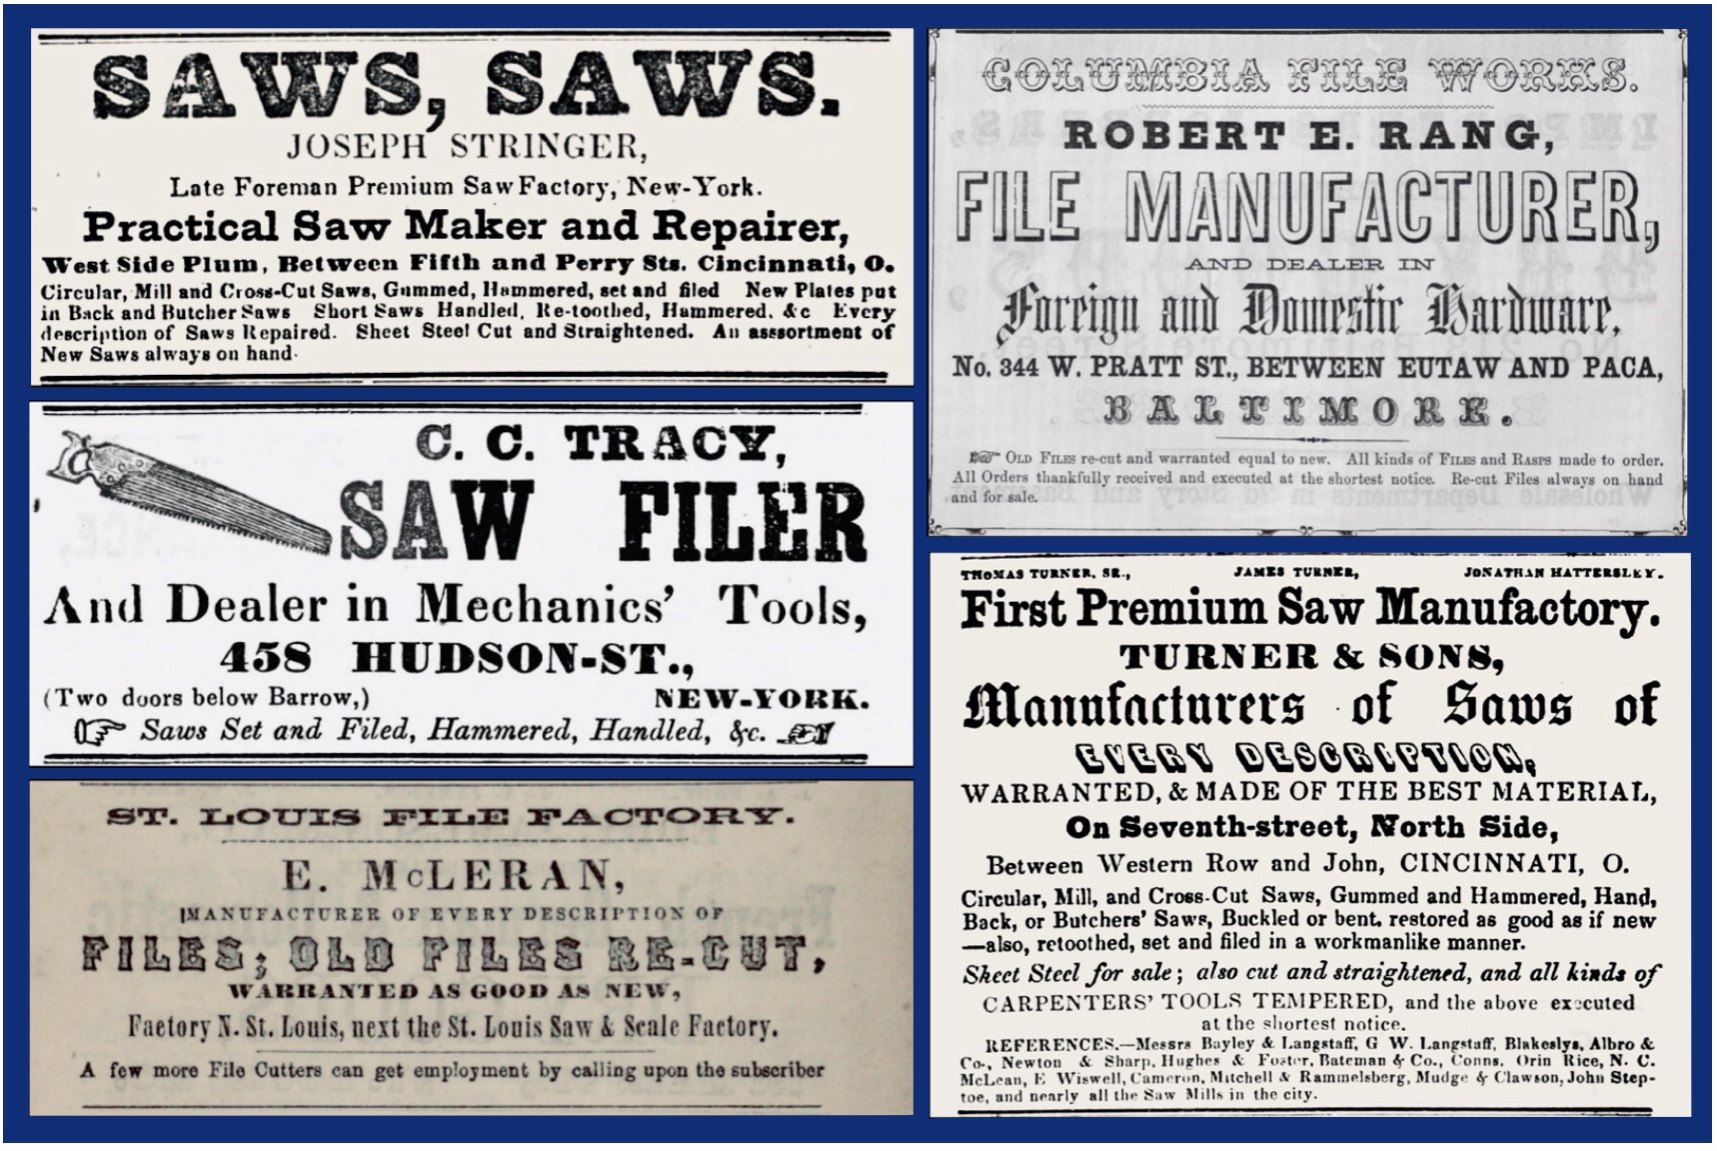
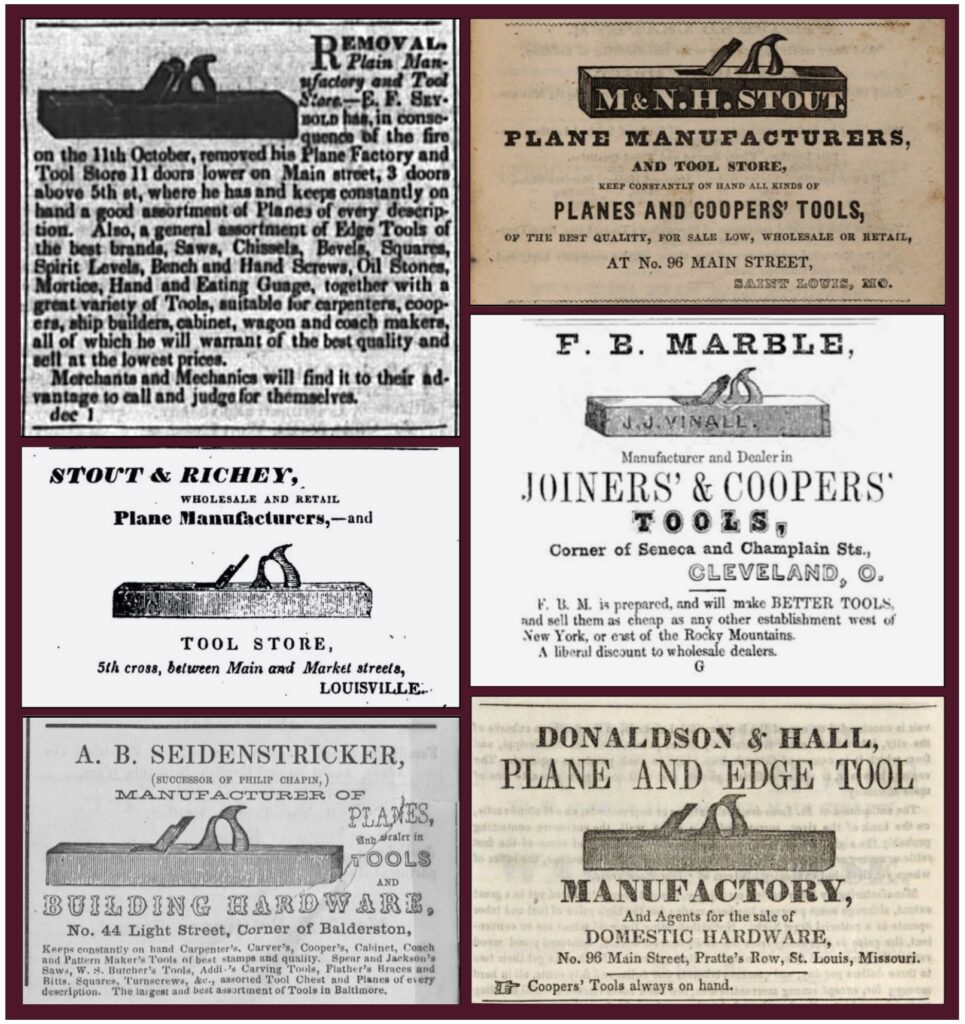
Paid advertisements were usually in a section towards the back of a directory. The cost of an ad depended on the size of the ad space. Consequently, a small business (and most were small businesses) needed to cram in all the necessary details in a space that might measure only 1 inch by three inches. Fortunately, there were numerous fonts and font sizes to jazz up their ads and grab the attention of the public. The combination of fonts and stock images used in these old ads is one feature that makes them so attractive to today’s woodworkers (and others).
A checklist of items to put in an ad include the tradesman’s name, business name, location, goods and services provided and references. Some directions on how the find the business (two doors down, westside, next to, between) were particularly helpful in the crowded conditions of the city. Phrases that communicate the tradesmen is ready, willing and able to meet the needs of a customer include “prepared to” “at the shortest notice” and “always on hand.”
Joseph Stringer (top-left) let his Cincinnati customers know he was previously a foreman at a premium saw manufacturer in New York. He is a “practical” saw maker and repairer indicating he will make or repair saws that fit the needs of the customer. The last lines of the ads are worth reading if you are looking for a job, can only afford a refurbished file or saw. First Premium Saw Manufactory of Cincinnati (bottom-right) has some weighty references. Mitchell & Rammelsberg made all varieties of furniture and at one time was considered one of the largest furniture factories in the world. Mudge & Clawson made over a hundred different styles of bedsteads.
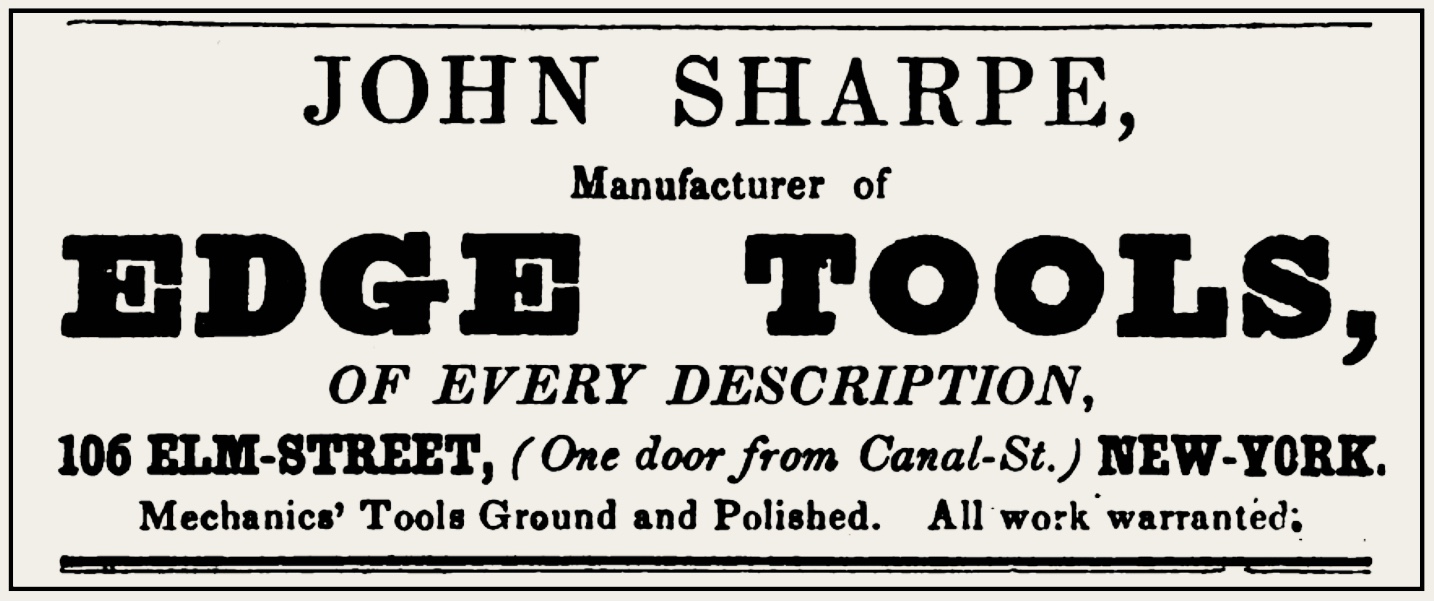
It never hurts to have your name match your business.
Stock images, such as the handplane, made it easier for the woodworking customer find a merchant. The ad at the top-left is from a Cincinnati newspaper. After E. F. Seybold had a fire (or fire spread to his premises) it was a matter of urgency to let the public know his new location and that he had stock on hand. Business directories also helped customers find merchants after fires or other situations forced merchants to relocate.
Stout & Richey of Louisville, Kentucky advertised in a directory that seemed to allow only business-card type ads. Note that A.B. Seidenstricker of Baltimore is the successor to well-known planemaker Phillip Chapin. In the small print at the bottom of his add F.B. Marble of Cleveland boasts he can make BETTER tools at cheaper prices “as any establishment west of New York, or east of the Rocky Mountains.” That’s a lot of chutzpah and about 1800 miles (on today’s roadways).
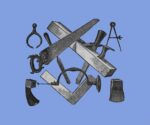
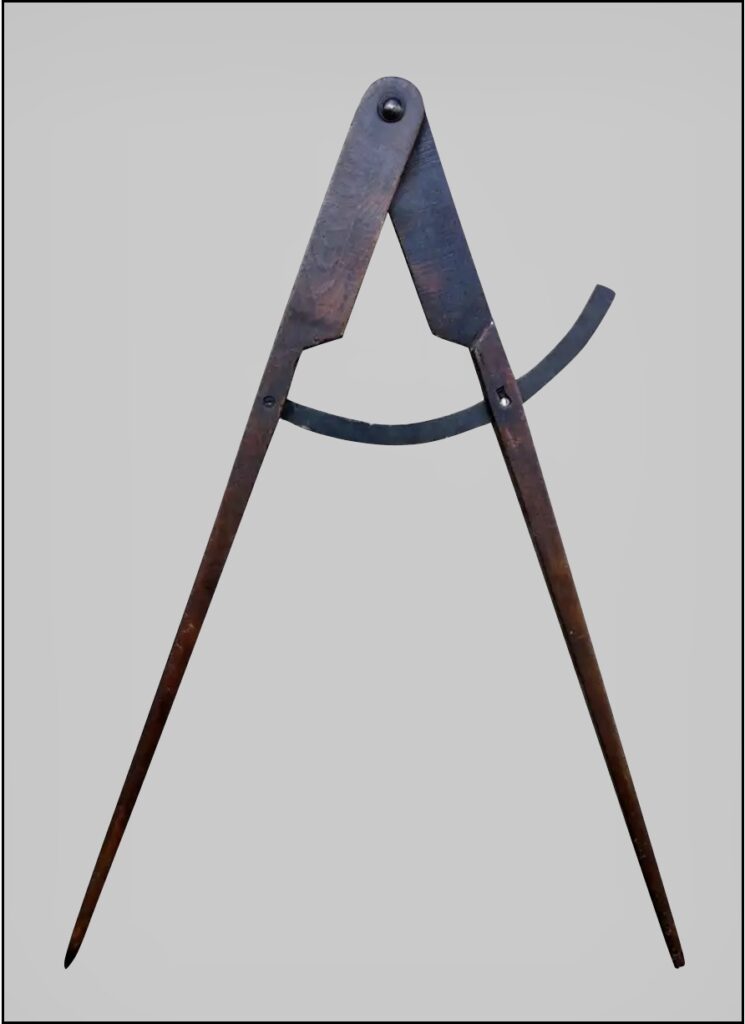
Wood and metal compass from a toolmaker’s shop. It would have been displayed inside the shop. American, late 18th century to early 19th century. Photo: 1stdibs.
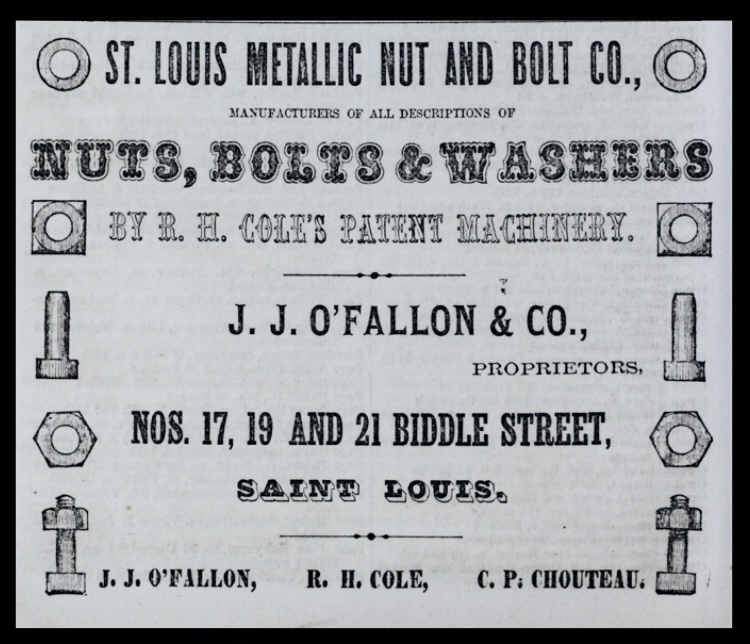
This is a well-ordered ad using its products to form a border. It also has the power of three: three products, three owners and three consecutive lots on Biddle Street. It makes me wonder if bolts were kept at No. 17, nuts at No.19 and washers at No.21 (and now you know why they would never have hired me). Richard H. Cole was granted a patent in 1857 for a machine that fabricated metal nuts. Denizens of St. Louis will recognize the names of the other two proprietors. C.P. Chouteau is likely a member of the family that helped found St. Louis. J.J. O’Fallon is likely the son of John O’Fallon. O’Fallon, senior, was a nephew of William Clark (of Lewis and Clark) and, after a career in the U.S. Army, made St. Louis his home and was involved in the expansion of the railroads.
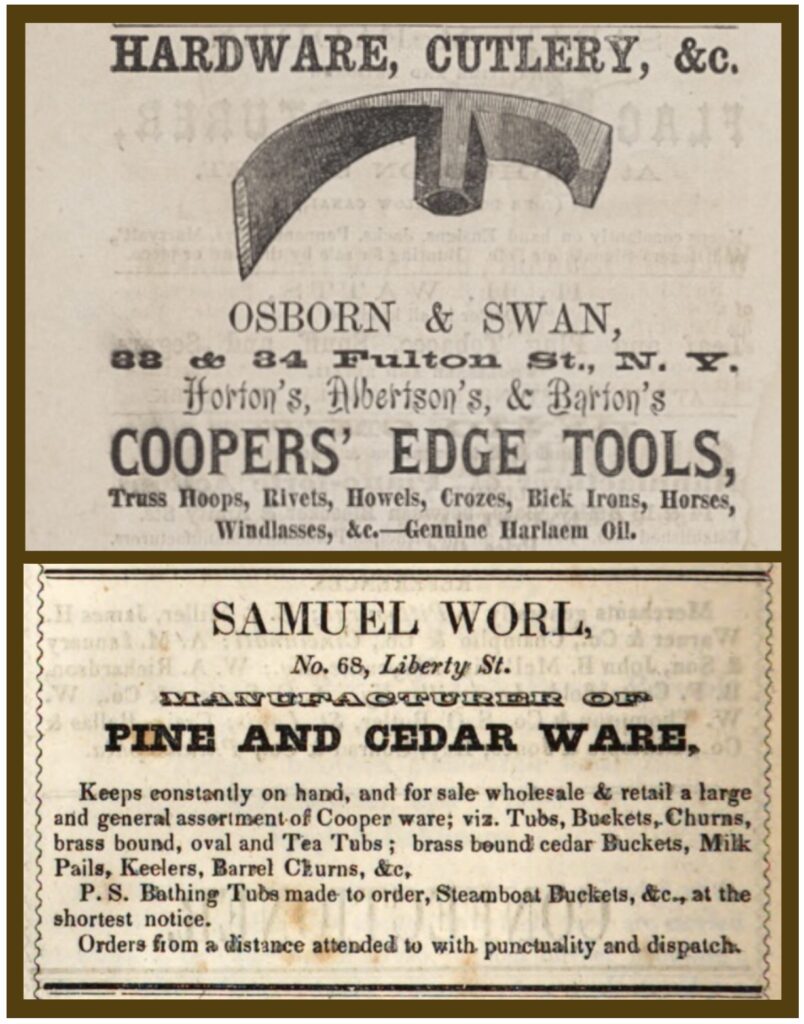
The image of the adze draws the eye to Osborn & Swan’s ad and the name brands of tools on offer. Samuel Worl, cooper of Pittsburgh offered a full line of products. With his business located near the convergence of three rivers, including the Ohio River and steamboat traffic, he could take and fill orders from customers outside of Pittsburgh.
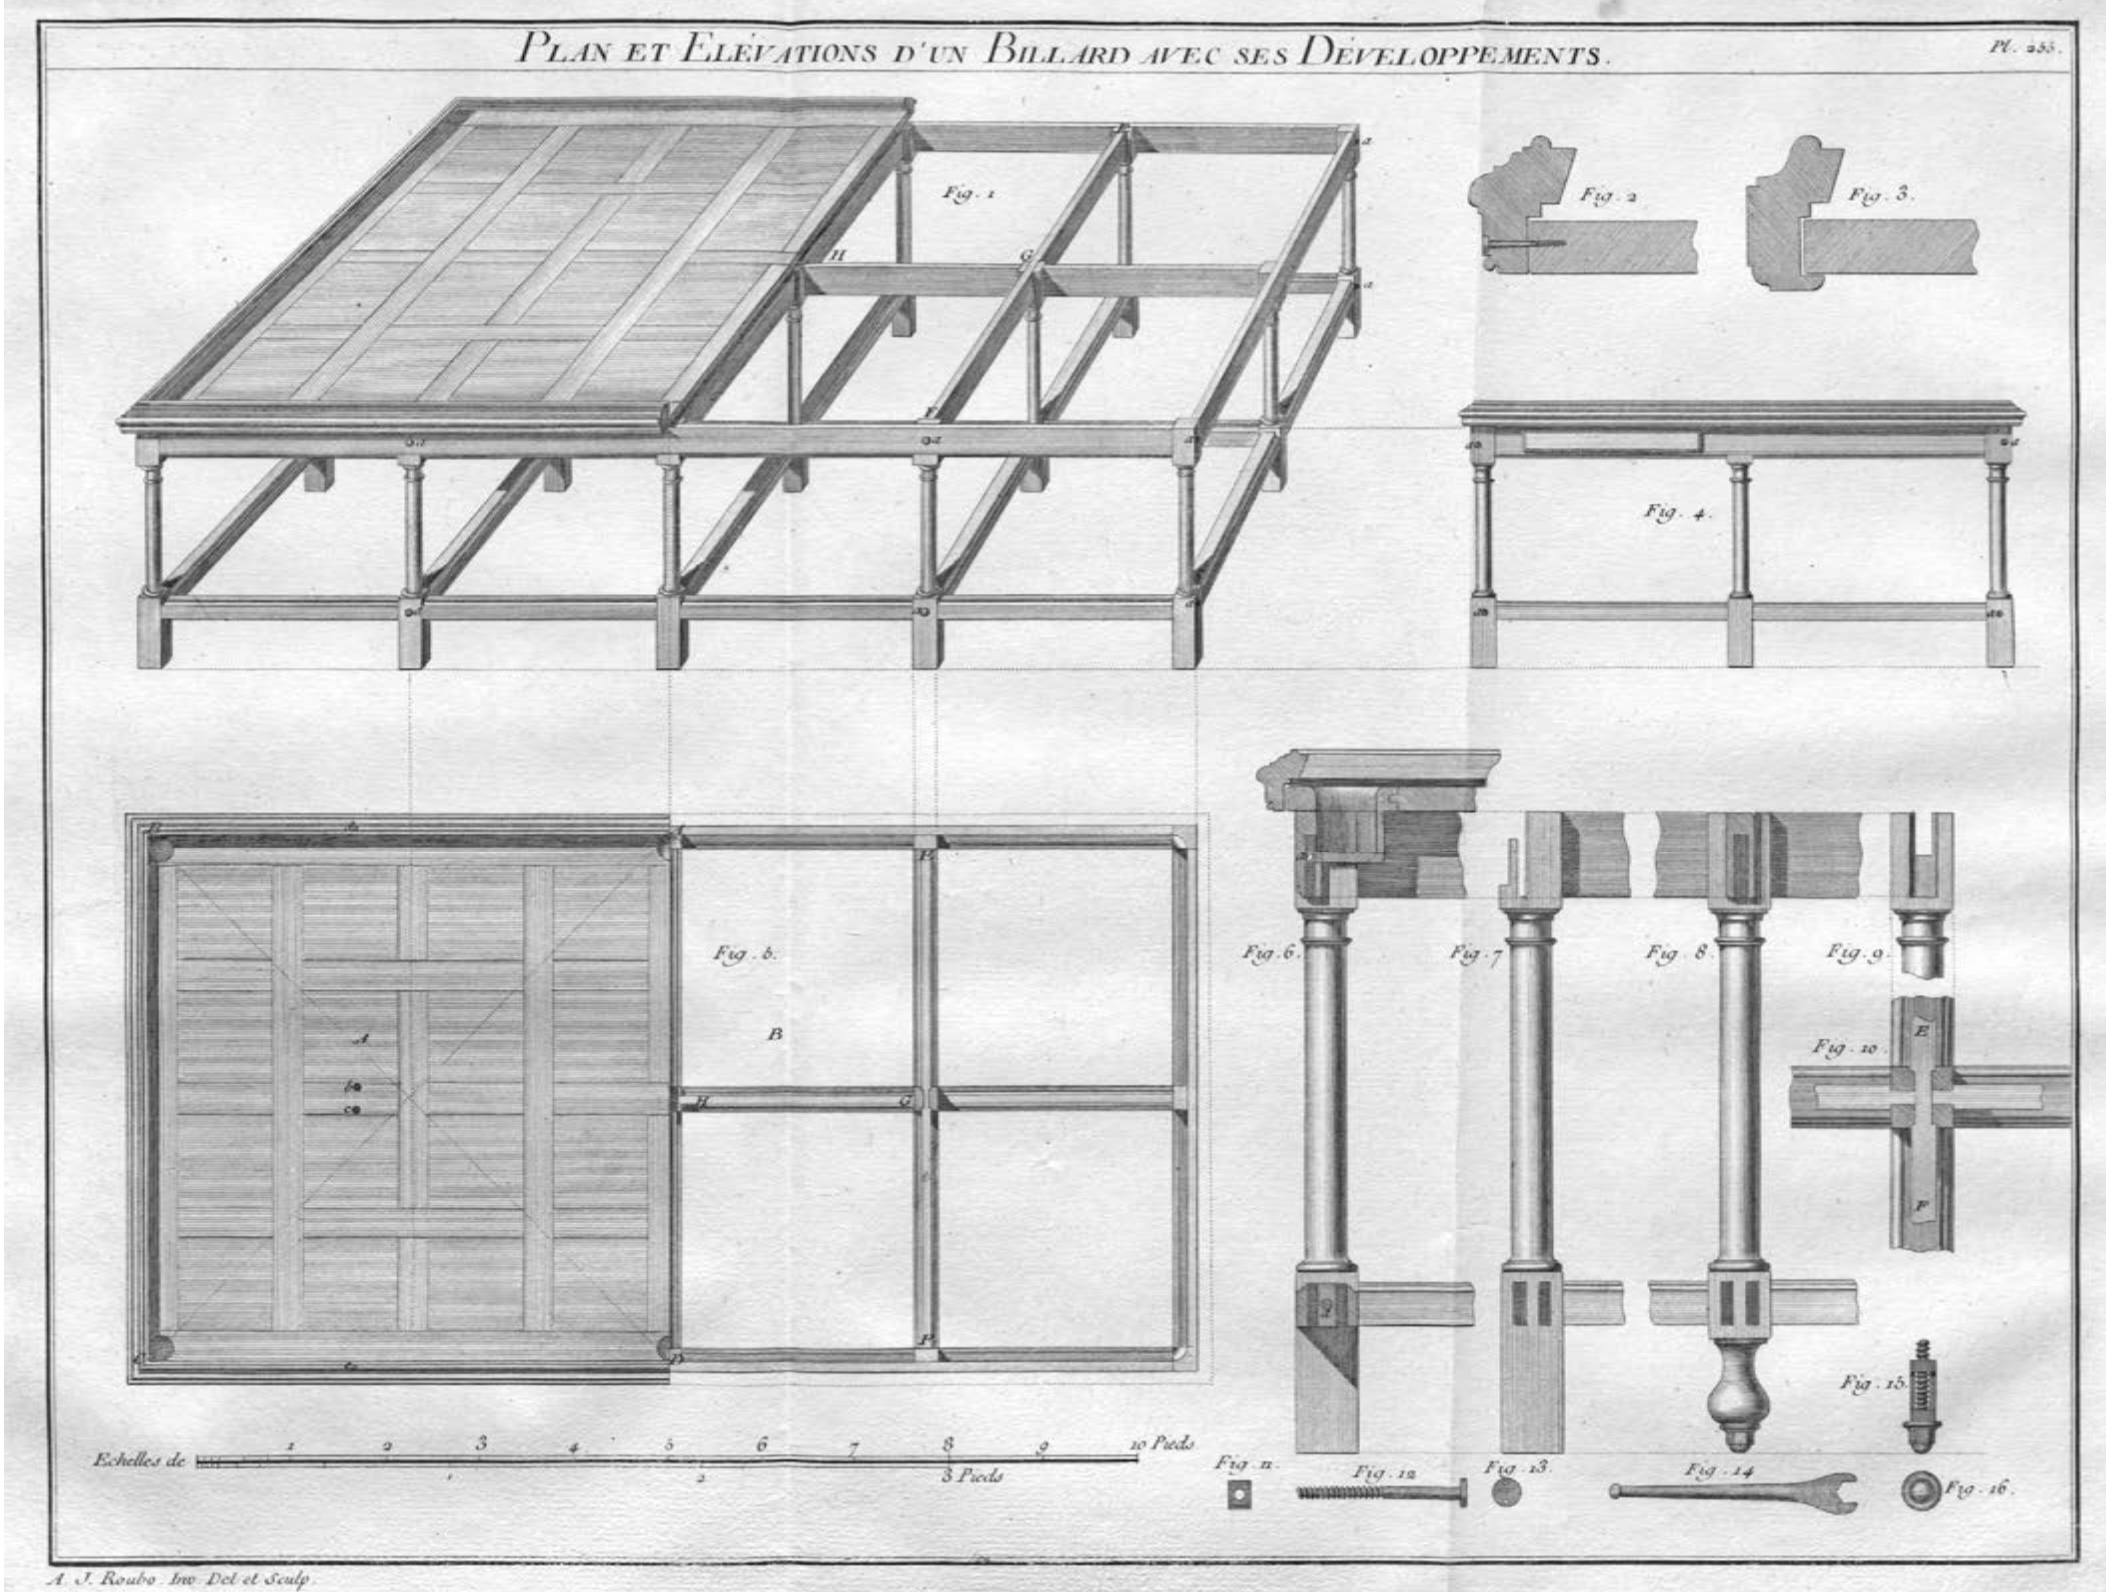
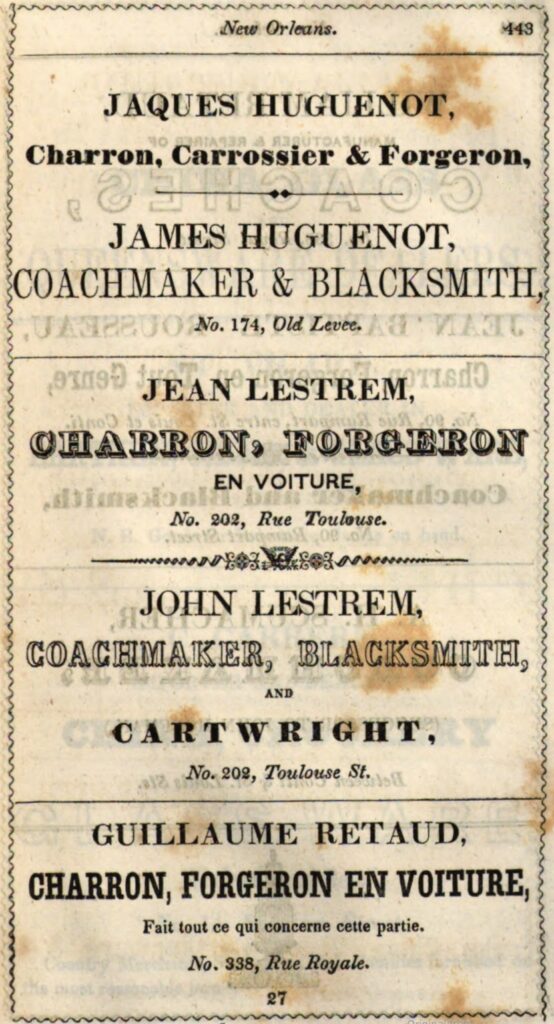
One 1844 business directory featured histories and advertisements from what it termed the cities of the Mississippi Valley. It was essentially a tour from the large cities that were along the Ohio River (or had access via canal) and those cities along the Mississippi River. The last city was, of course, New Orleans. Antognini, like many French craftsmen of the city, had his advertisements offered in French and English. However, he is a bit sly in offering one particular item to only his French-speaking customers (and you will have to figure that out for yourself). But, billiard tables? Yes, let’s not forget the importance of a game of billiards, fine liquor and the opportunity to make a business deal. Billiards was a popular pastime and Monsieur Roubo had a whole section on games tables. Plate 255 below.
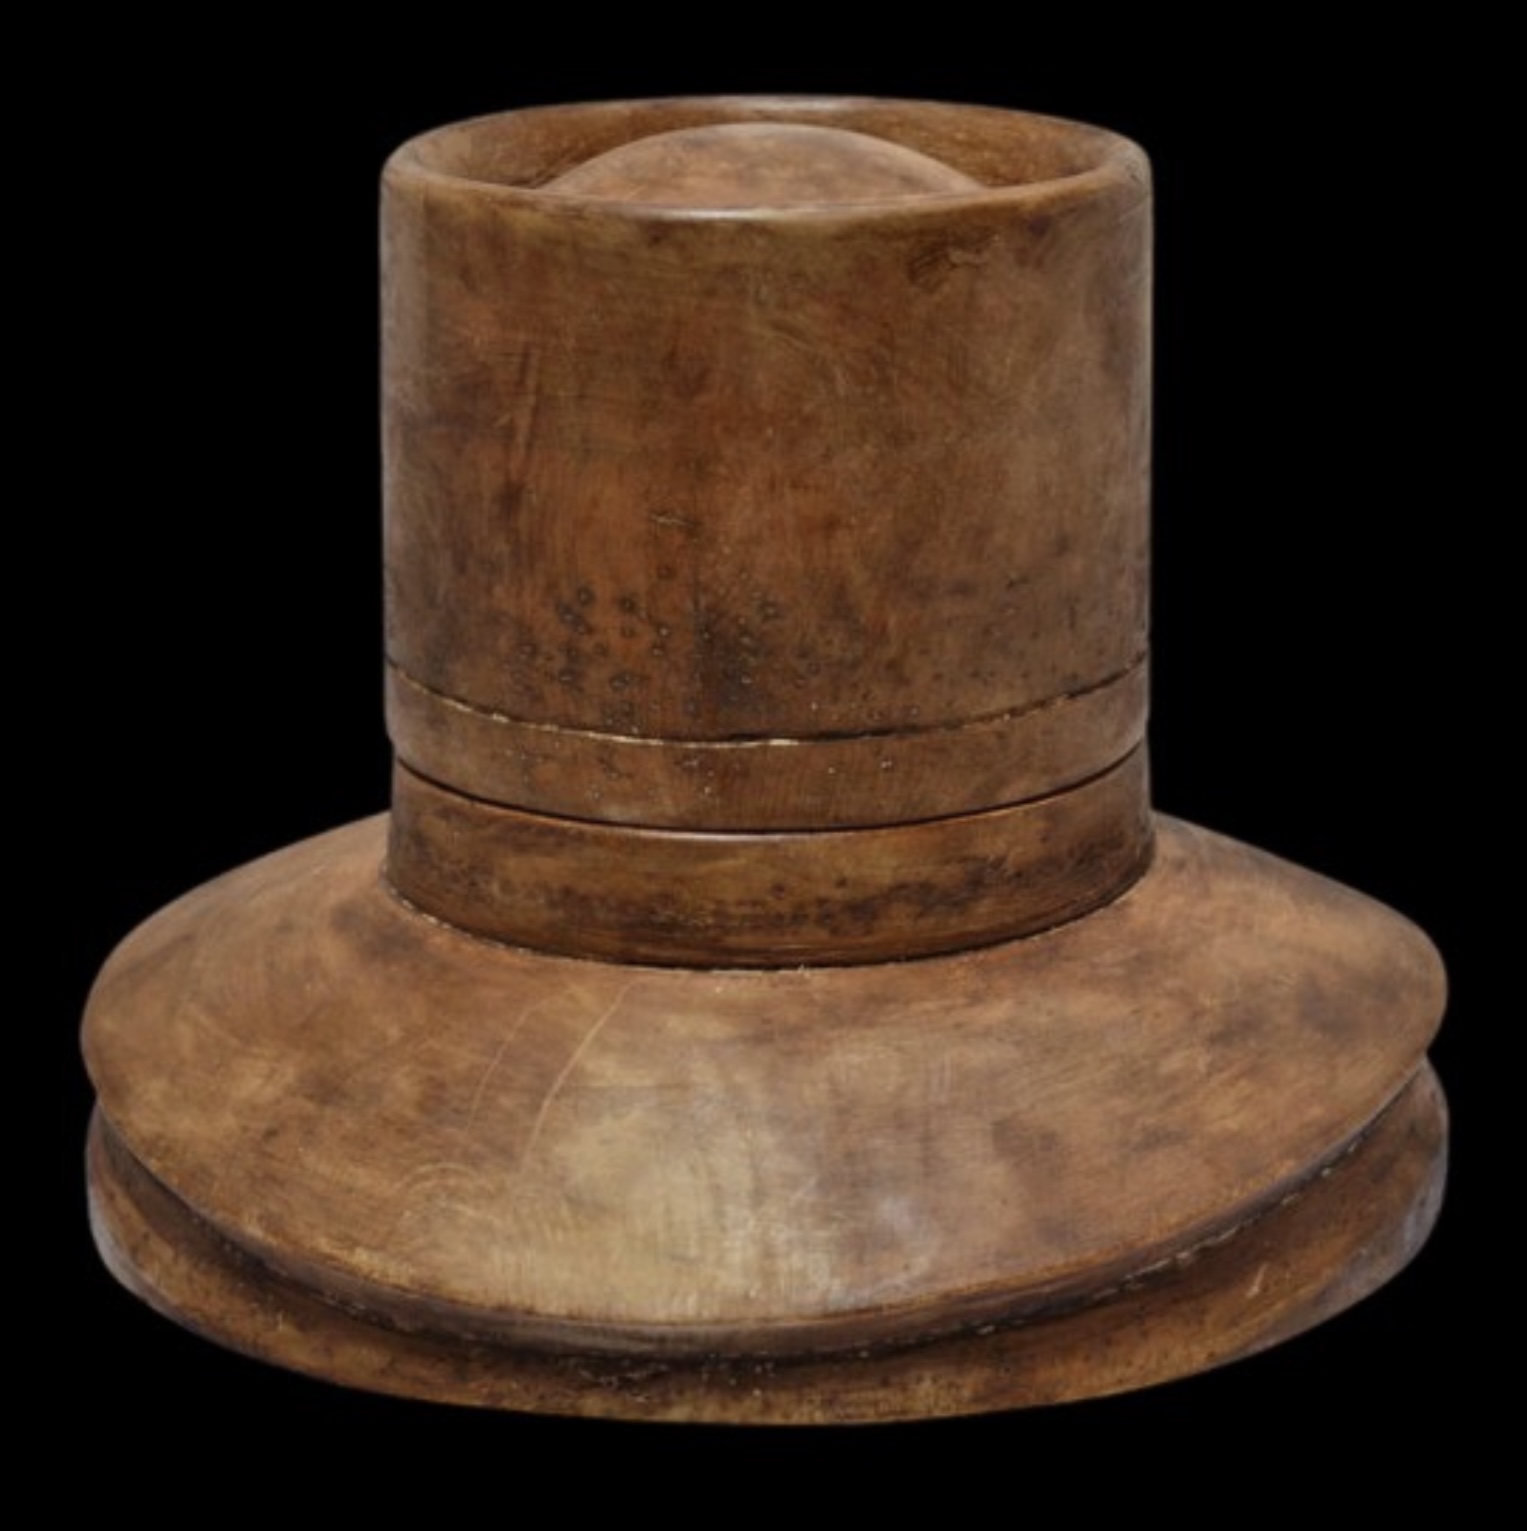
As for hat forms, every man and woman wore a hat. The wealthy citizens of New Orleans looked forward to receiving news and drawings of the latest fashions from Paris. Antognini was probably one of several businesses that supplied hat forms to the hatters and milliners of New Orleans. By 1861 Antognini had gained a partner and was still in business but seems to have discontinued making hat forms.
19th-century French wooden hat form comprised of two pieces. Photo: Elizabeth Street Gallery, New York.
Of the three coachmakers and blacksmiths on this page my favorite is Guillaume Retaud. Monsieur Retard pays for only what is necessary and he basically says “I do what it says.”
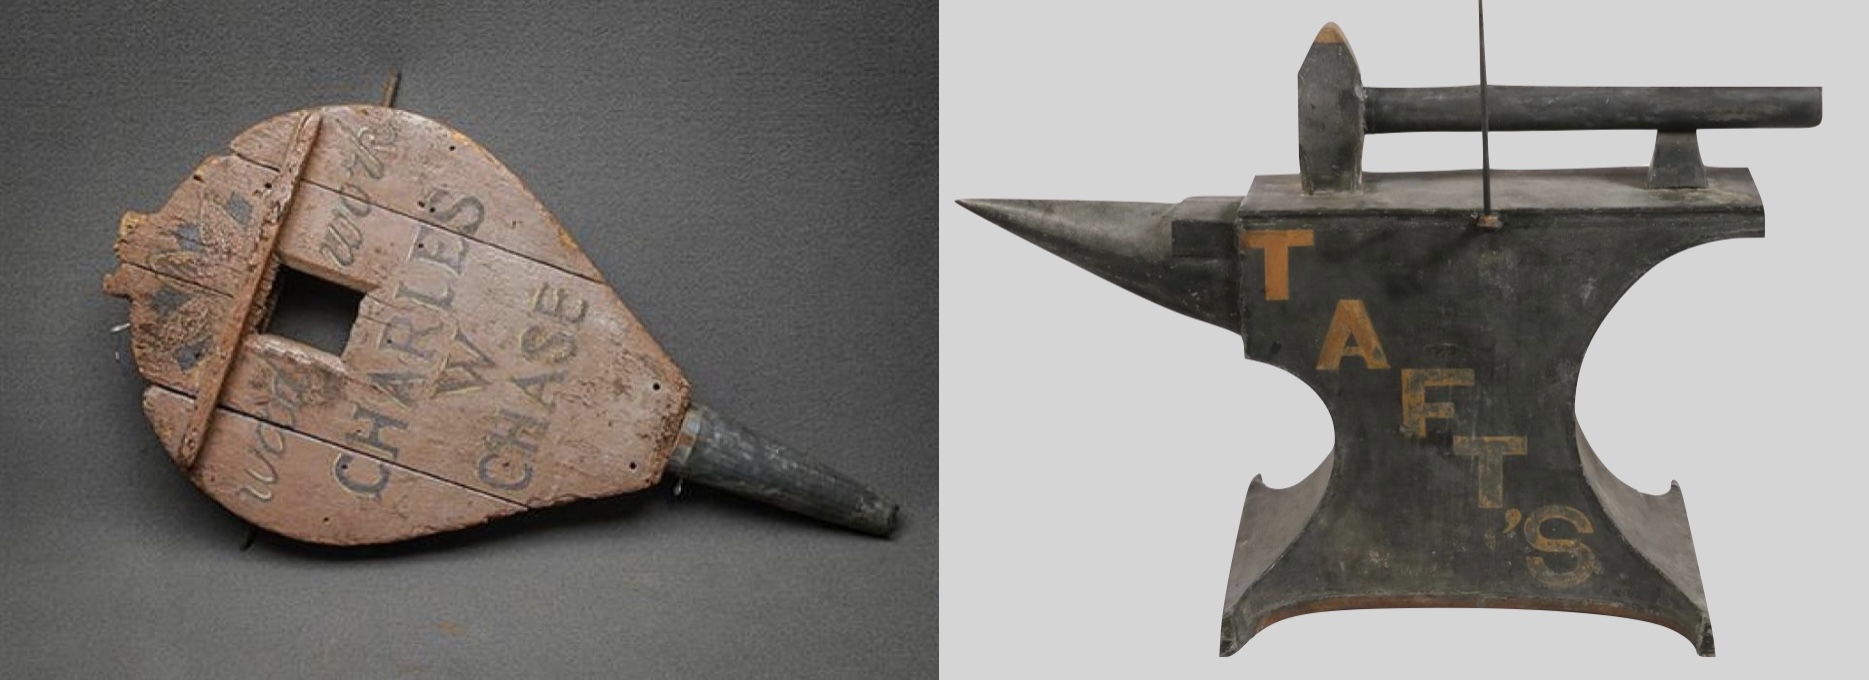
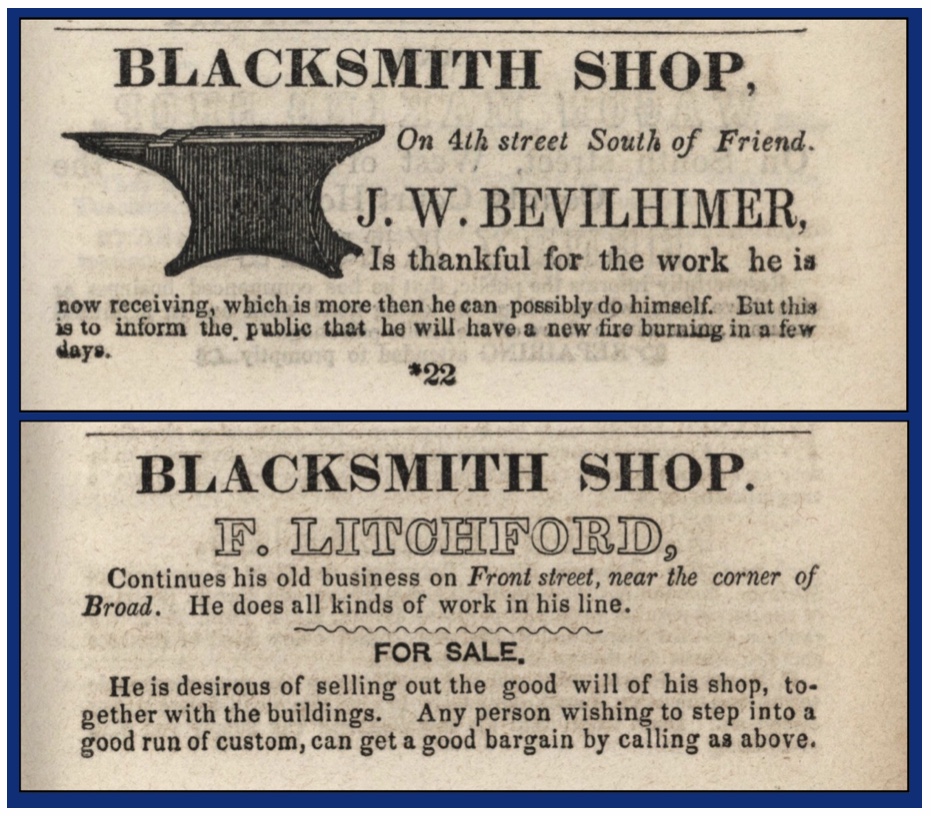
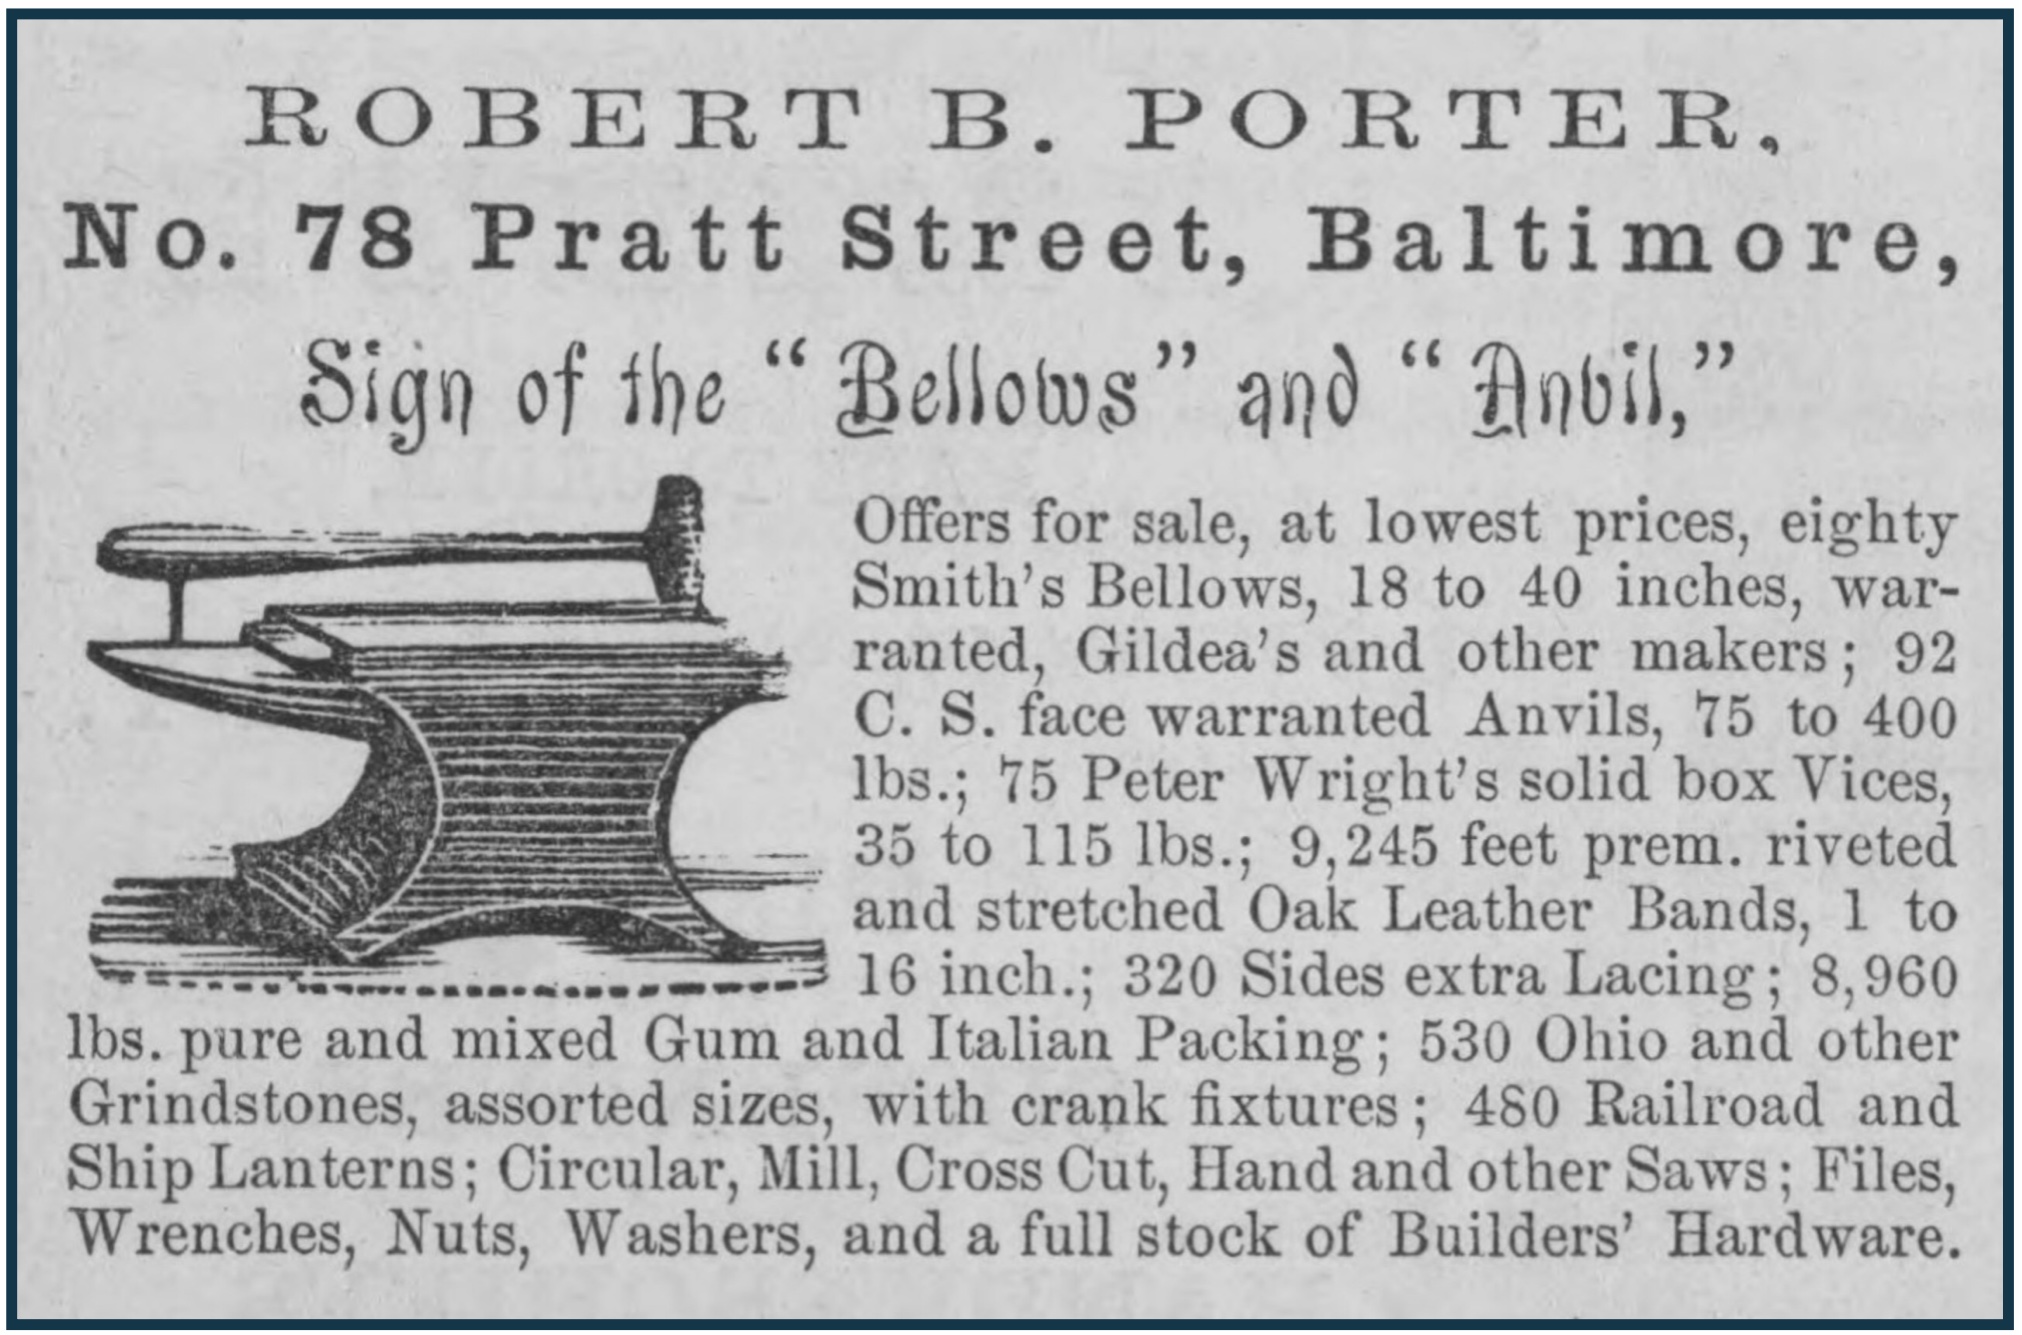
Two Columbus, Ohio blacksmiths. Mr. Bevilhimer kindly thanks his customers and offers reassurance that he will be lighting a new fire to keep up with his orders. It’s possible he may have had to delay taking new orders until he cleared a backlog. Fred Litchford, on the other hand, wants to sell his business. I checked a later Columbus directory and found he was still in business and he was Black. He continued his business and eventually his son worked with him. I had to include this Baltimore blacksmith because he just goes whole hog with his inventory and, best of all, he was at the Sign of the Bellows and Anvil. Imagine that sign.
Left: a tin-mounted wooden bellows sign for a blacksmith. Photo: Weschler’s Auctions, Rockville, Maryland. Right: a tin anvil and hammer sign. Photo: Thomston Place Auction Galleries, Maine.
Thomas J. Magee was patriotic, a punster, or both. When applied to a ladder, “E Pluribus Unum” is very clever. Magee was first listed in the Cincinnati business directory in 1856. Two years later his carpenter and builder listing expanded to include ladder manufacturer. By their nature, a ladder ad should be tall and this ad fits the bill. Magee also doesn’t get to wordy. If you wanted carpentry and jobbing work it would be done, etc., etc. His last listing was in 1860. A five-year run for a business was not unusual. Magee may have moved on to another of the “western” cities or he may have succumbed to illness or injury.
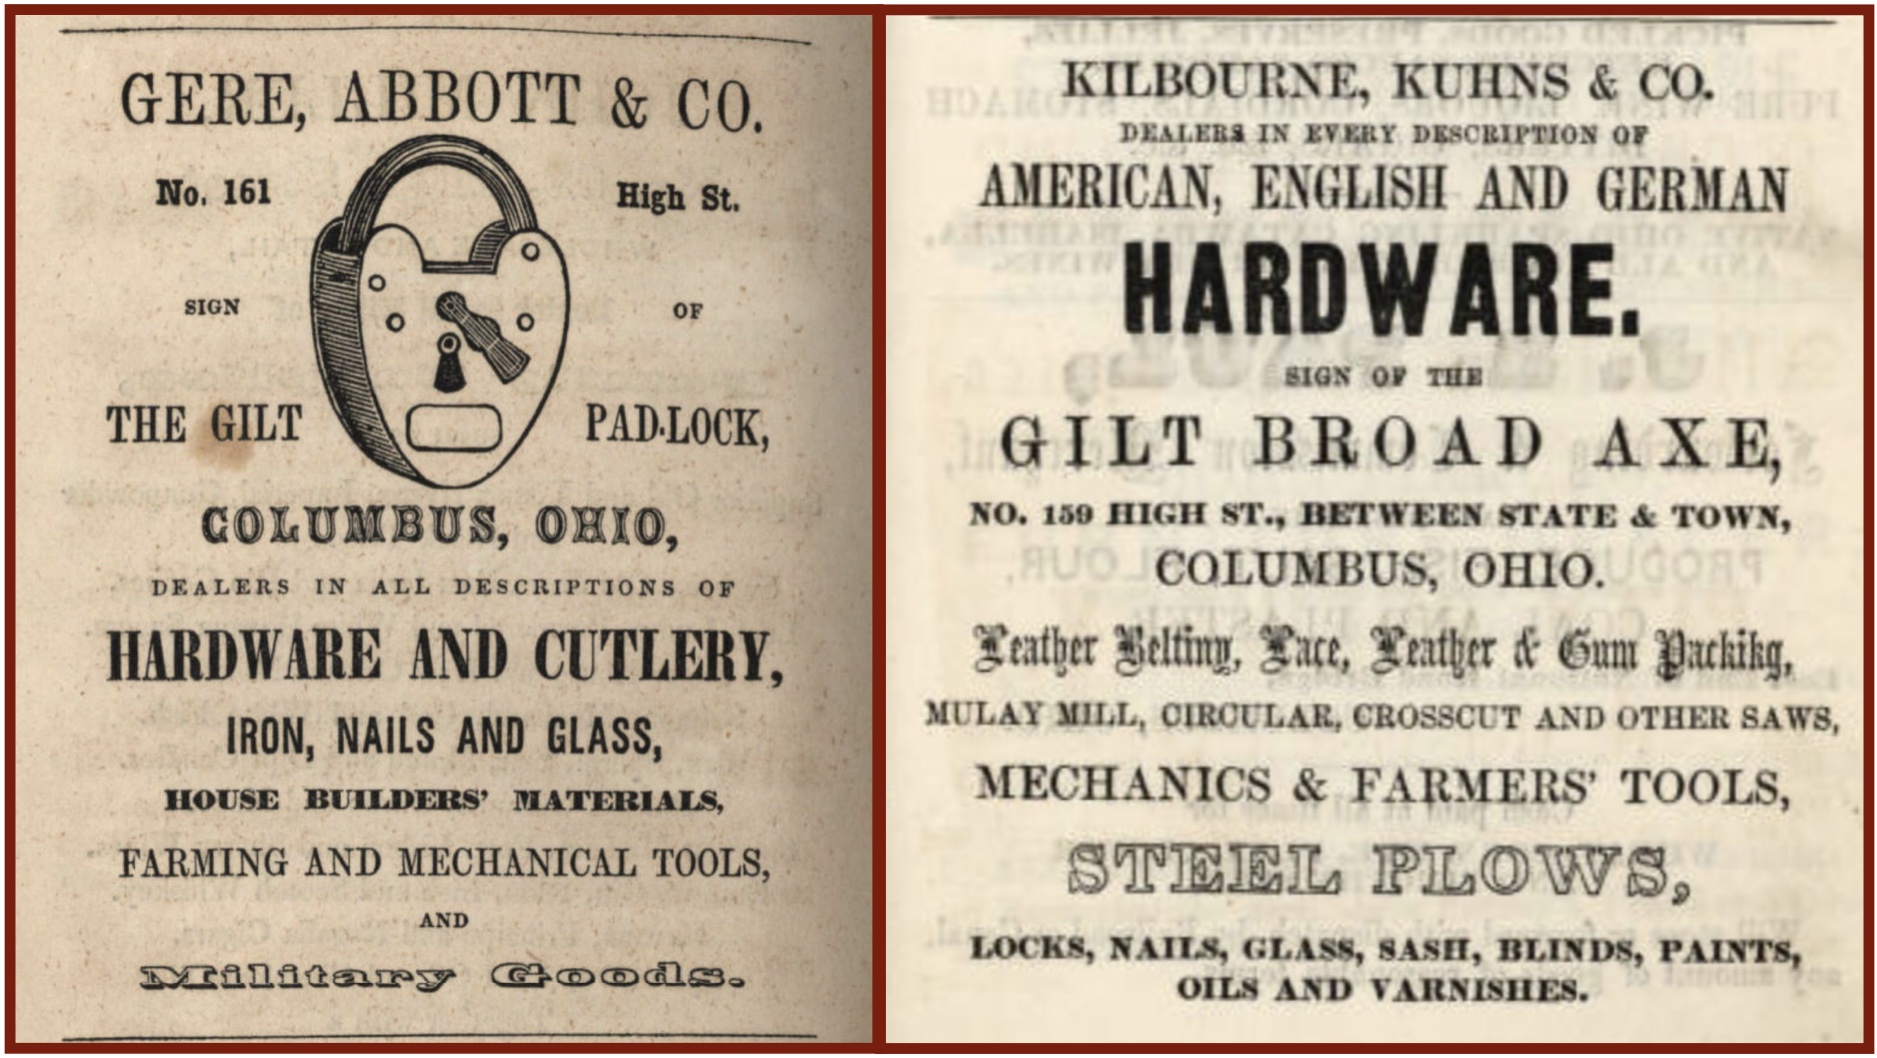
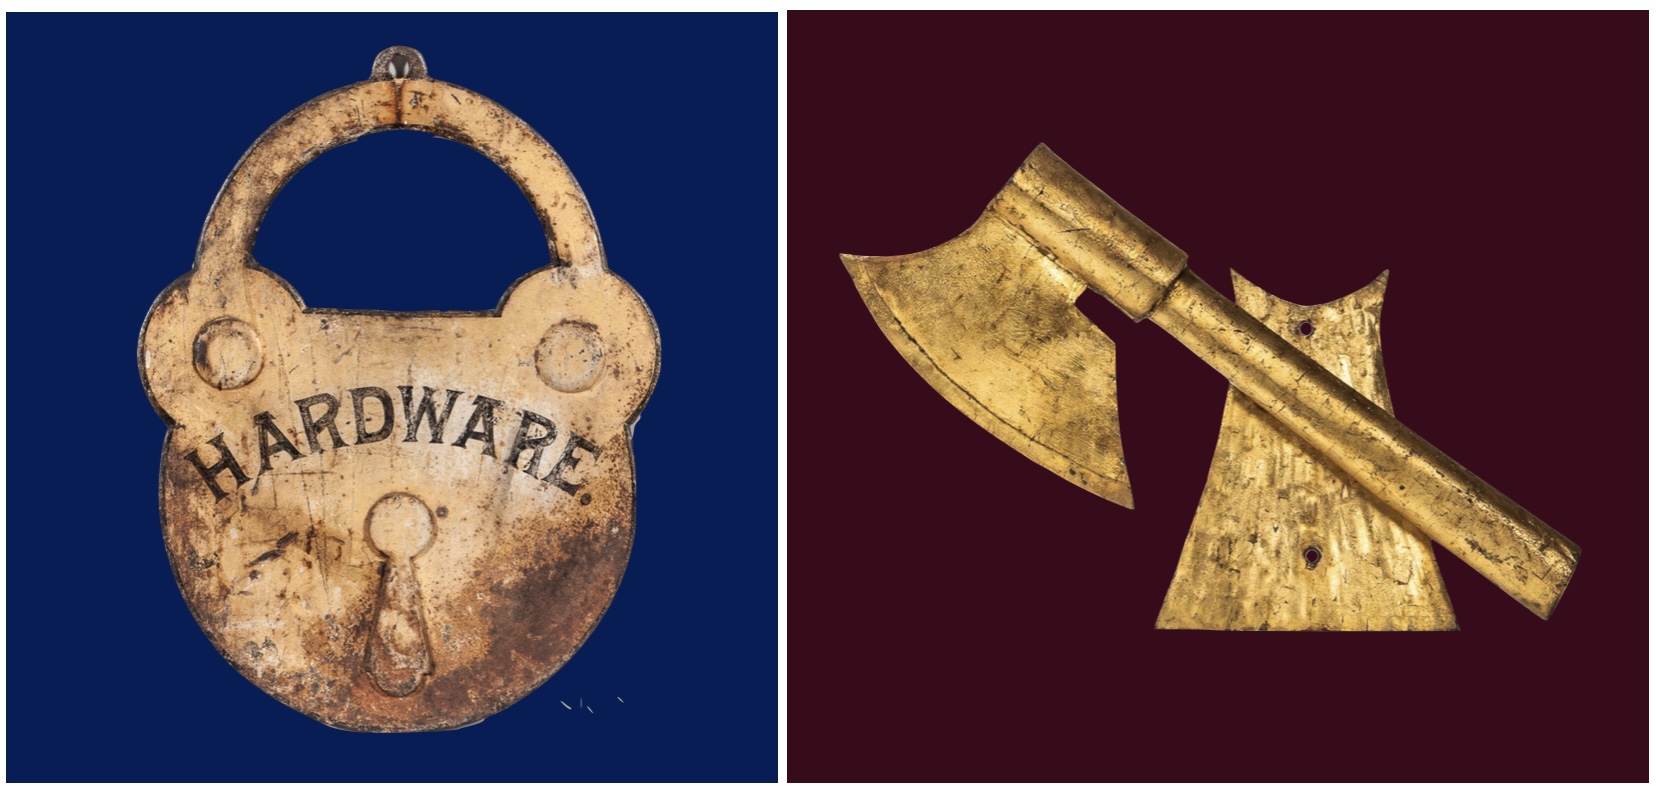
I chose these two Columbus hardware stores because of their signs: the gilt padlock and the gilt broad axe. After putting them together I noticed they were next door to each other! Both the padlock and broad axe were traditional signs used by hardware shops. It must have been quite a sight to see the two gilt signs side-by-side and shining in the sunlight while the shop owners glared at each other. As you can see a good old fashioned hardware store carried everything.
Both signs are from 19th-century hardware stores. Photos: Skinner Auctions, Massachusetts.
All of the river cities and their merchants were of great importance to the pioneers that chose to move west. They were the transfer points when traveling by boat and the last large towns or cities before overland travel into the wilderness. St. Louis and the adjacent area was the jumping-off point for overland travel to Oregon and other parts of the West Coast. It was the last place for repairs and resupply. Hardware stores were often gathering places where the westbound traveler could shop, get directions to a specialized tradesman and hear the latest news.
Several St. Louis business directories gave merchants the option of using highly detailed images and colored paper. Paper colors were yellow, green, blue and this pinkish tone chosen by J.W. Tyzack. Tyzack also paid for the full image (the smaller central square portion was also an option). Who needs words when you have a picture of many of the tools used in the mechanical trades, on the farm and in the home. It’s all there including a pocketknife.
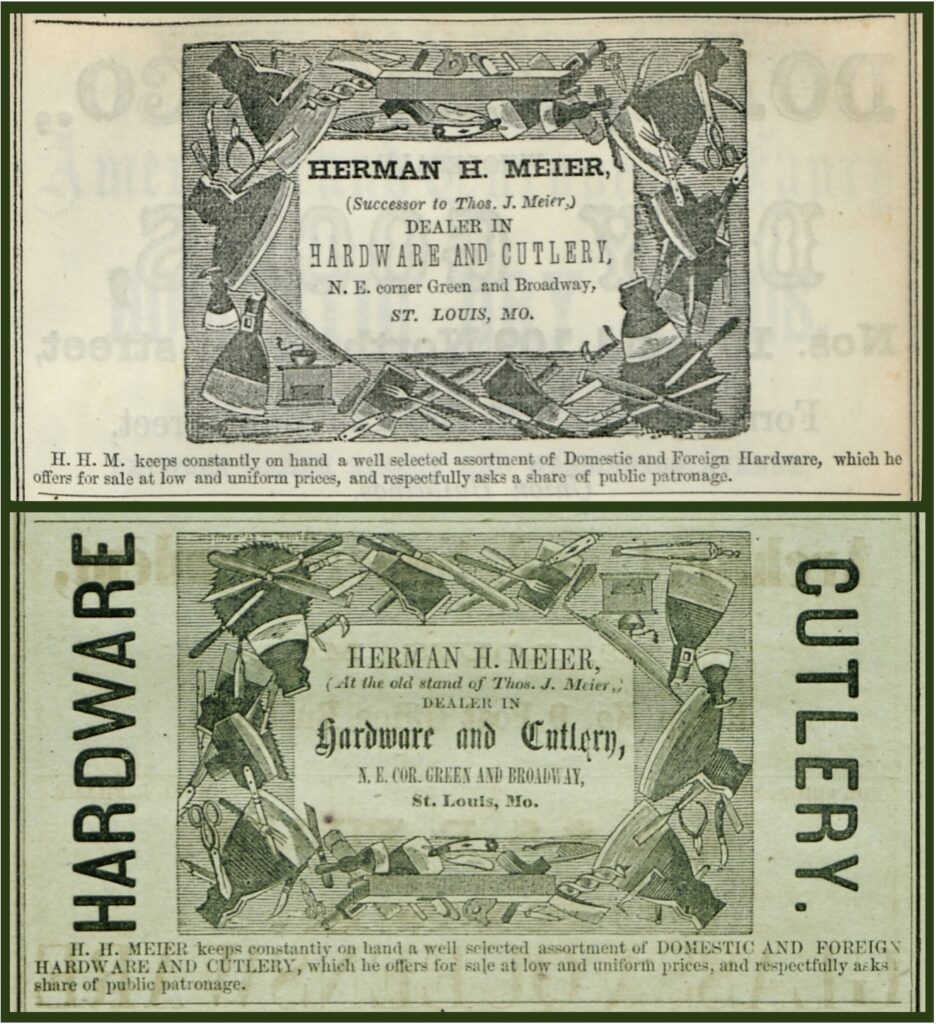
In the top portion Herman H. Meier, another hardware proprietor, advises he has taken over from Thomas Meier. He selected a very nice border of tools and implements—all is good. The following year he has an option to have his ad on color paper. He chose green, perhaps because his shop was on the corner of Green and Broadway. He has added the words Hardware and Cutlery at each end to make his ad more distinctive. Now, imagine his consternation when the new directory is published and his decorative tool border is upside down and backwards.
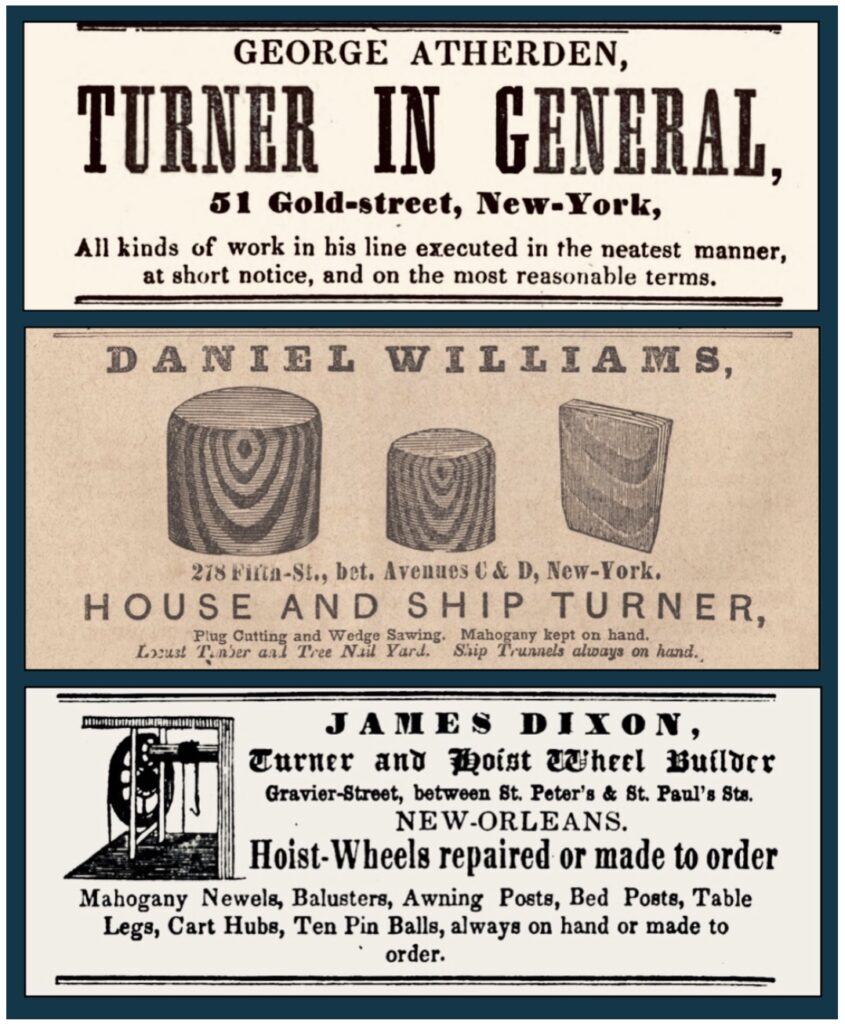
Three neat and orderly turners. Daniel Williams’ ad in the center is of particular note as he keeps a tree nail yard and makes trunnels (also known as trennels or trenails).
Siedhoff & Camp chose green paper and in case you didn’t notice they turn chair stuff, boring chair stuff, chair stuff and do turning in general.
In the gallery are several more tradesmen’s signs.
–Suzanne Ellison (all typos and other errors were caused by Titivillus, explanation here.)
The back of the chairmaker sign at the top of the blog post. Photo: Garth’s Auction, Columbus, Ohio.
Photo: Robert Young Antiques, London.
A French hardware shop sign dated 1834. Robert Young Antiques, London.
A wooden axe sign from a Kentucky hardware store. Skinner Auctions.
A blacksmith’s sign with an assortment of his wares. Skinner Antiques.
Another variation of a blacksmith’s sign. Skinner Auctions.
A wooden sign, either for a business selling these goods or a lumberjack. Jeffrey S. Evans, Mt. Crawford, Virginia.


 I had to include this Baltimore blacksmith because he just goes whole hog with his inventory and, best of all, he was at the Sign of the Bellows and Anvil. Imagine that sign.