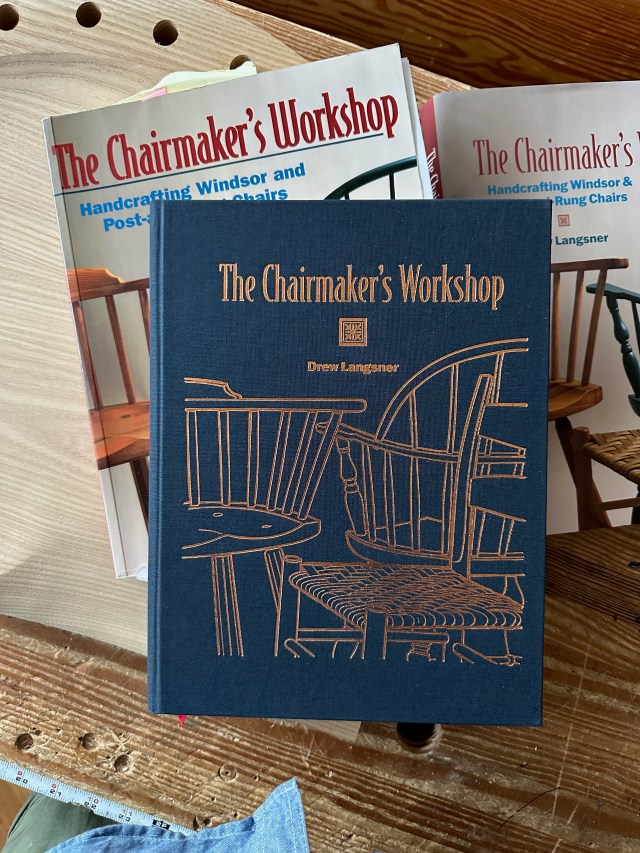
Day 2: Origin Work Jeans Made in Maine I’m always looking for good domestic-made workwear, not the stuff peddled for hipsters who wear Carhartt WIP. During the last year I have been wearing Origin Work Jeans, which are made in Maine. I have been unable to wear them out.
First, the inseams are triple-stitched. Yes, it looks overdone. Because it is. The denim is exceptionally strong – I have yet to rip the legs or tear the knees. And the pockets – oh, the pockets. They are lined with denim and not some tissue-thin cotton drill that disintegrates in a few months. The pockets last and last, even when filled with keys, knives and what-else-you-got.
The cut is forgiving for the woodworker’s physique (Body by IPAs). Your thighs will not be squeezed. Your “other organs” will also avoid the Denim Constrictor on fashionable jeans. These are real work jeans, and you can even order them with a double knee if your work is especially gravel-based. The jeans are available in three cuts: straight, boot cut and relaxed. I wear the straight cut.
The jeans normally cost $129. But you will find them on sale regularly for $99.
I honestly think I prefer the Origins to my Grease Point jeans, which are much more expensive. The Grease Points look nicer (I am constantly asked where I got them), but the Origin jeans have been more durable, especially the pockets.
Note the notch. Other benches feature a notch on the long edge of the benchtop that could be used for cutting tenons or sawing out fretwork. This illustration is from about 1505 in Nuremburg. The painting is the “Holy Family,” part of a 10-panel work by Bernhard Strigel. PAINTING: GERMANISCHES NATIONALMUSEUM, NÜRNBERG (LEIHGABE DER BAYERISCHEN STAATSGEMÄLDESAMMLUNG)
The following is excerpted from “Ingenious Mechanicks,” by Christopher Schwarz. This book is a journey into the past. It takes the reader from Pompeii, which features the oldest image of a Western bench, to a Roman fort in Germany to inspect the oldest surviving workbench, and finally to Christopher’s shop in Covington, where he recreated three historical workbenches and dozens of early jigs. This specific excerpt is by Suzanne Ellison who is a regular poster for Lost Art Press and did historical research for the book.
It is not surprising to see low Roman workbenches in Italy or any of the former Roman provinces. By mapping our bench discoveries, we found a strong relationship to locations along the Roman roads and trade routes that continued into the early decades of the 18th century.
After mapping the Spanish workbenches, I put an overlay of the Roman roads of Hispania and found, with a few exceptions, the plot points fell along or very near the Via Augusta (formerly the Via Herculea). Via Augusta, one of the major commercial Roman roads, ran along the Mediterranean coast from the Pyrenees in the northeast, through Valencia, diverted inland to Seville and ended back on the coast at Cadiz. Eight workbenches fall along the Via Augusta, with six benches from Valencia and Seville.
Via Augusta. Many workbenches we found in Spain showed up along the Roman road called Via Augusta (in red). MAPS BY BRENDAN GAFFNEY
Of the 38 low, Roman-type workbenches we espied, we found 21 benches (or 55 percent) that date from the first decade of the 16th century to the end of the 18th century. You can thank St. Joseph for that. Thirteen benches were in paintings from Italy and eight from Spain. But wait, the Kingdom of Naples was part of the Spanish Empire for most of the 1442 to 1714 time period. We have cross-pollination! For instance, Jose de Ribera, a major artist from Valencia, completed his mature work in Naples. Luca Giordano, from Naples, spent a decade in Madrid as court painter for Charles II. Adjusting the numbers results in almost a 50-50 split, with 10 benches for Italy and 11 for Spain.
The Limes. The northern border of the Roman Empire – the dotted line above – was called the Limes Germanicus. Here you can see the benches and their relationship to the frontier.
Some features of the low Italian and Spanish workbenches are a massive top with or without a face vise, a twin-screw vise, an early crochet (possibly the earliest depiction so far) and unusual planing stops. Oh yes, two benches with squared-off notches on the bench ends also turned up in our searches. One of the benches would help solve those mysterious notches on the 2nd-century Roman workbench from Saalburg.
The Mystery of the Notches
Beginning with the extant Saalburg workbench, we found seven benches with notches on the side or end of the benchtop. The Saalburg bench and three 16th-century benches have a fairly close regional distribution, while the examples with a notch in the bench ends are from Italy and Spain. The seventh bench has a side notch and originates from the New Kingdom of Granada in present-day Colombia.
The three 16th-century notched benches are from Memmingen (“Holy Family” by Bernhard Strigel), Nürnberg (Löffelholz bench) in southwest Germany and Bolzano (the Hans Kipferle panel) in northern Italy. The German benches are both dated 1505 and the Italian bench is dated 1561. When these benches are mapped along with the Saalburg bench, possible connections start to emerge. The Via Claudia Augusta, the Roman road that connected the Po River valley with the Raetia province (southern Germany), ran through Bolzano and across the Alps (it is a different road than Via Augusta). The road terminated at the capital of Raetia, Augusta Vindelicorum (present-day Augsburg). A branch off Via Claudia Augusta leads to the Roman city that became Kempten, just south of Memmingen.
Through the Middle Ages, the two main routes to cross the Alps converged in Bolzano and led to Augsburg: the Via Claudia Augusta through the Reschenpass and the Brenner route through the Brenner Pass. East-west Roman roads through Augsburg later also became important trade routes, turning the city into a commercial center. Similarly, Nürnberg benefited from the northsouth trade route it shared with Augsburg. The route was a portion of the Amber Road that linked southern Italy with the north and Baltic Seas. Trade routes were also information routes for cultures and technology. In the 15th and 16th centuries, this part of the former Roman Empire (and later Holy Roman Empire) experienced a cultural flowering. Considering the lengthy Roman presence in this region and the continued use of the trade routes, it is possible the side-notch feature survived and was in use on woodworking benches until at least the mid-16th century.
Local color. Keep your eyes open when in museums. Thanks to Suzanne Ellison’s sharp eye, this painting provided an important clue about the use of notches in workbenches. And the painting happened to be right up the road from me in Indianapolis.
The two end notches were in paintings from Ravenna, Italy, and Madrid, Spain. The Madrid painting, “Dream of Saint Joseph,” by Luca Giordano, shows a wedge in the notch and was a key to solving the “Saalburg mystery.” I found the image in mid-July and sent it with a few dozen other images to Chris. About a month later while verifying dates, titles, artists and locations of all the paintings I gave “The Dream” a closer look. St. Joseph’s side of the painting has an appealing composition with tremendous detail. One tremendous detail struck me in particular and that evening I emailed Chris asking if he had seen this detail before. The next morning he answered, and you can read about how the notches and wedges work in Chapter 5.
The last bench is from the New World when Colombia was a Spanish colony. The notch is sharply defined and dovetail-shaped. The email I sent to Chris with the image was titled, “Oh Look! What is that Notch in the Bench?” and two minutes later Chris’ response was a joyful expletive.
The post-and-rung chairs found in the final chapters of “Backwoods Chairmakers“ were printed without dimensions. This was by design; it was not an omission or mistake. The intention is for the chairmaker to make decisions – to determine rung heights and slat locations – that are common considerations when making a chair. The choice was not to hide the info or discourage the chairmaker, rather I followed a path similar to those of John Brown (“Welsh Stick Chairs“) and Jennie Alexander (in the first edition of “Make a Chair from a Tree”). Brown’s and Alexander’s books are not recipe books; the one making the chair is encouraged to make the decisions.
There’s another reason the dimensions were not included. The book’s focus is on the chairmakers and their chairs, their lives, their stories. The chairmakers’ traditions, approaches and methods varied greatly. Some used green wood, the drawknife, and the span of their hands for measurement. Others use a moisture meter, powered machinery and calipers. The tradition welcomes variety, and there is vibrancy within it. The last chapters of the “Backwoods Chairmakers” record a way to build post-and-rung chairs, with all the preceding chapters sharing the methods used by the Appalachian chairmakers.
With that said, I could have made my thinking more clear within the final chapters. The issue was in providing a significant amount of detail and dimensions without providing all of them.
Here’s the remedy: The dimensions will reside here on the LAP site, as a supplement to the book. We’ll make note in future editions that the additional details are available, should the reader desire more. I hope this will still encourage woodworkers to discover the details (and decide upon their own) when making their chair’s story sticks, while removing the frustration for those looking to replicate the three-slat or rocker as it is shown in the book. They can be downloaded below.
This is a an excerpt from Megan Fitzpatrick’s new book “Dutch Tool Chests.” I have been looking forward to its release for some time now and have finally had a chance to read through it. It is incredibly beautiful, which may not always be an applicable word for an instructional book, and clearly written. I appreciate this as one who is not a regular woodworker.
I will include bits of the instructional parts in later excerpts but for now I want to show off some fun pictures of Dutch tool chests that were submitted by LAP friends and readers. The options of how to make your tool chest more versatile seem endless after looking at these…not to mention some of the paint jobs!I only picked three at random but there are quite a few in the book to drool over.
I consider what I’ve presented in the preceding chapters to be the “base model” of the Dutch tool chest form – the Toyota Corolla, if you will. It will last you forever as-is, but might not be as comfortable in the long run as you’d desire.
This Dutch chest form is highly adaptable to different storage needs, sizes and aesthetics. And it sometimes serves, as you’ll see herein, as inspiration for variations that are at times but loosely inspired by the basic form.
I could not possibly cover all the possible storage options, bases, sizes, colors, wood choices and other creative decisions made by others who’ve built or adapted this form. So, I invited people to submit pictures of their chests, with detail pictures of their upgrades and clever ideas.
I present to you in the following pages as many of those as is practical – but without repeating too much of the same (I hope). But it turns out that many great minds think alike. So if you sent me pictures and I didn’t use them here, please know that I appreciate your submissions. It’s likely your chest isn’t blue, so I chose not to include it (just kidding). More likely is that the images simply weren’t large enough to use in print, or that there weren’t enough of them. But know that I nonetheless enjoyed seeing your work; I’m sorry if I couldn’t share it.
I hope the chests that follow (in no particular order) inspire you to build a Dutch tool chest and make it your own.
Jonathan Schneider
The chest is built from local (to Berlin) pine; the unpainted pieces are beech. There are pegged breadboard ends on the lid and fall front, and the dovetailed tray pulls out for easy access.
Note the groove in the drawer front’s center. That allows the drawer to be full depth, and it provides a sure path to guide the lock into its bottom recess. The lid-mounted saw till features cutouts that perfectly fit the blade guards.
Michael McCormick
McCormick’s walnut chest was made from “rough lumber, pretty much 90-percent unplugged,” he wrote. “It was exhausting.” Why the fancy wood? Because he had no climate-controlled shop space, McCormick’s chest lived in his family’s home office, where it needed to blend in as a piece of furniture.
The hardware is by John Switzer at Black Bear Forge.
McCormick says the lid board is the widest piece of walnut he’s ever found; the breadboard ends have kept it flat. Note the hanger for the tool brush, and the slotted hanging rack, which allows McCormick to slide wide chisels into a small hole.
In the bottom, McCormick made stalls for his shoulder plane, tongue-and-groove plane and router plane.
Olivia Bradley
The Dutch tool chest is the perfect size for Bradley’s small shop; she’s customized the interior to hold a lot in the chest’s relatively small footprint – but the interior is still flexible enough that she can stock it as needed for various classes. The elastic bands on the lid and fall front, which can be used for a number of tools, are inspired by toolmaker Liam Rickerby, who ships his winding sticks corralled by bands.
“When I got back from a stick chair class” at Lost Art Press writes Bradley, “I finally finished the cart to go under the Dutch tool chest. I needed a place to put [more] stickers.”
There’s a magnet embedded in Bradley’s lock, by which it sticks to a nail on the front of the chest when it’s not securing the fall front. The drawers in the lower compartment pull all the way out for easy access.
Against a side wall, a rack with 1″-dia. holes houses wider tools and bits. Also shown here is Bradley’s three-sided pencil box; the bottom is screwed to the shelf below.
FIG. 221. Chest, dated 1724: 1. Front view; 2. Side view; 3. Transverse section A–B, Pilistvere, Kõo vald, ERM A 350:11.
The following is excerpted from “Woodworking in Estonia.”The author, Ants Viires, devoted his life to recording the hand-tool folkways of his country without a shred of romanticism. Viires combined personal interviews and direct observation of work habits with archaeological evidence and a thorough scouring of the literature in his country and surrounding nations.
If all this sounds like a dry treatise, it’s not. “Woodworking in Estonia” is an important piece of evidence in understanding how our ancestors worked wood and understood it more intimately than we do. Viires records in great detail everything from the superstitions surrounding the harvesting of wood (should you whistle in the forest?) to detailed descriptions of how the Estonians dried the wood, bent it, steamed it and even buried it in horse dung to shape it for their needs.
Viires covers, in detail, the hand tools used by the Estonian, including many that will be unfamiliar to moderns (a beehive turner?). He then discusses all the different products Estonians made for their own use and for sale in the markets, including bent-wood boxes, chairs, chests, tables, sleds, carriages, spinning wheels, spoons, tobacco pipes, bowls and beer tankards.
Of older products of woodwork, the coffin and chest merit special mention, since already in feudal times a variety of methods were being employed for joining their sides, legs and the lid.
Priidu Anise (b. 1854) from Kaarma makes the following interesting comments concerning coffin and chest production.27
“They were always made of spruce or pine, which was soft and smooth. Chests were made to order by the village carpenter from wood supplied by the customer. The boards were also provided by the peasant placing the order.
“There were some people who made the complete chest at home. But clothes chests were a carpenter’s job; it always had to be more accomplished and so it was. I used to charge a basket of rye for making a grain chest; for a clothes chest – one and a half baskets of rye. The wood was provided by the customer…. The trunk of the pine was split in two, and if it was a thick one, the halves were split in two again. Of these you could get two wide boards and two narrow ones, for lids…. Such boards were put on the block and the edges cut clean, first one then the other.…”
The split boards were left to dry for a couple of years, first on the bathhouse and, just before use, in a room near smoke. This kept them from warping. The dried boards were taken to the carpenter “who went over them with a plane.” If the boards were wide, two were enough for the side, or base, of the chest. “I planed the sides of the boards until they were even, knocked in the tenons, and joined them together. Once the sides and the bottom were thus assembled, I marked the legs and cut the grooves and the holes for them.” (In cutting the groove “the work was done with the gimlet, and a chisel was used for cleaning up.”)28
“Now I put the whole thing together, first the ends, then the base and the front and back.“ Then came the making of the joints, which had to be strong enough to hold up the chest.
“The joining proceeded thus: The board which went through the leg was cut into and a wedge made of spruce was driven in…. This was an old method. In my time they began to put in tenons and join it that way.29 A hole was cut across the tenon with a fine gimlet, and the joint was sealed with a peg made of oak.” (“The bottom of the chest was placed so that the board on the side was ridged, or grooved, and thus it was joined (see Fig. 221). In larger chests an additional cross-piece was inserted, which went through to both side boards. If large tenons – 4″ (10 cm) in size – were used, it was not necessary to apply a cross-piece.”
To secure the top “the two rear legs were made higher, and cut so that the top would be forced onto them. Here also, oak pins were used…. Oak pins were strong and kept the top in position. Two more pins about 2″ (5 cm) in size were placed, and then the top rested firmly.”
FIG. 222. Chest with gable-type lid, presumably made before the Northern War. Rõuge, Kasaritsa vald. Somi village, ERM A 101-40.
The last stage was the smoothing and cutting away of all protruding ends. “All were cut away, from the top and the legs, with a sharp knife and a small plane where necessary.”
Altogether the work was completed with a minimum of tools, available in every peasant household: “An axe, knife, chisel, gimlet and an occasional plane… the edges were cleaned with a draw knife.” For making clothes chests a curved chisel was needed, and a special plane for the mouldings. The moulding planes in Kaarma came into use in 1870.
“It was first seen in the tool shop of the estate carpenter.” But it must be assumed that carpenters used such planes already in the early part of the 19th century, or even previously, for chest making; the museums abound in exhibits with moulding on sides and legs, obviously made by moulding planes.
FIG. 223. Chest with curved lid. Tõstamaa, Seli vald. ERM 4933.
The above methods of chest making must be considered general for the whole of Estonia, since the same features are found in all chests in the country, beginning with the oldest known one (1724) as may by be seen clearly in Fig. 221.
Chests with pillars in the four corners were common in Mediterranean countries in ancient times, from where they made their way through the Balkans and Central Europe, reaching as far as Scandinavia in the north. In the northern countries chests of the model described above appeared already in the 12th century.30 In Sweden, farmers made their own grain and flour chests until modern times.31
In the Baltic countries pillared chests are not commonplace. Apart from Estonia they were known to some extent among the Votyaks, as in Livonia and northern Latvia (Vidzeme).32 In other parts of Latvia, as well as in Lithuania and Belarus, the board chest with a lid that could be locked was popular until well into the 19th century. Specially decorated chests were used for clothes.33 Only in Pskov, where there was a strong element of Baltic nationals, was a variety of chests to be found, including the Estonian type. It is not unlikely that the chests reached Pskov parallel with their development in Estonia in the 19th century. In other parts of Russia chests of a different structure (“sunduk”) dating to the 17th century were used.34
FIG. 224. Lid with ridge on the top. Tartu-Maarja, Väägvere village. ERM vv.-akt 234:1.
The term for the pillar-cornered chest is closely linked in all Baltic-Finnish languages (Estonian – “kirst;” Finnish, Votyak – “kirstu;” Karelian – “kirsto;” Izhorian – “kirštu;” Livonian – “kiršt”), and was carried over into Old Russian – “kersta;” Latvian – “šķirsts”).35
On the basis of the ancient terms and in the light of archaeological discoveries in Scandinavia, it may be assumed that the type of chest as described above was known in Estonia before the 13th century.
Our impression of the Estonian chest so far is somewhat incomplete. We have admittedly noted that the basic structure of chests in Estonia was fairly uniform throughout the country; however, certain distinctions in detail and outward appearance exist between various districts. The most significant differences concern the lid. In the 19th century the gable-type lid was most in use in southeastern Estonia (Fig. 222). This type was produced by the Haanja home industry until the trunk and commode made their appearance in the 1880s. This was also the case further south, in Vidzeme.36 Similarly, in Pskov and other Peipus areas, as well as further north among the Votyaks, it was equally popular. The origin of the kind of lid can be traced back to ancient sarcophagi, and it is therefore considered to be the oldest type of lid in Estonia.37
FIG. 225. Chest (bridal chest). Pöide. Ardla village, Drawing from Archives of State Committee for Building and Architecture.
Chests with a curved lid, which in central Europe were associated with the Gothic period, predominated in Estonia in the 19th century. They were already popular in the early 18th century (see Fig. 221).
Various methods were employed for the decoration of these lids, and chests generally, including poker work (Fig. 223). In eastern Estonia, e.g. in the former Tartumaa region, it was customary to cover the top of the lid with a narrow board forming a ridge in the center (Fig. 224). In Saaremaa and Hiiumaa the edges of the chest were covered with ornamented boards (Fig. 225), which is obviously a characteristic feature of Swedish origin.38 This meant that the cross-piece was also on the outside, while the chest construction on the mainland placed the cross-piece inside the chest. All these distinctions, however, are not confined only to certain territories, and the same features may be found anywhere in the country.
27 Description taken from KV 79, 108-121. The additions in the parentheses date from KT 71, 45 onwards. Both the descriptions have been noted down by A. Toomessalu.
28 There were also more specialized tools, such as the croze and the grooving planes, but only a few village carpenters had them (Cf. p. 68 and Fig. 51:2).
29 Actually, use of pins was typical even at the oldest coffins (see Fig. 221). They have already been used in the Swedish 12th century coffins (Svensson, Figs. 5, 19-20, 34–36).
30 Erixson, Möbelkultur, pp. 126–128; Shoultz, p. 6; Karlson p. 91 and the following.; Svensson, Figs. 1–5, 17–21, 31–38.
31 Erixon, Möbelkultur, p. 127.
32 LE, p. 931; data received concerning Vidzeme from L. Dumpe, a scholar of the LVM.
33 Bielenstein, p. 235 onward; Figs. 166–168; Бломквист, p. 424 onward. Fig. 116; data of V. Milius, a Lithuanian candidate of history.
34 Бломквист, p. 426 onward.
35 Kalima, Balttil. Lainasanat, p. 118; Toivonen, p. 200; Aben p. 206.
36 LVM, chests with gable-type lid 21246 (Valga County), 21246 and 21247 (unknown origin); also LVM archives, folder 2440 (chests from Cēsis County).
37 Põldmäe, pp. 42-44.
38 See Erixon, Möbelkultur, p. 127; Schoultz, p. 10 and Fig. 10.