Our new storefront is fully up and running these days – and one of the benefits of visiting us in Covington is the opportunity to shop our Seconds Shelf (which is the Boarded Bookcase from “The Anarchist‘s Design Book“).
On it go all of the books and tools that aren’t quite perfect – items we can’t sell at full price. Maybe we spilled coffee on the pages. Maybe a cover was put on upside down at the bindery, or a few pages got folded incorrectly at assembly. Or the post service damaged the book in shipping. Or we dinged a hammer head while seating the wedge. This is all good stuff – readable and usable…just a wee bit blemished.
As a result of this less-than-perfection, these books, tools and accouterments are priced well below their usual retail price…and you have to visit us to get them. We can’t ship them. We’d lose money if we did…and not only because of the packing and shipping cost, but the human cost in keeping on top of online listings and the like. There is usually no more than one or two of any given title/item, and it would be prohibitively person expensive/time consuming to deal with listing them online.
So I’m afraid you’ll have to come to 407 Madison Ave., Covington, Ky., 41011 to partake. Bonus: You get to see us, and hang out for a while in our beautiful river city!
Store hours are currently Monday-Wednesday-Friday from 10 a.m.-2 p.m.
– Fitz
p.s. About those store hours: I regularly receive emails with special requests to come in early/late or on an unscheduled day. I beg you to please stop sending those. While we might change the hours in the future, for now, these are the hours. In our other hours, we are writing/editing books, building something in the shop, making tools, spending time with friends and family, communing with our cats….
The following is excerpted from Nancy R. Hiller’s “Making Things Work: Tales from A Cabinetmaker’s Life.” Hiller’s funny and occasionally delightfully crass stories tell of her years as a professional cabinetmaker who relished both the highs and the lows of the job.
“How much time do you spend in the shop, and how much in writing?” asked a friend of a friend who’d waved me over to sit with him at a holiday party. He’d noticed my bio in the list of contributors to an area magazine and knew I’d written a couple of books.
“I pretty much write in my spare time,” I said. “Mainly on weekends, if work in the shop doesn’t require my presence there. The books in effect pay nothing. The magazines at least pay something, but it’s not enough to cover my overhead and operating expenses, let alone live on.”
When I really cranked out articles for the local magazine where this acquaintance had seen my bio, I could make about $15 an hour. But this calculus relates to net income, not the gross revenue required to maintain a business – and certainly not my cabinetmaking business. It doesn’t matter whether I’m writing, sleeping, or working billable hours; a host of fixed and related expenses still have to be paid.
“Oh, please,” he said dismissively. “What kind of overhead and operating expenses do you have? You work from home and have no employees.”
I was taken aback. Why did he think he knew anything about my business? We scarcely knew each other. Did he think I was posturing as a professional while secretly just “crafting” in my garage?
“You know,” he added, rolling his eyes. “I used to do what you do.” He’d mentioned once that he had worked briefly as a carpenter during what he called his hippie youth; as part of this personal exploration he’d tried his hand at cabinetmaking before concluding that, while he loved the work itself, doing it for a living involved more tedium and less creative freedom than he could bear. Some years later he got a job as assistant art director at a major magazine and worked his way up to a well-paid position, from which he had recently retired. He pushed his chair back from the table and walked away without giving me a chance to respond.“
“Tosser,” I said under my breath as he sought out someone else to use as sounding board for his oversized ego. Then again, I realized, I had no idea how I would have responded had he stayed. If he really was that ignorant of the costs involved in operating a microenterprise – aboveboard, mind you, not under the table – a meaningful, non-defensive response would take some time for me to articulate, not to mention a willingness on his part to listen.
I grabbed his unused napkin and pulled a pen out of my bag. The numbers were fresh in my head; I’d spent the previous weekend going through the year’s accounts to get a jump on tax preparation.
“Overhead and operating expenses, 2014,” I wrote at the top of the napkin. That pompous jerk was not going to get away so easily. Between bites of salad Ilisted the categories I could remember, adding a few explanatory notes:
• “Business insurance (coverage of shop building and contents, liability, goods in transit, etc.) • Equipment rental (e.g., trailers for delivering large jobs) • Health insurance. (Many people whose health insurance premiums are subsidized by their employer have NO CLUE what it costs. Mine is $506 a month for so-called “wellness coverage,” i.e. I have to pay for almost everything out of pocket, and with a $6,000 deductible. My husband and I are both self-employed, so we each pay through the nose.) • Permits (e.g., for parking in our highly regulated city) • Accountant’s fees • Mileage
At this point I realized I had lapsed into completely irrational behavior. He would never read such a list, not to mention the parenthetical notes, which were likely to grow in length now that I was getting warmed up. But perhaps the sheer number of items listed would at least impress on him that I run a business with real-world operating expenses. So I continued writing.
• Packing & shipping • Website-related expenses • Office supplies & printing • Subscriptions to trade publications • Disposal of non-recyclable, non-compostable shop & jobsite waste • Phone & internet at shop • Dues to professional organizations • Shop utilities (electricity & water; the insurance industry now pretty much refuses to cover woodworking shops that are heated by means of a woodstove, and there is no way I’m going to run a business like this one without insurance) • Repair & maintenance of equipment; replacement blades, cutters, etc. • Bank charges (e.g., the cost of checks) for business account • Business travel expenses; I do sometimes teach, speak, & deliver furniture out of state. (These are not vacations, like those publishing-world boondoggles you brag about at cocktail parties.They are bona fide working trips.) • Business tangible property tax • Professional photography for the portfolio, when I can afford it • Taxes related to payroll: state unemployment tax, Medicare & Social Security matching taxes, etc. Years ago, my accountant advised me to organize my business as a Subchapter-S corporation instead of continuing as a self-employed proprietor.”
My hand was cramping, so I put down the pen and took a sip of cabernet. The cheese board at this bash was always a vision of abundance. I added a wedge of crumbly aged cheddar and some crackers to my plate – along with the wine, a perfect combination. By this time I had completely covered the napkin on both sides, but I sensed that I was far from finished. Grabbing a couple more napkins from the buffet, I got back to work.
“All of the above (and more) must be covered before I pay myself a penny. And this is not including investment in new tools, machinery, etc., which amounts to thousands of dollars. In 2014 the above expenses came to just over $20,000. I don’t know…maybe that’s chump change to you. Not to me.”
“And yes, my shop is behind my house. But I no longer live in the house. I had to move out during the recession, which absolutely gutted my business. During the worst year, my gross sales (i.e.,including materials) were $17,000. I slashed the overhead and everything else to the bone. I relied on my credit card to pay lots of bills, a debt that took the following two years to pay off. I’m incredibly lucky that my boyfriend at the time – now my husband – invited me to move in with him; at least that way I no longer had to pay for all my living expenses on one decimated income.”
“That year from hell, I obviously could not even pay myself minimum wageafter covering the overheads. You’re probably wondering why I didn’t just go out and get a couple of jobs – you know, bagging groceries, cleaning toilets at the office supply store. (BTW, there were none of those jobs available. Because recession.) Believe me, I thought about it. One friend, a nationally recognized furniture artisan, confided that he was seriously contemplating a job flipping burgers because he wasn’t getting orders. Another put his business in a holding pattern and relied on his wife to support him (he was lucky she could). But I calculated that doing spec pieces and writing would be a worthwhile investment in future business opportunities, even if I had to rely on my credit card to make that investment. Thank God my bet paid off.”
“I have been renting my house out to cover the mortgage & property taxes. You probably think this means I have Even. More. Income. But no. Renting the house increased the monthly payment because I no longer qualified for the homestead tax exemption. Also, insurance rates for a rented property are quite a bit higher than for one that’s owner-occupied. So the income from rent just barely covers the monthly payment. But at least I still have my shop, for which I am profoundly grateful.”
“Don’t get me wrong. I could, in fact, make more money if I only worked in the shop seven days a week and didn’t do the writing. But going back and forth between these kinds of work is critical to my sanity.”
“All of which is to say that yes, I do have overheads and operating expenses.”
I folded the napkins in half, put them in my pocket, and made my way through the crowded room over to the dessert table. I was balancing a slice of chocolate hazelnut torte on a cake knife when I spotted him spooning tiramisu seductively into the mouth of a woman who looked young enough to be his daughter. I stood there holding the torte on the knife while she closed her lips around the spoon and shut her eyes with an expression of orgasmic delight. Once she had recovered I walked over and tapped him on the shoulder. “Rafi,”I said, pulling the napkins out of my pocket, “I have something for you.” I unfolded them and laid them on the table in front of him.
“OK,” he said distractedly as he scooped up another spoonful for his friend, who seemed to be incapable of feeding herself even though she was old enough to drink wine. “Thanks.”
I happened to pass their table on my way out a half-hour later. The napkins were just where I’d placed them, but crumpled now, the ink smudged into a dark blue blur. Seeing me roll my eyes, a man at the next table said, “I don’t know what was written on those napkins, but it sure must have been funny. The guy sitting there was reading it to his daughter – or was she his girlfriend? – and at one point she laughed so hard she spat out a mouthful of pudding. Geez, what a sticky mess.”
This new edition is a significant upgrade to the “trade” edition, which was in black-and-white and on uncoated paper. The new edition is printed in color, so you can fully appreciate the tone of the cotton paper from the 18th-century engravings. We upgraded the paper to a #100 coated matte paper, enlarged the page size, added printed end sheets and include a tear-resistant dust jacket.
Why do this? Well, we never thought our “trade” edition quite matched the gravity of the project. Don Williams, Michele Pietryka-Pagán and Philippe Lafargue spent years translating the writings of André Roubo’s “l’Art du menuisier.” It is the world’s first masterpiece of woodworking writing, and only bits and pieces were ever translated into English. So last year we began working on this replacement for our “trade” edition.
Get your copy of our new “With All the Precision Possible: Roubo on Furniture” by 11:59 p.m. Monday April 21 to save 20 percent (and get free domestic shipping). After that, it will be $125 (still a good price for this beauty of a book).
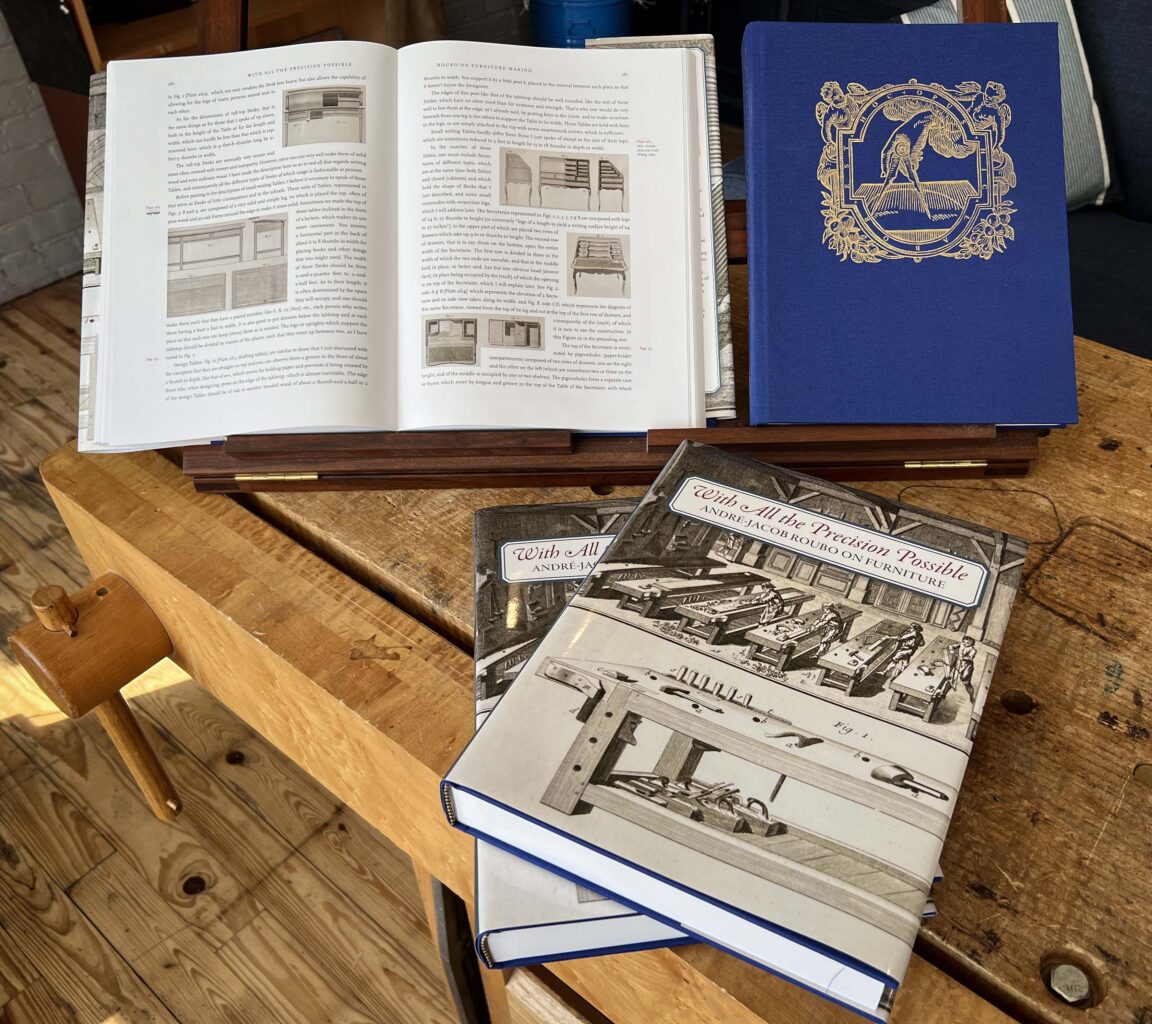
Fig. 5.1 “Waving Engine” from Mechanick Exercises, Joseph Moxon, 1678–80.
This is an excerpt from “With all the Precision Possible: Roubo on Furniture.” It is a follow-up to the post from a couple weeks ago that described a “machine for making waves.” Below is a portion of an essay by Jonathan Thornton that was written after he made one of these machines based off of historical descriptions of the machine.
The book “With All the Precision Possible: Roubo on Furniture” is the result of more than a decade of work by an international team that produced the first English translation of the 18th-century woodworking masterpiece: “l’art du Menuisier” by André-Jacob Roubo. This translation covers Roubo’s writing on woodworking tools, the workshop, joinery and building furniture.
In addition to the translated text and color images from the original, “With All the Precision Possible: Roubo on Furniture” also includes five contemporary essays on Roubo’s writing by craftsmen Christopher Schwarz, Don Williams, Michael Mascelli, Philippe Lafargue and Jonathan Thornton.
Introduction Anyone with longstanding interests in woodworking and the history and technology of picture frames could not help but be intrigued by the complex rippled mouldings that are most commonly seen surrounding paintings of the Baroque period. If that person is also a maker and collector of tools, as I am, then the construction of a device to make them is a strong temptation. It was years ago now that the temptation became almost an inevitability with my discovery of an engraving of such a device in Joseph Moxon’s seminal work on technology, “Mechanick Exercises.” 1 All I needed was the time, which was furnished by a semester sabbatical in 1994. I built a close reproduction of his device and have been exploring its capabilities as well as the literature on the subject ever since.
Moxon’s device intrigued me for several reasons: it was neglected or misunderstood in the available literature, it appeared that it would be capable of producing a variety of complex waveforms and it was the only type of such devices that to my knowledge had not been faithfully reproduced (although a somewhat modified version had been published in Fine Woodworking in 19862). The device, called the “Waving Engine” by Moxon (Fig. 5.1), works on a relatively simple principle. A stock piece is fastened to a guide or template rod carved into a waveform, and they are pulled together through a stationary cutter. As the guide rod rises and falls over a polished feeler bar, the waveform is gradually cut into the stock piece by a fixed blade. While the principle is simple, the devil is in the details.
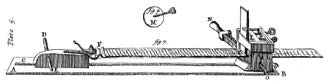
Fig. 5.5 Overall view of a reproduction “Waving Engine” of the Moxon type.(drawing by Thornton)
Making the Machine The illustration of the device that Moxon provides (from a plate almost certainly engraved by himself) presents a few problems of interpretation, and Moxon’s description, while fairly thorough, omits some important information. My intent was to make Moxon’s “engine” to his specifications, and if modifications had to be made, the reproduction itself would tell me what to do, and not my own second-guessing.
“The Waving Engine…hath a long square Plank…All along the length of this Plank, on the middle between the two sides, runs a Rabbet…Upon this Rabbet rides a Block with a Groove in its under side…the Groove in the Block is made fit to receive the Rabbet on the Plank.” (Joseph Moxon)
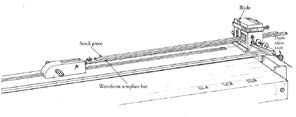
Fig. 5.6 Detail of pulling block and height adjust mechanism.(drawing by Thornton)
I made the plank from quartersawn sycamore. The rabbet I made from hard sugar maple, likewise the block that rides on it. This is the block that pulls both the patterned template and the stock piece through the cutterhead. Moxon attaches these elements to the block with a “Vice, somewhat larger than a great Handvice….” In considering this, I made the only major deviation from Moxon’s machine. I didn’t see how a fixed vice could easily follow the up-and-down motion of the guide rod (“rack”) and stock (“riglet”), let alone the gradual raising of these strips as the molding was cut. I suspect that simple looseness of fit allowed Moxon’s machine to accommodate these movements. In place of the hand-vice, I forged a tongue with a hinged box joint (mortise and tenon) much like the joint in a pair of pliers. The tongue would move to accommodate any adjustment upwards. The tongue itself was fastened into the block with a rod, which threads through it and also penetrates the block (at an angle — the purpose of which I will make clear). By means of this rod, I can adjust the attachment point to accommodate different widths of stock. In addition, I placed a support rod and knob under the end of the tongue and likewise threaded into the block, so that I could raise the attachment tongue correspondingly as the strips rose. This modification does not alter Moxon’s method in any important way, while making the machine easier to use.
“At the farther end of the Plank is erected a square ∫trong piece of Wood…This square piece hath a square wide Morte∫s in it on the Top…upon the top of this is a strong square flat Iron Coller…”
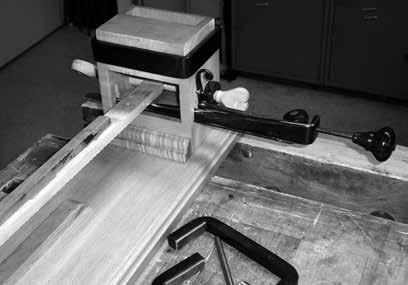
Fig. 5.7 Detail of cutterhead and slide board clampedinto the end-Vise of a cabinetmaker’s workbench. Thedevice is set up to make a side-to-side (flammleisten)waveform moulding (drawing by Thornton)
This is the business end of Moxon’s device which I call the “cutterhead.” My upright block was made of a single piece of maple, with the appropriate mortises as described. I added two projecting through-tenons to fasten the block into the plank, so that they could be gripped by the end-Vise of my workbench when the machine was in use, and allow me to easily disassemble the machine when it was not. The purpose of the collar is to clamp the fixed scraper-type blade perpendicular to the stock piece. My collar was forged from mild steel, as were the screws that tighten it on the block. Like Moxon, I forged perforated disks on the ends of the screws, so that a bar could be inserted to tighten them with lever action. It is important that the blade not move while in use.
Moxon is at his sketchiest when it comes to how the depth of cut is gradually increased, although the engraving seems to show what the description omits. A bar is shown penetrating the block underneath the “rack” that appears to be both tapered and furnished with a threaded rod for gradually advancing it under the work. There can be no other way to do this in a controlled way. Jutzi and Ringger in their discussion of Moxon’s machine had a different interpretation.19 They speculate that this knob, projecting out of the far side of the machine, was used manually by a helper to lift the guide rod and workpiece against the blade. Moxon however, refers to this as “a wooden screw called a Knob.” He also appears to illustrate, though he does not discuss, the taper of the polished rod that is advanced by this screw-knob. It seemed clear to me what he intended: I made a steel bar with a T-shaped cross section that would slide through T-shaped slots in the block. I put the taper side up, as Moxon appears to do, and simply accounted for this cant in the rack and “riglet,” by setting my attachment-tongue into the pulling block at the same angle.
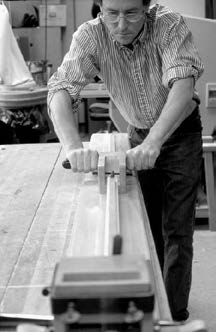
Fig. 5.8 Making a moulding on the Moxon “WavingEngine.”
I captured the end of my adjusting screw-rod with a sort of clutch lever that would allow me to easily disassemble the machine, an alteration necessitated by my own tight space that again, did not alter Moxon’s device in any important way. The screwrod uses a fine thread so that I can very gradually raise the work under the cutter. In use, one or two revolutions of a rosewood knob on the end of this screw increases the depth enough for the next cutting pull. The handles on my pulling block were also made of turned and polished rosewood, press-fitted onto a steel rod, which runs through the block, again for ease of knock-down.
“But before you draw the Rack through the Engine, you must consider the Office…of the iron screw…for by these screws, and the Rabbet and Groove, your work will be evenly gaged all the way…under the edge of the iron.”
Moxon shows only one screw, though he refers to them in the plural. These screws serve to keep the work “gaged” under the blade. The end of the screw shown was fitted with a flat iron disk, that appears to be a sort of wear-plate against the moving template and workpiece, called the “rack” and “riglet” respectively by Moxon. Jutzi and Ringger speculate on two screws, one from each side, that enter at an angle. Their drawings are interpretive reconstructions as they did not build such a device.
I believe that Moxon clearly shows a screw entering perpendicular to the cutter-head block. I also decided to use two screws, so that I would have greater flexibility than could be achieved with just one, though the inside surface of the cutterhead could have conceivably gauged the other side of the strips. Instead of iron, I made my screws from lemon-wood (Calycophyllum candidissimum), a beautiful close grained relative of boxwood, and equally hard-wearing. I threaded these with the Beall router attachment, and made decorative double volute-shaped flanges on the ends similar to the screw end shown by Moxon. I decided that locking washers were a good idea if I wanted to keep my work well “gaged.” I made these from rosewood also, and placed them on the outside of my block where they are easier to get at.
My blades were made from 01 steel, a high-carbon, oil-quenching tool-steel that has low warp characteristics in hardening, and can be tempered to create a tough and hard blade. The blade “whose lower end is cut into the form of the Molding you intend your work shall have…” has a single bevel facing toward the pulling block. I filed and ground the shapes before hardening the blades. I sharpened them once on the bevel, then subsequently only on the flat side.
“Then if you lay hold of the handles of the Block…and strongly draw upon them, the Rack and Riglet will both together slide through the Mouth of the wooden piece…and as the rounds of the Rack rid over the round edge of the flat iron…the Riglet will on its upper side receive the Form of the several Waves on the under side of the Rack, and also the Form, or Molding that is on the edge of the bottom of the iron, (blade) and so the Riglet will be both molded and waved.”
The final form of the mouldings is dictated by the shape of the blade, by the form of the template or combined templates, and by the attachment point of the pulling block. The number of possible designs is multiplied by the addition of any of these elements, and quickly becomes astronomical. Even with my still limited stock of blades and templates, I will probably never produce all of the possibilities.
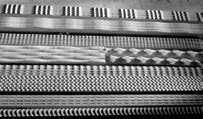
Fig. 5.9 A selection of mouldings made on the Moxon“Waving Engine.”
Using the Machine I have continued to explore the capabilities of this tool in the years since I first made it, and it has provided both mental and physical exercise. In action, I hold the tongue down with my finger as I push the strips through the machine for the return stroke, then I “draw strongly” on my handles. Depending on how deep the moulding is going to be, and this is dependent on the wave amplitude of the template, I will continue to make cutting strokes until the mouldings are complete. I take coarse cuts (Moxon would say “rank”) to start out with, but by the end, when the blade is bearing more-or-less continuously, the shaving needs to be thinner than paper. I can complete some moulding strips in 15 to 20 minutes, but deep mouldings in a hard wood take more time.
Any wood that is hard and relatively dense will work well for the moulding strips. Cherry is excellent, as are pear and maple. Many of the period mouldings are executed in either ebony or a fruitwood stained to look like ebony (ebonized). I have gotten by with poplar for moulding with a gentle wave. It’s best if the grain rises away from the pulling block so that the wood fibers are severed more obliquely. Earlier on, I mounted the moulding strips to the “racks” or guide bars with a few drywall screws shortened so that they did not come through the surface of my mouldings. I still had to make them relatively thick however, and they were only held firmly in a few places. Now I prefer to use the wood turner’s trick of gluing the stock piece to the template with pieces of heavy brown paper. The finished moulding is then taken off by splitting the paper interleaves, and scraping the glue and paper residue away.
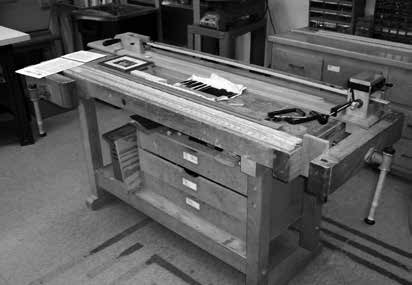
Fig. 5.10 Two views of the author’s waving engine.
The “racks” are made of hard maple. I have hand-carved some of them after stepping off the intervals with a divider, by using the same gouge across the grain both bevel side up and bevel side down. I have also used a pin-indexing jig on my table saw and router table T-slide like those jigs used to cut box joints. I did this to create bars with tight waves that would have consumed a lot of time in carving. The mathematical accuracy of this method can be both an advantage and a disadvantage depending on your point of view. Historic ripple mouldings have subtle variation and character.
No sanding is required on a properly cut moulding. The blade leaves an almost polished surface in a wood like cherry. I also discovered that pushing the moulding back through the cutter-head for the return stroke burnishes the moulding against the polished bevel of the blade. Stain will greatly accentuate the wave appearance by selectively penetrating the severed wood fibers on the insides of the wave troughs.
1. Moxon, Joseph (reprinted from the 1703 edition). Mechanick Exercises or the Doctrine of Handy-Works. Scarsdale, NY, The Early American IndustriesAssociation (1979).
2. Robinson, T. “Handscraped Waves.” Fine Woodworking, 58 May/June (1986) 64.
A simple ogee (aka cyma recta or cyma reversa) on the ends of a six-board chest.
Both Chris and I have made and taught a lot of six-board chests over the years, and typically we lay out and cut a “boot-jack,” (inverted V”), simple arc or ogee on the ends. Those are easy to lay out and all three are relatively easy to cut…and and don’t hurt our brains or the brains of students too much.
So when working on “Good Eye” the latest artisan geometry book from Jim Tolpin and George Walker, we were both rather dumbstruck with the clever way the authors reverse-engineered the layout of a fancy-looking but simple-to-cut six-board end panel – a layout I have never produced, but have now added to my mental design library. It’s not that I couldn’t have made this shape through measuring – it just wouldn’t have occurred to me to do so; I try to always teach a layout that is scalable without numbers and requires just a few tools, such as a straightedge and compass. That way, you’re teaching the process not the result.
That’s the approach of this entire book – looking at a piece of furniture and showing how the relationships between and among its proportions, and how you can use this knowledge in the real world as you design your own pieces. (Or how to better understand what makes an exiting piece “good.”)
I’ve excerpted this section of “Good Eye” for you below.
– Fitz
Next, let’s turn our attention to the end panels. In addition to the decorative pattern covering the entire surface, the end panels have a triangle cutout (Fig. 3.23). This is not just decorative; it gives the piece four feet to improve stability.
If you look closer, you’ll notice it’s not one, but two triangles, one nested inside the other. The smaller triangle provides that space to carve some relief at the bottom of the decoration. Notice also that this smaller triangle is notched with a right-angle cutout near the floor. It’s likely that the bulk of the decorative linenfold on both end panels was executed on a single board. It was then cut in half, one for each end. So we’ll lay out a mirror-image pattern on the backside of the board and then saw them out after the linenfold is complete.
Because we are making the end panels from a single board we begin with a board that’s two units wide. Instead of three units high, we double it to six units high to have enough length for both ends (Fig. 3.24).
It’s two mirror-image triangles with a pair of smaller triangles nested inside them (Fig. 3.25). The lines and circles that create this pattern look complicated at first glance (Fig. 3.26). Yet, if we walk through it step by step, you can see the logic unfold and the genius of this deceptively simple design.
Begin by drawing a pair of diagonals across the corners (Fig. 3.27). This provides our centerline for the decorative linenfold pattern as well as the apex for our large triangle cutout. It also marks the halfway spot to mark a saw line to separate the two pieces later on.
The first large decorative triangle is centered on the board. The bottom corner of the triangle is inset one-fourth the overall width of the board. We can find that one-fourth width with another pair of diagonals (Fig. 3.28).
Note that we used diagonals just like we did before when locating one-third of a rectangle. Again, these intersections locate one-fourth of our rectangle on both the vertical and the horizontal.
The larger decorative triangles are equilateral. To locate the apex, set a pair of dividers to span the width of the base of the triangle and scribe a pair of overlapping circles (Fig. 3.29).
These two circles define our two mirror-image triangles. A line that runs from the center of one circle to the other establishes the base of our triangles. The intersections, top and bottom, where our circles overlap, locate the apex of both triangles. Strike lines to connect the width of the base with the apex on both top and bottom. These two back-to-back triangles create a diamond shape.
To define the smaller triangles that are nested inside, draw a line from the corner of the board that passes through the apex of our triangle until it crosses the saw line (Fig. 3.30).
Draw three more diagonals, one from each corner to complete the two smaller triangles. Finally, the small notch at the base of the smaller triangle. It’s simply two side-by-side squares, or you could picture it as a rectangle that’s one unit high by two units wide (Fig. 3.31).
The layout for the decorative linenfold carving is similar to the front panel. The width of the tools themselves step off the repetitions across the board using the centerline as the starting point.
One final note on these geometric layouts. For the sake of clarity, we show all lines and circles in their entirety. When you see these layouts in historic books or even remnants left on old work, the actual layout lines are abbreviated. You might see only a few intersections and tick marks. If I were laying this out, being familiar with lines, it would look something like Fig. 3.32. It’s abbreviated, but still has the information needed.