The surface patterns of the raw wood can overwhelm the subtleties of the forms.
This is an excerpt from “Chairmaker’s Notebook” written and illustrated by Peter Galbert.
Paint has come a long way from the toxic lead paints of the original Windsors to the stringy enamels of the 20th century. I paint my chairs with milk paint, and while it was not the traditional finish for Windsors, it does a great job of coloring the wood without obscuring the texture. One problem with milk paint is that its manufacturers tend to describe mixing and using it in a way that creates a crude “country” finish. I don’t want this for my chairs, so I mix the paint thinner than recommended and follow a multi-coat process to get the refined look I want.
When done properly, the grain and texture of the wood are clearly visible, and the desirable tool marks and edges are sharp and crisp. Not only is the warmth and depth of the wood present, but it is deepened. Over time, normal use will wear the paint, exposing the edges of the chair and highlighting the shaping. The overall effect is far more striking than one dominated solely by the surfaces and colors of the wood.
Before launching into surface and paint preparation, I feel compelled to talk about samples. Committing making sample boards might just be the toughest lesson in all of woodworking. But until you have a sample – and I mean a completed sample – that you are pleased with, it is more than likely that you will be disappointed in the results on the actual piece.
When working with a new finish, I make samples on the various woods and surface preparations of my piece. I observe all the normal drying times, steps and layers. Lots of notes will help you remember the steps and measurements. Once I love the results, it’s time to work on the actual piece.
Wetting scraped and sanded areas raises the compressed fibers.
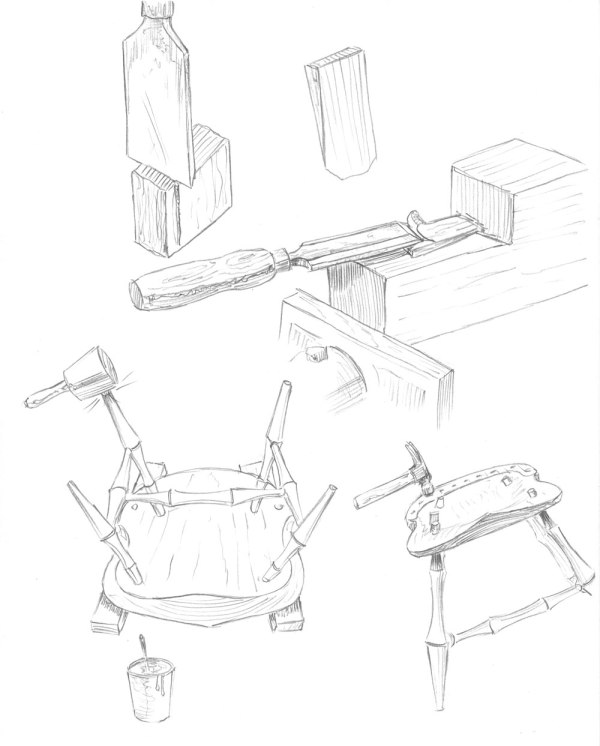
Surface Preparation Surface preparation is vital to getting good results. Any surface that was shaved with a sharp blade, such as a drawknife or spokeshave, is ready for finishing without any further preparation – save making sure that it is free from dirt or grime. This is because the cutting action shears the fibers cleanly without compressing the grain. Even parts that have been put through the steamer will show no raised grain where they were shaved with a sharp tool.
Areas that have been scraped and sanded will have some degree of grain compression that will show up as raised rough fibers on the surface once they contact either water, water-based stain or water-based milk paint. For these areas, I sand to #220-grit, then wet them to raise the grain. This is often easier to do before assembling the chair.
Most surfaces on the oak can be finished with spokeshaves, leaving an inviting faceted surface, ready to finish.
It’s important to let the surface dry and harden; letting it sit overnight is best. Then I lightly sand with #220-grit paper, being careful not to apply too much pressure. Instead, I let the sandpaper cut the fibers with multiple light passes. These areas will most likely show raised grain again, but I sand them after the first coat of paint has soaked into them and hardened the fibers. One sanding after the first coat of paint is usually enough, but I inspect those areas carefully to ensure that I am happy with the surface after paint is reapplied.
My turnings in the undercarriage are finished with a skew, but because any burnishing that takes place may resist the paint sticking, I sand lightly with #320-grit while the piece is on the lathe. Be sure to remove the tool rest and any loose clothing before sanding. I also wear a respirator because the fine dust is dangerous. There should be no surface preparation required after that.
Rinsing the seat with naptha cleans the surface and can reveal surface quality.
The seat is perhaps the most critical place for surface preparation. Pine tends to compress when scraped, and it might also contain considerable sap or pitch. It is difficult for paint to adhere to sap, so I heat the surface of the seat with a heat gun until I can see the pores with sap in them liquify. Then I rinse the seat with naptha or grain alcohol. Always wear gloves when handling solvents. I repeat this if the seat seems quite pitchy. Some manufacturers suggest sealing the seat with a coat of shellac or using an acrylic additive to the milk paint to encourage solid adhesion. I have done both, but have found that the brand of milk paint that I use, from the Real Milk Paint Company, doesn’t require help sticking to the surface. If I do use an additive, I only use it on the first coat on the seat and nowhere else on the chair.
If your chair has been sitting around for a while unpainted, oxidation and dust will have contaminated the surface and you might consider wiping the whole chair with solvent such as grain alcohol or naptha before painting.
Using wood fresh from a log has a number of advantages for the chair and chairmaker. But that being said, lack of access or experience with green wood should not prevent you from exploring chairmaking. Once you understand the concepts behind the use of green wood and the advantages it imparts, you’ll see there are ways to use dried wood with the same or similar results. Ideas for starting with dry wood are included at the end of this chapter. The process may not be as easy using dried wood, but I recognize that for some woodworkers, the plunge into chairmaking and green woodworking might take place in stages. With a little success in chairmaking, I have no doubt that the excitement will nudge you ever closer to the log.
Why Split Wood?
While the softness and flexibility of the green wood is obvious, you might wonder what the advantage is of split wood. Working from split wood can be a tough concept to grasp, even for the experienced furniture maker.
Splitting wood preserves its strength.
Trees don’t have any flat or square parts, and wood is not a homogenous material that’s indifferent to the way it is cut. Trees are a bundle of fibers, and once the tools and techniques to split and shave these fibers come into play, hand-tool jobs that would be difficult or tedious with sawn planks become simple and fast.
One way to compare sawn wood to split wood is that a saw blade ignores the fibers and cuts across them. Splits follow the fibers, which yields strong parts that display amazing flexibility without a loss of strength. But there is more to this story.
Whenever sawn wood is shaped, shaved or cut with hand tools, the direction of cut is of primary concern. A smooth surface can be created by cutting or shaving the fibers in the direction that they ascend from the sawn board. Cutting in the opposite direction, where the fibers descend into the board, will cause the cutter to grab the exposed end grain and lever out small chips. This “tear-out” leaves a rough, undesirable surface and takes more effort to cut.
With sawn lumber, grain direction is paramount.
On sawn boards, the direction can change from one area to another, especially if the tree didn’t grow straight. The showy grain patterns so prized in cabinetwork are the result of milling across the fibers, whereas split and shaved pieces will have uniform – perhaps even boring – figure.
But showy grain can force you to constantly change your cutting direction to avoid tear-out, which slows the process. Plus, when shaving round parts from sawn wood, you will usually have to change direction as you shave around the surface. On the lathe, changing direction is impossible.
But when parts are split and shaved to follow the fibers, the direction of cut is simplified. You always head from the thick area to the thin. On round parts, this allows you to work around the entire piece without changing direction.
Common challenges with sawn boards.
This enables you to rely on the shape of the piece to dictate the tool’s cutting direction instead of constantly interpreting the surface for clues.
Split wood can be worked in either direction when shaved parallel to the fibers. Once the fibers are carved across, the direction of cut is always toward the thinner area.
This simplifies and speeds the shaping process. Trying to shave a sawn spindle that has fibers that are not parallel to the axis of the spindle requires a constant changing of the cutting direction, which renders the process impractical.
Peter Galbert, working at the Lie-Nielsen 2014 Open House in Warren, Maine.
Peter Galbert, author of “Chairmaker’s Notebook,” is widely considered to be one of the finest chairmakers alive today. He’s also a sculptor and painter. And teacher. And writer. He’s an inventor of clever chairmaking tools, which have propelled several prosperous toolmaking businesses. He’s lived in Manhattan, in upstate New York and central Massachusetts, raising goats and chickens, and in Boston. He cooks. He travels (most recently with his partner, renowned landscape architect Stephanie Hubbard, to Baja where they dreamed of another life spent rescuing Mexican street dogs together). Nick Offerman, in his book “Good Clean Fun,” dedicated an entire chapter to him. The man is not yet 50.
And yet, he’ll probably cringe when reading this.
A self-described introvert, Peter says he feels like he’s already received more exposure in life than he should. Fellow woodworkers joke, using the word “hate” when talking about him, which is actually another word for “admire” (tinged with jealousy). For Peter is a rare human — talented, yet approachable. Intelligent, yet unpretentious. And he’s a strong believer in the importance of connecting with others — a belief that stemmed from several isolating stints in high-end furniture and cabinetmaking shops in Manhattan.
But first, the beginning.
Peter was raised in the northern suburbs of Atlanta, before it became the definition of urban sprawl. His neighborhood was surrounded by farmland and plenty of wooded space. “We didn’t have the Internet then, so we played in the creek a lot,” he says. In his immediate family he has a sister and two brothers, but then he mentions a half-sister and says he’s very close to her half-brothers. “When we get together, there is a lot of us,” he says, laughing.
Early on Peter showed an interest in drawing and making things, pursuits his mother always encouraged. It wasn’t the typical teenage comic book art, although he says he imagines he would have enjoyed that. Rather, even at a young age Peter was most interested in depicting things realistically, transposing the world around him.
Peter attended the School of the Art Institute of Chicago, where he studied drawing and painting, and did some sculpture work as well. He dropped out for a couple years, worked and travelled, and then enrolled at the University of Illinois at Urbana-Champaign, “mainly because I knew I wanted to be a college graduate,” he says. He majored in photography, while continuing his art studies, and graduated in 1995.
Without a broad skill set but an eagerness to learn, Peter moved to New York City. His friends were there and it was the mid-1990s. Things were booming and rent, even in Manhattan, was reasonable. “It was a very positive time to be there,” he says.
Peter landed work in a cabinet shop, but it was physically demanding and mentally isolating. He knew he wanted — needed — something else. He hopped around a few places, even landing a gig with the Smithsonian, building everything from pedestals to grass huts to help display extraordinary artifacts and art. He describes that work as amazing — simply because he was able to be so close to objects he loved — and yet he wanted a more intimate relationship with wood.
By chance Peter noticed a “for rent” sign one day while walking the streets of Manhattan. Inside was a 20’ x 12’ storefront workshop, partly occupied by a guitar maker, Justin Gunn.
“He was so capable of building his whole guitar on simply a benchtop with hand tools and I was so impressed with how organic the process was,” Peter says. “The fact that he took wood and transformed it into something that was quite appreciated for more than just its structural ability or its surface appearance, it was there for its tonal quality, too, and the way that he built it, I was super jealous. I wanted something like that.”
Peter paid $400 a month to share the space with Gunn (who later fell in love with a Dutch woman, moved to Holland and became a musician). Given the space, the fact that he could only use hand tools, and his desire to build something both beautiful and functional, chairs made most sense. And so, Peter became a chairmaker.
Fan Back Side Chair by Peter
Continuous Arm Settee by Peter
Comb Back Rocking Chair by Peter
“Woodworkers are notoriously a romantic lot,” he says. “They pour their heart and soul into it and get pennies out. It’s a very tough, tough business.” Chairs required little overhead. “You can make them essentially for nothing, the materials are almost free they’re so cheap. And then the question was: Could I get the buying public to respond in such a way that I could start to capture back some of my input in the form of their purchase? And then it just became about communication. The more they could understand about why I was committed to doing things the way I was and what I was doing the more they started buying. So I found that education was one of the biggest components to what I was trying to do.”
By 2000, the low-rent-in-Manhattan gig was up. Peter was faced with a choice: rent another workshop way out in Brooklyn and continue to struggle with the lack of materials (trees) or move to the county. Two hours north he found a farmhouse with 50 acres that he could rent for the same amount of money he would have spent on workshop space in Brooklyn.
At first, Peter lived the country life only part time. He and his wife at the time commuted back and forth each weekend. But when his then-wife became fed up with corporate life in New York City, and they recognized the fact that they were never very happy on the return drive each Sunday, they took it as a sign and moved to upstate New York for good.
Peter with his partner, Stephanie Hubbard.
In 2010 Peter moved to central Massachusetts, lived there a couple years, divorced, and lived there for a couple more years. In the last few years he met his partner, Stephanie, and last year he moved to Boston, where she worked and lived.
Peter’s lathe.
Peter’s home workshop in Boston.
Peter’s view from his home storeroom and workbench area.
Despite it being city living Peter has a small yard (where you can find him barbecuing most summer evenings) and there’s a separate garage. He works in a 20’ x 20’ workshop, listening to classical music or operas he can’t understand, or Sherlock Holmes books on tape. The location is ideal, as it’s close to North Bennet Street School, which is where he’s spending most of his teaching hours this year.
Eventually he says he’d like to get back to the country. “I love that life, it’s an amazing life to live, it’s really charmed.” But for now, he’s happy.
When I spoke with Peter he was at the State University of New York at Purchase, where he had been since early October, experimenting with new work thanks to a grant.
“This is way more than I could ever ask for,” he says about life in general. “I can do a lot of what I love doing and like right now, this thing I’m doing in New York, getting paid to explore anything I want to do which is crazy but it’s come my way because of my efforts in chairmaking and writing — people want to see me do creative things.”
One of Peter’s sculptures, a cherry log with an embedded object.
Peter’s residency ended in mid-December. While there he worked mostly on sculptures, carving logs while also splitting them to make it look as if objects were embedded in them. “It’s a fun, interesting way to re-approach the split log,” he says.
He also dabbled in chair work, hoping to develop new methodologies to use at home, and taught three hours a week. His workspace was completely accessible to students all day long. He admitted it was weird at first — he had become quite used to his private hovel, but he says the experience enabled him to break open some long-held habits that weren’t necessarily positive. “It was very inspiring,” he says, when asked about interacting with the students. “They’re very creative and thoughtful people.”
One of Peter’s chairs at the Lie-Nielsen 2014 Open House in Warren, Maine.
“It’s a strange business,” he says. “People want to quantify it somehow. I simply engage the craft. I don’t see myself as a furniture maker. A lot of other things I do now fund what I do. They all complement each other.”
Throughout the years toolmaking also has complemented Peter’s work. “When I first started I had to make a bunch of my own tools,” he says. They weren’t commercially available, they weren’t designed for chairmakers (rather they were being appropriated for the craft) or they weren’t good. “Plus I didn’t have a lot of money so I just started making my own tools because I needed the jobs to get done that I was doing quicker.”
Peter says he also was suspicious of the amount of tools for sale. “In woodworking, they’ll sell you a tool to help you open the doorknob to get to the shop.” He wanted to be closer to the process than simply flipping through a catalog.
Claire Minihan produces the travisher.
Charlie Ryland produces the drill bits.
Tim Manney produces the adze and reamer.
Peter developed a travisher, reamer, adze and drill bits, which he has since handed off to dear friends who have further developed and improved the tools, and now sell them as their own businesses.
Claire Minihan produces and sells the travisher, Tim Manney produces and sells the adze and reamer, and Charlie Ryland produces and sells the drill bits.
The Galbert Caliper provides a constant, accurate reading of a workpiece’s diameter while it’s being cut.
The Galbert Drawsharp is a simple and helpful jig for sharpening drawknives.
Peter also developed a caliper and a sharpening jig for drawknives, which he sells. Next up? Maybe the sightline ruler he writes about in his book. He has an opportunity to do a short run of them — something he’s considering for 2017.
Illustrations from Peter’s book, “Chairmaker’s Notebook”.
While Peter says folks have been overly enthusiastic about his book, writing a tome of that scale (he spent three years hand-drawing more than 500 of the book’s illustrations) was exhausting. And yet, he’s proud of it, and is open to more (smaller) book-writing projects.
When asked to choose a favorite woodworking book, he spoke of the difficulty in that but then mentioned Eric Sloane’s “A Museum of Early American Tools.” “That really was a huge influence; exciting me about what could be made with simple tools,” he says. “My drawings are just sad imitations of what he did. It’s just the most stunningly descriptive book in drawings and that’s what inspired me to draw my book.” Peter says he aspires to Sloane’s economy of means, being able to create textures and visual awareness in simple drawings — in Sloane’s drawings, Peter says it’s easy to differentiate what’s wood, what’s metal, what’s shiny, what’s matte.
When not building chairs or developing tools, or sculpting, painting, teaching, speaking, drawing or writing, Peter says he enjoys Scotch. And visiting museums. And traveling. He and Stephanie have been all over California, Mexico, Toronto and Australia. I asked him for a favorite place. “It’s more about who you’re with than where you’re going,” he says.
For a man who seemingly has everything, what does he want most from life? “Just to continue to develop and share my own interests and abilities,” he says. “At this point I feel so lucky for what I already have that I feel guilty for wishing for more, but I definitely feel that it comes down to tailoring your efforts so they both maximize your joy and then connect with other people through it. Because that’s the one thing I learned early on — when training and observing, the isolation is really intense. And even though I’m an introvert by nature — I need a huge amount of down time in between social encounters — I was really disturbed by how isolating that trade was. One of my biggest priorities now is my connection to Tim, Claire and Charlie, and so many other people I have come to adore. That’s my community, and that’s huge.”
Every month we get queries from people who want to write a book for us. And every month I send each of them a nice rejection letter. We simply don’t choose authors that way.
Every Lost Art Press book begins as a long conversation between the writer, John and me about things that may or may not become a book. Most of these conversations are dead ends, but they are interesting dead ends.
During the conversations, we’re also sizing up the author as a person and asking ourselves the questions: Do we want to be in business with this person? Do we like them? Do we share the same ethics about the craft and business?
If all the stars align, we start working on a book together. And if the stars align again, it gets published.
Starting Monday we’re going to introduce you to each of our authors through lengthy profiles written by Kara Gebhart Uhl and published here. The first one will be on Peter Galbert, author of “Chairmaker’s Notebook.”
This book started out as a three-way conversation between Peter, Curtis Buchanan and me in Berea, Ky. The project took several crazy turns until it finally was birthed as the massive “Chairmaker’s Notebook.”
I’ve already read Kara’s profile of Peter, and I learned a lot about Peter, even though I’ve known him for years.
I hope you enjoy these periodic profiles. After Peter, Kara will be writing about Robert Wearing and Matt Bickford.
This week we are sending “Chairmaker’s Notebook” by Peter Galbert out for a second printing.
Most of the changes made for the second printing are technical in nature – we adjusted the histogram of several of Peter’s hand-drawn images to darken them.
But there is one significant correction to the content of the book, so I would like to post that here for everyone to download for free.
In Chapter 3, Peter presents two pages of plans for the two chairs he built for the book. Because of a scanning error on my part (not Peter’s), the enlargement percentage shown on the pages of the first printing is incorrect. It should be 545 percent (not 540 percent).
Additionally, the drawings for the underside of the seat and the bending form for the balloon-back were slightly off the correct scale.
I spent the morning trying to figure out how I made this error. My conclusion: I screwed up something while scanning the original drawings.
You can download a pdf of the corrected version of those two pages here:


 This week we are sending “