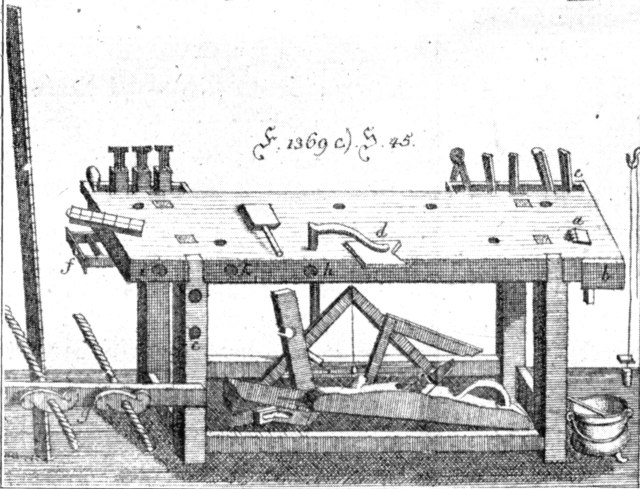
Jeff Burks pointed out that the bench shown in this entry is indeed French and was copied in reverse for the German encyclopedia. But even more important, Burks offered this translation of the description of the bench from the French source: “L’ Art Des Expériences” (Volume 1), Jean-Antoine Nollet, 1770.
Tools and Processes of the Joiner
The Joiner can not do without a workbench; it must be sturdy & such that we can turn (lathe) upon it: take for it a slab of beech or female elm, which is six to seven feet in length, eighteen to twenty inches wide and at least three and a half inches thick; raise it from twenty-seven to twenty-eight inches, on four oak legs (feet) of four inches squared, joined with a forked top end, with four rails from below, beneath which you form a bottom with boards for placing the tools; See Plate 1, Fig. 1.
At one end of the bench there must be an iron toothed claw A, pressed into a square wooden shank, that goes through the thickness of the bench & that we raise and lower with the mallet. This claw or hook serves to hold and support the flat parts, which we draw up to plane the faces.
At the same end of the workbench & on the edge which is to the right hand of the worker, you will attach a flange or wooden hook (crochet) B, to similarly stop the boards you wish to dress on the edge. It is a flat piece of wood five to six inches in length and as wide as the bench is thick. The end is cut on a slope to form an angle with the edge of the bench in which we place the end of the board; & if it is sufficiently long it is supported at the other end by a movable peg that we put into one of the holes that are drilled in the post C, otherwise it is held by a piece of board D, notched to form an angle, and held to the bench by a holdfast.
As we will need the holdfast in different places on the workbench, there must be several holes, not on the same line, but on two, which include between them nearly one third the width of the workbench & those that are made on one of these two lines meet in the middle of the spaces left between those of the other line; these holes should be larger than is necessary to fit only the shank of the holdfast, for it must take a forward slanting position, that is to say, it must touch the right upper edge of the hole & the left lower edge when it is struck with the mallet.
On the opposite edge, and always at the same end of the workbench, you will attach two small cleats and a stick (rule) fifteen inches or so in length E e, leaving between it and the workbench an interval of seven to eight lines to place the tools we most often need, such as firmer chisels, bench chisels, mortising chisels, compass, &c. You can do so at the other end of the same edge, to have at hand brace bits, some marking gauges, a couple of rasps, many large files, &c. Add in one end of the bench a small drawer with compartments F, which contains grease for the brace bits, chalk, black stone, pieces of dogfish skin, some more worn than the others because in many cases it is too coarse when new.
Your bench will offer you a great convenience if it is garnished with a press, Fig 2. which can be removed when not needed. It should have two wood screws, each of which is fifteen or sixteen inches in length and about twenty or twenty two lines in diameter, with two nuts an inch and a half thick formed in an S shape. About five or six inches in length: You tap two holes G H, four inches deep into the thickness of the workbench, two feet apart from each other, there you will enter the two screws, and on their protruding parts you slide a bar that is not less than eighteen lines thick and three inches wide, and from over this the nuts will squeeze what you put between the bar and the workbench.
Make a third threaded hole h, between the first two and get a second bar pierced to conform to the distance H h; you will thereby have two presses of various lengths to choose from according to the dimensions of the pieces that you will contain or clamp.
The screws and holes must be made of very firm wood that will not break. The cormier (quickbeam) and l’alizier (beam-tree) make the best of all for this usage. Failing them you will take the wild pear, or elm if you can not find better. I will say below how it is done with the screws and wood nuts; about the press bar, it should be stiff wood such as ash, for Example.
The translation confirms that the press was indeed inserted into the holes on front edge of the benchtop. And that you could even have two different-size vises for larger or smaller work. Also interesting: Nollet points out the doe’s foot is used for restraining boards that you are edge-planing in the the crochet. I’ve not tried this technique (but will today).
As this bench is from 1770, I still think there is an earlier bench out there that Joseph Moxon or his engraver were looking at when they added the double-screw to the bench in “Mechanick Exercises.”
— Christopher Schwarz


 One of the workbenches in Andre-Jacob Roubo’s French masterwork on the craft is called out as a “German” workbench in