After a long dry spell (five months), we finally have two new products in our store that we have been working on for a long time (nine years on the saw sharpening book!).
“Set & File: A Practical Guide to Saw Sharpening” by Matt Cianci is in our warehouse and shipping. It is $32. If you buy it before July 1, you will receive a free pdf download of the book at checkout. This book shows you saw teeth like you’ve never seen them before: up close. Matt Cianci, a long-time saw doctor, has a practical way to teach saw sharpening that anyone can do (I watched teach this last weekend).
If you’ve ever been frustrated by old texts about saw sharpening, this book will set you straight (pun intended).
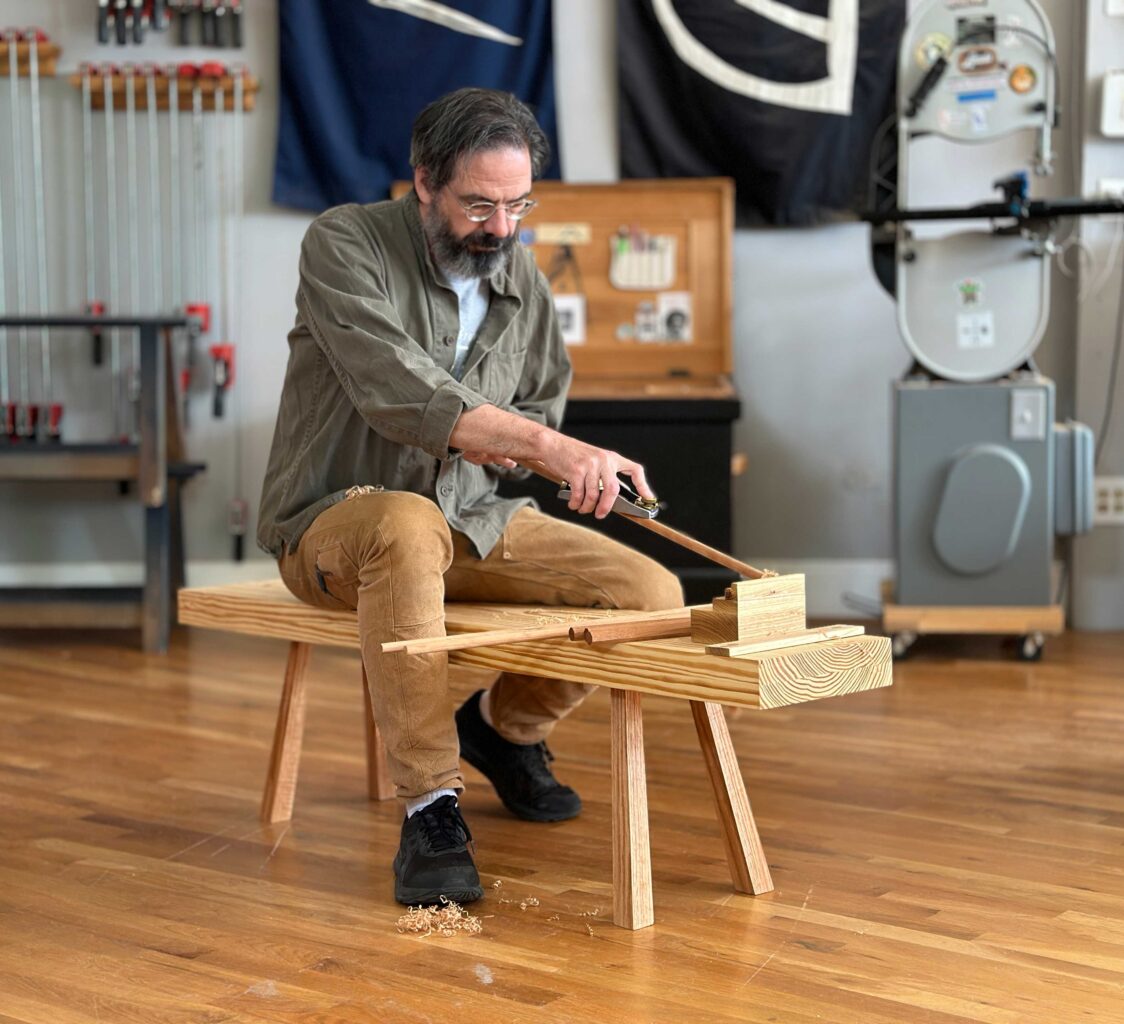
“Video: Build a Roman Workbench.” This video shows you how to build the most portable, compact, inexpensive and easy-to-use workbenches available. Made from about $45 in dimensional lumber and scraps, these benches allow you to make cabinets, chairs and tables while sitting down.
These benches are ideal for apartment woodworkers – or anyone who has limited shop space (the bench can double as a coffee table). It’s also ideal for woodworkers who travel, who like to work outside or have mobility issues.
The video is now $35 – a special introductory offer. After July 1, it will be $60. The video includes downloadable construction drawings and a packet of additional information on workholding.
Megan is finishing Matt Cianci’s book “Set & File: A Practical Guide to Saw Sharpening,” and I’m polishing “The American Peasant.” Both books will go to the printer within the month, and then we will turn to our next publishing projects.
Here’s what is coming up.
Megan is (still) working on her Dutch tool chest book, and she’ll also take the reins on Jim Tolpin and George Walker’s next book, “Good Eye.” Their early drafts have convinced me this will be their best book. For this book, George and Jim are deconstructing pieces of furniture to show their underlying patterns and language.
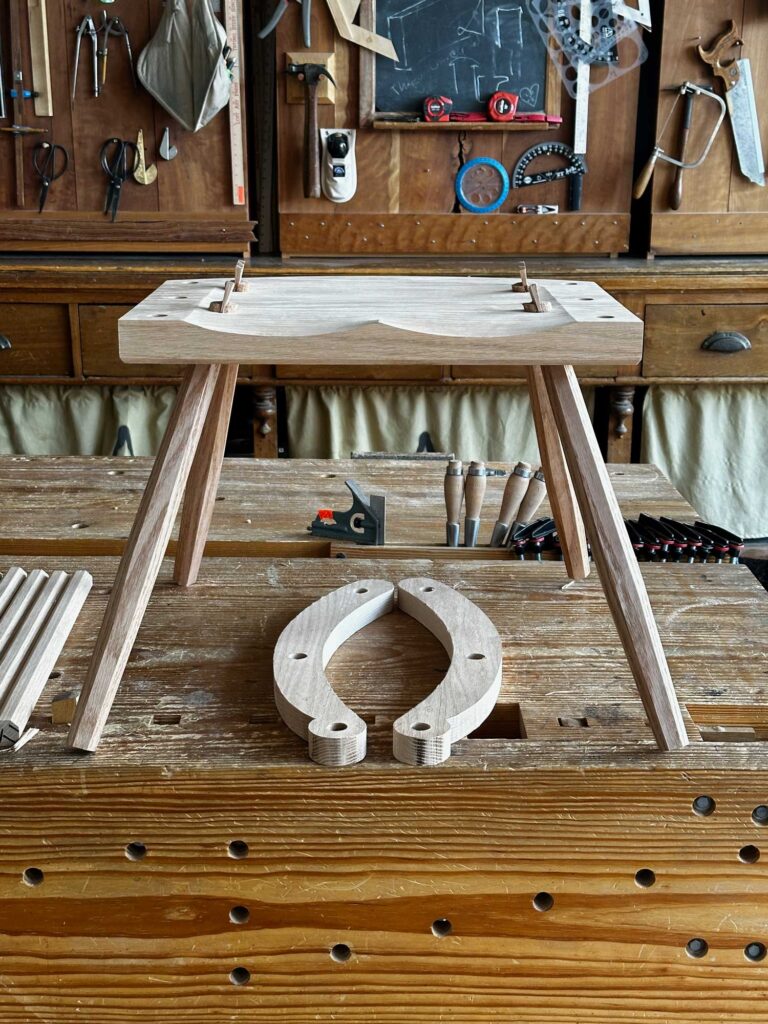
Also in the works: Kale and I just began filming a long-form video on building and using a Roman workbench.
And I will dive into the next issue of “The Stick Chair Journal.” I have been working on the second issue off and on, and I promise it will be out before the end of 2024. The delay on “The Stick Chair Journal” has not been due to a lack of enthusiasm. Quite the opposite. My list of stories for the second (and third) issues grows every week.
Mostly, I have been stalled by our 11-month-long restoration of the Anthe building, our new fulfillment center. Finally, work on the Anthe building is winding down. This week we’re repairing the basement stairs and waterproofing the second-floor doors over the loading dock. These little projects are much easier to tackle than say: pay for a new roof, sunlight, gutter and reconstruction of the rear masonry wall.
Aside from the Anthe building, one of the obstacles to the next issue of “The Stick Chair Journal” is which chair plan we will publish in issue two. I have seven designs I’ve been working on:
Comb-back with a plywood arm and comb Settle/Settee The Shortback Irish writing chair Peasant chair The Stout Lad chair (a chair for larger body types) Hobbit chair
I want to build them all. And given enough time, I will. Since writing “The Stick Chair Book” (a free download), I have been moving chair-by-chair to a particular chair form in my mind. The two chairs on my bench right now (shown above) are a significant step forward to that chair – both in form and the natural dye I’m cooking up.
Or maybe I’m just fooling myself and “that chair” will always be on the horizon.
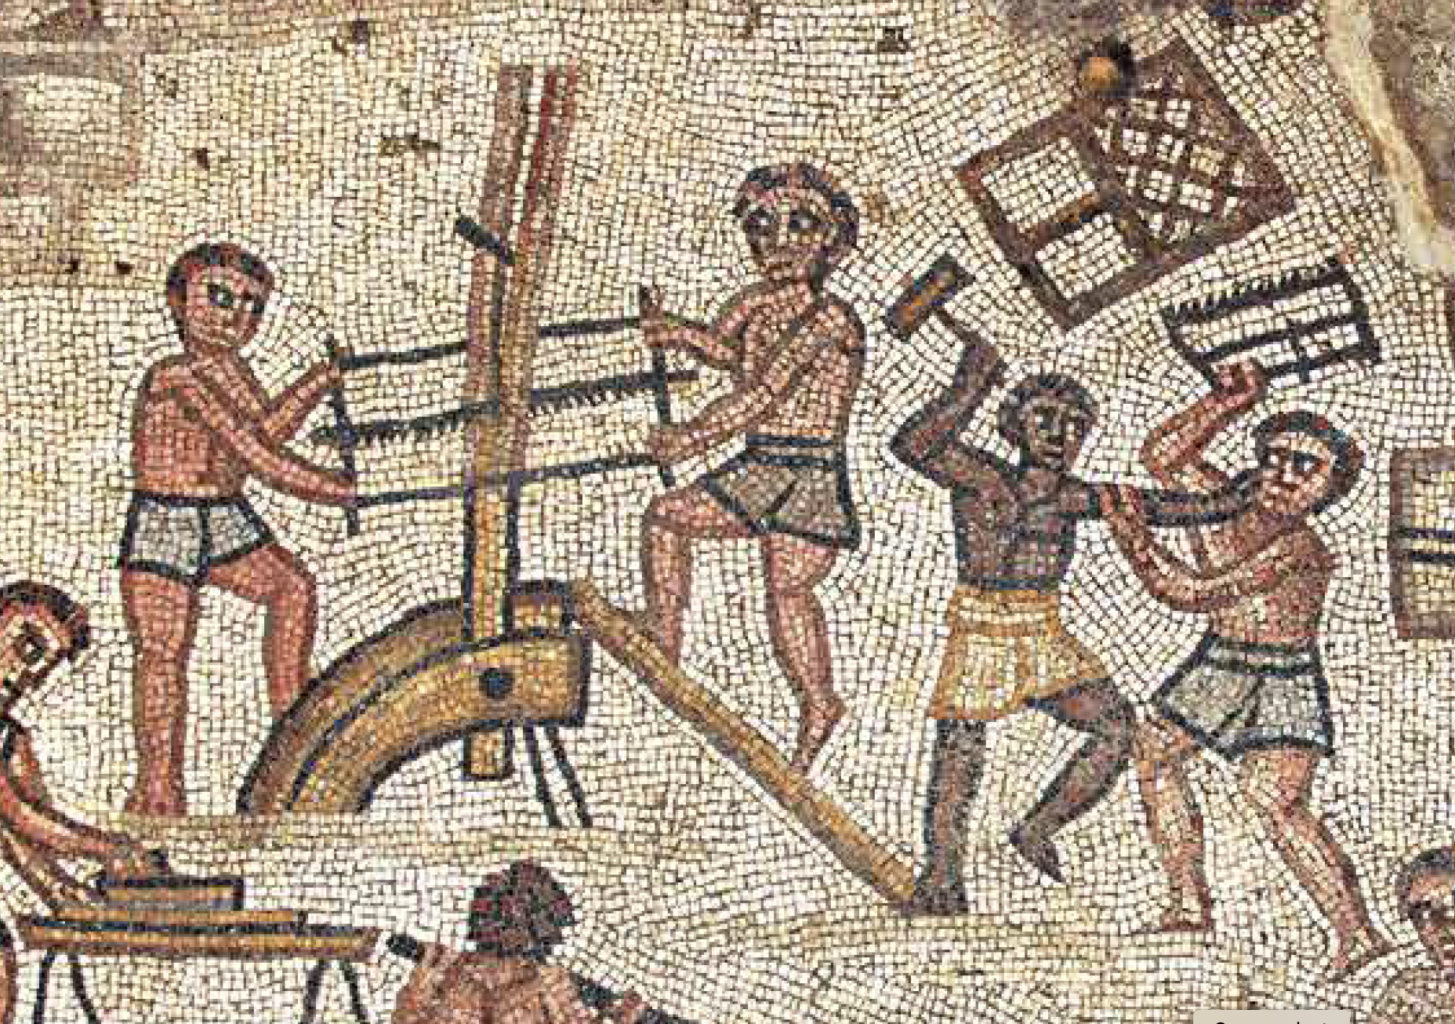
Somehow the stunning mosaics unearthed at the Huqoq synagogue during the last 12 years have escaped my attention. Reader Richard Mahler pointed them out to me, and I have been thinking about them all week.
The mosaic I have been poring over is the one depicting the construction of the Tower of Babel. There are stoneworkers (yawn). A crane taking materials to the top (kinda yawn). A guy adzing a post (!). A guy planing on a bench (!!). Sawing boards Egyptian style (!!!). And a fight with mallets vs. a bowsaw (!!!!). And an interesting window.
There is some interesting woodworking stuff in these mosaics. Let’s start with the guys ripping a board that is standing upright.
The synagogue was built in the early 5th century (C.E.), and yet here we have two guys ripping a plank in a clearly ancient Egyptian style. The plank is vertical and secured in place at the ground, and the workers are sawing down with a wedge in place to help keep the kerf open.
Ancient Egyptian sawyers were depicted working exactly this way with one exception. The ancient Egyptians used a bronze saw – it looks like a Japanese saw. With the teeth set to only one side of the blade.
The Romans here use a frame saw. As far as we know the Romans and Greeks invented frame saws and handplanes. So this is a real interesting transitional scene.
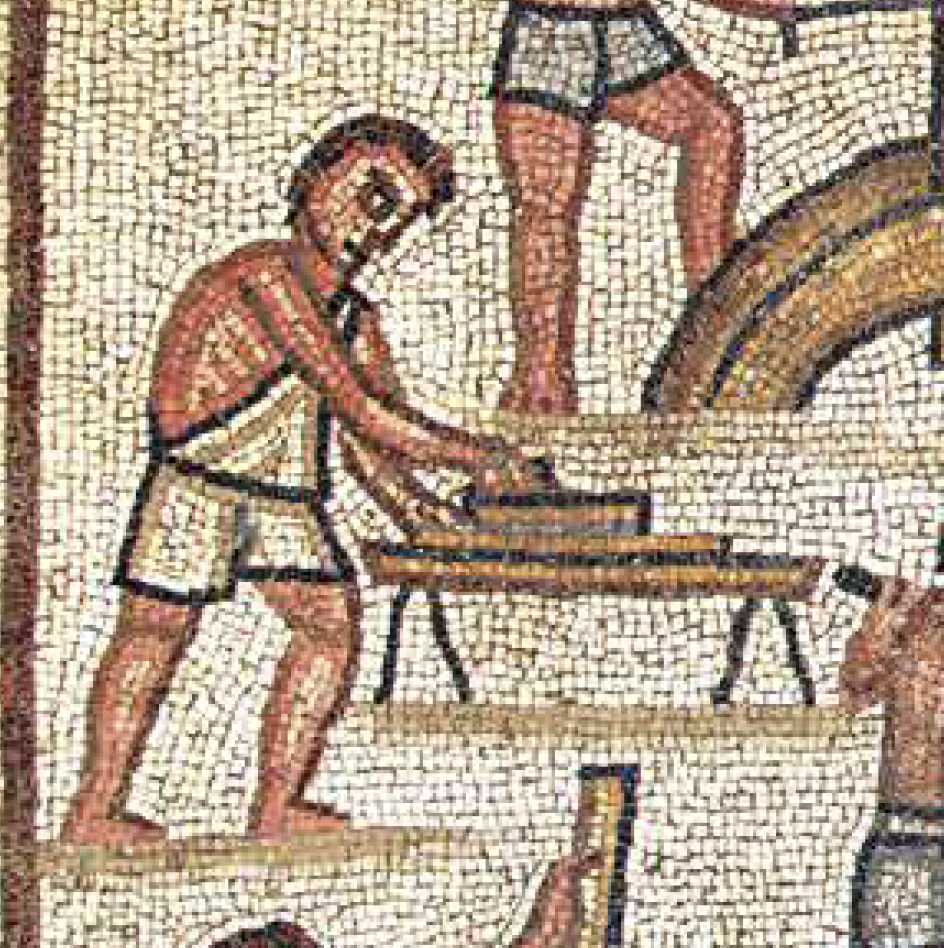
Next we have a guy working the side of a plank with an adze. The post is vertical. Again this is something you see in ancient Egyptian imagery. Later, adzes were shown with longer handles with the work on the floor. Though the handheld adze used vertically still survives in some cultures to this day.
And the workbench. My immediate reaction was: Look at that low Roman workbench. But 2 seconds later my head said: But why is the worker standing up as he planes a board on it? Do we have a problem here because this is a pre-perspective image? (Yes.) But does that explain why he is standing up? (No.)
So we just have to accept that maybe we don’t know what the artist saw. The worker holds the board with his left hand as he planes with his right. There is no evidence of a planing stop.
And finally we have a nice window and a fight between two workers: one holding a bowsaw and the other holding a mallet. The story of the Tower of Babel is about humanity’s attempt to build a tower to heaven. God cursed the workers and made them speak different languages. Chaos ensued.
One amazing thing: Early black woodworker. The earliest image I know.
Second thing: My money is on the guy with a mallet.
Note the notch. Other benches feature a notch on the long edge of the benchtop that could be used for cutting tenons or sawing out fretwork. This illustration is from about 1505 in Nuremburg. The painting is the “Holy Family,” part of a 10-panel work by Bernhard Strigel. PAINTING: GERMANISCHES NATIONALMUSEUM, NÜRNBERG (LEIHGABE DER BAYERISCHEN STAATSGEMÄLDESAMMLUNG)
The following is excerpted from “Ingenious Mechanicks,” by Christopher Schwarz. This book is a journey into the past. It takes the reader from Pompeii, which features the oldest image of a Western bench, to a Roman fort in Germany to inspect the oldest surviving workbench, and finally to Christopher’s shop in Covington, where he recreated three historical workbenches and dozens of early jigs. This specific excerpt is by Suzanne Ellison who is a regular poster for Lost Art Press and did historical research for the book.
It is not surprising to see low Roman workbenches in Italy or any of the former Roman provinces. By mapping our bench discoveries, we found a strong relationship to locations along the Roman roads and trade routes that continued into the early decades of the 18th century.
After mapping the Spanish workbenches, I put an overlay of the Roman roads of Hispania and found, with a few exceptions, the plot points fell along or very near the Via Augusta (formerly the Via Herculea). Via Augusta, one of the major commercial Roman roads, ran along the Mediterranean coast from the Pyrenees in the northeast, through Valencia, diverted inland to Seville and ended back on the coast at Cadiz. Eight workbenches fall along the Via Augusta, with six benches from Valencia and Seville.
Via Augusta. Many workbenches we found in Spain showed up along the Roman road called Via Augusta (in red). MAPS BY BRENDAN GAFFNEY
Of the 38 low, Roman-type workbenches we espied, we found 21 benches (or 55 percent) that date from the first decade of the 16th century to the end of the 18th century. You can thank St. Joseph for that. Thirteen benches were in paintings from Italy and eight from Spain. But wait, the Kingdom of Naples was part of the Spanish Empire for most of the 1442 to 1714 time period. We have cross-pollination! For instance, Jose de Ribera, a major artist from Valencia, completed his mature work in Naples. Luca Giordano, from Naples, spent a decade in Madrid as court painter for Charles II. Adjusting the numbers results in almost a 50-50 split, with 10 benches for Italy and 11 for Spain.
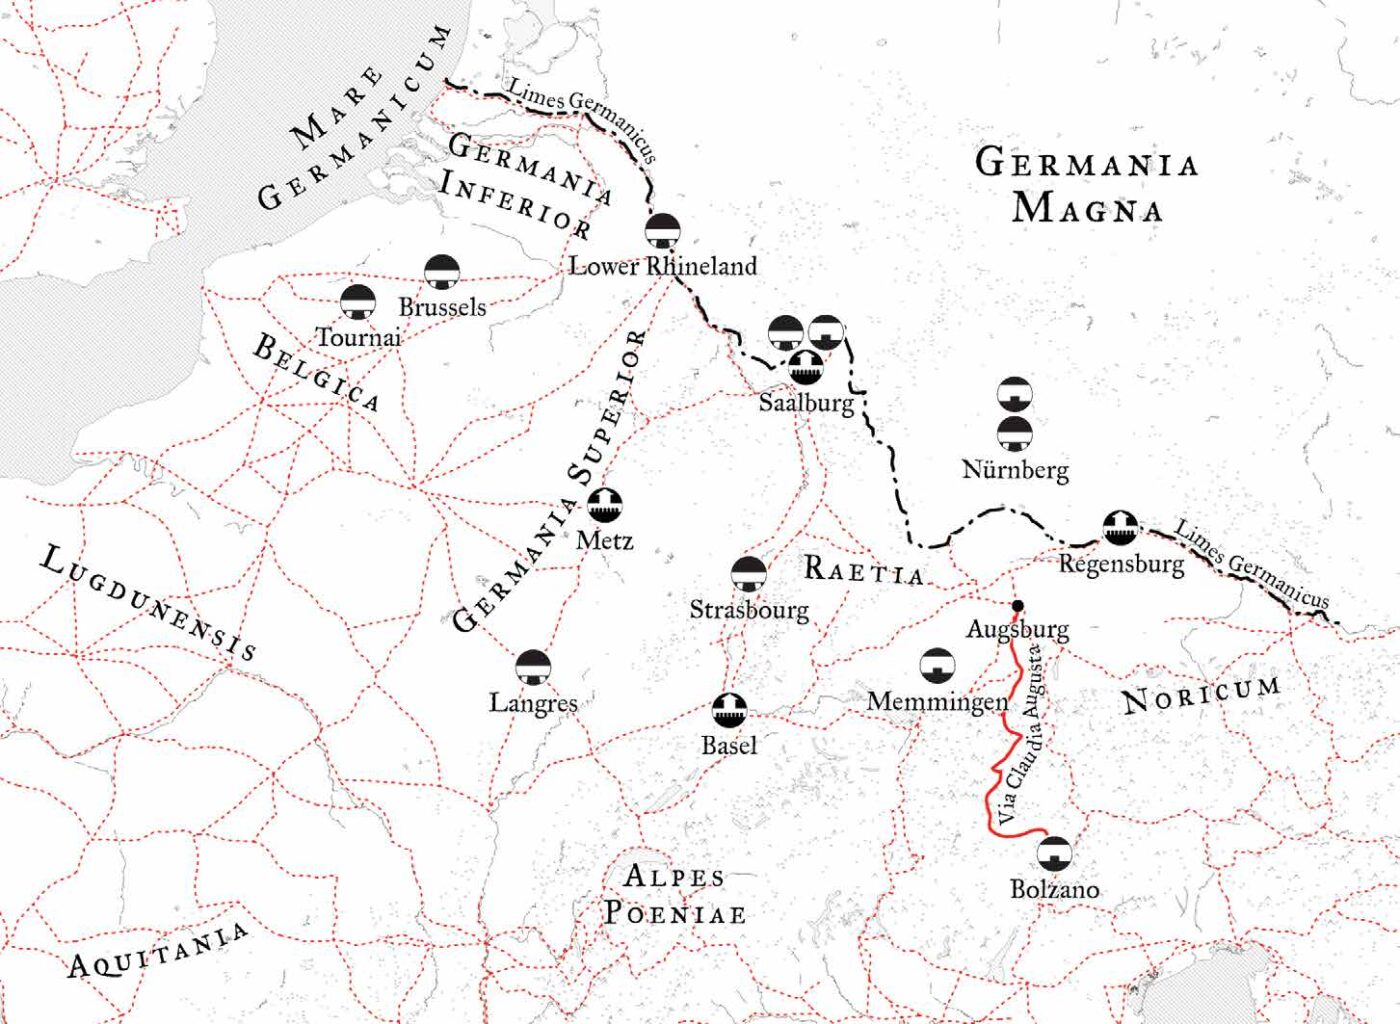
The Limes. The northern border of the Roman Empire – the dotted line above – was called the Limes Germanicus. Here you can see the benches and their relationship to the frontier.
Some features of the low Italian and Spanish workbenches are a massive top with or without a face vise, a twin-screw vise, an early crochet (possibly the earliest depiction so far) and unusual planing stops. Oh yes, two benches with squared-off notches on the bench ends also turned up in our searches. One of the benches would help solve those mysterious notches on the 2nd-century Roman workbench from Saalburg.
The Mystery of the Notches
Beginning with the extant Saalburg workbench, we found seven benches with notches on the side or end of the benchtop. The Saalburg bench and three 16th-century benches have a fairly close regional distribution, while the examples with a notch in the bench ends are from Italy and Spain. The seventh bench has a side notch and originates from the New Kingdom of Granada in present-day Colombia.
The three 16th-century notched benches are from Memmingen (“Holy Family” by Bernhard Strigel), Nürnberg (Löffelholz bench) in southwest Germany and Bolzano (the Hans Kipferle panel) in northern Italy. The German benches are both dated 1505 and the Italian bench is dated 1561. When these benches are mapped along with the Saalburg bench, possible connections start to emerge. The Via Claudia Augusta, the Roman road that connected the Po River valley with the Raetia province (southern Germany), ran through Bolzano and across the Alps (it is a different road than Via Augusta). The road terminated at the capital of Raetia, Augusta Vindelicorum (present-day Augsburg). A branch off Via Claudia Augusta leads to the Roman city that became Kempten, just south of Memmingen.
Through the Middle Ages, the two main routes to cross the Alps converged in Bolzano and led to Augsburg: the Via Claudia Augusta through the Reschenpass and the Brenner route through the Brenner Pass. East-west Roman roads through Augsburg later also became important trade routes, turning the city into a commercial center. Similarly, Nürnberg benefited from the northsouth trade route it shared with Augsburg. The route was a portion of the Amber Road that linked southern Italy with the north and Baltic Seas. Trade routes were also information routes for cultures and technology. In the 15th and 16th centuries, this part of the former Roman Empire (and later Holy Roman Empire) experienced a cultural flowering. Considering the lengthy Roman presence in this region and the continued use of the trade routes, it is possible the side-notch feature survived and was in use on woodworking benches until at least the mid-16th century.
Local color. Keep your eyes open when in museums. Thanks to Suzanne Ellison’s sharp eye, this painting provided an important clue about the use of notches in workbenches. And the painting happened to be right up the road from me in Indianapolis.
The two end notches were in paintings from Ravenna, Italy, and Madrid, Spain. The Madrid painting, “Dream of Saint Joseph,” by Luca Giordano, shows a wedge in the notch and was a key to solving the “Saalburg mystery.” I found the image in mid-July and sent it with a few dozen other images to Chris. About a month later while verifying dates, titles, artists and locations of all the paintings I gave “The Dream” a closer look. St. Joseph’s side of the painting has an appealing composition with tremendous detail. One tremendous detail struck me in particular and that evening I emailed Chris asking if he had seen this detail before. The next morning he answered, and you can read about how the notches and wedges work in Chapter 5.
The last bench is from the New World when Colombia was a Spanish colony. The notch is sharply defined and dovetail-shaped. The email I sent to Chris with the image was titled, “Oh Look! What is that Notch in the Bench?” and two minutes later Chris’ response was a joyful expletive.
Traditional shop in miniature. This workbench scene, owned by tool collector John Sindelar, shows a complete, functioning shop. But what if you don’t own a bench?
The following is excerpted from “The Anarchist’s Workbench,” by Christopher Schwarz. The book is – on the one hand – a detailed plan for a simple workbench that can be built using construction lumber and basic woodworking tools. But it’s also the story of Schwarz’s 20-year journey researching, building and refining historical workbenches until there was nothing left to improve.
Along the way, Schwarz quits his corporate job, builds a publishing company founded on the principles of mutualism and moves into an 1896 German barroom in a red-light district, where he now builds furniture, publishes books and tries to live as an aesthetic anarchist. Oh – and the PDF of the book is free (see the first sentence at this link.)
There’s only one reason that the cheap-o workbench industry exists. And that’s because people think they need a workbench to build a workbench (or are truly delusional and think it will be fine for furniture making).
So many woodworkers I’ve met have spent $200 to $500 on a bench that isn’t worth the BTUs to burn. The things wobble like a broken finger. The vises hold like the handshake of a creepy vacuum salesman. They are too lightweight for even mild planing tasks.
You don’t need one of these benches to someday construct a “real” bench. In fact, I build benches all the time without the assistance of a workbench. It’s easy. Start with sawhorses. Glue up the benchtop on the sawhorses. Sawhorses + benchtop = ersatz bench. Now build the workbench’s base on top of that ersatz bench. Put the base and the benchtop together. You’re done.
If you want a temporary workbench until you build a “real” workbench, there are ways to get the job done with just a little money and a little frustration. This brief chapter seeks to give you some options. I know that some of you will insist on buying something as soon as you anoint yourself a woodworker. It’s an instinct we’re trained into as consumers. Here are a few things to put in your shopping cart instead of a cheap workbench:
Buy an industrial steel packing table with a hardwood top. You can get these from many, many suppliers (McMaster-Carr is one). These feature a heavy welded steel base and a wooden top that’s maple, if you’re lucky. These metal tables don’t rack like a cheap workbench and cost less (way less if you find a used one). You can screw thin pieces of wood to the top as planing stops so you can plane the faces of boards and legs and the like. And get a large handscrew clamp to stabilize boards when planing them on edge. These packing tables don’t come with any vises, of course, but you can fix that with your credit card.
Buy a couple bar clamps (you’ll need clamps no matter what) that are long enough to span the width of the top of the packing table. Screw a 4×4 below the benchtop right at the front edge of the top – this will allow you to clamp your work to the front edge of the benchtop so you can work on boards’ edges and ends.
That’s one solution. How about a simpler approach?
Use your kitchen cabinets, kitchen table or dining table as the workbench. You can clamp planing stops to the tabletop (you’ll need a couple F-style clamps for this). Don’t forget to buy a large handscrew clamp to help stabilize boards when planing them on edge on the tabletop.
For working on edges and ends of boards, buy a commercial Moxon vise, which you can clamp to any tabletop or countertop. This vise will let you work on the edges and ends of boards. Even after you build a “real” workbench, you’ll continue to use the Moxon and the handscrews.
Is that still too much money? Do you have a public park nearby?
Use a picnic table. Drive nails or screws into the top to serve as planing stops. With a picnic table you get both high and low working surfaces. You can drive some nails into the picnic table’s benches to act as a planing stop and use them like a Roman workbench.
Buy a couple big handscrew clamps (every woodworker needs these anyway). Clamp or screw these handscrews to the picnic table so they work like vises so you can work on boards’ edges or ends.
Here are other time-honored solutions I have observed in the wild.
Take four pieces of 3/4″ x 24″ x 96″ CDX cheap-o plywood and screw them together face to face to make a 3″-thick benchtop. Screw this benchtop to a used metal desk. The old metal desks that populated schools, warehouses and government offices are ugly, cheap and widely available. They are almost all 30″ high. Add a 3″-thick benchtop and you are in the right height range for most Americans. Some of these desks have MDF desktops. Some have sheet metal tops. Either way, you can screw your plywood benchtop to the desk. Bonus: The drawers give you tool storage. Add workholding as above.
Conscript an old dresser/bureau. This is a three- or four-drawer cabinet for storing clothes. One 19th-century book I read showed how to turn this into a workbench. Attach planing stops to the top of the bureau/dresser. For sawing, keep it simple – use 5-gallon buckets as sawbenches (thanks for that tip, Mike Siemsen). You also could clamp a Moxon vise to the top. The lower drawers are for storing tools. The upper drawer can catch sawdust (not my idea – it was mentioned in the book).
The Apocalypse Workbench When I teach or demonstrate woodworking on the road, the venue is occasionally luxurious and other times it’s more like “Lord of the Flies.” I’ve showed up at woodworking clubs where the workbench on offer was a folding table with metal legs and a particleboard top.
After years of encountering this problem, I learned to travel with an emergency kit of things that allowed me to work without bursting into sweat and tears in front of an audience. Here’s the kit:
Two large handscrews
Two 36″ bar clamps
Two F-style clamps (usually with 12″ bars)
Thin strips of plywood, usually 3″ x 24″ and in two thicknesses: 1/4″ and 1/2″
Small clamping pads of scrap plywood, to prevent denting my work when I pinch it
A few softwood shims
A couple simple bench hooks for sawing.
This kit has converted many desks and tables into somewhat-functioning workbenches. The handscrews and bar clamps act as face vises. The plywood scraps can be made into planing stops for planing with the grain or across it. And the F-style clamps can clamp my work – or other clamps – to the tabletop.
To be sure, I’m always happy to return home to my workbench. But until I find a way to fit it in an airplane’s overhead compartment, this kit has become a way that I can work almost anywhere.