Saint Maud’s – a community workshop in northern Wisconsin – just started a 38-week course for 4-H kids to build the armchair in “Build a Chair from Bulls%$t.” Check out the first video here.
They’ll be posting videos on Instagram of the kids as they build their chairs. We’re going to follow along. You can, too. Here’s their Instagram feed. And their Facebook page.
The public workshop resides in a decommissioned Catholic church (hence the “saint” part). And the “Maud?” That was the name of a beloved family dog. (It’s not a religious school. I don’t even know if there is a Saint Maud….)
It’s a great little organization. In addition to the public workshop, they operate a “Sloyd Bus” that travels to surrounding communities to spread the love of handwork to kids. Read more about the Sloyd Bus here.
The workshop was started by Karl and Charlie Zinsmaster in 2022. Charlie (the father) is a long-time community leader. Karl (the son) has a degree in furniture design and worked in New York City and Minnesota before returning home to start the workshop.
We’re all thrilled to see this. The book (which is free to download) is supposed to make chairmaking accessible to anyone with basic tools and home center materials. We can’t wait to see the chairs come together during the coming weeks.
Dr. Mike Epworth with one of his chairs inspired by Jimmy Possum chairs.
I am particularly excited to announce that we will publish a book about the Jimmy Possum chair tradition by Dr. Mike Epworth, who has spent decades studying, researching and building these remarkable Australian folk chairs.
The book’s working title is “Wild Line: The Past and Future of the Jimmy Possum Chairmaking Tradition.” We don’t have a publication date yet, but I suspect it will be a short wait for this book. Epworth has been building up to write this book during his entire adult life.
The Jimmy Possum chair is a form unique to Australia that was born in the Meander Valley of Tasmania in the 19th century. The way the chair is made is ingenious. The front legs of the chair pass through the seat to support the arm. The back legs also pass through the seat at an angle. They also support the arm, and the angle of the back leg provides the rake needed to stabilize the chair.
There are many stories and legends attached to the chair. And the chair has seen many iterations from different makers.
Epworth’s book promises to plumb the history of the chair and the families who built it. But the book will go much further than that – exploring the revival of the chair in the 20th century and plotting out a future for it.
A scale model of a Jimmy Possum chair made by Epworth.
“In the turning of the drawknife, the sound of timber splitting, there remains what Walter Benjamin called the ‘aura’ of the handmade: that trace of presence which cannot be reproduced or perfected, only renewed. It is the slow shimmer of memory held in matter, the conversation between what was made and what is yet to be made,” Epworth writes. “To follow the wild line is to resist the smooth surfaces of modernity, to stay close to the irregular, the felt, the human. The Jimmy Possum tradition, like the land, is never finished. It waits for the next hand, the next imagination, the next making.”
Epworth now builds the chair (and teaches others to build it) using tools and workholding that fit into a backpack. And he uses recycled materials to make his chairs. Many times his classes are for non-woodworkers, and he uses the chair as a way to build community and memory among the classmates.
If you want to read more about Epworth’s interesting work, here are some links to follow:
During my trip to Australia last month I got to see a number of original Jimmy Possum chairs at The Australian Centre for Rare Arts & Forgotten Trades. And I got to meet Epworth and his partner, Bronwyn Harm, who has been taking photos and videos to support Epworth’s research.
All this quickly convinced me that readers would love a book on this chair. I can’t wait to read it.
Students from my most recent Chairmaker’s Toolbox class, October 2025. I like to foreground the “toolbox” part of the name 🙂
Among the woodworking charities Chris and I support, and to which we donate our time and teaching to every year, is The Chairmaker’s Toolbox (CMT). This organization, founded by Aspen Golann, works to remove barriers to learning by championing woodworking education for those who have been underserved in traditional woodworking shops – particularly in the disappearance of woodworking education in our schools.
Right now is the annual CMT fund drive. Your tax deductible monthly gift could help to sponsor scholarships for new makers and aspiring instructors, support meal and travel stipends for class assistants, covert postage and packing for donated tools and more! (And you’ll get a cool limited-edition sheet of stickers featuring chairs made in in 2025 classes.) Any amount helps! Or make a one-time donation by November 14 and get a nifty tote bag printed with a logo designed by Tahm Lytle.
YELLOW PINE, HOT SPRINGS, ARK. After years of working with yellow pine on our Arkansas farm, I convinced myself it was an ideal wood for a workbench.
The following is excerpted from “The Anarchist’s Workbench,” by Christopher Schwarz. The book is – on the one hand – a detailed plan for a simple workbench that can be built using construction lumber and basic woodworking tools. But it’s also the story of Schwarz’s 20-year journey researching, building and refining historical workbenches until there was nothing left to improve.
Along the way, Schwarz quits his corporate job, builds a publishing company founded on the principles of mutualism and moves into an 1896 German barroom in a red-light district, where he now builds furniture, publishes books and tries to live as an aesthetic anarchist. Oh – and the PDF of the book is free (see the first sentence at this link.)
This following chapter should be the shortest one in the book and should consist of only the following paragraph.
The wood for your workbench should be the heaviest and cheapest stuff that you can obtain with great ease. Let it dry a bit before you build your bench. When you mill it, discard any bits that twist a lot or split.
Sadly, I know that paragraph won’t do because first-time bench-builders have enormous anxiety about every aspect of the project, especially the wood. And people who have built only one workbench (or watched a guy do it once) have fierce opinions on the topic that they spread far and wide.
The truth is that the number of wood species that are questionable for building a workbench is tiny. So, let’s talk about those first. Here are the woods I would avoid, if possible.
White Pines I’ve built benches with white pines and they are sub-optimal for a couple reasons: weight and hardness. They are strong enough; mostly I object to how lightweight they are. A good furniture maker’s bench should be heavy so that it won’t move or shake while you work. White pines are remarkably lightweight, which is a great characteristic when making a tool chest (which should be mobile). [Editor’s note: Dude. That’s my bench you’re dissing. I weighed it down. It’s fine.]
A typical cubic foot of Eastern white pine (Pinus strobus) weighs 25 lbs. at 12 percent moisture content. A typical cubic foot of hard maple (Acer saccharum) is 44 pounds. That’s a big difference. Also, white pines dent when you look at them sideways. That’s not a deal killer, but it’s annoying.
Bottom line: I’ll use white pines for some parts in a bench, such as the stretchers or shelf boards, when the rest of the bench is made from dense stuff. But an all-white-pine bench is not my first choice.
WHITE PINE WORKBENCH, 2010 Megan Fitzpatrick’s second workbench was built using white pine offcuts from a log home.
Eschew Exotics The other extreme is to build your bench out of a wood with properties more like steel than cellulose. Purpleheart (Peltogyne spp.) is a prime example. A cubic foot of this atrocity weighs 56 lbs. at 12 percent moisture content. That weight seems ideal for the bench builder who wants mass. But working with it is agonizing. It brutalizes your tools, both hand and power. (Plus it looks like a Smurf with a skin disease.) Ipe (Handroanthus spp.) is another prime example. A cubic foot weighs a ridiculous 69 lbs. Cutting it with regular woodworking tools is like trying to gum a carrot to death.
Plus, these woods are stupid expensive compared to the woods easily available to a North American woodworker. If I lived in South America and could purchase these woods for a reasonable price, I’d probably give them some love. But here in the Northern Hemisphere, there are many cheaper woods that are plenty heavy and easier to work.
CHERRY SLABS, COLUMBUS, OHIO, 2010 At first glance, the slabs seemed big enough and sound enough to make a workbench. But the rot caused some problems.
Avoid Spongy Woods If a tree has been sitting on the ground a while, it’s likely that decay has set in. And the bugs built this city on rot and mold. Some of these trees end up at your lumberyard, especially if the seller deals in live-edge slabs or big pieces of wood for fireplace mantles.
Semi-rotted wood is fine for a conference table or fireplace mantle. That’s because it won’t see much abuse (and it likely will see a lot of epoxy). But if you put that same wood in a workbench, disaster might find you.
One of my workbenches had a thick benchtop of black cherry (Prunus serotina) that had been sitting out in the parking lot of a woodworking shop for a couple seasons. The price ($0.00) was right, and I could see some areas of the top were spongy. So, I filled these voids with a flexible epoxy that I tinted black. This was in 2010, and – oh my lord I just realized that this fact puts me at the forefront of the “bigslabs with epoxy pour” movement. Kill me.
Anyway, the epoxy wasn’t strong enough to stabilize the entire cherry slab for use as a benchtop. And during a public event a couple years later, Roy Underhill knocked a chunk off the benchtop while setting a holdfast in it. (And that’s why there are now two giant lag screws in its front edge.)
So, check any slabs for punkiness before purchasing. Probe any dis- colored areas with a pocket-knife, which will plunge into the bits that are too soft. Here’s one more clue: If you pick up a slab and it seems entirely too lightweight, it’s probably been turned into a Golden Corral by the insect world. Put the slab back.
REPAIR TO A ROTTED SECTION Despite the epoxy, a chunk of the bench had to be bolted back on.
Some Red Herrings If you remove the above three kinds of woods from your list of potential species, you still have an enormous range from which to choose.But some people will insist that you narrow it down even more. Don’t let them. Some people just like to be a bossy-pants, and so they come up with other hurdles for you to leap over when choosing a wood. Here are some dumb pieces of advice trying to lead you astray.
Use only light-colored species. This advice seems to make sense at first. A lightly colored bench will reflect light in a dark shop. It also will be easy to sight your plane soles against the benchtop to deter- mine if its cutter is centered in the mouth.
But in reality, its hue doesn’t make a ding-dong bit of difference.
Light-colored benches become dark with age. Dark-colored benches become light with age. Everything ends up as middling brown. I’ve seen old maple benches that look like walnut. And old walnut benches that look like maple. And working on either of these benches is no problem whatsoever. If you are struggling, sight that plane sole against a piece of wood on your bench. Or the floor. Or a piece of paper.
I’d probably pass on building an ebony bench because it’s just an expensively dumb choice for a workbench. But if I had some nice walnut or cherry that was dirt cheap and thick, I’d turn it into a bench without remorse.
Dumb advice, part two: Use only a closed-pore or diffuse-pore species. The theory here is that if you use an open-pored species, such as ash or oak, then the pores might collect metal filings or other debris that will scratch your work. I have never, ever found this to be a problem. Oak, ash and other open-pore species are great for building workbenches.
Part three: Use only hardwood for your benchtop. Again, this seems to make sense on the surface. A hard benchtop is nice. But “hard- woods” aren’t always hard. Basswood (Tilia americana) is an American hardwood. But it’s as easily dented as Eastern white pine. If a hard benchtop is your goal, then you need to start comparing the different Janka ratings of the species on your short list.
Janka hardness is a number that expresses the pounds of force required to push a steel ball (that is .444″ in diameter) halfway into a board. It’s a number you can easily look up if you want to go down the Janka rabbit hole.
I tend to lurk around the rim of the Janka rabbit hole. If the wood is really soft (Eastern white pine’s Janka rating is 380 pounds-force) I want to know that before I get building. (By way of comparison, hardmaple’s Janka rating is 1,450 pounds-force. Ipe’s is a ridiculous 3,510
pounds-force.) The hardness of a species is something to consider, but
it’s not my first concern. So, what is?
How much the wood costs, per pound.
That might sound weird. Let’s talk about it.
Let’s Talk About Weight When you compare the weights of species, you need to make sure the comparisons are all at the same moisture content (12 percent is the typical comparison unit). You can compare the density of a species by comparing its “specific gravity,” which is a method that compares the weight to a cubic meter of water. Or you can look at the average dried weight of a cubic foot of the wood (also at 12 percent moisture content).
These are useful, but I think you can also make some important comparisons by factoring in the local price of a species. It’s like buying meat at the butcher. Is rib eye ritzier than hamburger? The price per pound helps us answer that question (and yes, it is).
For example, a cubic foot of hard maple consists of 12 board feet of maple. If maple is $4.73 a board foot, then a cubic foot of maple costs $56.76. That cubic foot weighs 44 lbs. Or $1.29/pound.
Longleaf pine (a yellow pine) is 78 cents a board foot (for No. 1 grade), so a cubic foot costs $9.40. That cubic foot weighs 41 lbs. Or a remarkably cheap 23 cents per pound.
Because I live to poke fun at Ipe, let’s run those numbers. Ipe costs $17 a board foot, so a cubic foot costs $204. That cubic foot weighs 69 lbs. So Ipe is $2.96/pound. Not a great deal at the wood butcher’s.
The chart (below) compares some of the common U.S. hardwoods and softwoods using typical Midwestern retail prices circa 2020 (this is not wholesale or trade pricing). This cost-per-pound calculation is simple to do yourself using your local prices.
Here’s how: Take your cost per board foot (use 8/4 prices) and multiply that by 12. That’s the cost for a cubic foot. Now divide that number by the weight of a cubic foot of that species (a statistic that is easily found in books and online). The result is the cost per pound.
Do the Math From the chart, ash looks like a good choice among the hardwoods. The problem with that assessment is that by the time you are reading this book, white ash might be almost extinct. The emerald ash borer has devastated the ash forests in the United States. So, you might not be able to buy it at any price. And if you do find it, you want to ensure it hasn’t rotted. We have been plagued by punky ash for the last few years as the sawyers have milled up trees that have been standing dead.
Aside from ash, poplar and the maples are a great bang for the buck. Both are easy to work, readily available and fairly cheap by the pound. I’ve made workbenches using all three species and think they’re fine. Neither is considered a noble species for a workbench, like European beech. But as long as you aren’t out to impress anyone, go for it. You’ll have no problem finding those species at almost any lumberyard in America.
But if you want to go full redneck, read on.
Softwoods that are used for structural members in home construction – the yellow pines, Douglas fir, hemlock and some spruces – are an outstanding value. They are heavy, cheap and readily available at any lumberyard. After working with them most of my life in residential construction and workbench building, they remain my No. 1 choice for workbenches.
Here’s why: Anyone can buy it. You don’t have to search out a specialty lumberyard or set up a commercial account. Just go to the home center if you want (though I always prefer family lumberyards). They have plenty.
Also important: They have plenty. A typical home center or family lumberyard will have hundreds of planks of 2x material in the racks on any given day – everything from 2x6s to 2x12s – with lengths from 8′ to 16′. At a home center, you can spend hours sifting through the racks to find the best boards – the employees don’t care. At a family lumberyard it pays to ask permission (they will sometimes be happy to help you). Either way, just be sure to restack the lumber nicer than you found it.
Here’s another buying tip: Some lumberyard chains carry No. 2 yellow pine, others carry No. 1. The price difference is minimal, but the quality isn’t. No. 1 is worth the extra nickels. If you find a yard that deals in No. 1, you might be able to buy all the wood for your bench in one swoop. If you buy No. 2, you might have to hit all the yards in your town, county or region.
YELLOW PINE NEEDLES, HOT SPRINGS, ARK. Yellow pines are identified by how their needles are bundled on a twig. Yellow pines typically have two, three or five needles per fascicle (or bundle).
Yellow pine is easy to work. I’ve built yellow pine workbenches using only hand tools, and using a full-on machine shop. It’s friendly stuff. Yes, there can be some knots, but if you pick your boards with care, you’ll have almost none of those to deal with.
So there must be disadvantages. Yes, but they are slight. Construction lumber is sold in a wetter state than hardwood lumber. While hardwoods are typically sold at about 12 percent moisture content (or at equilibrium with some environment) that is not the case with construction lumber. It is wetter.
How wet? In the Midwest it might be 15-20 percent moisture content. On the West Coast, it might be even wetter (as in wet enoughto ooze and squirt water). So, you need to gather up what you need to build your bench, cut it to rough length, stack it and wait a bit.
It might also be “case hardened” because it was kiln dried too quickly. When lumber is rushed through a kiln it can develop tension that is released when you cut it. It’s particularly obvious when you rip a board. Sometimes the wood will pinch so hard on a blade it will stop a 3-horsepower table saw like pinching out a candle.
How do you deal with this? It’s not difficult.
1. Plan to cut things a bit over-wide. And have some wooden wedges handy to keep the kerf open when you rip the wood. After that first rip, a case-hardened board will usually lose all of its fight.
2. Make your rip cut to a shallow depth at first – less than half the thickness of the board. Then raise the blade, flip the board end-over-end and finish the rip.
The final disadvantage: Softwoods are uber-redneck. No one is going to “ooh and ahh” over your choice of yellow pine. It’s the mullet of the forest.
$175 WORKBENCH AFTER 20 YEARS OF USE, 2020 The yellow pine in this workbench is now about as hard as maple and moves little with the seasons.
The True Cost of Yellow Pine Per Pound I’m not a trusting soul. After I calculated the cost of yellow pine per pound (23 cents) based on published statistics, I decided to see if that worked in the real world. So, I weighed several 2x12x8s and came up with an average weight of 30.4 pounds each.
These were boards I’d had in my shop for months, so they had likely lost some of their water weight (as all softwoods do). Plus, the boards in this particular pile were fairly average – not full of sap or with lots of heavy summerwood. In other words, they were a bit on the light-weight side.
Each of these boards cost $8.81 each, so that’s 29 cents per pound – about 6 cents per pound more expensive than the published weight tables indicate. But still a great deal.
I wondered, how did that work out after surfacing the boards and gluing them up? What was the cost per pound of “finished” yellow pine?
Here’s how I calculated that. The benchtop for the workbench at the end of this book is made from nine 2x12s, ripped in half, glued up and planed so the top is 5″ thick. Nine 2×12 x 8s cost $79.29. After gluing up the top, I managed to weigh it on a heavy-duty scale we use for shipping crates. The top weighed 240 pounds. That’s 33 cents per pound. Still a bargain (if you ask me).
POPULAR WOODWORKING, FEBRUARY 2001 The opening spread for the $175 workbench article, my first published workbench plan.
Back to the $175 Workbench As I built the “$175 Workbench” for Popular Woodworking I encountered all the advantages and disadvantages of yellow pine mentioned above. A fair number of the boards were case hardened, so gettingthem ripped and glued up was a challenge. It took two of us to wrangle the laminations for the benchtop.
But, and here’s the kicker, I still own that workbench. And it has taught me other important lessons about construction-grade softwoods, yellow pine in particular. Here are two: It doesn’t move much in service and it gets harder and harder with age.
True and embarrassing fact: When I started woodworking, I assumed that softwoods moved more with the seasons than hardwoods. This was based on working with home center softwoods. I’d buy what I needed and start working it the same day. By the end of the day, the wood would be a warped mess. And sometimes unusable.
The real problem was that the pine was wet and hadn’t acclimated to my workshop. And – here’s another fun fact – all woods tend to move a lot as they expunge that last little bit of water to become at balance with their environment.
So, I was working with pine at the worst possible time.
If you let softwoods dry for a few weeks, the stuff barely moves at all when you plane it and saw it. In general, softwoods move less in service than hardwoods.
I also love how yellow pine gets tougher with age. I’m told that this is because the sap hardens, first to copal then (after a couple million years) into amber. The difference is dramatic. When I purchase newly cut yellow pine, I can dent its soft earlywood with my knuckle or fingernail. After a year or two, it seems as hard as Formica.
My yellow pine bench was still soft and spongy when I finished it in 2000. Soon after that, the magazine had an evening event where we brought in a bunch of local readers. We did this sort of social event every few months or so. Sometimes it was for a focus group. Sometimes it was to test some new tools from a particular manufacturer.
After this event, a bunch of readers gathered around my new workbench and asked questions, which went something like this: “Nice bench but, yellow pine?”
Once again, I was unprepared. All I could manage to say was that it was cheap and heavy. The readers didn’t disagree with me, but they also weren’t impressed.
That’s when I decided to plow into the book “Wood Handbook: Wood as an Engineering Material,” which is published by the U.S. Department of Agriculture. This book is free online – our tax dollars paid for it – and it is filled with all the numbers and terms that will impress people: modulus of elasticity, modulus of rupture, rolling shear strength, tensile strength and (the term that will always get you laid if you bring it up at a bar) Poisson’s ratio. I also learned that most wooden roller coasters and telephone poles are made from yellow pine.
The “Wood Handbook” proved what I knew in my heart: yellow pine is an outstanding workbench material. It is heavy, strong and stiff. I then had the numbers, and I could use them to defend my choice of yellow pine.
However, there’s no need to get into a discussion of those facts and figures. Or to reproduce the tables that explore wood as an engineering material. That’s because any decent design for a workbench renders most of those tabular charts moot. If you make your benchtop so it’s between 4″ and 6″ thick, even balsa wood is technically stiff enough to do the job. Pick a somewhat heavy species, and your thick benchtop will provide all the weight and stiffness you need – even if your bench’s legs are white pine.
In other words, a thick benchtop renders the pointy-headed statistics a bit meaningless. Simply overbuild your bench – especially the benchtop – and almost any species will do
Terry Gordon shows visitors one of the tools he uses at his assembly bench, where he assembles every plane his company makes.
Every plane that HNT Gordon sends out to customers is assembled and inspected by the company’s founder, Terry Gordon. The process takes place at Terry’s workbench near the front of the company’s factory in Alstonville, Australia. There, Terry makes small adjustments to the wood and metal components with a wide variety of tools, from simple chisels to custom-made floats they’ve made on-site.
That’s the way it has been since Terry started the business in 1995, and how he expects it to continue for years to come.
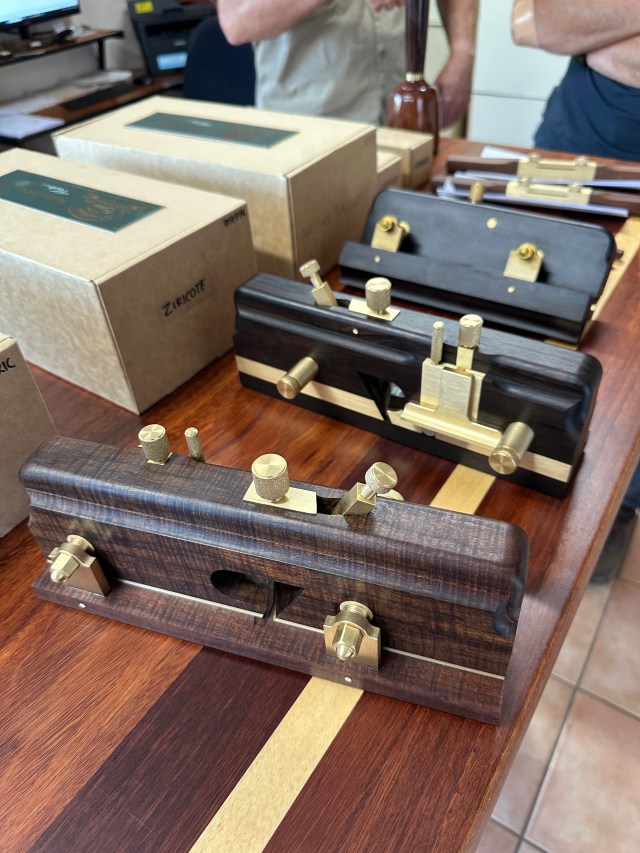
That’s a surprising level of care and dedication for a company that makes more than 50 products, from (fairly) simple smoothing planes up to a moving fililster that is made up of dozens of brass and wooden parts.
Aluminum vises during assembly.
And Terry’s painstaking care shows through all of the company’s products, including its new range of aluminum vises that are unlike any vise I’ve ever seen or used.
This month, Terry loaned a couple of workbenches for a stick chair class I taught in Newrybar, Australia. It was the first chance I ever had to use both his face vises and his tail vises for more than just a few minutes in a showroom. During the week I used the vises with as much gusto as I would at home (I had to work fast and hard because I had to build a chair and teach 11 students to do the same). So the vises got a workout.
They’re fantastic. And I plan to incorporate both the HNT Gordon bench vise and end vise into the next workbench I build (probably next year). And if I can swing the cash, I might even spring for the company’s Pattern Maker’s Vise.
Near the end of last week, I visited the company’s factory for a tour and a look at the range of high and low industrial technologies that Terry uses to make his tools.
The Wood
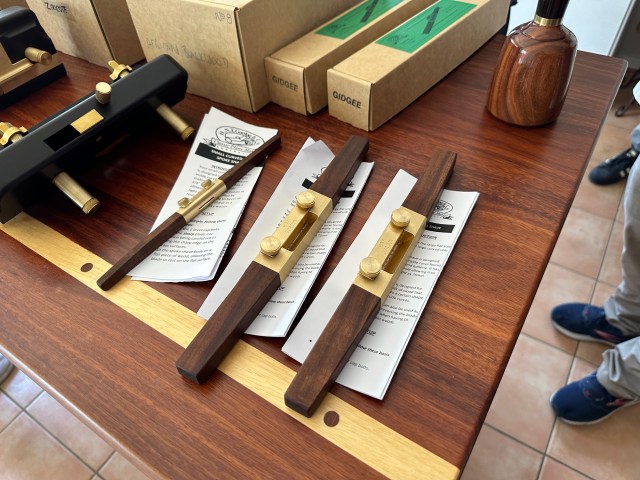
HNT Gordon is known for the dense and stable woods they use in their handplane bodies, particularly ringed gidgee. In many cases, Terry and his employees cut the trees down on farms and slab up the planks. Other times the wood comes from trusted suppliers or occasionally from the customer.
After being cut to size, the wood chunks go into a kiln for several months to get the moisture content down. The blanks are then cut into plane bodies (the company is in the midst of switching to a CNC mill) and then the bodies are further conditioned in a humidity controlled room for even more months until they are ready to be used in a finished plane.
The Brass
Brass parts are made in a variety of ways, from old manual lathes to four-axis milling machines. Many of the latest changes at HNT Gordon involve milling bench plane bodies from one chunk of wood (instead of laminating them from multiple pieces). And simplifying the metalwork by using CNC technology to cut parts from single billets of brass (such as a spokeshave body) instead of assembling the brass bodies from multiple pieces.
The Aluminum
The back of the factory houses the machines that make the parts for vises (and other tools) and the stockpile of parts for future vises. Like all the tools at HNT Gordon, the vises are assembled in small batches.
It’s a small operation (five full-time employees and more part-timers) for a company that makes so much complex work. And Terry’s attention is now focused on training the next generation of toolmakers to carry the company forward.
Moving fillisters – an impressive bit of manufacturing.
In fact, Terry remarked that the company’s plow plane was the last tool he planned to design for his company. He still will assemble tools for the company, but he said he wants to get back to doing what he set out to do before he started making handplanes: And that’s making furniture.
I’m sure we’ll be writing more about HNT Gordon in future blog entries, especially when I start reconfiguring our bench room in January and Megan and I start building a new bench.
Several of my students bought HNT Gordon spokeshaves after our tour and were thrilled with their performance.