Proper proportions. This Shaker classic is one of the best examples of how frame components can influence the character of a cabinet. While the board between the doors does not exactly qualify as a face frame stile, that is one of its functions. Contrast its extreme width with the single-board thickness of the rails between the drawers. (Private collection, Paul Rocheleau)
Unlike most kitchen design books, “Kitchen Think” is a woodworker’s guide to designing and furnishing the kitchen, from a down-to-the-studs renovation to refacing existing cabinets. And she shows you how it can be done without spending a fortune or adding significantly to your local landfill.
Yes, there are hundreds of pretty full-color photos of well-designed kitchens, which are organized into 24 case studies throughout the book. They range from the sculptural (kitchens by Johnny Grey and Wharton Esherick) to kitchens of a more recognizable form.
But there’s also a heavy dose of practical instruction: how to build cabinets efficiently, how to make a basic kitchen island, how to build a wall-hung plate rack. Plus butt-saving advice that comes only from experience – like how to maximize space in inside corners, how to scribe cabinets and countertops into odd spaces and how to make sure you’ve left ample space for hardware.
All of this is built on a foundation of research into kitchens from the past. Hiller’s historical perspective on design might just change your mind about what makes a good kitchen.
Widths of door stiles & rails Bottom rails are almost always wider than top rails on old cabinet and furniture doors. Sometimes stiles are the same width as the top rail (before material is removed for fitting the doors), sometimes not – and sometimes they are dramatically different.
Dimensions of face frame stiles and rails (in addition to where they appear) For example, a true period look for cabinets predating the widespread use of mechanical drawer slides requires intermediate drawer rails. Even if you plan to mount your drawers on full-extension slides, you should incorporate rails between them to evoke the look of those that once supported web frames.
Style is cyclical. The pulls on these metal cabinets found in a garage inspired those Lynette Breton made for her mid-century style kitchen. She made the concave handle detail with a router with a shop-made jig, using a rub collar and core box bit. Before using the router, she bored out the center on the drill press to give the bit a place to plunge into. The core box bit removed the remainder of the waste. The process was more nerve-racking than it might have been because she did this routing after painting the cabinets. The pulls in the center are Bakelite with chrome from Vintage Hardware in Port Townsend, Wash. (vintagehardware.com). (Margaret Stevens Becksvoort)
Hardware What kind of hinges were used, and how were they attached? If the doors were hung on butt hinges, were they mortised into the door and face frame, or only into the door? What is the length of the hinge? How wide are the leaves? Are the pins removable or fixed, and do they have finials? What is the finish?
Hardware position Note the distance of the top and bottom (and center, if applicable) hinges from the ends of the door. Note the position of drawer pulls, doorknobs or latches; door hardware was commonly installed approximately halfway or two-thirds to three-quarters of the way up on base cabinet doors and similarly spaced in the opposite direction for upper doors. They were not usually located in the upper or lower corner, as is typical of cabinet doors today.
Set correctly. When we recreated the pantry in Lauri Hafvenstein’s 1917 house, I followed the original pattern Lauri had seen in a neighbor’s kitchen, with inset doors and half-inset drawer faces.(Lauri Hafvenstein)
Are doors and drawers inset, overlay or half inset? Drawer faces were sometimes half inset even though the doors in the same set of cabinets were fully inset.
Moulding profiles It should go without saying that moulding profiles are important. They can vary enormously and are one of the most distinctive and delightful details in a period kitchen. If you cannot replicate a profile yourself, you can usually have it done in the species of your choice by a millwork shop willing to custom-grind knives. Just be sure you order extra, as there will usually be a hefty set-up charge along with the grinding fee, and different batches can have dimensional variations invisible to the eye but great enough to cause headaches during installation.
Edge treatment of half inset drawer faces These may be eased, quarter-round, beveled or moulded.
Graduated. Notice the proportions of door elements in this elevation of a pantry “dresser” from an 1899 carpenter’s guide. (A gift to the author from Charles Bickford)
Proportions of graduated drawers Along with the proportions of face frames and door components, one of the least-noticed and most critical aspects of historic kitchens is the proportions of drawer faces. Many cabinetmakers make the mistake of building all the drawer faces in a stack to the same size. Not only does this look terrible, because when viewed from above (i.e., from normal standing height), the bottom drawer will inevitably look smaller than the rest, and so, out of scale. It’s also not how drawers were traditionally sized. You can make as many adverse comparisons as you like between 19th-century cabinetmakers and the furniture made by those who worked in the golden zone of northeastern American states during the late 18th century, but even oft-maligned Victorians worked with a tradition grounded in classical proportions. This was one of the first and most important lessons I learned from Roy Griffiths in 1980.
Toe kicks. Flush toe kicks were an option in 1927, and still are today. (1927 Universal millwork catalog)
Toe kicks Are they flush (i.e., does the bottom rail of the face frame go all the way to the floor) or recessed? If the toe kick is partially recessed – i.e., if the face frame stiles extend down to the floor with inset toe kicks between them – note the rhythm of this variation. In some cases the stiles are full-length only at the end of each cabinet run, with the kick recessed everywhere else. In others, the stiles may run down to the floor on each cabinet.
Here’s what I knew about Caleb James before I interviewed him for this profile:
He makes hardwood spokeshaves that are handsome enough to qualify as sculpture, in addition to being a joy to use. The spokeshaves alone made Caleb worthy of a profile.
He makes Danish Modern chairs based on original designs by Hans Wegner, and those chairs are not just comfortable, but marvels of craftsmanship.
He is a devoted family man with a wife and two daughters.
He’s a clean-cut guy who dresses nicely.
He has a refreshingly down-to-earth take on woodworking, especially when it comes to making furniture and tools as a livelihood.
I had no idea that Caleb does all this while living with an auto-immune disorder, nor that he’d spent years making a good living by selling household appliances – never mind that he once dreamed of being a helicopter pilot and went a good way toward achieving that goal before life caused him to change course.
Caleb with his wife, Tracy, and daughters Claire (left) and Petra. (Photo: Kelsey Joy Hefner www.kelseyjoyphoto.com.)
We spoke by phone on a recent weekend. Caleb was working at home, at the end of a street 5 miles from downtown Greenville, S.C., where he and his family have lived for eight years. “All you see is woods at the back of the house,” he told me. There are deer, bears and wild turkeys just outside the back door. A deer was foraging in the woods about 40 yards away as we spoke.
Caleb’s father, Bill James (left), with his uncle, Steve James, in their military uniforms.
The South has always been Caleb’s region. He was born in 1981 in the Gulf Coast town of Ocean Springs, Miss., where his father, a Vietnam War veteran and a framing carpenter by trade, worked for a manufacturer of mobile homes. When Caleb was 5, his parents split up and he moved with his dad to northern Arkansas, which had originally been home to his father’s family. A few years later they moved to Branson, Mo. After that he lived in St. Louis, where his mother had moved to be near her sister and was attending night school through a community college program while supporting herself by waiting tables; following her training she became a legal secretary.
Caleb’s parents with Caleb (in his father’s lap) and his brother Abe.
That’s a lot of moving. By the time Caleb was in ninth grade, he’d attended 11 different schools and was living with extended family and friends while working for his aunt, who ran a roadside fruit stand. At 14 he dropped out of public school and did his best to keep learning while employed as a dishwasher and waiter. He took college courses in air conditioning and appliance repair work, and earned a GED certificate.
At 17 Caleb moved to Texas; his mother, aunt and two brothers were living outside of Houston. His brother ran a stucco business and invited him to work there; they worked in traditional stucco, as well as Drivit, a cladding system that resembles stucco while enhancing a building’s insulation. Working outside in south Texas weather was not a viable long-term gig for “a white kid out in the sun,” as Caleb puts it. “It wasn’t something I thought I would survive at for very long.” Even his hands got sunburned.
He took a job working for a guy who bought used appliances from Sears – the washers, stoves and refrigerators hauled away from homes where customers had replaced them with new ones. His boss sold the used appliances in Mexico. Caleb was in charge of loading the truck that headed south across the border. “We would stack them to the ceiling,” he laughs. “Needless to say, I was in the best shape of my life.” When his boss expanded into buying and selling appliances that were slightly blemished (“scratch and dents”), one of his fellow employees suggested they repair the damaged appliances and retail them locally rather than sell them wholesale. Caleb found he had an uncanny knack for repairing appliances and removing blemishes. Retail sales exploded. The company he worked for initially had three employees; within three years they had 30.
It was steady work that paid well. “I really didn’t think about much more than survival,” he says of that time. Even so, Caleb played a central role in the business and ended up making better money than he’d ever anticipated.
Caleb and Tracy with helicopter.
He wanted to go back to school and train to be a helicopter pilot. Because his father was a disabled veteran, Caleb could go to school under the G.I. Bill until he turned 26. The authorities approved him for the commercial helicopter pilot program, but the Veterans Administration “pulled the payment” shortly before he completed the private pilot portion of the training – he learned that they were legally permitted to do so by some fine print in the G.I. Bill. So he decided to build on his experience with kitchen appliances.
An Appliance Business of Their Own
In late 2003, at the age of 22, Caleb and his brother, Jeremiah, started a business selling blemished appliances of better quality, among them Gaggenau, Wolf, Thermador and Sub-Zero. They focused on kitchen appliances because kitchen remodeling was big business at the time; it was before the Great Recession, which devastated so much of the housing and remodeling market. “If you’ve got a built-in oven and it’s got a ding on the back side, it really makes no difference. We were a perfect option; if you were going to pay $1,000 for an oven, you could buy it from us [instead] for $500 – $600.”
Caleb and Tracy on their wedding day.
Caleb met his wife, Tracy, through their church community in Houston. Both are Jehovah’s Witnesses. Tracy is from the Canadian town of High Prairie in the province of Alberta. Coming from a family of avid travelers, she had set out on her own at 17 to visit friends in Texas. After she and Caleb met at a church service they stayed in touch; about a year and a half later, they were married. It was the only way they could continue their relationship, he notes – “I couldn’t move [to Canada], and she couldn’t move to the States.” They celebrated their 20th anniversary this past May.
“Maybe my first woodworking project for my home,” Caleb calls this. “A plywood box to put my stereo/DVD entertainment components on, circa 2006.”
In around 2006, Caleb bought a table saw at a yard sale so he could build stuff for their home – “You buy your first house, and then you start building furniture,” he says. Plywood was one of his go-to materials. “A turning point was making an end table,” he says. He made the top and aprons, “having really no idea of what I was doing,” then proudly showed the piece to a cabinetmaker friend. “The look on his face was, ‘Wow, this is terrible.’ At that point I realized I really didn’t know what I was doing. I just kind of piddled with woodworking.”
The following year an acquaintance called out of the blue to tell Caleb about a gentleman who was retiring. He wanted to sell his shop equipment and wondered whether Caleb and Jeremiah might be interested in reselling it. They went to take a look. Faced with a 5-horsepower Delta cabinet saw and dust collector going for $275 (for both), Caleb “quickly realized ‘here’s some equipment I want to keep for myself.’ I was always interested in woodworking.” At that point his training consisted of 7th-grade woodshop class, augmented by what he’d learned through exposure to his father’s carpentry work. He started reading books on the subject; specifically, he cites the series of books by Danish-American furniture maker Tage Frid. Rounding out the year, Tracy and Caleb had their first child, Claire, that December.
Caleb grew more and more interested in woodworking. He appreciated the solitude of the work, which he found therapeutic. He was drawn to Danish Modern design, and also experimented with Windsor chairs and tried steam-bending parts in the garage. People would tell him his work was nice and ask whether he made it to sell. “I don’t have time,” he’d respond. He was building furniture at night and on weekends. But when he started to think about leaving the appliance business he posted some work on Etsy. It sold. “Here I am working every day at my normal business,” he continues, “and I get to a point [where I] ask myself ‘what are you doing? Do you just want to work all the time?’” By the time the James’ second daughter, Petra, was born in May, 2011, Caleb had signed the papers to sell his stake in the appliance business to Jeremiah.
Transition to Professional Woodworking
Caleb’s first large orders were for beds. A contact in Houston who had recently taken over a historic hardware storefront in Rice Village wanted to add local handcrafted furniture to his already hard-to-find items. He was already selling his own line of paints that were free of volatile organic compounds, specialty rubber mattresses, and more, and was looking for a craftsman to represent; he figured that if people were spending $8,000 on a mattress, maybe they’d also spend $3,000 or $4,000 on a bed. In addition to building beds, Caleb continued to sell chairs on Etsy and took commissions through an architect in Charleston.
Tracy “is a go-go-go” person, Caleb says; she loves to learn new things and be involved with people. He, on the other hand, “would probably stay and work in my shop and never leave home unless I was forced to.” When they were living in Katy, a suburb of Houston, Tracy took a course in computer drafting and worked part-time as draftsperson for an electrical company. When Caleb and Jeremiah started the appliance business he convinced her to join them; she handled sales and logistics while Caleb ran the warehouse. He calls her “a perfect salesperson. She has a knack for it – probably because she’s genuine.” Her interest in interior design didn’t hurt, either; clients appreciated her enthusiasm and readiness to go beyond the minimum required when dealing with their projects. She grew into the role of sales manager and kept that up until they sold the business in 2011. Tracy continued to do electrical design part-time while Caleb switched to full-time woodworking in his shop at home.
Caleb has had an unnamed auto-immune disorder since his late teens. After the family moved to Greenville in 2013, he became extremely anemic and developed some other health problems. He had discovered he had celiac disease in 2008; other health challenges appeared to stem from this condition. It took about a year to figure out what was going on and get back on track. Caleb now takes many supplements because he doesn’t absorb nutrients adequately.
While he was having health problems he found himself unable to handle heavy materials – “I’d be worn out in 45 minutes,” he remembers. A few years earlier he’d taught himself to make side-escapement planes, appreciating that a purpose-designed handplane would work well for some of the coped joints he used in chairmaking. He learned a lot from a Lie-Nielsen Toolworks video of Larry Williams on making tools. “I would make a bunch of furniture for somebody, then spend a couple of days making hand tools.”
Side escapement panel-raising plane.
During this period, Tracy worked full-time for about 1-1/2 years. “I was Mister Mom,” he says. It’s one of his favorite jobs.
Handplanes were a product he could make with limited strength and energy, so he started making them, even though he had no idea whether anyone would buy them. As it happened, Peter Galbert, with whom he’d taken a class, called to say he was going to be a presenter at Woodworking in America (WIA) and asked whether Caleb might like to demonstrate turning techniques at his booth; he pointed out that it would also be a good opportunity to gauge interest in his planes.
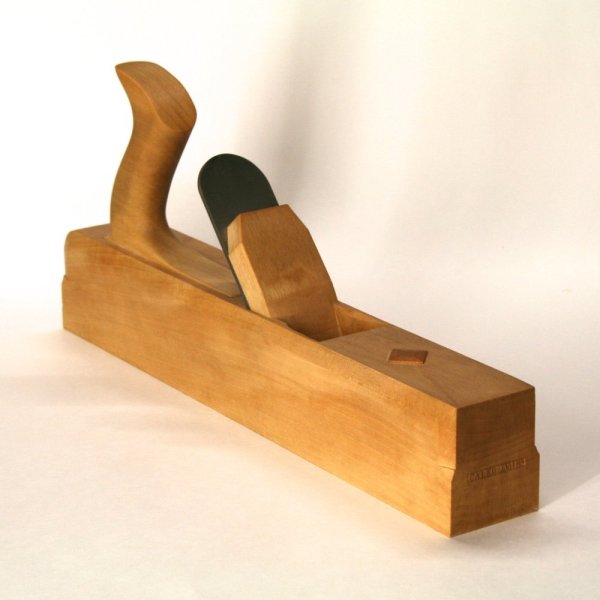
Fore or Jack plane.
Thumbnail plane in pear.
Hard as it might be to imagine, Caleb was a total stranger to the larger woodworking world in 2013, so he calls attending WIA that year “kind of a new experience for me.” A Lee Valley Tools representative approached him with a colleague, Fred West, who was known for buying and collecting tools. Fred, says Caleb, was reputed to be the kind of person who, “if he liked what you did, would buy as much of your stuff as he could, to try to help you.” He placed an order for almost $5,000-worth of Caleb’s tools, which convinced Caleb that tool making could be a viable way to make a living. Deneb Puchalski of Lie-Nielsen Toolworks invited Caleb to join the company at events around the country, at no cost. “I was very flattered,” recalls Caleb, “and thought this was a great opportunity.” He got his shop in order. Fortunately, he had already brought in a store of beech for the work.
Not long after his introduction to the woodworking community at WIA, Caleb met Christopher Schwarz at another tool event, this one in Charleston. Chris had been blogging about Danish furniture and asked if he could blog about Caleb’s tools, adding, “You ought to write a book on Danish Modern furniture for me.” Caleb had been blogging about his Danish furniture for a couple of years by then; he suspects Chris may have seen his posts, which prompted the offer.
“I thought he must have been joking,” Caleb remembers. “The next day he mentioned it to me again, with ‘I’m not joking. I don’t make this kind of offer unless I’m serious.’”
“I chewed on that” for several years, says Caleb – not least because he was so busy making handplanes, thanks to a blog post Chris had written about a side bead plane that Caleb had started producing. That post resulted in orders for about 100 planes in 36 hours at WIA. “I really didn’t know what I was getting into,” he says. Although he had made dozens of planes, he’d only sold a small number of them before this avalanche of orders. He stopped taking more orders, unsure whether he’d be able to fill them all. As Caleb puts it, “I just wanted to make sure if this was a bad idea it didn’t get any worse!”
Luckily, things worked out. He made side escapement planes for about three years, building scarcely any furniture during that time. Then he turned to spokeshaves for a couple of years. “So I’ve spent as much time doing tools as furniture.” And he’s working on that book.
Training
Caleb attributes his proficiency in part to watching his father build things. His dad never felt any hesitation, he says; instead, his attitude was “If you need it…just build it yourself.”
“I’m very much an auto-didact,” he continues. “I have no problem reading about something, then thinking through it.” That said, he doesn’t consider himself self-taught; as he sees it, “I learned from books.”
He did take one class with Peter Galbert circa 2011, because he wanted to spend time with someone who was making a living from their craft. He wasn’t building chairs like Pete’s; he just wanted to see how Pete was making chairs for a living. Caleb told Pete he was building chairs of his own for a living, in response to which Pete “dropped a big stack of his plans on the bench” and gave Caleb permission to build as many of his designs as he might wish, and sell them – a generous offer that Caleb appreciated, even though he didn’t build any of Pete’s designs for sale. He had his own ideas.
Pete, in turn, had learned a lot from Curtis Buchanan. Curtis contacted Caleb after Pete told him Caleb was good at drawing. Curtis proposed a swap: Draw a chair for Curtis and take a class in payment. So Caleb took a two-week comb-back armchair class; that was the chair Curtis wanted him to draw. Caleb found he had to redo the drawing multiple times “because Curtis builds ‘by feeling’; you had to unpack what his design was” in order to draw it on paper. That process took him into drafting on the computer, which made edits easier. Caleb produced two sets of drawings: the comb-back armchair and a continuous armchair. When they came to a third drawing, he told Curtis that he wasn’t a professional draftsperson and they should find a professional. He and Curtis happened upon Jeff Lefkowitz after a few failed attempts with other professionals. Jeff was already doing the manuals for Brian Boggs chairs, he says, “and did a fantastic job going forward.”
On Woodworking
“I try to avoid a philosophy with my woodworking and just do it,” Caleb answers when I ask for his thoughts about the larger woodworking picture. “I’m very much a ‘do what works and make it fit the application’ person.” While some woodworkers say “OMG, I would never buy anything from Ikea,” he says “I can’t afford to make all my own furniture. Here’s this nice solid-wood pine bunk bed, which probably used fewer materials [anyway]. I could probably take it apart and ship it to someone else after my girls outgrow it.” On the other hand, when it comes to his own work, he makes every chair to the best of his abilities and charges a premium price, even if that’s an indulgence for him and his client. He finds more appeal in Frank Lloyd Wright’s idea that “‘the home will be consumed by the environment at some point.’ If it lasts the entire lifetime of one individual, great. If you can hand it on to someone else after a lifetime [of use], that’s even better.” Caleb thinks of himself as pragmatic.
“I really avoid the philosophical discussion of woodworking, especially in social media,” he continues. “It feels like a source of argument. Opinions in that environment often turn into dogma. And in the end, I don’t know that any of it matters. ‘That’s great,’” he says, as if talking with an acquaintance, “‘have a discussion with your buddy when you’re geeking out on it, and then just leave it there.’”
Someone recently asked how people reacted when he started showing more machines in Instagram posts about his work. “‘Did they react to you like when Bob Dylan started playing electric guitar?’” he recalls. “I laughed. Because I never try to present that all my woodworking is hand tool woodworking. It’s not. I’ve always used power tools to make my hand tools! It depends on your objective. My feeling is, every tool is equal. You use it for what it should be used for. Sometimes I’m working for therapeutic purposes. But then my objective might be to execute a design. And then there’s, ‘maybe my purpose is to make this piece at a price point that’s appropriate to my client and me.’ I just use the right tool for the job and don’t worry about the rest.”
NONE SHALL PASS: The notebook where I recorded what I learned at The Windsor Institute. It is off-limits for my work today.
Editor’s note: The following is a short excerpt from “The Stick Chair Book,” which will be released this fall. Among all the how-to chapters in my books, I always try to add some chapters that add a psychological or historical dimension to the Part-A-into-Slot-B stuff. This is one of those chapters.
— Christopher Schwarz
With all the woodworking information available for free these days, it seems unlikely that there are still trade secrets amongst us.
But during 15 years of working with professional woodworkers to get their work published in a magazine, I had a lot of conversations that went like this:
“What kind of dye is that?” I’d ask.
“Red.”
“What brand? And what is the name of the color?” I’d ask.
“Can’t say.”
There were also many techniques that were off-limits. The woodworker would say something like: “This is how I teach it, but it is not how I do it.”
These encounters troubled me. I thought all the secrecy stuff had died off with the European guilds. But apparently, I was wrong. In many ways, I sympathized with the professional. He or she was fighting a horde of amateurs who were willing to undercut the prices of the pros. Why should a professional offer aid or comfort to this amateur enemy?
On the other hand, as woodworker W. Patrick Edwards says, “To die with a secret is a sin.” How will the craft progress if we don’t share what we know?
As I plunged deep into chairmaking in the early 2000s, I found myself stymied by some operations relating to compound geometry. The techniques published in the books seemed entirely too awkward compared to what I knew about pre-industrial woodworking. There had to be a simpler way to do these difficult operations.
I took some chairmaking classes. These helped, but I felt like either:
The teacher was also finding his way in the dark.
They didn’t really want to tell me how they did it.
In 2010, I took a Windsor chairmaking course with Mike Dunbar at The Windsor Institute, along with my father and John Hoffman, my business partner. Dunbar, now retired from the school, had built a chairmakers’ terrarium. You started with the class on making a sack-back chair. Then you moved on to other chair forms. If you wanted to make chairs for a living, you could receive training on business, sales and marketing from Mike’s spouse, Susanna. Plus, the Dunbars, their employees and affiliates supplied students with tools, patterns and wood for amateur and professional chairmakers.
Sack Back in Progress: My father (left) sights John Hoffman as he drills the initial mortise for a leg in a sack-back chair at The Windsor Institute.
It was an impressive operation. Mike and his assistants were there at every step to help you move forward on your chair. The lectures were funny. The workshop itself was gorgeous.
There was one problem, however. The class materials. At the top of the handouts for the class was this warning:
Our students are authorized to use these materials for the making of chairs for personal use and for the making of chairs for sale. We do not authorize the dissemination, reproduction, or publication of these materials in any form and strictly prohibit the use of the materials in the teaching of chairmaking to others.
Again, I felt that same old conflict. There is the urge to protect what you know. But that same urge has caused a lot of knowledge to be stockpiled in the cemeteries.
During my week at The Windsor Institute, I filled a red notebook with all the details of constructing a sack-back chair. I also kept all the handouts from the class in a green folder – both now in my bookcase.
However, I never consult them. I’m almost afraid to read them because they might give me some ideas for making chairs that I am not allowed to pass on to others.
OK, wait a minute. I’ll be right back.
Good news, everyone. I went through the class materials and notes, and I didn’t find anything that was universally mind-blowing. Most of the juicy bits in my notes related to how to build that specific sack-back chair. Whew. I’m glad I don’t build sack backs.
Giving away knowledge has always been a part of my personality. I don’t like secrets. While it would be easy to assign that trait to my time as a newspaper journalist, I know it goes back much further. In fact, I remember the moment I became this way.
In 1977 I was in fourth grade at the local Lutheran school. That year, some of the kids in the higher grades were permitted to dissect sharks for biology class. So, one day when we were called for an assembly in the school’s common area, I hoped (against hope) we were going to see some shark guts or something cool.
Instead, there was some old dude standing in the center of the room, holding a regular piece of paper. We all sat down on the carpet around him, legs crossed. Waiting for the boring session about a dull piece of paper to begin.
He began.
“Let’s say we live in a world where ‘corners’ are the most valuable thing in the whole world. Can you imagine that?”
“Yeah, but I can also imagine some crazy dissected shark fetuses.”
“How many corners does this sheet of paper have? Yes? You? Why yes, you are correct! This sheet of paper has four corners!”
“You know what has more corners? Shark teeth. Rows and rows of flesh-ripping corners.”
“Now, what if a friend of yours came up to you and was really, really sad. Sad that she didn’t have a single corner in the whole world.”
“So, my friend is a circle?”
“What would you do? You don’t want to give up one of your corners. Because then you’d have fewer corners. But you feel really bad for your friend. And so, you decide to give her one of your corners.”
Then the guy holds up the sheet of paper. He rips off one of the corners and gives it to a kid in the front row. Suddenly I’m transfixed.
“Oh look, I gave up one of my precious corners. But now I have five corners instead of four. That’s strange, don’t you think?
“Then, another friend asks for a corner because he has none.
“Another one? How can I lose yet another corner?
“But I decide again to give up one of my precious corners.”
Rip. He hands a corner of paper to me.
“And look. Now I have six corners instead of five!”
The guy continues to rip corners off the sheet of paper and hand them out, increasing the number of corners with every rip.
No one had ever explained generosity to me in those terms before. And though I was only 9 years old (and I still haven’t seen a dissected shark), I was a different person from that day forward. Giving stuff away – money, time, possessions, corners, knowledge – always results in getting something greater back in return. The more I give away, the more I receive.
To this day, however, I sympathize with people who hoard their knowledge out of caution or fear. When you are in a dying profession such as woodworking, giving up your hard-won know-how seems like suicide.
But here’s what I’ve found. If the stuff you know is really good – truly excellent – you could end up like Garrett Hack, Christian Becksvoort or David Charlesworth. Amateurs and professionals will pay to learn what you know through classes. Publishers will pay for you to write it down. You might have a tip or trick named after you.
Or you can remain that bitter man in his shop up on the hill. Perhaps you know how to make buttons for attaching tables to their tabletops in one amazing swish on the table saw. But you aren’t performing that trick for just anybody.
It’s a great trick. One that could change the way everyone works in their shop in the entire world. Right? There’s only one way to find out.
***
The following chapters detail how I build stick chairs. I’ve tried to include every “corner” that I’ve acquired since I first started building these chairs. Also, I’ve tried to give credit to the people who taught me the trick or the operation.
I’m sure I’ve forgotten a few good tricks and the names of some chairmaking friends who have shared their knowledge along the way. If so, I apologize.
My hope is that you will refine these operations and make them simpler, easier and foolproof. And when someone asks you how you make your sticks or your arms or your legs, you’ll be willing to rip off one of your own corners and give it away.
A few weeks back I promised a panel glue-up primer… and today is the first time I’ve needed to glue up a panel since. The basic stock prep for the panel pieces is the same as the rest of the prep, until it comes to sticking the two (or more) pieces together. So that’s where I’ll pick up. And as always, it’s best if you can surface your lumber then do any glue-ups within a few hours. The less time the wood has to move, the better – even if you’ve properly acclimated it.
If I’m using yellow glue or liquid-hide glue (which is almost all the time), I rip both edges of pieces for a glue-up; I want those outside edges flat and level so the clamps have a good, parallel surface on which to close. If I’m using hot hide glue and doing a rub joint (which is almost never), there are no clamps involved, so the outside edges don’t matter.
Regardless of my approach, the first steps are the same. Lay out the panel and mark it with a cabinetmaker’s triangle.
After layout, mark a cabinetmaker’s triangle across the panel.
You want to joint the edges so that you cancel out any non-perfect-90° angle from your electric jointer or jointer-plane work. If you’re jointing by hand, match-plane the two while clamped together in your vise. This will cancel out any error in your angle. If using a electric jointer, mark one edge “I” (inside) and the other “O” (outside). I runs against the fence, O runs not against the fence. This cancels out any error in the jointer’s fence.
The letters tell me which way to orient the boards at the jointer.
I carefully joint each mating edge, fairly slowly, and at the same, steady speed. Then I immediately proceed to glue up.
Let’s dispense with the rub joint first. For a panel glue-up, the only glue I’d use for a rub joint is hot hide glue (though some sources will say other glues work, too). With the two mating edges freshly jointed, simply coat both edges – quickly – then rub those two edges together lengthwise until the glue starts to gel, doing your best to keep them aligned across the thickness. Then set them on end against a wall and give the glue time to completely dry. No clamp necessary. (The few times I’ve glued up panels this way, I’ve left them a little thick so that I can level the glue line after, and not end up with a too-thin panel. Typically, I use the tack-ability of hot hide glue only for glue blocks and veneer.)
I use liquid hide glue (preferably the the Old Brown stuff) for most things in woodworking, but for typical panel glue-ups, I reach for the yellow stuff. It sets up more quickly, so the clamps can come off after 30 minutes (which means I can get more glue-ups done more quickly – and every minute is precious when prepping stock for classes).
I have things set up and ready to go at my bench before I joint the workpiece’s edges.
I’ll have a glue-up station ready to go on my bench before I bring stock in from the machine room, usually with a piece of paper underneath an odd number of clamps, because I always want one in the center (and if my prep is good, I can dispense with putting every other clamp on top of the panel). Along with the glue bottle, I have a bucket of water (hot water if I’m using hide glue) and a rag.
First, I run a bead of glue down the center of one board.
Just under the spout is too much glue – I had to hold still while Chris snapped the picture – so look behind the nozzle for the approximate correct amount.e
Then I spread it evenly with my finger (which is fast) or with an old toothbrush (which is slower but less messy).
Guess where I stopped for that last picture…
I want enough glue that I can rub the wet edge on the dry edge and get enough glue on the mating board that its edge is also fully wetted. But no more than that.
Start in the middle.
Then I wipe the excess glue off my finger before tightening the center clamp. I keep a finger or two of my non-clamp hand on the seam so that I can feel if I need to exert downward pressure on either board for a perfect mate. (Usually, doing the glue-ups immediately after prep obviates this problem.) I don’t tighten all the way – just enough to hold the joint closed as I repeat at both ends. Then I snug them in the same order until the joint is fully closed and I see a line of glue beads down the seam. That tells me the joint is closed tightly enough, and that I used enough (actually, just a tiny bit too much!) glue.
Now the ends.
That spot with no bead is where I was feeling for level – otherwise, I’ve a continuous line of glue beads down the seam.
Next I reach for the bucket and rag, and with an almost-completely wrung-out rag, wipe off the excess glue with small circular motions along the seam. Rinse, re-wet and re-wring the rag often (you don’t want to simply spread thinned glue over the surface). And don’t forget to do the other side. You’ll have a little squeeze-out under the clamps, but it’s easy enough to knock off with a scraper, chisel or plane after the glue is completely dry. Note that none of us in this shop has ever had a problem with glue-size interfering with finishing. Any residual glue is planed away.
Scrub both sides. The glue is a lot easier to get off now than after it’s dry. And no, this won’t weaken the joint or interfere with finishing.
The last task is to check the clock and write the time on the edge of the panel. After 30 minutes, you can take the clamps off and move on to the next glue-up. With multiples, I usually stack them up to dry (another reason to remove the glue on the surface), and let them sit overnight before ripping to final size and squaring the ends.
If I need the clamps for other panels, I can take them off this panel at 12:20. If I don’t need the clamps, I typically leave the panel in clamps longer (not because I have to, but because I forget about it).
I know there are all kinds of charts, studies and special clamping doodads to help you achieve ideal clamp pressure. I’m sure those are useful. For someone. Me? This simple approach has served me well for more than a decade.
On Saturday, I sprayed two coats of lacquer on a small Dutch tool chest and its lower chest, then reinstalled the hardware. With that, I am done with the building and picture-taking thereof…I think.
I have a table of contents with chapters that cover the order of operations, and image folders tagged to each of those chapters. The images within each folder serve as a visual outline of what I need to cover in the text, and many of my pictures are simply visual notes – reminders of what I want to write – that won’t make it into the book.
By the end, I’ll have taught readers how to build two sizes of Dutch tools chest (with a choice of three lids), plus a lower chest on which to rest the small one (or the large one, if you’re tall), to make it easy to access the tools (as well as hold more). I’m offering several approaches to each operation when practical, so that no matter what the tool kit or skill set, readers should be able to find a method that appeals.
I’ve outfitted the interiors of both chests to hold chisels, marking knives and other pointy tools on the back wall. One has a saw till on the chest floor, the other has it behind the hanging rack. Both chests have cubbies for a jointer, jack and smooth plane (and suggestions for ways to tuck a block plane on the wall).
But as I wrote months ago, I’ve seen many clever modifications, drawers, racks, lift-out tills and more in similar chests over the years. And because I can’t possibly construct every possibility myself, I plan to feature some of those in a gallery (with credit, of course!) in the book. Many of you who’ve already built Dutch tool chests responded to my initial request for pictures, and I’ll be in touch with you soon (and thanks again!).
But I’d love to have more photos for the book. I’m looking for clever solutions to storing tools – digital images that are at least 300 dpi at 5×7. (Chris has a helpful post on photography here.) In short, I need in-focus pictures that show the relevant features without clutter or visual distractions. I realize not everyone can shoot these kinds of photos, so if quick phone snaps* are the best you can do, I’ll feature some of those in blog posts when the book comes out, which I hope is before the winter holidays. The deadline for photos is June 30, to fitz@lostartpress.com.
I’ll have this book written, designed and to my editor (that would be Chris) by July 30. So I’m signing off now to start writing far too many words, then excising as many adverbs and gerunds as possible.
— Fitz
* Note: If you have a late-model phone, it might be able to take pictures of a quality suitable for print.