The American Welsh stick chair I built in London last week. It’s made from European oak.
When I travel overseas, I sometimes take melatonin to help my body adjust to a new time zone. The good news: I think it works. The weird news: I have the strangest dreams when I take it.
This month, I’m in the U.K. to teach a few classes, take in some sights and do some serious chair research in High Wycombe, Wales and Ireland. Right now, I’m in London teaching a couple classes organized by Derek Jones at the school where he works, London Design & Engineering UTC.
On the night after my plane arrived, I was tossing about in the hotel bed, worried about the details of the chair class that was to begin the next morning. I took a tablet of melatonin and dreamt of chairs.
In the dream, I made a stick chair using plywood. The plywood arm was only one piece (and it had a doubler laminated on top). Here was the weird part – I was totally calm about the one-piece arm because there is no short grain in plywood.
Then I saddled the plywood seat and was fascinated by revealing the plies below with a travisher. It was like making a topographic map. The legs and crest were also plywood. The sticks were solid wood (I think).
When I woke up, I took a long hot shower to calm my pre-teaching jitters and realized that my dream wasn’t entirely stupid. In fact, by the time I had dried myself off, I had resolved to build a plywood stick chair.
Yes, I know you don’t like it. Please file your complaints with our Complaint Office.
Heck, I don’t even know if I like it, but I do know that I have to build it. When an idea gets under my skin – even a stupid idea – the only way to exorcise it is to construct it. So I’m going to pick up some Baltic birch ply when I get home and give it a go.
Full-panel construction, sometimes called slab or wide-panel construction, consists of a single board, or a series of boards glued up to form a wider panel. In a case piece, the grain would run up one side, across the top, down the other side and along the bottom. As reiterated from Chapter 1, wood moves across the grain but not in length. Consequently, a carcase built using wide panels will retain its height and width, but the front-to-back depth will vary depending on the seasons and humidity. In the case of a blanket box, the grain wraps all the way around, and the height varies from summer to winter.
Frame-and-panel (or stick-and-panel) construction consists of a relatively narrow frame running around all four sides of a panel, which, no matter what the size of the panel, is free to “float” in the frame, and has no bearing on the wood movement of the frame. Because the frame has long grain running up, across, down and back, the frame remains the same size year-round. There are pros and cons to both approaches, so let’s have a closer look.
Wide-panel pine blanket box. In this example, the depth and width remain the same, while the height changes slightly from summer to winter. DENNIS GRIGGS PHOTO.
Until the Middle Ages, Western furniture was all constructed of wide boards or joined panels. However, the Egyptians, as early as the reign of Tutankhamun around 1,300 BCE, used frame-and-panel construction for some of their very ornate pieces. The obvious advantage to wide-board construction is that it’s much less work. A six-board chest requires six boards, joinery or nails, and voilà, you’re done. If you’re going to use frame-and-panel construction for all six surfaces, you will require at least five pieces of wood for each surface, or 30 pieces of wood for the entire exterior case. All those pieces have to be edged, grooved and mortised or tenoned. Right off the bat, the frame-and-panel construction is much more work. Most frame-and-panel building is actually a hybrid, utilizing frames and panels for the sides, bottom and back, and a wide board or panel for the top. Nobody wants an expansion gap on a desktop or cabinet top. The same goes for shelves, and sometime bottoms, if the interior is to be used as a shelf. It just invites dust and crumbs to collect on any horizontal surface gaps. So the top of a desk or cabinet, or shelves made with single panels, have to be attached in a manner that allows wood to move with the seasons. With all that extra work, you get a cabinet that is extremely stable, and all those frames can be glued together in any configuration without having to deal with movement (except for the top and shelves).
Frame-and-panel Shaker tailor counter in figured cherry. This is more complex to construct than a wide-panel construction, but it’s very stable. DENNIS GRIGGS PHOTO.
Wide-panel cases go together much faster and look a lot cleaner, because there are not gaps or interruptions in the grain. Once the four sides are together, expansion and contraction becomes a major issue whenever grain runs perpendicular to an existing panel. Think doors, backs, web frames and mouldings. Most woodworkers opt for an approach that is a hybrid in those situations.
During his long career as a chairmaker, Chris Williams has heard stories of people filling up shipping containers of Welsh stick chairs and sending them to the United States. (You also hear stories – shudder – of people chopping them up and burning them for fuel.)
Last week, I saw another piece of evidence that the migration of Welsh stick chairs to North America was something that has really happened. As I was packing up to leave the shop at Wyatt Childs Inc. last week after a week of building French workbenches, Bo Childs drove up the shop in his white pickup truck with two stick chairs in the bed.
His father had brought them over from the U.K., and he wanted me to have a look at them.
We took the chairs over to the lawn behind his house and gave them a quick inspection. I was trying to get on the road to catch a plane to London (crazy life), so I didn’t get to document them completely. Maybe next time.
What I saw was one chair (above) that clearly is a Darvel chair, a Scottish stick chair. And based on the turnings, it’s likely one that’s earlier in their history.
For me, what was most interesting about the Darvel chair was the spindle deck. It’s slightly raised and rabbeted, like the deck on my chairs. I’ve not seen this detail on an old chair. I hope to investigate this chair a little more next time I’m in Georgia and can look for tool marks.
The other chair bears all the hallmarks of a Welsh stick chair (Chris Williams also said it looked Welsh to him). The armbow looked like it was made from a curved branch. And the seat’s shape matched the arm. The seat itself is massive and thick with a slight bevel on its underside.
Also interesting to see was that some of the mortises in the arms were blind. And when we looked under the arm it was apparent that the maker had made a few mistakes in locating these blind mortises (there was also evidence of this in the chair’s seat).
These “errors” didn’t take anything away from the appearance of the chair. I love it.
Other details I noticed on my quick investigation: The chair had an H-stretcher and was missing the middle bar of the H. Also, what is difficult to convey with these photos is how massive the components are. The legs are quite thick – much thicker than I would typically make in a chair.
As always, seeking out and encountering the “real thing” is an education that’s worth more than 1 million clicks on the internet.
For me, the jack plane is as essential as the hatchet is to a green woodworker. Or a drawknife is to a traditional chairmaker. The jack plane (sometimes called a fore plane) gets furniture parts to shape in a huge hurry, and with only a little effort.
Most woodworkers who show up at our door don’t have a proper jack plane. Their tools might look like jack planes, but they’re set up all wrong (basically, like big old block planes). Whenever we can, we take these woodworkers out back to the shed. Not for a whuppin’, but to the grinder, where we can transform a store-bought 14”-long bass-boat anchor into a tool that can work small miracles in wood.
I think it’s a simple process. But I want to present it in small steps and in detail so that anyone – even those at the beginning of the craft – can do this. Let’s begin by buying the right plane.
Too Much, Too Little
It’s easy to spend either way too much or way too little when buying a jack plane. If you have the cash, it’s tempting to buy a premium plane from Lie-Nielsen, Veritas, Wood River or Clifton.
I wouldn’t.
Doing so is (in my opinion) a huge waste of your money and the toolmaker’s effort. Plus, it’s like fishing with an ICBM. You can indeed trick one of these beauties into slumming as a real jack plane. But the premium tool was designed and manufactured to do so much more, so it’s just a cosmic and comic waste.
It’s also tempting to go to Harbor Freight and purchase this $14.99 miracle of pot metal and skin-lashing plastic. Or to go to eBay.com and pick out an old Stanley No. 5 that came from the bottom of the sea. Or sneak into Cracker Barrel and remove a wooden-bodied jack that’s affixed to the walls with Torx screws.
For the love of hashbrown casserole, please do none of these things.
The dirt-cheap planes from Grizzly, Anant, Harbor Freight and all the other overseas makers are trouble with a capital Chromium. Their cutting irons (and I’ve sharpened a lot of them) are banana-shaped, inconsistently heat-treated and alloyed with anti-rusting elements that make them as pleasant to sharpen as a lemon gummi bear.
Usually the handles of these planes are plastic or poorly shaped wood that will – without any additional assistance – make you hate handplaning. And the machining on the tool is usually crap, as well. I’ve handled hundreds of these planes since the late 1990s, and they don’t ever seem to get better or worse.
As to wooden-bodied planes, I love them. Adore them, in fact. But they don’t tend to survive well over time. Thanks to wood movement, abuse or being plumb wore out, their wedges don’t hold well. Or they hold too well. And they just need a lot of love to get them working. Yes, you can do it. No, it’s not as hard as hippocampus surgery. But for your first plane, I recommend you get an early Stanley No. 5 jack plane with an iron body.
Wait, Don’t These Stanley Planes Stink?
Stanley has made planes that rival both Lie-Nielsen and Harbor Freight. It just depends on who was running the company at the time. In general, early planes (made before World War II) are nicer than later planes (made after the war). But very early Stanley planes can be problematic as well because they are missing key innovations, or they have odd (read: hard-to-find) replacement parts.
For me, the sweet spot is Stanley planes made somewhere from about 1902 to 1924. That sounds like a small window of time, but Stanley made a lot of planes during that period, and lots of them survive.
To learn to date a plane (I mean to find out its age; not its turn-ons), I recommend you become familiar with one of the many handplane dating charts. Here’s the quick-study guide: buy a plane that has one, two or three patent dates cast into the tool’s body, right behind the frog.
Once you’ve spotted one of these planes, look for the obvious. Are the handles beautifully shaped rosewood? Uncracked and unsullied? Is the tool rusty? Are large hunks broken off its body? (Basically, it’s like searching for a human mate.)
One caution: If an old tool looks like it’s brand new, my instinct is to skip it. If it is indeed perfectly preserved and functional, it will likely be expensive. If it has been “restored,” the previous owner might have “over restored” it, removing metal that you’d rather still have. Third option: The tool has always been defective/cursed and has frustrated every user who has picked it up.
There are lots of these tools out there. So, don’t get frustrated if you can’t find the one you want after 10 minutes of scrolling. I purchased the tool shown in these photos for less than $40, and I overpaid a bit to get one that looked especially clean.
Avoid Replacement Parts
It’s tempting to buy a jack with a missing part, a cracked tote or an incorrect knob and think: I’ll just buy a replacement part. Parts are out there, but their costs (plus shipping) add up quickly. My experience is that it’s best to wait patiently for a sound example with all its bits intact.
That includes the iron and chipbreaker/cap iron. Many woodworkers replace these instinctually. While that might be a good idea for a smoothing plane (or it might not…), it’s rarely necessary for a jack plane. Plus, I have found that Stanley’s old irons – if they haven’t been abused – are easy to sharpen and tend to stay that way. Plus, they fit the tool without any fuss. So, look for an iron with a lot of life left in it, and a chipbreaker that isn’t dogmeat.
Last word on replacing parts: It’s tempting to embark on making your own replacement front knob and tote before setting up the plane for use. I recommend you do that after you have surfaced 100 boards with the existing handles. By that time, you will know if you like the handles and how you would change them (and you’ll probably notice that you can’t improve much on Stanley’s early handle designs).
Bottom line: Don’t waste your money. Invest a little in an old tool that has been cared for and the next steps will be easy.
— Christopher Schwarz
Coming Up
Clean & True Critical Surfaces: Part 2
Grind the Iron & Fit the Chipbreaker: Part 3
Set Up & Use: Part 4
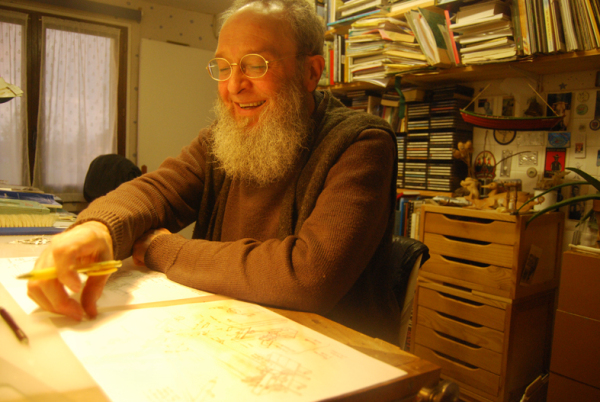
Maurice Pommier, in his workshop. Photo by Brian Anderson.
[Editor’s note: We recently reached out for an interview with Maurice Pommier, author and illustrator of “Grandpa’s Workshop” (translated by Brian Anderson – you can read about Brian’s visit to see Maurice and his workshop in 2012 here). Maurice lives in Évreux, France, and speaks little English. But he responded, in the most generous way – an illustrated letter. Here are his words, as he wrote them without edits from us, along with a handful of illustrations, sketches and pictures to help paint a small picture of who Maurice is and some of the brilliant work he has done.]
I am not very able to speak of me. I am born in 1946.
My mother was dressmaker. She worked hard, early morning and late evening.
My father, alive but broken by the nazis.
We lived in a little village, Peyrat de Bellac. I go to school and after I was boarder at collège in the nearby town.
I thank life for having put in my company a lot of great people – I can not name them all. I choose three, the others do not be dissatisfied.
Tonton Dédé, the best, with working with tools and with his hands.
Pépé Léonard, the best storyteller. When he stop speaking, he was whistling.
Mémé Anna.
I think I’ve been drawing since I know how is made a pencil.
In 1968, I married Francine, she supports me since that date. We live in Évreux. We had three children and now four grandchildren; I worked at the Post Office for a long time. But I did not stop drawing.
Xavier Josset
My friend Xavier Josset has been presenting my first book to a publisher, me, I would have never been there.
After things changed, I left the Post Office, but I continued to draw and scribble. And write stories. In the following pages I enclose a small catalog of my bad habits. J’espère ne pas être ennuyeux.
“Moulin Richard de Bas, Ambert,” the oldest paper mill in France (watercolor)
“Rosace, tracé régulateur,” Cathédrale St Guy, Prague
François Calame, creator of Carpenters Without Borders, is a friend. I had the chance to make shavings and sawdust in his company.
The Tithe Barn of Daubeuf-la-Campagne (La grange aux dîmes de Daubeuf la Campagne)
Originally the barn was built with five bays. It was later extended to the south with five further bays. The barn is oriented north to south in its length. The drawing here shows the older part of the barn. The cross-frames, the main purlins and the bracing are shown, but for clarity, the rafters and the intermediate purlins are omitted. The doors, which have undergone several alterations over the course of the barnʼs history, have also been omitted.
La grange était constituée à son origine par 5 travées. Par la suite elle fut agrandie vers le sud, par 5 travées nouvelles. La construction est orientée nord/sud. Voici un petit schéma décrivant la charpente la plus ancienne. Il montre les travées, les fermes et le contreventement, pour plus de clarté, les chevrons n’ont pas été dessinés, ainsi qu’une partie des pannes. Les portes, modifiées ou crées au cours de son histoire, ne sont pas représentées non plus.
— “Daubeuf Workshop Diary,” p. 11, Carpenters Without Borders, (ink + sweat …)
“An Able Seaman” (pen + brush + ink)
illustration from “Moby Dick” by Herman Melville, illustrated by Maurice Pommier, Ch. 41, (Hachette-Jeunesse, Paris, 2001) (watercolor + pen + ink)
illustration from “Le Sac Du Mousse” by Maurice Pommier, (La Martinière Groupe, Paris, 2004) (watercolor + pen + ink)
illustration from “Le Sac Du Mousse” by Maurice Pommier, (La Martinière Groupe, Paris, 2004) (watercolor + pen + ink)
Papercuts
“The Book of Tobit,” papercut (paper + X-Acto knife – “impossible to erase, no repentance …”
“St. Nicolas & Pierre le Noir,” papercut (paper + X-Acto knife)
“St. Nicolas & Pierre le Noir,” papercut (paper + X-Acto knife) “The genies of the fields and woods that accompanied St. Nicolas; as they were a source of disorder, the religious authorities forbade them.”
Tools & Wood
Simon (6 years old), my last grandson, says: “Pépé make me a crossbow!”
“My woodwork shop, it’s a mess! I know, it’s the same thing in my drawing workshop. But I love old tools. My friend Loïc says: ‘Maurice, to find room, you’ll have to push the walls!'”
My toolbox, less beautiful than Christopher’s.
Small model of a trestle born of my passion for roofing geometry – en français, “l’art du Trait.” One of the essential skills of the French carpenters.
Patrick Macaire
My current job, under Patrick’s direction. I met Patrick Macaire a few years ago and since, in my drawing workshop, there is a struggle for space between little pieces of wood and drawings.
P. 93
Gros plan sur le tracé de la saillie de l’arêtier en plan.
Gros plan sur le tracé de la queue de vache sur l’élévation de l’arêtier.
Tracés théoriques qui ne seront pas repris intégralement à l’épure (Theoretical plots that will not be fully included in the sketch)
P. 99
Jambe de force La jambe de force peut s’établir en prolongeant sa face inférieure jusqu’au lattis et en reportant son niveau sur la ferme de croupe et de l’arêtier; puis, en plan, en générant une sablière d’emprunt (au niveau de la ligne de trave) et en la faisant tourner à l’axe. Vérification en générant un faîtage d’emprunt au niveau de la dalle et en faisant tourner: les trois points doivent s’aligner.
We are finishing the Deuxième carnet – it’s been 7 years since we are working on these two notebooks.
For carpenters, the rabbit is the apprentice – he has big legs to run fast and big ears to hear everything.