My thanks go out to two Lost Art Press readers for their help in transcribing and translating Johann Brotze’s 18th-century description of the Latvian bentwood chair. On the day of the original post, Peter-Christian Miest very quickly transcribed Brotze’s Cursive and the following day he provided an updated version. Over the weekend, Mattias Hallin translated the text to English.
Brotze’s Chair Description in English
A chair, such as the Latvian farmers make from wood, without gluing or nailing even the least part of it.
The chair A presented here is made in the following manner from several parts put together. The part abcd forms the back and the two rear legs. On the upper portion of the same, on the inner sides opposite one another by d and a, are two sets of kerfs, in order to clamp in place the board e. By b and c the wood is halfway cut out, in order to be able to bend it and clamp in place the lower piece of wood fghi, whose both ends f and i, have been cut in such a manner, as to fit into place and be held fast at b and c. In this lower piece of wood the part klmn with its ends k & n that make make up the front legs, is set and finally the whole together with the part opqr that forms the seat, assembled in such a way, that one part holds the other, and none of them yield. In the part opqr and also lm four kerfs are made towards the inside, which go in deep enough, to hold in place the seat s. And this assembly gives a firm, immutable and durable stool.
You can read, or reread, the original post here. Peter Follansbee provided a link concerning the knutkorg (“knot basket”), which certainly seems to be the precursor to the bentwood chair. You can find that here.
Once again, thank you Peter-Christian and Mattias!
The set of templates makes it easier to build the Staked Armchair from “The Anarchist’s Design Book,” but they are also a good starting point for many of the chairs in “The Stick Chair Book.” The seat and arm shape is the same, as are the leg locations and stick locations. So the templates are a good place to start exploring chairmaking.
(FYI, we also carry full-size paper patterns for the five chairs in “The Stick Chair Book.” These need to be adhered to your own wood and cut out.
The templates are laser cut in Ohio. If you want a set, don’t tarry. We might not stock these permanently as getting the raw material is getting harder and harder.
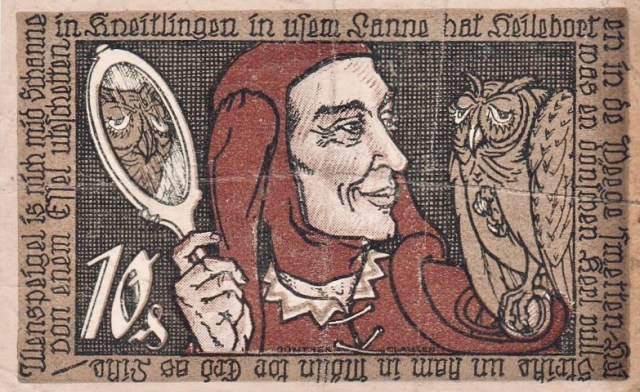
Bank note for Braunschweiger Staatsbank, 1921, Falkenstein/Bildagentur Historical Collection.
Have you ever worked with someone who, despite being given detailed instructions, never gets the job done right? (Don’t answer that if you work by yourself.) The end of another workweek is a good time to meet, or be reintroduced to, Eulenspiegel. He has a five-hundred year history in European literature with his exploits translated into multiple languages. His first name is variously Dyl, Til or Thyll. His surname might be shown as Ulenspiegel and in English he is Owlglass or Howlglass. His stories have been studied by historians and humorists as they provide another level of detail about 16th-century life and society.
Cover of the 1515 Straßburg edition, woodcut attributed to Hans Baldung Gruen, student of Albrecht Dürer.
Eulenspiegel Who? Till Eulenspiegel was a fictional character in a series of tales were written in Low German and published in the first decade of the 16th century. His stories take place in the 14th century with his birth in 1300 and death in 1350. Although he travels elsewhere, much of his story takes place in Northern Germany. Eulenspiegel means owl mirror and he is depicted with both an owl and a mirror on the covers of his books. He is a wily rogue and through his antics he exposes hypocrisy, greed and foolishness in all he meets. He spares neither the aristocrat nor the common man.
The humor in Eulenspiegel’s exploits is how he carries out the exact commands given to him, no more, no less. Those who employ him make assumptions, react favorably to his assurances and later feel the consequences of their readiness to hire this unknown person. The owl and mirror, symbols of wisdom and reflection, are much lacking in those you are unfortunate enough to meet Eulenspiegel.
The tales of Eulenspiegel are bawdy and earthy (not to mention inordinate quantities of excrement) as was typical of 16th-century humor. If you have read editions published in the latter half of the 19th century and in the 20th century the indelicate bits have been taken out.Although some of you will be disappointed, there were no indelicate bits that needed to be excised to present the tale of Eulenspiegel and the Carpenter.
How Eulenspiegel Became a Carpenter in Dresden and Failed to Win Much Praise
Eulenspiegel came into Dresden, near the Bohemian forest, upon the Elbe River and declared himself a carpenter. It so happened, to his good fortune, that a master carpenter in the town heard of this, and lacking his own journeyman due to Blue Monday, hired Eulenspiegel to be his journeyman.
The master was to attend his cousin’s wedding that afternoon and was pressed for time to have a job completed. He told Eulenspiegel of the wedding and instructed his new journeyman to work diligently and glue four boards together for a table. Eulenspiegel asked to be shown the boards. The master took the four boards and stacked them together on the bench. Satisfied his new journeyman knew what was need, the master informed Eulenspiegel he would return late in the evening and departed for the wedding. Eulenspiegel got to work.
Woodcut from “Eulenspiegel Keimensweiß” by Johannes Schmidt, 1572. This was an edition written in rhyme.
He bored holes in each of the boards and stacked them together, one atop the other. The glue pot was put on the fire to heat and when it was ready he poured and brushed the glue to bind all the boards together. He then carried the boards to the roof so the glue would dry in the sunshine.
17th-century woodcuts of Eulenspiegel working as a carpenter, Ashmolean Museum, Oxford University.
When his work was done Eulenspiegel make it an early night and went to bed. The master and his wife returned late in the evening, both tipsy and a bit befuddled. He roused Eulenspiegel to ask about the day’s work and was assured that all was done exactly as requested. The master was pleased to have found a good worker and remarked to his wife that one does not find such a good fellow every day.
Early the next morning the master bade Eulenspiegel to show him the table top that had been glued together the previous day. When the master saw how Eulenspiegel had ruined the boards meant for a table, he was enraged and demanded to know where Eulenspiegel had learned the art of carpentry. Eulenspiegel was confused to be asked such a question and said as much. The master shouted that Eulenspiegel had spoiled costly wood. Moved by the master’s anger and shouting, Eulenspiegel responded he had only done that which was commanded and if the wood was ruined it was the master’s fault not his. Grabbing his iron square, the master shouted to Eulenspiegel to be gone his workshop, for of the work that was done he would have no profit. Thus, Eulenspiegel departed with very little praise for his work.
Eulenspiegel’s End
The last few tales of Eulenspiegel’s life relate his death and burial in 1350. His burial was a very appropriate ending for such a waggish character. As the story goes, a hollowed-out tree was used as his coffin (or perhaps a regular wooden coffin). Two ropes, one at each end, were used to lower the coffin. Unfortunately, the lower rope broke and the coffin was stuck standing upright. Those attending the funeral decided to let his coffin remain as it was as it seemed a fitting burial for Eulenspiegel. His tombstone was sculpted with an owl holding a mirror in its talons.
Eulenspiegel’s burial from a broadsheet illustrating Eulenspiegel’s life, 1729, British Museum.
There are many notable people from human history whose burial sites are unknown, but there is no doubt about where Eulenspiegel’s fictional remains are buried. As a measure of his beloved status there is tombstone that still stands (or pretends to stand) in Mölln, Germany.
If you are a newer reader of the LAP blog and puzzled by Blue Monday (or are an old hand and want to relive your youthful hangover days) you can read a post I wrote about Blue Mondays here.
Today we are opening up the list for people who want to attend our Chair Chat™ class at the Lost Art Press storefront Oct. 10-14, 2022, with me, Rudy Everts and Klaus Skrudland.
The class is $1,300 per student (plus materials). The attendees will be determined by a random drawing on Wednesday, July 6. Here’s how you can sign up. Please read the following with care.
The class is for people who wish to build a vernacular stick chair. We’ve had several people ask us if they could take the class and instead build a ladderback, Hans Wegner chair, Windsor chair or other factory chair that involves bent laminations, steambending or factory methods.
The answer is, unfortunately, no. We don’t have the equipment, jigs or time to make one of these chairs. We would fail your expectations. We are equipped to make any stick chair (that we know of), as long as it’s vernacular.
To sign up for the drawing, send an email to: lapdrawing@lostartpress.com before 3 p.m. (Eastern) on Wednesday, July 6, 2022. Please use the subject line of “Chair Chat Class” and include the following information (incomplete forms will be discarded).
Your name(first and last)
Your phone number (this is only to contact you in case email doesn’t go through)
One sentence about the chair you would like to build. (It can be as simple as “Welsh comb back” or “Irish armchair” or “whatever.”)
How you would like to build your chair. Choose one:
Almost entirely by hand
A balance of hand and machine methods
Almost entirely by machine
This last detail is important as we need to get a mix of students so that people aren’t waiting in line to use the chopping block or the band saw.
Klaus at work on a chair leg.
Students will be allowed to bring their own materials. Or we can supply them for a fee (likely about $200 per chair). More details about the class and the instructors can be found here.
After the drawing occurs, don’t despair if you aren’t picked. We will keep your name handy in case students need to cancel (it happens).
Klaus, Rudy and I are looking forward to this class and sharing everything we know about chairmaking, eating too much fried chicken and drinking just the right amount of beer. It will be a fun week.
It’s a photo of a cat, ergo, Katherine (aka the Wax Princess) has more soft wax available. Last weekend, she made up a large batch, and it’s now up for sale in her etsy store.
As you can see, Funky Winkerbean has slept through this announcement. (The wax also doubles as a teddy bear.)
Notes on the finish: This is the finish Chris uses on his chairs. Katherine cooks it up here in the machine room using a waterless process. She then packages it in a tough glass jar with a metal screw-top lid. She applies her hand-designed label to each lid, boxes up the jars and ships them in a durable cardboard mailer. The money she makes from wax helps her make ends meet at college. Instructions for the wax are below.
This chair is finished with Katherine’s Soft Wax 2.0.
Instructions for Soft Wax 2.0 Soft Wax 2.0 is a safe finish for bare wood that is incredibly easy to apply and imparts a beautiful low luster to the wood.
The finish is made by cooking raw, organic linseed oil (from the flax plant) and combining it with cosmetics-grade beeswax and a small amount of a citrus-based solvent. The result is that this finish can be applied without special safety equipment, such as a respirator. The only safety caution is to dry the rags out flat you used to apply before throwing them away. (All linseed oil generates heat as it cures, and there is a small but real chance of the rags catching fire if they are bunched up while wet.)
Soft Wax 2.0 is an ideal finish for pieces that will be touched a lot, such as chairs, turned objects and spoons. The finish does not build a film, so the wood feels like wood – not plastic. Because of this, the wax does not provide a strong barrier against water or alcohol. If you use it on countertops or a kitchen table, you will need to touch it up every once in a while. Simply add a little more Soft Wax to a deteriorated finish and the repair is done – no stripping or additional chemicals needed.
Soft Wax 2.0 is not intended to be used over a film finish (such as lacquer, shellac or varnish). It is best used on bare wood. However, you can apply it over a porous finish, such as milk paint.
APPLICATION INSTRUCTIONS (VERY IMPORTANT): Applying Soft Wax 2.0 is so easy if you follow the simple instructions. On bare wood, apply a thin coat of soft wax using a rag, applicator pad, 3M gray pad or steel wool. Allow the finish to soak in about 15 minutes. Then, with a clean rag or towel, wipe the entire surface until it feels dry. Do not leave any excess finish on the surface. If you do leave some behind, the wood will get gummy and sticky.
The finish will be dry enough to use in a couple hours. After a couple weeks, the oil will be fully cured. After that, you can add a second coat (or not). A second coat will add more sheen and a little more protection to the wood.
Soft Wax 2.0 is made in small batches in Kentucky. Each glass jar contains 8 oz. of soft wax, enough for at least two chairs.