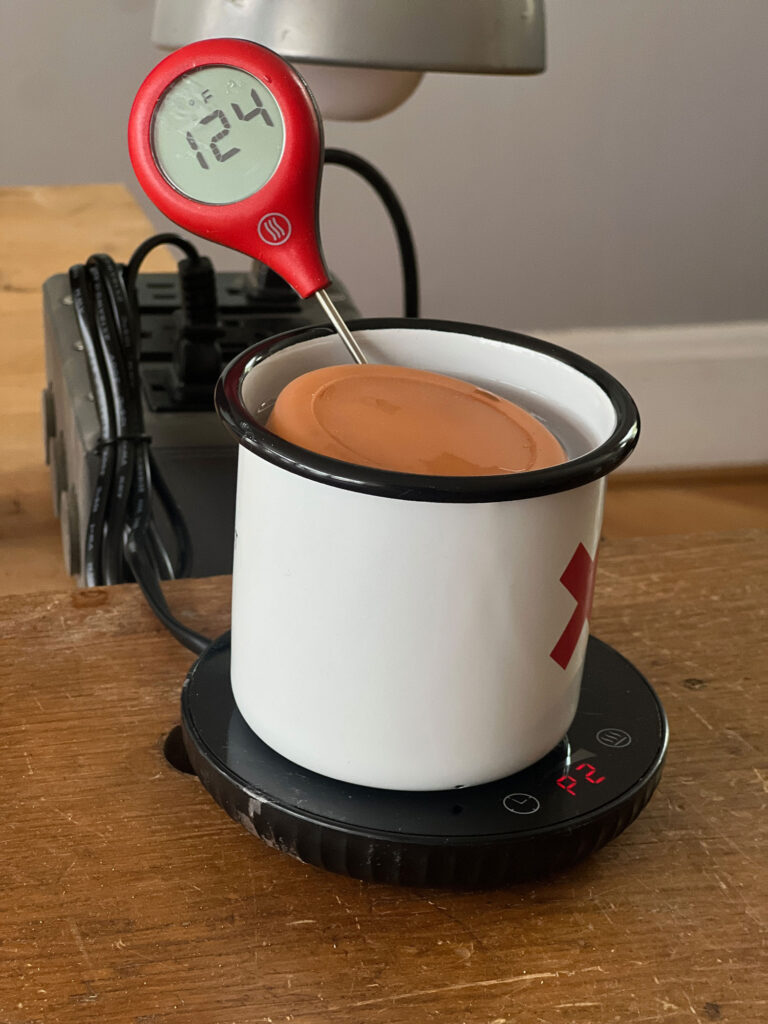
One of the other suggestions for a replacement for the beloved Hold Heet glue pot is to use a coffee mug warmer, such as this one. I chose this particular model because it has two heat settings that are ideal for heating glue (122°F and 140°F), plus it has a timer and an automatic shutoff.
I’ve used it a few times, but the limitation of this kind of glue heater was obvious from the start: It’s too small to heat more than a little bit of glue. If you work on small projects and need only a few ounces of glue at a time, a mug warmer is ideal. But I had trouble heating enough glue for a chair class and had to break out the Hold Heet.
Honestly, it’s a lot to expect from a $20 appliance that is supposed to keep 8 ounces of coffee warm. It just doesn’t put out enough heat to warm a water bath and a plastic glue bottle. (You can’t put the glue bottle directly on the warmer; it will melt.)
One possible option would be to store your glue in a steel container, which could go directly on the appliance. I tried using a large ceramic vessel but couldn’t get the water above 100° F. The thing likes to heat metal.
So the best option was a steel vessel filled with water and a glue bottle inside.
So, bottom line: It’s great for people who need enough glue for a few crackers. But if you need enough for a big piece of casework, look elsewhere.
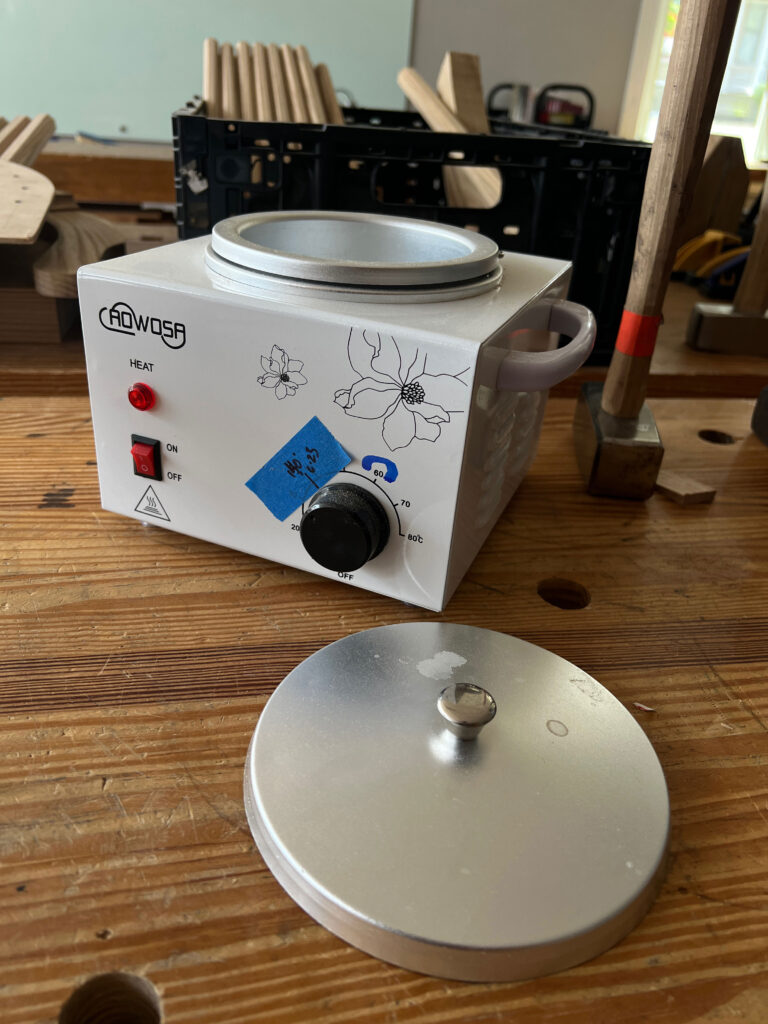
With the disappearance of the Hold Heet glue pots from the market, readers have asked for some alternatives that don’t involve purchasing industrial equipment.
I’ve tried several options. This entry is about using a wax warmer that is designed to heat body wax for hair removal. The machine is sold under a variety of brand names, but they all have similar specifications. So while I cannot compare the Aowosa to the Daordaer, my guess is these white sheet-metal waxers are quite similar.
First, the good news: They are inexpensive (less than $50) and they work. Just don’t trust the temperature scale (more on that in a bit). They heat up fast and hold the temperature steady. Like the Hold Heet, there is a removable double-pot with a handle, which makes it easy to keep the pot full of water during long days. The lid is fairly useless unless you heat small containers of glue.
Now the bad news: This is not by any stretch of the imagination professional equipment. Everything is lightweight and thin. I’ve had my Hold Heet for as long as I can remember. It is built like a little tank. I don’t get that same vibe from these wax warmers. I hope I’m wrong.
The main problem is that the temperature scale on mine is not even close. When I set it for 140° F (60° C), it raced up to 180° F. I let the machine run for a couple days to see if there was some sort of break-in period. So far, no. So I put a piece of tape on the scale and marked where 140° really is.
I will continue to use this machine during classes when we heat a lot of glue. And it’s convenient for making small batches of Soft Wax, too. But will I bequeath it to my children at my death? I’m guessing no.
— Christopher Schwarz
P.S. If someone can recommend a reasonably priced heavy duty unit to test, please post it in the comments.
You may have read a few weeks ago about what happens when Chris gets bored with watching me teach. And what happens a day later when people share “advice” after said experiments. As far as I know, the bugs have not yet eaten what is now Roy Underhill’s Dutch tool chest. (And frankly, I’m a little offended that some of y’all think my dovetail joints aren’t tight enough to keep the bugs out….)
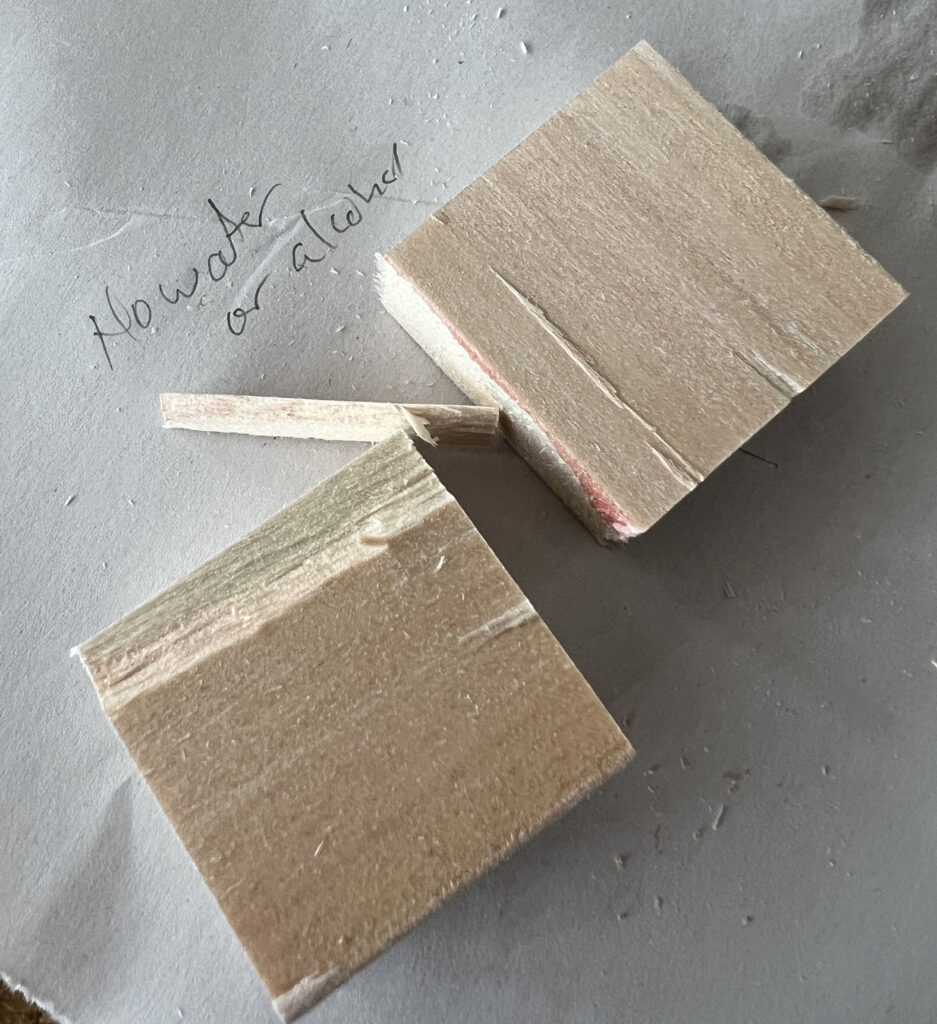
I didn’t bring the chest home, but we did bring home the test joint Chris made with Gummy Bear Glue. On Tuesday, I tried reversing the gummy glue using the same strategies one uses to reverse hide glue; both are gelatin, after all.
But first, I hit the snot out of it…again. We first tried to reverse the joint using nothing but force (a big hammer) the day after Chris glued the two pieces together. It didn’t work then, either. But you see can above that this time, the lump hammer produced the start of a split. Under extreme force, the wood is failing before the gummy glue. Just as it does with hide glue, PVA and other wood-appropriate mastics after they’ve fully cured.
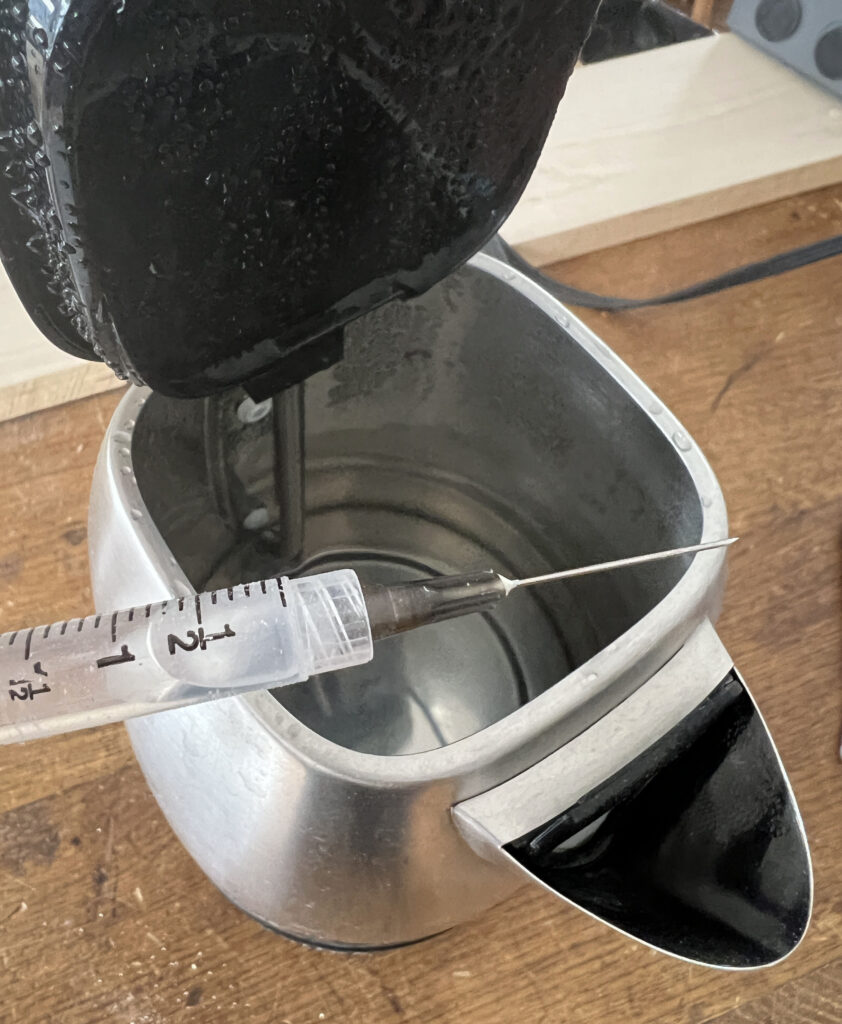
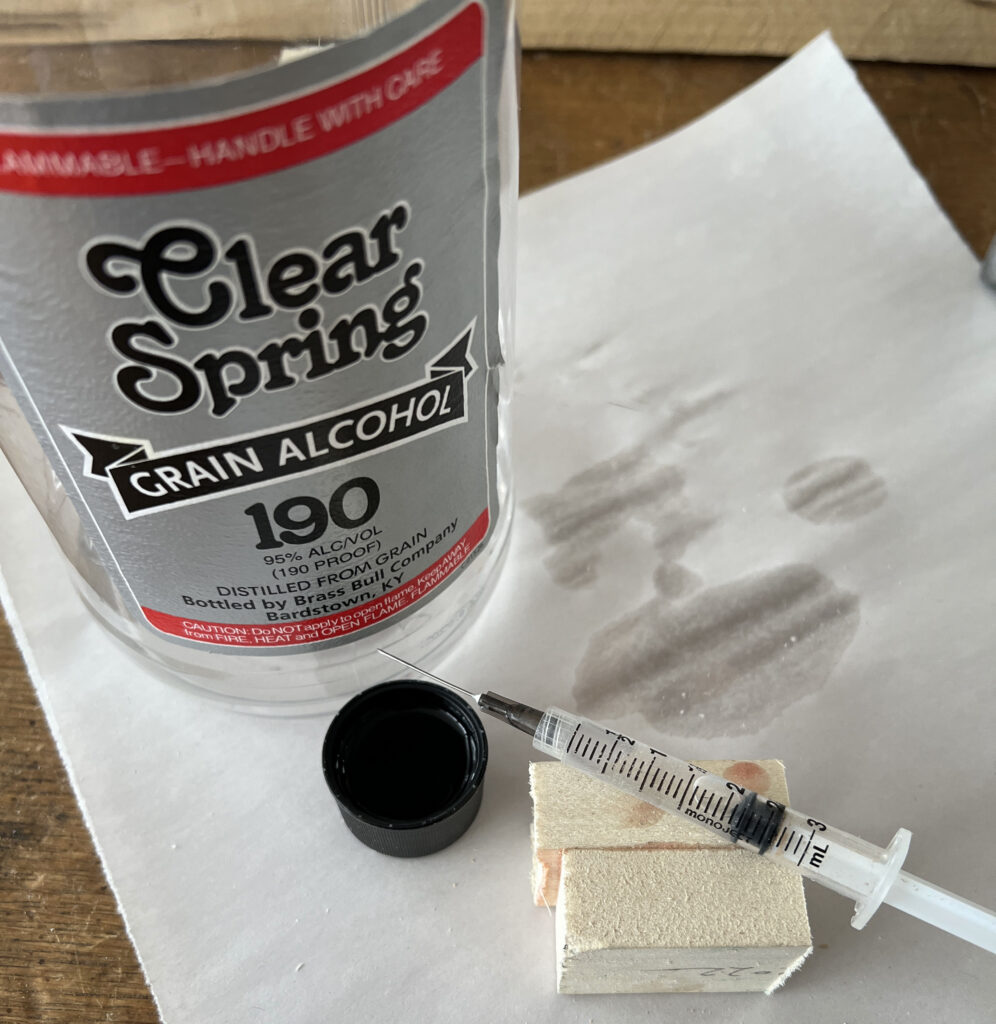
I cut the test joint into three pieces before testing the gummy glue reversal with hot water, alcohol and a chisel.
I boiled water, then as quickly as possible sucked it into a syringe with an 18-gauge needle and inserted hot water into the joint on all sides. After letting it sit for a few minutes, I was able to pop the joint apart with a sharp hammer blow. Just as I’ve done numerous times to hide glue joints treated with hot water.
As you can see, it’s an almost dead-clear reversal – no wood failure in the joint (that teensy bit of failure visible at the top of the above picture is where the split was starting from the untreated hammer blow).
Next I tried inserting 190-proof grain alcohol into the joint. This crystalizes hide glue – and it did the same here. I waited two minutes or so before smacking the joint, and you can see below that the split isn’t quite as clear as with the water, with a few thin areas of wood failure visible (again, the obvious failure at the edge is the result of before-treatment beating).
Then, I used a wide chisel to try to cleanly split the joint without water or alcohol. Same as with any wood glue, there is obvious wood failure – if not as much as I’ve seen with traditional hide glue.
Is two weeks enough set-up time – and in winter, where it’s too cold for the bugs – for a proper test of the gummy glue? Maybe not. But clearly, it has some holding power. Regardless, I am 100-percent certain that Roy’s Dutch tool chest will not fall apart; have you seen the number of nails I use on those things?*
– Fitz
* Maybe you haven’t…but soon, very soon, you’ll be able to refer to a book on the subject. Just trying to head that question off at the pass…
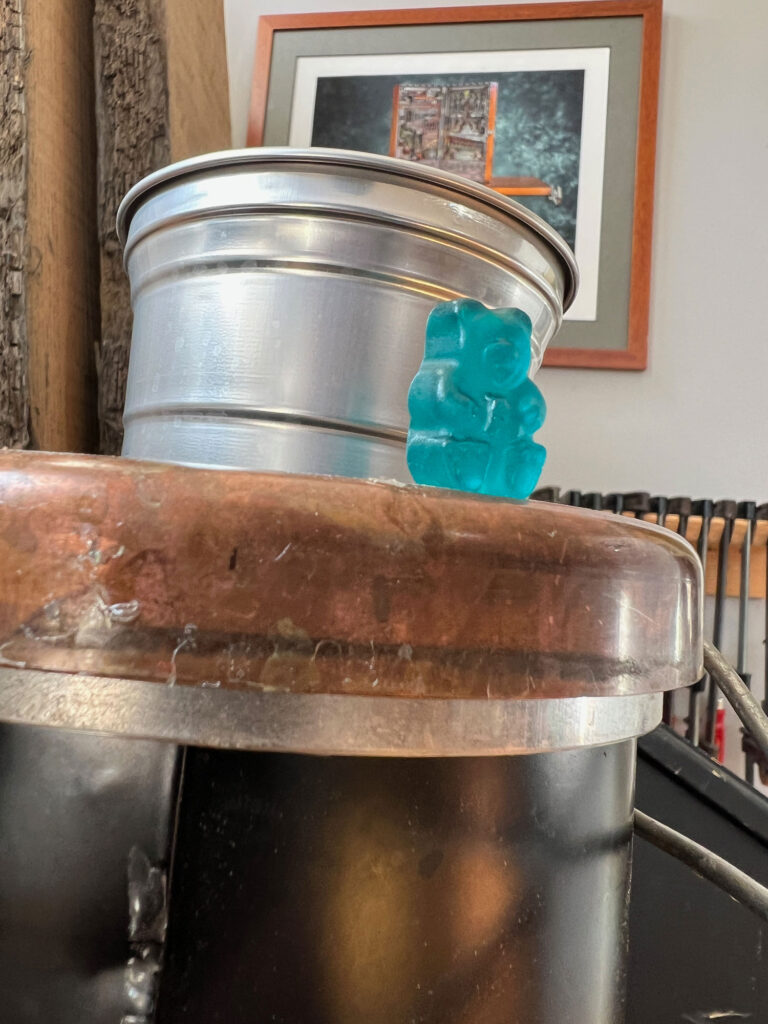
A blue Albanese bear watches over the murder of his bag-mates.
One thing I love when Megan Fitzpatrick teaches in our storefront is that I am exiled from the bench room, and I need to amuse myself without woodworking tools or loud music.
So today I decided to experiment more with making gelatin-based glues. In December, I successfully made glue using gummy worms and bears. Then I made some nice liquid hide glue using unflavored gelatin.
I want to develop some recipes that readers can follow and replicate. So today was all about careful measurements, calculations and carrying the gazinta.
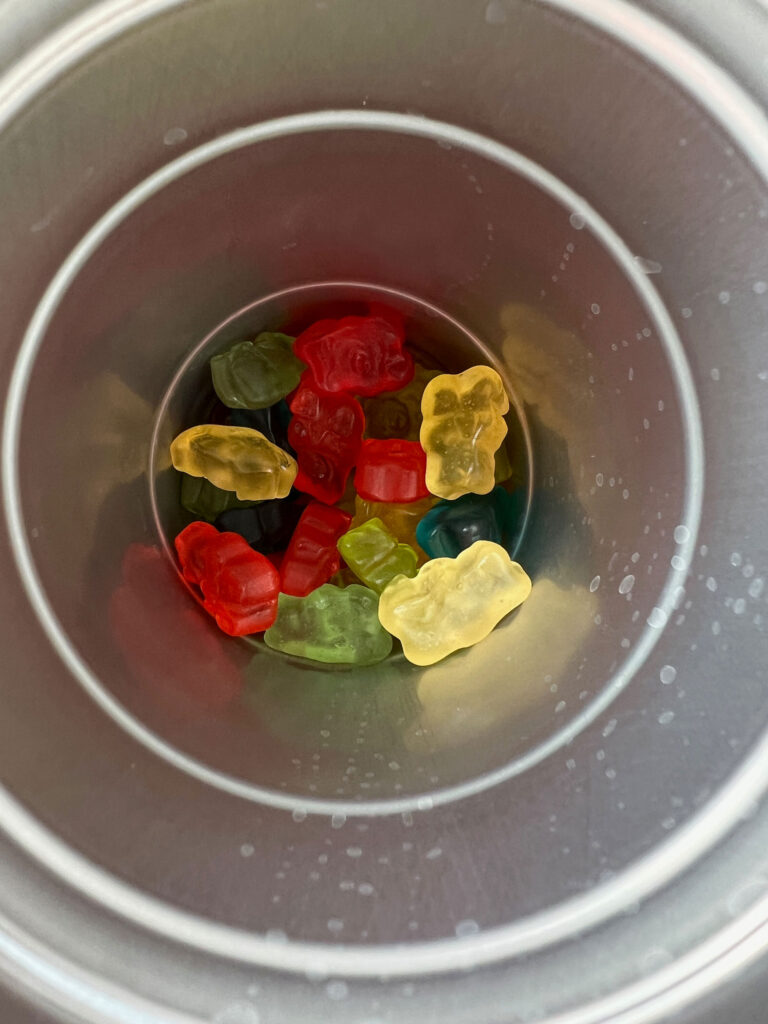
The gummy bears right before they are covered in water and melted.
Gummy Glue 2
When I made my first few batches, I threw some gummies in the glue pot and added water until the stuff looked like glue. That’s still a valid approach. But I wanted to see if I could create a recipe that was a little better thought out.
Gummy bears are basically gelatin and sugar, with some added colors, flavors and a little carnauba wax to keep them from sticking to each other in the package. Today I’m using a local brand of gummy, Albanese, which is made in Indiana. They are softer than your typical Haribo bear and smell a good deal more.
According to the packaging, the bears are about 44 percent sugar. That makes them about 56 percent other stuff – mostly gelatin. So a rough guess is that 100 grams of bears contain about 50 to 55 grams of gelatin. For simplicity, I’m saying that the bears are 50 percent gelatin.
So a typical hide glue recipe combines 75 grams of hide glue pearls and 3/4 cups (177ml) of water. So, I’m melting 150 grams of bears in 3/4 cups of water. (Useful fact, the Albanese bears are 5g each, so you can count out 30 bears instead of purchasing a drug-dealer scale that weighs in grams.)
I know some of you are concerned about the sugar (won’t bugs eat it?). I have been reading some academic papers that suggest that the sugar might actually make the glue stronger. But we will see.
The gummy glue is cooking now, and I hope to convince Megan’s students to use it on their sawbenches (or at least have a taste of it).
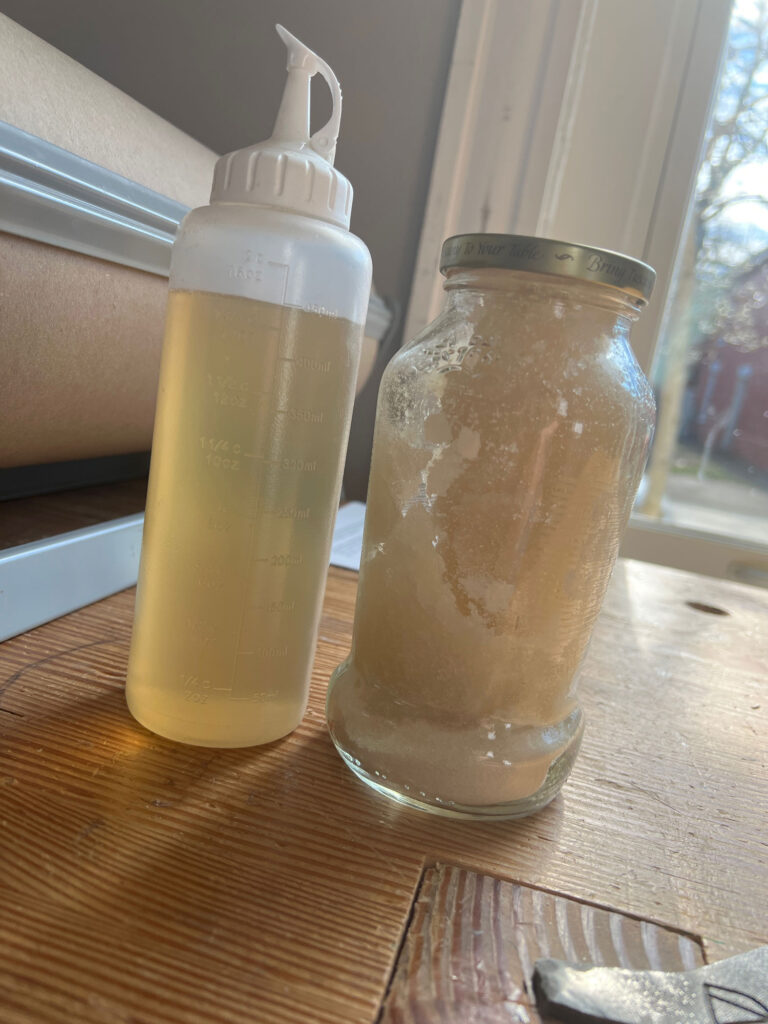
My first batch of gelatin glue (left). The second batch in progress (right). You can see some dry powdered gelatin at the bottom of the jar.
Death Grip Glue 2
When I made my first batch of gelatin glue, I measured out the gelatin using volume because the original recipe used volume. When I poured the water into the gelatin, the gelatin immediately soaked up all the water and left about 25 percent of the gelatin powder bone-dry. So I added more water (I don’t know how much).
When I cooked the glue, it came out watery. Too watery. It would run off joints like water. So I cooked it down until it was snot-like. Then it worked great.
My goal with this second batch of glue is to create a more reliable recipe. First I converted the hide glue recipe from volume to weight. Why? The gelatin is like fine sand. The hide glue pearls are like fine gravel. So there’s some air between the pearls.
When I weighed one cup of glue pearls, they equaled 150 grams. So I put 150 grams of gelatin in a clean glass jar and added 1-1/2 cups (355ml) of water.
Again, the gelatin soaked up all the water, leaving some dry stuff at the bottom. I decided to just leave it for now and see what it looks like tomorrow when I need to cook it.
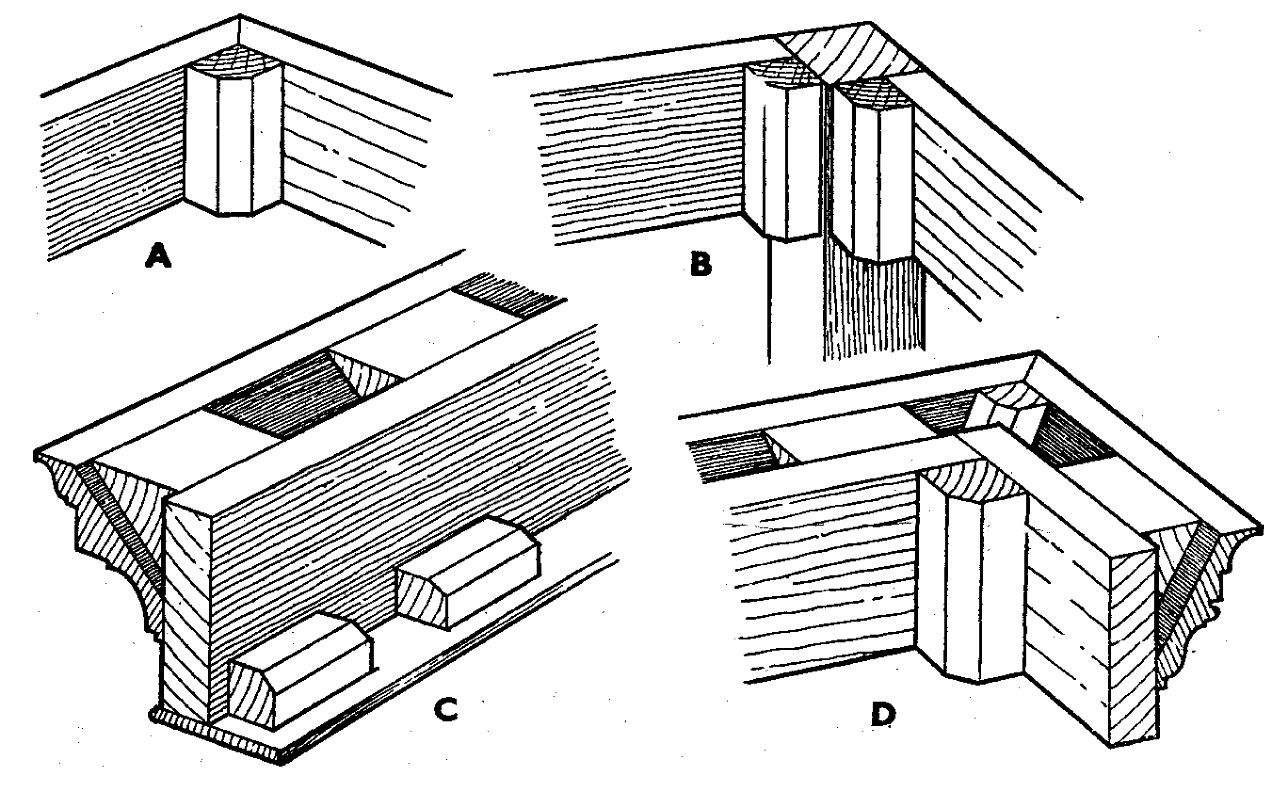
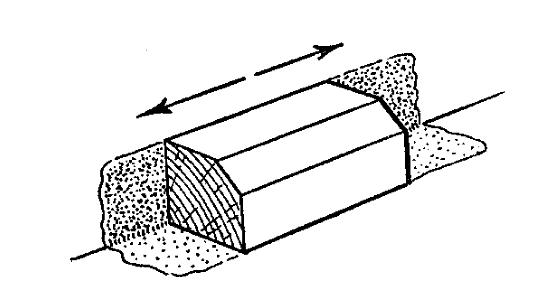
FIG. 5. EXAMPLES OF WAYS IN WHICH GLUE BLOCKS ARE USEFUL
The following is excerpted from “The Woodworker: The Charles H. Hayward Years,” Vol. II – Techniques. This article was first published when “glue” was understood to be hot hide glue (or, as it’s called in The Woodworker, Scotch glue). Rub joints work with other glues, but in my experience, not nearly as quickly – hot hide glue has incredibly fast tack. I’ve used glue blocks on several pieces, and for them, I always heat up a little hot hide glue. It’s well worth the (minor) trouble.
– Fitz
Like most other things, glue blocking has its abuses as well as its uses. A typical example is when it is used to replace a properly cut joint in cheap work. If confined to its correct function, however, that of strengthening a joint, it can add very materially to the strength, and is a perfectly legitimate practice.
From the outset we should be clear that the glue block is a rather ugly thing to look upon. It is therefore suitable only for positions where it is not seen, for it does its work chiefly by virtue of its bulk and the extra gluing surface which it provides, and it necessarily leaves a smear of glue at each side (we shall see the reason for this presently). In concealed positions, however, it can increase the strength of a joint very considerably.
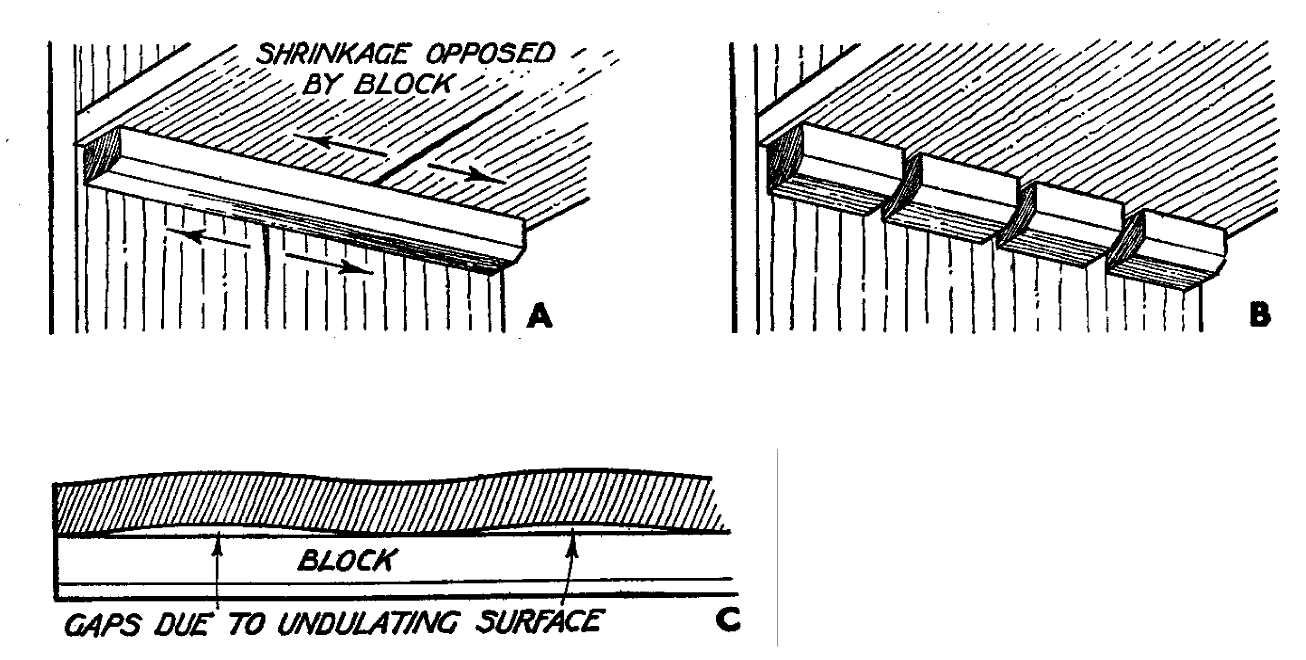
FIG. 1. HOW GLUE BLOCK STRENGTHENS A JOINT This shows how the blocks help to resist lateral movement by acting as angle struts. They also considerably increase the gluing area
As a simple example of its use take the T joint at A, Fig. 1. If the vertical member is subjected to much side pressure it is clear that, apart from the glue with which it is assembled, it has only the resistance of the wood in the joint to prevent movement. If the wood crushes or breaks, the member will give. At B, however, the glue blocks by their bulk offer considerable resistance, and in addition they have mechanical strength in that increased leverage is required to shift the joint. They are virtually like a short stay inserted at each side.
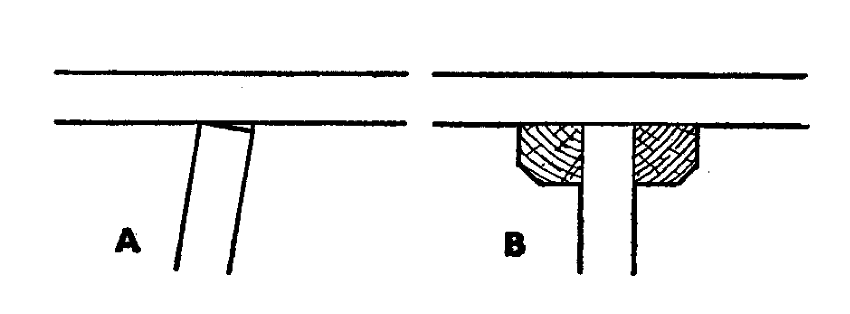
FIG. 2. WHY SHORT BLOCKS ARE PREFERABLE
To be fully effective, a glue block should be comparatively short—say an average of about 3 in. One reason is shown at A and B, Fig. 2. At A there is one long block running the whole length of the joint, and its grain runs across that of the pieces that it joins. Consequently the block resists movement in the event of shrinkage, and a split is almost inevitable. If, however, there are several short blocks close together, as at B, the wood is free to contract without resistance from the blocks.
Of course, when the grain of all the parts runs in the same direction there is not so great an objection to the use of long blocks, but, even then, short blocks are generally stronger for another reason. If the wood that is being joined undulates slightly, as at C, Fig. 2, it is inevitable that there will be gaps in places with loss of strength. Clearly, short blocks would conform much more closely to the uneven surface.
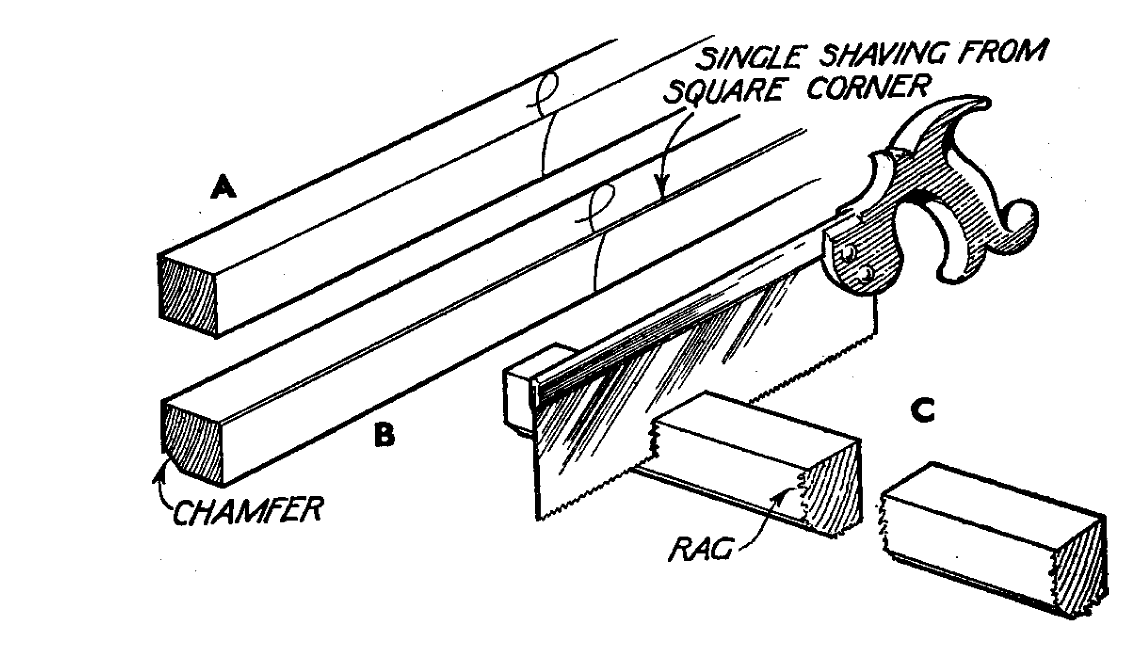
FIG. 3. STAGES IN MAKING GLUE BLOCKS
Preparation of blocks. The wood should be prepared in a length and cross-cut. Plane the first edge straight, and then make the other square with it, as at A, Fig. 3. Plane the remaining two surfaces (it does not matter if these are not exactly square), chamfer the outer corner, as at B, and take a single shaving from off the inner corner. There are two reasons for the large bevel. It lightens the block and takes off what is otherwise a heavy appearance; and it makes it obvious to the man who uses the block which is the square corner. The purpose of the single shaving from the latter is that sometimes a bead of glue is left in the corner into which the block is rubbed, and the removal of the corner enables the block to clear this.
FIG. 4. HOW BLOCK IS RUBBED IN THE ANGLE
When cross-cutting the blocks keep the square corner pointing toward you, as at C, Fig. 3. In this way the saw always cuts into both square surfaces. Any rag occurs at the outer surfaces where it does no harm.
Gluing the Blocks. When gluing a block, glue the two square surfaces and rub the block back and forth in the angle a few times, as in Fig. 4. A few examples of the positions in which glue blocks are useful are given in Fig. 5 [at top].