My current favorite book. Not because of the content necessarily. Just look at that cover! Wow.
When you encounter a person who is an incredibly talented woodworker, designer and teacher, it’s natural to wonder, “Why hasn’t this person written a book and become a famous author?”
I’ve met a lot of these people. I’ve attempted to get some of them to write a book. I’ve succeeded a few times and failed at least 100 times in my efforts. The next time you think, “Why doesn’t this person write a book?” here are some reasons I have encountered in my career.
They are perfectly happy with their life. They are plenty busy. They make enough money. They are not interested in becoming better known. You can’t argue with this. Writing a book can make you and your family miserable for a couple years.
They don’t have the organizational skills, focus and stamina to complete a book. A good book can require two years of work. It’s easy to get distracted or bored by the project. Especially if your day job is already a challenge.
They have no confidence in their writing skills and they fear the book will not find an audience. Basically, fear of failure. A related reason: The person is functionally illiterate. This is more common than you think. The smartest person I’ve met in my life was functionally illiterate. Writing a book will expose this fact to others, which can be embarrassing.
They know they have a problem calling a project “finished.” They will work and work on it, and it will never be good enough to release to the world.
They cannot afford to gamble spending two years on a project that might only pay them pennies on the hour. Many books do not make economic sense. If you do the math, it’s easy to conclude that only successful authors can afford to write books (a paradox).
They aren’t interested in sharing their methods of work with the entire world. Some authors fear their furniture business will be ruined if they share plans and their real methods with the public (John Brown was this way).
They feel like a fraud for some reason, perhaps a valid or invalid reason. Writing a book will expose them.
They distrust publishers. It’s a fair criticism; a lot of them are snakes.
The person is a complete jackass. Publishing a book is a team effort. If the author cannot take constructive criticism or they belittle everyone else in the project, their book is unlikely to be born.
I’m sure there are other reasons I haven’t yet encountered. Bottom line: It takes a special kind of maniacal, well-organized, generous optimist to write a book. Oh, and they have to have some talent, too. Honestly, the process is so fraught, it’s a miracle we have any woodworking books.
John Wilson, who unlocked the mysteries of Shaker oval boxes for millions of woodworkers around the world, died on Friday, Jan. 27. He was 83.
Wilson of Charlotte, Michigan, began his career as an anthropology professor, but then became a home builder and professional woodworker whose main line of business was building Shaker oval boxes and supplying woodworkers with the training and raw materials for these boxes (especially the copper tacks that hold the bent bands together).
But Wilson’s career encompassed more than just the beguiling and beautiful boxes. He also wrote extensively about toolmaking and taught classes on a wide variety of subjects, from boatbuilding to workbench building.
John Wilson’s boxes on the cover of Popular Woodworking, August 2003.
The business at the center of it all, The Home Shop (aka ShakerOvalBox.com), offers all the supplies and information that woodworkers need to build the boxes. Wilson retired fully from business in December 2022, leaving Eric Pintar, his long-time employee and partner, in charge of the business.
“John took full retirement… in full confidence that we will carry on with The Home Shop, and I’m ready to live into that,” Pintar said.
Pintar worked for Wilson for 28 years, and began as a shop assistant there when he was 16. In 2004, Pintar became an equal partner with Wilson in The Home Shop. Since the start of the pandemic Pintar had taken the lead responsibility for the output of the Home Shop including the teaching of Shaker oval box classes. With Wilson’s passing he takes ownership of the Home Shop and will lead it into the future.
So the supply of Shaker box supplies is secure for years to come, Pintar said. Still Pintar is humbled by the role he is moving to fill and said he is saddened that it is under these circumstances.
From Professor to Woodworker
Wilson grew up in Syracuse, N.Y., and was allowed full use of his father’s hand-tool workshop. While he studied anthropology at university, he worked as a carpenter on the side. After graduating with a master’s degree, Wilson taught anthropology at Purdue University, Michigan State University and Albion College. Despite his best efforts, a doctoral dissertation eluded him, thus ending a career as a university professor. Wilson then went to work in home construction.
In 1977, Lansing Community College offered him a job teaching furniture design. There was a catch: The class began in two hours, according to a 2007 interview of Wilson by Kara Gebhart Uhl. On his way to class, Wilson checked out Ejner Handberg’s “Shop Drawings of Shaker Furniture and Woodenware, Vol. 1” (Berkshire House). That book, and the course, led Wilson to investigating the Shaker’s oval boxes and figuring out how to make them.
“To be able to take the methods used by the Shakers and share those with others is a very beautiful thing, and in the spirit of the Shakers,” Pintar said. “Before John (making these boxes) was mysterious. He brought the methods and materials to the public.”
Wilson began making the boxes to sell and taught others how to make them in classes all over the country. That led to him starting The Home Shop, a large workshop on his land that he built using mostly recycled materials. The Home Shop supplied makers of Shaker boxes everything they needed to build them, including the carefully sawn wooden bands, plans and – most importantly – the copper tacks.
One of the amazing tack machines at The Home Shop.
In 1991, the W.W. Cross Nail Co. – the last copper tack manufacturer – stopped making tacks. Wilson acquired their machinery and began making seven sizes of tacks and 1/2” copper shoe pegs. The noisy, ingenious machines crank out a pound of tacks in about 15 minutes. In the early 2007 interview, Wilson said he was making about 300 pounds of tacks a year.
Wilson insisted for years on keeping the personal touch with The Home Shop. It was years before they had a website. Orders were taken over the phone and shipped with a bill – the honor system.
The Home Shop also offered classes on toolmaking (planes, spokeshaves and travishers), joinery (hand-cut dovetails, mortise-and-tenons), plus sailboat building and paddle making.
John Wilson & John Brown
I first heard of Wilson by reading the column of Welsh chairmaker John Brown (aka JB) in Good Woodworking magazine. JB took his first trip to teach chairmaking in America in 1997 and taught at Drew Langsner’s school, Country Workshops in North Carolina, and at The Home Shop in Charlotte.
Wilson always used an efficient blend of machinery and hand tools to make furniture. JB, on the other hand, used only a band saw to rough out the pieces and then was passionate (probably an understatement) about using hand tools only for the remainder of the work.
During the class, the men famously butted heads. Though Wilson was hosting the class, he also was a student in it. So when Wilson got behind in his work in the class, he would try to catch up in the wee hours of the morning with the help of some power tools.
JB was furious.
“I received a proper dressing down such as a boot camp sergeant might give,” Wilson told Gebhart in 2007. “I stood attentive like a good solider, listening to a man deserving of respect because of his expertise and experience. I could appreciate his point of view, so passionately given, on the virtue of hand tools while blending that kernel of truth with the mix of tools I had just employed that morning.”
JB also confiscated a micrometer from one of the students and threw it in a lake.
In the end it all turned out OK, and Wilson ended up making several of the chairs for his family: his wife, Sally, and children Molly and Will.
The “Little House” at right. The Home Shop at left.
Writing it Down
In the early 2000s, Wilson began writing magazine articles and books to help spread the word about Shaker oval boxes and toolmaking. He wrote multiple articles for Popular Woodworking Magazine, which is how I got to know him. Many of his articles are free for the reading here on The Home Shop’s website.
Plus he wrote and self-published four books. Three were on Shaker Oval Boxes plus “Making Wood Tools.” Like his business in general, Wilson made his books with a careful eye to quality with a personal touch – every book was autographed.
I made several visits to The Home Shop to help take photos for Wilson’s articles. I was always struck by how nearly everything there was made by him. I mean everything. He built the buildings, the kiln, the shop, the storage areas. Plus everything inside them.
His work was always soft and humane. The workshop was flooded with light thanks to enormous skylights (salvaged from sliding doors). I got to stay in his so-called “Little House,” a 15′ x 15′ structure where he lived for 12 years. This building – built decades before the “tiny house” movement – was incredibly well-considered. It felt absolutely roomy and comfortable thanks to his planning and careful construction of every bit.
As a person, Wilson was remarkably generous with his knowledge and his time. He sent hand-written letters (always accompanied by a postcard for The Home Shop). And he has been generous to the craft. His work with oval boxes has launched the woodworking businesses of hundreds of people over the years, and he never sought credit or royalties or anything. He just seemed thrilled that other people enjoyed making the boxes as much as he did.
Thanks to Wilson, I’ve made a bunch of these oval boxes – they are incredible gifts to give. And I couldn’t have done it without him.
So thanks John, for everything you gave us and more. You will be missed.
Below are two handplaning techniques from Robert Wearing’s “The Solution at Hand.” Wearing was one of the foremost experts on woodworking appliances; he wrote extensively about them for Woodworker magazine and published a number of books on the topic. In 2019, we approached Wearing about collecting the best of the appliances for handwork into one new book, and he agreed.
The result is “The Solution at Hand: Jigs & Fixtures to Make Benchwork Easier,” a hardbound book of our favorite jigs from Wearing’s career. The book covers a wide swath of material, from building workbench appliances for planing, to making handscrews (and many other ingenious clamps), some simple tools that you cannot buy anywhere else, to marking devices that make complex tasks easier.
– Fitz
Thin strips of identical thickness, such as may be required for laminating, can be accurately produced by handplaning by means of a simple jig. This consists of a base-block, A, and two rebated side members, B. The space between the two rebates must just allow free movement of the chosen jack plane. A projects below B, to be held in the vice.
The sides are glued and pinned in place using an assembly block with a true face in the plane position and a piece of ply, card or suitable spacing material of the required thickness. The illustration makes this clear. When complete, an end stop, C, is fitted.
Modifications: For the making of stringings for inlaying or musical instrument making, grooves are ploughed or cut on the circular saw in the baseblock A. In this case there is no need for rebated sides. Very thin pieces will tend to buckle when planed against a stop. This is overcome by cutting away some of the baseblock and pinning on the workpiece below the level of the blade. In this case, of course, the components and the jig must be made extra long.
An adjustable model can be made by slotting and screwing on the sides. The adjustment is made using the same method as when gluing on the sides to the simple model. Solid wood keys for reinforcing mitre joints can be produced in this manner.
Handplaning Very Small Components
Very small components can best be planed by holding a plane upside down in the vice and pushing the workpiece over the blade. As this method gives every chance of shaving off the fingertips, a push stick is an advantage. Even better is this simple planing device. It consists of a hardwood base with a firmly secured handle. Guide pieces, thinner than the finished job, can be pinned or glued on so that they can be changed when the aid is used for another job.
In today’s look at a smallish section of the loosely organized Covington Mechanical Library (it becomes looser every time I look at a shelf and bemoan the mis-shelving), we’ll travel to the United Kingdom and a few of her former colonies, as well as France, Estonia (via the CIA), and Sweden. And yes, I took the picture below after rearranging a bit from the lead image – so now this shelf is at least slightly more organized. (Why such a small section? I have a class that starts Monday, I’m writing this on Saturday, and I’m not quite done with stock prep. I’ll cover the rest of this shelf in my next library post.)
England The first grouping is English furniture, starting (appropriately) with Edward T. Joy’s “English Furniture: 1800-1851” (Sotheby Parke Bernet, 1977), which includes the influence of Hepplewhite and Sheraton at the start of the period, the Regency period to the Great Exhibition/Victorian. That’s followed by our friend Charles H. Hayward’s “English Period Furniture Designs” (Arco, 1968). As far as I can tell, these are drawings he did for The Woodworker Magazine that were compiled by the publisher, and include measured drawings and select details for pieces ranging from the late 15th century through the Regency. In the back are one-page illustrations of various forms through the ages (chairs, chests, etc.). Next is Margaret Jourdain’s expanded edition of John C. Rogers’ “English Furniture” (Sterling, 1950). It’s divided into broad historical periods, and includes nice drawings select details and how they changed over time (drawers, cabriole legs), as well as a few tricky joints – stuff you can’t see from the outside.
From Rogers’ “English Furniture.”
David Knell’s “English Country Furniture: 1500-1900” second edition (Antique Collectors’ Club, 2000) will come as no surprise to those who know its owners love of all things vernacular – though Chris prefers Gilbert and Chinnery – both of whom are well represented in our collection…though not all on this shelf. Next is one of those favorites: Christopher Gilbert’s “English Vernacular Furniture: 1750-1900” (Yale UP, 1991), which Chris says is both excellent writing and research. Then it’s Mark P. McGrail’s “Furniture Brasses: A Short History of English Furniture Fittings (Armac Manufacturing, 1997). This one is published by a maker of hardware, so it of course shows their wares – but it’s also an invaluable education of what hardware is appropriate to the various periods in English furniture. Next up is an saddle-stitched exhibition catalog, “A Exhibition of Common Furniture” from the Stable Court Exhibition Galleries in Leeds, 1982. Our researcher extraordinaire Suzanne Ellison sent this one to Chris. It’s where he got the idea for his dearly departed dugout chair, and it has the story of his favorite “creepie” (see below).
The last book English Furniture book (in this grouping) is Christopher Gilbert’s “Selected Writings on Vernacular Furniture: 1966-98” (The Regional Furniture Society, 1991). The title alone should reveal its appeal.
Wales & Ireland I am quite sure we have more books on both Welsh and Irish Furniture; they must be upstairs on Chris’ bedside reading stack or elsewhere on these shelves. They’ll turn up on this blog series eventually. Here, however, we have one lone Welsh offering: Richard Bebb’s “Welsh Country Furniture,” (Shire, 1994). It’s a short treatment of forms and attribution. Then it’s across the Irish Sea with Nicholas Loughnan’s “Irish Country Furniture” (Easton & Son, 1984) and John Teahan’s “Irish Furniture & Woodcraft”(Town House and Country House, 1994). Both are slim volumes that offer but a glimpse of work from the Emerald Isle. David Shaw-Smith’s “Ireland’s Traditional Crafts” (Thames & Hundson, 1984) looks at handicraft beyond furniture, from willow and straw work to other woodwork (coopering, pipes) to textiles to stonework and more. Then we have the first edition of Claudia Kinmonth’s “Irish Country Furniture 1700-1950” (Yale UP 1993). You can read more about Kinmonth in Nancy Hiller’s profile of her.
Canada & New Zealand Howard Pain’s “The Heritage of Upper Canadian Furniture: A Study in the Survival of Formal and Vernacular Styles from Britain, America and Europe, 1780-1900” second edition (Key Porter, 1984). Publisher Steve Shanesy had this book at Popular Woodworking, and Chris always loved it. So he bought a copy. It’s an interesting look at furniture that hasn’t gotten a lot of coverage – pieces based on the traditional furniture of those who emigrated to Canada from all over the world, but produced in very different conditions. And there are a fair number of stick chairs. S. Northcote-Bade’s “Colonial Furniture in New Zealand” (Reed, 1971), a gift from a reader when Chris was working on “Campaign Furniture.” It shows some portable furniture, suitable for use on a ship and at home in the owner’s final destination.
From “Colonial Furniture in New Zealand.”
France, Estonia & Sweden. (Together Why?) For some reason, we’ve a single book on the crafts of France in this section (there are many more to come): “The Handicrafts of France: As Recorded in the Descriptions des Arts et Métiers 1761-1788,” (by Arthur Cole and George Watts, published by Augusts Kelley, 1952). That’s followed by Ants Viires’ revised edition of what we call “Woodworking in Estonia” – the one on which our translation is based. Alongside it is the 1969 translation into English, which has one of the craziest book stories I’ve read. Part 1 of said story is here; part 2 is here.
Last on today’s world tour is Hans Keijser, Lars Sjöberg and R. Willick’s “Making Swedish Country Furniture & Household Things” (Cloudburst Press, 1976). This was liberated from, er, a former employer, by…someone. This isn’t slöjd work; rather it’s the vernacular furniture than informs much of Chris’ work. In this book is the “Skansen Bench,” which was built as as “I Can Do That” project for Popular Woodworking, and has since been repurposed as a low workbench.
Bean and our low Swedish bench.
— Fitz
This is the ninth post in the Covington Mechanical Library tour. To see the earlier ones, click on “Categories” on the right rail, and drop down to “Mechanical Library.” Or click here.
Now that we’ve sold through our copies, we’re offering a free pdf of our high-quality scan of the “Stanley Catalogue No. 34.” You can read it in this post, and click on the link below the window to download.
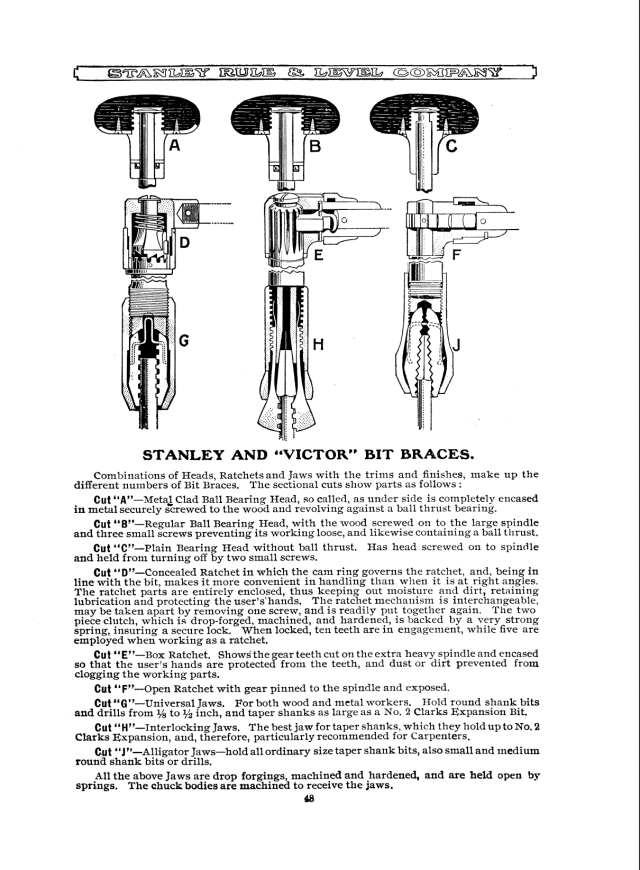
This catalog shows nearly every tool needed in a hand-tool shop, from the chisels to the butt gauges to every sort of plane in Stanley’s 1914 line. The catalog’s text explains what each one was used for and how it functions differently from other similar tools available at the time.
The catalog also has fantastic exploded views of many of the complex tools, such as the company’s miter boxes, the multi-planes and handplanes.
It’s a great way to better understand how hand tools of all sorts work.