Several weeks ago, James Wright of “Wood by Wright” and his daughter, Melody, poked their heads in to see just what really goes on around Lost Art Press. With camera in hand, James and Melody, recorded as Chris gave the grand tour of our shop, offices, and Anthe warehouse.
You may recognize James from his popular Youtube channel where he posts daily hand tool woodworking, demonstrations and how-to videos. You can click here to see James’s channel and watch more content.
But before you do that, give the video below a watch if you wish to get an in-depth look of where we work, create and pee!
We have the books. We have the tools. We have the boxes. We are ready for Free Shipping On All Orders in October!
Whatever you order, be it a box of pencils, a bottle of glue or a handful of pocketbooks, will ship free through the end of this month.
We can do this because we have all our inventory in our own warehouse in Covington, and we have Mark and Gabe (and the rest of us as needed) to help ship that inventory without losing our pants. (We used to be charged $4 for every order, plus storage, plus boxes, plus pick fees, plus, plus, plus… Now our storage and salaries are fixed overhead costs.)
So through the end of this month (October 2025) we are offering free shipping on every product. There’s no code to type in. No coupon. When you check out, free shipping will be automatically applied.
Figure 3.1: The bridge entrance to the main temple complex of Putuo island, as photographed by John Thompson for his book “Illustrations of China and Its People,” published in 1874. Mount Putuo is one of four sacred mountains in Chinese Buddhism and has been a center of worship and pilgrimage since at least the 10th century A.D.
After years of research and more than 150 interviews, Gaffney produced a definitive biography of Krenov, featuring historical documents, press clippings and hundreds of historical photographs. Gaffney traced Krenov’s life from his birth in a small village in far-flung Russia, to China, Seattle, Alaska, Sweden and finally to Northern California where he founded the College of the Redwoods Fine Woodworking Program (now The Krenov School). The book brims with the details of Krenov’s life that, until now, were known only to close friends and family.
The newborn Jim would remain in Uelen only through the winter. Even in this faraway place, at the edge of the Asian continent, soldiers began appearing with the incoming merchants. They arrived to solidify the new revolutionary government’s control of even the most far-flung districts, and the post-revolutionary civil war between the Bolsheviks and other rival factions had spread east. The first boat in the spring of 1921 carried a message from Dmitri’s parents, who had fled St. Petersburg for Shanghai like many other wealthy Russian emigrés. They urged the couple to join them in the safety of their new home, and Dmitri left immediately for nearby Nome, Alaska, to make arrangements for their travel. The family would travel down the western coast of America and then west across the Pacific, the journey through Russia now being too dangerous.
“I resented the thought of family reunion,” Julia wrote. “But I could not possibly stay in Uelen alone with my baby.” Her resentment at the reunion stemmed not only from her distaste for her in-laws and the nobility they represented that she had flourished apart from, but also her parting ways with the Chukchi people. “Not a day was I unwell during the three years in Uelen. And now I had to leave the life I was fit for, the people I loved.”
But with the Russian civil war spreading to the outpost, with the Bolsheviks having reestablished control of Chukotka, her husband’s quick preparations may have been doubly motivated. Dmitri, perhaps happy to leave the remote outpost to join a semblance of the old Russian society, quickly sent back for his wife and newborn son, who boarded a schooner from Uelen to Nome – American territory.
In Nome, Julia and her child were subject to significant cultural whiplash. The simple fur garment that the Chukchi had given her son, made from fawn-skin, was swapped out by visiting nurses for diapers and outerwear. The couple and their son caused a stir in the small Alaskan city.
“‘The wife of the Governor of Siberia (imagine – Siberia!) and her son’ were the silly captions in the Nome papers,” Julia remembered, poking fun at the title given to her by the press; no such governor existed, though Dmitri may have given his short-lived title of “Chairman of the Chukotsk Regional Council” to lend weight to their plea for assistance. They were housed by the mayor of Nome, who also sent nurses and food to the young family, as the Krenovs waited for a few days before boarding a ship to the mainland United States. The Alaskan government footed the bill, to be reimbursed by Dmitri after he was able to make contact with his family in Shanghai. When Dmitri did make contact with his parents, they were only able to send a small sum for their travel, and so the couple made their way to Seattle and boarded a Japanese freighter, the Suo Maru, destined for Shanghai.
The trans-Pacific trip was trying for Julia and her newborn. There were no private cabins, only bunks, and Julia spent much of the trip seasick, leaving Dmitri to care for the months-old Jim. In the South China Sea the ship met a typhoon, and it only barely made its way to the port of Shanghai.
The family was greeted at the port by a valet, a young Chinese man in the employ of Dmitri’s parents, who fetched them from the docks. The family was brought home, after their trying trip on the freighter, by a luxurious Victorian carriage to the residence of “Mr. and Mrs. K.” The home was on Bubbling Well Road, a famous district known at the time as a wealthy and fashionable area, with tree-lined streets frequented by automobiles, a relatively new technological arrival to the Chinese city.
Figure 3.2: Dmitri’s parents’ mansion in Shanghai on Bubbling Well Road. The context of the exotic flora and blurred rickshaw in front of the house betray the locale of the photo, which otherwise is similar in form and aesthetic to the Art Nouveau and Eclectic styles of architecture Alexander Krenov is credited with in St. Petersburg, where 16 buildings attributed to his designs as an architect still stand. Photo courtesy of the Krenov family.
Over champagne at a celebratory dinner, Julia was encouraged to continue teaching English in the new city, not to indigenous children but to “a host of former generals, civil servants, professors and members of the Russian colony in exile.” These Russian expatriates were eager to learn English, perhaps sensing that Shanghai would only serve as a temporary home before an ultimate resettlement across the Pacific. In fact, the Communist Party of China was founded that year in Shanghai, modeling itself after the very revolution that had cast out Julia’s students; Shanghai, too, would soon scatter many of these privileged parties abroad.
Julia attempted in vain to find some comfort in urban Shanghai. And despite her teaching job that connected her with other Russians of noble birth, she felt ostracized and foreign in her new home. She found some comfort in observing “the ancient culture and proud past of the Chinese,” but she resented the segregation and intrusion that the European settlers had introduced in the city.
Her son’s life also was dramatically impacted in the move. At the insistence of Dmitri’s mother, a Chinese “amah,” or nurse, was hired to take care of the young boy. Julia grew fond of the young woman, whose appearance she described in her memoir as “pristine.”
“She was a slim young woman, gentle, quiet, endearing, in immaculate white coat and trousers,” Julia wrote. “Her hair with a bun in the back was so flat and glossy that one could have thought it lacquered or glued.”
The family spent their first year in the company of Dmitri’s parents; Julia taught the expatriate Russians English, and Dmitri worked as a consulting lawyer with his father’s architectural firm. But after their first summer in the city Julia sought a refuge outside the center city, perhaps wishing to win back a degree of independence from her husband’s family and hoping to escape the brutal heat of the city (which often soared over 100ºF). She made friends with another young Russian family with a daughter the same age as James. The families heard tell of a refuge, the temple island of Mount Putuo at the mouth of the Yangtze River, about 100 miles southeast of the city.
The Krenovs managed to find their way to the 1,000-year-old monastery on the island, and after a night in a small outbuilding, were given an audience with the dean of the temple. They had hoped to rent a small flat on the island for the summer, to escape the heat of the city – but the dean informed them there were no private residences on the island. However, the dean offered to construct a small building on the property in a week or two, and the Krenovs would be allowed to stay there, paying only a small rent.
After returning to the city to make arrangements, the family departed a week later to take up residence on the small sacred island with their young Chinese servant and James’s amah.
Figure 3.3: Julia’s photo of the Puji Temple on Putuo island. The island now has three main temples, Puji Temple, Huiji Temple and Fayi Temple, though in its heyday, it had upward of 82 temples, spanning its thousand years of history in the Song, Yuan, Ming and Qing dynasties. Photo courtesy of the Krenov family.
“Poo-too was a fairy-land,” Julia recalled, using a phonetic spelling of the island’s name. “The temples were surrounded with parks and ponds with legendary, century-old carps lazily moving, or standing among the lotuses.” The family attended daily services, with chanting monks in processions through the columned old temple building, and Julia found a subject on which she could focus her newfound sociological interests. She was fascinated by the ancient Buddhist philosophy, though her interest was objective; her heart remained with the Arctic people’s philosophy, and she found the monks’ philosophy “too introspective for my active temperament.”
Young James was just shy of 2 years old by the time the family made its way to the island, in the summer of 1922. The past year in Shanghai had seen the family split up, with James being cared for by his amah. On the island, the family was together in their simple homestead among the monks. The time on the island are among James Krenov’s earliest memories.
Figure 3.4: Julia sits on a wall in Mount Putuo with her 2-year-old son. While Jim’s amah accompanied them to the island, Julia was able to spend more time with her son while away from Shanghai and out from under the propriety of her in-laws. Photo courtesy of the Krenov family.
One particular vignette from the island would become a favorite story of James Krenov’s years later, one that reflected the influence of the worldly upbringing of the young Russian boy. His amah was herself a Buddhist, and would frequent the shrines of the temple each morning, with the child in tow. On one such morning, as the amah sat on her cushion in prayer, 2-year-old Krenov knelt beside her, imitating her posture. “He, too, knelt down beside her, folded his little palms carefully and bowed his head,” Julia remembered. “I felt tears tickle my eyes.” The monks of the temple were struck by the gesture. The family was an oddity on the island, but the island’s inhabitants were seemingly as interested in the curiosities of its new tenants as the visitors were struck by theirs.
Their months on the island began with a welcome relief from the heat of Shanghai, but the adventure from the security of the upper-class neighborhood of Dmitri’s parents was not without its misfortunes. The first exposure to the unsheltered reality of the people of Putuo came with the yearly pilgrimage many Buddhists took to the island. Hundreds of worshipers arrived at the island and a large party of “beggars” accompanied the arriving ships. Many of these poor pilgrims were ill with a stomach ailment, the Krenovs were told. Julia’s friend, another European who came to visit the island, had a tonic that she hoped might alleviate the suffering of the ill, who were kept outside the gates of the temple. Julia and her friend went about administering the medicine, and the next day, they found their patients had moved on. They were later informed that the beggars had in fact brought cholera to the island, and the outbreak had claimed the lives of dozens of the pilgrims. The family had shared the same water source, but managed to escape the illness.
Figure 3.5: The island of Mount Putuo is famous for its ancient trees, having been cared for by generations of temple caretakers. Among the 238 species of trees and shrubs on the island there are 63 species of rare trees and even one, the Putuo hornbeam (Carpinus putoensis), that exists nowhere else. Photo courtesy of the Krenov family.
The mishap that ended the family’s time on the idyllic island was a typhoon, a commonplace event on the East China Sea, that battered the unsheltered coastal islands. The Krenovs and their servants were moved from their small abode to the main temple, and after the worst of the storm, they emerged from the temple to find that the simple structure the monks had made for them had been leveled. Defeated and with the summer heat fading, the family returned to the mainland and Bubbling Well Road. Dmitri was happy to be back in the company of the expatriate Russians, whose dinners and receptions reminded him of his privileged days in St. Petersburg. Julia avoided such events under the pretext of working on her notes from the Chukchi culture, raising her child and tutoring her students – in fact, she later wrote in her memoir, she was tired of the tedium.
“I longed to get away from it all,” she wrote. “Had I been alone, I would have walked, if need be, through the hordes of the Semionov’s cossak bands that were raging and terrorising people near the Russian border.”
Julia wished to see her parents and return to St. Petersburg, despite its political upheaval, but the events unfolding back home in 1923 prevented her from doing so. The Russian civil war had ended, but the establishment of the USSR would have left her without the luxury of her upbringing, and had claimed the family home or possessions she might have returned to. In this period, she lost contact with her family in St. Petersburg; they may not have been there to receive her.
Their time in Shanghai, too, was coming to a dramatic end. Dmitri’s parents made plans to leave Shanghai for France. The older Russians may have been fleeing the nascent Chinese Communist Party established the prior year in Shanghai with support from the new Soviet state, or were growing restless in China and wished to return to Europe and the lifestyle they had left years earlier. Their journey was planned across the Pacific, where Dmitri’s father would exhibit his paintings in San Francisco and London.
Julia and Dmitri were left with a difficult choice. The young couple and their son might have remained in Shanghai without the support of Dmitri’s parents; Dmitri’s brother, Boris, stayed in Shanghai for another several decades until an eventual relocation to the northwestern United States in the late 1940s. But this option was not taken, perhaps because of Julia’s distaste for the old-world culture from which she had now grown distinctly apart. They considered a trip west to France, where they might have some chance of meeting Dmitri’s parents after their trip across the Pacific, but Julia was afraid of crossing the Indian Ocean, as the journey by boat was a long and risky voyage through the tropics. Julia didn’t think she could have withstood it, especially with a 2-year-old son in tow.
And so, after three years in Shanghai, the Krenovs made the choice to sail east to the United States, far across the Pacific Ocean, an exodus many upper-crust Russian expatriates were making after their expulsion from the new order of Communist Russia. They would have their last taste of luxury on this ocean crossing, not in the hold of a Japanese freighter but in a cabin on the Empress of Asia. This would be their last time together in the Eastern hemisphere, but the family would soon return to the white Arctic north, this time on the Alaskan side of the dateline, and among an indigenous people in a starkly different and impoverished situation.
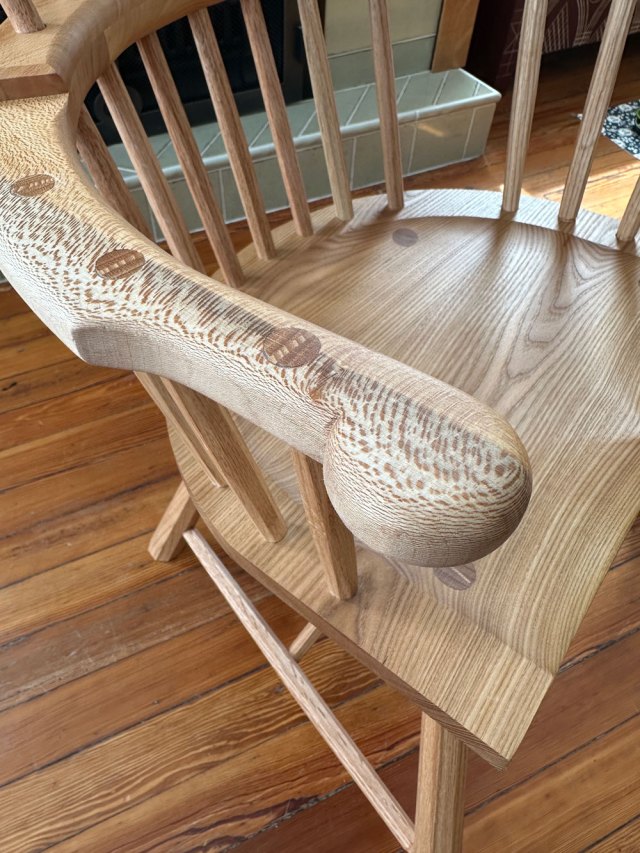
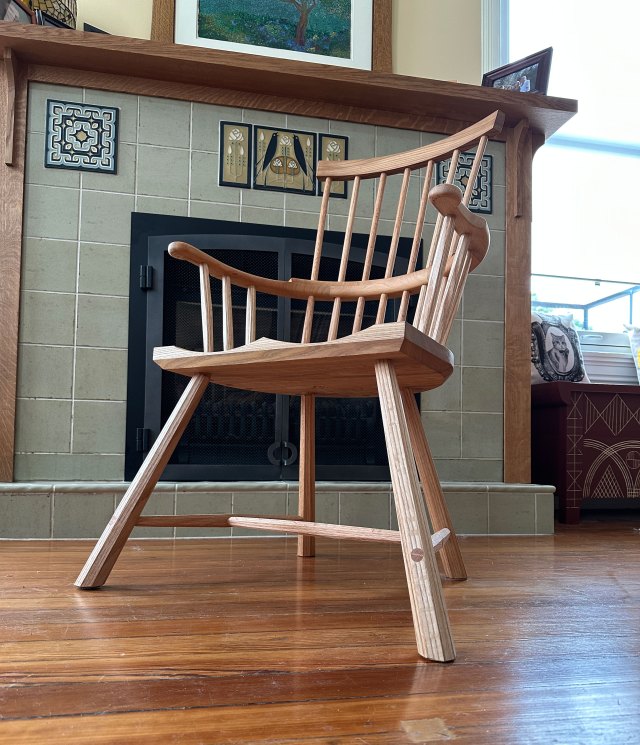
This seven-stick comb-back is Katherine’s first apprenticeship chair, which we built together while teaching a class last week. It’s set up for lounging, with back sticks that rake 20° back and a seat tilt for lounging.
Like all stick chairs, this one bears imperfections that mark how it was made. The leg angles are not exact because they were drilled by hand and without guides. Two mortises in the hands have small cosmetic gaps around the hands when the bit wandered as I drilled. (Yes it was me. Katherine was the spotter.)
All in all, it’s an excellent chair in the way it sits and looks. But it’s not manufactured perfection.
The chair has a red elm seat that is pierced with red oak legs and sticks. We drove the legs and sticks into the seat so hard that the oak’s facets cut into the elm. This is why stick chairs last.
The arm is quartersawn sycamore. Like elm, it’s unlikely to split, but it has a little flash of ray flake in the hands. And the comb is elm – because that’s what we had at the end of the day. The wedges are straight-grained hickory, which we drove like nails to hold the chair together.
The entire chair is assembled with animal glue, which is reversible should your descendants ever need to repair it. And the chair is finished with soft wax, which we make here in Covington. Both of us have signed the chair.
The seat height is 17”, which we are happy to cut down for you before shipping. The overall height of the chair is 39-3/8”.
Half of the chair’s proceeds will go to Katherine. Being an apprentice isn’t easy.
How to Buy the Chair
I’m selling this chair for $1,800 via a random drawing. The price includes shipping and crating to anywhere in the lower 48. If you wish to buy the chair, send an email to lapdrawing@lostartpress.com before 3 p.m. (Eastern) on Monday, September 29. Please use the subject line: “apprentice chair.” In the email please include your:
U.S. shipping address
Daytime phone number (this is for the trucking quote only)
If you are the “winner” the chair will be shipped to your door. The price includes the crate and all shipping charges. There are no additional charges. Alternatively, the chair can be picked up at our storefront. (I’m sorry but the chair cannot be shipped outside the U.S.)
Recently we’ve lost two important contributors to our craft: sawmaker Mike Wenzloff and historian Charles Hummel. I knew Mike fairly well, and I met Charlie in person only once. But both people made an indelible mark on me.
Mike Wenzloff was a pioneering sawmaker. During the early 2000s, Mike began making incredible handsaws and backsaws in a variety of patterns. He set up a small factory in Oregon to make them using a combination of hand techniques and automation.
For me, Mike was best known for his Kenyon-style saws. He was the first person I knew who made an entire set of the handsaws from the Benjamin Seaton tool chest for sale. And they were fantastic. From that set, I still own one of his sash saws (filed rip) and use it almost every day. His Kenyon tenon saw was an engineering feat and allowed woodworkers to understand how 18th-century tenon saws worked. They are nothing like modern tenon saws.
Mike was insistent that the prices of his saws should be reasonable so that beginners and middle-class woodworkers could afford them. While that made his business a struggle, he stuck to that idea until heart disease made him close down his sawmaking business.
After that, Mike immersed himself in cooking, according to his wife, Dina. And he began designing his own fonts.
Dina supplied the following obituary for Mike, and I’m posting it in its entirety.
Mike Wenzloff
February 15, 1956-July 25, 2025
Michael Kevin Wenzloff passed away July 25, 2025, in his home at age 69 after a long battle with heart disease. Mike was born February 15, 1956, in Everett, Washington, to parents Martha Anne (WHITE) and Richard Delmer Reed. He was later adopted by Otto Henry Wenzloff, Anne’s second husband.
Mike and his older brother, Rick, often spent summers with their grandparents Wilbur and Etta White. “Gramps” worked for the prison system two weeks on and two weeks off. He and the boys usually went hiking and fishing in the mountains of Washington every couple weeks.
Otto, Anne and the boys moved to Beaverton, Oregon, and then Tigard. Mike attended Tigard High School. Mike married Dina VanDerschelden, his wife of 51 years.
Mike worked for Otto at Tualatin Automotive, doing auto body repair and painting everything from small equipment to large dump trucks while Otto did most of the mechanics, training Mike at the same time.
In 1978, Mike, Dina and their son Kristofor moved to Sandpoint, Idaho, living in the log cabin they built without running water, electricity or phone for eight of their 10 years in Idaho. Two more sons, Albert and William, were born in the log cabin. In Idaho, Mike worked for the county and then went into the logging business. He loved working in the woods, especially cutting large trees and running a skidder.
Mike brought his family back to Oregon in 1988. There he attended Multnomah School of the Bible. During school Mike found he liked and had a knack for desktop publishing and all things computer. He started golfing and loved to golf with his sons.
Mike and Dina remodeled their home in Forest Grove, built in 1897. While there he took up woodworking and that grew into building handsaws with the help of his sons, Kris and Will, and nephew, Jacob. Wenzloff and Sons Sawmakers was a small family business until health concerns prevented Mike from continuing.
Mike was preceded in death by his mother, Anne Wenzloff, his birth father, Dick Reed, his brother Rick, and step sister Jackie.
Still living in Mike’s family are his father, Otto Wenzloff (Pam); Dick’s wife, Marlene; Mike’s wife, Dina; sons; Kris (Coleen), Al (Amy), and Will (Katie), granddaughters: Jaclynn (James), Sylvia and Zimri; grandsons: Wendell and Ezra; great grandson Noah; great granddaughter Gracelyn; step sister Gigi (Craig); nephews Jacob and Jordan, niece, Jennifer; and Otto’s three daughters, Dede, Grace, and Cheyenne.
Charles Hummel
It’s really not possible for me to pay tribute to Charles Hummel, a longtime historian at Winterthur and the author of “With Hammer in Hand.” Charlie literally wrote the book on how to cover historical woodworking practice.
“With Hammer in Hand” is the blueprint for how research and exposition are handled with historical woodworking practice. Charlie raised the bar for everyone, and the result is that books on historical practice are much less romantic and far more useful.
Charlie was also willing to help almost anyone else interested in historical practice, including Jennie Alexander, Peter Follansbee and a long list of other people exploring traditional practice.
I met him in person only once – at Jennie Alexander’s memorial. I was amazed at how sharp Charlie was. It was like talking to a 40-year-old genius.