The scholarship is open to “women and those who identify as female both nationally and internationally and is part of the school’s ongoing efforts to increase diversification in the craft.”
The school and woodworking community worked together, raising more than $7,000 via a raffle. Prizes included handmade furniture, equipment and a deluxe copy of “With All the Precision Possible: Roubo on Furniture”. Proceeds from the raffle will fund seven week-long class scholarships.
• Name and date of the class you’d like to attend (plus two alternates if your first choice is not available)
• 100-150 word description of why you’d like to attend
If selected, your scholarship will cover the full tuition of the class and, when deemed appropriate, a small travel stipend. Apply now through January 30. Scholarships will be awarded via email between December 31 and February 28. Check out all the details here.
To learn more about the Florida School of Woodwork and its founder, Kate Swann, check out Nancy Hiller’s two-part interview series here.
Fisher’s high valuation of hard work emanated from his constant recognition of the fleeting nature of time and, throughout his life, Fisher lived under a sense of Divine calling. Every moment mattered. He saw himself as a steward entrusted to use his time in this life wisely. Fellow minister, the Rev. Stephen Thurston, couldn’t help but recall that Fisher “was remarkable for his industry, esteeming it a great sin to waste time. Hence he accomplished much – labored on his farm, wrought at his bench, studied much, published several books, wrote more sermons than any man [he had] ever known …”. (9)
It was, at first, hard for me to contextualize Fisher’s level of productivity because I knew many ministers of this period were both well-educated and prolific. It is true that, compared to 21st-century standards, the amount of work Fisher produced is astonishing, but I wondered if that was typical for the 18th and 19th centuries. It turns out my doubts were unfounded.
Fabricating the elaborate clock mechanisms required a careful and skilled hand.
After reading scores of observations from his contemporaries, I found every single comment about the parson’s productivity concurs with this amazement. Even in his day, people could not believe what he accomplished. His son Josiah recalled, “Every moment of the day he was fully occupied from his early rising to about 10 at night. By a systematical division of time he was enabled to perform an amount of labor which is truly surprising.”
Fisher’s entry for Jan. 1, 1790, solemnly reflects on the passing of another year: “The fleeting years roll on in constant succession; seventeen hundred and eighty nine is past forever! Our clocks may stop, our business may be suspended; but the wheels of time will ever move till the grand period, when eternity commences … It is of infinite consequence that we should seize and use the present moment; not in the work of tomorrow, nor in the work of yesterday, but in the work of today, in the work of this instant. Time can never be recovered.” This conviction never abated and, accordingly, his actions throughout life were ordered and punctual. In the words of Candage, “his minutes were as precious to him as money to the miser.” (10)
This prioritization on productivity was apparently enough for Fisher to undertake the construction of a clock during his vacations from Harvard between 1790 and 1792. This “single day time piece,” a complex mechanism of wooden and brass gears of his own design, was a challenge that pushed his intellectual and artistic limits. Even the logwood-dyed clock case must have been something special – he spent three weeks constructing it.
Fisher’s clock face.
It is telling that of all the furniture that Fisher made for himself, this is the only piece that elicited explicit commentary. When Fisher later copied these early journal entries, he added an annotation that it was in his grandfather’s room until 1817, at which point, he brought it to Blue Hill to be installed in his new addition. Once home, he “repaired it and somewhat improved it, and set it up in [his] own house in Bluehill, where to this day, December 31, 1833, it has been a valuable piece of furniture.”
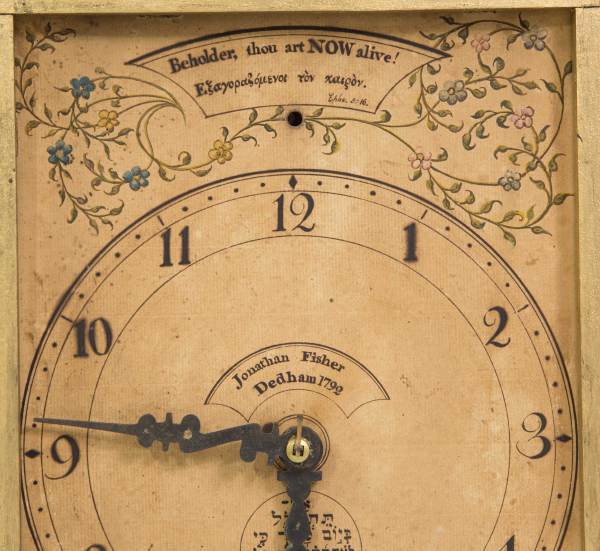
For some unknown reason, the original clock case was discarded in the 1817 restoration process and the clock itself was installed into a built-in closet in his hallway facing the kitchen. As a part of this restoration, Fisher also painted an elegant and florid new face for his clock. Several inscriptions remind the viewer to use their time wisely. At top center, the face reads: “Beholder, thou art NOW alive! Eph 5:16” (which is “Redeeming the time, because the days are evil”). Just below center of the dial, Proverbs 27:1 is written in Hebrew: “Boast not thyself of tomorrow; for thou knowest not what a day may bring forth.” The bottom of the clock reads: “What is your life?” in French and, “Time irretrievably flees” (a reference to Roman poet, Virgil) in Latin. Fisher saw the new clock face as an opportunity to call attention to the fleeting nature of life. The clock, then, functioned as a minister to him and his family, a preacher of righteousness, calling him to industry.
The mechanical aptitude required to make a clock exceeded that of the average rural craftsman.
But the spiritual value is only one side of the coin because it is hard to overestimate the significance of clocks in the late 18th century. To be able to tell time to the minute was an indication of sophistication and intellect. Scholars, ministers and gentlemen had clocks. Farmers had no use for the second hand – they thought in terms of morning and evening. But the urban elite had meetings and appointments. For a rural frontier minister to not only own a clock, but build it himself, is noteworthy.
The mechanical aptitude necessary to produce such a device was outside that of the average “mechanic” in the 18th century. Designing and fabricating the clockworks during vacations from college was the epitome of the marriage of head work and hand work. Such complex mechanisms demanded thorough planning and a careful hand in a way that none of his cabinetmaking did.
The clock was installed into this built-in closet in the main hall of his 1814 addition.
This clock face vividly illustrates how the intellectual, spiritual and creative vision Fisher had could collaborate to produce an object that asserts the power of all three at once. This complexity of abilities and motivations makes Fisher a fascinating study. To see an educated man who was just as comfortable conversing with the intelligentsia of his day as he was hewing out posts for his kitchen chairs is inspiring, to say the least.
(9) From Fisher’s funeral sermon delivered by the Rev. Stephen Thurston. (10) Candage, Rufus George Frederick, Memoir of Jonathan Fisher, of Blue Hill, Maine (1889), Kessinger Publishing, 2009, p 226.
We’ve had a notice about shipping deadlines up on every page of our online store for the last week or so, but it bears repeating here. Because of the massive shipping problems across the United States this season, Wednesday, Dec. 16, is the last day to place an order in our store and have any hope of receiving the box before Christmas.
Even if you do place the order by the 16th, we can’t guarantee the shipment will arrive in time. All the country’s shipping channels are overloaded, and there’s nothing we can do about that I’m afraid.
Several weeks ago we stopped shipping books out via Media Mail and have opted to send packages via faster methods. We have been absorbing the additional expenses. But even that hasn’t speeded things up as much as we’d like.
Bottom line: This is a difficult year. And we thank you in advance for your patience. Please know that John, Meghan, Megan, Kara and the warehouse staff have been doing everything possible to keep orders moving, answer customer questions and track down problems.
If you have a problem with a package, help@lostartpress.com is the best place to get help. Questions via phone calls, Facebook, Instagram or Twitter might get missed.
We’ve added three new PDF excerpts to some of our newest titles.
The excerpt for “Kitchen Think” by Nancy Hiller includes the Table of Contents, Dedication, Preface, Introduction, and Chapter 1: What is Custom Cabinetry?. Chapter 1 includes Case Study 1.1: A Truly Custom Kitchen, one of Nancy’s more recent commissions. The kitchen space is relatively small – a 1920s kitchen that had been remodeled in the 1990s using standard, modern sizes that required problematic compromises. The clients wanted a clean, open look while better utilizing the space, and Nancy delivered, showing the benefits of custom work, intelligent design and thoughtfulness. We also included five pages on how to build a simple kitchen island.
The excerpt for “The Workbench Book” by Scott Landis includes the Acknowledgments, Foreword by Christopher Schwarz, Contents, Introduction, and Chapter 3: 19th Century: The Shaker Bench. This chapter provides a thorough examination of the Shaker workbench (including that gorgeous bench featured on the book’s dust jacket). The chapter includes historical photos, detailed illustrations, a wealth of information and a close look at Norm Vandal’s Shaker-inspired bench.
The excerpt for “James Krenov: Leave Fingerprints” by Brendan Bernhardt Gaffney includes the Dedication, Table of Contents, Acknowledgments, Foreword by David Welter, Prologue, Chapter 1: Away to the East, and Chapter 10: Working Away in the Basement. Brendan spent years researching Krenov’s life and conducted more than 150 interviews resulting in chapters brimming with intimate details. The book is reminiscent of narrative nonfiction and a joy to read – these chapters exemplify that.
If you visit my shop unannounced, the first thing that happens is this: I turn down the thundering stereo so I can hear what the hell you’re saying.
I try to keep my passion for music to a minimum here on the blog. But sometimes, all the pieces seem to fit, and I allow myself to slip.
This is one of those posts.
John Moreland is one of my favorite artists. Based in Eastern Oklahoma, we share a lot of the same ground (I’m from Northwest Arkansas). Moreland came up through heavy metal bands, then did an about-face to become one of the most promising Americana singer-songwriters I’ve heard.
His songs are impossibly sad, as the best songs are, and are suited for listening during a late-night drive down the Kentucky AA highway. Mountains, country darkness and a humid breeze in your face.
The song that prompted this blog entry is “Cherokee,” from his outstanding “High on Tulsa Heat” album. I don’t much care for music videos, but fellow Chair Chat citizen Klaus Skrudland insisted I make an exception for this one.
I’m glad he did.
Now back to the normal woodworking-plus-the-odd-animal-reference content.