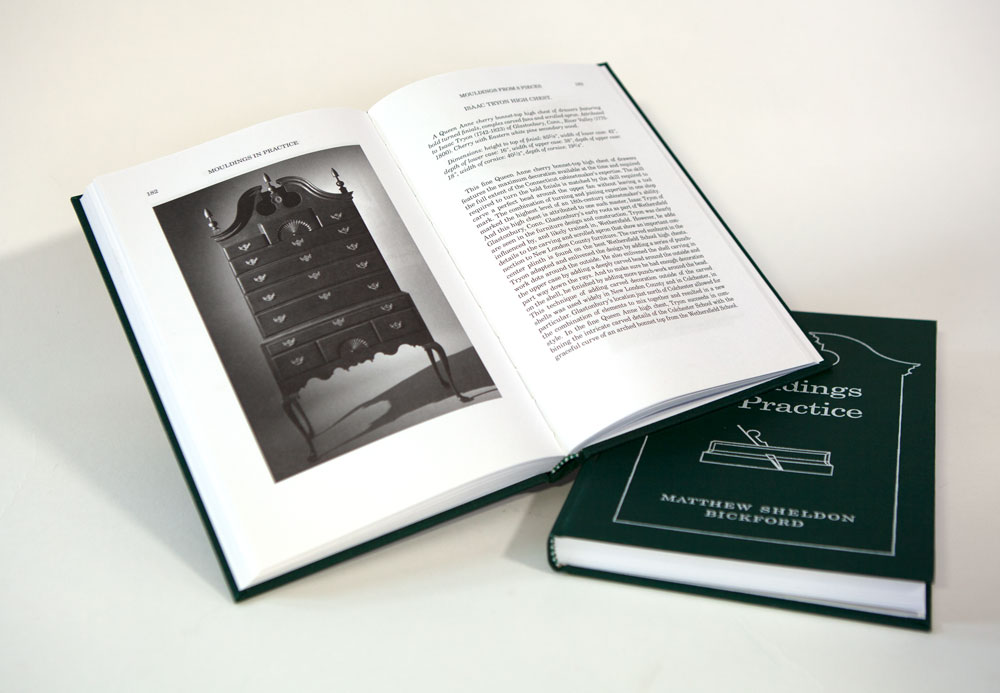
The following is excerpted from Matthew Bickford’s “Mouldings in Practice.” In this book, Bickford shows you how to turn a set of complicated mouldings into a series of predictable rabbets and chamfers that guide your hollow and round planes to make any moulding that has been made in the past or that you can envision for your future projects.
The first half of the book is focused on how to make the tools function, including the tools that help the hollow and round planes – such as the plow and the rabbet. Bickford also covers snipes bills and side rounds so you know their role in making mouldings. Once you understand how rabbets and chamfers guide the rounds and chamfers, he shows you how to execute the mouldings for eight very sweet Connecticut River Valley period projects using photos and step-by-step illustrations and instruction.
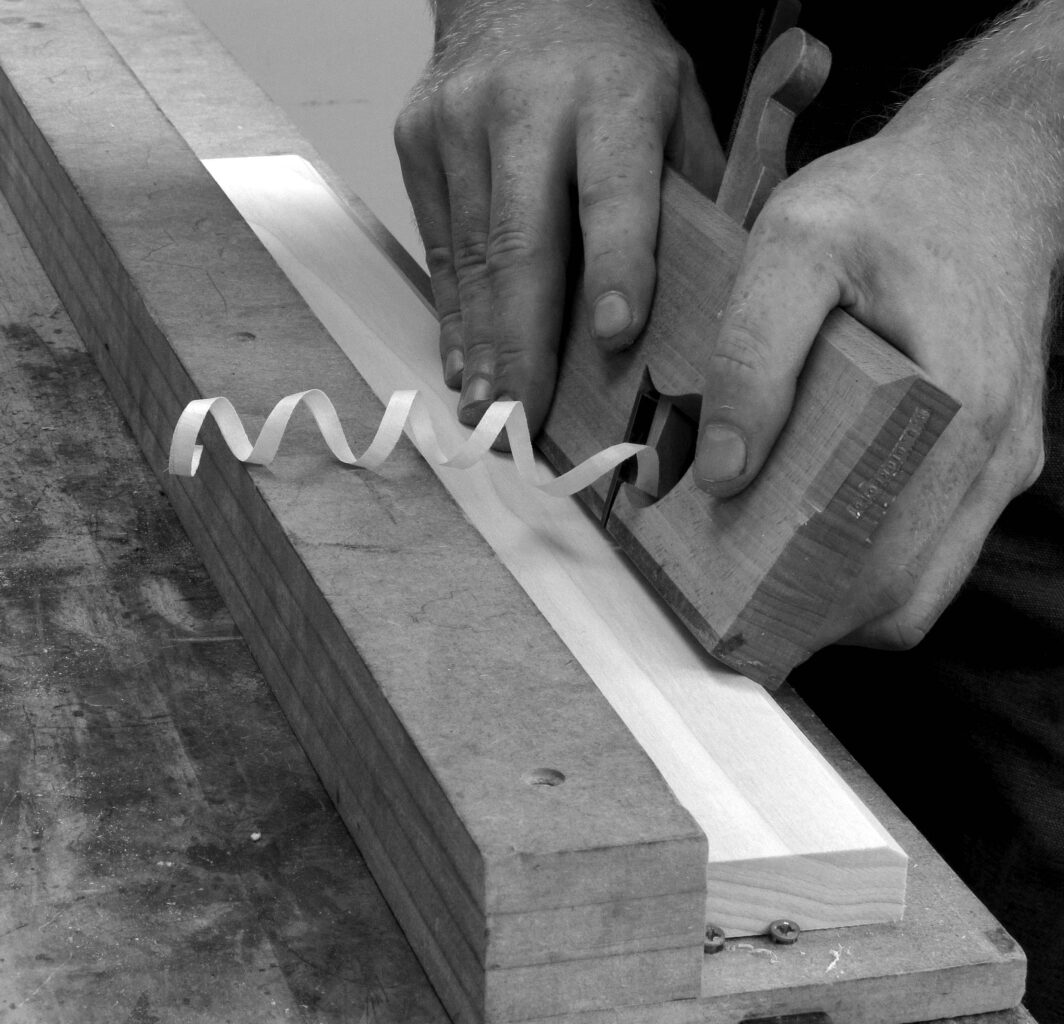
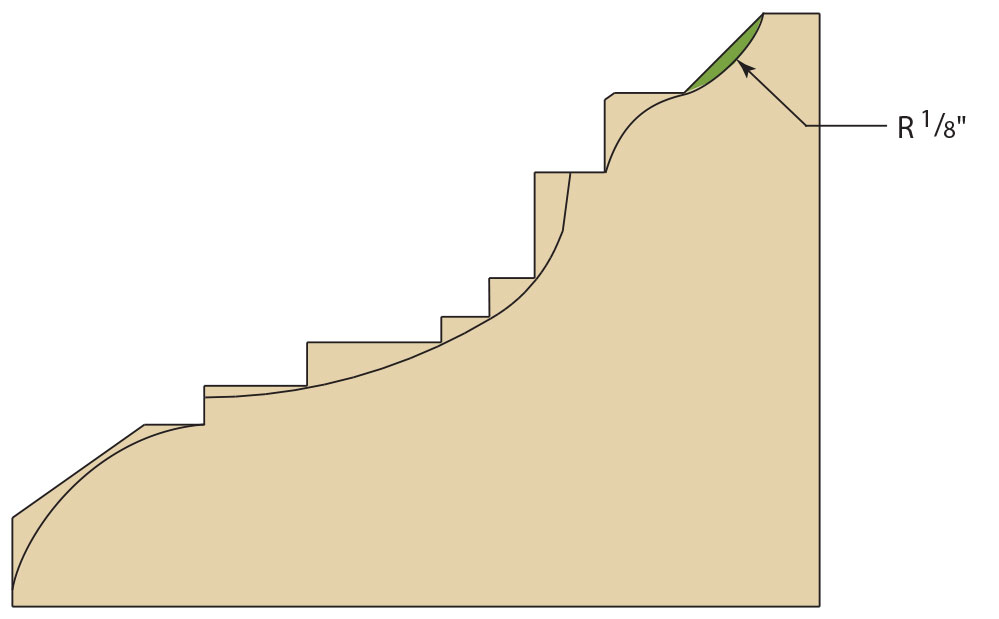
Below is one of the appendices, which shows you how to make a simple sticking board – a must have appliance for the hand-tool shop.
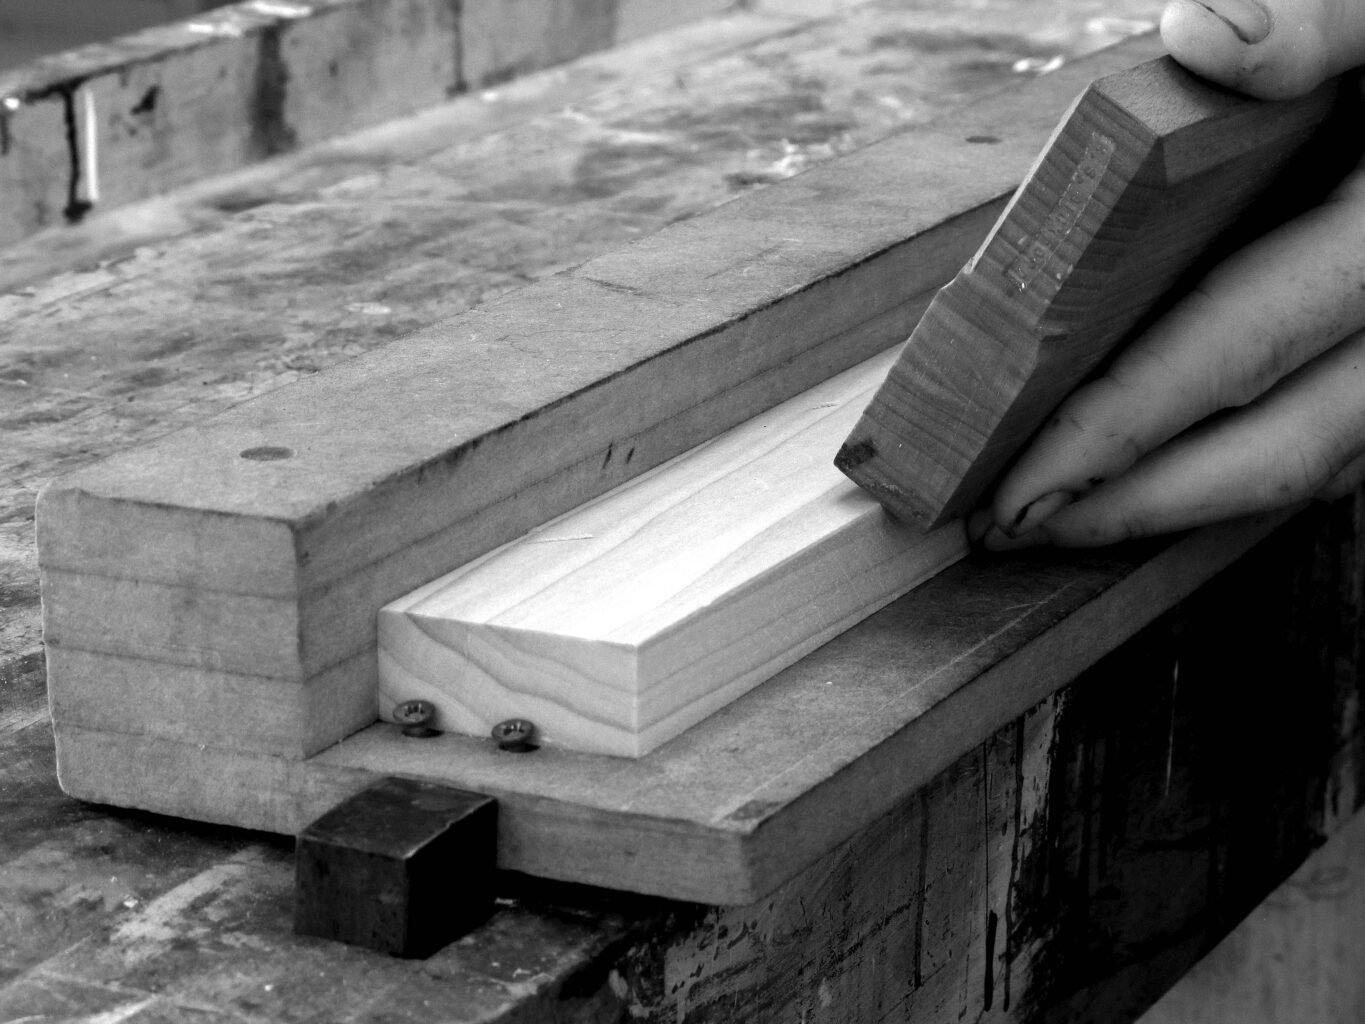
A table saw has a fence, a powered jointer has a table, your bench has dogs or a stop. Like any other task in our craft, bracing a piece while working is necessary. The solution is not always obvious. A sticking board is the appliance you will make to hold your work as you create profiles using your planes.
A sticking board in its simplest form is a base, a backer board and a stop. I use 1/2″-thick MDF (medium-density fiberboard) with screws set in a few inches from the end for the stops.
I add screws on both ends of the sticking board for the times when I need to plane in the opposite direction so the board’s grain runs in my favor. I make the sticking board wide enough so that it can be pinched between the dogs on my workbench and puts the work near the front edge of my bench.
Most of the force you exert upon the piece with these planes will not simply be downward against your bench. The piece you are working is often angled, so the planes are held at an angle, too. Simply clamping a piece between two bench dogs is not ideal for several reasons. This is one of those reasons.
A sticking board gives you a backboard to press against and resists this lateral pressure. The sticking board can be clamped in your bench between dogs and/or held down with holdfasts, screws or numerous other solutions. A firmly held sticking board prevents the workpiece from snapping out of the dogs and you from doing a belly flop across your bench and damaging the plane, iron and the moulding being stuck on your bench.
The sticking board will also prevent the clamping pressure of the two dogs from distorting a thin moulding.
Because the piece being worked upon is not usually pinned in the sticking board, gauging your progress does not require you to bend down and look for gauge lines, leftover rabbets or flat spots in less-than-ideal light. Simply pick the piece up, rotate it and examine it.
As a moulding becomes more intricate, so does the sticking board. The rabbet for a picture in a frame is cut first, making it more difficult to work from that point. Attaching a perfectly dimensioned piece to the board can make a non-square piece sit square again.
Attaching an angled plate to the sticking board allows the user to attach a crown moulding to the board. The options for specialized sticking board design are too many to list. Change the board to fit the piece. Finally, a sticking board, if rigid enough, can turn a typical 7′-long workbench into something more than 8′ long. I even have a game plan for the time when I need something even longer.
The following is excerpted from “Mouldings in Practice,” by Matthew Sheldon Bickford. The book turns a set of complicated mouldings into a series of predictable rabbets and chamfers that guide your hollow and round planes to make anything – anything – that has been made in the past or that you can envision for your future projects.
“Mouldings in Practice” is accessible for even the beginning hand-tool woodworker. It uses more than 200 color illustrations and dozens of photos to explain how to lay out, prepare for and cut any moulding you can draw.
The first half of the book is focused on how to make the tools function, including the tools that help the hollow and round planes – such as the plow and the rabbet. Matt also covers snipes bills and side rounds so you know their role in making mouldings. Once you understand how rabbets and chamfers guide the rounds and chamfers, Matt shows you how to execute the mouldings for eight very sweet Connecticut River Valley period projects using photos and step-by-step illustrations and instruction.
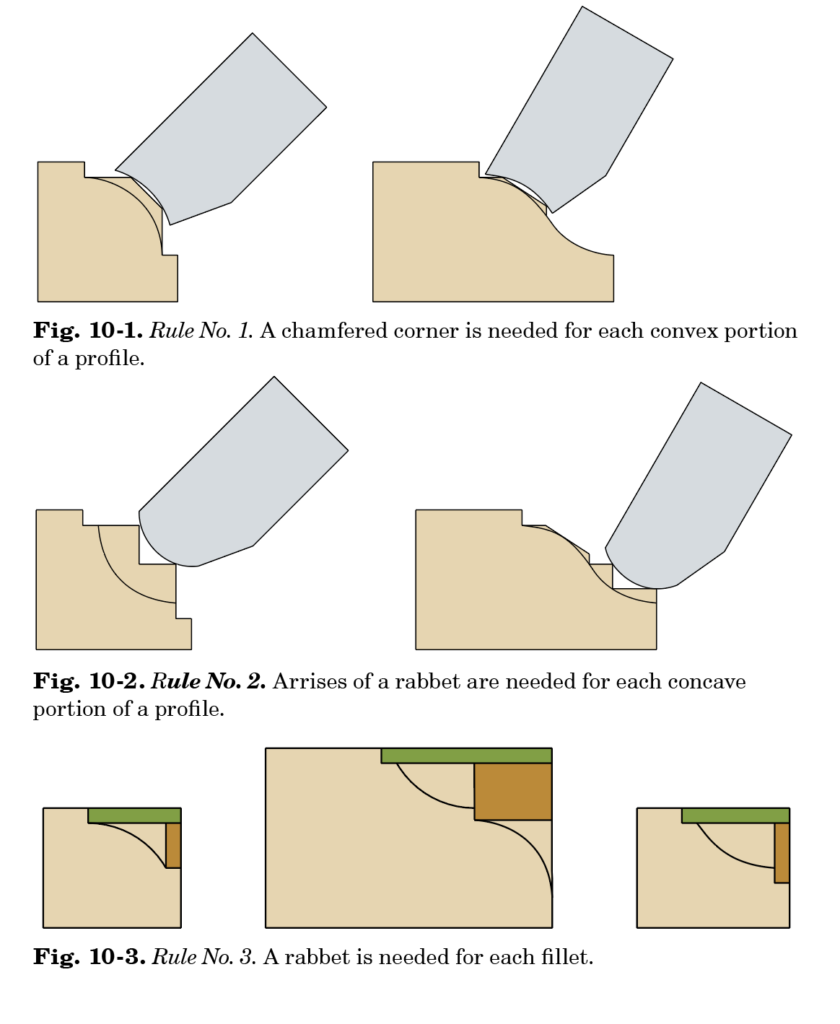
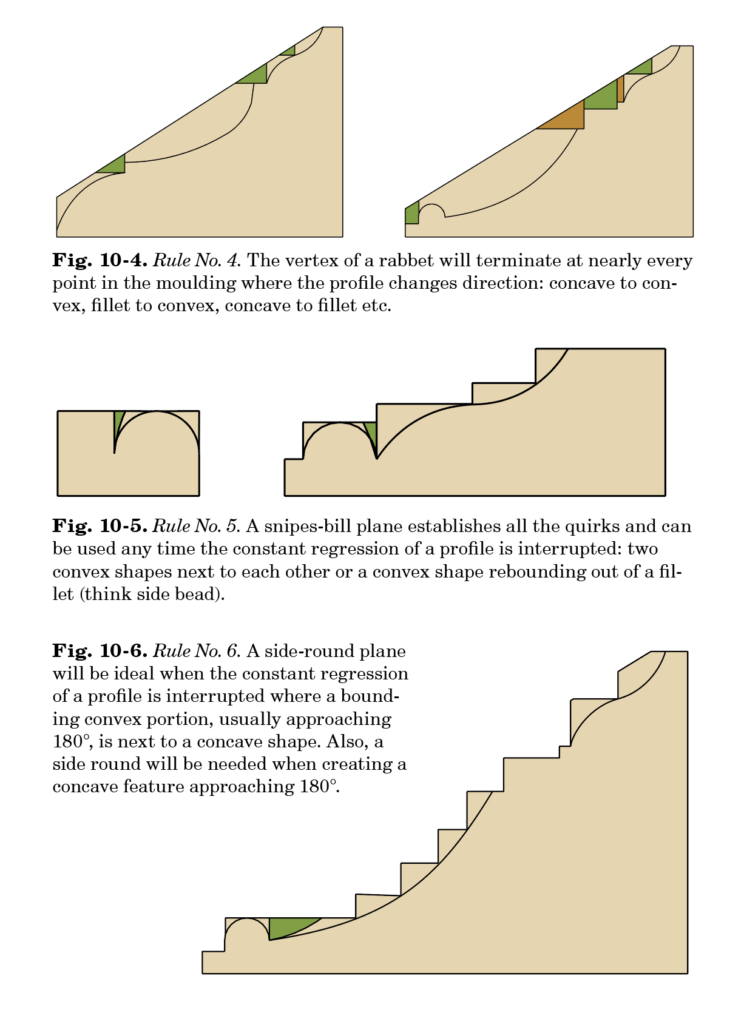
Breaking a moulding down into a series of simple forms results in a smooth execution. When you look at each aspect of a profile, consider the following rules:
Following these rules will make complex mouldings achievable.
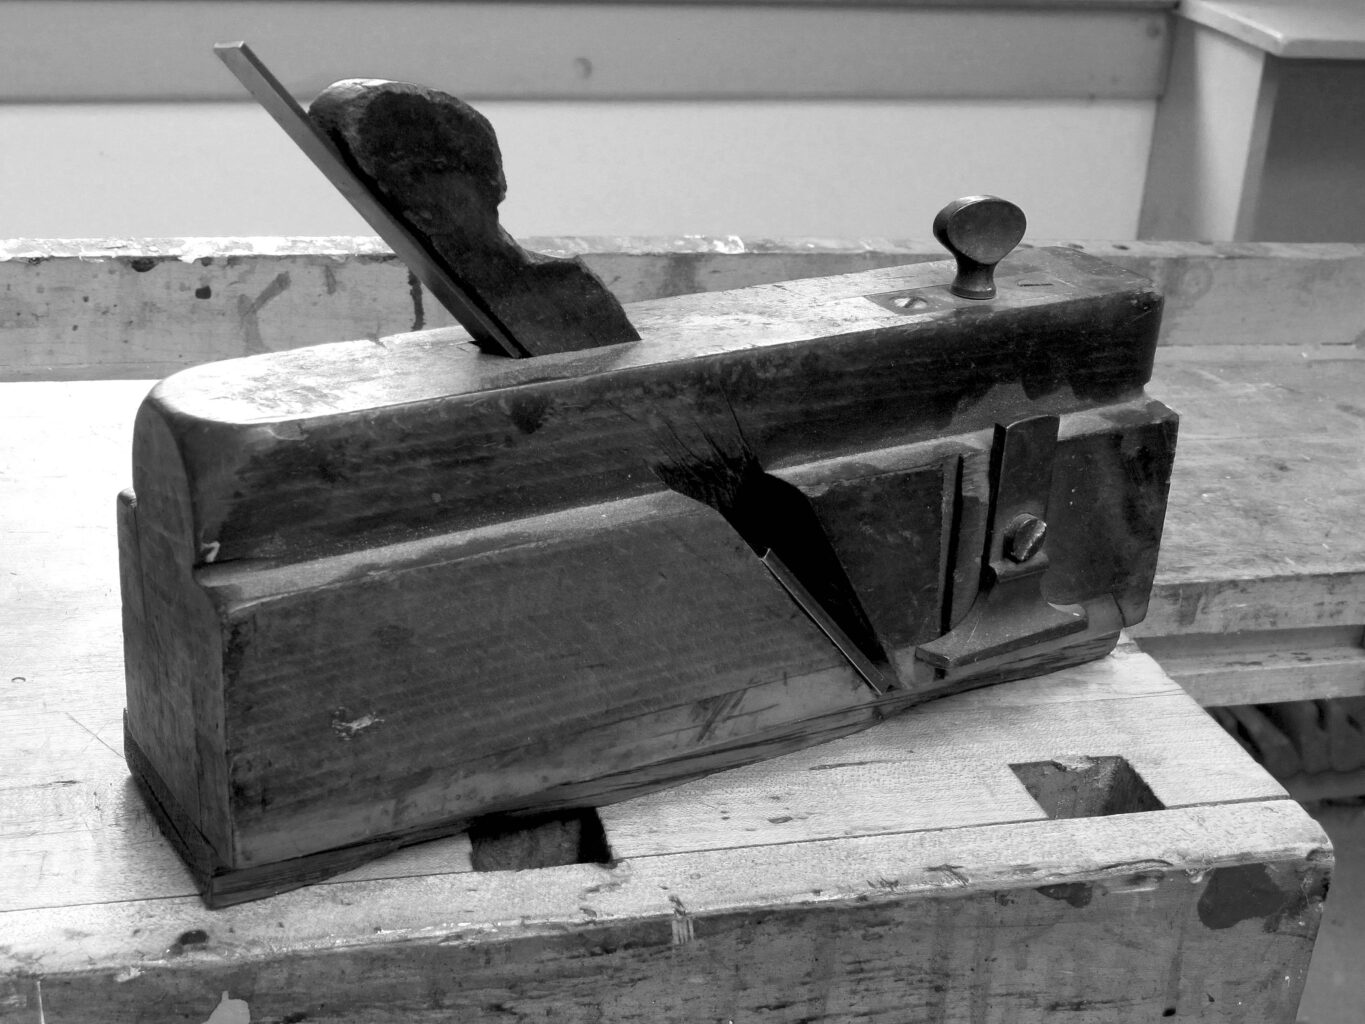
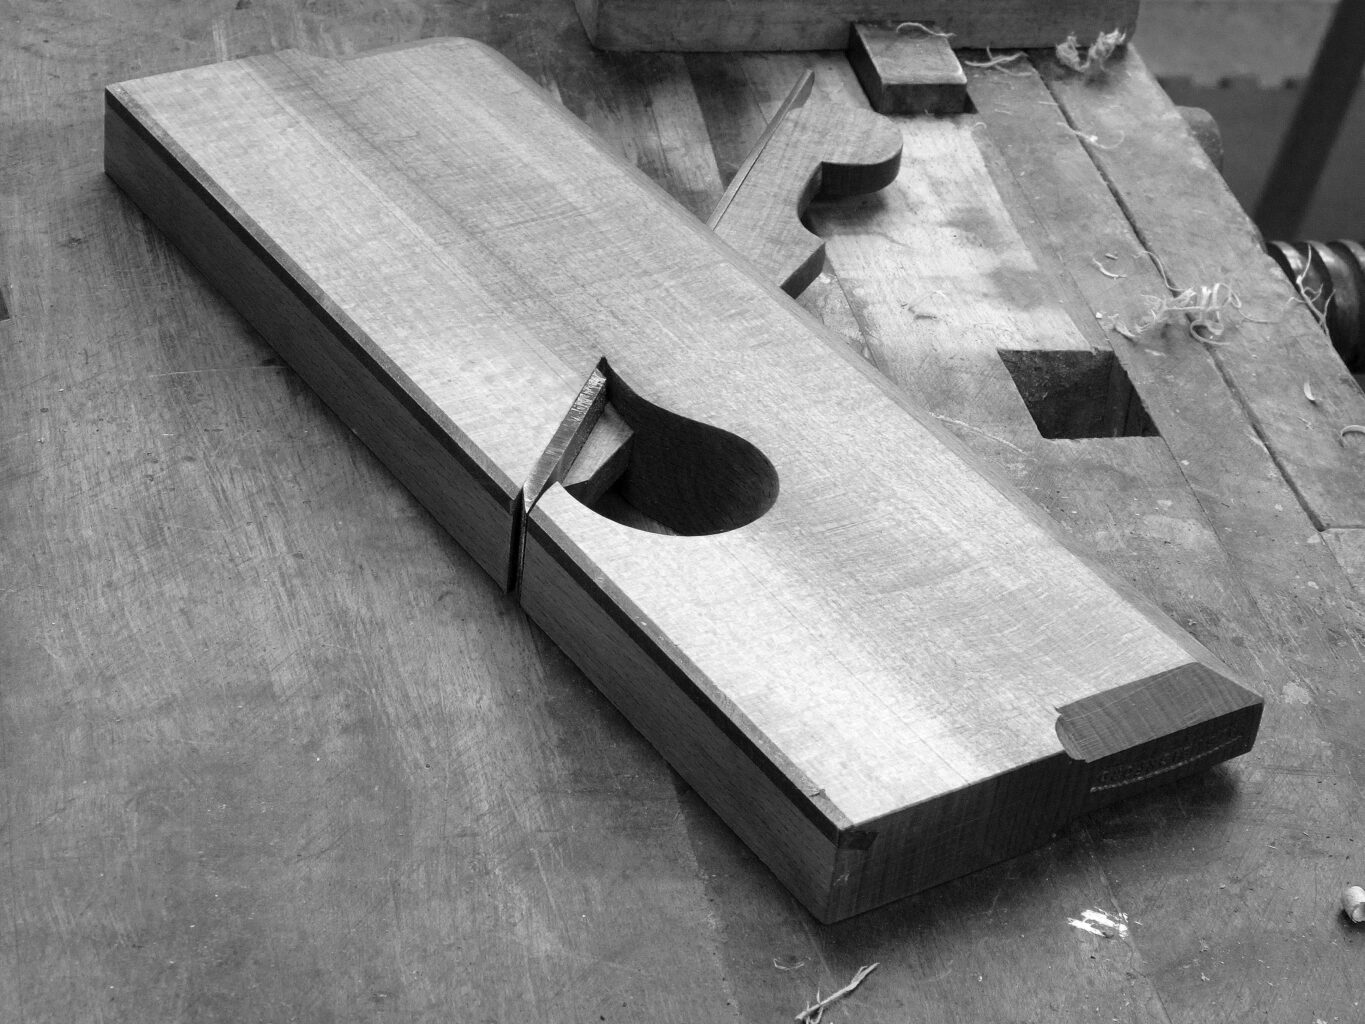
Fig. 4-1. Moving fillister. This moving fillister has a brass depth stop that is adjusted with the knob on top, along with an adjustable fence upon which this plane is standing. The iron is skewed across the sole and has a nicker ahead of the cutting edge for shearing wood fibers while working across the grain.
The following is excerpted from “Mouldings in Practice,” by Matthew Sheldon Bickford. The book turns a set of complicated mouldings into a series of predictable rabbets and chamfers that guide your hollow and round planes to make anything – anything – that has been made in the past or that you can envision for your future projects. The expert instruction is accessible for even the beginning hand-tool woodworker. It uses more than 200 color illustrations and dozens of photos to explain how to lay out, prepare for and cut any moulding you can draw.
Hollows and rounds have no depth stops and no fences, and they have cutting edges that are difficult to maintain. So how do we guide these planes? Is it not a trial to keep them sharp? The solution to both questions is a rabbeting plane.
Rabbets, which are grooves along the edge of a board, along with chamfers (or bevels), are the basis for all mouldings when using hollows and rounds. These rabbets serve three purposes: creating chutes in which the planes travel, creating guides that serve to gauge your progress, and removing as much material as possible with an edge that’s easy to maintain and easy to guide.
Cut Rabbets with a Rabbet Plane. All the moulding profiles discussed in this book begin with a series of rabbets and/or chamfers. These two shapes define the final moulding profile. Therefore, accuracy is crucial. Much of your time making moulding is spent laying out the profiles and transferring those layouts onto the wood via rabbets. Only an efficient method of executing these steps will lead to success. There are many methods.
Ventures through the Internet, books or magazines will introduce you to many tools for cutting rabbets, including fenced rabbet planes, moving fillisters and plow planes. A rabbet plane with a fixed fence and fixed depth stop needs only to be pressed against the side of a board, held vertically and swiped until the plane’s depth stop bottoms out and the plane stops cutting. It produces one rabbet of a fixed width and depth along the edge of a board.
A moving fillister plane might seem more versatile than a fixed rabbet plane. You can, of course, create rabbets of any width by adjusting the tool’s fence. Its depth stop can also be adjusted so that the plane cuts rabbets of various depths. Limitations still exist.
Though the plow plane is slightly different than a moving fillister, it also has an adjustable fence with (usually) an adjustable depth stop. A plow plane, in conjunction with a chisel, can be used to aggressively remove material along the edge of a board. In addition, a plow can cut grooves in the center of a board, which is necessary for some mouldings.
A moving fillister and plow plane are very useful when creating single rabbets of equal depth and width in different boards. But they have shortcomings. Most profiles start with multiple rabbets of varying dimensions. Each time one rabbet is completed and the next is started, the fence and depth stop need to be changed. In addition, many of the mouldings involve chamfering a corner of a rabbet. When using fenced planes, it will be necessary to set up a second plane to execute this brief step.
A fence and depth stop predetermine the order in which rabbets must be cut. This predefined order is not always efficient. Finally, there are circumstances in larger profiles when the surfaces upon which the fence and depth stop register are lost as subsequent rabbets are added.
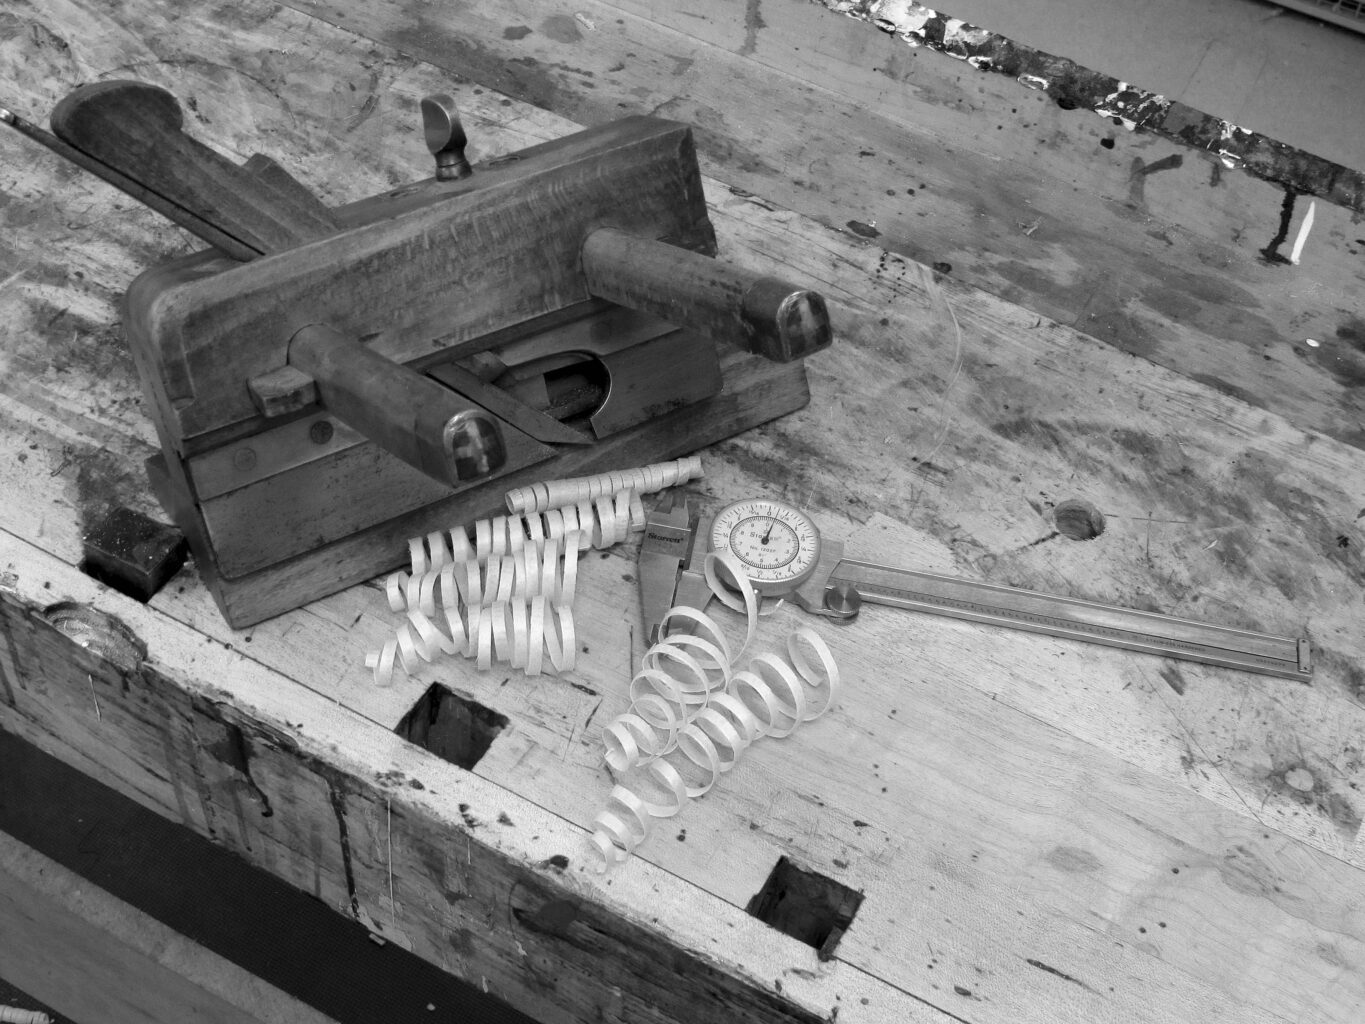
Fig. 4-2. Plow plane. This plow plane also has a brass depth stop, this time on the opposite side of the iron, that is adjusted with the brass knob on top. The plane is leaning upon its fence, which is adjusted by the wedged arms protruding through the plane’s body. When using my plow to make rabbets, I use only the thinnest iron. That iron allows for the most aggressive cut.
The Simple Rabbet Plane. For mouldings, an unfenced rabbet plane is ideal for the craftsman looking to use fewer planes. The simple rabbet plane has no depth stop and no fence. Therefore, each time a new rabbet with new dimensions in a new place along the board is needed, nothing needs to be adjusted. Despite this lack of guides, it is possible to be as accurate with this plane as you are with any gauge line made by a marking gauge.
Rabbet planes with no fence or depth stop excel at making mouldings because almost all profiles require multiple rabbets of varying dimensions.
A rabbet plane that is 7/8″ wide will cut rabbets as wide as the plane’s sole and as narrow as you want or need. There are few limitations to this plane. Contrary to common belief, at times you will wish for a plane that is slightly more narrow, 5/8″, but rarely for one that is wider. Among other things, a smaller plane will let you see inside the escapement when adding a small chamfer in a tight area. This narrow plane also allows these facets to be added in tighter spaces while keeping the sharp corners of the tool away from the surrounding facets. Additionally, the individual rabbets you need to cut are rarely wider than 7/8″, even for the large, complex mouldings.
I prefer a rabbet plane of this width, 7/8″, because I like to use approximately half of the plane’s sole in normal circumstances. I am able to comfortably reach under the plane and use my fingers as a fence against the edge of a board which, as you will see, is vital. If you have large hands, a narrow rabbet of 5/8″ will likely suit you better because you will use less of your fingertips. Many people simply prefer a narrower plane for this type of work because it is easier to recognize the vertical axis when holding a thin, tall plane body.
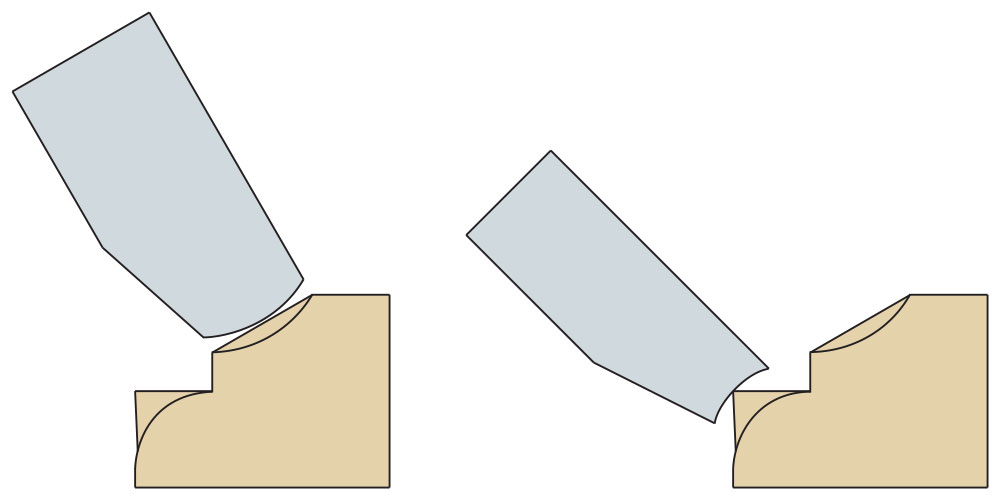
Rabbet: Setup & Use. When setting the iron of a rabbet plane it is important that the iron’s cutting edge be parallel to the sole. Additionally, it is vital that the iron’s side projects very slightly from the side of the rabbet plane’s body where the cut occurs. If the iron’s side is instead flush to the side of the plane it will be impossible for the plane to cut down into the wood vertically. The side of the iron must not be sharpened; if the side of the iron is sharp, it will scrape the vertical portion of the rabbet, or fillet. This will increase the rabbet’s width with each subsequent pass and can potentially clog the plane.
Holding an unfenced rabbet plane with no depth stop might seem intimidating. It is not necessarily obvious how it works. Some woodworkers think it is an inaccurate tool and has the singular use of cleaning up surfaces that were created by other planes. Perhaps you have read how some woodworkers attach a batten, or auxiliary fence, to the work for the rabbet to follow. This works, but it is another unnecessary step that consumes time and effort in some situations, and is useless in others. When working with a simple rabbet plane, here are the basic steps to follow.
Step 1: Mark the size of the rabbet with a marking gauge along the board’s face, edge and two ends.
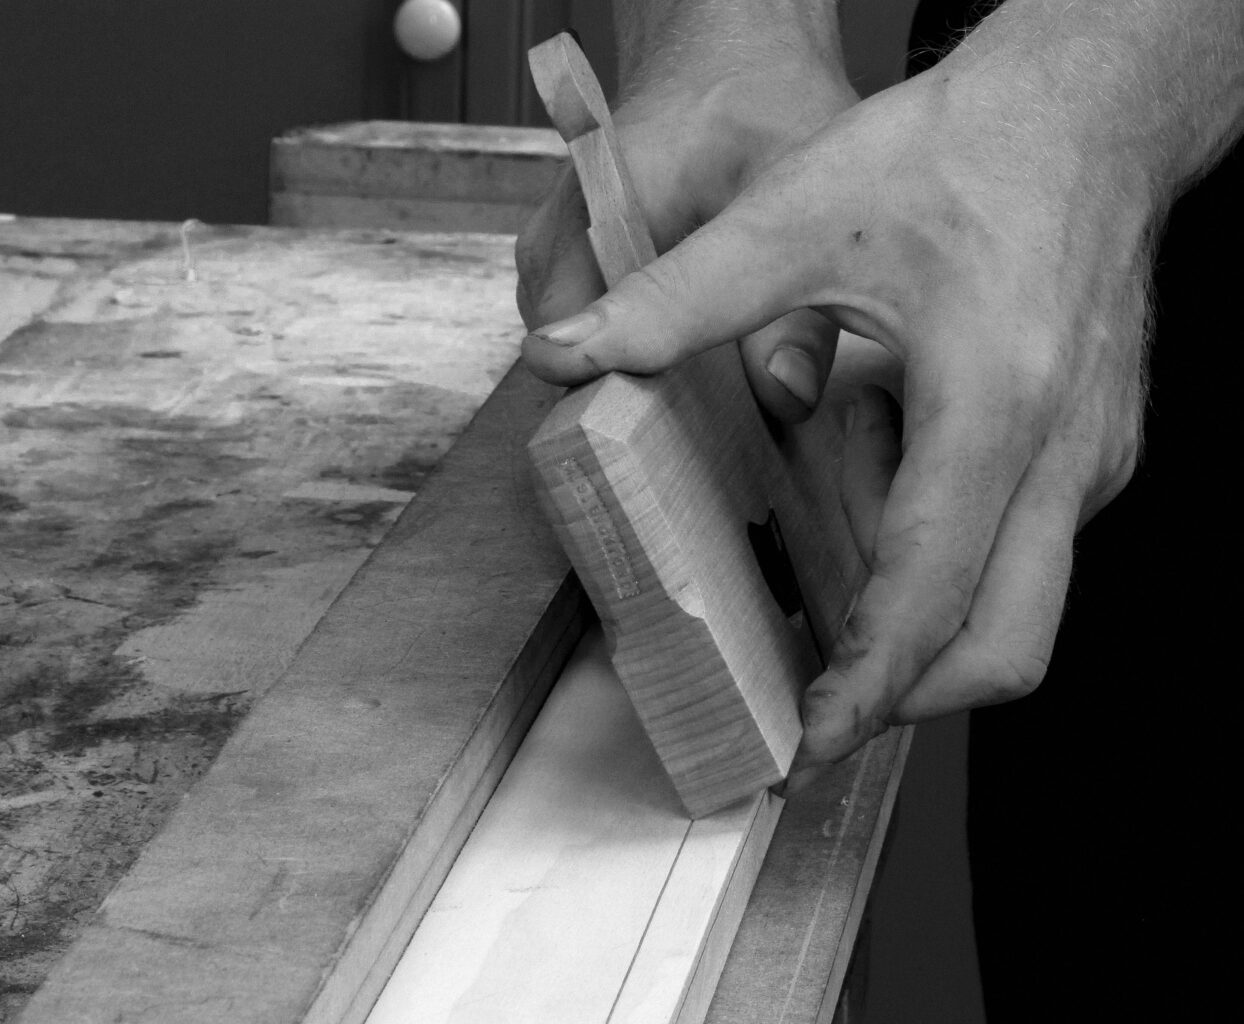
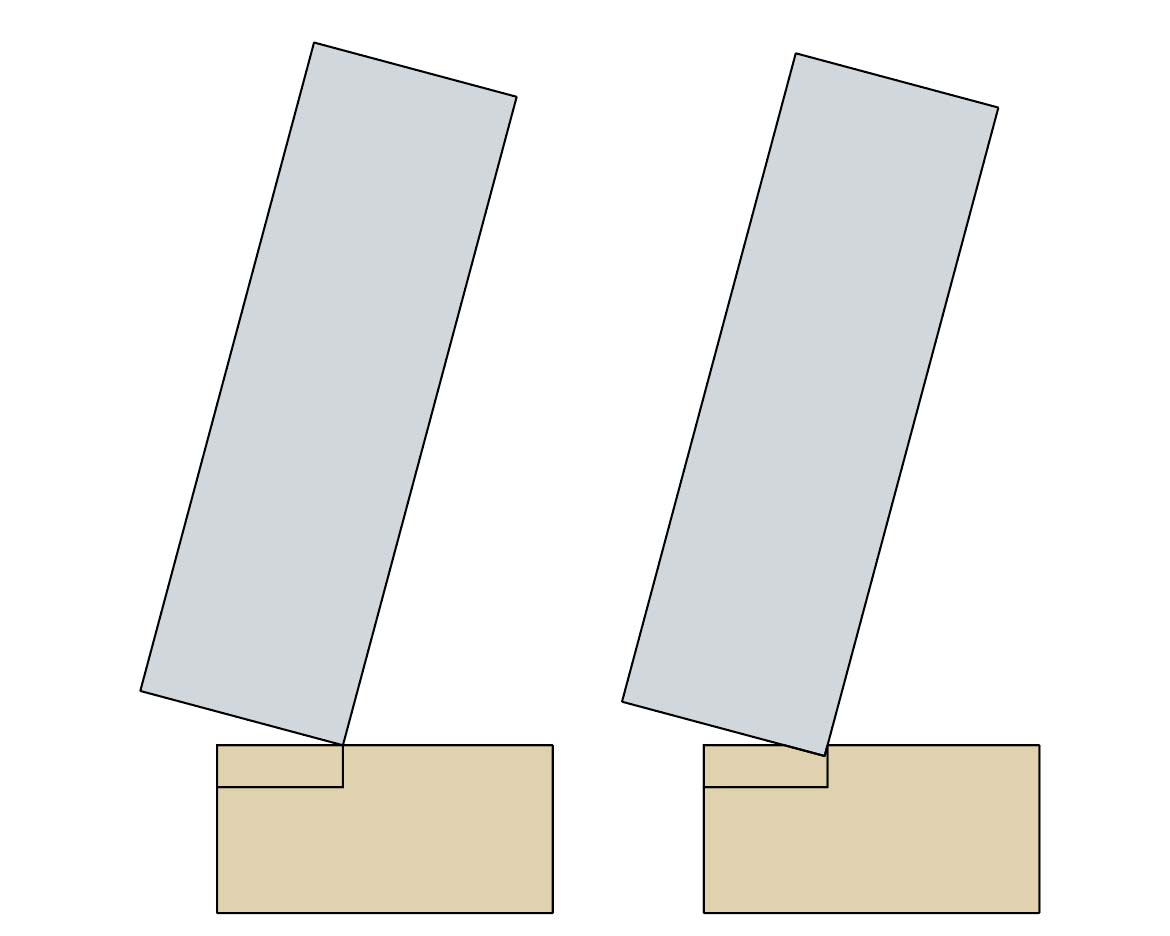
Fig. 4-3. Tilting a rabbet plane. My fore and middle finger, located in front of the cutting edge, help lead the plane down the length of the stock. Pressure is applied from the top of the plane toward your body, the sole and cutting edge. Do not apply this force away from your body against the side of the plane. This second method may result in the iron’s side scraping the far side of the gauge line and slightly widening the rabbet prior to starting.
Step 2: Pinch the plane with your thumb leading on top and your forefingers along the bottom. Hold the plane at an angle with its corner pressed into your gauge line. The plane will want to stay in that line. Use your fingers as a fence and take two passes. The plane’s corner will want to stay in the gauge line; your fingers will help it.
Fig. 4-4. Tip the plane substantially. The closer it is to 45°, the easier it will be for it to stay in the gauge line.
You have created a “V.” That “V” will give some slight room for error in the following step. The more rabbets you cut, the less you will use this second step.
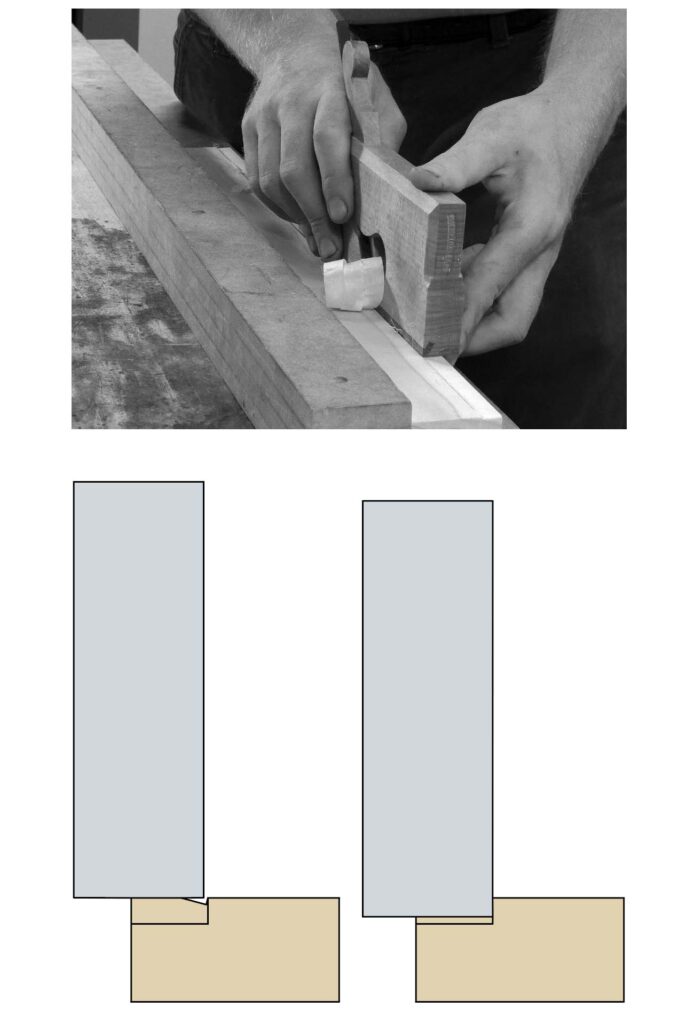
Figs. 4-5 & 4-6. Holding square. The fore and middle fingers of my leading hand are guiding the plane while my trailing hand applies most of the forward force. Be certain to hold the plane square, which is gauged by the existence of a full-width shaving.
Step 3: Hold the plane vertically (see Figs. 4-5 and 4-6). Keep the plane pinched in the same manner with your leading hand. This is the more difficult step because your fingers are now the only guide. Start taking passes and keep the corner of the plane and iron that are on the escapement side of the plane inside of your “V.” If you miss, try to miss toward the edge closest to you. (I do not watch the corner of the iron during this phase. I sight down the side of the plane’s body and watch the edge of the body in front of the iron. A pencil line drawn in the “V” will help the novice.)
Be certain that the plane you’re holding is vertical. A full-width shaving should be ejected at all times. After only a few passes, the fillet of the rabbet will be developed to the extent that your fenced fingers will be less necessary. At this stage you can become less careful and more aggressive by increasing your speed. Wispy shavings that flutter in the air are fun, but not here.
Your progress then should be closely monitored in two ways. First, make certain that the plane is being held vertically by comparing the floor of the rabbet with the previously marked gauge lines on the two ends of the work. Second, measure the depth of the rabbet against the gauge line running along the board’s edge. Take abbreviated passes along areas with high spots. The goal is to make one full-width, perpendicular shaving that removes the gauge line in its entirety on your final pass.
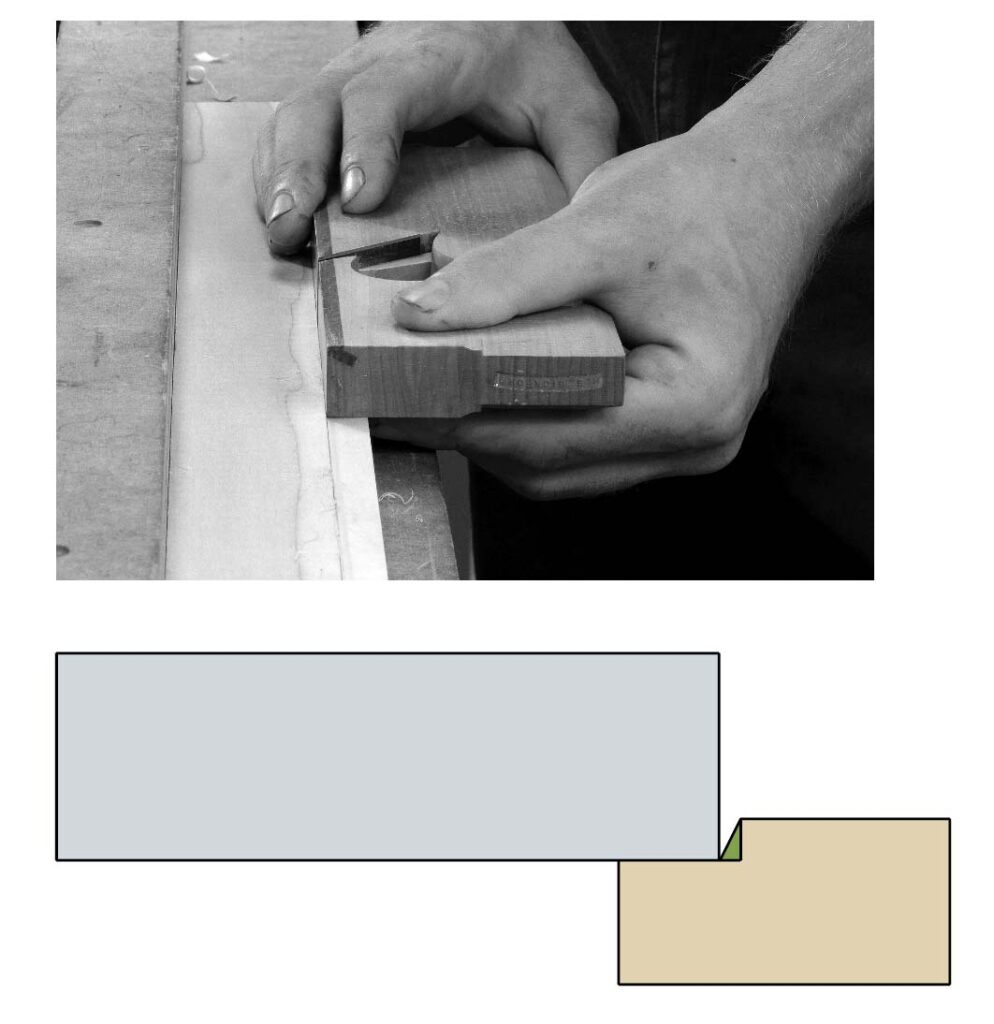
Figs. 4-7 & 4-8. Horizontal work. Hold the rabbet plane horizontal to clean up the vertical fillet. Clean-up will be necessary if you wandered from the gauge line at any stage or if the vertical fillet is a finished surface to appear in the final profile. Be aware that, depending on the season the rabbet plane was made and the season that it currently is (or the age of the plane) the iron may protrude too heavily on this opposite side or not at all. This can affect the results if several passes are necessary.
Step 4: If at any stage the plane was held out of vertical for several passes, or if the plane strayed from the gauge line, the vertical fillet along the back of the rabbet will not be perpendicular to the rabbet’s floor. To fix this, tip the plane on its face to clean the fillet.
As discussed, there are several ways to make a rabbet. This is a simple method when dealing with square stock because it involves one plane from start to finish. Other methods involve multiple planes and/or other tools such as chisels.
A metal shoulder plane, along with many other planes that have an iron that projects to the edge, can perform this task. This is not ideal, however, because they are heavy and do not easily eject their shavings.
In this way, a wooden rabbet plane is a luxury. Its tall body helps you find vertical easily. Its light weight allows you to be aggressive. Its escapement grants you speed. Its lack of a depth stop and fence allow you to cut the next rabbet with no adjustments. A simple rabbet plane can cut rabbets of any width less than their own – a 1/16″-wide rabbet is easily executed with a 7/8″-wide rabbet plane. When a corner needs to be chamfered, and roughly a third of your corners will, you don’t need to find a new plane and set it up.
Adding a chamfer with a rabbet plane is also a straightforward process. Your fingers will again serve as a fence. Progress will be gauged by sight. Look at the surrounding facets. Not only should the chamfer be of a uniform width, but the adjoining horizontal and vertical surfaces need to be uniform. Hold the plane at the desired angle and stop at the desired depth.
Fig. 4-9. Chamfering. Again, my fore and middle fingers are guiding the plane. When possible, I allow my trailing fingers to fall upon the workpiece. This will help gauge uniformity.
Fig. 4-10. Even shavings and results. Your goal when creating a chamfer is uniformity. All care, however, should not be paid toward this goal because efficiency is also warranted. Work for consistency, but do not demand it. The length of the hollow plane to follow will overcome moderate variations. The width of the plane’s sole in relation to the chamfer will overcome slight facets. Watch the surrounding horizontal and vertical facets. If these features look uniform from afar they are perfect for this step. Do not reach for your double square.
Note: Using a plane on its corner for the first few passes will eventually cause problems. A significant amount of wear will occur on the single point that runs in the gauge line. In time this edge will become slightly rounded and will not sit in a gauge line. Many antique planes show evidence of re-establishing that corner lost to wear. Some soles have been planed back so much that they approach the tool’s escapement; sometimes the face has been planed off to re-establish the sharp corner.
Fig. 4-11. Boxed corner. The boxing on this rabbet plane will help that corner of the plane remain sharp longer. It will not, of course, help the opposite, unboxed edge. The unboxed edge is used less often, but it is still used.
The solution? “Boxing” a corner of a rabbet plane is recommended if you use a rabbet on its edge. Boxing is where you inlay a wear-resistant species, such as boxwood, into the corner of the tool. This reduces that wear and the inevitable loss of that corner.
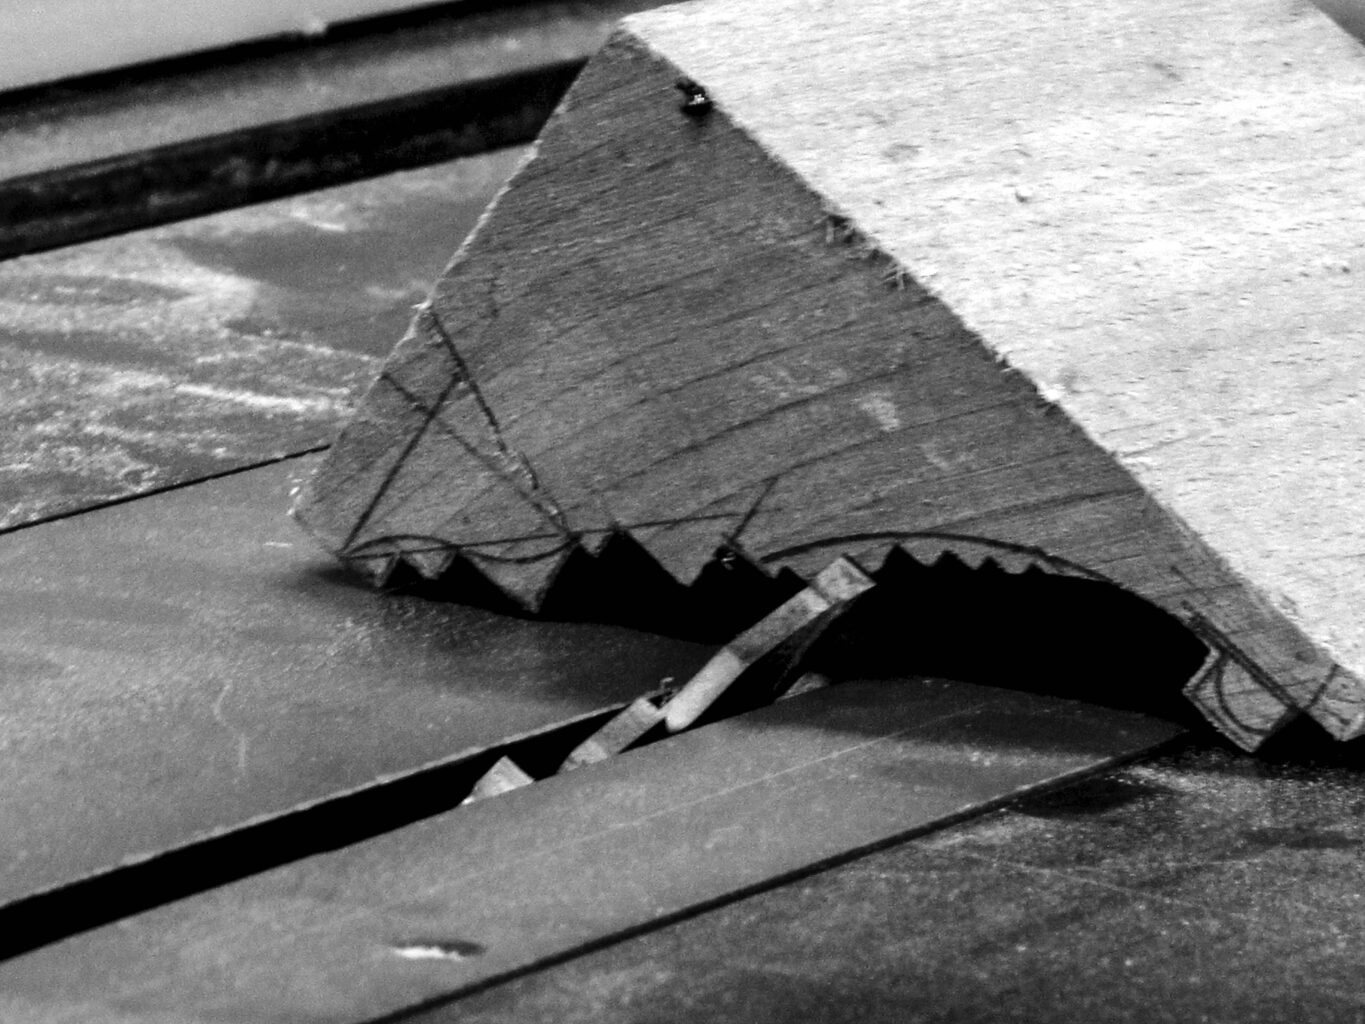
A table saw or other power tool is also an economical method for creating rabbets. When creating a large profile I often opt for this method. Getting rabbets close on a table saw then fine-tuning them with a rabbet plane is an efficient way to work. The main problem I have when using a table saw is that, after multiple passes, it will often turn a long, straight piece of thin wood into a long, bowed piece of wood that will become difficult to hold and then work. It is also dangerous to run many profiles to completion on power tools because the final product often has a triangular cross section.
Rabbet plane use begets rabbet plane use. The more you use a rabbet plane and the more comfortable you become with one, the less you will opt for the table saw. You will gravitate toward efficiency and effectiveness, which a rabbet plane allows.
Fig. 4-12. With the table saw. An errant pass across the table saw, with the blade raised too high, can quickly change the final profile drastically. Do not bother with 1/100ths on the saw. Do not feel like every rabbet on a single piece needs to be executed in this fashion because you’re already there. The risk of an extra rabbet can easily outweigh the reward of saving the three minutes it will take to do it by hand.
This last point will bring up the argument, “If efficiency and effectiveness are the goal, why not stay with a router in the first place?” I can create most profiles three days faster than a router user, unless he pays for overnight delivery of his specialized tooling (in which case I will only beat him by 24 hours). But I digress.
When Christopher Schwarz and John Hoffman started Lost Art Press in 2007, they had a bit of difficultly in convincing authors to write for them. It was an unproven press with a weird business model: share all profits and costs 50/50 with authors, no Amazon or other mass-market outlet sales, books shipped out of their homes (gotta put the kids to work somehow!), no employees…
But at a woodworking show in Albany, N.Y., Chris met Matt Bickford for the first time, and hung out in his booth for a while, talking furniture, woodworking and handplanes. Matt, too, had just started his business, making traditional hollows and rounds and other moulding planes, out of cherry (if you have a cherry M.S. Bickford plane, it’s almost a collector’s item at this point!).
Peter Follansbee was also at the show, so Chris treated Peter and Matt to pizza, and over dinner, cajoled them both into writing books for Lost Art Press. They were the first two outside authors to sign contracts with Chris and John. (I’ll share an excerpt from one of Peter’s book in October).
Matt’s book, “Mouldings in Practice,” is divided into two parts. The first half discusses moulding planes and the principles of how they’re used. Matt shows you how a great variety of mouldings can be stuck with a limited number of hollows and rounds (you don’t need a full set – or even a half set) to get started. Plus he discusses the roles of snipes bill and side rounds, and teaches you how to draw accurate profiles – one of the keys to success.
But what I found most mind-blowing is the use of rabbets in the “workbook” section (the second half of the book). Remove most of the waste with a rabbet plane (or dado stack), and you’re well on your way toward a finished moulding. Not only is there less wear-and-tear on harder-to-sharpen planes, the arrises function as guides for your hollows and rounds. This section includes many common profiles, and how to layout the rabbets to make the work easier. They’re broken down into basic steps that even a novice moulding plane user (me, when this book came out) can follow. What’s below is just the intro.
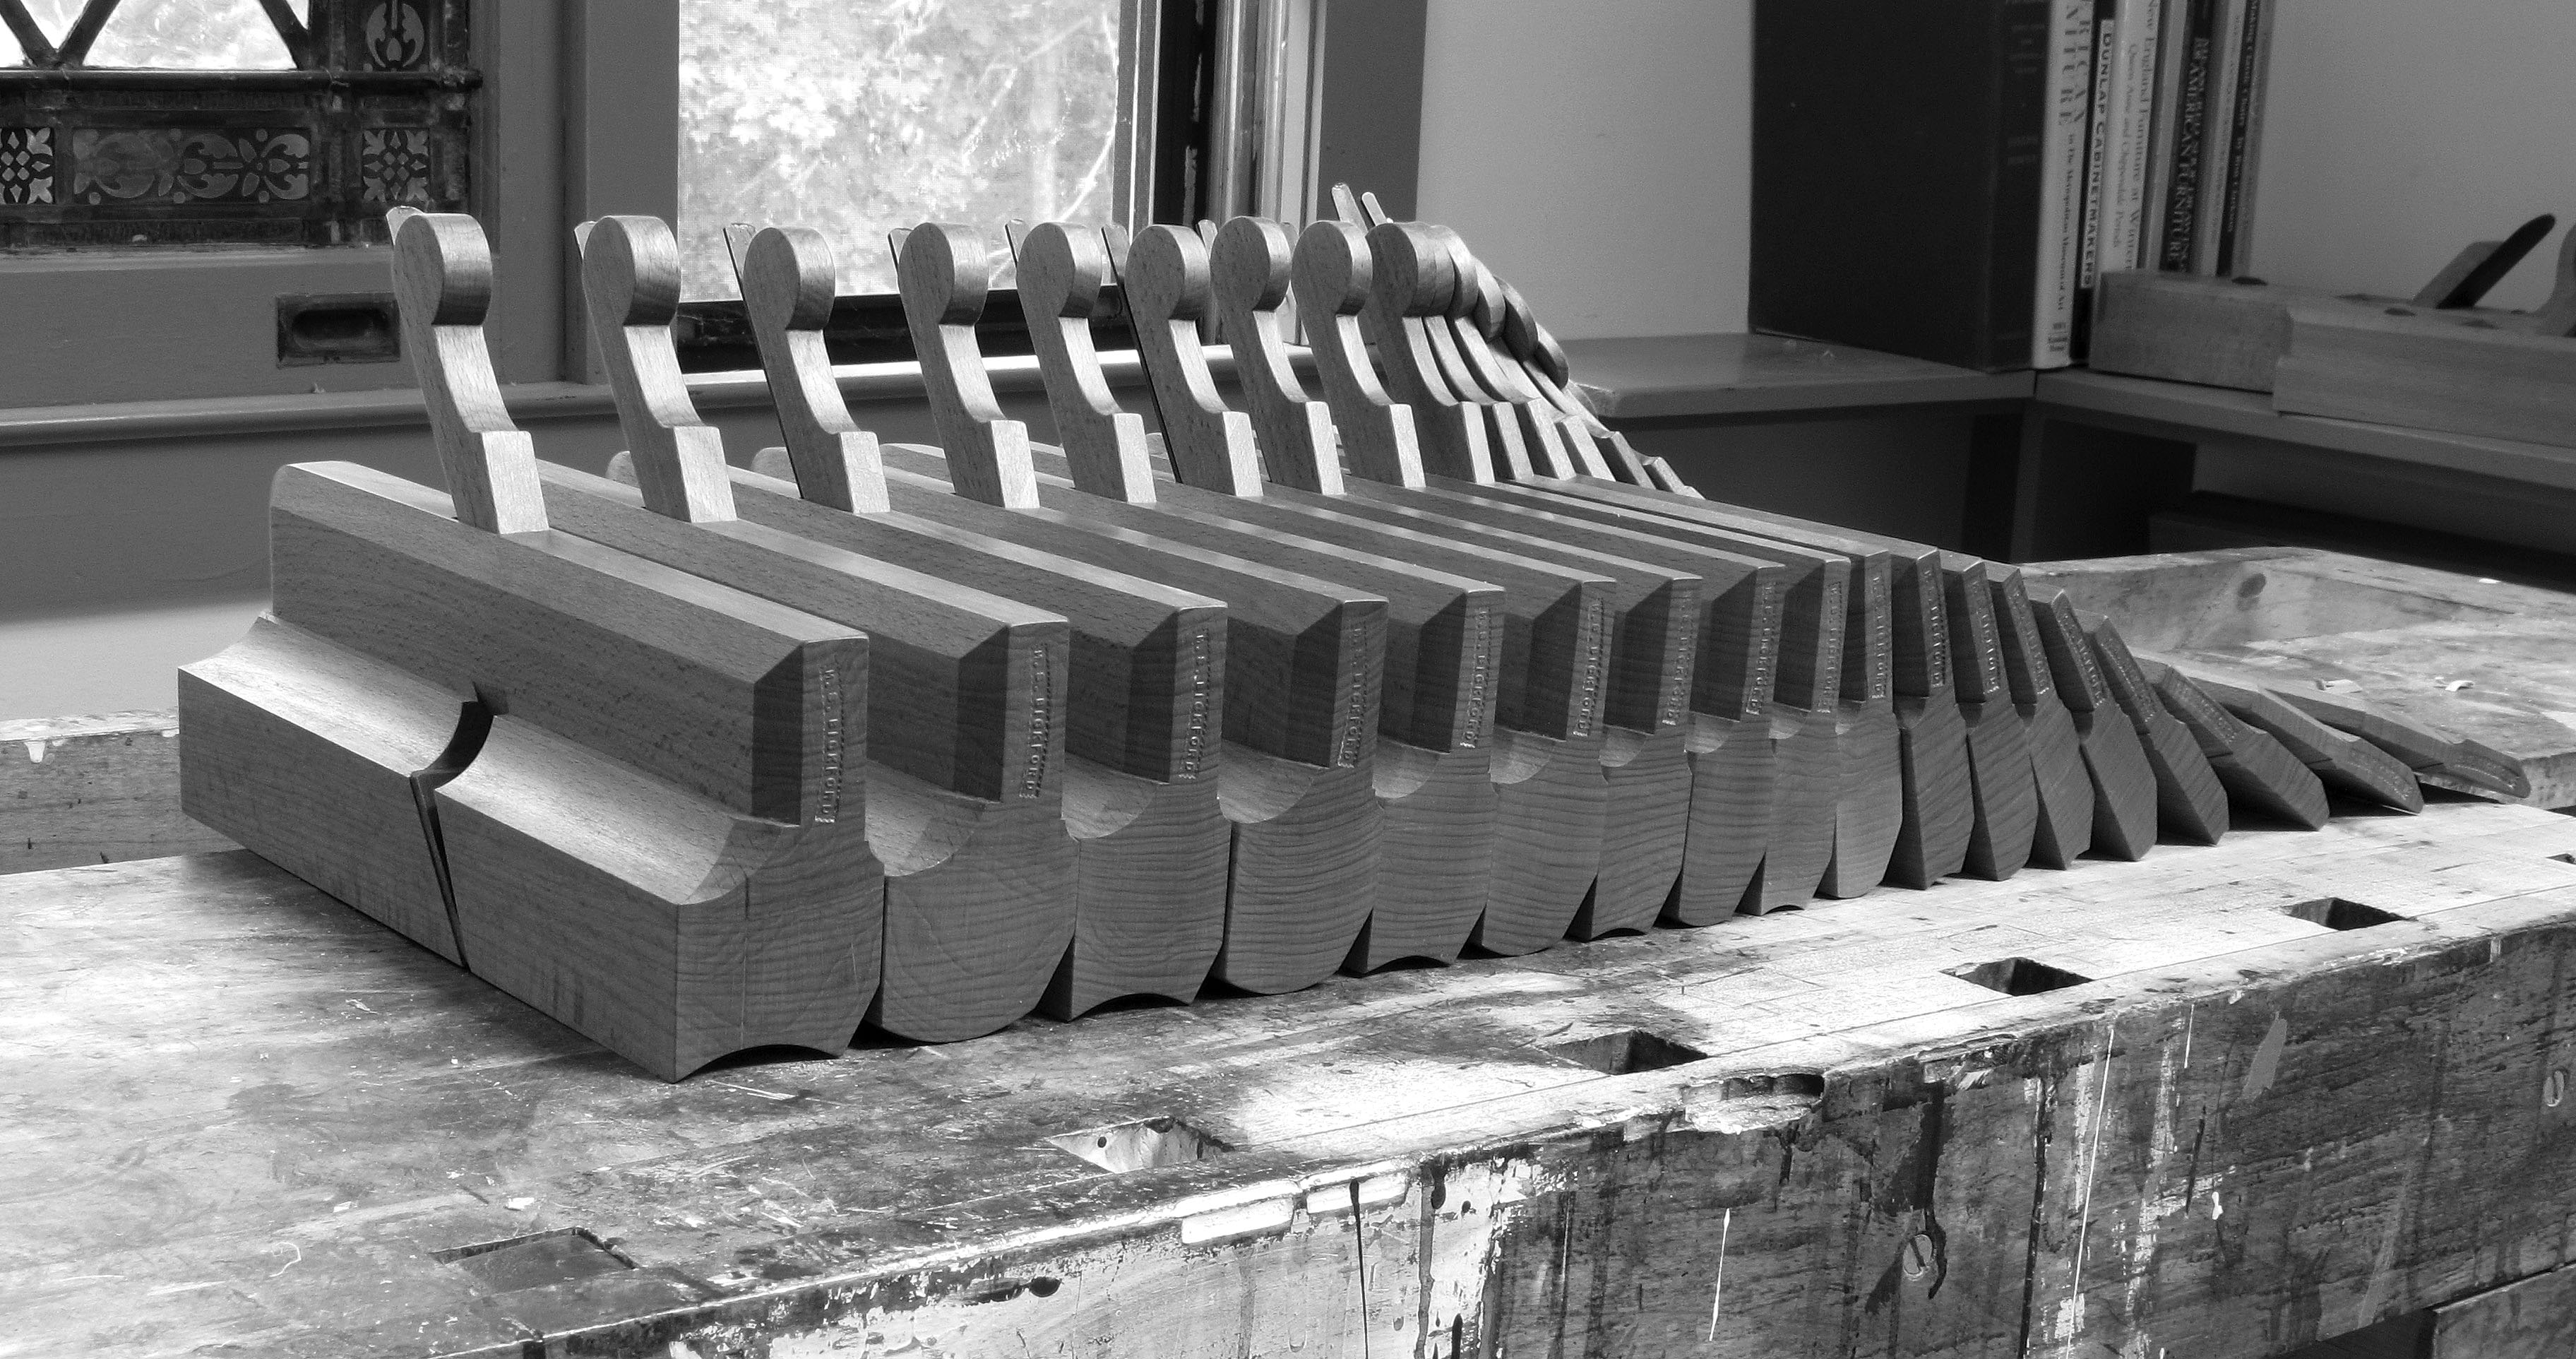
When I first became aware of hollows and rounds I read about the heralded “half set.” A half set of hollows and rounds is 18 planes, nine pairs, that incrementally increase in radius from 1/8″ at the low end to 11/2″ at the high end. The half set of planes is generally the even-numbered pairs in the previously referenced chart. (A full set is 36 planes, and also includes the odd numbers.)
Fig. 3-1. A half set. This pictured half set is nearly all that you will need to reproduce the various moulded edges of all period pieces, regardless of period. It’s also much more than many hobbyists will ever need.
A half set of hollows and rounds is an extraordinarily comprehensive grouping of planes that allows the owner to produce a range of moulding profiles that exist in the smallest spice box and largest secretary. Centuries ago, the half set was often acquired over time. For many users, myself included, the half set covers an unnecessarily broad range of work, and represents an undue expense. Many woodworkers narrow their plane choice down to match the scale of work that catches their fancy. For example, if you work only with 4/4 stock, then sizes above No. 8 may go unused. Starting with just a single pair of hollows and rounds – and an efficient method to accurately establish rabbets and chamfers – allows the production of dozens of different profiles.
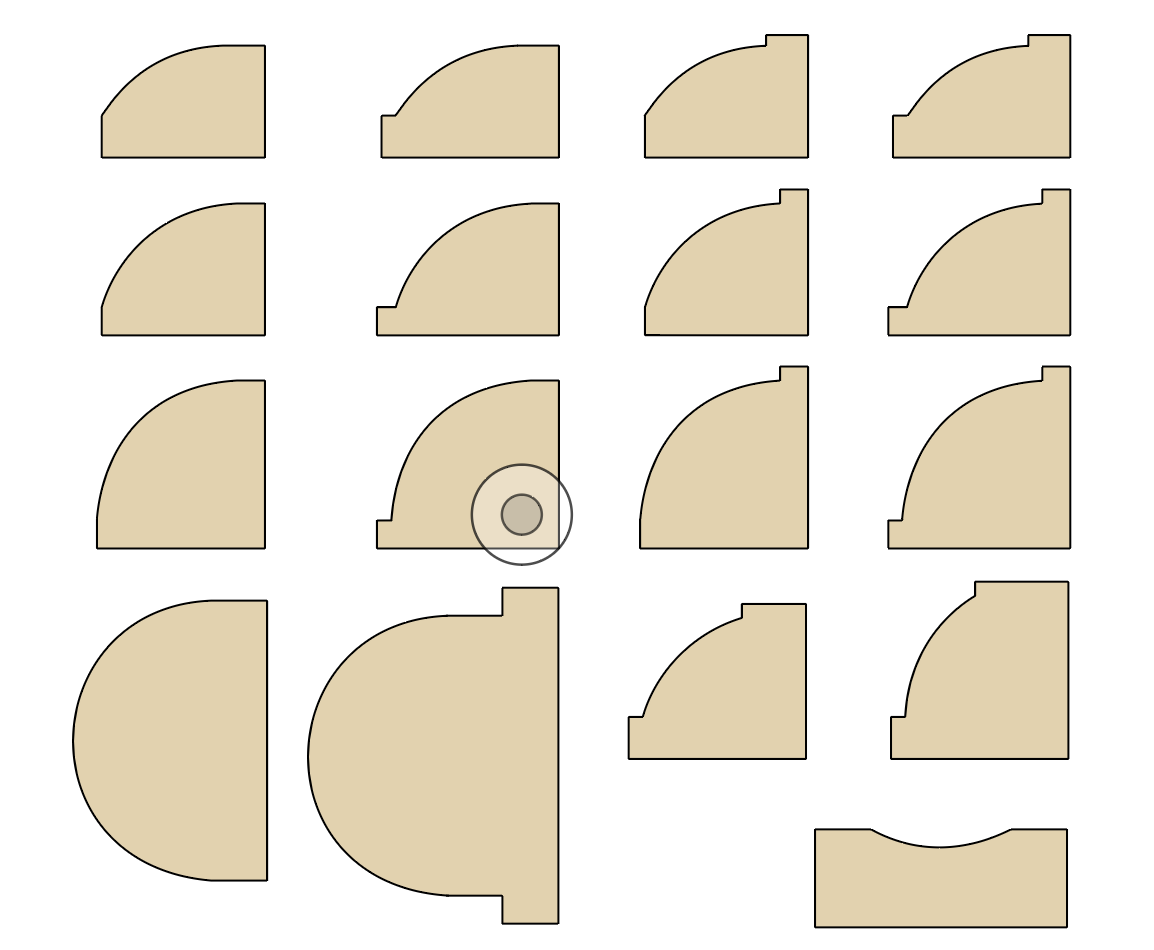
Fig. 3-2. Small differences. The differences between these profiles can appear as slight. To many woodworkers, however, they are significant. See more profiles on the following page.
The simplicity of combining only one convex and one concave arc might seem limiting. There are, however, scores of profiles you will be able to produce with just a single pair of hollows and rounds. These profiles will often contain minute differences – adding a vertical or horizontal fillet, or flat, adjusting the size of that fillet, increasing the curvature or changing the general angle of the profile. These small differences are important and are often glossed over or neglected on a router table.
Adding a second pair of hollows and rounds to your tool chest, a step I always encourage, increases the number of possible profiles far more than two-fold. Not only will you be able to create the 41 profiles shown above in two different sizes, you will also be able to mix the concave with the convex to form various cove and ovolo combinations and ogees. Additionally, you can mix concave with the concave and convex with the convex to form elliptical shapes. It is at this stage that you will unlock the true versatility of these planes.
The following are stepped examples of profiles that are primarily made with one pair of No. 6 planes. (A No. 6 was defined as cutting a radius of 6/16″ or 3/8″.) These profiles are a sampling that include the basic shapes, with a few basic modifications. You can combine and scale these to build large, intricate profiles that line and accent a piece of casework or a room.
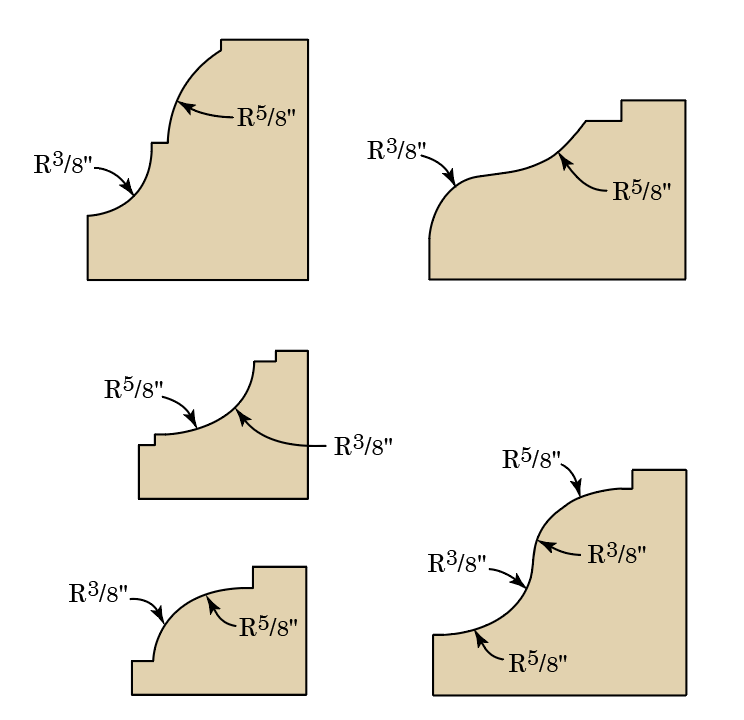
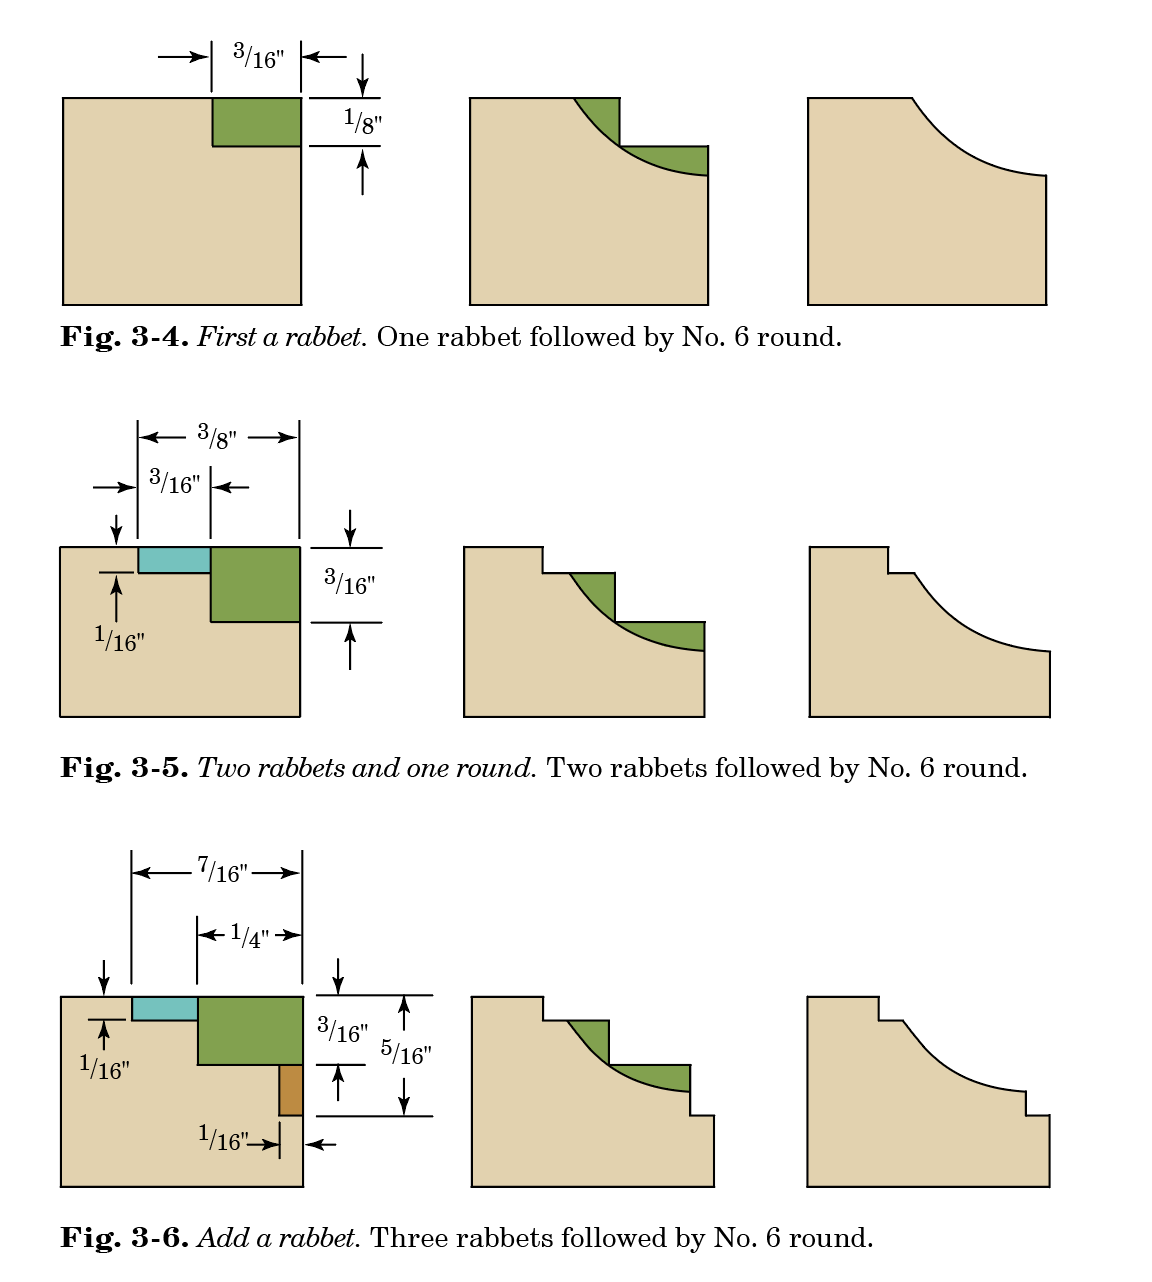
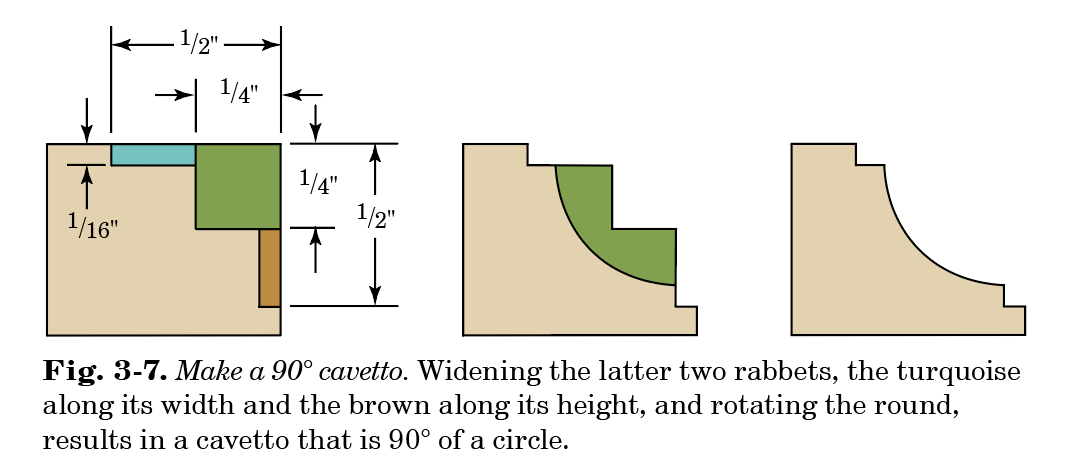
Cavetto (Cove).
A cavetto, or cove, begins with a rabbet, which acts as both a guide and depth stop for the work with the round plane. The layout and execution of the rabbet will be the focus of much of this book and is discussed in great detail beginning in chapter 4.
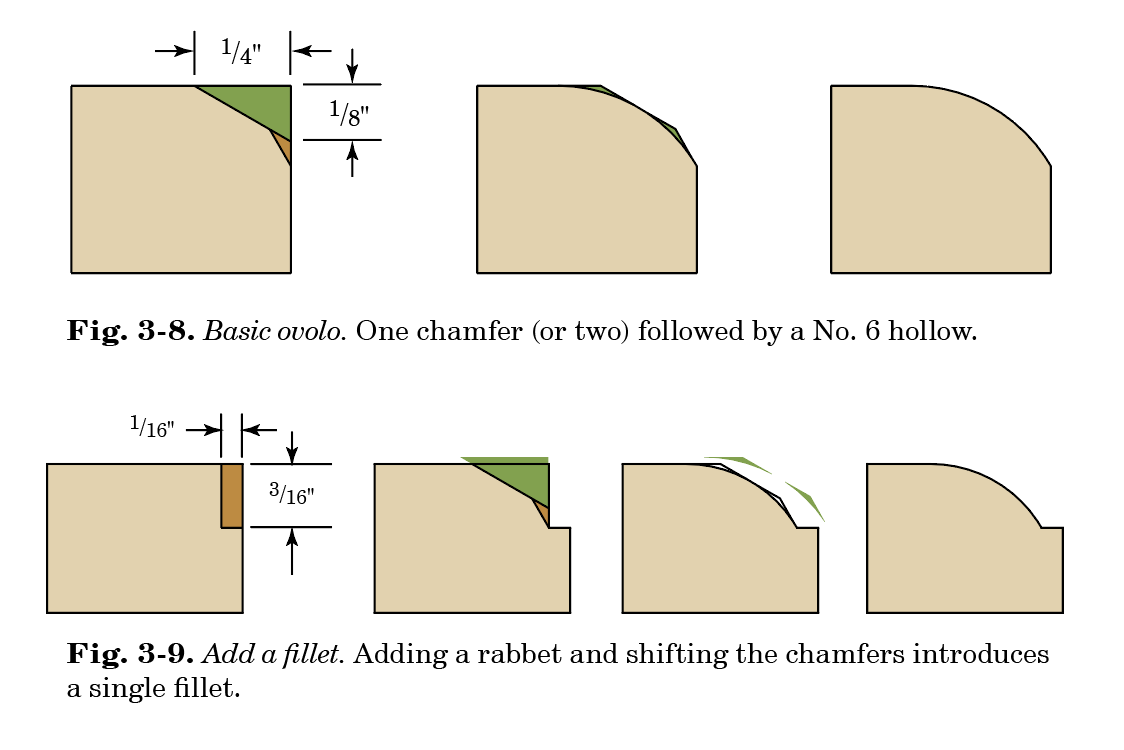
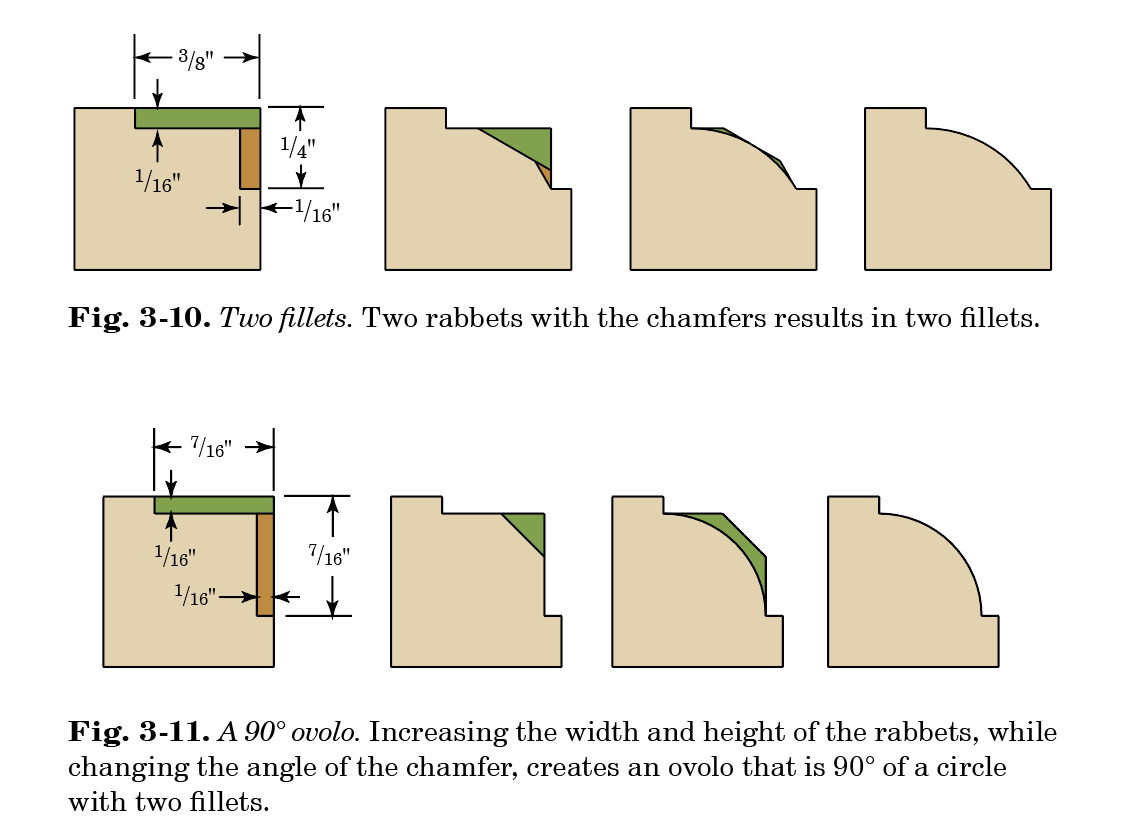
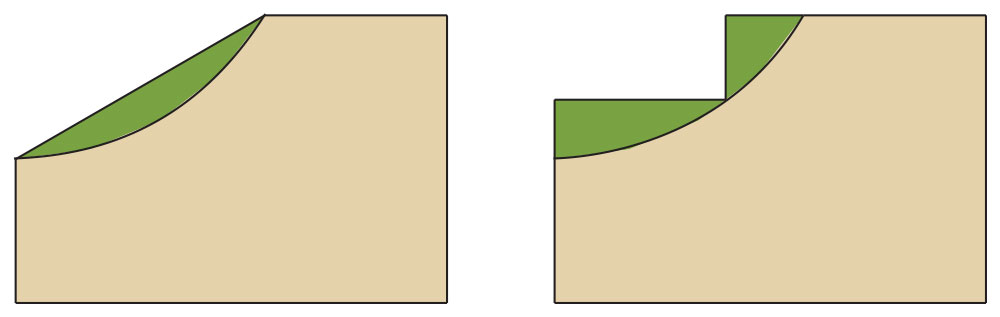
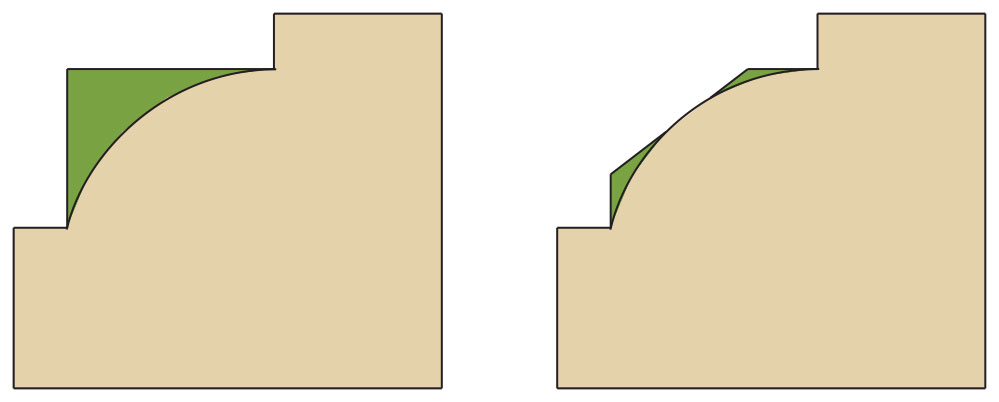
Ovolo.
An ovolo, like all instances when you use a hollow, begins with a chamfer. The chamfer, like the rabbet above, serves as both guide and depth gauge for subsequent work with the hollow plane. Again, the precise placement and execution of this chamfer will be discussed in greater detail beginning in chapter 4.
Torus (Bullnose).
When laid out in this way, two rabbets, two chamfers, and a No. 6 hollow create a bullnose.
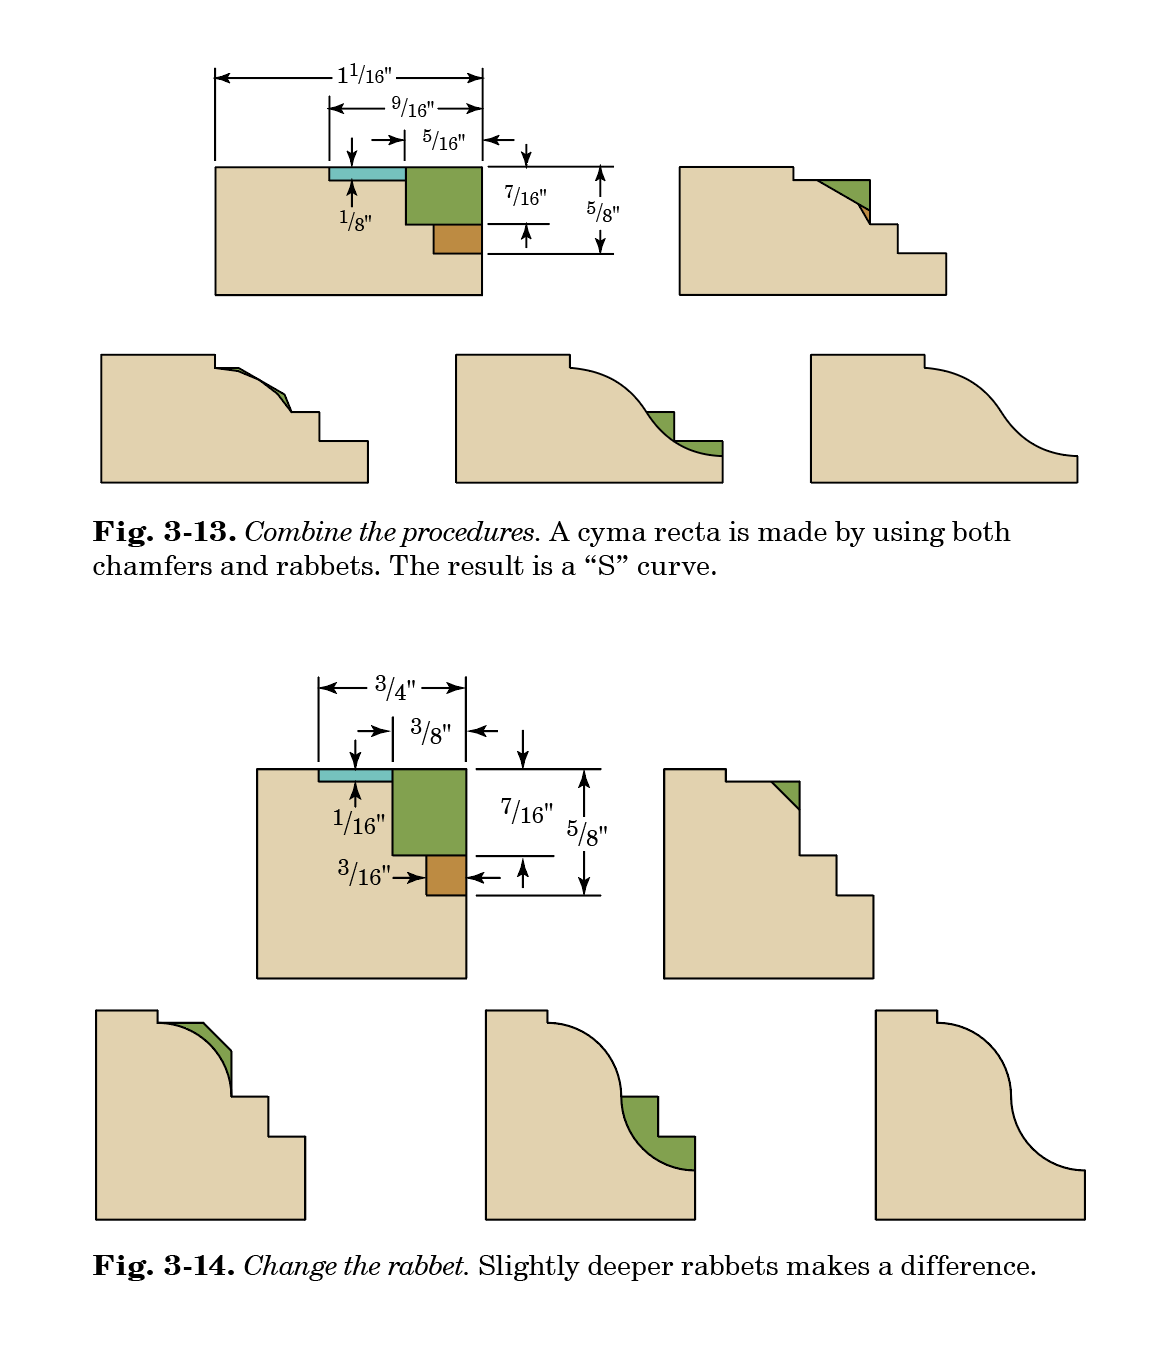
Ogee (Cyma Recta).
An ogee, or cyma recta, is achieved by combining the procedures for a cove and ovolo.
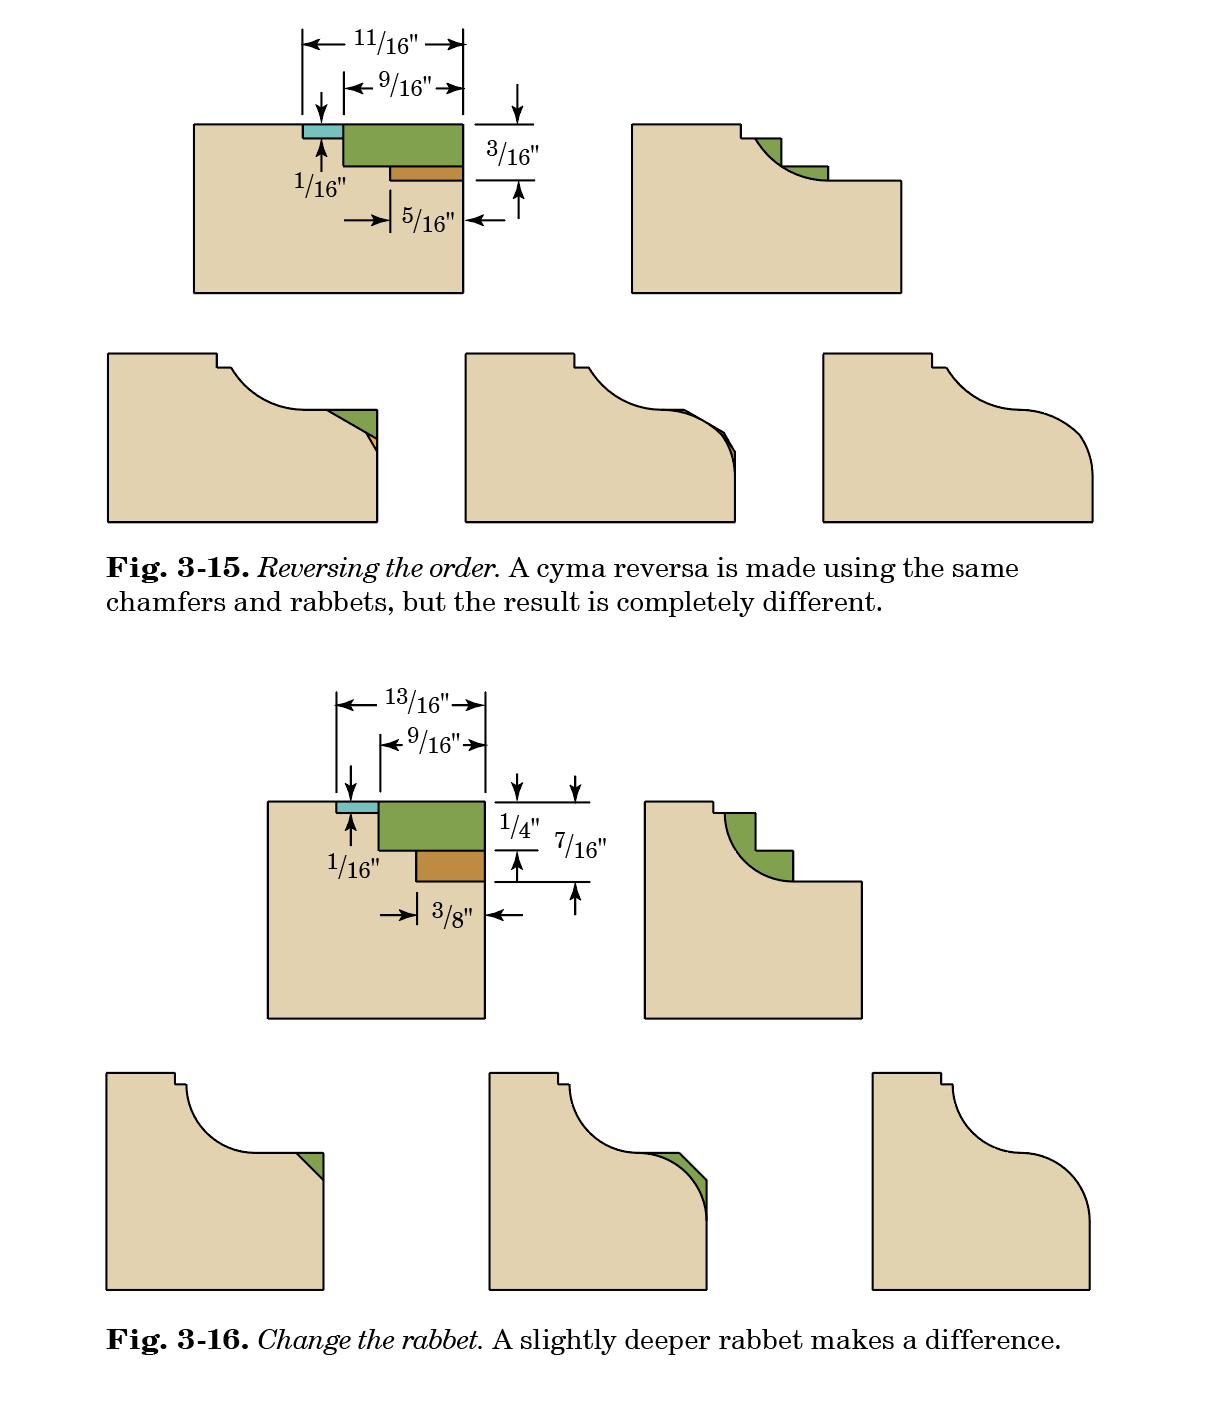
Reverse Ogee (Cyma Reversa).
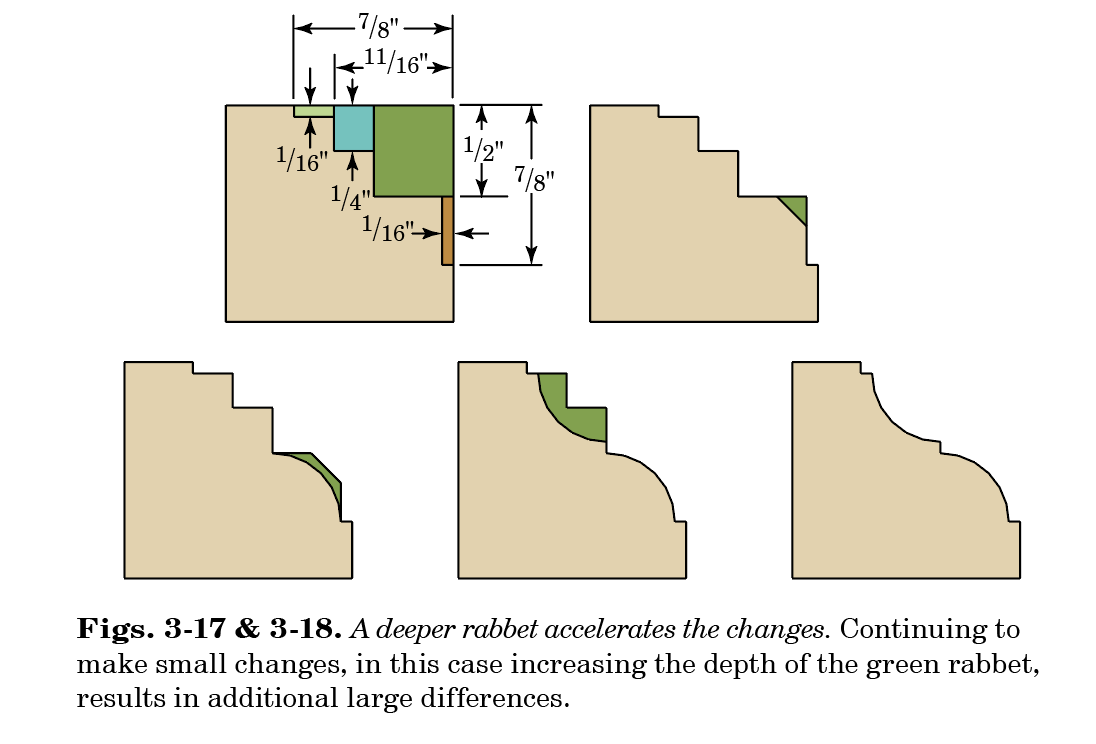
Minor changes to the rabbets can result in major changes to the profile.
Ovolo & Cove.
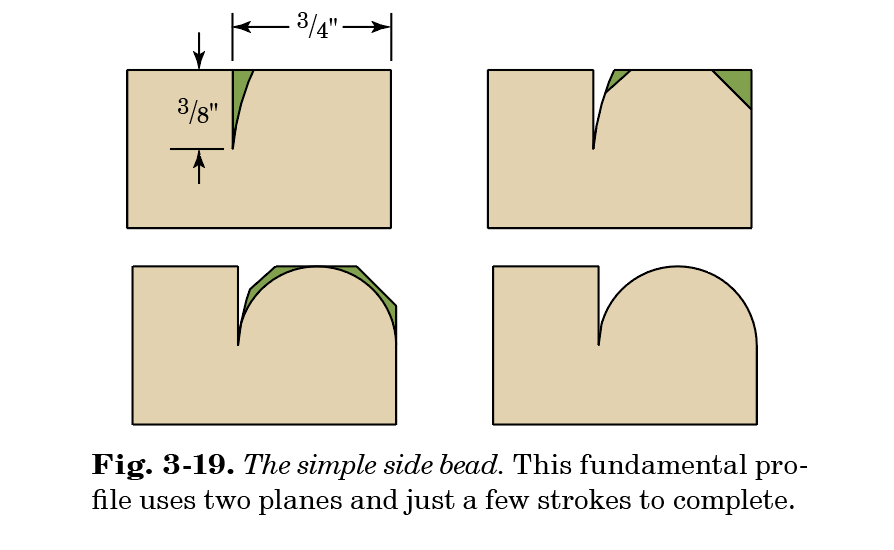
Side Bead.
A side bead starts with a snipes-bill plane that follows a gauge line, and it ends with a hollow.
I have spoken to scores of people regarding the methods of making profiles with hollows and rounds that I have covered thus far. While most new users find the techniques extremely simple and thorough, some more experienced woodworkers find it too calculated. In many ways I agree with this sentiment, particularly as you improve in your skills. In this chapter I will address a few of the techniques that many other woodworkers employ.
Many users much more accomplished than myself start the hollow on the single arris of a single rabbet rather than on the dual arrises of a chamfer. Similarly, for concave curves they start a round on a chamfer rather than the arrises defining a rabbet.
With these techniques, it is recommended that the user start the profile toward the end of the board, near where a pass with the plane is generally ended, and work his way back in abbreviated steps. The first pass with the round, using your fingers as a fence (I use my fingers on both sides here), will start the profile in the last 6″ of the board. With the second pass, back the plane up another 6″ and take another pass all the way to the end of the board. Proceeding in this way will create a profile that is ramped toward the end of the piece. To correct this, once the plane is tracking properly the user should beginto take passes abbreviated in the opposite direction – feathering the plane off the profile before the end – thereby evening the profile across its length. The toe of the plane will ultimately guide the cutting edge and the heel.
Fig. 13-2. Less work? If you start a round on a chamfer there is less material to remove, but also more steering of the tool.
The advantage of working in this manner, from end to beginning, is that the plane creates its own chutes in which to fall. The firstpass may be imperfect. The second pass, using the plane’s length and the chute that was started with the previous pass, will be slightly more accurate and uniform, especially toward the end. With each subsequent pass the profile will develop further and more uniformly. Accuracy here depends upon skill with steering the hollow and round, not on a square rabbet.
The advantage of this method in using a round is that there is less stock to remove in profiles of 60° as shown in Fig. 13-2.
There is, of course, much more stock to remove with a hollow using this method as shown in Fig. 13-3. There is, I guess, also one less step.
Fig. 13-3. More wear on the tool. Using a hollow on an arris will wear the sole and iron more in the middle of the tool.
The disadvantage of this traditional method of using hollows and rounds is in its inaccuracy for beginners. It is much easier for the new moulding plane user to achieve consistency when the plane has two points upon which to ride. However, I have introduced this technique here because there are times in which it is useful, even necessary.
For example, I use this method exclusively when working with No. 2 planes. You will notice that I never illustrate knocking the corners off the square facet before creating a bead, as shown in Fig. 13-4. Working a rabbet plane into that tight area is dangerous in regard to the surrounding profiles, especially given that the adjoining surfaces are complete at that stage.
Fig. 13-4. Useful with small planes. Working right on an arris is the way to go when dealing with the very small hollows and rounds.
The rabbet necessary to guide a No. 2 round is absurdly small; the two points upon which the plane sits are so close that they are somewhat irrelevant. I create a chamfer here and use the above method as shown in Fig. 13-5.
Fig. 13-5. Another place for steering. When making very small coves, a rabbet plane is impractical.
I also use these methods at times when working with larger planes, but their use is much more sporadic. Again, the further one progresses in his skills, the more individual preferences develop. You may try this method and prefer it – there is no question that many use it quite successfully. I will not argue with success.