“Artisan Geometry” is the overarching term used to describe the design approach in the five Lost Art Press books by Jim Tolpin and George Walker. We often get asked to explain it, and to recommend one or more of their books with which to get started.
We decided those questions would be better answered by Jim and George themselves – so they wrote a brief explanation of the term, then gave us some summations of each of the books. Check out the new Artisan Geometry page in our online store for their thoughts.
The following is an excerpt from “By Hound and Eye” by George Walker and Jim Tolpin; Illustrated by Andrea Love. It is a companion to the hardbound book “By Hand & Eye” by Walker and Tolpin. The two books are meant to complement one another. “By Hand & Eye” focuses more on the history behind the geometrical systems and offers projects using the simple ratios explored in the book. “By Hound & Eye” is concerned mostly with the practical exercises needed to open your inner eye and offers exercises not found in the hardbound book. Here is an example of the exercises and inspirations the books has to offer.
Fig. 4.1.5. I chose a proportion based on the intended use of this lap desk as the starting point for my design.
The following is excerpted from George Walker and Jim Tolpin’s first book collaboration, “By Hand & Eye.” (The projects in the book, including this one, are by Tolpin.) It’s the book that kicked off their “Artisan Geometry” work, which now includes four books: “By Hand & Eye,” “By Hound & Eye,” “From Truth to Tools” and “Euclid’s Door.”
“By Hand & Eye” is a deep dive into the world of history, architecture and design. And the authors have emerged with armloads of pearls for readers.
Instead of serving up a list of formulas with magical names (i.e. the Golden Section, the Rule of Thirds) that will transform the mundane into perfection, the authors show how much of the world is governed by simple proportions, noting how ratios such as 1:2; 3:5 and 4:5 were ubiquitous in the designs of pre-industrial artisans. And the tool that helps us explore this world, then as now, are dividers.
The key to good design is to master these basic “notes” – much like learning to sing “do, re, mi.” How to do this is the subject of the first three-quarters of the book. It offers exercises, examples and encouragement in opening your inner eye, propping it up with toothpicks and learning the simple geometry that will help you improve your design. The last quarter of “By Hand & Eye” takes these principles and puts them into practice by designing nine projects that are decidedly contemporary – proof positive that design isn’t reserved for highboys and 18th-century Philadelphia side chairs.
Design Parameters & Process ● The only starting parameter for this Shaker-style lap desk was the requirement that it provide a writing surface for note cards (about an 8″ x 11″ rectangle) so I chose this proportion (8:11) for the overall plan view of the lid.
● I then made the width of the top and bottom lid rails one-eighth of the overall frame height. By selecting 1-1/4″ as the frame width (which would also serve as the module length), the internal panel/writing surface is six modules wide (and therefore 8″) and is more than 11″ long. Drawing a diagonal intersects the inside edges of the top and bottom frames at exactly one-eighth the length of the lid (thanks to the magic of geometric expansion), establishing the width of the side frames.
● I added a two-module-wide extension to the angled frame lid to increase the internal capacity of the desk.
● To angle the lid to a 2:1 ratio, I made the sides one module high at the front rising to two modules high at the back.
● The lid and extension overlap the desk box by one-fourth of a module along all sides.
● I chose butt hinges that were close to one module in length, and I inset the hinges two modules.
● Note that the frame of the lid acts as a border around the writing surface and thus punctuates that space. If your eye chooses to make the frame lighter or stouter, remember that those framing elements are tied proportionally – if you make them stouter, the writing surface shrinks in both directions. Also note how the small ebony stops at the top and bottom act as another layer of punctuation.
● While the layout of the internal dividers is sized for paper and writing utensils, it also creates a pleasing division of major and minor spacings.
English oak coffer; 16th century. (Image from Wiki Commons, public domain.)
The once ubiquitous coffer (from the Greek “kophinos” – a basket; later from the French “coffre” – a chest) was also referred to as a “strong box” – because it was. (Later the term coffer would refer to an institution’s financial reserves.) This stout, often highly ornamented, chest reached its pinnacle of design and construction in the mid 1600s and was likely the first, and perhaps the only, piece of furniture that a commoner family might own. Likely used every day as a bench, its primary purpose was to keep the family’s valuables safe and private. Its thick oak walls and lid could often even keep its contents safe from a fire.
Accurate drawing of a similar 17th century English chest (by John Hurrell, published in 1903).
For George Walker and me, what is truly fascinating about these coffers is that they clearly demonstrate the traditional, artisan design process we have described in excruciating detail in “By Hand and Eye” (and decidedly less excruciatingly in “By Hound and Eye”).
For those unfamiliar with this process, here it is in a nutshell: Unlike modern builders who think primarily in terms of measurements to an external standard such as inches or centimeters, pre-industrial artisans took their cues from the builders of antiquity and thought more in terms of proportions. They would start by selecting a simple rectangle of harmonic proportions (literally from the audible harmonic musical scale) to govern the overall form. For example, the front elevation of height-to-length were commonly ratioed at 1:2 (an octave); 2:3 (a perfect fifth); 3:4 (a perfect fourth) or 3:5 (a perfect sixth). Within this rectangle they would select the span of some prominent element of the structure to act as a module (an internal index measurement often based on a element of the human body) and then tie all the other details proportionally to it.
The coffer is a perfect example of this ancient design process: a straightforward layout based on the geometry of a cuboid defined by simple whole number ratios of height, width and depth. Like the proportions embedded in the design of Grecian columns (which deeply influenced the design methodology of the joiners and cabinetmakers of the 17th and 18th centuries) the designer of this coffer clearly used the width of the chest’s leg in the front elevation as the “module” for the design. (The Greeks used the diameter of the base of a support column’s shaft, which happens to be the span of the human body, as the module for all the other elements of the temple.) We encourage you to print out the above drawing by Hurrell, take a sharp pair of dividers, set it to span the width of the leg (we label it “M”) and go exploring with us:
The first thing we’ll discover is that the height of the leg (to the underside of the lid) is exactly seven times its width (again, the module for this design). By eye, it looks like the length of the chest may be twice its height. When we step the module between the outside of the legs, however, we don’t come up with that nice whole-number ratio. On our second shot at it, we discover the lid from edge to edge is a precise 14 modules long. So there’s our 7:14 ratio – or to simplify 1:2. Which is a perfect octave harmonic, and a common choice for the coffers of this era (and later for highboys in their vertical extension).
Further exploration reveals that the mid-stiles and bottom rail are also a module wide, as is the height of the carved inscription of the date 1689. If you continue poking around, you’ll unearth all manner of modular-indexed relationships buried in the intricate geometric carvings. Be aware that the spans and radii, if not exactly a module-length, will be a whole number fraction above or below that length. For example, the module (plus a third of the module) serves as the spacing for the positioning of the lower rail from the baseline as well as the width of the top rail.
As in the ancient temples of Greece, every single element of this coffer enjoys a whole-number relationship with each other – and with the overall geometric form. As such, you can scale this piece of furniture up or down by simple changing the span of the module – no measuring to numerical dimensions is necessary – just an adherence to the ratios.
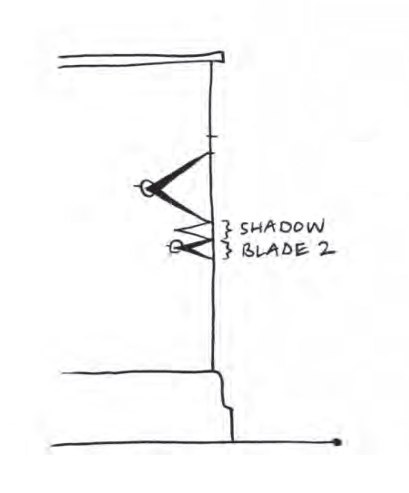
Now let’s explore the design of this coffer’s frame-and-panel lid. We were excited to discover how some anonymous 17th-century artisan made clever use of the module to add subtle, eye-pleasing asymmetry to the layout. Before you see how they did it (below), try to discover it for yourself. We find this sort of thing fun, and we bet you will too.
So here’s what we found: The module is utilized in four different ways: For the middle frames, it defines its overall width; for the hinge-side frame it defines its width, but it does not include the lid edging; for the end frame it does include the edging; and for the latch-side frame the module defines its width from the inside of the edging to the edge of the bevel next to the panel. Subtle, but just enough to make the design lively to the eye.
For your further entertainment, below are a couple more of Hurrell’s drawings of 17th-century English coffers for you to print out and explore. To see what we unpacked with our dividers, check out our blog at www.byhandandeye.com. One hint/reminder: The module for each of these designs is the width of the leg.
To learn more about the construction and carved ornamentation of these traditional coffers (also called a “joined chest” in America), you can do no better than to watch Peter Follensbee’s video “Joined Chest” available from Lie-Nielsen here or to read “The Artisan of Ipswich” by Robert Tarule, available from John Hopkins University Press here.