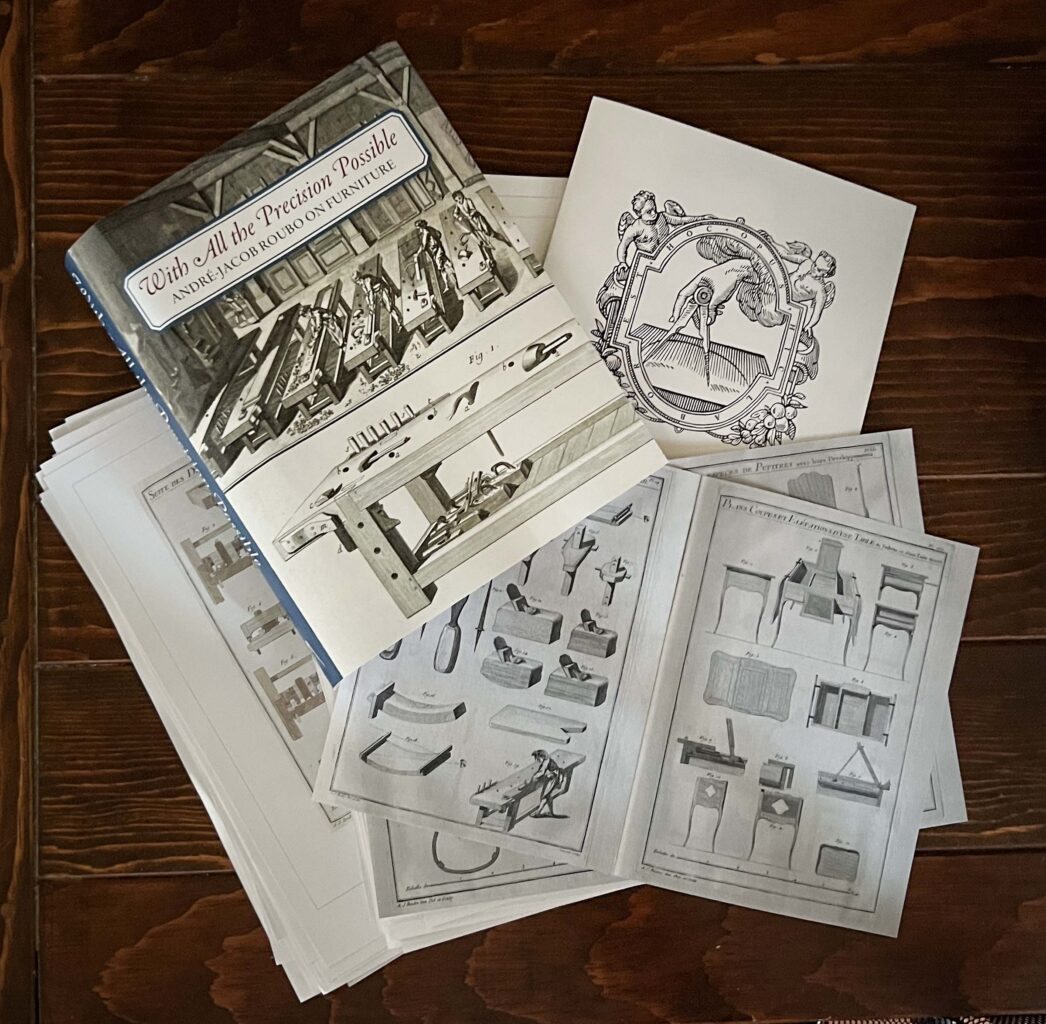
This new edition is a significant upgrade to the “trade” edition, which was in black-and-white and on uncoated paper. The new edition is printed in color, so you can fully appreciate the tone of the cotton paper from the 18th-century engravings. We upgraded the paper to a #100 coated matte paper, enlarged the page size, added printed end sheets and include a tear-resistant dust jacket.
Why do this? Well, we never thought our “trade” edition quite matched the gravity of the project. Don Williams, Michele Pietryka-Pagán and Philippe Lafargue spent years translating the writings of André Roubo’s “l’Art du menuisier.” It is the world’s first masterpiece of woodworking writing, and only bits and pieces were ever translated into English. So last year we began working on this replacement for our “trade” edition.
Get your copy of our new “With All the Precision Possible: Roubo on Furniture” by 11:59 p.m. Monday April 21 to save 20 percent (and get free domestic shipping). After that, it will be $125 (still a good price for this beauty of a book).
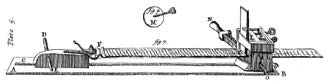
Fig. 5.1 “Waving Engine” from Mechanick Exercises, Joseph Moxon, 1678–80.
This is an excerpt from “With all the Precision Possible: Roubo on Furniture.” It is a follow-up to the post from a couple weeks ago that described a “machine for making waves.” Below is a portion of an essay by Jonathan Thornton that was written after he made one of these machines based off of historical descriptions of the machine.
The book “With All the Precision Possible: Roubo on Furniture” is the result of more than a decade of work by an international team that produced the first English translation of the 18th-century woodworking masterpiece: “l’art du Menuisier” by André-Jacob Roubo. This translation covers Roubo’s writing on woodworking tools, the workshop, joinery and building furniture.
In addition to the translated text and color images from the original, “With All the Precision Possible: Roubo on Furniture” also includes five contemporary essays on Roubo’s writing by craftsmen Christopher Schwarz, Don Williams, Michael Mascelli, Philippe Lafargue and Jonathan Thornton.
Introduction Anyone with longstanding interests in woodworking and the history and technology of picture frames could not help but be intrigued by the complex rippled mouldings that are most commonly seen surrounding paintings of the Baroque period. If that person is also a maker and collector of tools, as I am, then the construction of a device to make them is a strong temptation. It was years ago now that the temptation became almost an inevitability with my discovery of an engraving of such a device in Joseph Moxon’s seminal work on technology, “Mechanick Exercises.” 1 All I needed was the time, which was furnished by a semester sabbatical in 1994. I built a close reproduction of his device and have been exploring its capabilities as well as the literature on the subject ever since.
Moxon’s device intrigued me for several reasons: it was neglected or misunderstood in the available literature, it appeared that it would be capable of producing a variety of complex waveforms and it was the only type of such devices that to my knowledge had not been faithfully reproduced (although a somewhat modified version had been published in Fine Woodworking in 19862). The device, called the “Waving Engine” by Moxon (Fig. 5.1), works on a relatively simple principle. A stock piece is fastened to a guide or template rod carved into a waveform, and they are pulled together through a stationary cutter. As the guide rod rises and falls over a polished feeler bar, the waveform is gradually cut into the stock piece by a fixed blade. While the principle is simple, the devil is in the details.
Fig. 5.5 Overall view of a reproduction “Waving Engine” of the Moxon type.(drawing by Thornton)
Making the Machine The illustration of the device that Moxon provides (from a plate almost certainly engraved by himself) presents a few problems of interpretation, and Moxon’s description, while fairly thorough, omits some important information. My intent was to make Moxon’s “engine” to his specifications, and if modifications had to be made, the reproduction itself would tell me what to do, and not my own second-guessing.
“The Waving Engine…hath a long square Plank…All along the length of this Plank, on the middle between the two sides, runs a Rabbet…Upon this Rabbet rides a Block with a Groove in its under side…the Groove in the Block is made fit to receive the Rabbet on the Plank.” (Joseph Moxon)
Fig. 5.6 Detail of pulling block and height adjust mechanism.(drawing by Thornton)
I made the plank from quartersawn sycamore. The rabbet I made from hard sugar maple, likewise the block that rides on it. This is the block that pulls both the patterned template and the stock piece through the cutterhead. Moxon attaches these elements to the block with a “Vice, somewhat larger than a great Handvice….” In considering this, I made the only major deviation from Moxon’s machine. I didn’t see how a fixed vice could easily follow the up-and-down motion of the guide rod (“rack”) and stock (“riglet”), let alone the gradual raising of these strips as the molding was cut. I suspect that simple looseness of fit allowed Moxon’s machine to accommodate these movements. In place of the hand-vice, I forged a tongue with a hinged box joint (mortise and tenon) much like the joint in a pair of pliers. The tongue would move to accommodate any adjustment upwards. The tongue itself was fastened into the block with a rod, which threads through it and also penetrates the block (at an angle — the purpose of which I will make clear). By means of this rod, I can adjust the attachment point to accommodate different widths of stock. In addition, I placed a support rod and knob under the end of the tongue and likewise threaded into the block, so that I could raise the attachment tongue correspondingly as the strips rose. This modification does not alter Moxon’s method in any important way, while making the machine easier to use.
“At the farther end of the Plank is erected a square ∫trong piece of Wood…This square piece hath a square wide Morte∫s in it on the Top…upon the top of this is a strong square flat Iron Coller…”
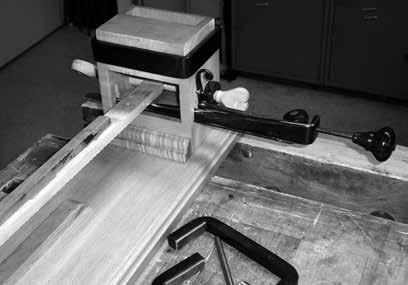
Fig. 5.7 Detail of cutterhead and slide board clampedinto the end-Vise of a cabinetmaker’s workbench. Thedevice is set up to make a side-to-side (flammleisten)waveform moulding (drawing by Thornton)
This is the business end of Moxon’s device which I call the “cutterhead.” My upright block was made of a single piece of maple, with the appropriate mortises as described. I added two projecting through-tenons to fasten the block into the plank, so that they could be gripped by the end-Vise of my workbench when the machine was in use, and allow me to easily disassemble the machine when it was not. The purpose of the collar is to clamp the fixed scraper-type blade perpendicular to the stock piece. My collar was forged from mild steel, as were the screws that tighten it on the block. Like Moxon, I forged perforated disks on the ends of the screws, so that a bar could be inserted to tighten them with lever action. It is important that the blade not move while in use.
Moxon is at his sketchiest when it comes to how the depth of cut is gradually increased, although the engraving seems to show what the description omits. A bar is shown penetrating the block underneath the “rack” that appears to be both tapered and furnished with a threaded rod for gradually advancing it under the work. There can be no other way to do this in a controlled way. Jutzi and Ringger in their discussion of Moxon’s machine had a different interpretation.19 They speculate that this knob, projecting out of the far side of the machine, was used manually by a helper to lift the guide rod and workpiece against the blade. Moxon however, refers to this as “a wooden screw called a Knob.” He also appears to illustrate, though he does not discuss, the taper of the polished rod that is advanced by this screw-knob. It seemed clear to me what he intended: I made a steel bar with a T-shaped cross section that would slide through T-shaped slots in the block. I put the taper side up, as Moxon appears to do, and simply accounted for this cant in the rack and “riglet,” by setting my attachment-tongue into the pulling block at the same angle.
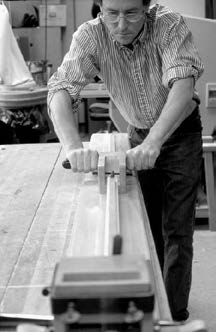
Fig. 5.8 Making a moulding on the Moxon “WavingEngine.”
I captured the end of my adjusting screw-rod with a sort of clutch lever that would allow me to easily disassemble the machine, an alteration necessitated by my own tight space that again, did not alter Moxon’s device in any important way. The screwrod uses a fine thread so that I can very gradually raise the work under the cutter. In use, one or two revolutions of a rosewood knob on the end of this screw increases the depth enough for the next cutting pull. The handles on my pulling block were also made of turned and polished rosewood, press-fitted onto a steel rod, which runs through the block, again for ease of knock-down.
“But before you draw the Rack through the Engine, you must consider the Office…of the iron screw…for by these screws, and the Rabbet and Groove, your work will be evenly gaged all the way…under the edge of the iron.”
Moxon shows only one screw, though he refers to them in the plural. These screws serve to keep the work “gaged” under the blade. The end of the screw shown was fitted with a flat iron disk, that appears to be a sort of wear-plate against the moving template and workpiece, called the “rack” and “riglet” respectively by Moxon. Jutzi and Ringger speculate on two screws, one from each side, that enter at an angle. Their drawings are interpretive reconstructions as they did not build such a device.
I believe that Moxon clearly shows a screw entering perpendicular to the cutter-head block. I also decided to use two screws, so that I would have greater flexibility than could be achieved with just one, though the inside surface of the cutterhead could have conceivably gauged the other side of the strips. Instead of iron, I made my screws from lemon-wood (Calycophyllum candidissimum), a beautiful close grained relative of boxwood, and equally hard-wearing. I threaded these with the Beall router attachment, and made decorative double volute-shaped flanges on the ends similar to the screw end shown by Moxon. I decided that locking washers were a good idea if I wanted to keep my work well “gaged.” I made these from rosewood also, and placed them on the outside of my block where they are easier to get at.
My blades were made from 01 steel, a high-carbon, oil-quenching tool-steel that has low warp characteristics in hardening, and can be tempered to create a tough and hard blade. The blade “whose lower end is cut into the form of the Molding you intend your work shall have…” has a single bevel facing toward the pulling block. I filed and ground the shapes before hardening the blades. I sharpened them once on the bevel, then subsequently only on the flat side.
“Then if you lay hold of the handles of the Block…and strongly draw upon them, the Rack and Riglet will both together slide through the Mouth of the wooden piece…and as the rounds of the Rack rid over the round edge of the flat iron…the Riglet will on its upper side receive the Form of the several Waves on the under side of the Rack, and also the Form, or Molding that is on the edge of the bottom of the iron, (blade) and so the Riglet will be both molded and waved.”
The final form of the mouldings is dictated by the shape of the blade, by the form of the template or combined templates, and by the attachment point of the pulling block. The number of possible designs is multiplied by the addition of any of these elements, and quickly becomes astronomical. Even with my still limited stock of blades and templates, I will probably never produce all of the possibilities.
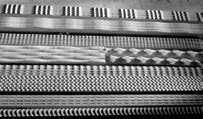
Fig. 5.9 A selection of mouldings made on the Moxon“Waving Engine.”
Using the Machine I have continued to explore the capabilities of this tool in the years since I first made it, and it has provided both mental and physical exercise. In action, I hold the tongue down with my finger as I push the strips through the machine for the return stroke, then I “draw strongly” on my handles. Depending on how deep the moulding is going to be, and this is dependent on the wave amplitude of the template, I will continue to make cutting strokes until the mouldings are complete. I take coarse cuts (Moxon would say “rank”) to start out with, but by the end, when the blade is bearing more-or-less continuously, the shaving needs to be thinner than paper. I can complete some moulding strips in 15 to 20 minutes, but deep mouldings in a hard wood take more time.
Any wood that is hard and relatively dense will work well for the moulding strips. Cherry is excellent, as are pear and maple. Many of the period mouldings are executed in either ebony or a fruitwood stained to look like ebony (ebonized). I have gotten by with poplar for moulding with a gentle wave. It’s best if the grain rises away from the pulling block so that the wood fibers are severed more obliquely. Earlier on, I mounted the moulding strips to the “racks” or guide bars with a few drywall screws shortened so that they did not come through the surface of my mouldings. I still had to make them relatively thick however, and they were only held firmly in a few places. Now I prefer to use the wood turner’s trick of gluing the stock piece to the template with pieces of heavy brown paper. The finished moulding is then taken off by splitting the paper interleaves, and scraping the glue and paper residue away.
Fig. 5.10 Two views of the author’s waving engine.
The “racks” are made of hard maple. I have hand-carved some of them after stepping off the intervals with a divider, by using the same gouge across the grain both bevel side up and bevel side down. I have also used a pin-indexing jig on my table saw and router table T-slide like those jigs used to cut box joints. I did this to create bars with tight waves that would have consumed a lot of time in carving. The mathematical accuracy of this method can be both an advantage and a disadvantage depending on your point of view. Historic ripple mouldings have subtle variation and character.
No sanding is required on a properly cut moulding. The blade leaves an almost polished surface in a wood like cherry. I also discovered that pushing the moulding back through the cutter-head for the return stroke burnishes the moulding against the polished bevel of the blade. Stain will greatly accentuate the wave appearance by selectively penetrating the severed wood fibers on the insides of the wave troughs.
1. Moxon, Joseph (reprinted from the 1703 edition). Mechanick Exercises or the Doctrine of Handy-Works. Scarsdale, NY, The Early American IndustriesAssociation (1979).
2. Robinson, T. “Handscraped Waves.” Fine Woodworking, 58 May/June (1986) 64.
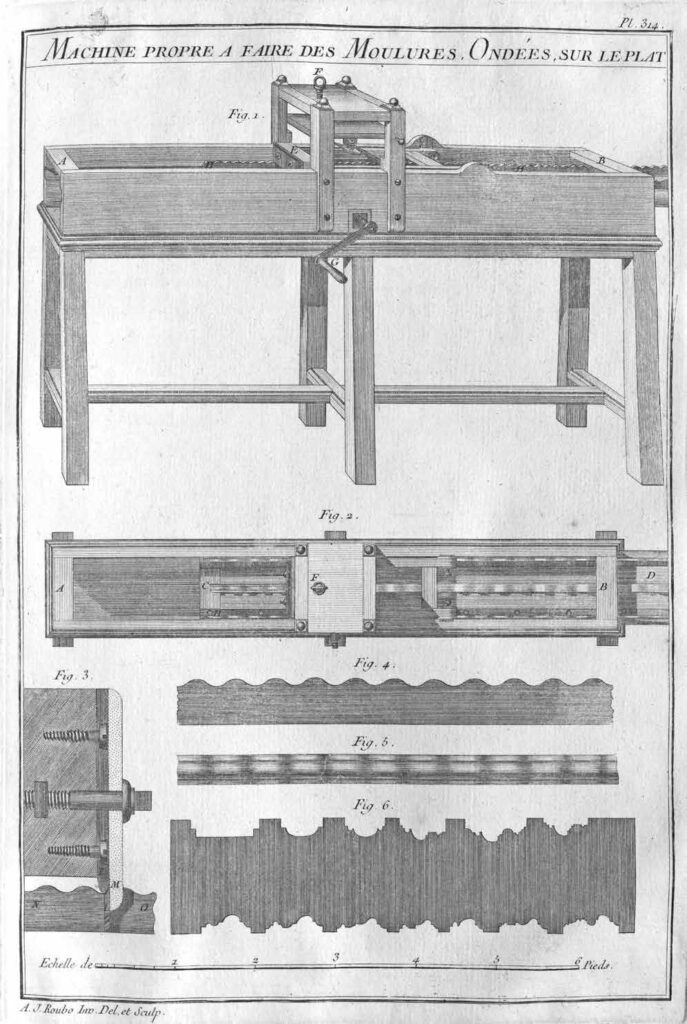
Plate 314. Machine Appropriate for Making Flat Wavy Mouldings
The following is an excerpt from “With All the Precision Possible: Roubo on Furniture.” This book is the result of more than a decade of work by an international team that produced the first English translation of the 18th-century woodworking masterpiece: “l’art du Menuisier” by André-Jacob Roubo. This translation covers Roubo’s writing on woodworking tools, the workshop, joinery and building furniture.
In addition to the translated text and color images from the original, “With All the Precision Possible: Roubo on Furniture” also includes five contemporary essays on Roubo’s writing by craftsmen Christopher Schwarz, Don Williams, Michael Mascelli, Philippe Lafargue and Jonathan Thornton.
The excerpt below details a machine that had gone out general use even before Roubo wrote the original text. However, there is no denying that the illustrations and explanation of the device are captivating. The details on it inspired Jonathan Thornton to recreate one of these machines and write an essay on it for “With All the Precision Possible.” A portion of the essay will be the excerpt for next week.
Description of the Machine commonly called the tool for waves, and the way of making use of it in different ways The machine that I am going to describe is the largest and the most complicated of all the cabinetry tools, which once were much used. Now they are not used much, since they are only used for works of applied wood [moldings] and they have, so to speak, combined all their science to veneer the wood properly. However, since this tool is ingenious, and you cannot find it anywhere, I thought I must include it here, in order to save it for posterity, supposing that this work succeeds.3
The use of the wave-cutting Tool represented in Fig. 1 is for cutting onto the wood wave-mouldings, or patterns, precise intricate repetitive designs, whether flat, on the face or even in both directions at the same time.
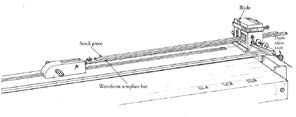
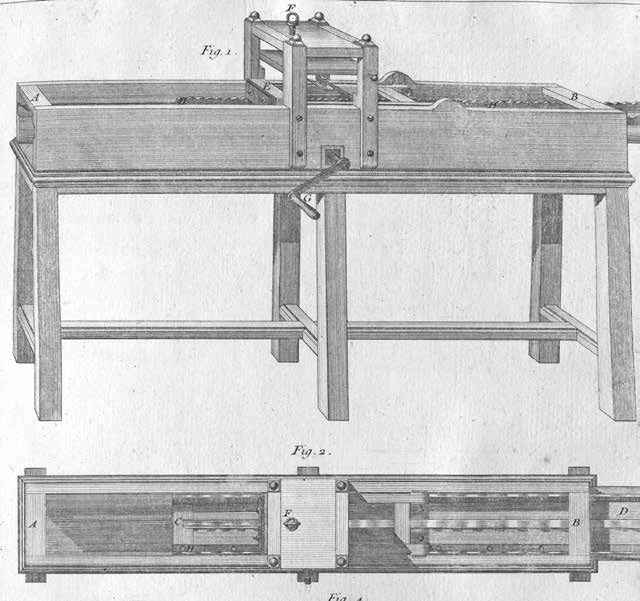
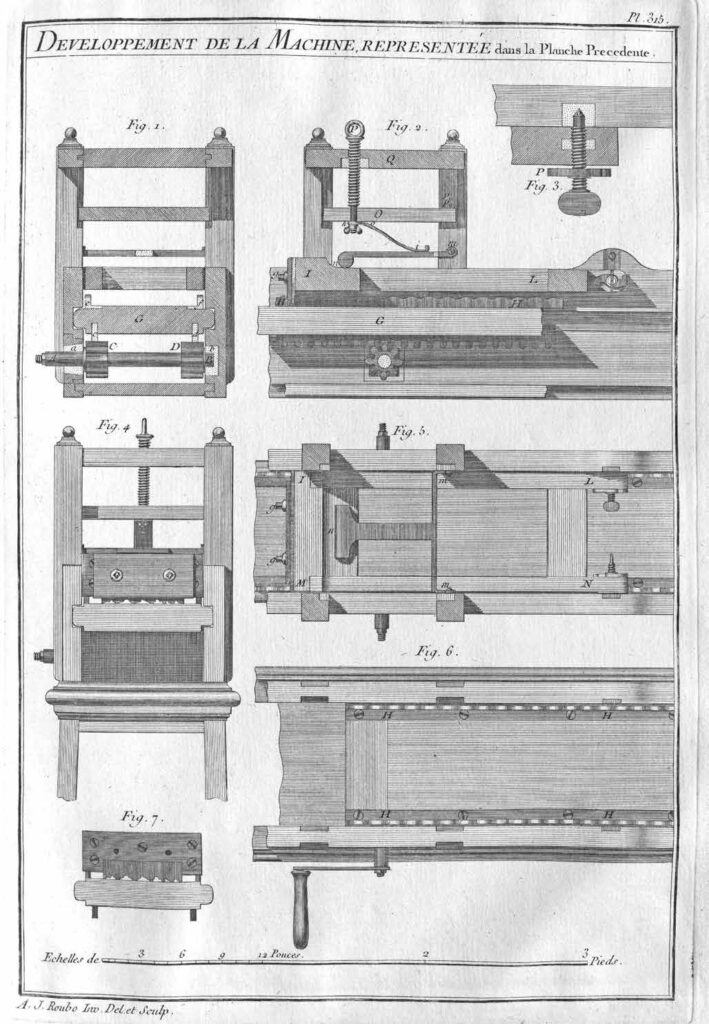
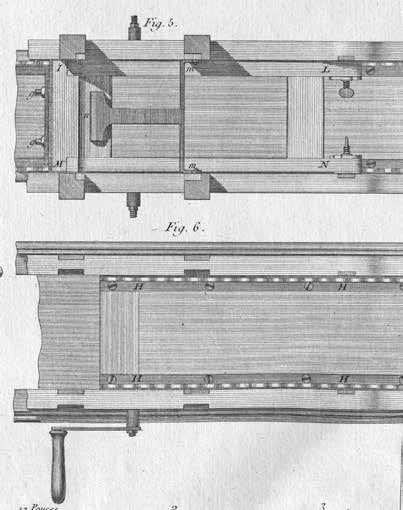
It is composed of a box from 7 to 8 feet in length, by one foot wide and 9 to 10 thumbs in height, exterior outside measurements. This box is open on top and at the ends, such that the distance between the two sides is retained only by cross-pieces A and B, Figs. 1 & 2, placed at two ends of the box, where they are assembled by mortise and tenon. At about the middle of the height of the box is placed a plank C–D, Fig. 2, about 2–thumbs thick, called a sommier [or platform, mattress; in similar machines for printing lithographs this is called the couch or the cooch]. This, for more strength, should be fit together at the ends and braced from below. This plank, or sommier [platform], is held in a groove in the two sides of the box (which should not be less than one–and-a-half thumb in thickness) and serves to hold the mouldings to be wave-cut, as I will explain later, and which you can see in Fig. 2, which represents the machine viewed from above.
In the middle of the box is placed a square frame of about a foot in width, viewed from the side, and which extends from 9 to 10 thumbs above the box, to the sides of which it is attached with some screws, and in which it enters by tenon and a notch, as you can see in the evolution of this machine, represented in the following Plate [315] Figs. 5 & 6.
The width of this frame is determined by the width of the box, the sides of which the uprights of the latter are flush on the interior. It is in this frame that is placed a spring which presses on the toolholder [the cutterhead] E, Fig. 1. This spring is raised and lowered by means of the screw F, Figs. 1 & 2.
The whole machine is held on a base of a solid construction and widened [splayed] in the form of a trestle to give it a better footing. The height of this base should be from 2 feet 8 to 10 thumbs, so that is has about 3 feet in height from the axis of the crank handle G to the ground. This is the most comfortable height for the person who turns this crank handle to have all his strength, whether raising or lowering it.
There are in this machine two movements: one is horizontal, which is done by means of the handle G, Fig. 1, which by making the pinion turn placed in the interior of the box, moves the sommier A–B, Fig. 2, and consequently the work which is held above.
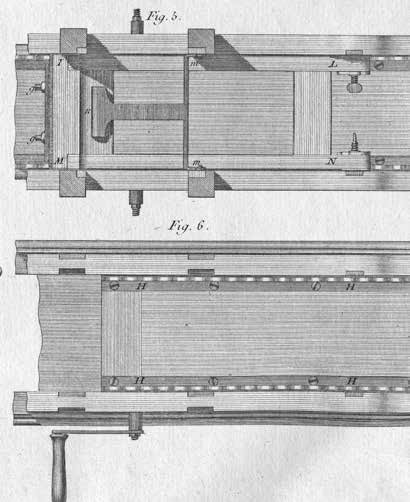
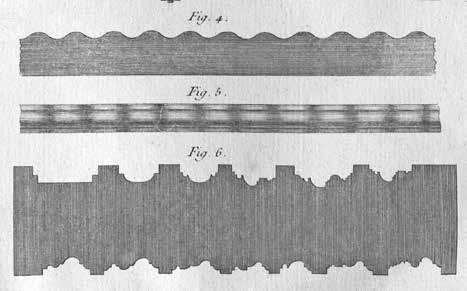
The other movement is vertical, downwards, and depends on the first. The rod, or wave guide/ channel H–H, Figs. 1 & 2 [Plate 315], which is held on the sommier, moves therefore with the latter, is raising the tool-holder F, Fig. 1, left, which then lowers immediately by itself, both by its own weight and by the pressure of the spring placed above. See Fig. 4, which represents a wave channel the size of the execution [ full-size/scale] Fig. 5, [which] represents a moulding completely wave-formed, according to the sinuosity of the wave channel in Fig. 4. Also see Fig. 3, which represents the cross-section of the tool-holder, which I will describe here later.
Fig. 6 represents a cutting blade viewed with different profiles, as large as the execution [ full-size/scale].
Figures 1 & 2 of this plate represent one of the transverse cross-sections of the machine, taken at the location of the pinions and the other the longitudinal cross-section of the same machine, so as to better understand the details of its construction and the mechanism of its operations.
Axis A–B, should be placed in the copper collars, a, b, so that they turn more easily. One should note at one of the sides of the box [is] a squared opening capable of letting pass pinions C–D, supposing that it is necessary to remove the axis outside. Pinions C–D, engaged in the toothed rack c, d, Fig. 1, and E, F, Fig. 2, which are embedded on the underside of the carriage [platform] G–G, same Figure, about 9–lines deep, and are held there by pegs, placed together in the sides of the latter, observing that the toothed racks are well positioned vis-a-vis the other, so that the two pinions C–D, Fig. 1, are contacted equally by the racks [platform] above. However, as it can happen that the teeth of the pinions are not well positioned vis-a-vis the other, one would do well, after having stopped/blocked one of the toothed racks, not to attach [secure] the other until after verifying that it fits well with its pinions, so as to be able to set it back or advance it as necessary.
Plate 315. The Development of the Machine Represented in the Preceding Plate
These racks can be made of iron or copper, which makes no difference for the machine, however it would be good that they be made of copper, given that the rubbing of two different metals is smoother and wears less than if the two pieces, that is to say, the rack and pinions, be of the same metal. [See Plate 314.]
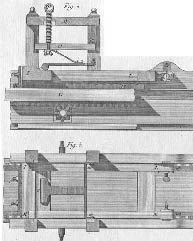
The rods or wave conduits [channels or guide rails for the work piece] e, f, Fig. 1, and H, H, Figs. 2 & 6, should be also made of copper, and they should be bent at a right angle to have the ability of attaching them with screws on the carriage [platform] in which they are notched in all their thickness, as one can see in Figs. 1 & 6.
When you put these [wave] channels on the platform, you must pay the greatest attention that the guilloche [pattern] be not only fit well together, but also that they match at the same point of their contour with the contact of the tool-stand which bears on top of it, as you can see in Fig. 4. This represents the machine viewed from the end, and even better in Fig. 7, which shows the toolstand [tracing and cutting head] where you have removed the cheek [ fence] which holds the iron in place, as I will explain later.
The tool-stand is a frame I–L, M–N, Figs. 2 & 5, of about 2 feet in length, by a width equal to the interior of the box, less the necessary play to prevent any rubbing, which you avoid by diminishing the thickness of the uprights in the entire length, and reserving there some heels at the ends, so that the frame is held against the sides of the box, and cannot get out of place when you move it.
The frame of the tool-stand is attached at the sides of the box by means of two threaded bolts, represented in Fig. 3, half as large as executed here, where the extremity o ends in a cone, and bears on a copper collar embedded in the side of the box.
This screw is held in place in the frame by a nut placed in the middle of its thickness, normally. To prevent the movement of the frame so that it does not turn the screw, you put a counter-screw P outside, which you tighten against the frame, which prevents the screw from making any movement. See Figs. 3 & 5.
As it is sometimes found where it is necessary to lift the point of the movement of the toolstand, you pierce many holes in the copper collar attached to the side of the box, as I did in Fig. 2.
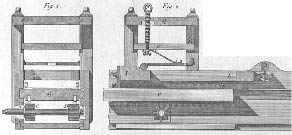
At the other end of the tool-stand, that is to say, where the cutting iron is secured/fitted, the cross-piece I, Fig. 2, should be very strong and assembled with a cover from above so as to present a uniform surface all along the length, which is the width of the tool-stand. Then you apply from above a piece of iron attached with some screws with countersunk heads, of a length equal to the width of the latter. And you make it overlap by about 5 or 6 lines at both ends, to make two frets that bear on the wave pattern [channels], and you make a notch in the middle of this piece of the size of the iron for positioning the cutting iron of the tool, as you can see in Fig. 7.
This iron is held in place by a cheek [ fence] (whether of iron or copper, either is equal), that you hold in place by means of two square-headed screws, g–g, Figs. 2, 4 & 5, where the nut is placed in the thickness of the cross-piece of the frame. See Fig. 3 of Plate 314, where I showed the cross-section of the tool-stand, with the contact I, the iron L, and the exterior cheek [ fence] M, which comes down as low as possible, that is to say, just to the bottom of the part the most hollowed of the latter.
The bottom of contact I [Plate 314] should be the thinnest possible (without however being a sharp edge), so that it follows well all the contours of the wavy pattern N–O. You must take great care that the point of contact for the fret be in the same direction as the iron cutting edge [both bevels are in the same direction], as I noted in this figure, so that the movement of the tool (which is made in describing an arc, where the center is found at the end of the frame) be less noticeable. I have partially remedied this by lengthening the point of the center of movement as much as has been possible.
The weight of the tool-stand should be almost sufficient to make the cutting iron bite into the surface of the wood workpiece. However, one must always put a spring there, both for augmenting the weight of the tool, supposing that it be necessary, and preventing it [ from] jumping around.
This spring h–i, Fig. 2, does not bear immediately on the tool-stand, but on a lever where its arms are loosely attached to the uprights of the movable frame of the box at m, Figs. 2 & 5.
The other end bears on the cross-piece of the tool-stand at n, which augments at the same time the strength and the elasticity of the spring, where the upper part is held below the small shelf O, Fig. 2, with screw P, where the nut is placed in the top of the frame Q. This screw serves, as I already said, to increase or diminish the pressure of the spring. The small shelf O through which passes the lower end of the screw, serves nothing but to hold it in place, and to press the heel o of the spring. As this small shelf is movable, you hold it from the opposite side of the screw with two pins, which you place across the uprights of the frame, as indicated by points p–p.
I made the head of the screw P in the form of a screw-eye, so that one cannot tighten it or loosen it by simply touching it, and so that you have need for a little pry bar or crank handle to do it. Those who approach the machine while it is adjusted cannot disturb anything there by simply touching it.
It is for this same reason that I prefer the screws with squared heads for closing the cheek [ fence] of the tool-stand, because a wrench is necessary to move these sorts of screws. You can eliminate their access from everyone’s hands, and consequently prevent anyone from changing anything on the tool.
As to the manner of using this machine, it is very simple. You begin by planing some wooden strips to the thickness of the profile that you have chosen, and the projection of the waves. This being done, you put in the tool-stand a smooth iron, which you adjust to the height equal to the projection of the moulding. You hold the strip on the platform, by means of little iron points placed [on the latter by equal distances from each other], and you make the machine move by turning the crank handle, which advances the platform forward. Consequently, the strip that is attached to the platform, after having passed many times under the smooth iron, is found to be wavy on its surface.
When the strip is thus finished, you remove the smooth iron, and you substitute the one that is shaped with a profile, and you begin the operation again, just until the iron is not cutting the wood any more, and consequently the moulding is perfectly finished.
You must take great care before running the moulding to verify that the wooden strip is placed truly parallel, which you know by making it pass the entire length under the blade that you hold elevated above. You should secure the strip on the platform only after having taken this precaution. You must also note that the pins that you place in the platform to hold the mouldings are positioned in the middle of their width [thickness of the moulding stock], and that they do not project enough to be able to meet the blade and cause any breakage, which you must take great care to avoid.
The blade of the waving tool is always placed perpendicular to the workpiece, which makes it scrape enough to cut, which cannot be otherwise, given that if you slant it in the normal way with moulding planes, it would scratch/drag on the wood as it comes against the grain, which happens at each undulation. What’s more, the blade thus slanted will no more be found in the same direction in all parts, which you must avoid as much as possible.
Since you can make many different blades, you must pay attention that they be all the same width, so that they completely fill the notch made in the piece which makes the cuts. You must also pay attention that they are all the same thickness, and that this thickness be considerable, to better resist the force of the wood in passing below.
The handle with which you move the waving tool can be placed to the right of the machine, as in Fig. 6, or to the left, as in Figs. 1 & 4, which makes no difference.
Each of these ways placing the handle has its advantages and disadvantages. If you place it to the right, which is the most natural way (since you made some effort pushing it), you cannot see the work well, behind which you position yourself. If on the contrary you place it to the left, you see the work clearly, but you are required to turn the handle in reverse. That is why, in order to eliminate these two inconveniences, I believe it would be better to position the two ends of the axis so that each one can receive a handle, like in Fig. 5, such that you can use it as you judge appropriate, whether on the right or on the left, or even from both sides at the same time.
3 It has not been possible to find a surviving wave-cutting Tool to make a good description of it. I have had only two iron blades, sold with other scrap metal which have nevertheless been very useful for fixing certain sizes, that I could not have known except for the description that Mr. Felibien made of this tool, which is otherwise very succinct, but imprecise, such that it could serve only to give me an idea of this machine, which I have then arranged in such a manner that it appeared to me the most likely. It has been greatly wished that those who have described this Machine in the Encyclopedia [of Diderot] had done something other than copy Mr. Felibien, instead of adding to the obscurity and inexactitude, as they have done. It would have been very useful to the public, and in particular to cabinetmakers, for whom they would have saved, or better said, presented one of their principal tools.
Ever since we sold out of the original 12″ x 17″ deluxe editions of “With All Precision Possible: Roubo on Furniture,” Chris has been itching to do another luxurious book…if perhaps not _quite_ so extravagant (the almost-full-folio size of that edition was crazy expensive). Instead, we’re working on a new quarto-size edition (9″ x 12″), with gorgeous acid-free #100-pound interior paper, and plates printed in their full sepia glory. The signatures will, of course, be Smyth-sewn, and the end papers will be printed with images of a few of the plates.
The cloth cover for the boards will be Verona Blue Jay (a vibrant cobalt blue) with a gold foil stamp; the headbands will be blue and gold.
Then, we’re wrapping the book in a gloss laminate dust jacket (shown above)
While at $125 this new edition of “With All Precision Possible: Roubo on Furniture” won’t be inexpensive, I think when you see it you’ll agree it’s worth the price. It’s going to be resplendent – and built to stand the test of time, shop and kids (as well as look great on your bookshelf).
The new deluxe edition is at the printer now; it is due in our warehouse in March.
– Fitz
Clockwise from left: Proof copies of the dust jacket, cover die stamp and end papers (atop the interior pages).
p.s. Translating Roubo is the most expensive and sprawling project we’ve been involved in – and it is ongoing. Don Williams and his team are working now on the remainder of the volumes. If this deluxe edition of “With All Precision Possible” is well-received, we’ll offer suitably fabulous editions of the forthcoming volumes as well, and of “To Make as Perfectly as Possible: Roubo on Marquetry.”
Philippe Lafargue died at his home from an undiagnosed glioblastoma on June 22. Philippe has been instrumental in the Roubo project, helping with translations for “Make as Perfectly as Possible: Roubo on Marquetry” and “With All Precision Possible: Roubo on Furniture.”
“When we first met more than 35 years ago, I recognized immediately the talents Philippe possessed, talents that often surpassed his ability to communicate them,” says Don Williams, who co-authored the Roubo books along with Michele Pietryka-Pagán. “Over the years, thanks to the foundation of the multi-year curriculum of École Boulle and the career choices he made later on, combined with the thoughtful encouragement of his former wife, Maria, and the family life with his children, he became what Tom Wolfe would call ‘A man in full.’ In the end, his contribution of good-humored friendship and technical, historical and verbal expertise was integral to Team Roubo functioning smoothly for creating the volumes. We will proceed without him, although to be truthful, I cannot fully envision that right now.”
On learning of his death, Michelewrote, “I never actually met Philippe, but I could tell from one phone call that I was communicating with a true professional – not only a true master at what he did, but also a superb human being. We are all worse off with this loss of Philippe. May he rest in peace.”
We recently featured Philippe in a Meet the Author profile. It ended with this quote from Philippe:
“You can fight all the time but life is going to take you where it’s going to take you. It’s up for you to go for it, to be quick to accept and change. And you are always part of it. That’s the beauty of it. No matter what happened, you are part of it – 50 percent is your choice. The rest is to accept that you have decided to do this or not. That’s the difficult part. But life is short. Life is to be lived. Life is to discover yourself.”