It has been a crazy chair week here in the shop…so no different than usual (except we had eight people working in here instead of the usual two). So today, we’re happy to take it a little easy and answer questions at the computer.
You know the drill: Post your woodworking question in the comments, and we’ll do our best to answer. Comments will close at around 5 p.m. (and there may be a lag between your asking and our answering).
Scandinavian chip carving examples from Jögge Sundqvist.
Below are the classes being offered at the Lost Art Press shop in the second half of 2024. You can click through now to the Covington Mechanicals registration site to read the class descriptions, but you cannot register until 10 a.m. Eastern on Monday, Feb. 19. (It looks like you can, ’cause there’s a “Register Now” or “Buy Tickets” button on every class…but you can’t. So don’t bother hitting that button yet.)
And for those who don’t already know, the classes typically sell out quite quickly – in nano-seconds, at times – so limber up those fingers and get ready to type fast on Feb. 19 at 10 a.m. Eastern! However: I beseech you to make sure you can join us for a given class before registering. We are not really a school, and don’t have a setup that makes refunds then filling open slots easy. (I do understand that life happens, and it’s sometimes unavoidable. But please don’t sign up first and check your schedule later!)
Welsh stick chairs by Chris Williams.
Chris and I have some commitments in the second half of the year that are keeping us from offering many general classes (including two scholarship classes for the Chairmaker’s Toolbox– more on that to come). But if any of our plans fall through, we might add a class or two later in the year. For now, here’s what’s on tap – and we’re delighted to welcome two Lost Art Press authors from overseas: Jögge Sundqvist who’s visiting from Sweden for two classes, and Chris Williams visiting from Wales for one.
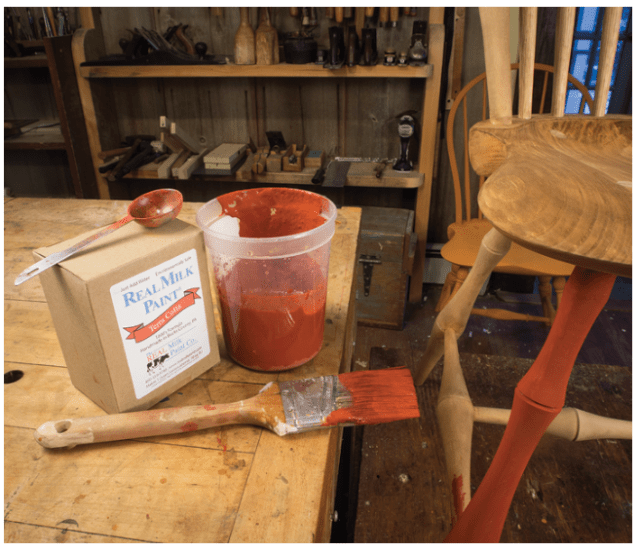
The following is excerpted from “Chairmaker’s Notebook,” by Peter Galbert. Whether you are an aspiring professional chairmaker, an experienced green woodworker or a home woodworker curious about the craft, “Chairmaker’s Notebook” is an in-depth guide to building your first Windsor chair or an even-better 30th one. Using more than 500 hand-drawn illustrations, Peter Galbert walks you through the entire process, from selecting wood at the log yard, to the chairs’ robust joinery, to applying a hand-burnished finish.
Finishing is the art of enhancing the work done at the bench
Wood finishing is an art completely separate from the craft of woodworking.
Sadly, this does not mean that all of us woodworkers who rush through the process as amateur finishers are off the hook. The problem is that we still need to learn the craft of finishing if we are going to practice it.
Too often, flushed with the desire to see our labors complete, we hurry through the process. But the finish is the first thing viewers see. And whether we like it or not, it can elevate our work – or cruelly diminish it.
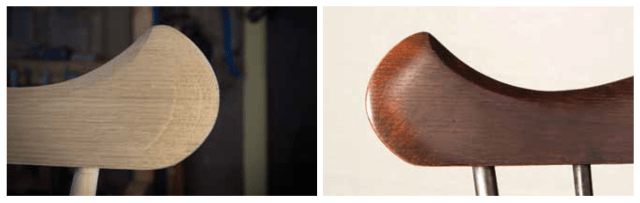
One solution is to work only with attractive woods and to use clear finishes. This imposes a design limit because certain chair forms get too visually chaotic when the wood grain is visible. The chairs that I make with clear finishes have more subtle shapes to keep from muddying or competing with the images on the surface of the wood. The finish process for these chairs is less daunting. But for the traditional chairs, which are made with woods chosen for their varying strengths rather than their beauty, a unifying finish is, in my opinion, essential.
The variety of woods used in the chair draw the eye in an unpainted chair, while the paint unifies the shape and accentuates the silhouette.
The most common concern with painting a chair is that you will diminish its beauty by cloaking the natural surface. But in looking through history, this wasn’t always the attitude; each era has a different and complex relationship with wood as a material and paint as a finish.
The surface patterns of the raw wood can overwhelm the subtleties of the forms.
In the times of the original Windsors, paint and bright colors were a luxury and sign of wealth. Just as the restoration of the Sistine Chapel exposed the rich, saturated colors of the original fresco, which shocked and even offended some modern onlookers, we are accustomed to the mellowed and patinated chairs of old. So our solution is to stain or paint our chairs muted colors to match our impressions of these venerated pieces. But an exploration of the real paints of old, with verdigris, lead and linseed oil, reveals a green so intense that it would make dayglo appear a subtle hue.
As paint technology advanced and cheapened, coloring furniture with paint became a means to give the masses their shot at glamor, and it was often used to hide cheap wood and inferior construction. Once paint became associated with cheap furniture, then unpainted pieces, using exotic or aesthetically pleasing woods, became the sign of wealth. Flash-forward another century and we have the reaction of the late 20th century against the influx of plastics into our world. In contrast to the uniform, artificial surface of plastic goods, all things natural and earthy were seen as beautiful. Any attempt to cover them was an affront to the material. This elevation of the wood as a material led to lots of garish wood grain becoming the central feature of the furniture, as opposed to a contributing component of the overall design.
The mixture of tooled and smooth surfaces will be enhanced by the paint.
Of course, we are all of our time, and each of us has a personal preference and bias. Initially, it was a stretch for me to paint my first chair, but after I witnessed the transformation and enhancement, I was committed to mastering the process.
Paint has come a long way from the toxic lead paints of the original Windsors to the stringy enamels of the 20th century. I paint my chairs with milk paint, and while it was not the traditional finish for Windsors, it does a great job of coloring the wood without obscuring the texture. One problem with milk paint is that its manufacturers tend to describe mixing and using it in a way that creates a crude “country” finish. I don’t want this for my chairs, so I mix the paint thinner than recommended and follow a multi-coat process to get the refined look I want.
Complex shapes and fluid lines are highlighted by the paint.
When done properly, the grain and texture of the wood are clearly visible, and the desirable tool marks and edges are sharp and crisp. Not only is the warmth and depth of the wood present, but it is deepened. Over time, normal use will wear the paint, exposing the edges of the chair and highlighting the shaping. The overall effect is far more striking than one dominated solely by the surfaces and colors of the wood.
Before launching into surface and paint preparation, I feel compelled to talk about samples. Committing to making sample boards might just be the toughest lesson in all of woodworking. But until you have a sample – and I mean a completed sample – that you are pleased with, it is more than likely that you will be disappointed in the results on the actual piece.
When working with a new finish, I make samples on the various woods and surface preparations of my piece. I observe all the normal drying times, steps and layers. Lots of notes will help you remember the steps and measurements. Once I love the results, it’s time to work on the actual piece.
Wetting scraped and sanded areas raises the compressed fibers.
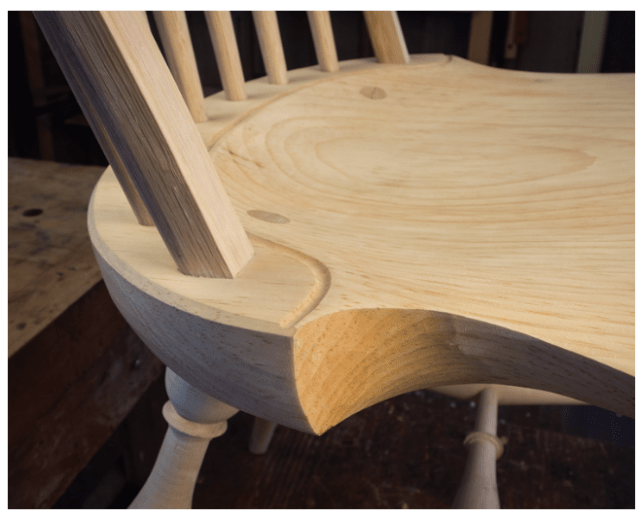
Surface Preparation Surface preparation is vital to getting good results. Any surface that was shaved with a sharp blade, such as a drawknife or spokeshave, is ready for finishing without any further preparation – save making sure that it is free from dirt or grime. This is because the cutting action shears the fibers cleanly without compressing the grain. Even parts that have been put through the steamer will show no raised grain where they were shaved with a sharp tool.
Check every joint for glue residue, especially in the highly visible areas.
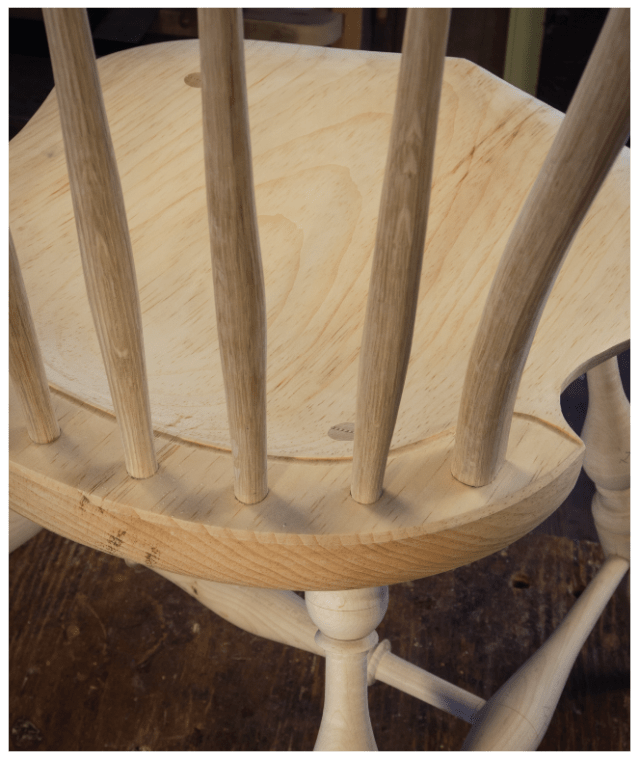
Areas that have been scraped and sanded will have some degree of grain compression that will show up as raised rough fibers on the surface once they contact either water, water-based stain or water-based milk paint. For these areas, I sand to #220-grit, then wet them to raise the grain. This is often easier to do before assembling the chair.
It’s important to let the surface dry and harden; letting it sit overnight is best. Then I lightly sand with #220- grit paper, being careful not to apply too much pressure. Instead, I let the sandpaper cut the fibers with multiple light passes. These areas will most likely show raised grain again, but I sand them after the first coat of paint has soaked into them and hardened the fibers. One sanding after the first coat of paint is usually enough, but I inspect those areas carefully to ensure that I am happy with the surface after paint is reapplied.
The tooled surfaces under the seat are a joy to discover and explore, plus, they are ready for finishing.
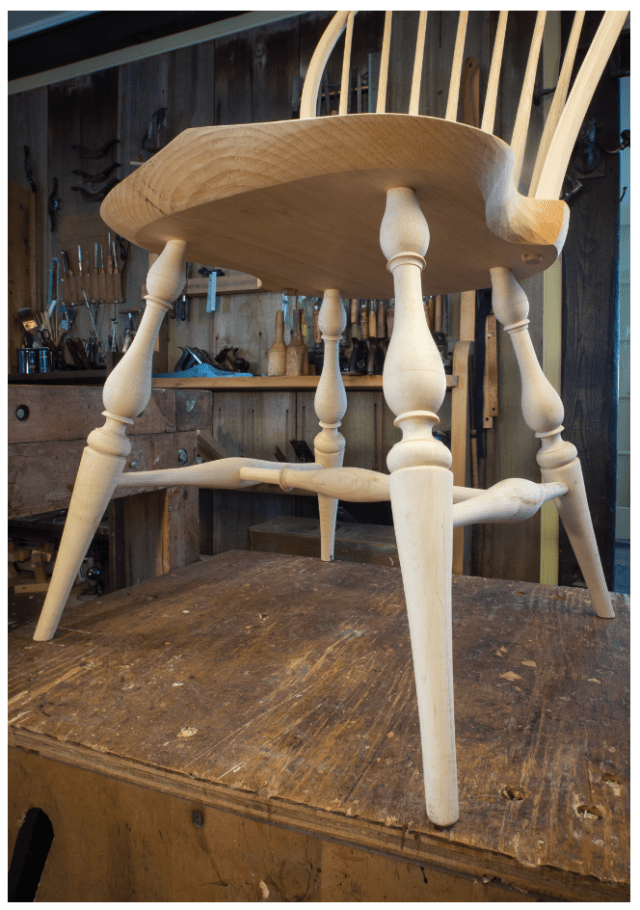
My turnings in the undercarriage are finished with a skew, but because any burnishing that takes place may resist the paint sticking, I sand lightly with #320-grit while the piece is on the lathe. Be sure to remove the tool rest and any loose clothing before sanding. I also wear a respirator because the fine dust is dangerous. There should be no surface preparation required after that.
Most surfaces on the oak can be finished with spokeshaves, leaving an inviting faceted surface, ready to finish.
The seat is perhaps the most critical place for surface preparation. Pine tends to compress when scraped, and it might also contain considerable sap or pitch. It is difficult for paint to adhere to sap, so I heat the surface of the seat with a heat gun until I can see the pores with sap in them liquify. Then I rinse the seat with naptha or grain alcohol. Always wear gloves when handling solvents. I repeat this if the seat seems quite pitchy. Some manufacturers suggest sealing the seat with a coat of shellac or using an acrylic additive to the milk paint to encourage solid adhesion. I have done both, but have found that the brand of milk paint that I use, from the Real Milk Paint Company, doesn’t require help sticking to the surface. If I do use an additive, I only use it on the first coat on the seat and nowhere else on the chair.
Inspect the legs for grime or glue and sand accordingly.
If your chair has been sitting around for a while unpainted, oxidation and dust will have contaminated the surface and you might consider wiping the whole chair with solvent such as grain alcohol or naptha before painting.
Rinsing the seat with naptha cleans the surface and can reveal surface quality.
Stain Once the initial surface preparation is complete, I can either go straight to painting, or to staining. Staining is a good way of mellowing the raw wood so that when the paint wears away, you won’t see the bright white of raw wood. The stain will also help you to see any areas of roughness you might have missed.
The stain will look uneven and splotchy.
I stain my chairs with a simple stain made from crushed walnut hulls soaked in hot water. Wear gloves when making or handling this stain or you will have orange fingers for a week or so. There is a commercially available stain called Van Dyke Crystals that is basically the same thing. An alternative is to combine a shellac sealer with stain by simply adding a little alcohol-based dye to the shellac.
Once the stain is dry, check for raised grain or glue spots.
Either way, I mix and strain the stain and rub it on with a soft cloth. I never paint or stain the bottoms of my chairs, preferring to just oil them and let the natural pumpkin patina of the white pine show. As the stain dries, I mix my first coat of milk paint. Each color of milk paint mixes and applies differently. So again, make a sample to be sure that you like the mix. Just because you successfully used proportions and steps to get a good green finish doesn’t ensure that your yellow one will work.
Milk Paint Milk paint is basically a mixture of lime, pigment and milk protein. I think of it as a very thin layer of colored plaster, rather than a paint. It wears beautifully and it is colorfast. Plus, the textures, tool marks and grain of the wood show through the thin, hard layer of paint. One very popular and successful way to use milk paint is to layer different colors, which creates beautiful wear patterns as the chair is used. I’ll describe painting my most popular finishes: black over red and peacock over stained goldenrod. If you wish to paint a solid-color chair, with no undercoat, just follow the instructions for the red undercoat, perhaps adding one more coat before rubbing it down. The concept of creating these layers is simple. A base coat of solid, thin paint is applied first. The key to this layer is that it not be “caked up” or too thick so that it masks the grain of the wood. Milk paint tends to go on a bit thick and uneven, so extra steps are needed to get the best finish. I usually take two coats to apply the base coat, rubbing the first layer with a Scotch-Brite pad and sanding areas with raised fibers. Then I paint the thin areas or areas that have been exposed through sanding or rubbing with a slightly thinner pot of the same color. Again, the goal is an even thin coat of a solid color. Then I either seal the base coat with a thin layer of shellac, or I go directly to the top coat. I follow the same process of painting on and rubbing down the top-coat color until I am happy with the results. Then I seal the paint with oil. You will find that sharp edges and facets tend to “burn through” to the undercoat, which can be avoided or exaggerated, depending on your taste.
To the left is mostly our John Brown stuff; to the right is Charles H. Hayward/The Woodworker compilations.
This Covington Mechanicals Library post feels like a sales pitch; sorry ’bout that. We’re up at top center of the shelves now, and that’s where we keep the stuff that’s incredibly important to Lost Art Press but – now – rarely needed. That’s all of John Brown’s columns from Good Woodworking magazine, and yearly compilations from The Woodworker magazine…the ones we didn’t cut apart to scan for our five-book Woodworker series. (The ones we did cut apart are in the white file box.)
Let’s go in publication order – both as far as the originals and the Lost Art Press books to which that shelf contributed: right to left.
In 2007, after at least one beer too many, Christopher Schwarz and John Hoffman discussed acquiring the rights to reprint some of Charles H. Hayward’s fantastic writing from The Woodworker magazine, of which he was editor from 1936 to 1966. There had been unauthorized reprints before (shame on those people), but nothing legit.
Possibly the most important thing shown in this picture is the L-bracket (and there are many others not shown here). We certainly don’t want this massive shelving unit falling over.
Long story short: We got the rights to use some of Hayward’s writing in physical books only – that’s why there are no pdf versions available of any of “The Woodworker: The Charles H. Hayward Years” volumes.
I can’t remember exactly when the project began in earnest, but I do recall sitting around the trestle table in Chris’s dining room in Ft. Mitchell, Ky., circa 2010 to discuss the project, then going down to the shop in the basement of his old house to slice off the spines on all The Woodworker compilations from 1936-66 – because that made the pages a heck of a lot easier to scan. (And I remember the canvas bag full of the sliced-off spines that Chris kept around for years. They might have been tossed in the move to Willard Street. Or possibly they are in a box in the basement.)
Yes, we felt a bit guilty. But it was for an excellent cause.
It took six years or so for the acquisition, selection, scanning, editing, layout and printing – and hundreds of hours of work from Chris, John, me, Phil Hirz, Ty Black and Linda Watts to get from idea to the publication of Volume I (which covers tools) and Volume II (which covers techniques) in early 2016.
This is what the binder read-through looks like on a complicated project – all those Post-Its are corrections or questions.
Volume III (on joinery) was released late in 2016, and Volume IV (on the shop and furniture) followed in early 2017.
It is to date the most labor-intensive project – by a long shot – undertaken by Chris, John and the rest of the folks at Lost Art Press. And in 2020, we added a fifth volume: “Honest Labour,” because Hayward’s editor’s notes were too good to not share. That project was completed in large part thanks to Kara Gebhart Uhl, who selected the columns we reprinted for each year, and wrote introductions for each annual division.
To learn more about Hayward – who I would hazard a guess is Chris’ most important woodworking/editing hero (mine is Chris) – check out two posts from 2016: “Get to know Charles H. Hayward, Part I“: and “Part II.”
Chris’ chairmaking hero, John Brown (aka JB), is represented on the left side of the shelves. Chris has written on this blog about his introduction to Brown, and his acquisition of all of John Brown’s columns. Well, there they are – and some of his and Chris Williams’ favorites were reprinted (with permission, of course) in Chris Williams’ book “Good Work: The Chairmaking Life of John Brown.” (Chris W. spent about a decade with Brown in Wales, and “Good Work” recounts their work together, from the day that Chris called JB until the day his mentor died in 2008.)
Some of Molly Brown’s prints of the illustrations she made for “Good Work.”
Tucked alongside the Good Woodworking issues and photocopies are prints of Molly Brown‘s illustrations for “Good Work” – gorgeous drawings that honor her father’s passion for chairmaking and for Wales.
While “Good Work” wasn’t a crazy project like Hayward, getting the rights to reprint JB’s “Welsh Stick Chairs” was a personal investment for Chris Schwarz. “My affection for Brown was three-fold. First, it was about the Welsh stick chair. He introduced me to the form that has guided my taste in chairs since 1996,” wrote Chris. “Second, it was about hand tools. I’d been using hand tools almost exclusively since age 11, and it was shocking that someone else I admired did the same thing. I didn’t do it by choice (my parents wouldn’t let me use power tools), but thanks to Brown I decided that I was OK. And third was how he declared ‘I am an anarchist’ in one of his columns. (In fact, his column was labeled “The Anarchist Woodworker” for a period of time.)”
I remember a lot of metaphoric hair pulling as he negotiated rights with all of JB’s heirs – it was Matty Sears (one of JB’s sons), who finally made it happen. And I remember how happy Chris was to bring this book back into print.
– Fitz
p.s. This is the 14th post in the Covington Mechanical Library tour. To see the earlier ones, click on “Categories” on the right rail, and drop down to “Mechanical Library.” Or click here. NB: I have used the same picture at the top of every post, simply circling the cubby I’m covering in a given post. For the close-ups, I’ve taken new pictures each time. The odds on that cubby still containing all the same books in the same order as the main image are slim indeed (in case you zoom in and see discrepancies).
I finished this small chest yesterday…almost! (I’ll do the last bit today, in between questions.)
It’s Open Wire time, where you can pose your woodworking questions in the comments section below and we’ll do our best to answer them.
Chris is also getting ready for a class that starts Monday, and I’m getting the class pages ready for the July-December 2024 classes (they’ll be announced soon!)…and finishing one last thing I forgot about on the chest interior shown above: a plane cubby. One simply must have a plane cubby. So there may be lag between your question and our answer.