With June comes summer, and the forest pretty much goes on cruise control. Everything that was happening keeps happening, and not much new happens.
American basswood (Tilia americana) is a late bloomer, literally. It blooms in the early part of June:

I had a hard time getting a photo; this is about the best I could get. (The light kept changing, and the breeze kept moving things in and out of the shadows and in and out of focus.) You can see a tongue-like bract above each cluster of flowers. These bracts are much paler than the leaves, so they stand out, even from a distance.
Here’s another June-blooming tree, this one with wild-and-crazy flowers:

It’s a chestnut, probably a Chinese chestnut (Castanea mollissima). While Chinese chestnuts (imported after the demise of the American chestnut due to chestnut blight) are common near houses, this one is growing in a semi-wild location. It’s also possible that it is a hybrid. American chestnuts (C. dentata) do still occur in Ohio, but they only grow for a couple of years before they succumb to the blight. The largest one I’ve ever seen was about five feet tall.
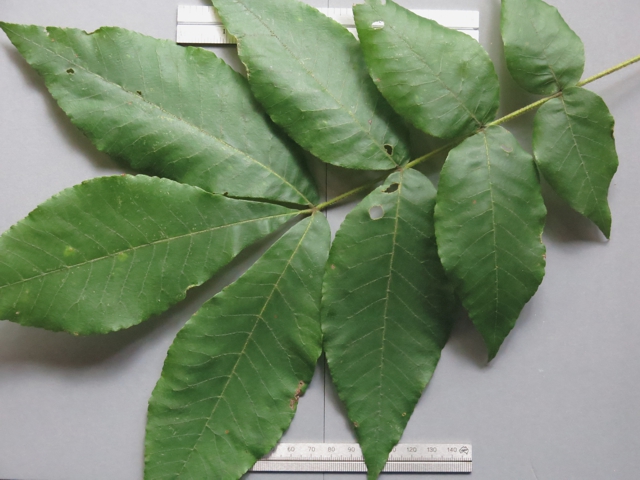
Here is one of the tree’s leaves:

The fact that it is very broad and almost square across at the base is what suggests that it is a Chinese chestnut; the other possibility, Japanese chestnut (C. crenata) is more rounded. American chestnut leaves are paler green, and they taper to a point at both ends.
The other trees are all done flowering, and the ones that haven’t already dropped their seeds are busy growing this season’s crop. The fruit of the American beech (Fagus grandifolia) is, of course, the beech nut (just like the baby food):

They are supposedly tasty, but I’ve never managed to find one in that period of a few microseconds between when they turn ripe and when the squirrels take all of them.
The leaves of the American beech are somewhat elm-like (see last month), but are symmetric at the base (despite the fact that this one looks asymmetric, because I couldn’t get it to lay flat):

There are many species of hickory, and they are rather confusing. There are two species that I see here in my yard. First up is shagbark hickory (Carya ovata):

Shagbark has five leaflets, and the three distal ones are teardrop-shaped and much larger than the other two. At high magnification, the margins of the leaves have little tufts of hair.
The other one in my yard is mockernut hickory (C. tomentosa), which usually has seven or nine leaflets (occasional leaves will have five or eleven):
Its leaflets are not quite as teardrop-shaped, and the size difference from one end to the other is not as dramatic. The leaf margins have a few hairs, but nothing like shagbark.
Here’s an interesting one; I took it from one of my neighbor’s trees (don’t tell her):

There are five leaflets, tapered and elliptical rather than teardrop-shaped, and there are no hairs on the leaf margins. I’m pretty sure that it’s pignut hickory (C. glabra), but it’s all but impossible to distinguish from red hickory (C. ovalis), so much so that some authorities think the two should be treated as a single species. According to one source, “It is said that the two cannot be separated ‘except with completely mature fruit collected in November.’” Well, this one has quite a few nuts on it, so maybe I’ll be able to key it out then (again, if the squirrels don’t get them all first).
In the same family as the hickories (and pecan) are the walnuts. Around here, black walnut (Juglans nigra) is common. The trees are easy to spot, with their long, pinnate leaves having between 11 and 23 leaflets, and usually an overall “droopy” appearance to the foliage:

The bark is not quite as “braided” looking as hickory, but more so than ash or tuliptree:

Butternut (J. cinerea) supposedly occurs around here, but I haven’t seen it. Butternut is in serious decline due to butternut canker, which is probably why I haven’t been able to find any. Its leaves are similar, but generally fuzzier.
There are a couple of lookalike trees (or tall shrubs) to look out for as well. Smooth sumac (Rhus glabra) is a tall, gangly shrub that’s most often seen at the very edge of the forest:

It is easily distinguished in spring by its conical clusters of cream-colored flowers, which give way by the end of June to clusters of berries:

The berries start out green, but quickly turn a deep red and persist through the winter. Staghorn sumac (R. typhina) is very similar, but less common. As you might guess, its stems are hairy and not smooth.
The tree that most resembles black walnut is a somewhat invasive alien species, tree of heaven (Ailanthus altissima)—most people just call it “ailanthus”:

It’s less droopy and usually a bit deeper green than black walnut.
Did you notice something not quite right in that last photo? The leaves at the center right are actually those of a black walnut growing next to the ailanthus:

The fruit of the ailanthus is a winged samara; it turns bright orange or red when ripe.

Of course, if you see walnuts, that’s kind of a giveaway:

Butternut fruit are more elongated, with smooth rather than pebbly skin covered in fine fuzz.
Incidentally, the name of the walnut genus, Juglans, means “Jupiter’s testicles.” I trust that I don’t need to explain how that name came about.
A close-up view of the leaves is also useful to distinguish these species. Black walnut leaflets have short petioles and finely serrated edges:

Sumac leaflets have no petioles, and somewhat more coarsely-toothed edges (sumac also exudes a very sticky, milky sap when cut):

Ailanthus leaflets have short petioles and just a few blunt teeth near the base:

You can also see on each tooth a gland that looks like a small pimple. From the underside, this is more obvious:

American hornbeam (Carpinus americana) is a tree prized for its hard, dense wood that resists splitting, perfect for tool handles. It is widespread as an understory tree in the forests around here, but for some reason I rarely see any with a trunk more than an inch or so in diameter. Its leaves are small and finely serrated:

Its fruit clusters hang down near the ends of the branches:

The related hophornbeam (Ostrya virginiana) also occurs here, but is less common, and I wasn’t able to find one with fruit. The leaves are all but identical, but the fruit looks a bit like those of hops (as in beer); hence, the name.
I’ve always thought that if a committee of circus clowns that tie balloon animals were tasked with designing a leaf, they’d come up with something like sassafras (Sassafras albidum):

Freshly-emerged leaves give off a pleasant, spicy scent when crushed. The wood gives off the same scent when cut, but the odor unfortunately fades pretty quickly. I have a few small pieces that came from a pallet (holding up a shipment of lumber from Horizon Wood Products in Pennsylvania).
Not all of the leaves have three lobes; some only have one side lobe, and others have none:

As was the case last month, wildflowers are few and far between. I found some American bellflower (Campanulastrum americanum):

This is one that I haven’t seen before. I’m pretty sure that it’s fringed loosestrife (Lysimachia ciliata), but it has some characters that look a bit more like some related species:

It didn’t help that I was out photographing these the day after the flowers were battered by very heavy rains.
Unlike the previous two, which like the edge of the woods, the smooth oxeye (Heliopsis helianthoides) can be found deep in the forest:

–Steve Schafer
Like this:
Like Loading...