At 1 p.m. Eastern tomorrow (Tues., Oct. 6), Peter Galbert will carve a chair seat right in front of your very eyes on Mary May’s live-streamed Twitch TV channel. The web address is: twitch.tv/marymaywoodcarver.
You don’t have to have a Twitch account to watch, but if you want to ask questions or interact in any way, you do. Twitch is free and can be watched online, or through the free app for either iOS or android.
If you can’t make the live stream, you can watch the recorded show afterward on Mary’s Twitch channel.
— Fitz
p.s. Obligatory commercial mentions: Take a look at Mary May’s “Carving the Acanthus Leaf” here, and Peter Galbert’s “Chairmaker’s Notebook” here.
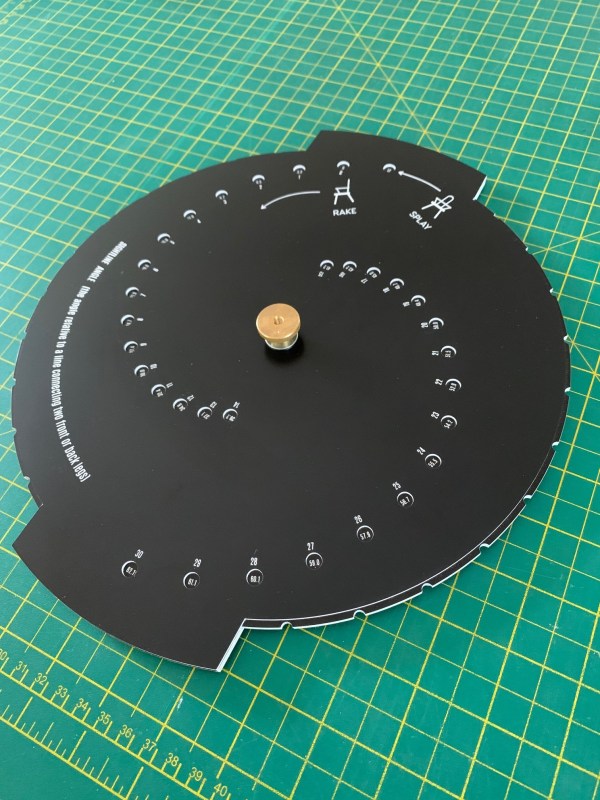
The working model of the Chairpanzee before production work begins. The final product will have some small changes compared to the image above.
I don’t keep a diary, I just look back at Instagram to see what I was doing on any given day. This is how I know The Chairpanzee was born on 11th April, as nothing more than an idea in search of a good name. That day, in the early stages of my COVID-19 infection, I sat at my desk designing a new low back chair. I used other chairs I admire as a reference point, noting their rake and splay angles to understand the visual effect they generate. Rake and splay are all very well on a drawing, but when it comes to making a chair what we really need are a sightline and a resultant angle for the legs. This approach allows us to drill with reference to a single sliding bevel (set to the resultant) which is positioned along the sightline. It struck me that a simple device to tell us those sightline and resultant angles based on any given rake and splay would be a useful tool to own, which brings us to today.
There are published tables available to use as a reference, but for this product I went back to first principles, enlisting my older brother (an Engineering Ph.D.) to do the hard bit. Shortly after, armed with lines of data, the first prototype was born. An important concept from the beginning was to return both the sightline and resultant for a single setting of rake and splay, which led to the double-sided design. Every good product needs a memorable name and, having christened an earlier product the Bevel Monkey, it seemed only right to continue the simian DNA line. My son George eventually won the pun-off on a family walk, coming up with the perfect name: Chairpanzee.
Collaboration is a key aspect of product development; it leads to ideas being challenged and ultimately creates a better end product. A good idea is also worth nothing without a route to market, so with both of those principles in mind, Chris Schwarz and I formed an alliance to develop a product that would become part of the Crucible range. We pulled apart the flaws in the first prototype, which was too big and suffered from racking sliders that jammed. We also needed to scratch an itch that Chris had: the thought that a wheel-type gauge might fit the bill. We got to a wheel gauge eventually and I still have a fondness for its Fibonacci-like pattern of holes, but it would have been too big and too expensive to produce. You have to be willing to drown a few ideas in the river on this journey.
By prototype three we were zeroing in on the concept of a double-sided slider, which could be produced to a high quality at an affordable price. We made an important step toward a printed product, which allowed us to reproduce detailed graphics and fine data on a durable surface. Laser engraving had been a useful development tool, but ultimately too costly as a production solution. Following creation of the graphics and layout, we arrived at the end of the story with prototype number four, which looks exactly like the product you’ll be able to have in your hands very soon (pictured at the top of this blog entry).
“Drew’s books and tool sales were invaluable to me in the 90s as I explored traditional woodworking. There was a fascinating world within the brown cover of his 1978 book ‘Country Woodcraft’ and Drew and Louise were really living it. From Louise’s baskets to a carved hauling yoke to bowls and spoons, I found wood, and the working of it, honored.”
Drew and Louise Langsner began their woodworking classes at Country Workshops in 1978 and ran them until 2017 – more than 400 classes in all. The instructor list reads like a who’s who of green woodworking, featuring Wille and Jögge Sundqvist, Jennie Alexander, Curtis Buchanan, Brian Boggs, Carl Swensson, John Brown, the toolmaker Hans Karlsson and more. Working with and alongside these great craftspeople, I’d bet Drew has seen more green woodworking than anyone alive. There’s so much content rattling around in Drew’s memory, and now he’s distilled much of that information into a new expanded edition of his 1978 book “Country Woodcraft.”
The world was young when the book first came out. If you wanted information like this back then, it was more than a click away. Mail order was the standard order of the day. That’s how I got the book. Then just a couple years later, a notice in small print in the back of Fine Woodworking alerted me to the existence of Drew’s then-fledgling school called Country Workshops. A long trip from Massachusetts down to North Carolina, and my world changed forever.
But the book started it, along with John Alexander’s “Make a Chair from a Tree,” which was published the same year. “Country Woodcraft” was a project-based book that really taught techniques, starting off with felling and splitting trees into usable sections and going through the making of all manner of household and farm implements. This book is where Americans first saw Wille Sundqvist make wooden spoons; Drew and Louise met Wille in 1976, then brought him to their farm two years later for some of the first courses their school ever ran. The hewn wooden bowls stem from the same source. White oak basketry and poplar bark boxes are among the many projects included here that they learned in their adopted home of southern Appalachia.
Now with the updates to this seminal book we have the benefit of all of Drew’s continued exploration. Having watched Drew now for much of 40 years, I can tell you he puts a tremendous amount of thought into his woodworking and teaching. Drew has always wanted to know how to use this tool, that technique, but also why to use them. And how to make them better. He has searched out great craftspeople and toolmakers and learned as much as he could from them, adapting and blending ideas from one to another. Refinement has been at the forefront of his work. Being a teacher and overseeing others instructing classes, Drew’s focus is often on how to convey his ideas to students. And they get more than their money’s worth. “Life-changing” is an adjective often used to describe students’ experiences at Country Workshops.
Reading the new edition of “Country Woodcraft” was as exciting for me as reading it the first time all those years ago. Great depth and detail, showing us what has changed his thinking through the decades and why. Things Drew couldn’t have known back then are carefully explained now – even down to what to do with the shavings! Many of us remember when the book first came around, but now the great influx of interest in green woodworking, spoon carving and other related crafts will introduce this well-deserving giant in the field to a whole new audience.
On Wednesday morning I shipped out my last commission furniture piece for a long time. Perhaps forever.
Last year I closed the ordering form on my personal site. And since then I have worked through the backlog of orders, chipping away until Wednesday when I dropped off a crate at the depot across the river.
For the last 10 years, commission work has been a third to half my income. The other half is writing and teaching. Commissions kept us afloat as we paid Madeline’s tuition at Ohio State and Katherine’s at Spalding University.
During the last three years, Lost Art Press, the commission work and the number of new designs in my sketchbooks took root, bloomed and became overgrown. And last year I had to make a choice.
Double or triple my prices for commissions to (likely) reduce them. As I build vernacular-inspired pieces, and I have a strong proletariat streak, that didn’t feel right.
Hire people to help out on both the commissions and shoulder some of my responsibilities for the press. That would put me back into managing other people’s work on a day-to-day basis. I’d rather get a simultaneous root canal/vasectomy without even an aspirin. I want to do the work, not manage it.
Shut down commissions and build work on spec.
I chose door No. 3.
In the coming months, I’ll occasionally list a piece for sale here on the blog. Lucy and I have decided we can afford the hit to my income (thanks to a debt-free life). This will free me to write and edit more books, build furniture pieces that have been struggling in the birth canal and to stay outwardly sane.
I’ve enjoyed working with customers since I took my first commission for a Shop of the Crafters Morris chair in 1997 from a couple in Texas. Since then, I’ve built some crazy stuff that made me a better woodworker. And I’ve met some people I now call friends.
I’ll miss some aspects of commission work. And now I am about to get into the truck and head to the lumberyard to build something for… who knows?
I’ve taken a few green woodworking classes, and I’ve lurked in the background for several others. What stands out to me from those experiences is that the axe is the tool most unfamiliar to green green woodworkers. Sure, we all know what an axe is, and we might have used one to split firewood.
But most woodworkers haven’t used an axe for carving until their first green woodworking class. I know I hadn’t. And my grandfather’s axe from his short stint as a carpenter on the L&N Railroad cut neither the mustard nor the wood (at least not as I needed it to).
So even though the pdf excerpt below is one of the appendices from Drew Langsner’s “Country Woodcraft: Then and Now,” I think it’s an excellent introduction to green woodworking.
Reminder: Until the physical book ships to the warehouse, all orders include a free pdf download of “Country Woodcraft: Then and Now” in its entirety.