There are two reasons I bore and ream the mortises for a chair before saddling the seat. 1) Saddling the seat removes any spelching made by the drill bit. Or, put another way, I don’t spelch my newly saddled seat. And 2) If I mess up the boring or reaming then I haven’t wasted as much time if I’d saddled the seat.
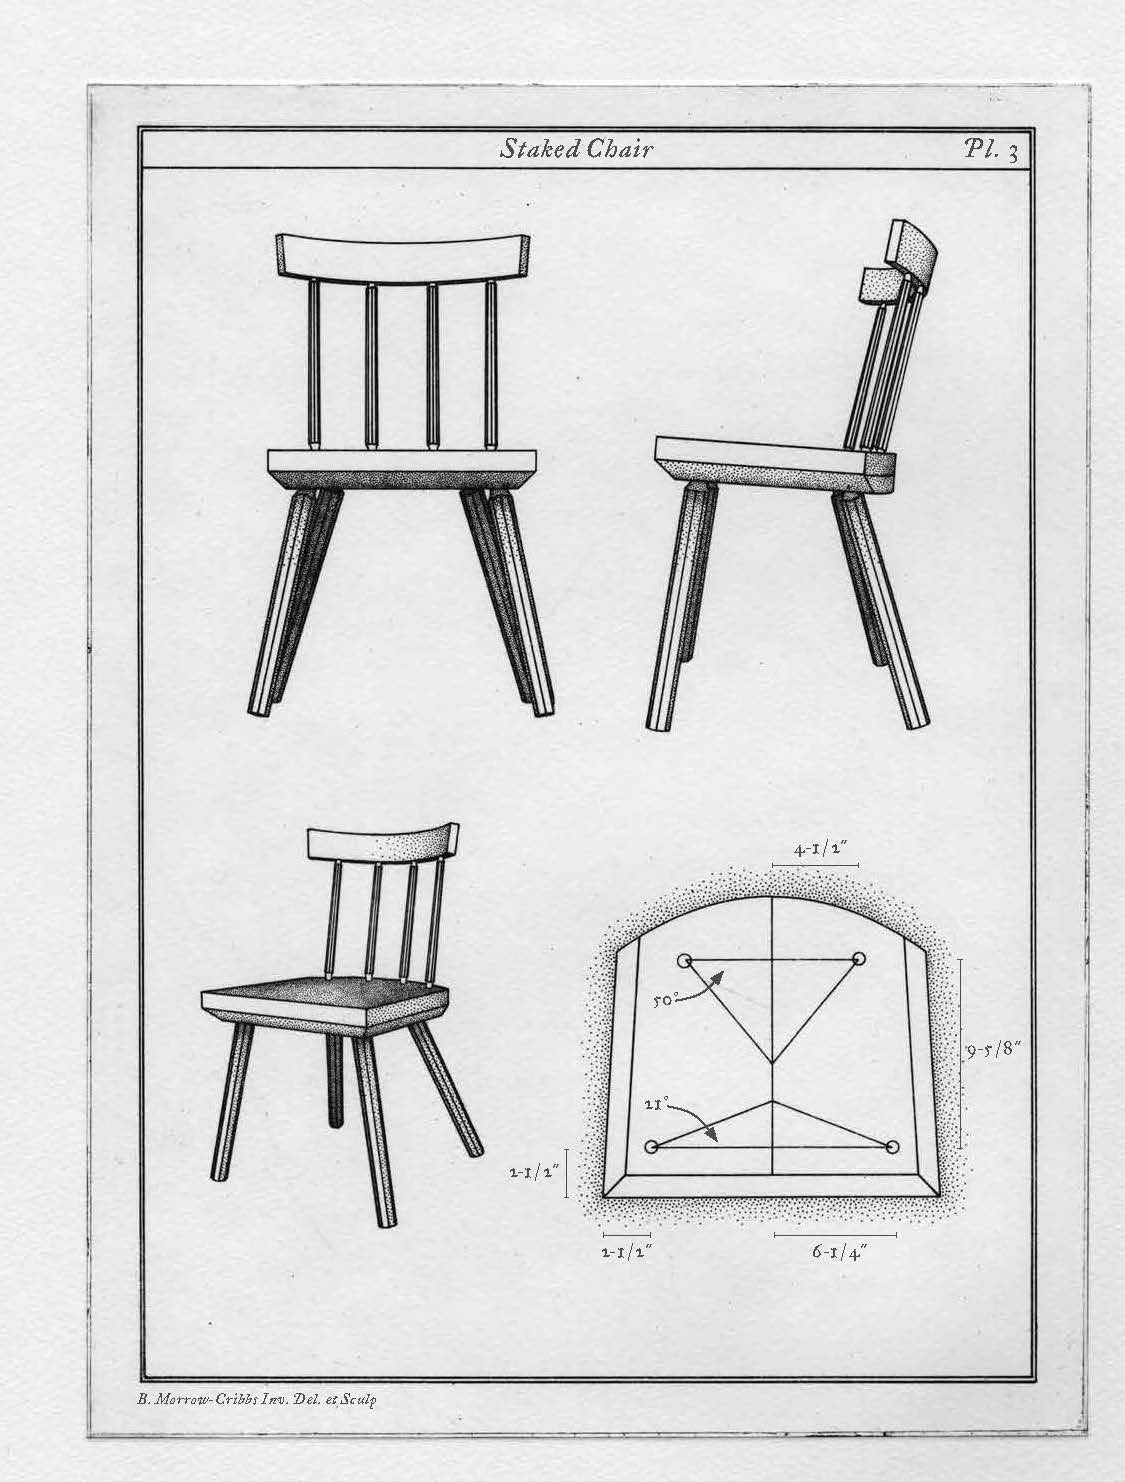
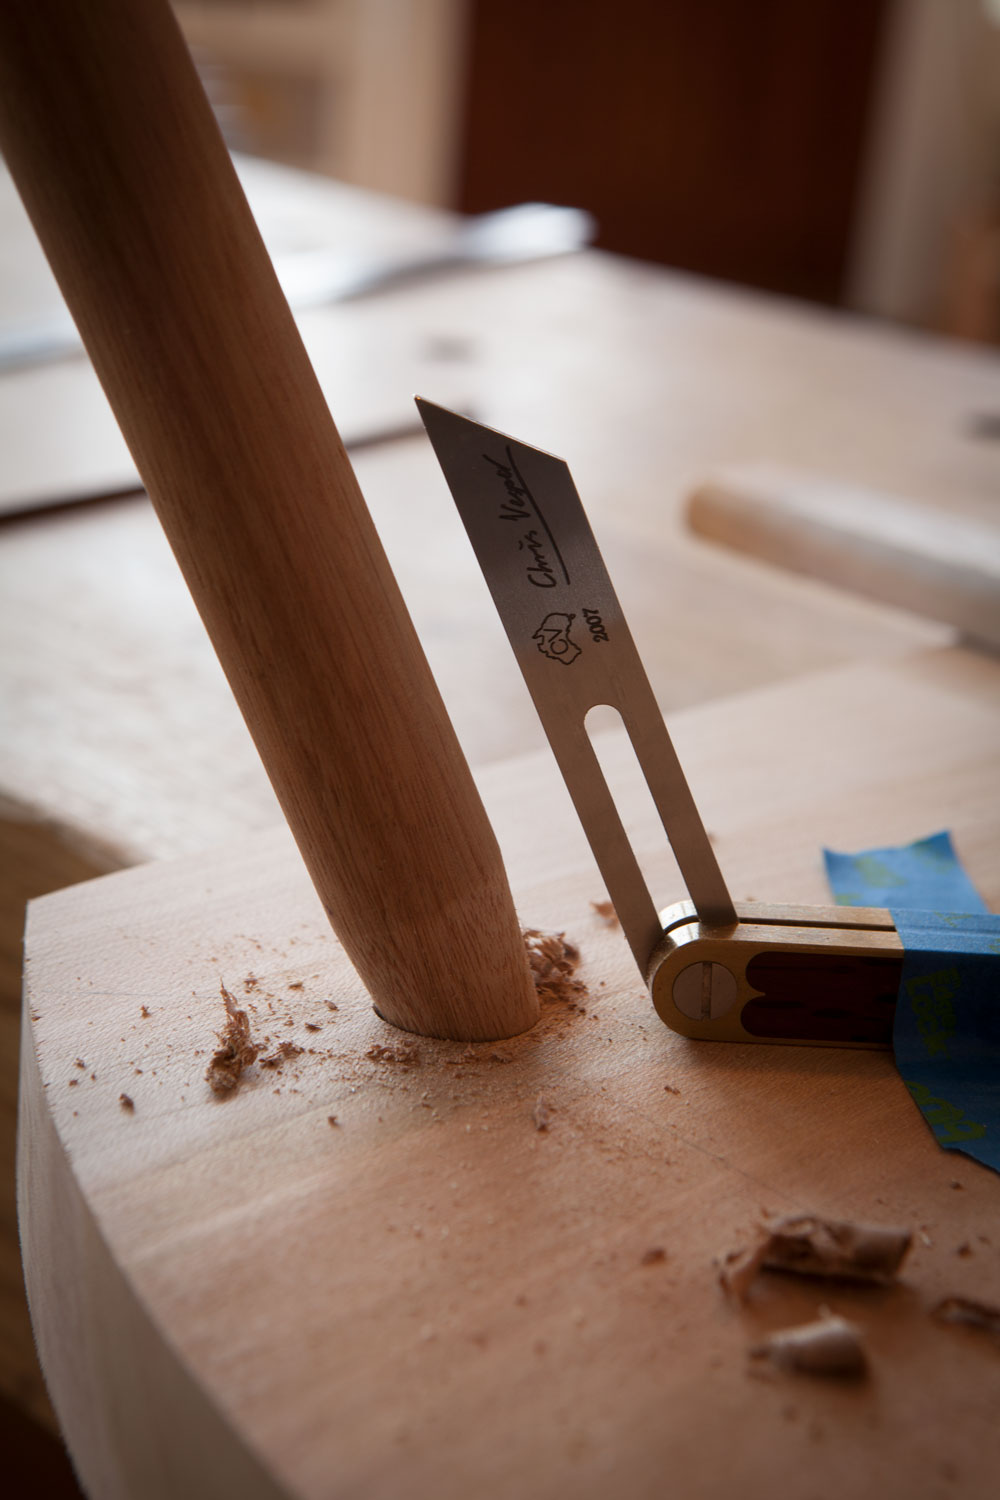
Like many chairmakers, I use sightlines and resultant angles to bore and ream my mortises for the legs. And I’ve figured out how to do it without any trig. Or numbers. Or words. (OK, scratch the “or words.” The words and explanation are covered fully in “The Anarchist’s Design Book” </blowhard advertisement>.)
With this chair I use the same angles as the staked chair in the book. So use the drawing above to draw your sightlines and set your sliding bevel square (which Roubo calls the “false square,” which amuses me greatly, which wasn’t supposed to be amusing but is).
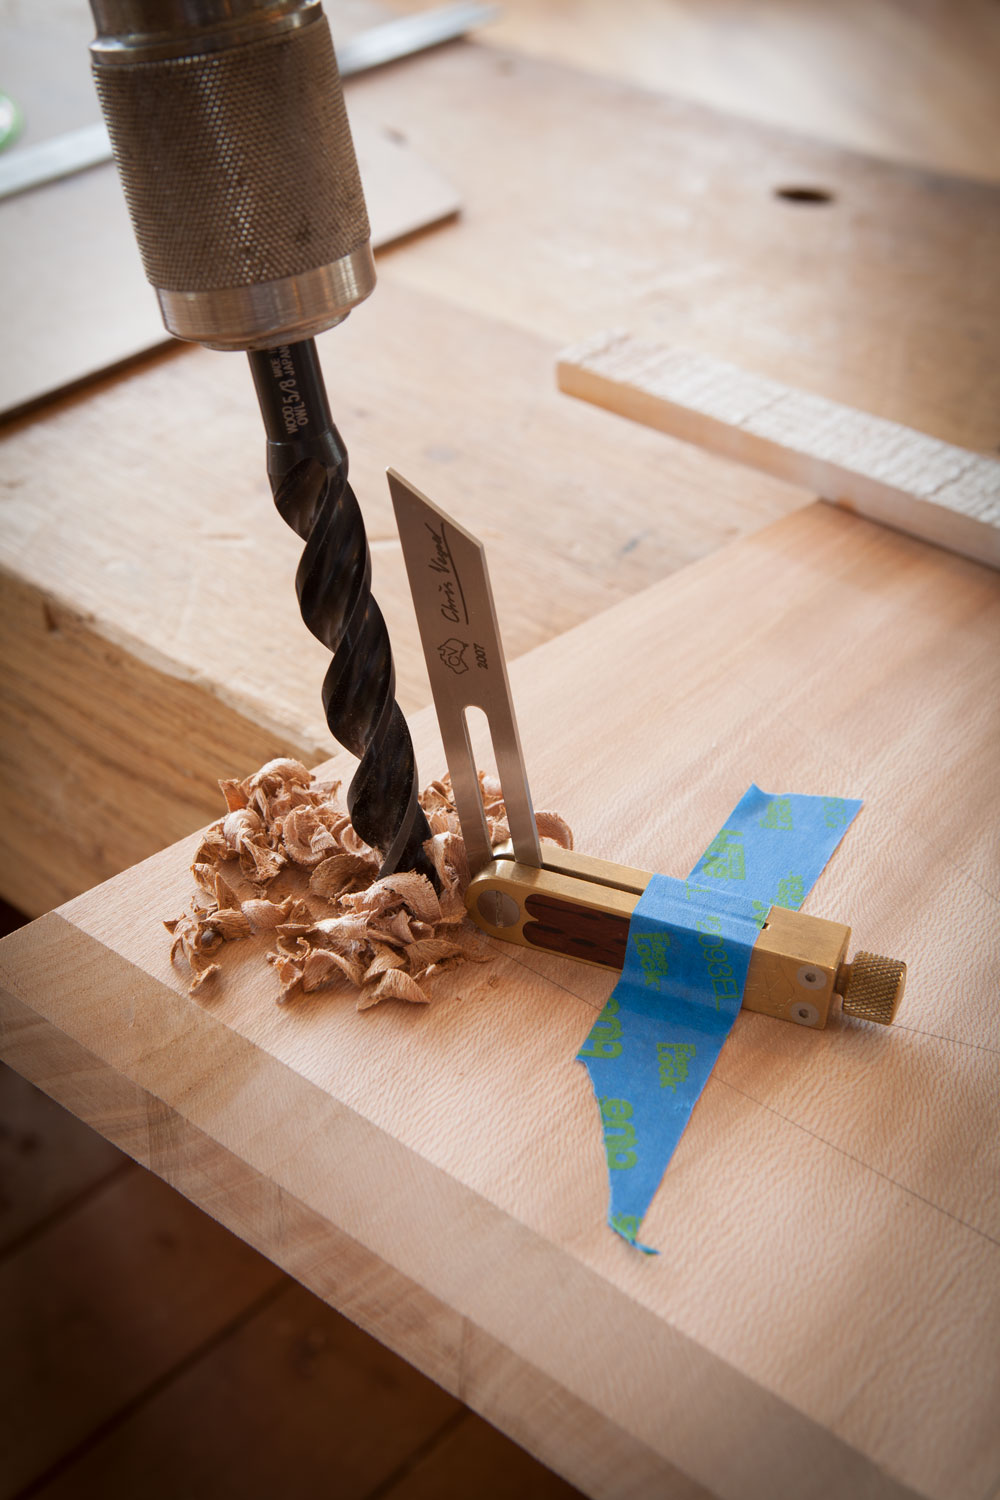
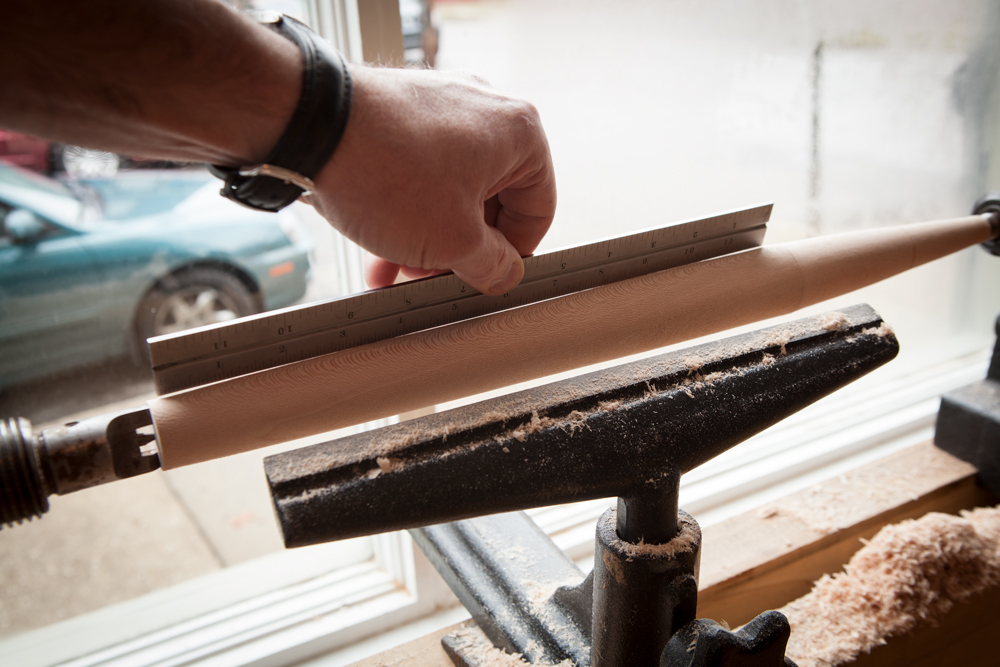
Bore the 5/8” hole for the mortises, using the sliding bevel as a guide for your bit. I put a backer board under the seat so I can bore straight through without thinking/stopping. When the shavings change color I rotate the brace twice more and pull out.
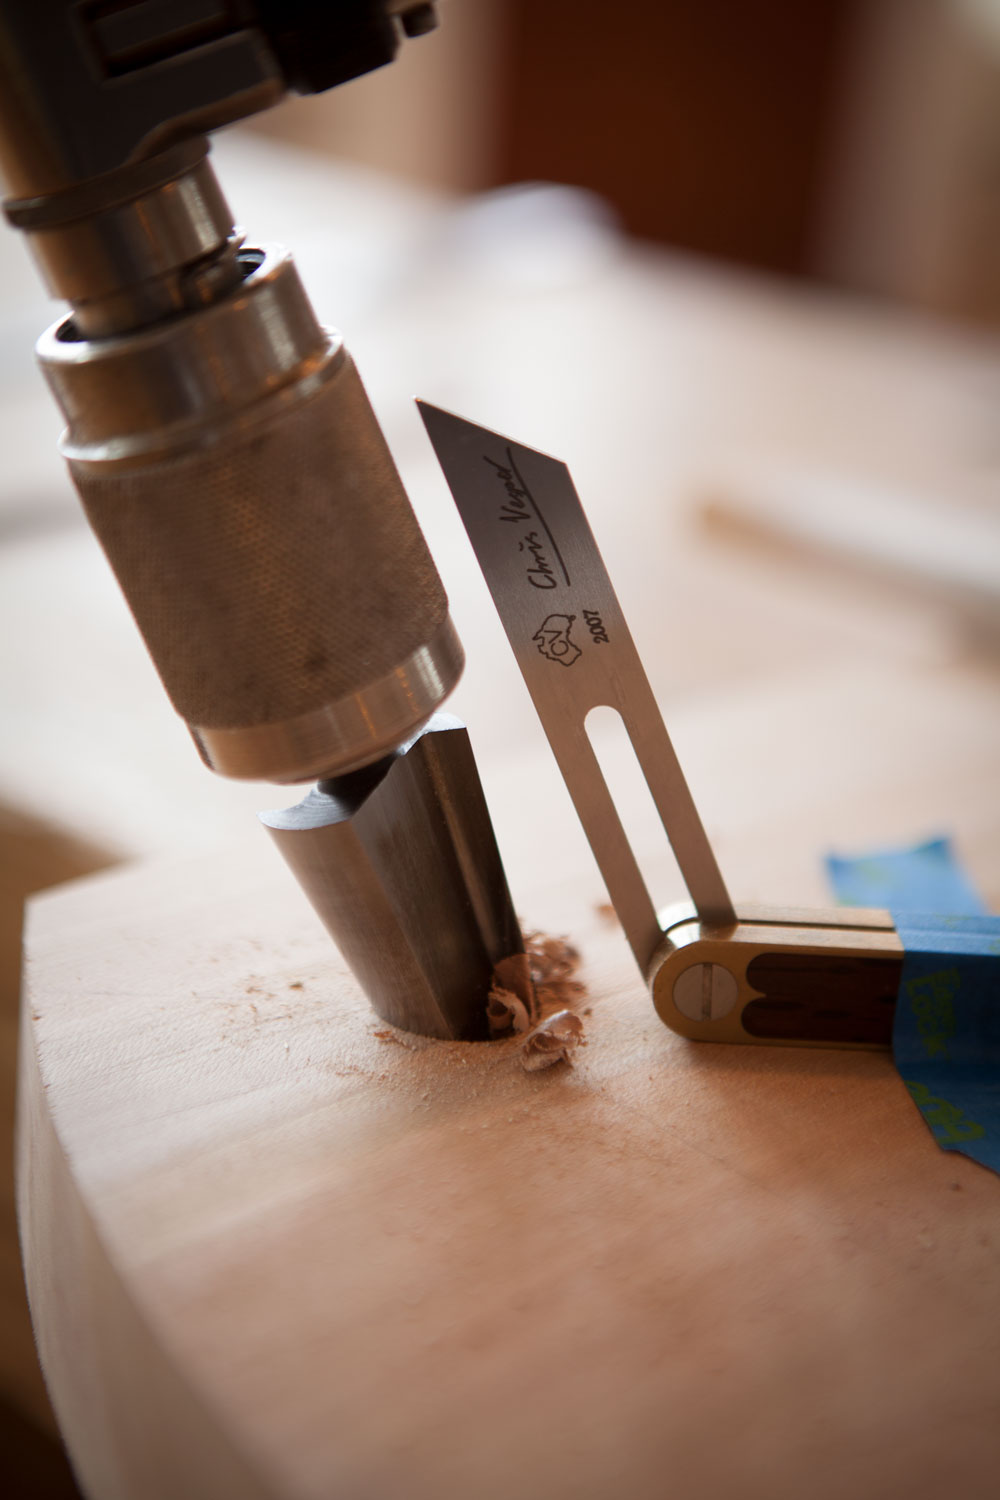
Reaming is similar. But instead of using the bit as a guide for the bevel square, I use the shell of my chuck. This is why I love the chuck of my Yankee brace. It is a straight cylinder. Some chucks are fancy shaped like a baluster. They’re pretty, but they are no help when reaming.
Ever four turns or so, I pull out and check my angle using a dowel with a tapered tenon on the end. I can’t check my work (easily) using the actual legs because they are all kinds of tapered.
Then I drive all four legs into their mortises, stand back and make sure the whole thing doesn’t look like a bandy-legged goat.
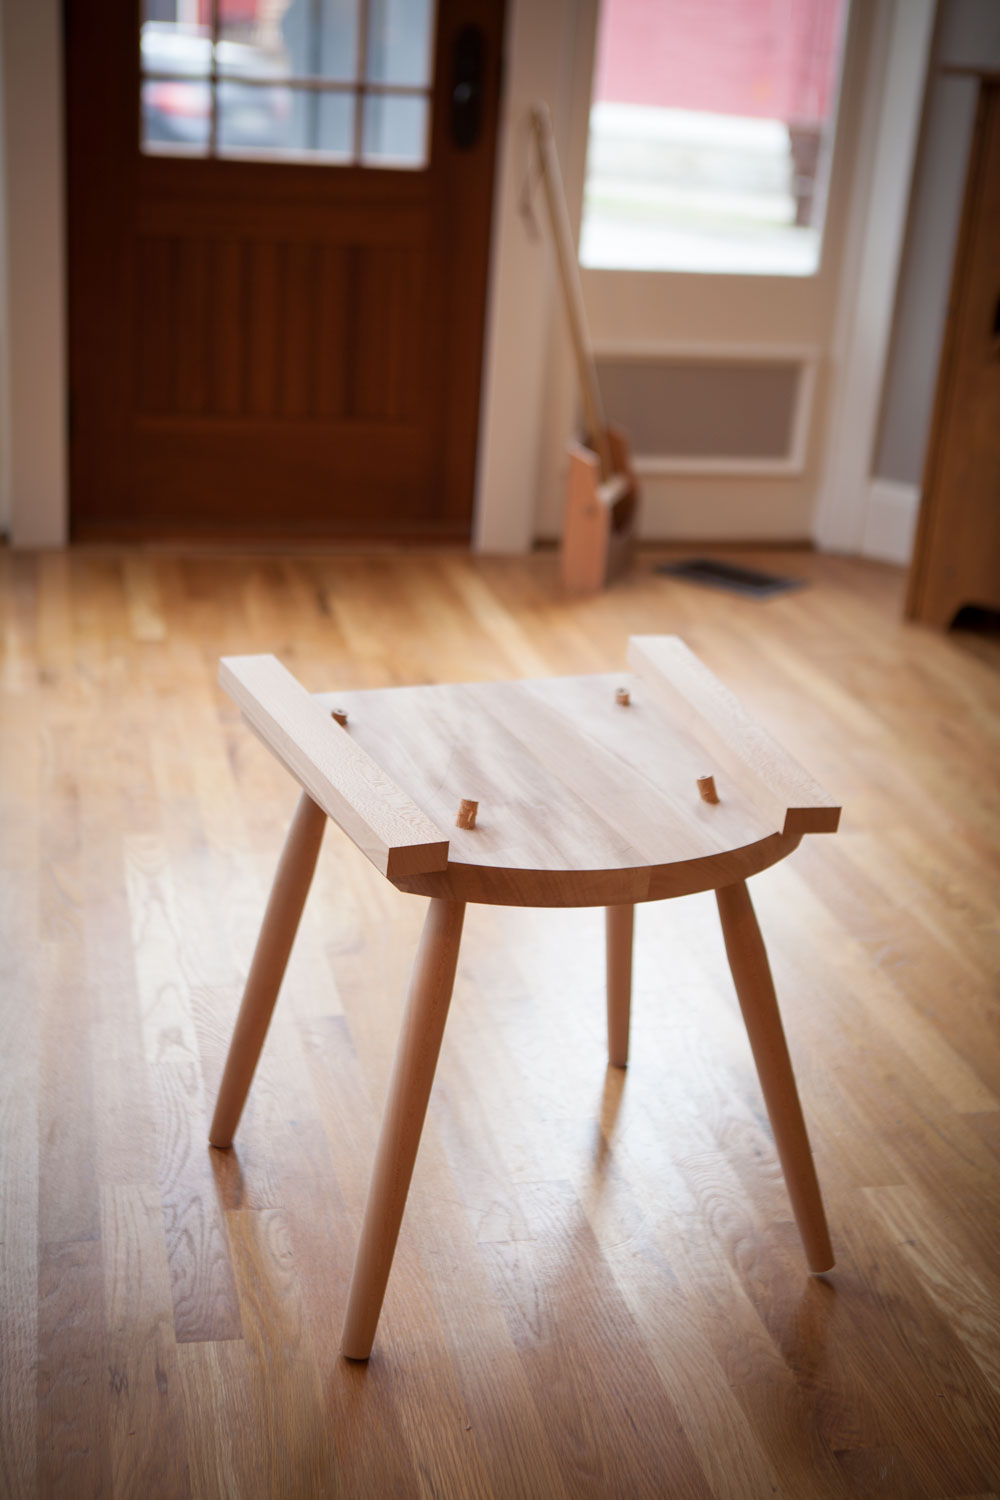
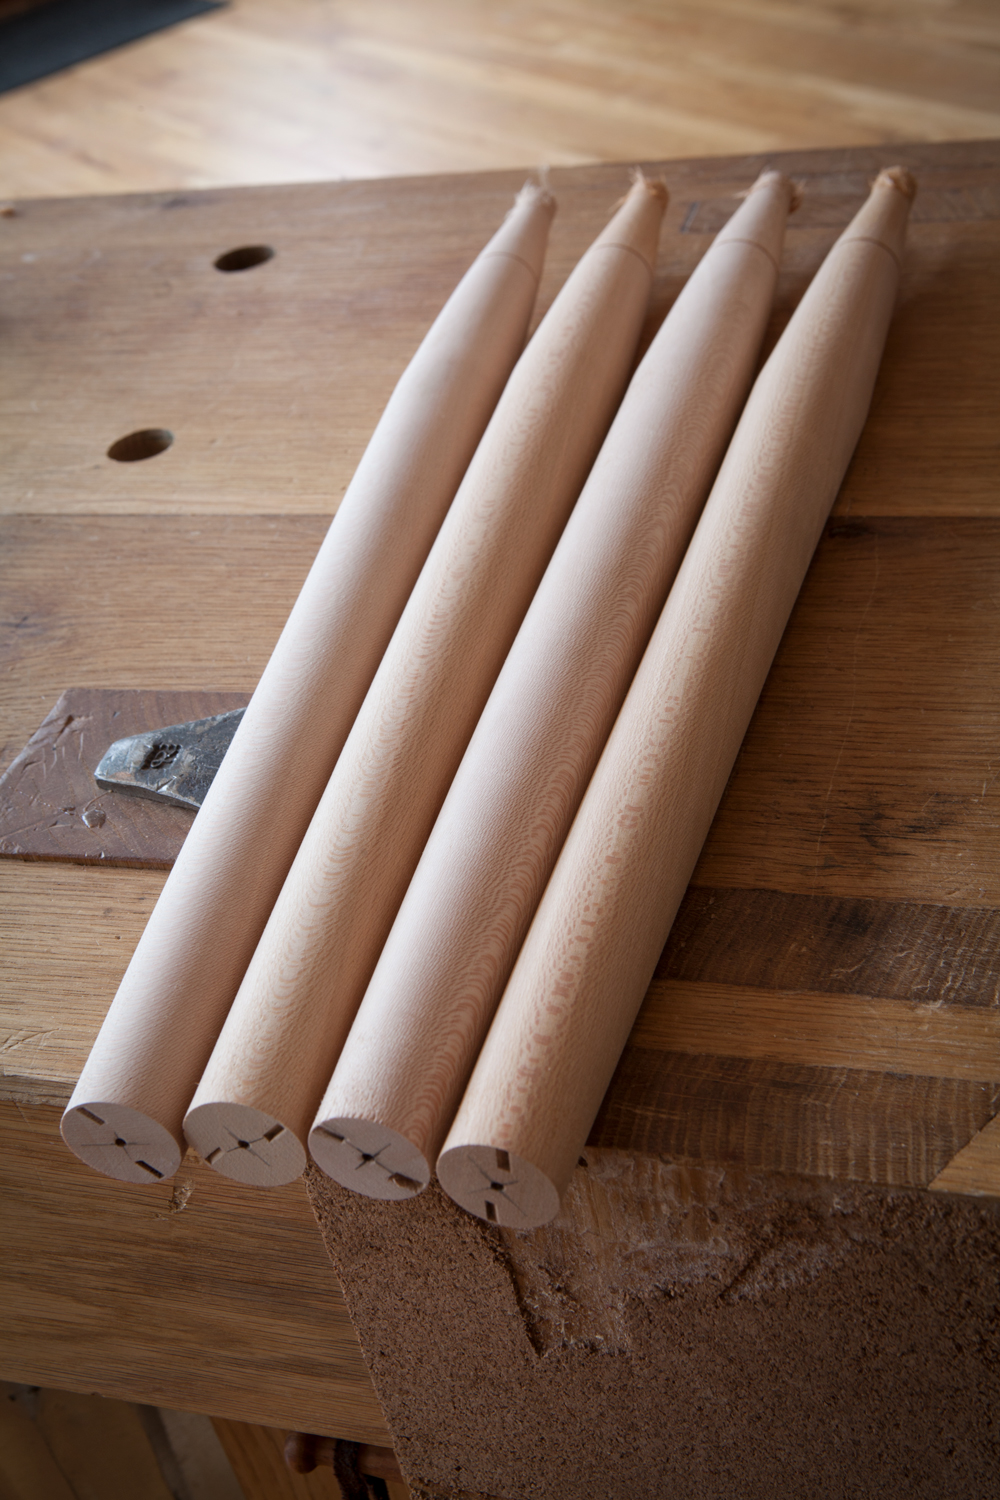
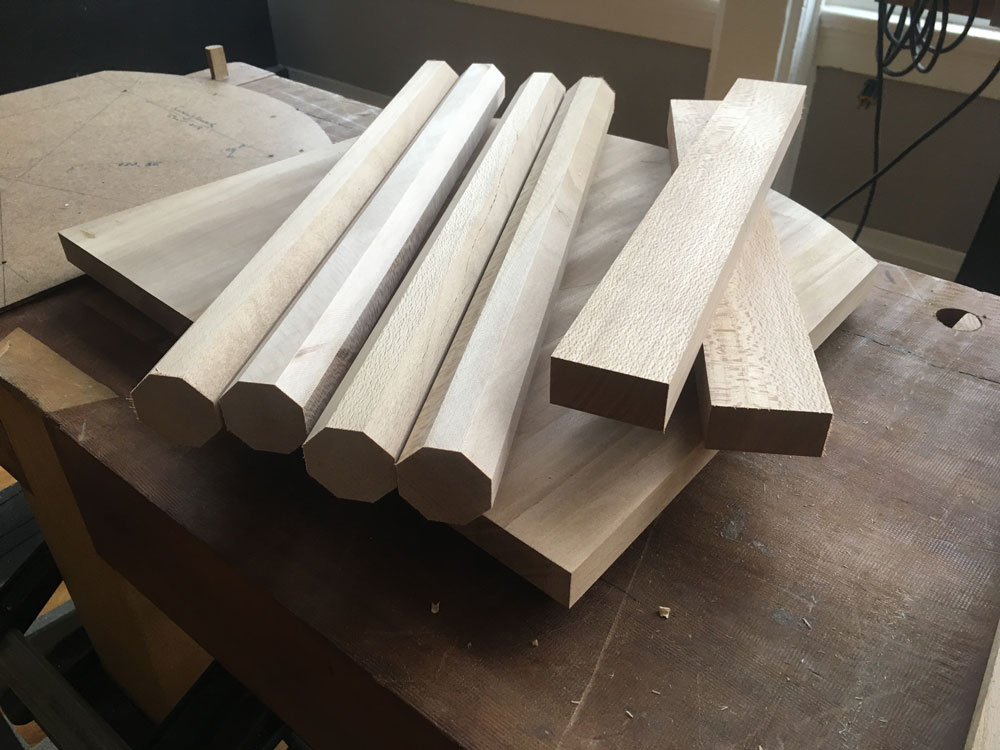
All the legs featured in “The Anarchist’s Design Book” are octagonal or square in section – this makes them easy to make without a lathe. For this chair design, I decided to turn the legs but make the shape simple enough that you could shave them if, again, you are lathe-less in Louisiana.
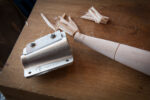
This shape of leg is a modernized bamboo turning. The top section of the leg tapers and flows into the leg’s tapered tenon. The taper begins 6-1/2″ from the top of the leg and tapers from 1-1/2″ to 5/8″ at the top of the tenon. The bottom section of the leg tapers to 1″ at the floor.
This profile looks nice with the 12.8° taper I use on my tenons. However, if you use a different angle, I’m going to show you how I laid out the leg so you can design it to suit your tools.
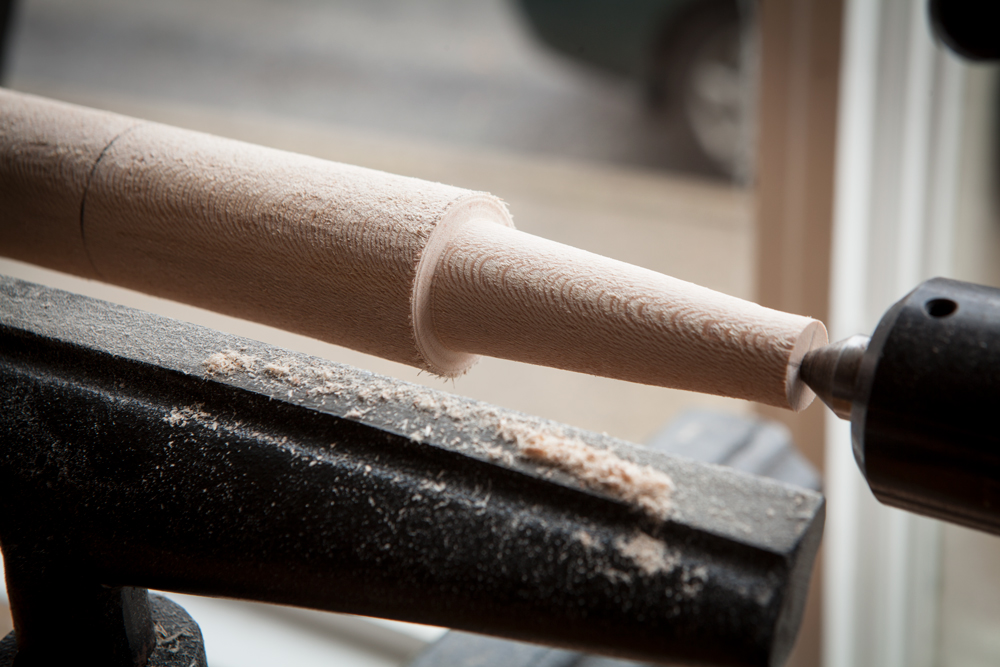
First I made the leg blanks into 1-1/2″ x 1-1/2″ x 19″ octagons. I chucked them in the lathe and turned the leg to a straight cylinder (note that after you get the leg dimensions figured out you can skip this step to save time).
Then I marked the length of my tenon (3″) on the leg and turned the tenon very slightly oversized. The tenon starts as 1-1/16″ in diameter and tapers to 5/8″ at the top.
With the taper roughed in I took a straightedge and held it up to the taper and eyeballed where this taper would end at the full diameter of the leg. This guess is about 6-1/2″ from the top. I could have drawn it out in CAD, but I like wood better than pixels.
I marked the cylinder at 6-1/2″ from the top of the leg and then turned the remainder of the top taper to that point. Note that I turned a small groove where the tenon began. This is an important mark when you shave the tenon to its final size.
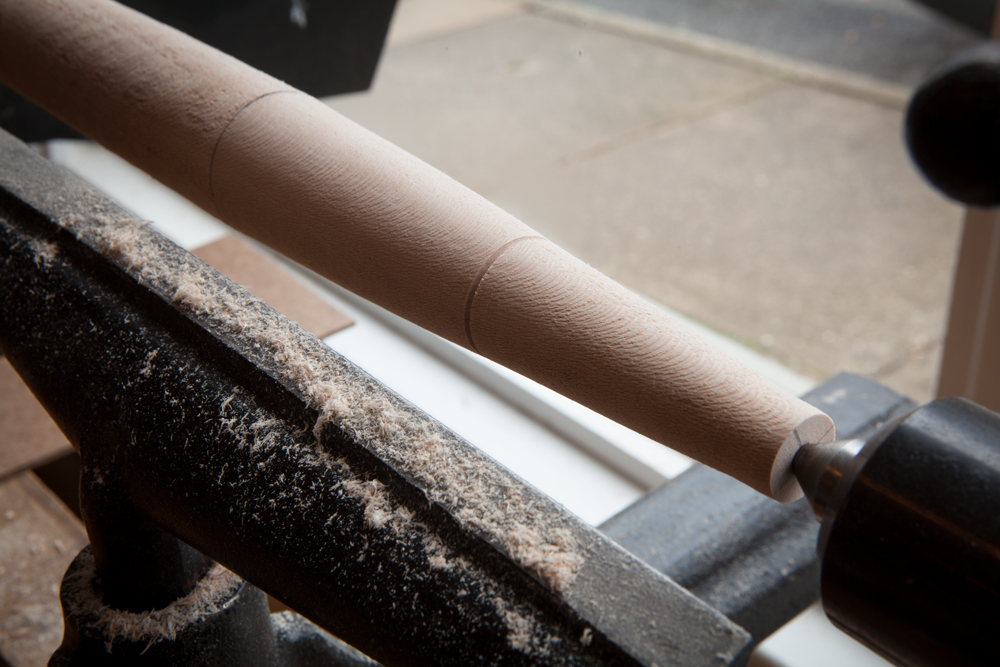
The rest is easy. I turned the bottom taper from the 6-1/2″ line down to the bottom of the leg. The bottom of the leg is 1″ in diameter. In the photo above I’m looking for humps with a straightedge.
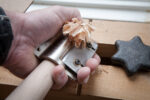
Then I removed the leg from the lathe and used my tapered tenon cutter to shave the tenon to the perfect shape and size. It took only a few turns to do. When I shaved the legs in the tenon cutter I stopped cutting right at the groove I turned in the leg.
Then I sanded the legs (avoiding the tenons) with #180-grit sandpaper and got ready to leg up the chair. That’s tomorrow’s entry.
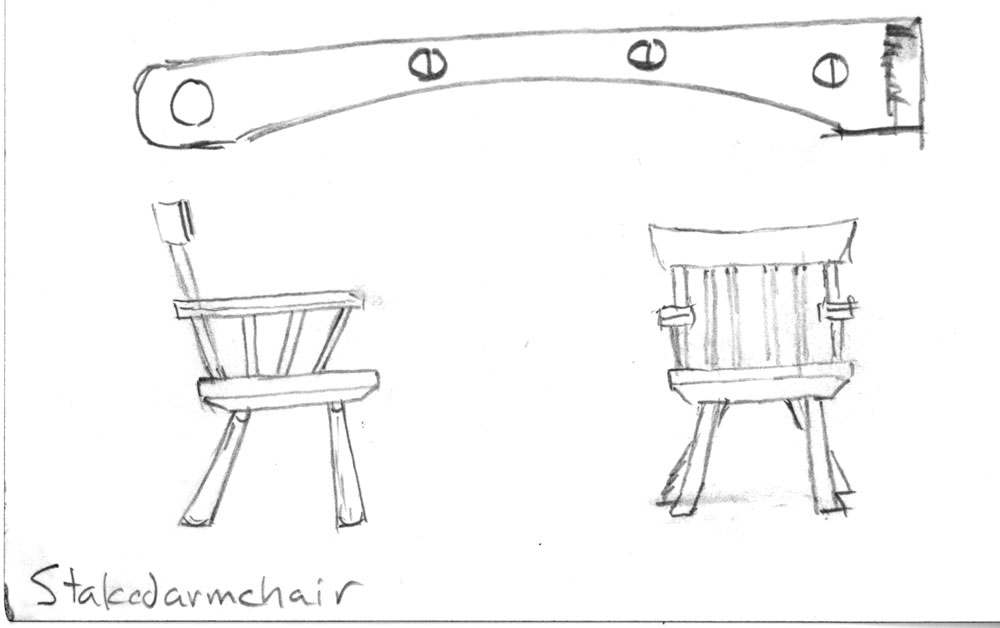
When I finished up writing “The Anarchist’s Design Book” in January 2016, there were two projects that I wish I’d included: a staked armchair and a staked settee.
At the time, my designs for these two pieces were still juvenile. Well maybe that’s not correct. They were too complex to be presented in a book aimed at simple forms. So I set them aside. During the last 12 months, I’ve completed these two designs and began building the staked armchair this week.
For the armchair, I finally got the arm shape to my satisfaction while drinking a beer in a Cleveland restaurant (that’s the 45-second sketch above). While the arm is dead simple, it has an interior curve that echoes the curve at the back of the seat and a bevel on the front that repeats the bevel on the underside of the seat.
I’m going to photograph the construction process and share it here on the blog. After I get this armchair built and I also finish the settee we might add them to the next printing of “The Anarchist’s Design Book.” (If we do that, we will offer free downloads of the new chapters to all previous purchasers, no matter where you bought the book.)
This armchair will be made with sycamore and hickory left over from the last chair.
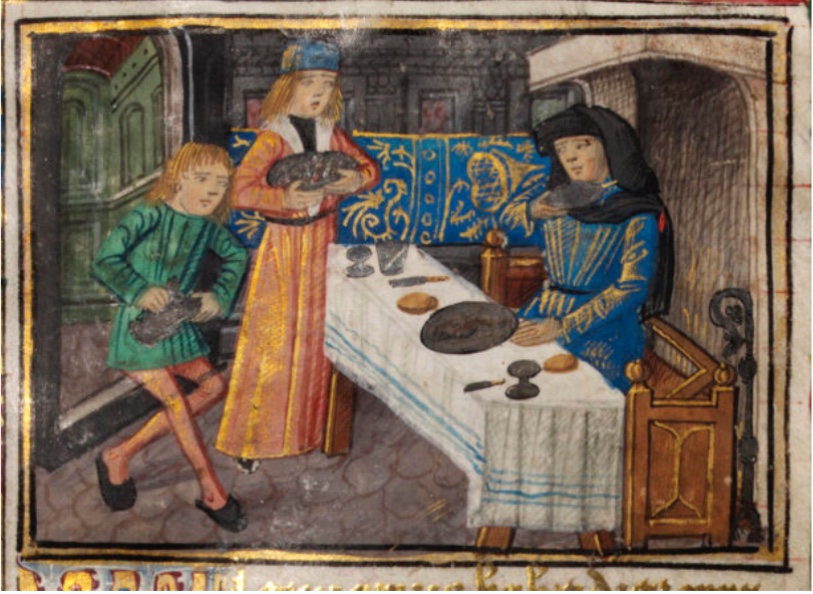
The Playfair Hours, MSL/1918/475 fol 1r, French, 1480s. Copyright the Victoria & Albert Museum.
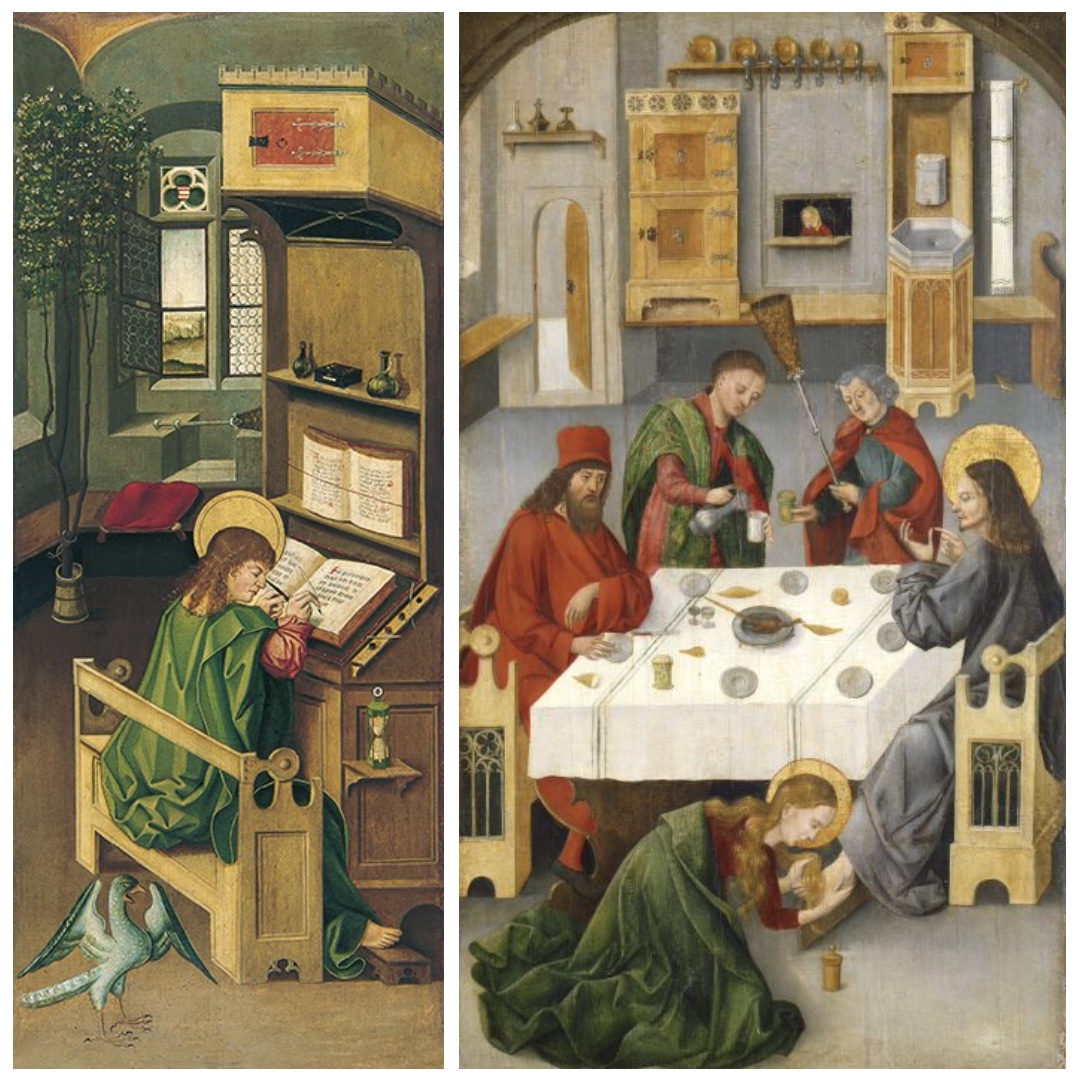
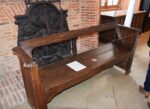
Medieval homes were sparsely furnished, and each piece usually would have more than one function. One of the intriguing bench styles that can be found in many manuscript images is the bench with a flip-able back rest. The form seems to have become popular in the early part of the 15th century.
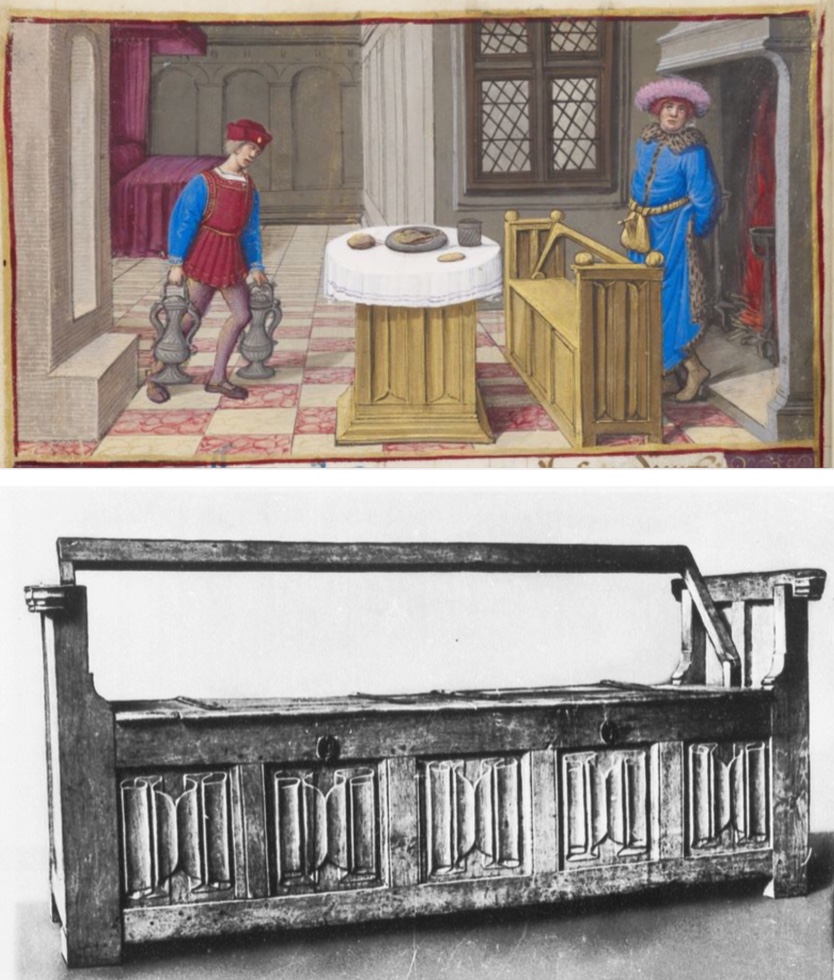
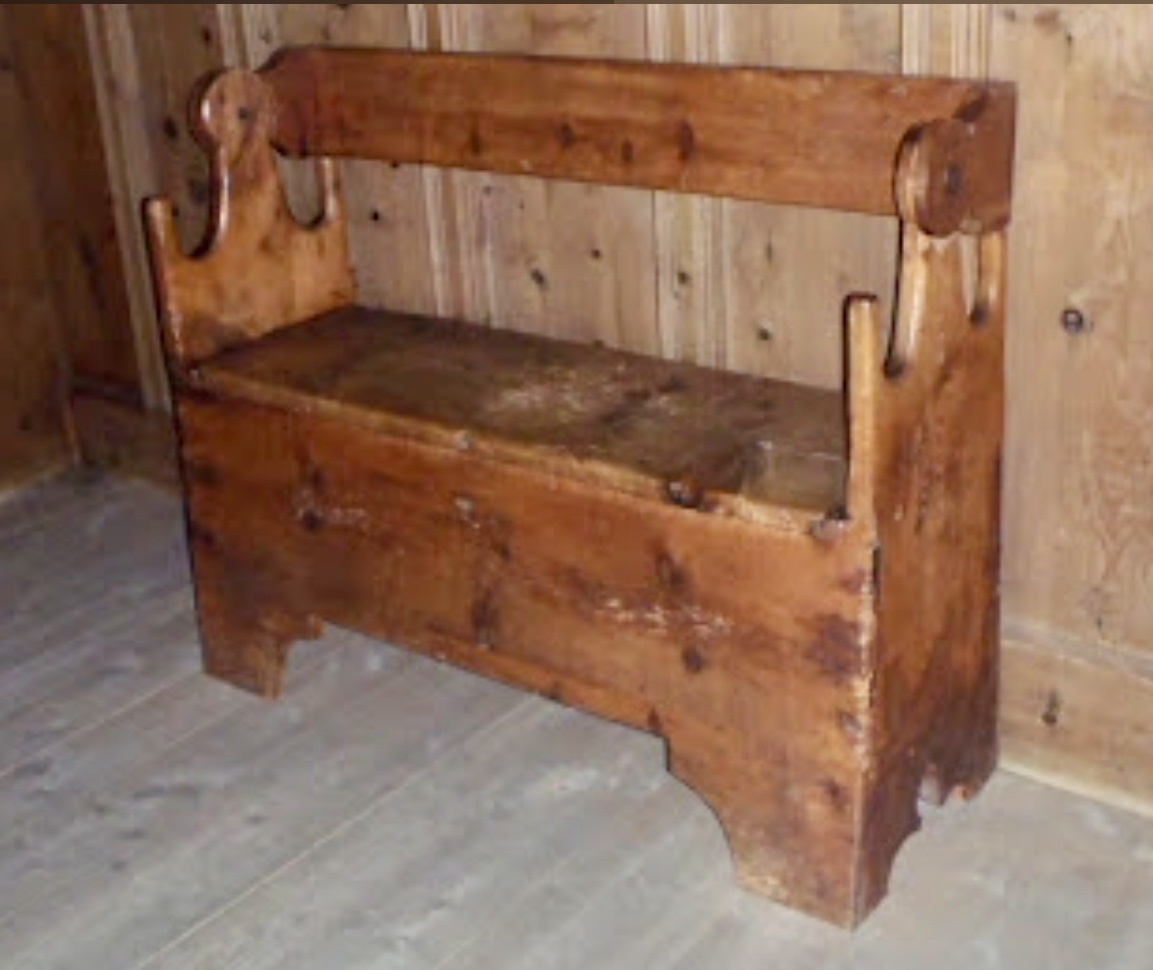
The manuscript and the real thing. Top: February from the Hours of Henry VIII, Tours, MS H.8 fol 1v, France, ca. 1500. Morgan Library, New York. Bottom: Bank mit Faltwerk, Gothic, Kunstgewerbesammlungen, Berlin.
To make the bench even more useful, the base could be a storage chest. In manuscripts, the bench is normally seen in front of a fireplace. Warm up facing the fire, and when you were warm enough and it was time to dine, flip the backrest and face the table.
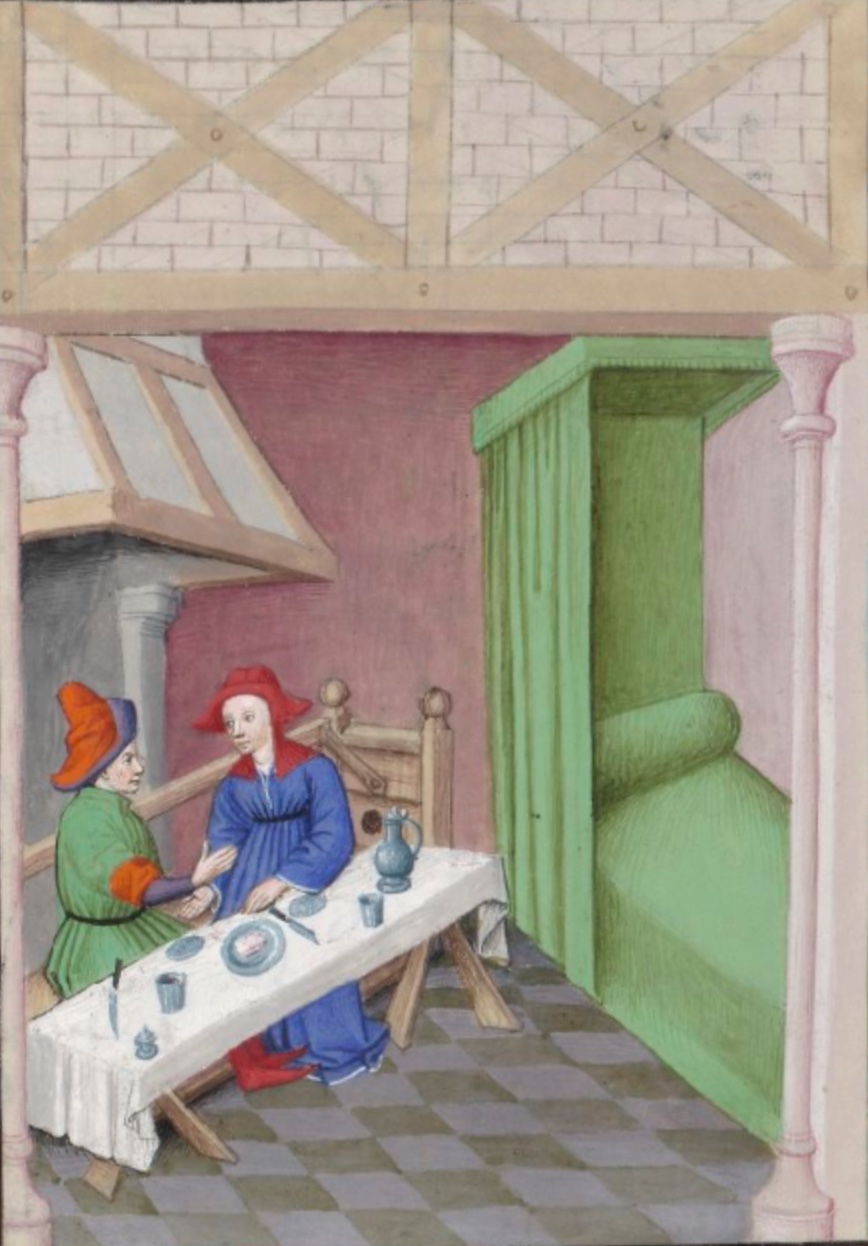
Décaméron de Boccace, MS 5070 réserve fol 314r, 15th c. Bibliothèque de Arsenal, Gallica BnF.
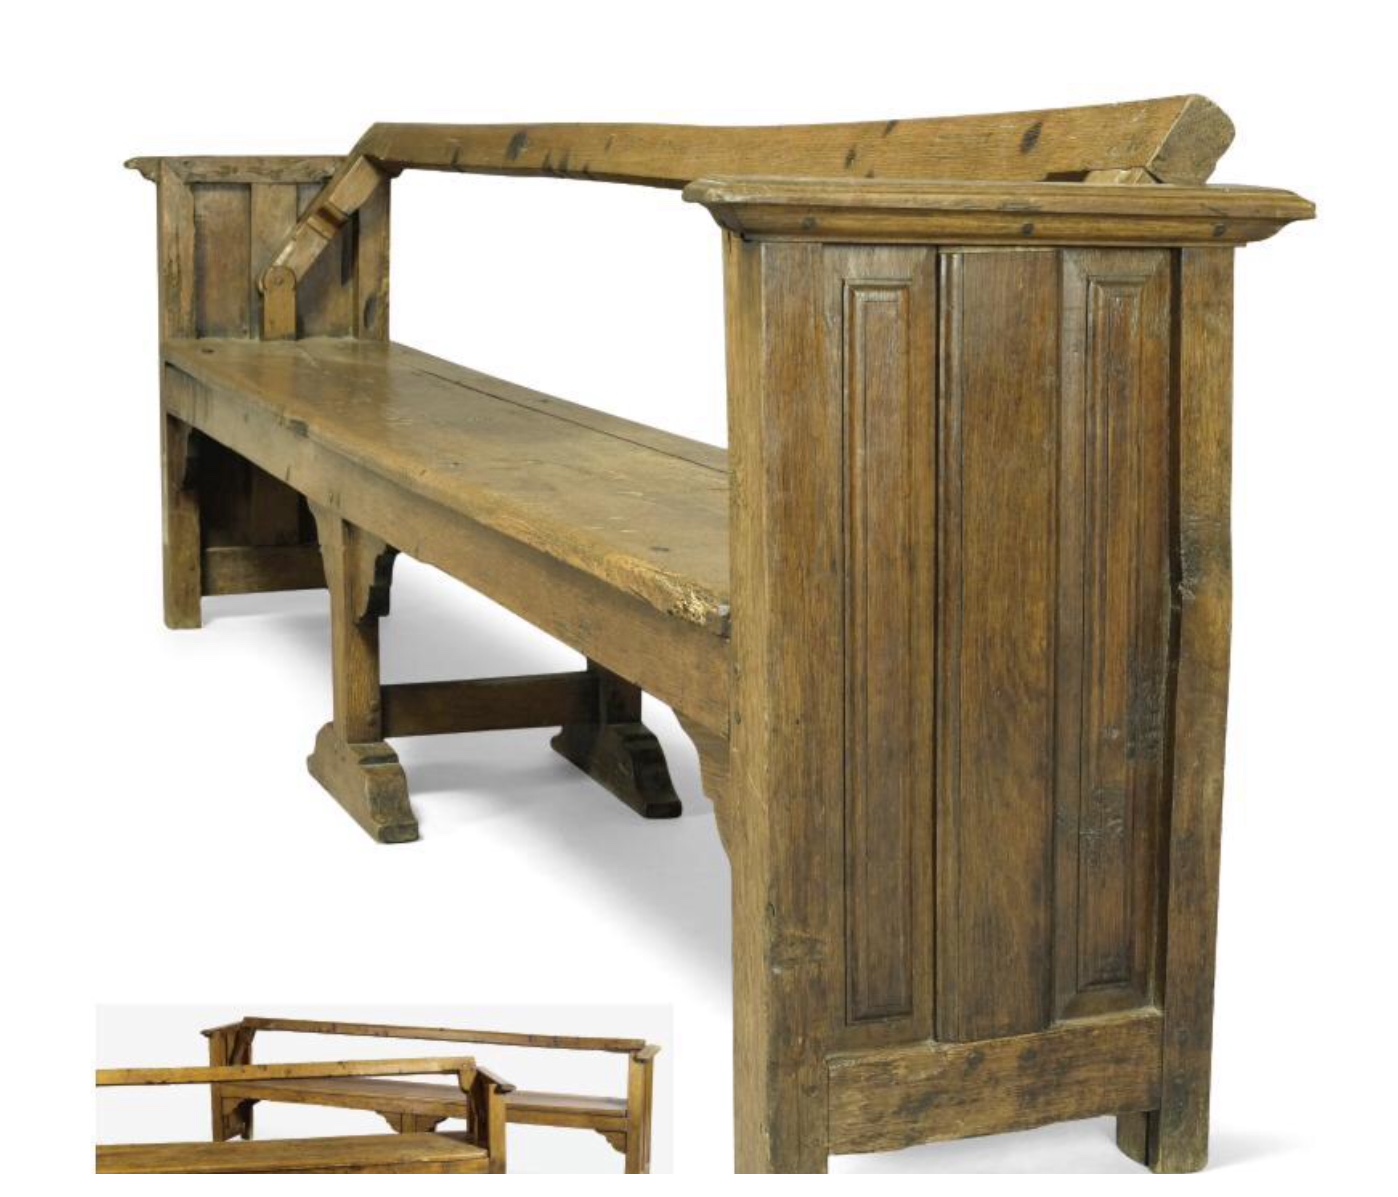
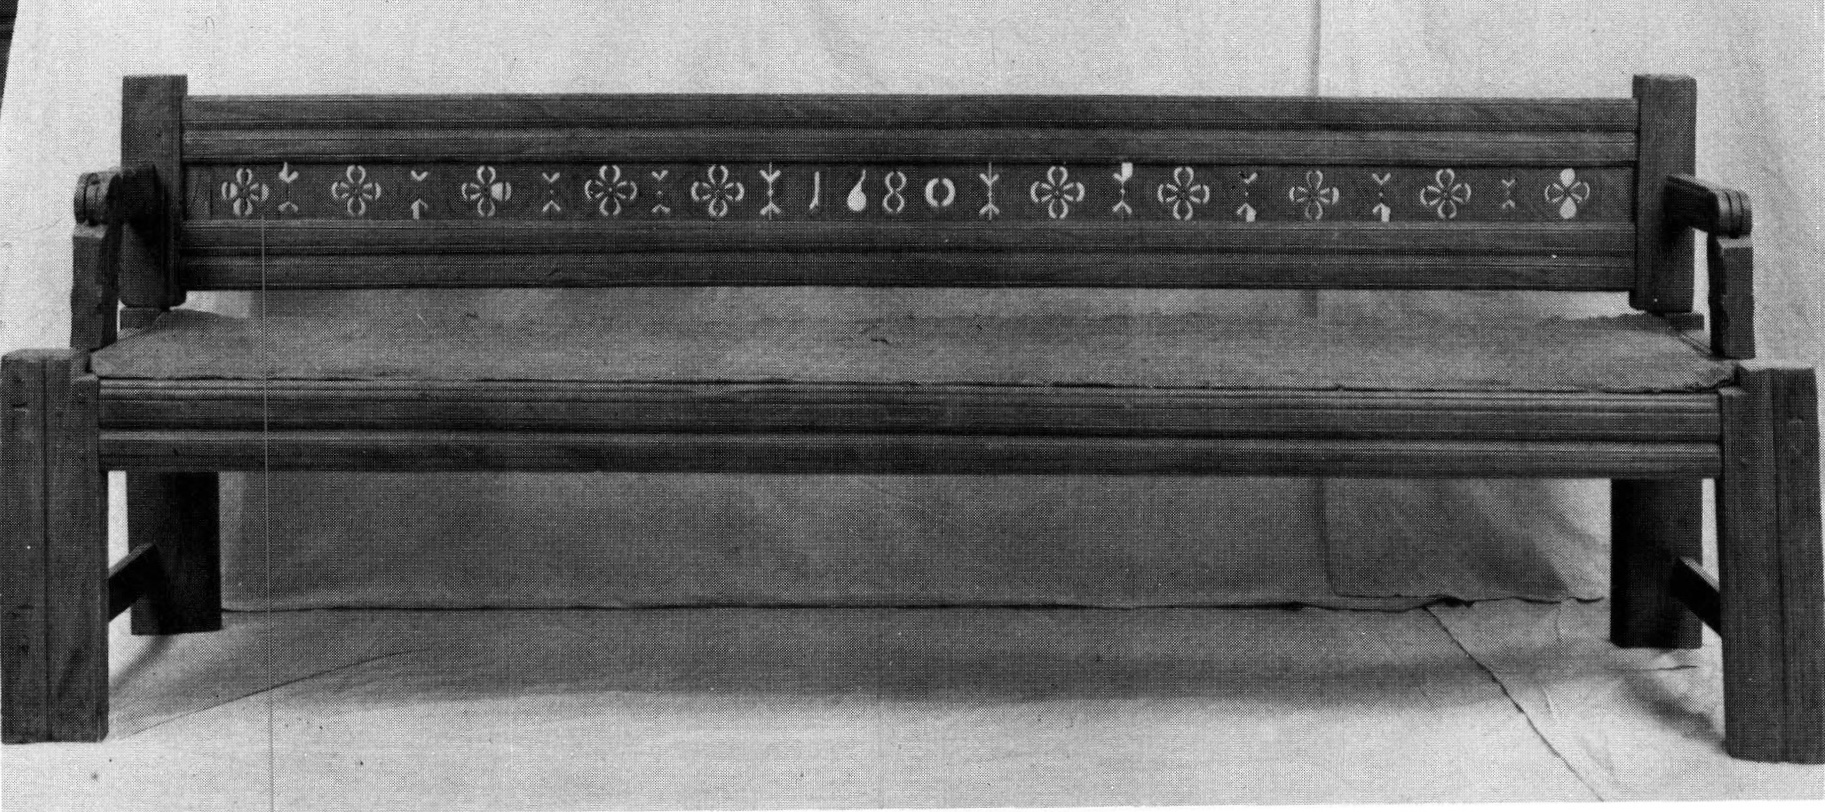
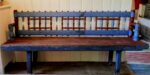
Banc à Tournis The France banc à tournis (or banc-tournis) typically has a thin backrest that turns inside the side panels. Although they are found in manuscripts, I did not find any French versions with the lower storage chest.
16th c. Northern France, probably Normandy, oak. Sotheby’s.
The side panels serve as the legs of the bench and often bear the only decorative element, in this case, linenfold carving.
16th c. Northern France, oak, from Chateau de Cornillon, Loire. Sotheby’s.
The pair above with carved panels on the side are a bit longer and a central support is added.
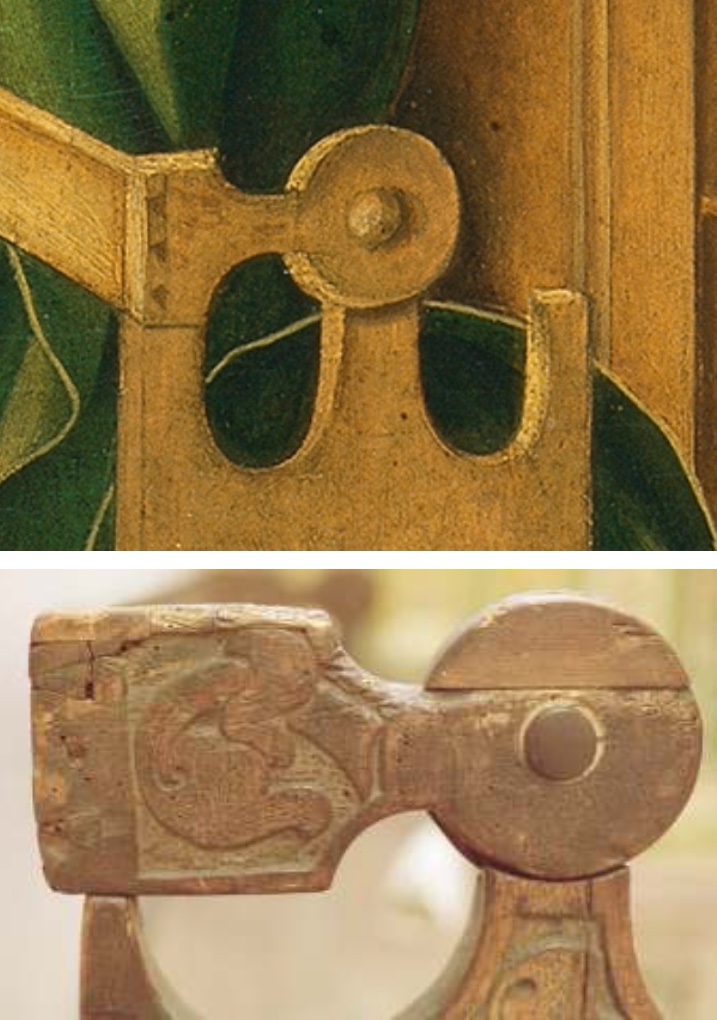
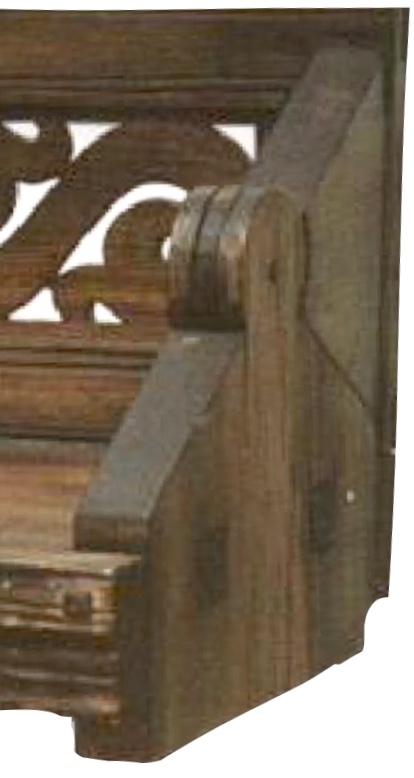
Here you can get a better look at two versions of the turning arm. The center dowel in the pivot does not pierce the side panel. In the (sharper) photo on the left it is easy to see how the side panel is constructed to include a vertical stop for the turning arm of the backrest.
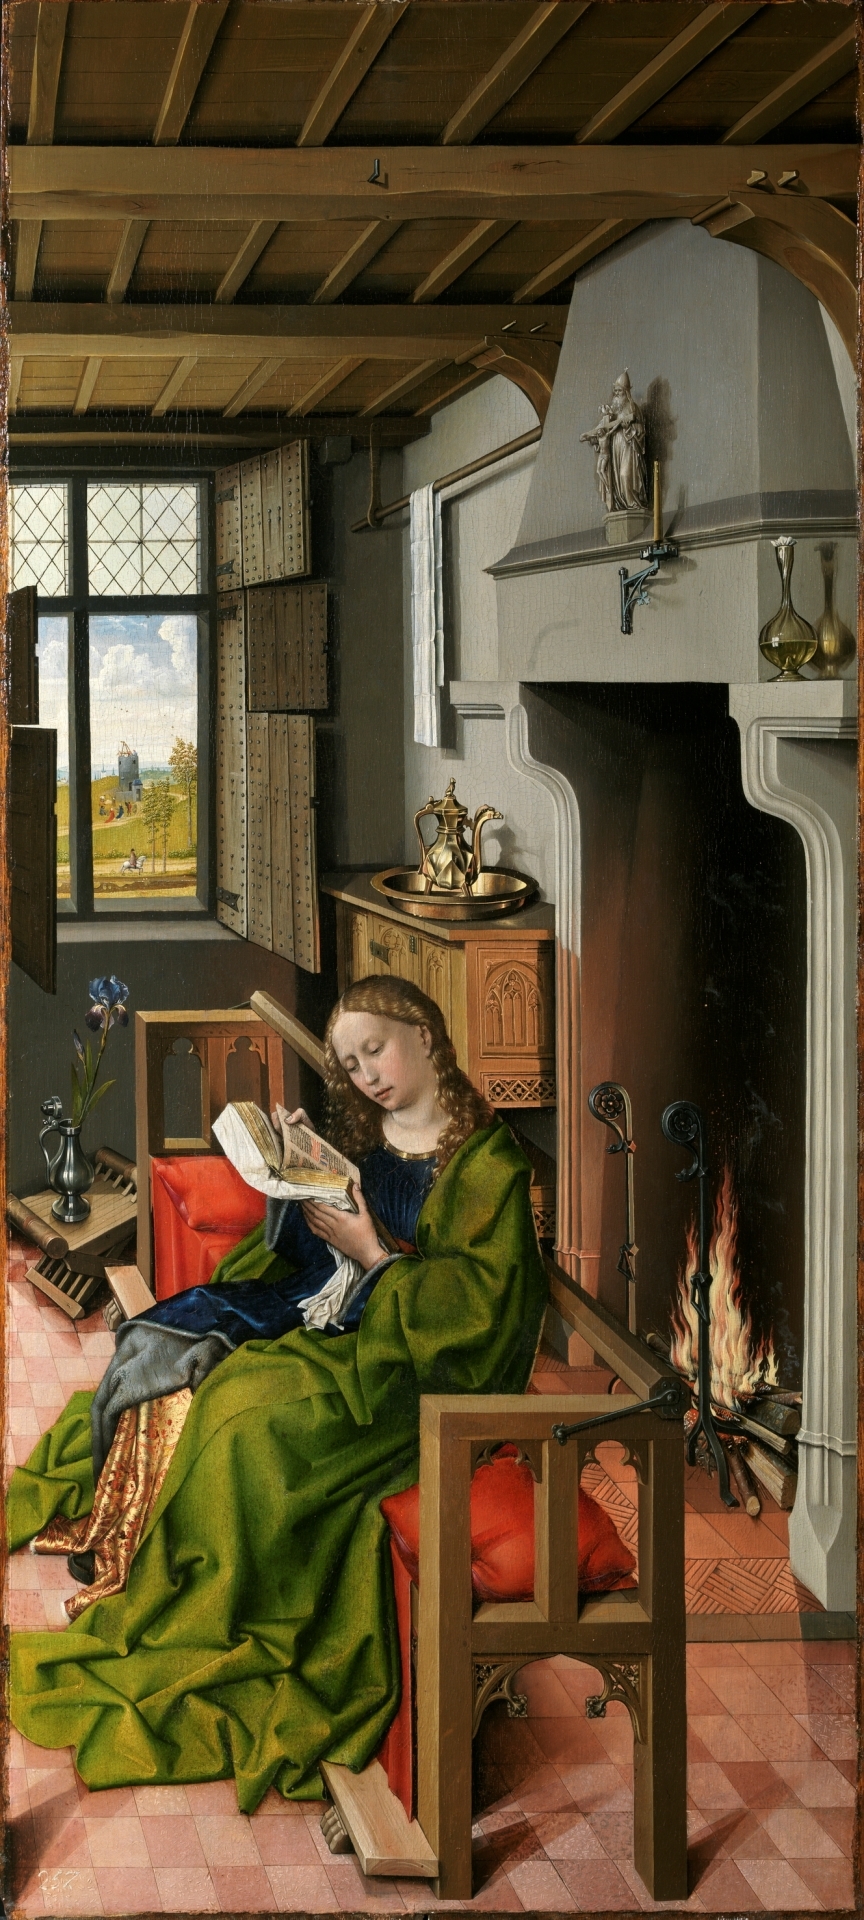
Saint Barbara, 1438, by Robert Campin, Flemish. Museo del Prado, Madrid.
Flemish artists were notoriously good at fine details. In this painting which is the left side of the Werl Altarpiece, Saint Barbara sits on another French-style banc à tournis. In this case the backrest is an six-sided bar with a metal turning arm and mounted on the outside of the side panel.
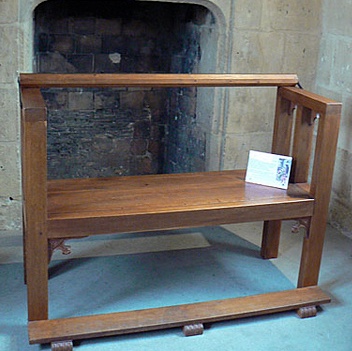
Banc à tournis, early 15th century from Tour sans peur, Paris.
The open sides of this bench preclude mounting the turning arm on the inside. Another feature of these benches is a footrest. They can be hard to see in paintings due to the voluminous clothing worn by the bench occupants. The footrest is also one of those pieces that gets broken off – or intentionally taken off – as these benches moved through the centuries.
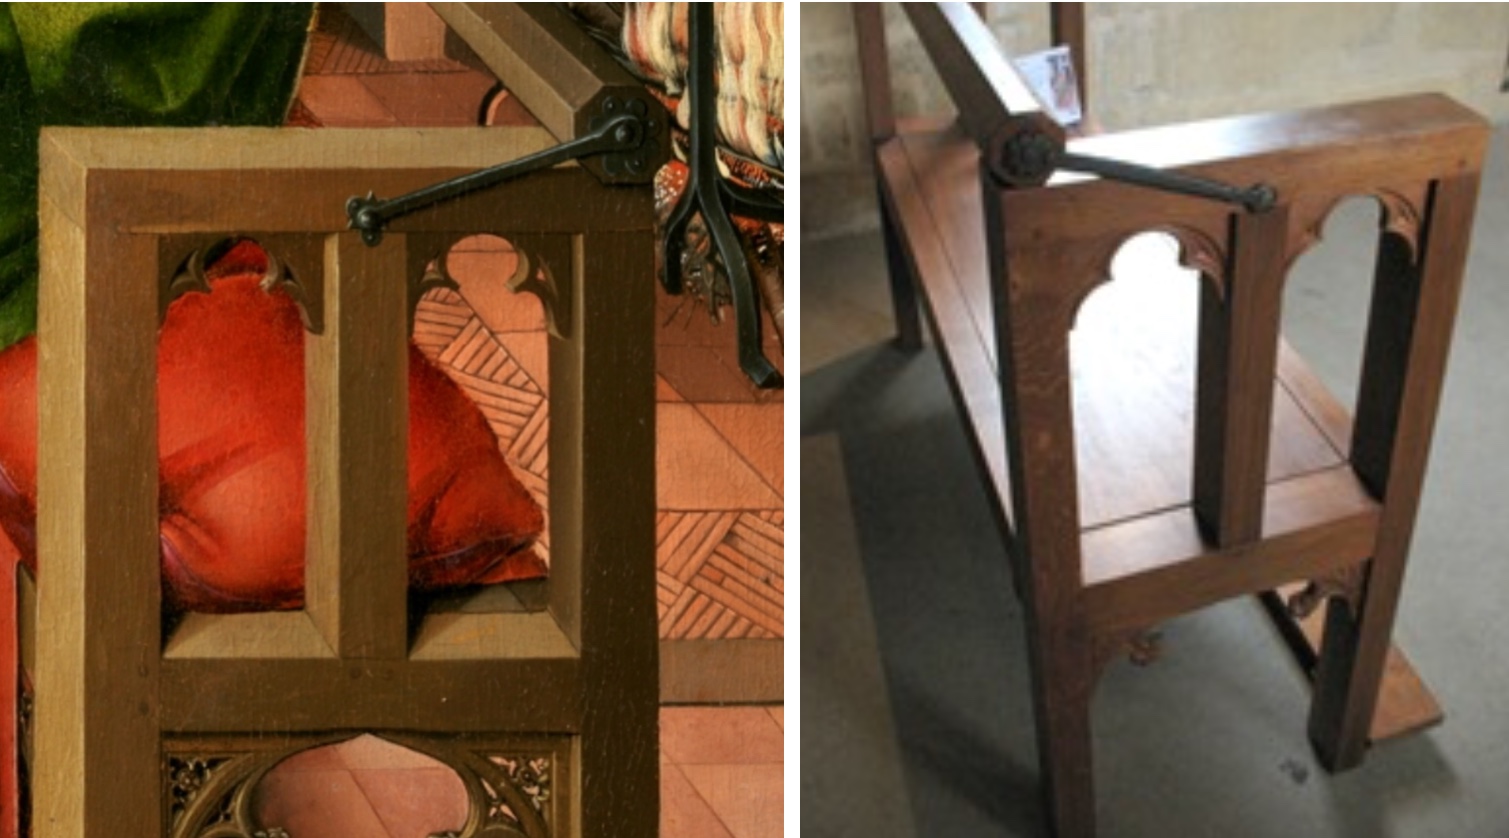
A comparison of the metal turning arm in the painted version and the real thing.
In the Sotheby’s notes about the two benches from Northern France it gave the 1589 inventory of a banc à tournis owned by Catherine de Medici: ‘un banc à dossier mobile e pouvant faire face à la chiminée ou tourner le dos.’ At the time (2007) this was the last known record of one of these benches.
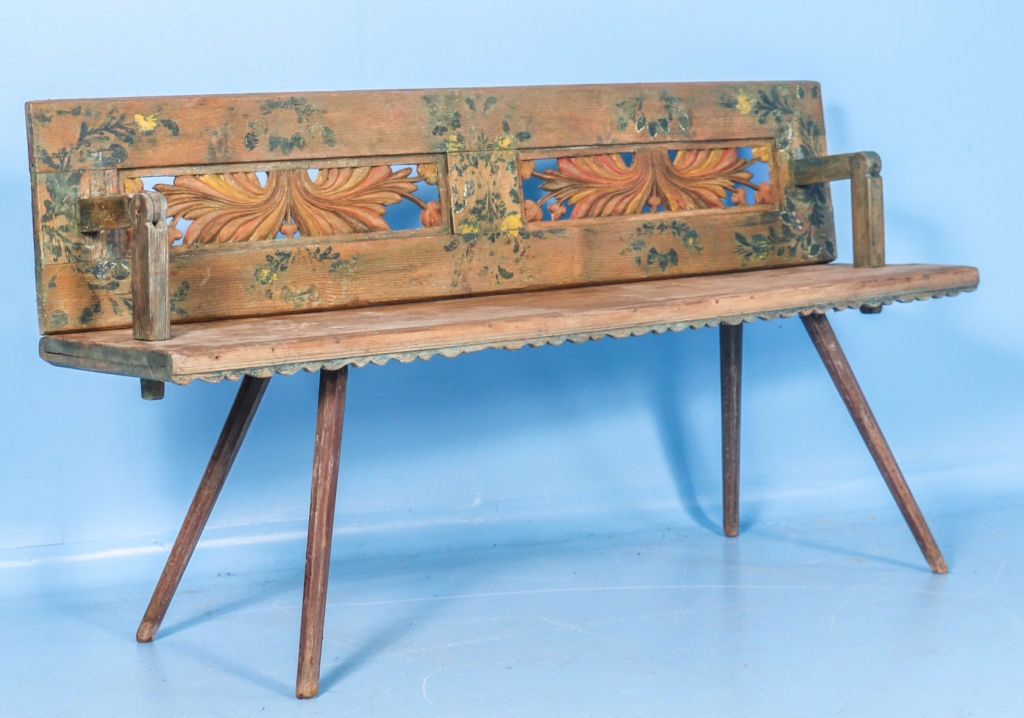
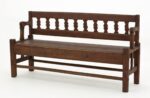
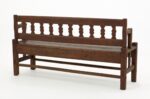
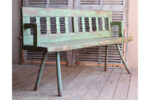
Styrcsitten The German version of these benches are the strycsitten, identified by the turning mechanism mounted atop the side panel.
As with the French benches, there are variations in the side panels, decorative elements and whether there is a storage chest.
Pilgrimage to Santiago Compostella, part of an altarpiece, 1460 by Friedrich Herlin. Archive Gerstenberg-ullsteinbild.
The pilgrims are sitting on a plain styrcsitten with a narrow backrest and we can definitely see the hinges of the chest.
Two paintings by Gabriel Mälesskircher from Munich. Left: Saint John the Evangelist, 1478, Museo Thyssen-Bornemisza, Madrid. Right: Mary Magdalene washes Christ’s feet, 1476, German National Museum, Nürnberg.
Based on his painting style, Mälesskircher was probably trained by Flemish masters. He shows us two strycsitten without chests, but with great decorative work on the side panels.
Tirol Landesmuseum, Innsbruck, Austria. Photo from St. Thomas Guild blog.
A plain bench with storage chest. The backrest is wider than what is usually seen in manuscripts and paintings and would likely be more comfortable.
Photo from St. Thomas Guild blog.
This second bench from the 15th century has a beautifully-carved backrest and, as you can see, a storage chest. There are color photos floating around that may or may not be the same bench. I have seen notes that the pictured bench may have been destroyed in WWII.
Mälesskircher’s painting vs. an actual bench (photo from St. Thomas Guild blog).
The turning mechanism of the strycsitten sits on the central point of the side panel. The two outside points serve as the rests. Variations will be the depth of the curves and height of the three points, and carvings or piercings on the side panels.
If you are shopping around for a flip-able bench to make and so far you aren’t wowed by the banc à tournis or strycsitten, let’s go north.
Vändbänken
From Hälsingland/Dalarna, 1800s. Photo Stadsauktion Sundsvall.
The vändbänk is a Swedish bench with some interesting details. No side panels to worry about, as much turning detail as one might want and a very cool turning mechanism.
These benches were painted in the folk tradition and the seat might have an apron. In the bench above you can still see remnants of paint. The apron is carved with a leaf pattern.
And here is how it turns. I don’t know the Swedish term for the turning arm so I am naming it Thor’s Hammer. Many examples have the same staked legs in what looks like the start of a ballet second position demi-plié. These benches have personality and turnings, lots of turnings.
1800s, collection of the Nordiska Museet. Photo by Skansen Digitalt Museum.
Another variation is a fence-like apron attached to one side.
When the backrest is turned to the other side the apron is left behind. Here you also get an idea of the heft of the burly turning arm.
Kalmer läns museum.
This bench appears to be older than the previous two and is from Norra Bäckbo. In the local dialect it is known as a rall. No turnings but a nicely figured backrest.
Dated 1680 from Junkboda Bygdea. Collection of Nordiska museet.
In the Junkboda Bygdea dialect this bench is a brudsärla and has a heavier build. The legs extend above the level of the seat and act as the stops for the backrest. The backrest is more solid than previous examples and has wonderful quatrefoil piercings while the apron has simple beading. The turning mechanism is the same but without any apparent decoration.
Two more non-Swedish benches with a similar turning arm are from Hungary and Russia.
Dated late 19th century.
The Hungarian bench variation has staked stick legs instead of the more substantial Swedish bench legs. The seat is also less substantial but has a nice frilly apron. The backrest has deeply carved and pierced panels. This may have had some repainting, however, it still gives us a good idea of the folk painting found in Eastern Europe.
This beefy Russian bench almost looks like a church pew, except for the legs. The back rest has a carved and pierced design that can also be found in textiles.
The bench shows another variation of how to turn the backrest.
With some similarity to the German styrcsitten the backrest turns atop the side panel and together they give a solid side to the bench end.
The St. Thomas Guild has been exploring the strycsitten for several years and they have a ton of photos of the benches (and other furniture) they have found. You can take a trip over to their blog here. If you get lost they have an alphabetic directory that will help you get redirected on their blog.
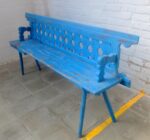
As with many folk crafts this bench is disappearing. Whatever your preference in style or decoration I urge you to consider making one of these versatile benches.
There are a few more examples of these flip-able benches in the gallery.
— Suzanne Ellison
16th century, Dutch.
16th (?) century, French. Linenfold side panels, noted central supports.
French, 15th century from Chateau de Martainville, Normandy.
Swedish, 1700s (?), from Kalmer läns museum.
Swedish, the other side.
Swedish, 1700s. Photo by Berit Bryntse.
Hungarian. Note similar backrest decoration as the Swedish bench.
Another Hungarian. Shapely turning arm. Did this backrest come from another bench?
Circa 1500, oak chair version of strycsitten with chest. Rijksmuseum.
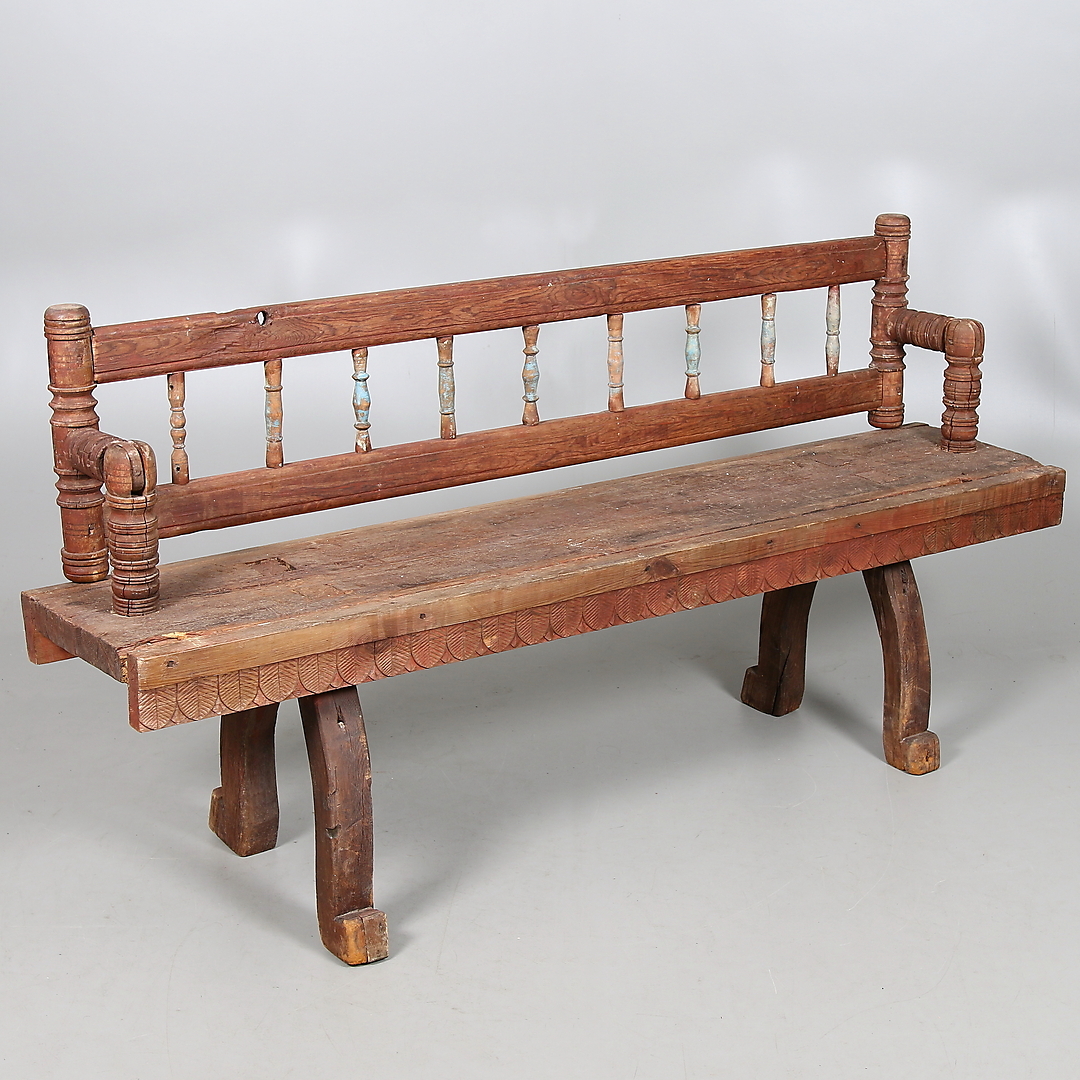
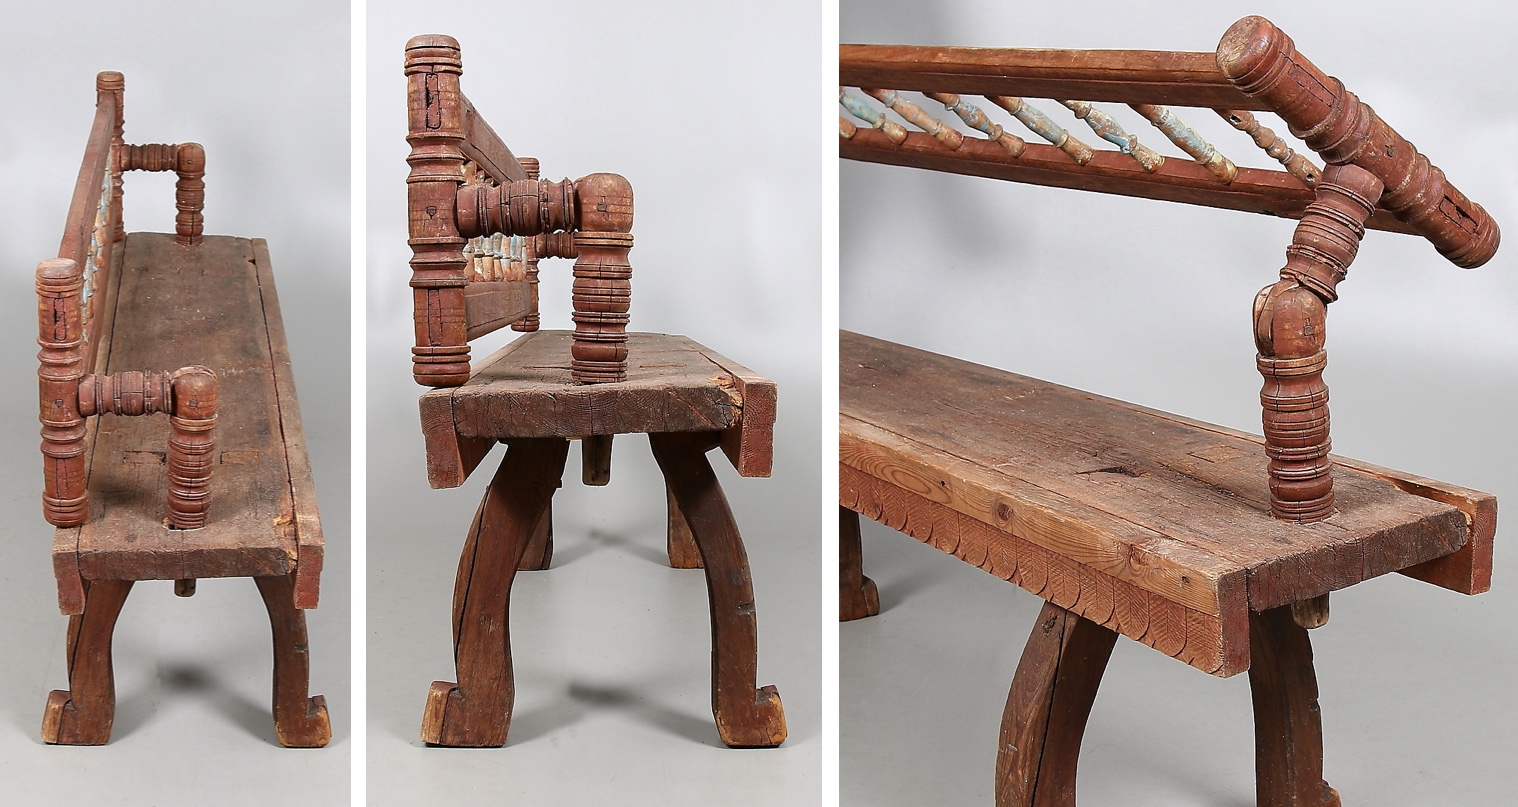
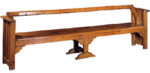
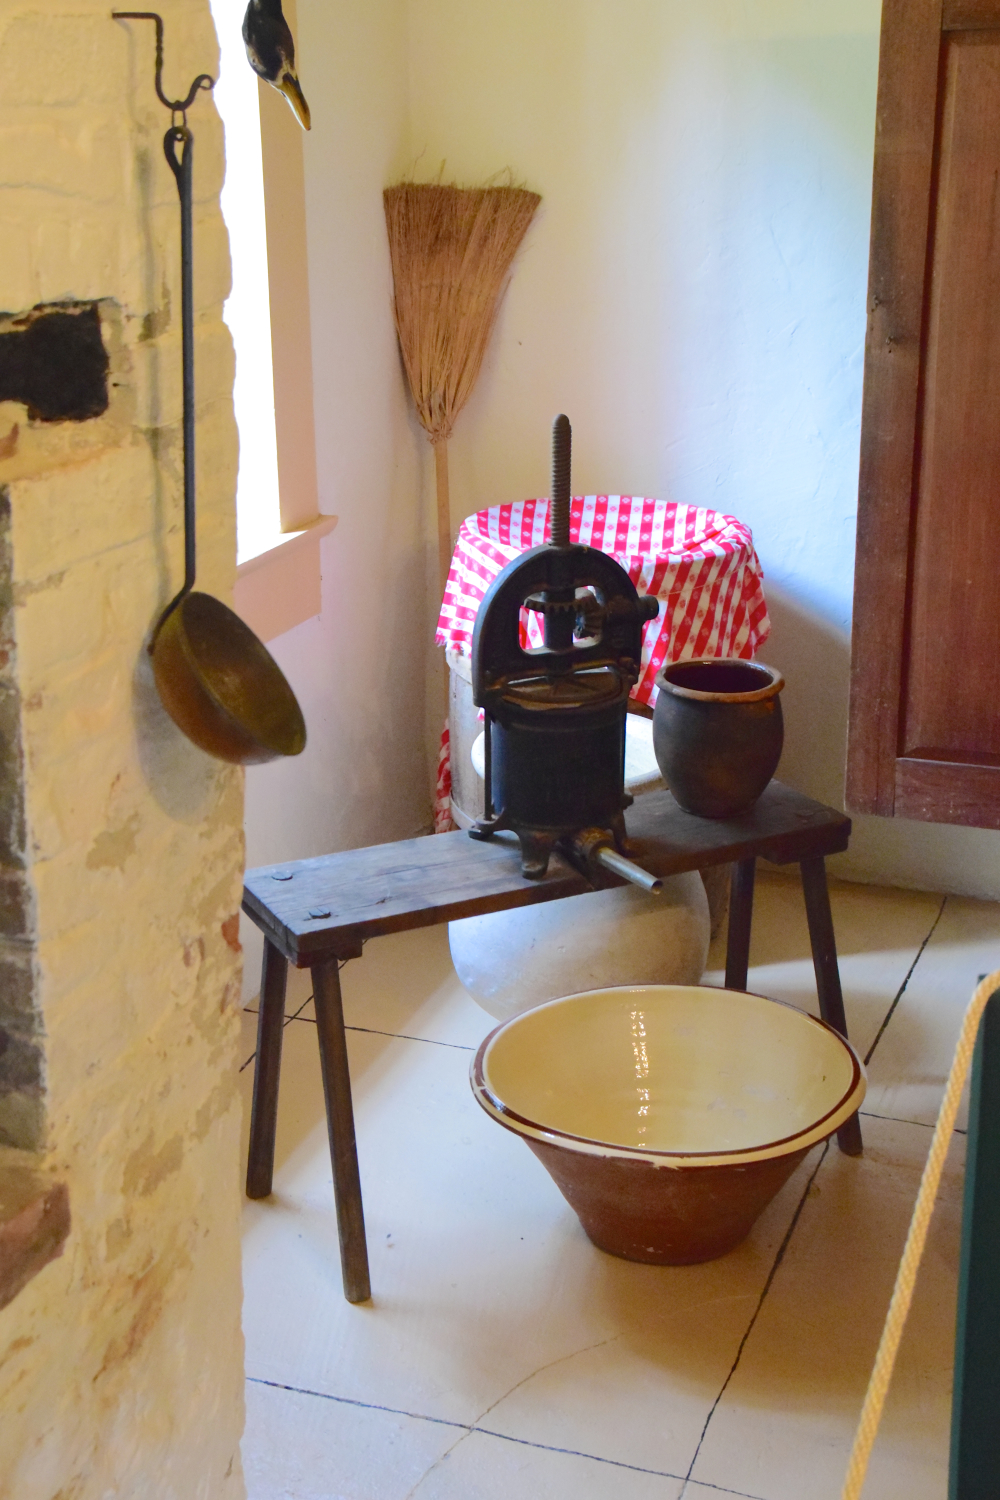
Mark Firley of The Furniture Record sent me the above photo he took at Destrehan Plantation, which is 30 minutes west of New Orleans. It’s a nicely proportioned staked bench that is supporting a crackling press, which is used to press lard from cracklings or juice from fruit.
I quite like how the cross-grain battens are oriented at the ends of the top. All in all, it’s a nice piece, despite its primitive appearance.