OverDrive bits (left) work for shallow angles. Bits with longer lead points can tilt much more.
One of the most common questions I get is why I don’t use Forstner bits much in chairmaking. The bits are readily available, make flat-bottomed holes and cut cleanly.
The answer is basically this: The Forstner’s lead point is too short*. That means if I want to drill anything other than a shallow angle I need to start the bit nearly vertical then tilt my drill to get to the desired angle. It’s do-able, but it’s easy to over- or under-shoot things.
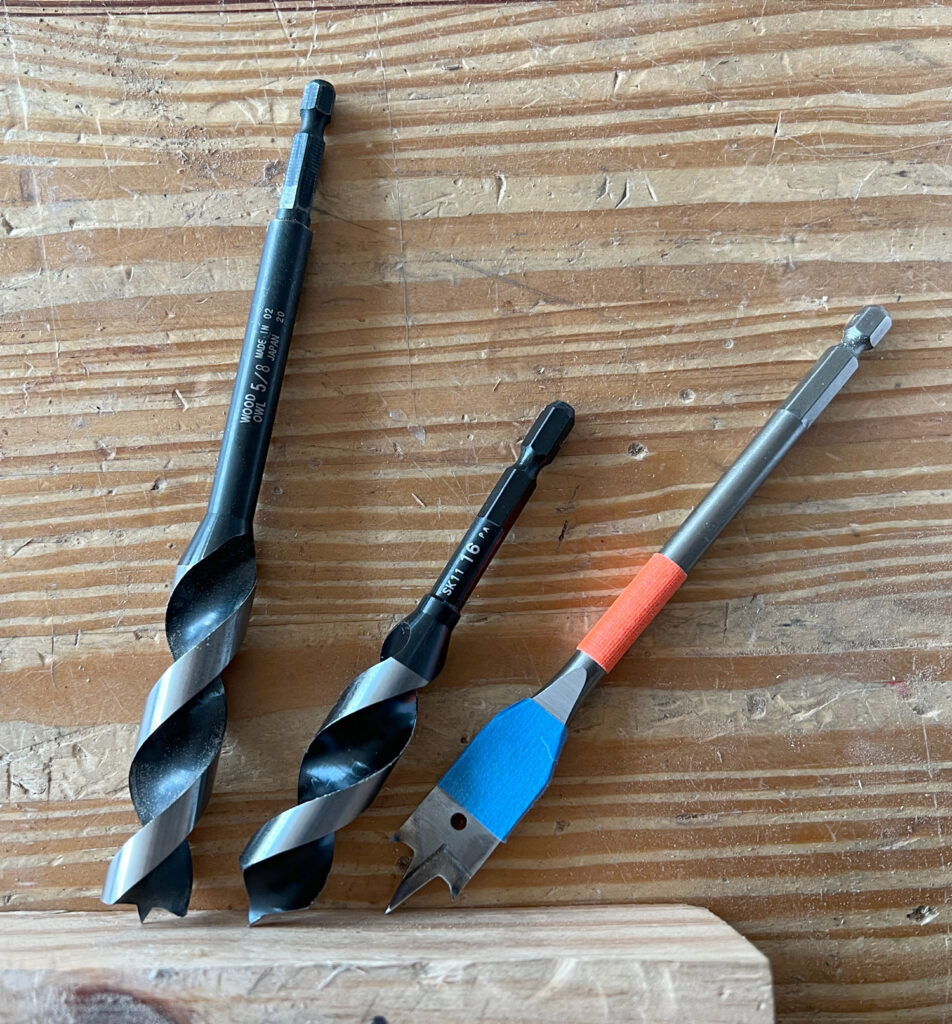
So most of the bits I use in chairmaking have a long lead point. This long lead point allows me to tilt the bit to the right angle, lock my elbows then drill. Here are the three bits I use the most, with their advantages and disadvantages.
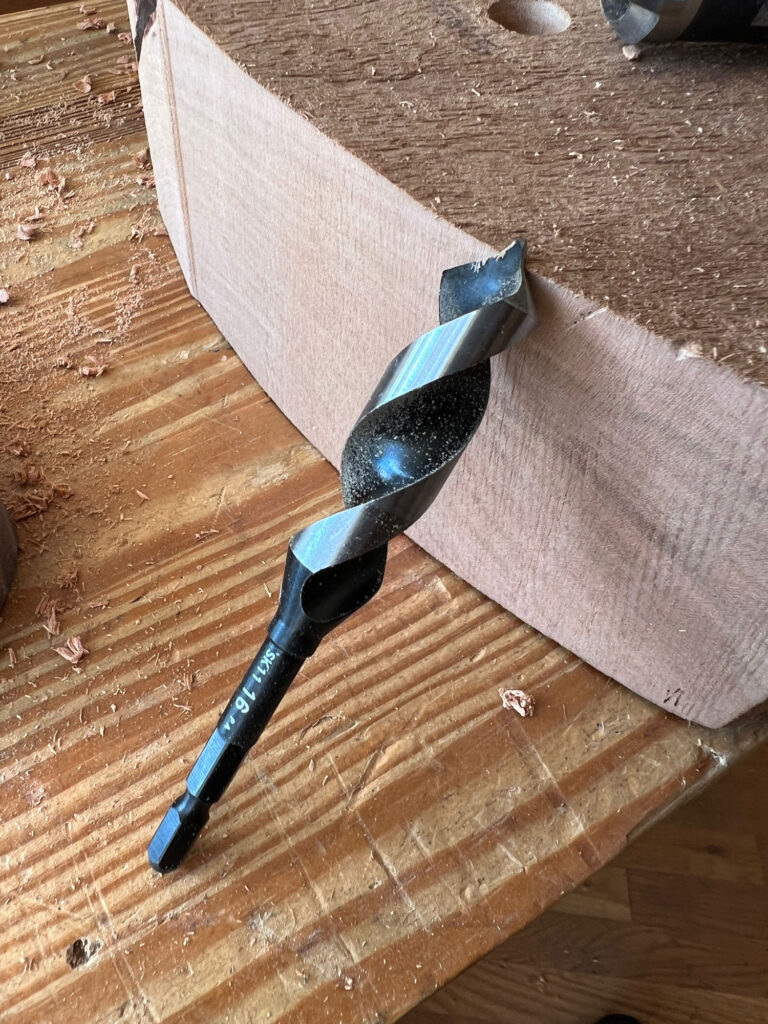
Star-M F-Style bit.
Star-M F-Type Bit, 16mm, by WoodOwl
This is my favorite bit, but good luck finding it. Most reliable sources are regularly sold out. This bit can handle just about any common chairmaking angle. I can tilt up to 30° off vertical if I make a small starter divot with an awl for the bit’s point.
Other advantages: It cuts clean holes without any splintering on the exit side. This makes drilling through the arm and seat a quick and painless operation.
Disadvantages: The side flutes are sharp. So if you move your drill sideways while boring, you will end up with an overly oval hole. The solution is to practice (sanding down the flutes doesn’t seem to help much).
The bit is metric and drills a 0.629”-diameter hole. So you’ll need to adjust your tenon-cutter to get a snug fit.
Finally, the bit seems to dull faster than my other WoodOwl bits. This is a problem with the other two bits discussed below. I get about five chairs out of one of these bits, and I haven’t found a way to sharpen them (yet).
WoodOwl’s OverDrive bit.
WoodOwl OverDrive Bit, 5/8”
This bit is much easier to find than the Star-M. So keep searching. Lots of little suppliers have them in stock. The bit makes a true 5/8” hole (0.625”). And it also leaves a clean exit hole.
So what’s the catch? The lead tip isn’t long, so you are limited in the chair angles you can bore. I can easily bore 11° off vertical. And 14° when I am pushing things (and if I make a small starter divot with an awl for the bit’s point). That range of angles will get you through most dining chairs without too much trouble.
Like the Star-M’s, the side flutes are sharp – so practice makes round. And the bit doesn’t last as long as its big auger cousins from WoodOwl, which seem to last forever.
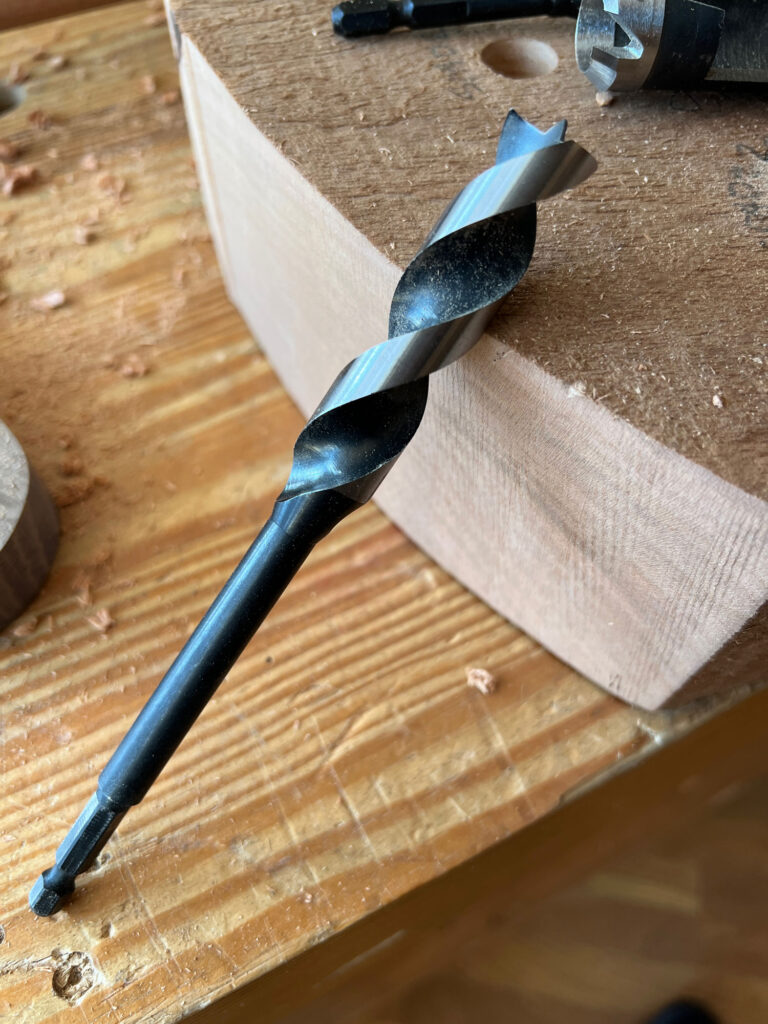
WoodOwl’s spade bit.
WoodOwl 5/8” Spade Bit
Really, any spade bit will do. The WoodOwl just happens to come sharper than most cheap bits. Another good option is to look for vintage (meaning ye olde 2020) Irwin bits that have the rim cutters. Other people have had luck with Milwaukee and Makita bits. Basically, look for spades that look like the WoodOwls. The bit needs two rim cutters (the little cat ears). The bit’s faces need to be surface ground (otherwise the bit will fail to bore gouda). And the lead point should *not* be a screw. These lead-screw spades are a sin against the Chair Gods.
Spades can handle almost any angle – up to 34° off vertical with ease. They can be resharpened. You can adjust their diameter on a grinder in seconds. They are cheap and plentiful. And they don’t have the side-cutting problems that the two above bits do.
But they blow out the backside like an American tourist after 10 currywursts. So you need to clamp backing blocks below the arm and seat when you make through-mortises.
— Christopher Schwarz
*There are Forstners out there that have a long lead point – usually a replaceable brad-point bit. But they are hard to find. And expensive when you do.
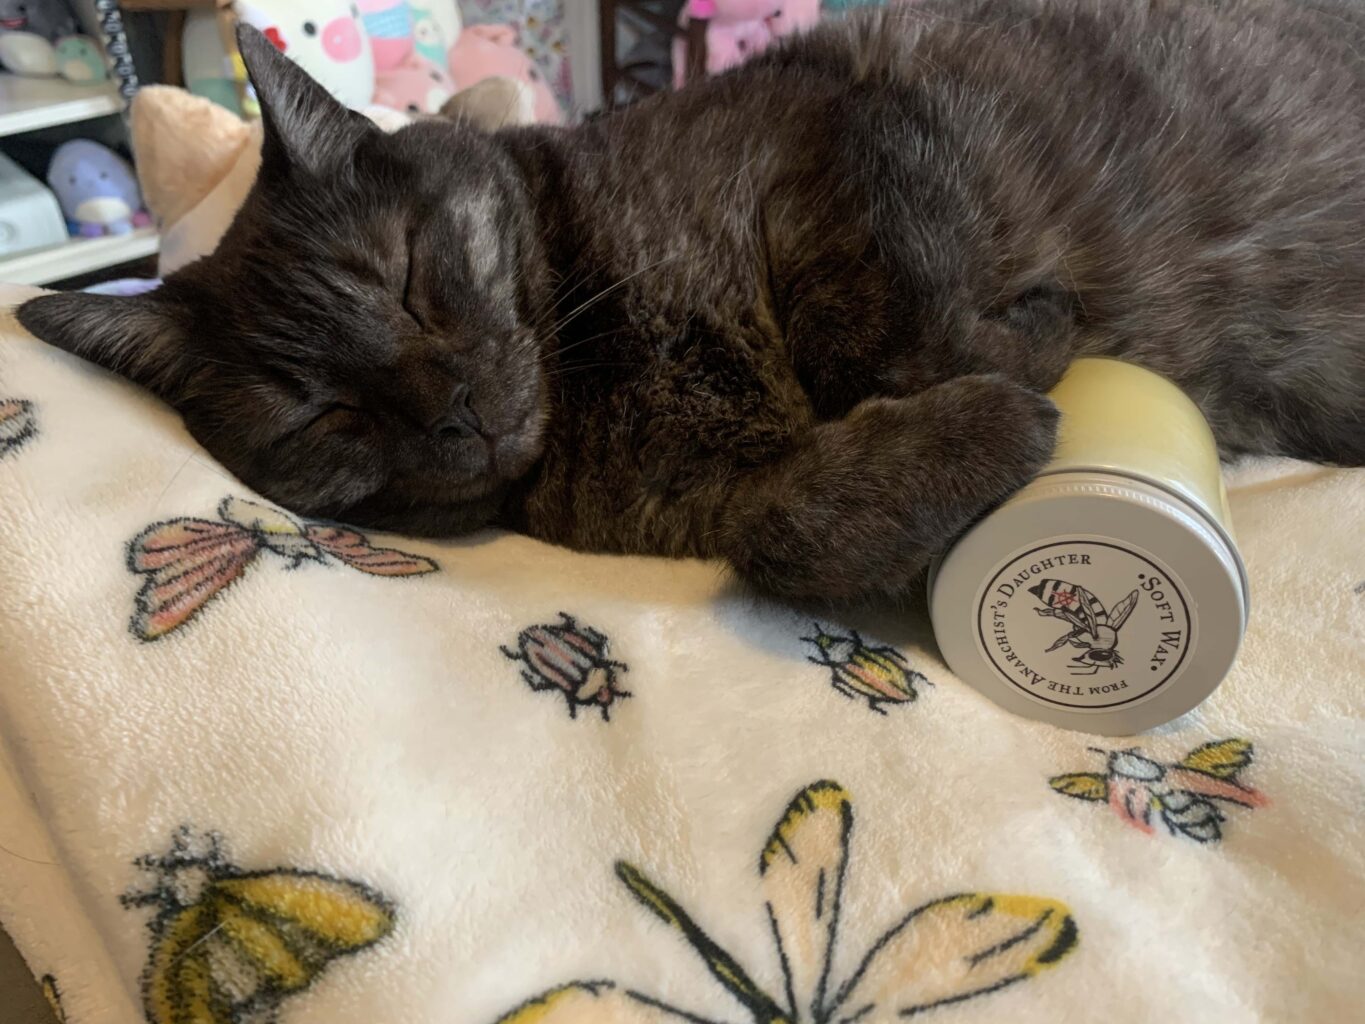
It’s a photo of a cat, ergo, Katherine (aka the Wax Princess) has more soft wax available. Last weekend, she made up a large batch, and it’s now up for sale in her etsy store.
As you can see, Funky Winkerbean has slept through this announcement. (The wax also doubles as a teddy bear.)
Notes on the finish: This is the finish Chris uses on his chairs. Katherine cooks it up here in the machine room using a waterless process. She then packages it in a tough glass jar with a metal screw-top lid. She applies her hand-designed label to each lid, boxes up the jars and ships them in a durable cardboard mailer. The money she makes from wax helps her make ends meet at college. Instructions for the wax are below.
This chair is finished with Katherine’s Soft Wax 2.0.
Instructions for Soft Wax 2.0 Soft Wax 2.0 is a safe finish for bare wood that is incredibly easy to apply and imparts a beautiful low luster to the wood.
The finish is made by cooking raw, organic linseed oil (from the flax plant) and combining it with cosmetics-grade beeswax and a small amount of a citrus-based solvent. The result is that this finish can be applied without special safety equipment, such as a respirator. The only safety caution is to dry the rags out flat you used to apply before throwing them away. (All linseed oil generates heat as it cures, and there is a small but real chance of the rags catching fire if they are bunched up while wet.)
Soft Wax 2.0 is an ideal finish for pieces that will be touched a lot, such as chairs, turned objects and spoons. The finish does not build a film, so the wood feels like wood – not plastic. Because of this, the wax does not provide a strong barrier against water or alcohol. If you use it on countertops or a kitchen table, you will need to touch it up every once in a while. Simply add a little more Soft Wax to a deteriorated finish and the repair is done – no stripping or additional chemicals needed.
Soft Wax 2.0 is not intended to be used over a film finish (such as lacquer, shellac or varnish). It is best used on bare wood. However, you can apply it over a porous finish, such as milk paint.
APPLICATION INSTRUCTIONS (VERY IMPORTANT): Applying Soft Wax 2.0 is so easy if you follow the simple instructions. On bare wood, apply a thin coat of soft wax using a rag, applicator pad, 3M gray pad or steel wool. Allow the finish to soak in about 15 minutes. Then, with a clean rag or towel, wipe the entire surface until it feels dry. Do not leave any excess finish on the surface. If you do leave some behind, the wood will get gummy and sticky.
The finish will be dry enough to use in a couple hours. After a couple weeks, the oil will be fully cured. After that, you can add a second coat (or not). A second coat will add more sheen and a little more protection to the wood.
Soft Wax 2.0 is made in small batches in Kentucky. Each glass jar contains 8 oz. of soft wax, enough for at least two chairs.
When I purchased our storefront here on Willard Street in Covington in 2015, I was certain of two things: 1) It was the final old building that I was going to bring back to life; 2) It would be the final resting place of Lost Art Press.
Until this month, I’ve never given more than 2 seconds of thought about what will happen to this company after John and I die. We’ll be dead, so we won’t care.
But this month, it looks like everything I wrote in the first sentence of this blog entry is incorrect. We have just purchased an old woodworking tool factory at 407 Madison Ave. in downtown Covington. This building housed the Anthe Machine Works, which made woodworking cutters from the time the company started in 1897 until it closed in 2019.
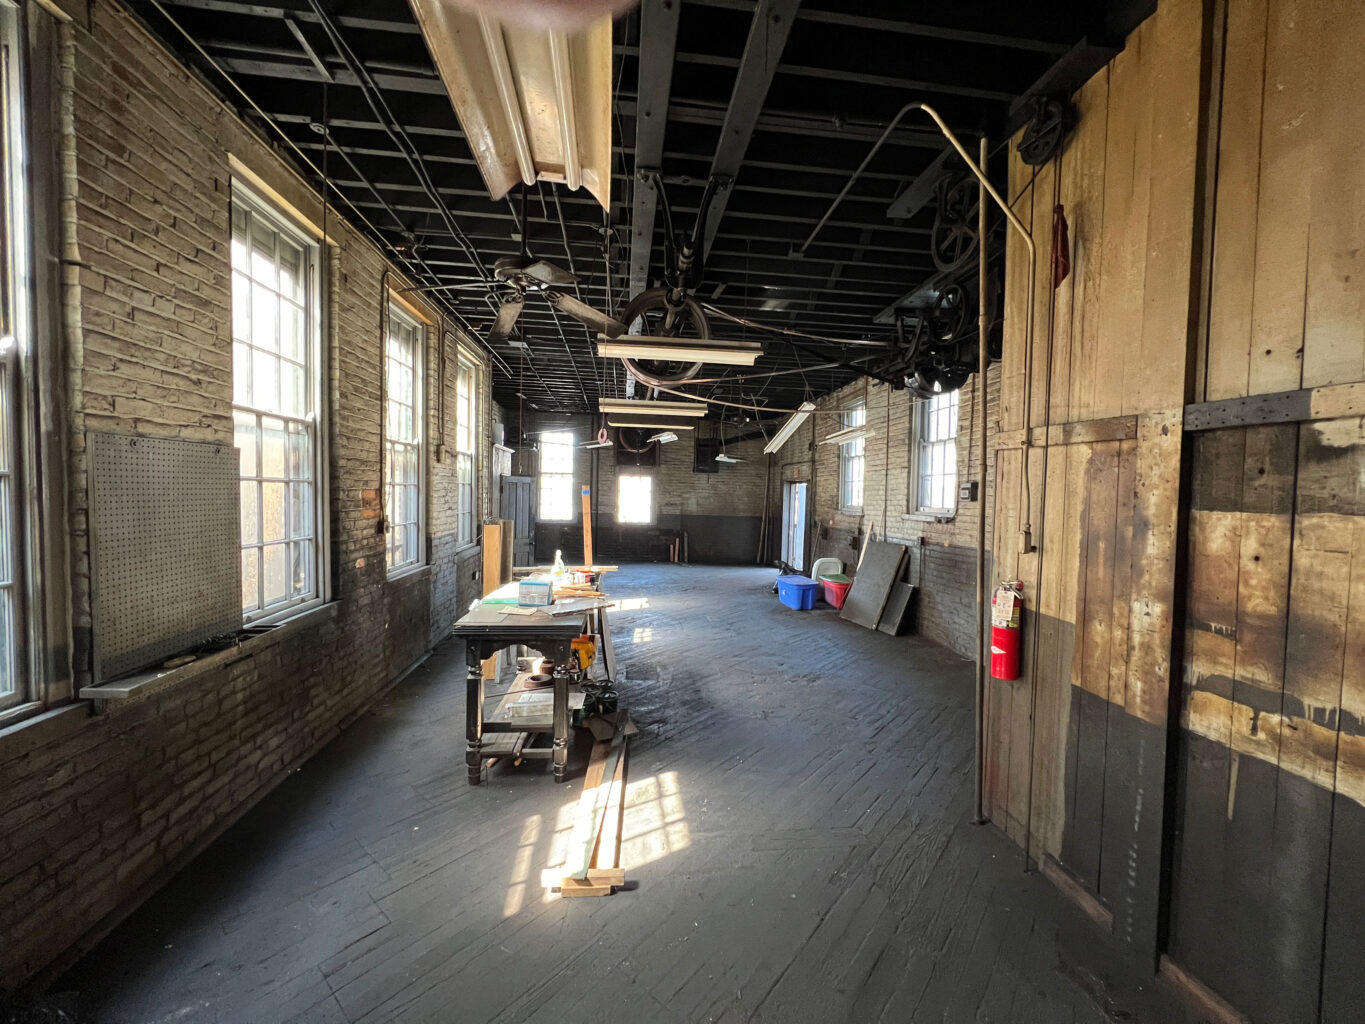
The first floor of the Anthe building behind the office. Note the lineshaft, which powers the elevator.
The building is a time capsule, with few modern improvements. Original floors, mouldings, elevator, windows, lineshaft and (yikes) toilets. It is a gorgeous space that is flooded with light. And it has no modern amenities.
The Anthe building has more than 5,000 square feet of space that is in need of preservation and restoration. And it is big enough that it now helps us see Lost Art Press as a multi-generational enterprise.
This building will allow us to bring our fulfillment operations here to Covington and have room to grow (if we want to). By June, all of our inventory will be on the floor of the Anthe building. And we will be able to mail out orders to customers with the same personal touch we bring to everything else we do.
We are thrilled by all this. But we are also a bit terrified.
In order to buy the building, we agreed to take on debt for the first time in our history. It’s not a huge loan. In fact, we will save money by transferring our inventory to Covington. But it is a debt.
More important is that we have taken on an obligation to this building, which is a historic structure with virtually no alterations. The storefront is all frame-and-panel woodwork surrounded by cast iron. The doors – all original. The trim around the windows? The original Greek key steel trim.
Though the building is in decent shape, it needs an almost endless amount of love. It needs a plan for its sensitive restoration. And it needs a lot of skilled help.
So this is the part of the blog entry where I do something I never wanted to do: show my ass.
The purchase of a huge building is something we’ve never done. And here is the other thing we’ve never done: ask for your help to restore it.
The first stage of restoring the Anthe building is to make the first floor a safe and comfortable working space. Plus maintain humidity levels to protect our books in inventory. That means we need to:
Add HVAC to the first floor (with plans for systems on the other two floors).
Pave the gravel drive to our loading dock to allow us to receive and send shipments.
Provide basic amenities. Offer a working bathroom. Add locks on doors that work. Fix the original stairs. Remove some modern “improvements” to the front office.
Get the freight elevator running.
The gravel drive that allows us to load in and out. This needs to be paved.
The building’s original freight elevator. We love it.
To help pay for these initial projects, we are asking for your help. We have four tiers of support, and each tier offers something useful or beautiful in return. You can purchase any of these tiers in our store now. Links below and here.
* A special one-week stick chair class in February 2024 here in Covington. This will also be a food tour as all your meals and drinks will be included. Together we’ll each make a stick chair (you’ll get to pick the design) from some premium wood (not bog oak – I don’t have enough; think maple, white oak, walnut). We’ll have nice lunches brought in to the shop. And we’ll go out every night to one of our favorite places in Cincinnati or Covington. Oh, and there will be a Sunday bluegrass night the evening before. The exact date will be decided by the six students, so it is a little flexible.
* Signed copy of “The American Peasant” made out to you when it is released in December
* Invitation to our Opening Day Party in early 2024
* Signed copy of “The American Peasant” made out to you when it is released in December
* Invitation to our Opening Day Party in early 2024
If you can help, thank you. If you cannot, we totally understand. Simply being a customer of Lost Art Press helps support and sustain our work.
In the coming weeks I’ll write more about the building and our plans for the future of Lost Art Press – beyond this current generation. I can tell you one thing right now: We would sooner give it away than sell it to a venture capital firm.
So if you have children, start feeding them a steady diet of Roy Underhill and Charles Hayward. We might need them here in Covington.
— Christopher Schwarz
The top floor of the Anthe building. Everything is original. And everything needs love.
Roy Underhill in his office, recording the audiobook of “The Joiner and Cabient Maker.”
“The Joiner and Cabinet Maker” is a short book written by an anonymous tradesman; it was first published in 1839. It tells the fictional tale of Thomas, a lad of 13 or 14 who is apprenticed to a rural shop, that builds everything from built-ins to more elaborate veneered casework. The book was written to guide young people who might be considering a life in the joinery or cabinetmaking trades, and every page is filled with surprises.
Unlike other woodworking books of the time, “The Joiner and Cabinet Maker” focuses on how apprentices can obtain the basic skills needed to work in a hand-tool shop. It begins with Thomas tending the fire to keep the hide glue warm, and it details how he learns stock preparation, many forms of joinery and casework construction. It ends with Thomas building a veneered mahogany chest of drawers that is French polished. However, this is not a book for children. It is a book for anyone exploring hand-tool woodworking.
Even more delightful is that Thomas builds three projects during the course of his journey in the book, and there is enough detail in the text and illustrations to re-create these three projects just as they were built in 1839.
When Lost Art Press published the expanded edition* of “The Joiner and Cabinet Maker” in 2011, a teacher of autistic students approached LAP about an audiobook of the original 1839 text to help teach craft history. Their students weren’t able to read the book, but they could listen to it. So we asked the inimitable Roy Underhill to help us out. He brought not only his hand-tool knowledge but his excellent thespian training to the project.
Why don’t we offer audiobooks of more of our books? Well, they are the posters of our aural world…which is to say this one made no money. Was it worthwhile? Absolutely – it helped an underserved audience of students. But it took a lot of investment of various resources, and we do have lots of cats to keep in kibble.
But because the audiobook made almost no money, we’ve decided to now offer it free to blog readers. You can download the 22 zipped mp3 files below for 125 minutes of listening pleasure. When you click the button below, the file will likely go directly to you “downloads” folder. (Yes, we are sure the link works; we have checked it a dozen times.)
*The expanded edition of “The Joiner and Cabinet Maker” includes not only the original text, but a historical snapshot of England in the early 19th century by Joel Moskowitz, and chapters on building the three projects (a Packing Box, a dovetailed Schoolbox and a Chest of Drawers), plus complete plans, from Christopher Schwarz.
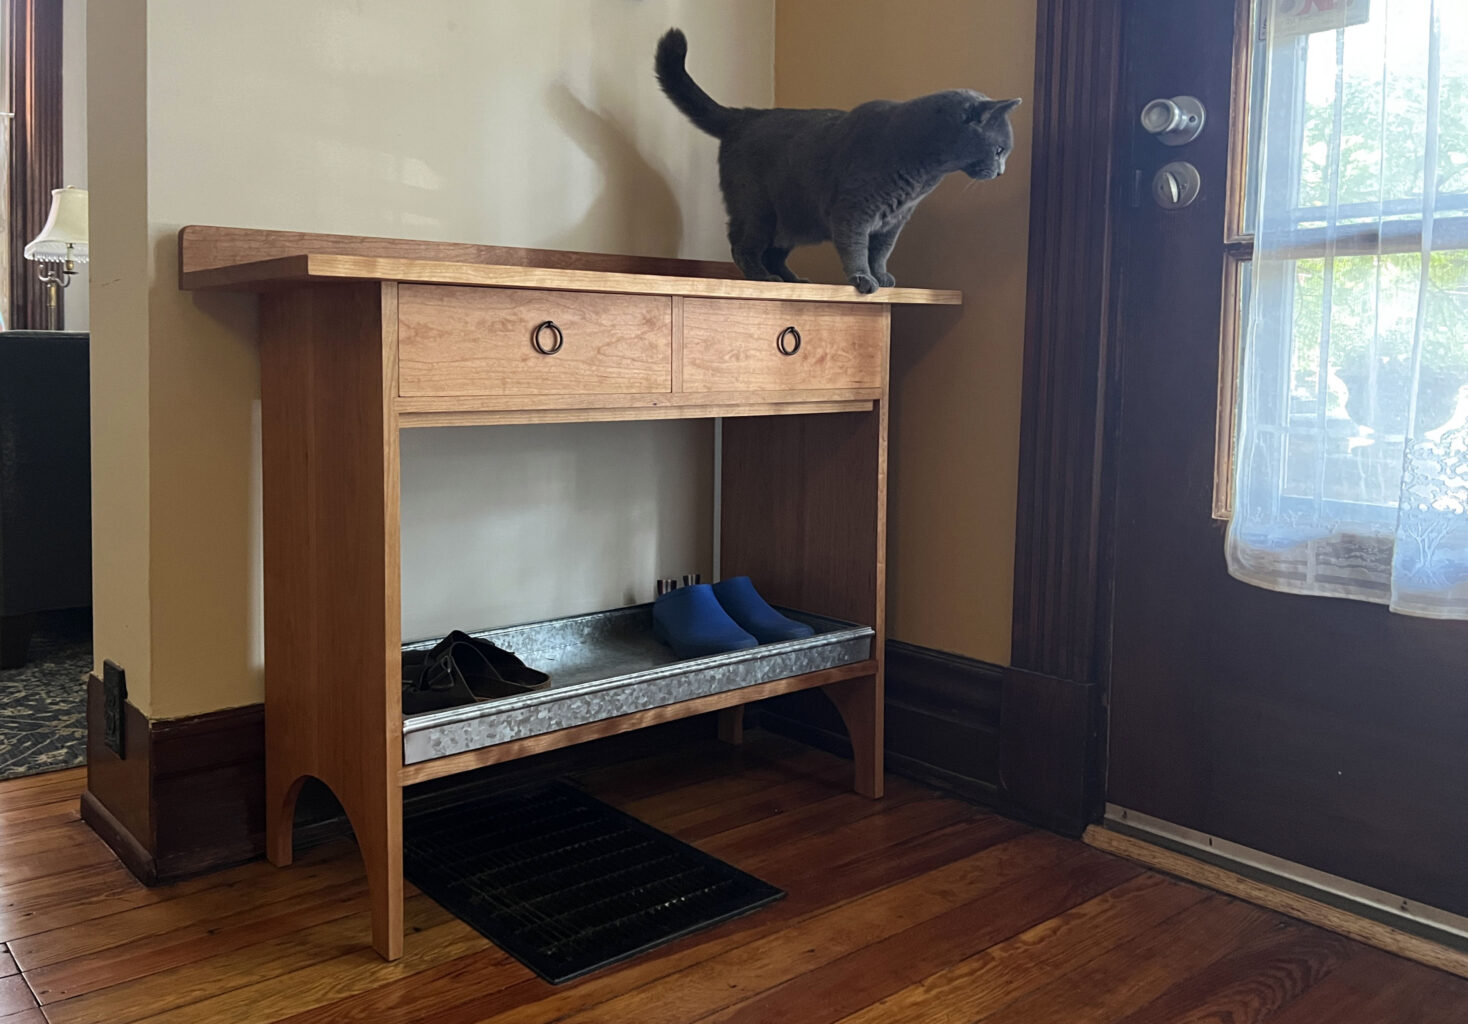
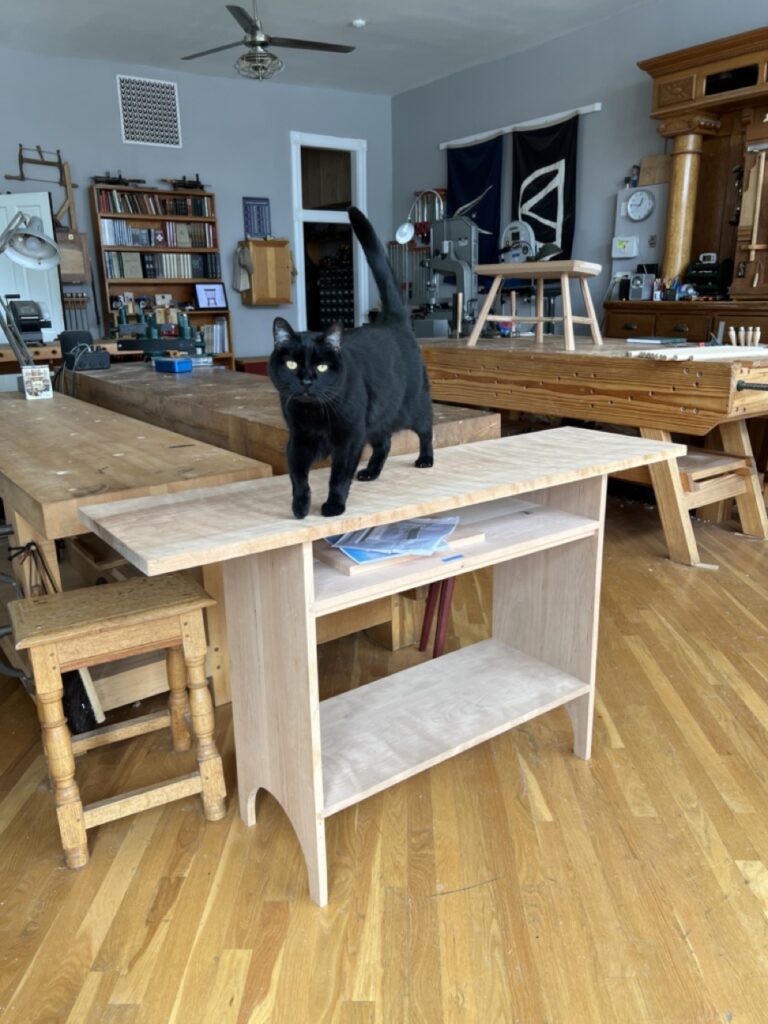
I did not build this for the cats. But I’m not sad that Olivia likes it.
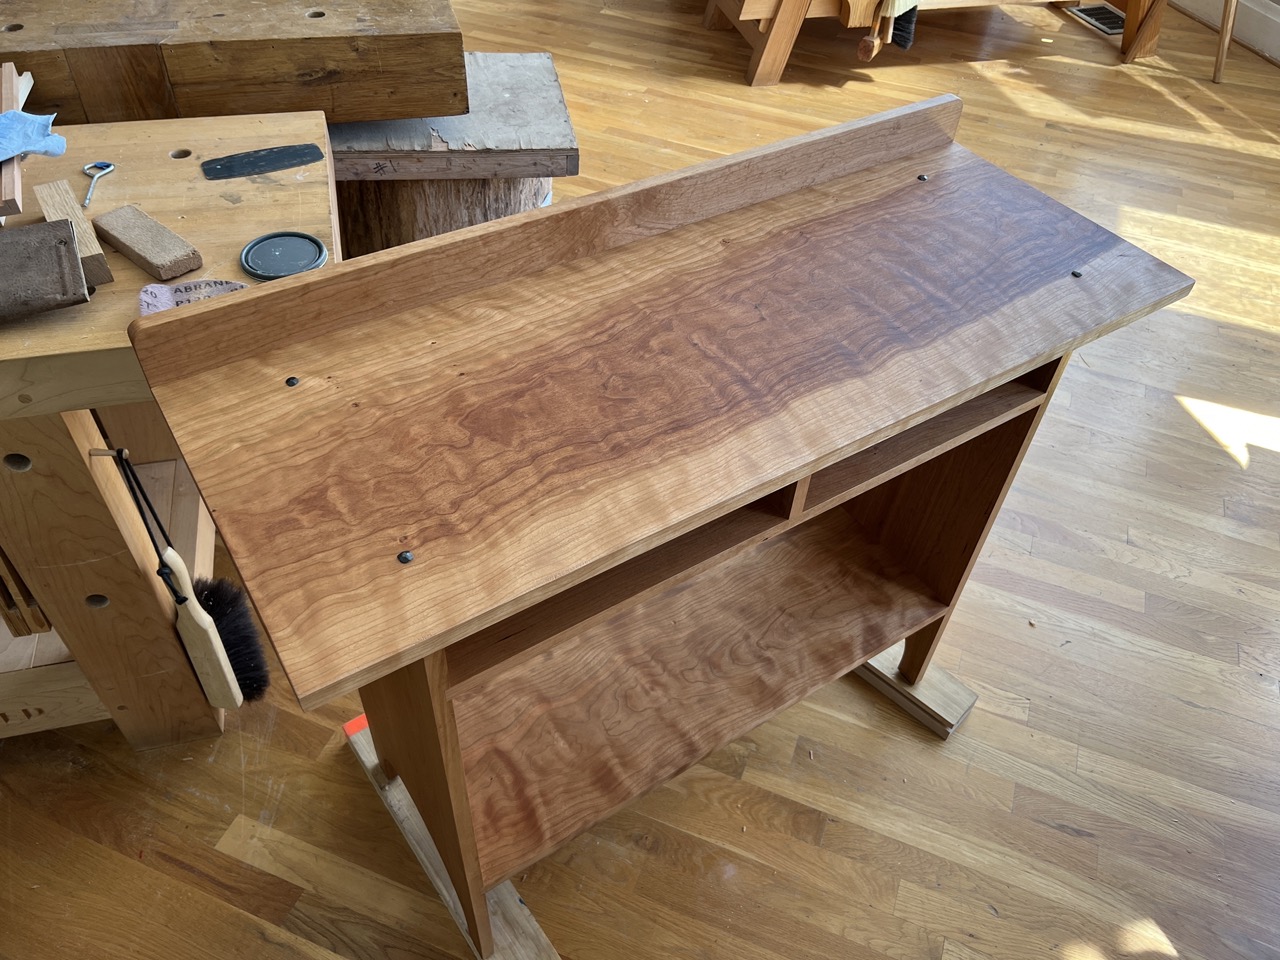
I have a small flower garden in front of my house, and after years of being annoyed by having to sit down on my porch to don an old pair of running shoes for weeding (and checking them for spiders first, because they lived on the porch), I finally broke down and bought myself some garden clogs. They’re easy to slip on and off as I walk in and out the door, which is great, but I don’t want to leave them on the porch (they are much more likely to take a walk than my nasty old running shoes). But then I got annoyed by the amount of dirt I was tracking into the house, and bought myself a galvanized steel boot tray. But…just inside my front door is an HVAC return, so the boot tray had to go across the hall, and well…that was a good excuse to build a piece of furniture* to hold it – something that could fit just inside the door to make it easier to stow my clogs, and provide enough space underneath to allow for air flow.
Before all I built was tool chests, my M.O. was to find a Shaker piece that I like and modify it to suit my space, needs or both. So I went back to my old ways and spent a few days leafing through the various Shaker books in the Covington Mechanical Library.
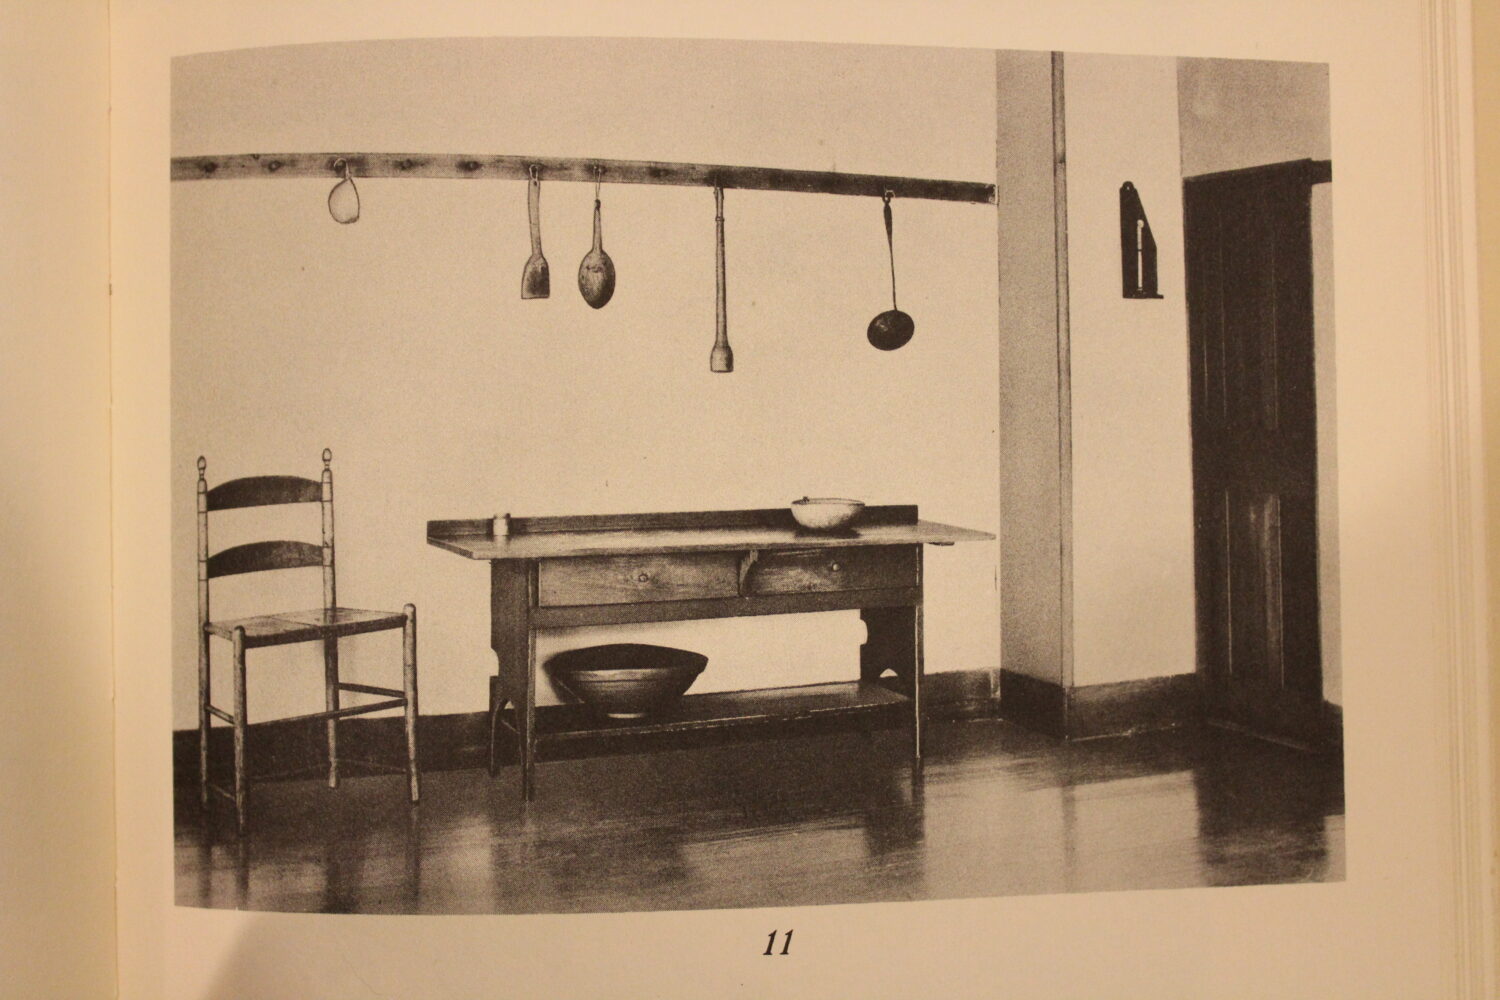
I had almost settled on a washstand when Will Myers dug up a photograph of a piece illustrated in “The Encyclopedia of Shaker Furniture” by Timothy D. Rieman and Jean M. Burks (Schiffer, 2003), and in volume 2 of Ejner Handberg’s “Shop Drawings of Shaker Furniture and Woodenware” (Berkshire Traveller, 1975) – a “Bake Room Table” that was in the North Family Dwelling House at Mount Lebanon. I liked the drawings, but didn’t fall in love with the form until I saw the (unique) table in a photo.
Will found this photo (by William F. Winter) in “Shaker Furniture: Craftsmanship American Communal Sect” by Edward Deming Andrews and Faith Andrews (Dover, 1950).
The shelf that cuts across the side cutouts was, according to Handberg, probably added later. And what are those round cutouts at the back? Maybe it fit around a pipe of some kind?
The original, at 66″ long and just more than 28″ high, looks lighter and more graceful than what I made, but I didn’t have the space to copy its size. And I chose to make the cutout at the feet a bit shorter so that I could fit the shelf (my entire reason for building the piece!) above the void. I also skipped the support at the front between the drawers; the overhang on my top wasn’t enough to require it. Still, it was the starting point I needed – that, and the size of the boot tray it was destined to hold.
I also changed the construction, with a 3/4″-thick solid dust board (or perhaps it should be called a drawer support, given there are no drawers below it?), dadoed below the drawers instead of the nailed-on 2-1/4″-wide rails front and back, and nailed-on runners (if Handberg is correct). That last decision was a tactical error; the wider board provides more protection against racking…so I ended up pocket screwing (go ahead – come at me; there are period pocket screws in plenty of Shaker and other period work) a rail behind the drawers and under the back of the shelf (likely overkill, as I am wont to do).
I don’t typically do “proper” drawings/models (notice the lack of dados). I want to see just enough of the form to be able to decide if the proportions work for me. (The height is 30″.)
And instead of classic Shaker wooden pulls, I used iron ring pulls, to match the iron nails that attach the top. As a result of its almost-square form, size and metal hardware, I think my result skews a bit Arts & Crafts.
It’s a simple build for a simple customer. Were I building this for a more discerning end user (i.e. one that is paying me), I’d probably use sliding dovetails to attach the dust board/drawer support (and possibly use a web frame instead of solid wood there) as well as the drawer divider, and inset the back rails in grooves. And my drawer dovetails would be better.
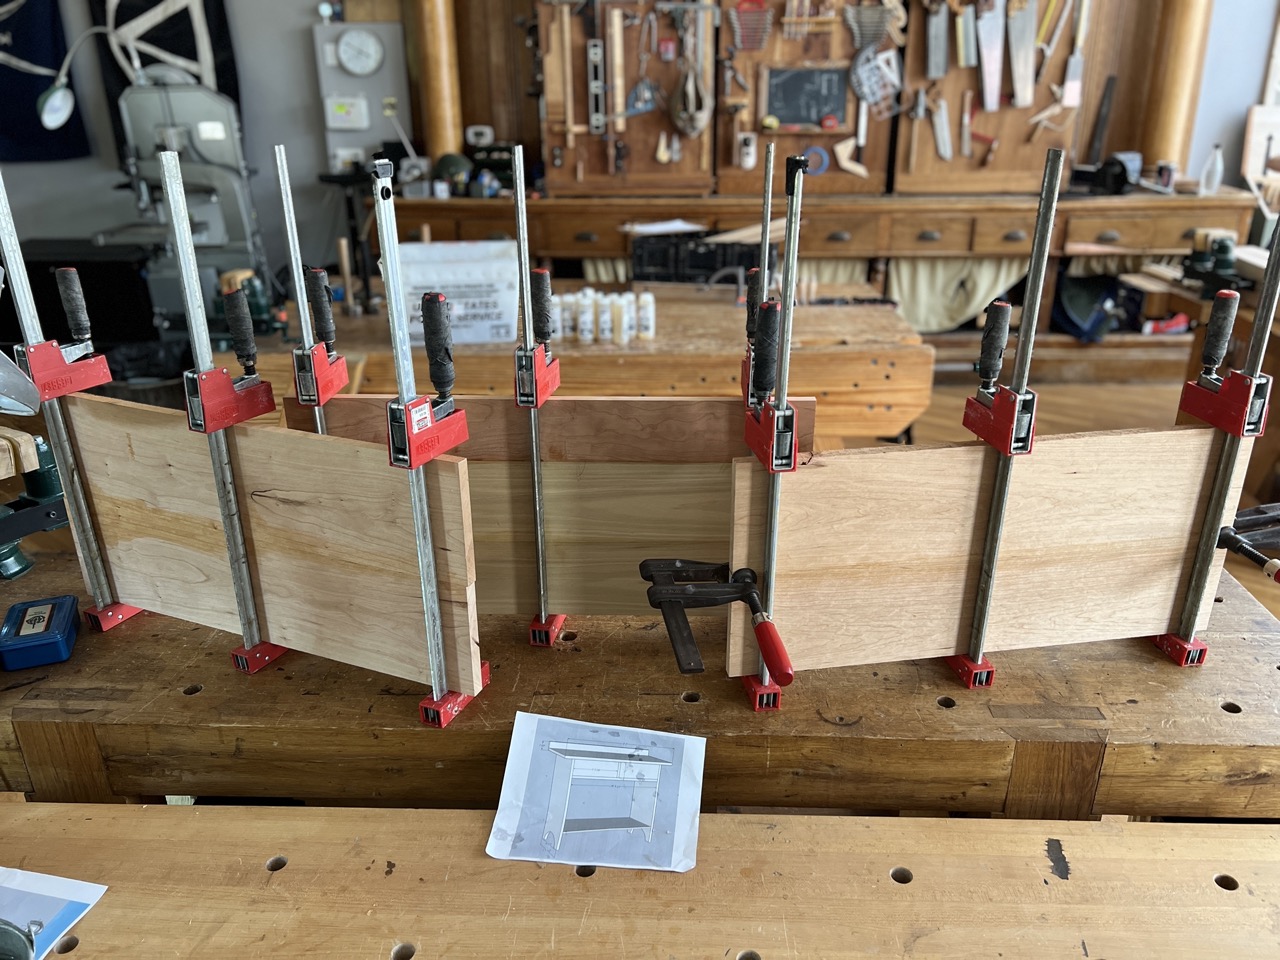
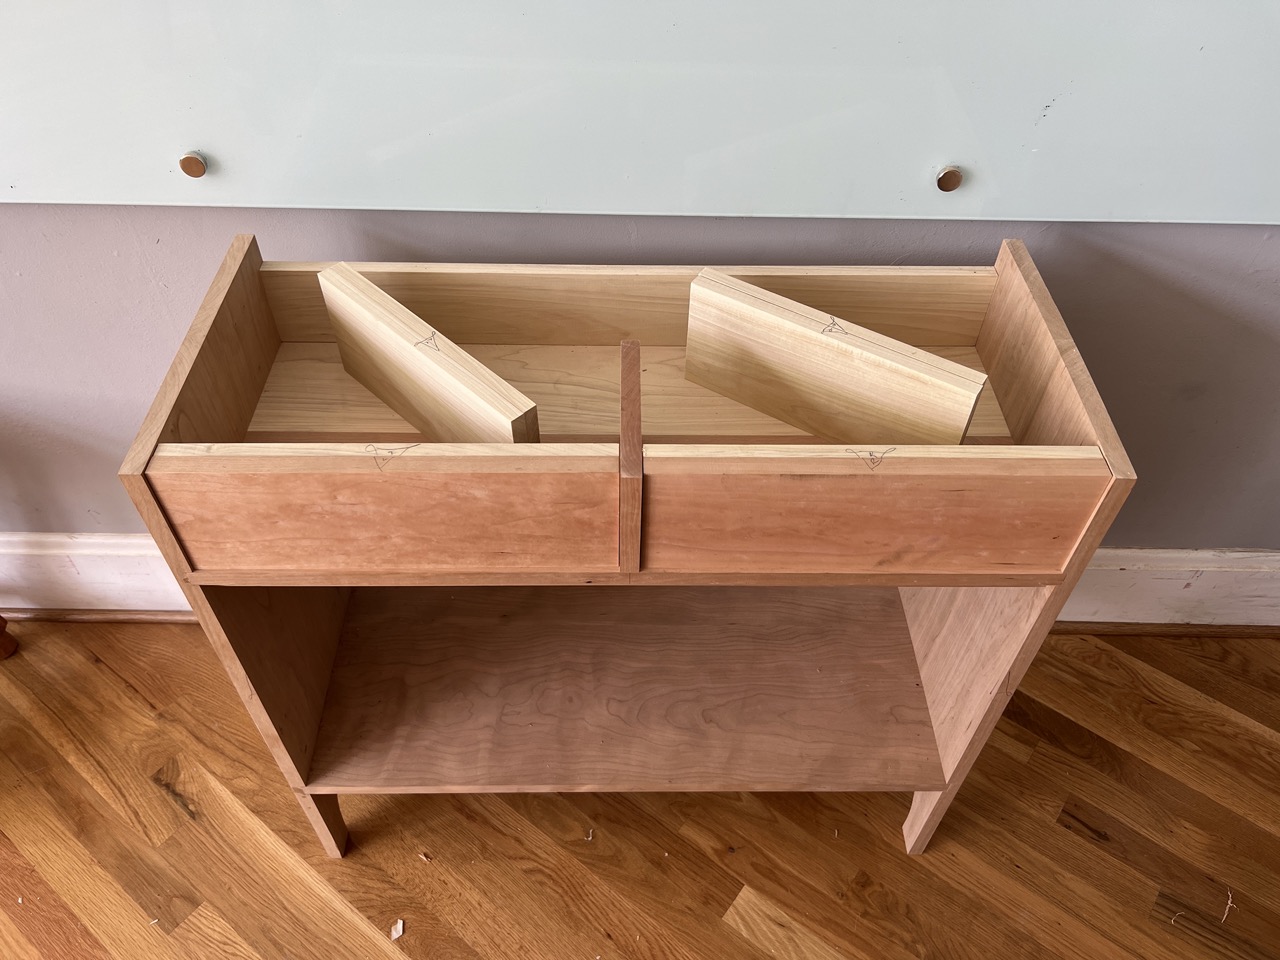
The Build I started by gluing up the side panels and drawer support. All the wood that shows is cherry, but I glued up the drawer support from a 5″-wide or so piece of cherry on the front, and poplar behind. (I guess it does show at the back to the cats, but they don’t care).
This side and drawer support are all approximately 3/4″-thick…but I don’t know for sure. Once it was flat and close enough to 3/4″, I called the pieces ready for glue.
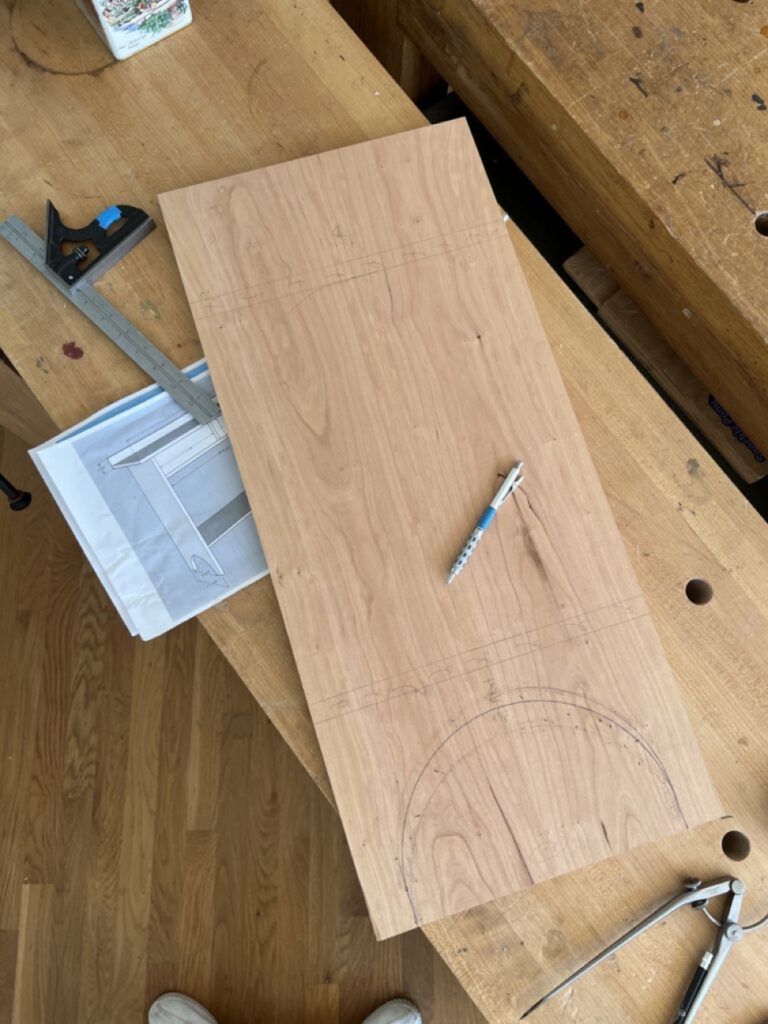
Then I marked out the dado locations, and played around with the curved cutouts at the bottom – and I ended up with curves that are slightly higher than what I drew. I cut them out on the band saw, then cleaned up the cuts with a combination of the spindle sander and sandpaper (#120 and #180) wrapped over a piece of the cutout (a sanding “fid”) to clean up the rough spindle-sander scratches.
The bottom curve is what I drew on the screen – it was too round. To my eye, it looks better with an 1-1/2″ or so of a straight line at the feet.
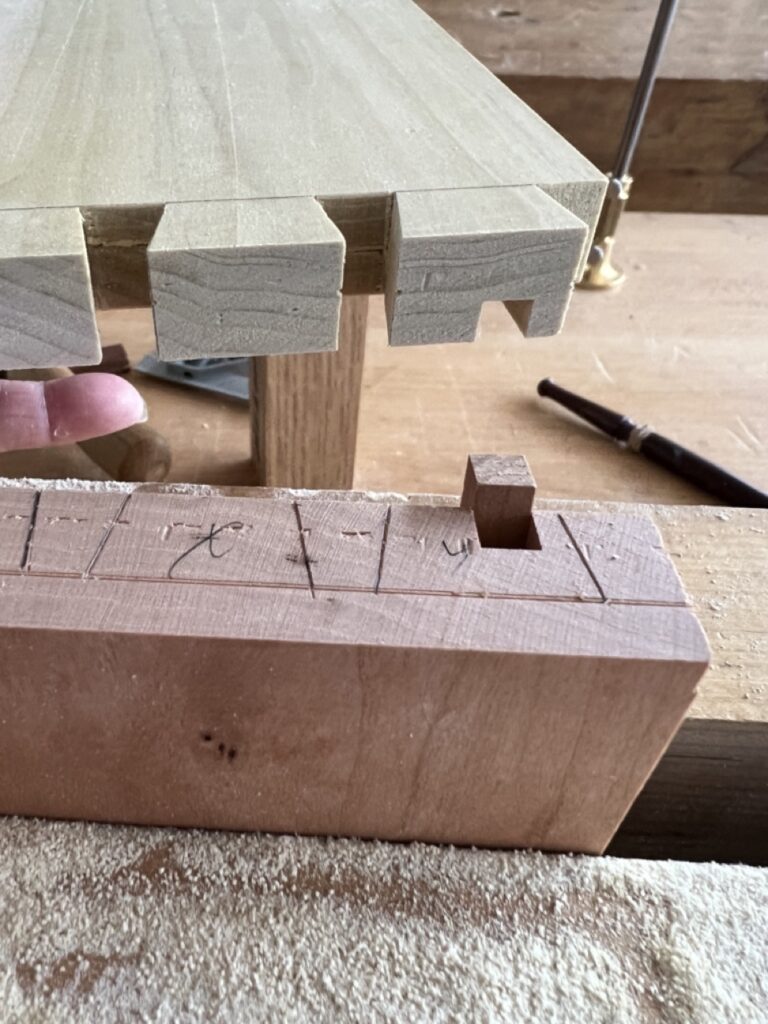
Then, I sawed the walls of the dados (which are a 1/4″ deep), knocked out most of the waste with a chisel and cleaned up the dado bottoms with a router plane (there’s a video here of this process, should you care to watch).
With one side arranged dados-up on the bench, smear a bit of glue in the dados, then put the shelf and support in place. Brush glue in the mating dados then put the other side in place on top. If the shelf and support are held tightly in well-fit dados and not moving around once they’re in their housings, it makes glue-up a lot easier to handle by yourself. If your fit is too loose, knock a wedge or two in on the underside to push out any gap and tighten things up. After the glue is dry, you can use a chisel so cut off the protruding end of a wedge (or, if it’s below the shelf at the bottom where it won’t show, just leave it).
Then, lift the assembly to get clamps across it front and back at the dado location and check it for square … then foolishly move the now-quite-heavy assembly off your bench and onto the floor by yourself because it will look better in a picture that way. Be sure to then complain that your back hurts.
If you do move it, check it again for square. If things aren’t quite square, a foot at one bottom corner and a bit pulling or pushing at the opposite top corner can easily shift things (usually). Once it’s square, walk away until the glue is completely dry.
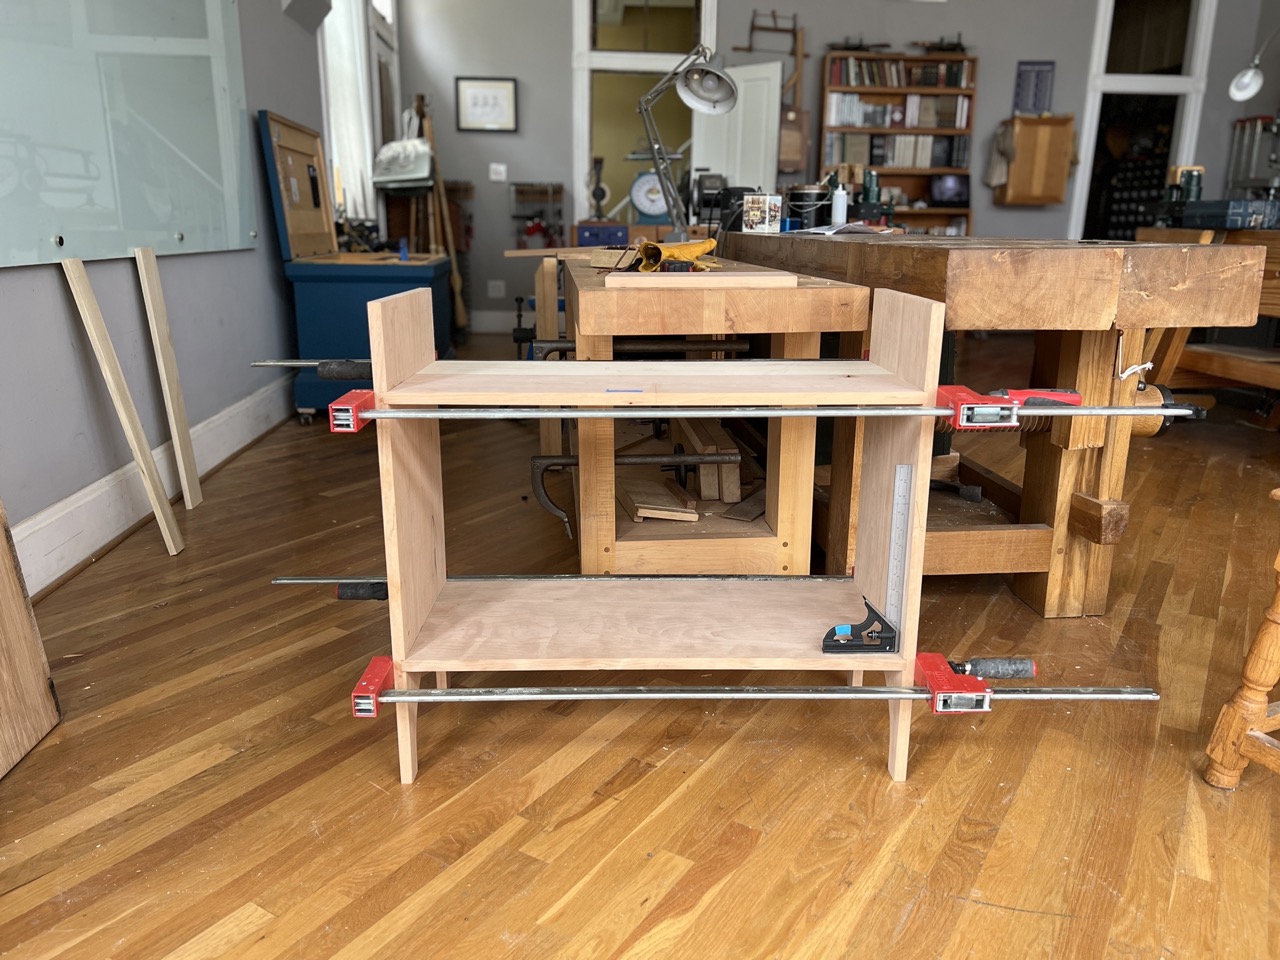
After I took the clamps off, I realized I was being boneheaded; the piece needed some wider horizontal members to keep it from racking. So, I pocket-screwed 3″-wide rails between the sides at the back above the drawer support (poplar) and below the shelf (cherry). Then, the right side developed a slight cup at the top front – and I was afraid it would get worse. So, I pocket-screwed a 3/4″-thick x 3″-wide piece of cherry about 1/2″ back under the front of the drawer support. Uh … it’ll create a nice shadow line.
Tangent: I should have known things would go at least a little bit wrong. Some of the cherry I used for this piece is cursed. I’d bought the 5/4 stuff in mid-2017, with plans to build a Stickley 808 server for a Popular Woodworking article. I was seduced by the wood’s curly grain and remarkably low price … even though I knew curly cherry could be a right royal pain in the butt at the best of times, and that the low price indicated it was already misbehaving. But … so pretty!
I commissioned reproduction hardware from John Switzer at Black Bear Forge, and stickered the wood to acclimate for a month or so in the PW shop. Then I surfaced it to 7/8″ and glued up my panels. It all looked fabulous. For about a week. Then all the panels developed a gentle cup. OK – I could flatten it again, and build the piece out of 3/4″ instead of 7/8″. It happened again. So I put the panels aside and decided to build the server out of white oak, just like the originals. I bought the oak … then I was no longer employed at PW.
Those cherry panels left PW with me, and they’ve been in the basement at Lost Art Press ever since. (John’s gorgeous hardware has been in my basement ever since.) Chris recently used one of the panels as a desktop across trestles. And after flattening it and putting heavy stuff atop it, that panel has remained flat; I thought the curse had been broken. Chris says he’s protected from it there is no joinery involved in his setup.
The curse was not broken – but the addition of a front rail seems to have at least overcome it. For now. But never forget that wood hates you.
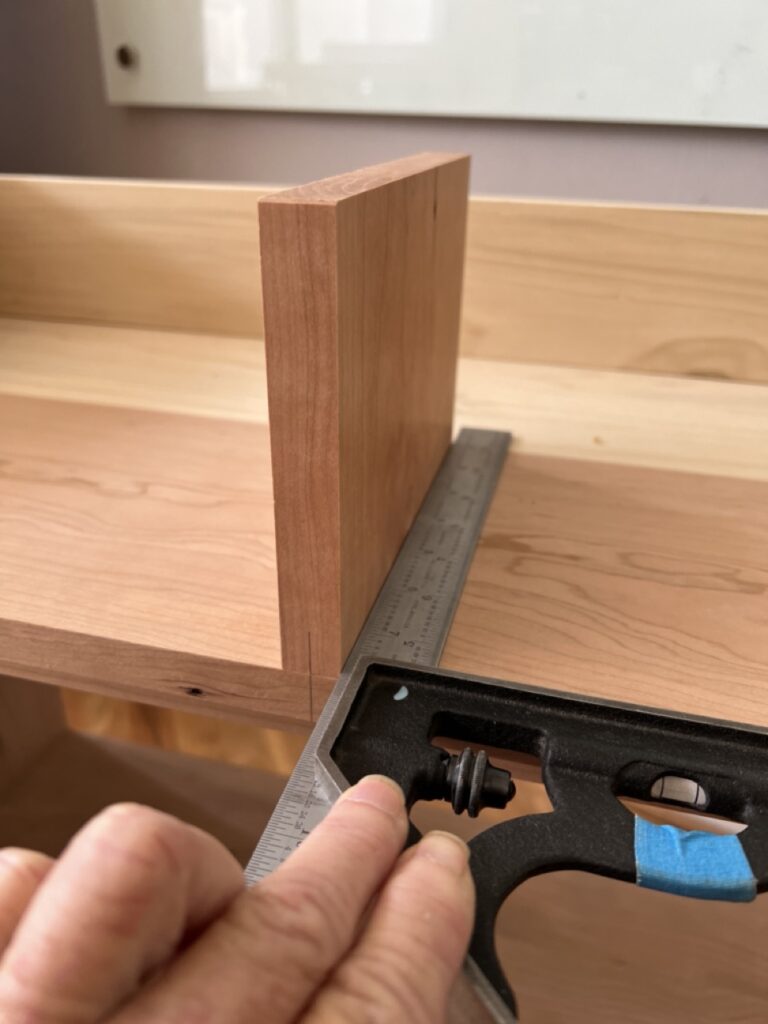
After the clamps were off, I marked centerlines on the drawer support and 5″-wide drawer divider, then clamped the divider firmly in place, and countersunk screws to hold it in place from underneath. It is simply butted tight to the underside of the top.
Use a square to align the divider to the front, then clamp it in place before drilling pilot holes for screws (I used three screws, though two would likely suffice).
I had a beautiful wide piece of cherry from C.R. Muterspaw for the top that I sure wish I could have used at full length. Not only was cutting it painful, but I think a longer overhang to either side added lightness – but rendered it not fit for purpose.
IWally liked the longer top, too – more real estate for treats.
I cut a small roundover on each end of the top’s back rail, sanded it, then glued it in place to the back of the top. I could have gotten away with leaving it off from a functional POV, but I wanted the extra overhang that offered for the front edge.
I then dithered over best to attach the top, and after considering the use of traditional buttons (which would require 1″ shorter drawer sides and backs to accommodate their attachment), had decided on figure-8 fasteners (which would require drawers sides and backs only 1/8′ or so narrower than the fronts), when Chris talked me into using blacksmith-made nails. I liked the way they looked on the cupboard in “American Peasant,” so…
The only great-looking nails we had (they were made by Mark Kelly, a blacksmith at Mt. Vernon) were 2-3/4″ long; I really should have used 2″ nails. It was a bit scary to drill so deeply into the cherry sides. But I got away with it… or so I thought for about 14 hours. I did a test drilling setup for tapered pilot holes, and after successful tests drilled my pilots and hammered the nails in place. They looked great. Whew! By the next morning, a small split developed at one location. But you can’t really see it without bending down and looking closely. And I’m not showing you.
The customer is dismayed but accepting of the flaws. (I blame the curse.)
Further adding to the flaws count: It turns out I didn’t get the divider perfectly centered; the left opening is 1/16″ smaller than the right. So I fit each drawer front and back to its opening with a No. 51 shooting plane. For those who don’t already know, a tightly fit drawer is key to smooth movement. These have maybe a 1/32″ reveal side to side. (And wood movement won’t be an issue, as that will be top to bottom, where I left about 1/16″.)
Another tangent: Years ago, I erred on the side of too loose, and those drawers bug the bejeezus out of me to this day. It’s this piece – the drawers, which have just under a 1/8″ reveal on both sides, rack every time I slide them in. Yes, I have some thin UHMW tape…no, I have not yet applied it even though I know it would likely solve the problem.
A smart person would have made the sides of a length to allow that back rail to serve as a drawer stop. I need to glue in 3/4″ thick blocks.
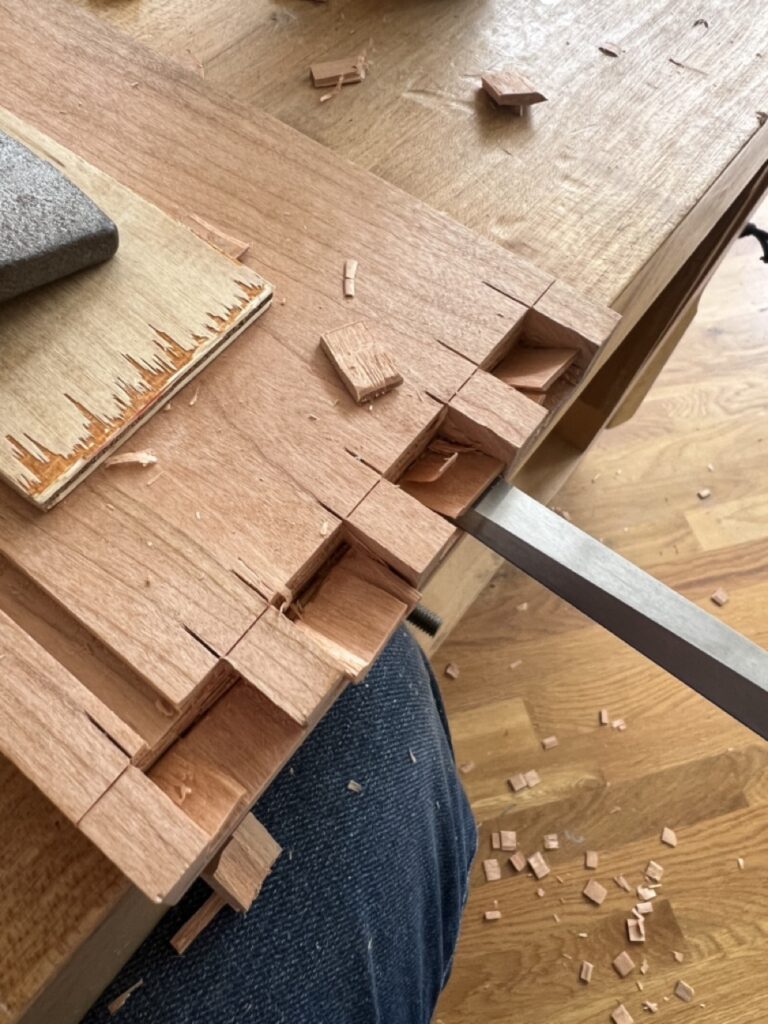
The drawers are half-blind dovetails at the front and through dovetails at the back (the tailboards are on the side, so that the drawers can’t be pulled apart in use). The only advice I have on cutting drawer dovetails is to run the grooves for the drawer bottoms before transferring the tails to the pin boards. That way, you can stick a shim of the right size in the grooves to help align the pieces (a trick I’m pretty sure I learned from a Chris Becksvoort article in Fine Woodworking).
The drawer back is 3/4″ narrower than the front, to allow the bottoms to slide in underneath it. The bottoms are 1/2″-thick paint-grade plywood, rabbetted to fit the 1/4″ wide x 1/4″ deep grooves. I cut a slot in the center back, then nailed it to the underside of the back to keep it from moving. (A more discerning client would get solid wood, sized to allow for expansion and contraction – but that’s not an issue with the plywood.)
I cut half-blinds so rarely that I can’t remember if I prefer to secure the board vertically in a twin-screw vise or flat on the bench to make the cuts. These were cut in the vise – but I think my overcuts end up longer – thereby making the waste in the corners slightly easier to remove – when I clamp it flat to the bench. (Yep, I know lots of folks pooh-pooh overcutting. “Whatev,” as the kids haven’t said for some time, now. There are plenty of period drawers that employ overcuts; I’m in good company.)
Regardless of how you make the saw cuts, chiseling out the waste is a matter of working back and forth between the baselines and creating square surfaces on both faces. And a fishtail chisel can help you get into the corners.
And to finish things off, instead of leaving blue-tape pulls in place for years, I decided on traditional iron ring pulls (32 mm). Simply drill a hole where desired to fit the staple legs, then bend each leg back with a pair of pliers, and hammer the staple legs in place. I decided to locate the pulls slightly above center. I taped off the location, marked the hole, then drilled it over a backer board so as to avoid blowout on the backside.
The finish is soft wax 2.0 – easy to make, safe to use and simple to re-apply if it proves necessary. You’ll find directions for making and using it in Chris’s latest book, “American Peasant” – a free PDF download (see pages 65-7).
Now that my new piece is at home and in use, I’m confident the Curse of the Curly Cherry is finally broken … as long as the drawers and tray stay in place, covering up that cursed wood. (But I remain leery of using the two panels still in our basement!)
I admit it’s a bit of shame to cover up that lovely curly cherry on the shelf…but it was the only way to break the curse.
And if I ever get to make this again, well, I’ve identified all the problems! If I call this one a prototype, maybe the mistakes won’t bother me as much. (They will. That is my curse.)
– Fitz
*aka a procrastination technique to put off building a pantry cabinet or the bookcase for the bottom of my staircase.