Olivia and I, checking out the marvelous construction of one of the interactive pages in “The Dream of the Joiner.”
Last summer, a mysterious package arrived for me in the mail. It was from Suzanne Ellison, whom you know better as Suzo, our indefatigable researcher, aka The Saucy Indexer. Inside was an incredible handmade book, written and illustrated by Suzo, “The Dream of the Joiner.” And it was furoshiki-wrapped (see below). Oh, that I had a quarter of Suzo’s imagination – and a scintilla of her amazing ability to construct pop-up books (for lack of a better descriptor for the interactivity…though “pop-up book” seems insufficient for this handmade delight.). Suzo is the best! And I meant to share this long before now. But today, it was quiet enough in the shop that I could record it.
I felt bad about opening this gorgeous package.
With apologies for my attempt at character voices (I fear I forgot which voice went with which character from time to time) I give you “The Dream of the Joiner” in a video reading (and do read the left-hand pages, with information about the illustrations – I did not include that text, because it’s not part of the narrative). The folding/moving/turning parts of this book are even more impressive in person, but I hope this will suffice.
Thank you again, Suzanne, for this amazing gift (which lives on a shelf well out of reach of the cats)!
About 2012, Ty Black and I developed some leather pockets for the inside of tool chests that would hold important stuff. One held a block plane. The other held pencils, pens, knives, 6” rule and other skinny things that could get lost in a tool chest.
We never intended to make them for sale, but after more than a decade of using them in our shop, I realized that other woodworkers would find them as useful as we do.
We enlisted our clothing designer, Tom Bonamici, to create canvas versions. And we had Sew Valley (here in Cincinnati) stitch them for us. They are made of the same great canvas we use for our waist apron and tool roll. (So you can be all matchy-matchy.)
We have just received our first shipment, and they are available in our store. They are sold individually, or as a set with a modest discount.
The following is excerpted from “The Essential Woodworker,” by Robert Wearing. In our opinion, “The Essential Woodworker” is one of the best books on hand-tool usage written in the post-Charles Hayward era. Wearing was classically trained in England as a woodworker and embraced both power and hand tools in his shop and in his teaching. The book is filled with more than 500 hand-drawn illustrations by Wearing that explain every operation in a hand-tool shop. His illustrations are properly drafted, drawn in perspective and masterfully clear.
Wood is porous and, depending on the atmosphere, will absorb or give out moisture causing it to expand or contract (Fig 215). This cannot be prevented, and allowance must be made for this movement in the construction of the table top. The amount of movement in length is negligible.
Fig 215b. Making shrinkage buttons. (Top) Traditional method using short-grain offcuts. (Bottom) Using long-grain offcuts.
If the top is screwed directly to the frame it will either split due to contraction or bow due to expansion. This is the most common cause of split table tops. The problem is overcome using shrinkage buttons to secure the top. The mortices for these were discussed on p. 76. Buttons on the long sides must have room to move in and out so their mortices need to be only slightly longer than the buttons. Buttons on the short sides or ends need room to move sideways in the mortices which must therefore be longer.
To make the shrinkage buttons there are two possible methods (Fig 215b). The traditional method is to use short grain offcuts. Produce to thickness and remove a rebate. Then saw off the button. Repeat the process as required.
Fig 216.
Using the more common long grain offcuts is the second method. Produce to width and thickness, bevel or round corners, saw out a rebate and then saw off the button.
Fig 217.
Having made the required number of buttons, lay the table top flat and cramp the frame onto it. Check that the overlap on all four sides is correct. Make an improvised depth gauge and carefully drill into the table top.
Fig 218. Metallic buttons that allow wood movement.
The thickness of the buttons should be such that, when withdrawn sharply from the mortice, they will snap down against the table top. In other words, the length X on the button must be very slightly less than the length Y on the rail in order to obtain the vice-like grip (Fig 219).
The following post is from our friend Mattias Hallin, who has been using linseed oil paint for a lot longer than have we – his approach is different than ours. (For starters, he’s willing to put in a significant amount of time whereas I, a pushy American, haven’t his patience! And OK…I can’t leave things to dry for as long as necessary in our shop for his approach. But his lovely results are undeniable.)
As regular readers of this blog’s ‘comments’ section may already know, I am a great fan and proponent of linseed oil paint as a furniture finish. (I also adore it as a house paint, both exterior and interior, and as a paint in general, but those applications are well beyond both the scope of this blog post and my personal practical experience.)
I won’t come as a surprise, then, that I have followed Chris’s and Megan’s work with and writing on these paints with great interest, not least as I have gone about painting with them myself in slightly different ways. This blog post follows from discussions I have had with Chris and Megan about those differences, and is a presentation of two particular techniques – glaze and three-coat paint respectively – that I have experimented with and used successfully (at least in the sense of to my own full satisfaction) on projects.
For those who don’t know me, I should perhaps add that I’m Swedish, but live in Belgium; hence the trans-oceanic qualifier to the title.
The Paints & Other Materials
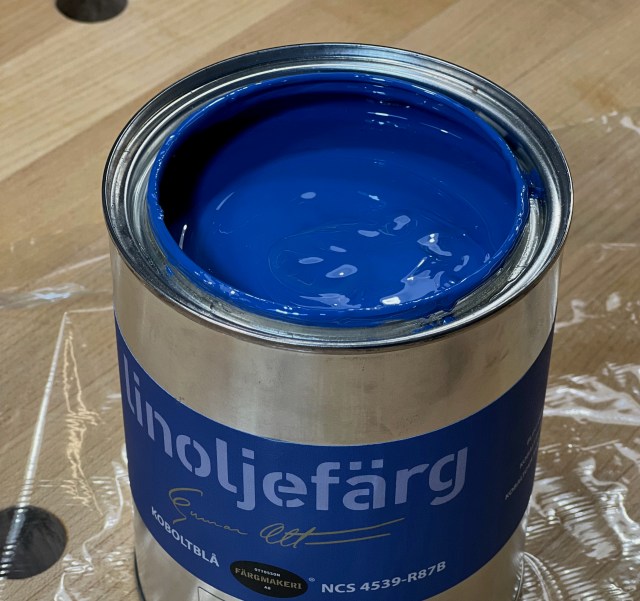
A range of Ottosson linseed oil products. From left to right: raw linseed oil, boiled linseed oil and glaze oil; sun-oxidized linseed oil (small bottle, half-hidden); a selection of linseed oil paints in cans of different size plus two tubes of artists’ oil paints; a small tin of balsamic turpentine; a tube of “Rubinol” linseed oil putty; linseed oil soap, liquid and solid; and linseed oil wax. By the way, the benchtop is finished with two coats of Ottosson boiled linseed oil.
To date, I have only ever worked with linseed oils, linseed oil paints and related products from the small company Ottosson Färgmakeri AB in Genarp, Sweden. This is not because I know or believe its products to be superior to those of its competitors, such as Allbäck, Brouns & Co, Gysinge, Heron or Selder (and I’m sure there are yet other brands that I’m not even aware of). I know no such thing. It is quite simply because I tried Ottosson first, and was happy enough that I never looked further. In other words, while what follows is indeed an endorsement on my part of the Ottosson range of products, this is emphatically not to the detriment of any of the others. They may be better, equal or worse, depending on your values for judging such things. But me? I’ve no idea, because I haven’t tried them. One day I may attempt to find out my true druthers by doing some comparative testing. Should such things matter to you, get some samples and get testing! In the meantime, I’d say the paint you can get is always better than the one you can’t, so if you are linseed oil paint curious, get whichever you can and try it for yourself!
Should you specifically want to get hold of some Ottosson stuff, though, in the U.S. you can find it at Solvent-Free Paint in upstate New York, Earth & Flax in Pennsylvania, and Atlas Preservation in Connecticut. If you are elsewhere, there’s a retailer map available at the Ottosson website.
And just to be totally clear, above-board and all LAP about it, I do of course not have any affiliation with Ottosson Färgmakeri AB (or any other company mentioned for that matter), other than as contented customer, and have paid full retail price for all products I’m about to mention.
For brushes, I have mostly used natural (pig) bristle brushes from another small Swedish company, Gnesta Penseln. Their Allround Brush, No. 5530, is my definite favorite, but I have also been pleased enough with their flat No. 609. For some glaze paint work I have also tried and had good results with a synthetic artist’s varnish brush.
From top to bottom: a Gnesta Penseln Flat No. 609, a Peacock No. 1240 synthetic varnish brush and a Gnesta Penseln Allround No. 5530.
To clean my brushes, I use liquid linseed oil soap and water. After painting, I will first remove as much paint as possible, first on some paper or a piece scrap, then onto a rag of some kind. I will then move to the sink, add a good dollop of soap to the bristles, work it in with the fingers to a good lather then rinse under running cold water. This cycle (dollop of soap/lather/rinse) is repeated until the lather shows no trace of color, and the rinse water runs clear. Depending on the size of the brush and for how long I had been painting, it will take me from a couple up to maybe 10 minutes to get the brush fully clean, but this video should give a better idea of how difficult it is (not):
I have not yet tried the alternative of storing my brushes in raw linseed oil without any cleaning, but am sure that this would work, too. I have simply found the task of cleaning them simple enough that I’m fine with the five minutes or so of extra effort at the end of a session.
Finally, while I’m sure all readers of this blog already know this, let’s stay on the safe side, and mention again that any rags or similar with linseed oil products on them must never, ever be left to dry balled-up or just thrown in the trash, as the oxidation that occurs when the oil or paint dries generates enough heat that they can spontaneously combust!
Rags can be laid out flat to dry, after which they will be safe to dispose of; they can be burned if local regulations permit; or they can be drenched in water. For my part, I will usually do what I show towards the end of the above video: hold them under the tap until they’re soaking wet, then tie them up like that in the nitrile gloves I like to wear when painting (‘cause I’m a certified, genuine, bona fide Fancy Lad™, who wants no paint stains on his dainty wee fingers). This keeps them both wet and deprived of oxygen, in which state they can be safely thrown away.
Glaze Paint Technique
I’m not entirely sure what this technique should properly be called in English. The Swedish word is lasyr, from the German Lasur, and it is etymologically related to words like azure and lapis lazuli. It is in effect to paint with transparent or semi-transparent paint, so that the underlying wood or other surface (such as a previous layer of paint – it is also a traditional fine art technique) still shines through. However, both various dictionaries and several paint makers refer to it as glaze or glaze paint, so that is what I will call it here. [Editor’s note: I think “glaze” is correct.]
As a wood finish, I believe this technique is often used to make one wood look more like another in color, or as part of grain painting. At least I know that Ottosson sell pots of paint in the correct size and intended for mixing with glaze oil that have names such as “walnut”, “teak”, “mahogany”, “oak”, “old wood” and “driftwood.”
For my part, however, I have been more interested in glaze paint as a technique to bring vibrant but transparent color to a project.
My first-ever attempt came about as part of my workbench build. The bench itself, in hard maple, had already been finished with two coats of boiled linseed oil. Having spent upwards of 800 hours on building it mostly by hand, my patience was beginning to wear just a little thin, and I wanted to be done and get woodworking. So instead of dimensioning the lumber for the shelf by hand from rough-sawn maple stock, as I had done for the rest of the build, I ordered a couple of S4S boards from my local lumberyard. They mostly sell construction lumber, and don’t carry hard maple, but do a usually nice enough sideline in ash. What they gave me this time was excellent quality, but to my mind perhaps not the most attractive grain pattern, so I hit upon the idea to liven up the bench with some color. which in turn made me wonder how a glaze paint might look?!
I read up a bit on glaze paint products, and, as we were going to Sweden anyway, decided to look in at Ottosson in Genarp. (They’re located about 12 miles from my old hometown of Lund, although their first production site was actually across the street from where I grew up!) My wife and I ended up spending a good couple of hours there, talking products, options and techniques, and came away with quite a shopping bag.
After a sufficient number of test pieces with which I will not bore you, I settled on a glaze paint mixed 50/50 from Ottosson glaze oil and the company’s Light English Red linseed oil paint. The glaze oil is a ready-made mix of boiled linseed oil, castor oil, lemon oil and odorless mineral spirits and, judging from the Safety Data Sheet, probably also a small amount of cobalt-zirconium driers (this particular product is thus not VOC-free, so not in the buck-nekkid application category).
I first gave the boards a base coat of boiled linseed oil and left that to dry for 24 hours.
(The Ottosson boiled linseed oil, by the way, is a traditional one, that is to say a purified linseed oil that has been pre-polymerised by heating for better drying properties but with no metallic driers added.)
After the base coat had dried, I applied a first coat of the paint-and-glaze oil mix in a thin but even coat and left it to soak into the wood for about half an hour. I then wiped off all the excess with a lint-free rag, a rather depressing procedure as the initial rich and vibrant color almost completely disappeared.
The second coat was applied in the same manner: brush on, wipe off, leave for 12 hours, but after application of the third coat, I gave in to temptation (ooh! pretty!) and just left it as it had been brushed on, with no subsequent wiping. Not my best idea. I did get away with it, but it took close to a week before the boards were dry enough to put in place, and even then, they remained ever so slightly sticky for a couple of months.
Application of the first paint-and-glaze oil mix. Ooh!
The same boards after initial coat excess had been wiped off. Ouch.
Finally dry enough to put in place. Still just a little sticky, though.
At the same time as the shelving boards, I also glaze-painted the bench’s swing-away seat, this time mixing Ottosson glaze oil with an Ottosson artist’s oil paint from a tube, in ultra-marine. I found no significant difference between mixing the oil with linseed oil paint or with linseed oil artist’s paint, except that it was easier to figure out the proportions with the standard paint as it was a liquid rather than a paste. In this instance it didn’t matter, but for multiple batches I think liquid paint will make for easier repeatability.
Once more I was tempted by the initial ooh! pretty! shine to skip the wiping. This time, though, it didn’t work. While I found the rich ultra-marine color absolutely lovely as such, it became impossible to brush out all air bubbles from the surface. Worse yet, it simple refused to cure, staying sticky seemingly forever, and it eventually began to slightly wrinkle and also to look dull.
There was nothing for it but to plane away the glaze paint, start over and let the color depth build gradually. After five cycles of brush on/wipe off, a final, very thin and unwiped coat of pure glaze oil went on top for some extra gloss, and I called the job done.
I’ve since learned on subsequent projects (as on the whisky cabinet shown below) that the way to go to build the depth of color is indeed a base coat of boiled linseed oil left to dry for 24 hours followed by as many thin brush coats as needed, each wiped off after about 30 minutes then left to dry for 12 hours. The number of coats will depend on when one is happy with the result. For extra gloss, a final very thin coat of pure glaze oil can be added.
The seat with the glaze paint laid on way too thick (see the bubbles along the upper edge) that just refused to cure.
Starting over. It is a nice blue color, though!
The slate almost clean again.
First new coat brushed on thinly …
… and wiped off again 30 minutes later! The rag was disposed of safely.
Slowly building to more depth, one coat at a time. I don’t remember how many coats there are in this particular photo, but at a guess there might be three.
And the final result! Not quite as vivid and strong a color as the first attempt, but it cured quickly and has stayed just like this ever since. And it matches my favorite coffee mug.
Three-coat Paint
This is a rather more straightforward and much less finicky technique that consists of near enough what it sounds like – does was it says on the tin of paint, as it were. The aim is a fully painted result, with some hints of the wood grain still showing but not all that much. For my part, I also aim for that paint to initially look just as new as it is, with neither a matte nor a glossy sheen. So far, I have not found any need to add anything like wax or otherwise try to modify the final appearance of the paint.
This is of course a pure matter of taste: I prefer patination to happen naturally, and with these linseed oil paint finishes, I rather suspect I may not live long enough to see them at their absolute best. (Not that I necessarily expect any furniture that I build to last beyond my looking after it, but on the off chance that it does, I try to build it well enough that it might, and choose a finish with at least the potential to wear and age with grace and beauty.)
The necessary ingredients for the three-coat paint technique are just linseed oil paint and boiled linseed oil. It could also include turpentine, which is supposed to make the paint easier to apply smoothly and shorten drying times, but so far, I have refrained from adding any. Turpentine may be a natural product, but it is still a solvent that comes with health risks, and to date I have done all of my painting indoors. My workshop is reasonably well-ventilated, but still indoors. Some nice, sunny summer’s day, when I can work outdoors, I intend to do some tests that include turpentine, but until then I prefer not to include it.
If the piece to be painted is from pine or some other resinous wood, and has knots or resinous pockets, these must first be sealed with two coats of shellac. Otherwise, the resin will sooner or later bleed through and cause local discoloration of the paint.
The first coat proper consists of one third linseed oil paint mixed very thoroughly (stirring! yay! Or do like Megan and get friendly with shops that have paint mixers) with two-thirds purified boiled linseed oil (no driers). This is applied as thin as possible with a brush, after which every part is dry-tipped with another, clean brush to level out any brush marks and to remove any small accumulations at the bottom of the vertical surfaces. (If there are substantial pools of paint at the bottom of the vertical surfaces after one has finished painting the piece, that is a sure sign that the paint went on too thick. What I’m talking about tipping off here are mere smidgens of paint brought down by gravity to the bottom of a vertical surface.)
It is also important to know that linseed oil paint has close to zero self-leveling properties. Any errant brush marks in the fresh paint will still be there when it has dried. It is thus key to work on a consistent (direction, evenness, etc.) final set of brush strokes, which is why tipping off comes in so handy. On the other hand, the long open time of the paint helps – there’s plenty of time to be thorough about it.
If this first, thinned-with-oil coat goes on bare wood, it is likely to be dry to the touch within less than 24 hours, and depending on circumstances (temperature, humidity and – not least – ventilation) might be ready for a second coat in 48 hours. Personally, I try to wait for another 24 hours, as I sand very lightly between coats, and for that want the previous coat to be sufficiently cured.
Strictly speaking it is not necessary to sand, but I have found the final surface becomes nicer and smoother to the touch if I remove any minute nibs and any dust that might have settled in the still-wet paint of previous coats. I have a paint stall in the least-dusty part of the workshop, so dust is not a massive issue for me, but the place is not clean to operation theater levels, either.
I usually sand very lightly with a #500-grit Mirka Abranet disk, either wrapped around a block of cork or just held in my hand, but before the first coat is sanded, I will go over the piece and apply some “Rubinol” linseed oil putty to any minor imperfections. After sanding, I carefully remove all loose dust with a vacuum cleaner followed by a damp, clean rag, and the patches where putty was applied are given a very light touch-up with the initial base coat oil/paint mix to get the whole piece back to an even base color. These patches are then left to dry for maybe 12 hours or so, after which the piece is ready for the second coat.
Both the second and third coats are of full-strength, undiluted linseed oil paint, straight out of the can, and applied as thinly as possible but with full coverage. The paint goes a very long way, though, as with no solvents there is no evaporation either: what goes on, stays on. A good natural bristle brush will hold a lot of paint, too, so it shouldn’t be dipped deep at all. A small dollop of paint is taken up at the end of the brush and deposited in a good spot on the surface, from where it is distributed as far as it will go with strong strokes and stipples in varying directions. Before moving on, the freshly painted surface is equalized with the same brush, while at the end of the session everything is tipped off again with a clean brush as already mentioned. What you see is what you get, so it should look as good as you can make it before leaving it to cure
I leave the second coat to dry for 48 to 72 hours, depending on circumstances, and again sand ever so lightly with the #500-grit Abranet.
The third and final coat I will try to leave alone to dry for a full week before moving or touching anything.
If it hasn’t become clear already, the three-coat paint technique is not for those in a hurry to be done. Not that it is inefficient as such – it takes about as long to apply as any paint, and you don’t have to stand there for a whole week actively watching it dry. (You can certainly go away for a coffee at least three times a day with no adverse effects on the final result.) In a production environment, where a piece has to go out the door before any money comes in, these long waiting times could be an issue. For the hobbyist, much less so, unless a slow-drying piece puts the whole workshop in lockdown for reasons of space or suchlike.
While the piece should be dry enough to handle and use after no more than a week on the outside, in my experience it will still be several months before the paint is really cured all the way through. The way I test this is by closing my hand over a part of the piece. If in a short while the paint feels ever so slightly “clammy” under my hand, I know it is still curing. When it no longer feels that way, I consider it well and truly set.
I thus aim for a fully painted effect, with an even, satin sort of sheen. If one wants a glossier surface, a certain amount of sun-oxidised linseed oil can be added to the paint for the final coat. For such a mix, Ottosson recommends a 10- to 15-percent by volume oil-to-paint ratio. For my part, I have yet to give this a try, so I cannot say what difference it might make.
Below follows a series of photos from the various stages of painting two pieces – a stick chair and a bookcase – with the three-coat technique described above.
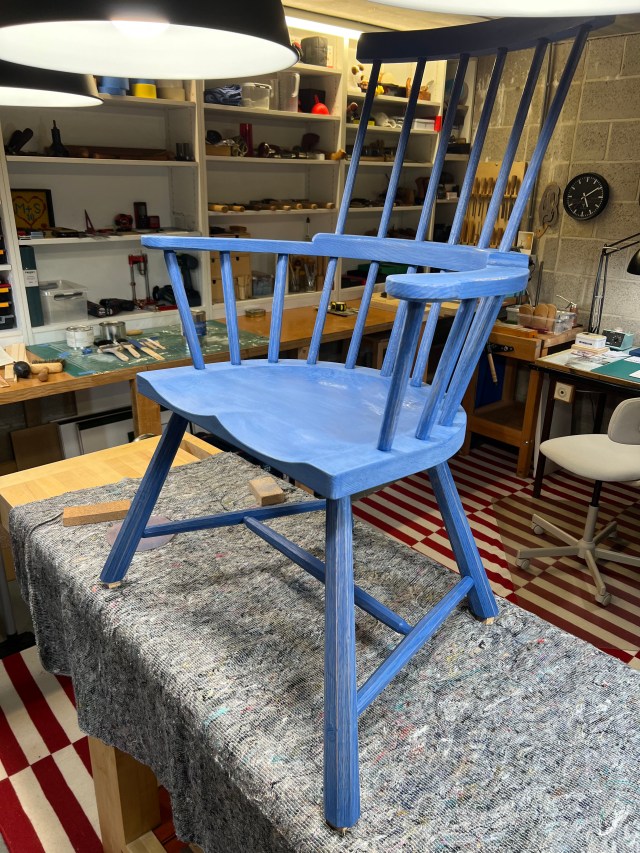
The first coat of one-third paint and two-thirds boiled linseed oil applied to a stick chair. The color is Ottosson Cobalt Blue.
The first coat has dried …
… and linseed oil putty has been applied to various minor imperfections.
The same first coat after some light sanding.
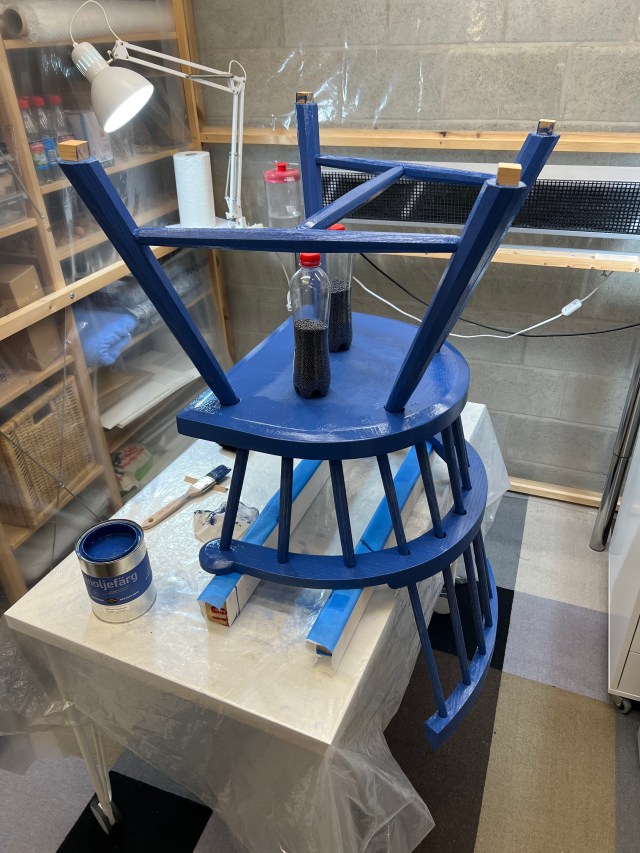
The second coat is applied undiluted and straight out of the tin. (The bottles, used here as counterweights, contain lead shot I use for ballast in model boats. I removed them before recoating the chair seat bottom.)
The second coat after drying and light sanding.
The freshly applied third coat just after final tipping off. Resist the urge to touch the paint unless you wish to sign the piece with a fingerprint.
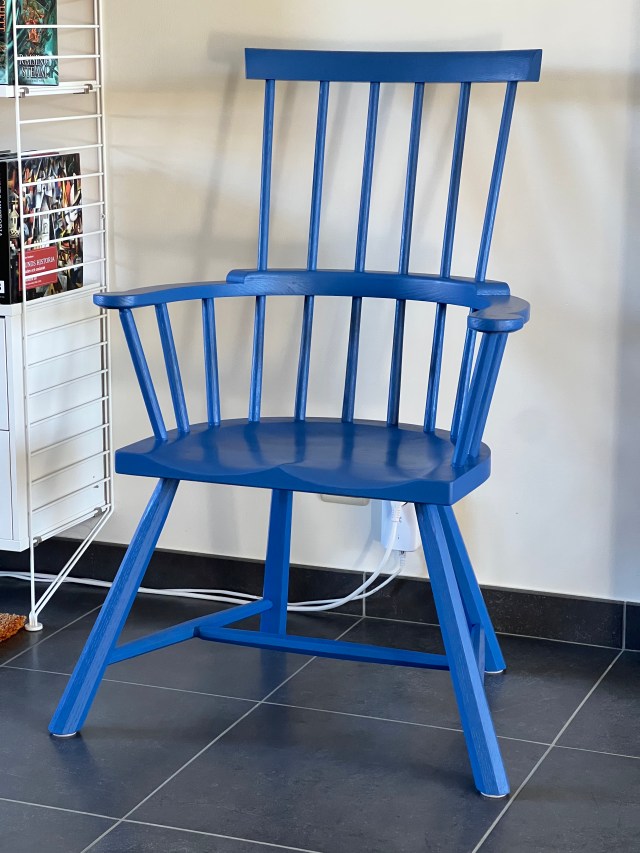
The finished paint job about two weeks later.
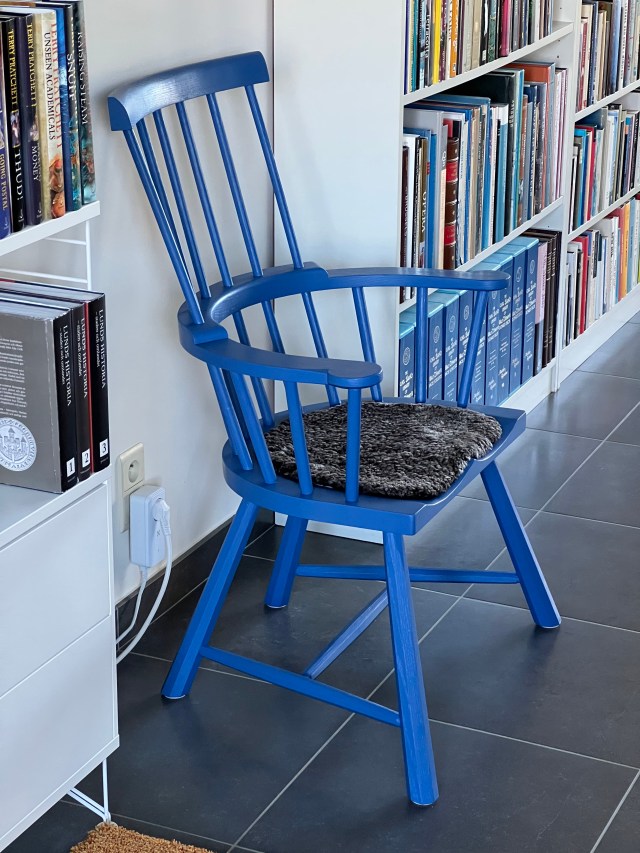
The same chair from another angle, with a sheepskin pad added to the seat.
Pre-assembly painting of bookcase rail edges. The one on the left has just had the second coat applied, the one on the right is still wearing only the first oil-diluted coat, lightly sanded. Note the brush in the background, and how only the very tip has been dipped in the paint. The color is Ottosson Light English Red.
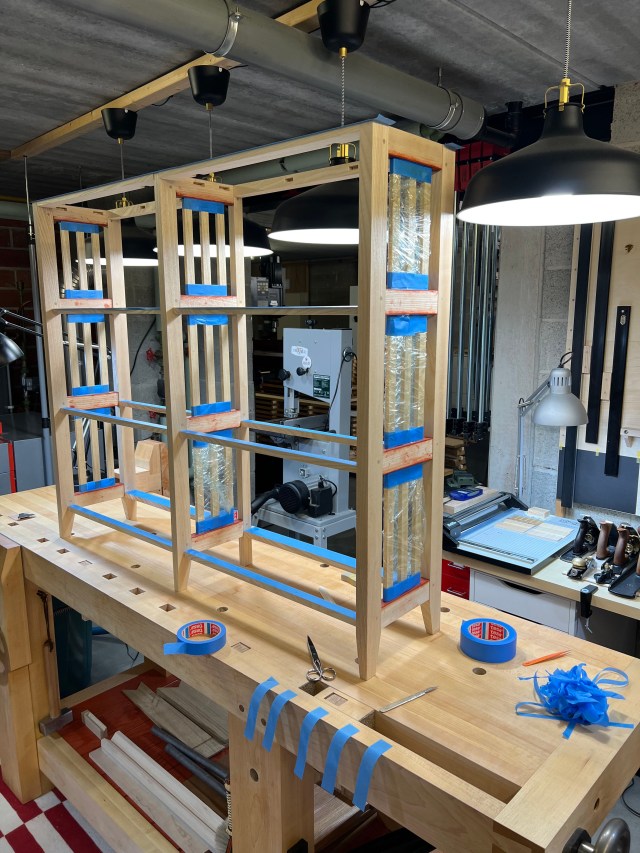
Glue-up of a gable with rails painted on the edges. The reason for the pre-assembly painting was that the slats were going to remain natural with just a soap finish …
… and as linseed oil paint is not great for precision painting, careful and generous masking of those slats was necessary.
First coat of diluted paint applied to the whole carcase …
… followed by putty …
… to improve on minor imperfections …
… then lightly touched up with small dabs of the oil/paint mix.
The second coat being applied …
… followed by light sanding …
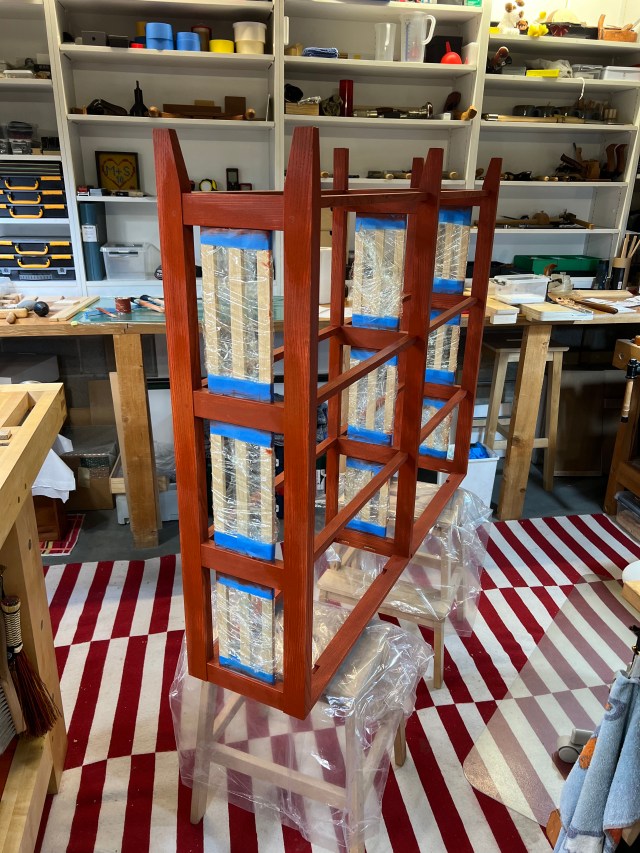
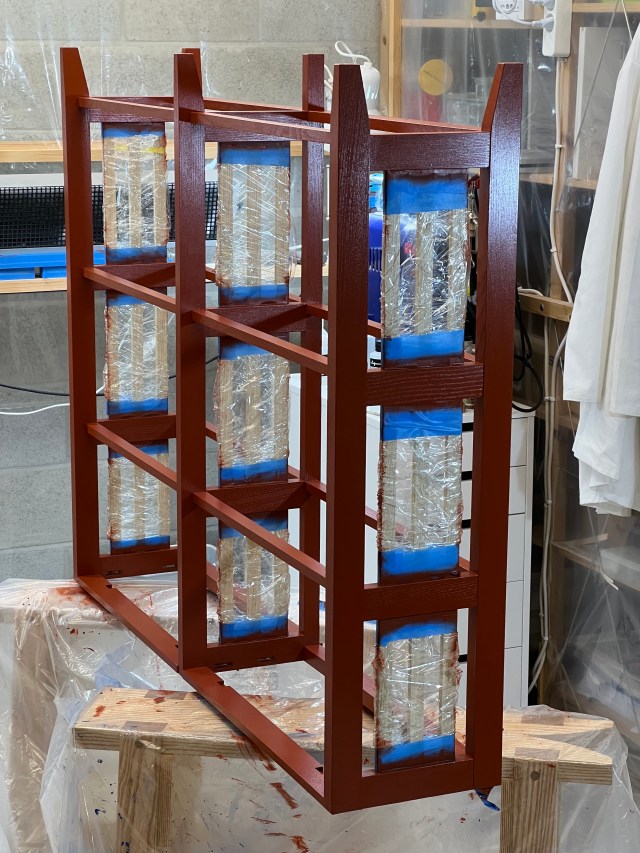
… then by the third and final coat. Photo taken just after the last tipping off.
This was the result when the masking tape came off a couple of weeks later. I had strategically applied the final coat just before leaving for the U.S. and Handworks, so was never tempted to handle it too early. This photo gives a pretty good idea of the degree of coverage and sheen that I aim for with a three-coat paint job.
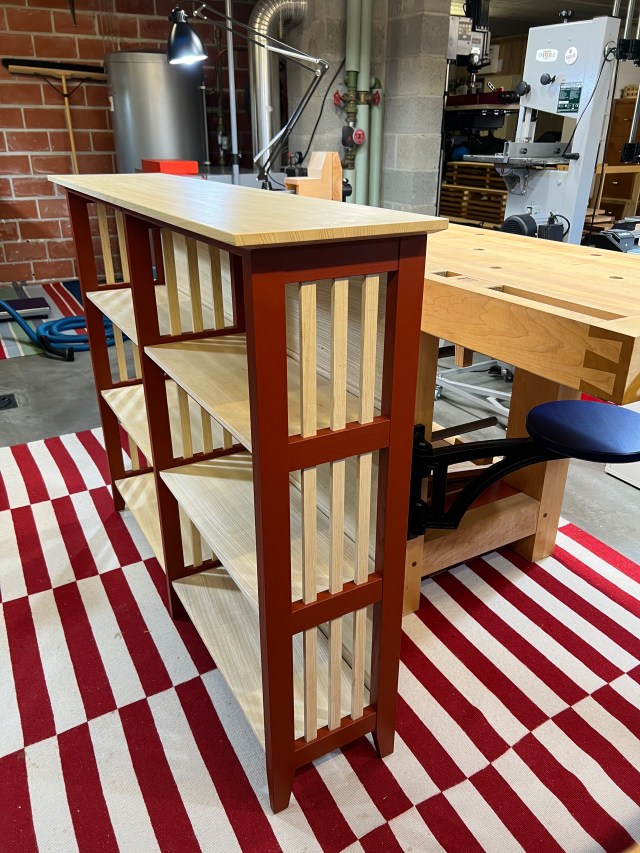
The finished bookcase. It is entirely made of ash, both the painted and unpainted parts. Everything not painted has been finished with soap (except for the rear of the back panel, which was left with no finish at all).
Mixing the Two
Finally, below are a few photos of a project on which I used both techniques. This is a whisky cabinet, designed by Geoffrey Fowler, that I (mostly) built during a post-pandemic get-together in London, also organized by Geoffrey, of a bunch of the regulars on Bench.Talk.101 (see Quercus Magazine #10 for more on that event). The wood is ash, while the glaze paint was made up with the same linseed oil paint used for the three-coat part: Ottosson’s Ardbeg Green.
Given the number of coats needed, the glaze-painting was by necessity a slow and somewhat painstaking process. It was made even more so by the fact that the glaze oil is quite thin, so not particularly suited to vertical surfaces. When glaze painting the cabinet, I found the safest way to a good result was to do only horizontal surfaces, so one side at a time. With four coats per side, six sides to the carcase and two to the door plus some edges that had to be glaze-painted before assembly, and with 12 hours between each coat, it did take me the better part of two weeks to get the job done. I was happy enough with the result, though, that to me it was worth the trouble. Your mileage may vary.
Glaze-painting the door frame. Before assembly, the back of the panel was given a three-coat paint job and the inside edges of the frame were glaze-painted.
The cabinet with the door in place. The visible exterior of the cabinet is all glaze-painted with four coats brushed on and wiped off. The door panel is finished with two coats of Ottosson linseed oil wax.
On the inside, the door panel back and the backboards have been three-coat painted. I did not do a great job with the backboards as the last coat went on rather too thick, as can be seen from the difference of sheen, but once the paint was fully cured it did even out to an acceptable level. The drawer front is, like the exterior of the door panel, finished with linseed oil wax.
In Conclusion
I still have much to learn about linseed oil paints, and am looking forward both to getting better at what I already do and to picking up new techniques and testing other methods.
For example, I am very interested to see what results can be had with a single-coat system based on diluting the paint with boiled linseed oil only. Ottosson recommends a 20/80 mix of oil and paint for single-coat interior woodwork, but it would be fun to experiment with a range of ratios and see what the results look like.
I also want to find out what adding turpentine will do, and if it would be worth the whiff? Ditto the addition of sun-oxidised oil to the final coat – will I like glossier? Not to mention to see what can be done with artists’ paints on smaller pieces, in the footsteps of Jögge Sundqvist (who, by the way and judging from the photos in Slöjd in Wood, seems to get his artist’s paints from Ottosson). And of course, to give some of the other brands a go.
I am well aware that painted furniture is not to everyone’s taste, but that is a simple problem to solve: if you don’t like it, don’t do it! If, however, you find the idea not entirely without merit, I heartily recommend linseed oil paint. As I hope is becoming apparent from recent posts and discussions on this blog, it is nice to work with and has the potential for some very attractive and tactile results, at least to my eyes and hands.
Scandinavian chip carving examples from Jögge Sundqvist.
Below are the classes being offered at the Lost Art Press shop in the second half of 2024. You can click through now to the Covington Mechanicals registration site to read the class descriptions, but you cannot register until 10 a.m. Eastern on Monday, Feb. 19. (It looks like you can, ’cause there’s a “Register Now” or “Buy Tickets” button on every class…but you can’t. So don’t bother hitting that button yet.)
And for those who don’t already know, the classes typically sell out quite quickly – in nano-seconds, at times – so limber up those fingers and get ready to type fast on Feb. 19 at 10 a.m. Eastern! However: I beseech you to make sure you can join us for a given class before registering. We are not really a school, and don’t have a setup that makes refunds then filling open slots easy. (I do understand that life happens, and it’s sometimes unavoidable. But please don’t sign up first and check your schedule later!)
Welsh stick chairs by Chris Williams.
Chris and I have some commitments in the second half of the year that are keeping us from offering many general classes (including two scholarship classes for the Chairmaker’s Toolbox– more on that to come). But if any of our plans fall through, we might add a class or two later in the year. For now, here’s what’s on tap – and we’re delighted to welcome two Lost Art Press authors from overseas: Jögge Sundqvist who’s visiting from Sweden for two classes, and Chris Williams visiting from Wales for one.