Business Insider recently released a video on India’s shellac industry with amazing footage of how it’s made. You can watch it here.
While we think of shellac as a finish, it’s also used to coat candy and pills, preserve fruit, make bangles and more. Learn how the Kerria lacca insect secretes lac and see how it’s harvested using methods that originated 3,000 years ago. Follow along as the video highlights careful steps in production and watch as workers use their hands, feet and teeth to stretch large sheets of shellac. This video packs a lot in 10 minutes and is fascinating to watch.
Fig. 2. China cabinet door, late eighteenth century.
As a general classification some six general types of doors have been evolved over the years, though the variations on each are almost unlimited. Only a few can be illustrated here, but the reader should find the range useful when he comes to design or make up a piece of furniture.
The purpose of a door is clear and obvious enough, yet the variety of ways in which it has been made over the years is amazing. Consider, for instance, how far removed the delicate-traceried door in Fig. 2 is from the single slab oak door in Fig. 1, virile and spirited though the latter is. Of course, the two belong not only to different ages, but also to different techniques of construction. Obviously, too, the usage the two would have to face would be entirely different, the Gothic specimen standing up to everyday use, whereas the eighteenth-century door belongs to a cabinet intended for a drawing room, used only by genteel people.
Framed and panelled door. Second half seventeenth century. Shows several interesting features. The stiles are beaded with the scratch stock, but the beads run out at the rails so that the tenons have square shoulders. On the centre muntin no attempt is made at mitreing—indeed, there is no corresponding moulding on either rail. The difficulty is overcome by butting at the top and scribing.
At the outset it is interesting to consider the reasons for changes in construction, apart from the variations in form largely dictated by fashion. A single slab of wood is the simplest form but carries with it certain disadvantages, perhaps the chief of which is its liability to shrink. It might also cast, though both of these potential faults would be minimised by the use of quarter-cut timber. Possibly a more serious drawback is the limitation imposed by the widths in which timber is available. A wide door would have necessitated jointing and possibly using cross-battens at the back. A last undesirable feature is the single grain direction. Oak is a tough wood, but it does cleave easily, and such a door could easily break.
Framed door with turned spindles. First half seventeenth century. Frame is joined with mortice and tenon joints, the spindles having dowels turned at the ends. Turning appears to have been introduced in the mid sixteenth century and was quite commonplace in the following century. Most early turning was done on the pole lathe, the springy pole reversing the rotation after the power stroke.
It was no doubt a combination of these drawbacks that brought about the framed system of construction. The frame itself provided strength across width as well as height, the panel being more or less a filling. Being free to move in its grooves, there was no liability to split in the event of shrinkage, and the over-all width of the door could be increased—in fact it only needed centre muntins for the width to be increased ad lib.
Single slab oak door. First half sixteenth century. Pierced right through with Gothic tracery designs and with simple channelled moulding cut with the gouge. From a food cupboard. It is in a single piece of oak, and has suffered from woodworm, but is otherwise sound and has remained quite flat. It is the simplest form of door, but has certain constructional disadvantages (see photo [at top]).
The introduction of veneering made it desirable to have flush surfaces, and so the clamped and flush panelled door was used, not always with success owing to its liability to split due to resistance to shrinkage. Finally today we have veneered flush doors of multi-ply, lamin-board, or chipboard, in which many faults have been eliminated (though even here there are certain snags).
Framed and panelled oak door. Early seventeenth century. The craftsman has used the true mitre, and has overcome the problem of combining this with the grooving to contain the panels. Note how the mortice is set in at the inside since the tenon is automatically cut away by the grooving. At the same time the tenon has long-and-short shoulders because the front of the stile has to be cut back level with the moulding which is worked in the solid. The whole thing is assembled without glue, the joints being pegged. Mostly the oak was quarter-cut, sometimes being riven.
Framed door with raised panel. Second half seventeenth century. The main outer frame is grooved to hold the panels, but the moulding is separate and is mitred round. At the centre the main members are mitred and rebated to take the small raised panel, a bolection moulding being fitted to hold it. Sometimes quite elaborate patterns with mitred mouldings were made. One common pattern had diamond-shaped panels, in which case, of course, the mitre lines halved the over-all joining angle. Bolection mouldings giving a raised-panel effect were often used.
Flemish cabinet door. Seventeenth century. The moulding of the main framework is worked in the solid and is mitred at the corners. A characteristic feature is the wide use of channelling and flat recessed beads. Carving is in the solid, the background being cut back leaving the detail in shallow relief.
Long clockcase flush door. Late seventeenth century. Interesting in that it is an early example of veneering. The ends are clamped as shown and a strange feature is that the clamps are sometimes merely butted without any tongue. It seems a risky construction, but of course the veneer strengthens it considerably.
Clamped and veneered flush door. Second half of seventeenth century onwards. Most usual construction was of pine with clamped ends tongued on. The weakness was the liability of the main panel to shrink, and this showed itself eventually either in stress marks in the veneer towards the edges as shown here, or in cracks towards the centre. An alternative sometimes followed was to fit a flush panel in a framework, but there was still the potential danger of cracks or stress marks due to shrinkage.
Framed and veneered door. Early eighteenth century. Framework is veneered with walnut, and has an applied bolection moulding at the inner edge forming a rebate for the panel. Construction is rather unusual in that the top rail runs right through, and has resulted in slight stress marks, the consequence of shrinkage. The veneer is mitred at the corners, but was frequently butted, the joint lines vertical.
Barred door in mahogany. Mid-eighteenth century. The lattice moulding was usually of astragal section about 3/8 in. wide, the back grooved to fit over 1/8 in. bars. The glass was either beaded or puttied in. Note that the section of framework moulding is half that of the lattice. In all cases the mitre lines halve the over-all angle of the joining mouldings. Below are framework and moulding sections.
Framed door with fielded panel. Mid-eighteenth century. A costly door to make, especially by hand methods. A square-edged frame would be made first, and the inner shape bow sawn. The rebate would be largely chiselled. The scratch stock would be used for the moulding, though the carver would finish off the sharp inner corners. The fielding of the panel would again need the scratch stock.
Panelled and veneered door. Second half eighteenth century. Made in either of the two ways shown. The frame is assembled and the elliptical shape cut out. After veneering across the grain the small thumb mould is bent round and fixed, thus forming a rebate. The panel is veneered, dropped in from the back, and held with a bead.
Framed and panelled door. About 1770. The top curve is formed by making the top rail extra wide and packing the stiles locally, cutting to shape afterwards and veneering. The moulding would be either made up separately and applied, or worked in the solid. In the latter case the whole thing would have to be in mahogany, or a local edging of mahogany would be applied. Lower quadrant corners are set in separately.
Built-out door in mahogany. Second half eighteenth century. Here again the top is a wide rail cut to shape after assembling. The rebate is worked around the curve (that on the straight parts being done before gluing up). The panel is dropped in flush and the joint covered by a half-round sausage and berry mould. Tongues are used to hold the canted corners.
French type door, part gilt. Late eighteenth century. Rails are made wide enough to include the curves, and are put together with long-and-short shouldered joints, the stiles being rebated beforehand. After cutting the rails to shape the rebates are continued round the curves. The panels are dropped in and held by the face moulding which is mitred round. To form the carved details blocks are glued on and carved when in position, though in some cases the whole thing is carved in the solid, the groundwork being recessed.
Barred door in mahogany. Late eighteenth century. After assembling the framework, the bar mouldings are grooved and worked with the scratch stock at the shaped edge of a board, cut out, and assembled over a marked-out panel fitted to the door rebate. All mitre lines halve the over-all angle. Glazing bars are added at the back afterwards, being checked into the frame. Thin strong canvas glued to the joints in the bars strengthens them.
Framed door with raised panel. Early twentieth century. The framework is morticed and tenoned together, the inner edges being grooved to receive the tongues of the panel. The latter is grooved to enable the panel to project, and a wide rebate on the face gives a double stepped effect. The tenon is haunched, the end of the groove being thus filled in.
Raised and veneered door. About 1930. Here again the panel is raised and is tongued into the framework which is mitred and tongued. A wide, shallow chamfer is worked around the framework before assembly, and a corresponding local chamfer formed at each corner (see dotted lines). The panel corners are canted to line up with the chamfers.
Veneered flush door. Late eighteenth century onwards. Narrow straight-grained strips are glued side by side with heart sides alternately outwards and inwards. In best work this is counter-veneered across the grain both sides, and the face veneers put down lastly. In many ways this is the most reliable construction. Counter-veneers are frequently omitted, even in good class work.
Gothic oak door. Modern construction. The main framework is grooved to hold the panel, and the mould at the edge is stuck in the solid, the corners being finished with the mason’s mitre. To obviate extensive recessing, the tracery is applied, the whole fitting into the grooves in the framework. To avoid shrinkage complications the grain of the tracery is vertical and thus any movement in this is the same as that of the panel. Note that the groove in the framework is wide enough to take both panel and applied tracery.
Veneered flush door. Modern style. Both sides of the door should be veneered, and in the best work both sides are counter-veneered. Note that in any case the grain of the veneer which touches the groundwork is at right angles with the outer layer of the ply or laminboard. Unless this is done hair cracks may develop. Usually such a door has to be lipped. If this is done first it is concealed by the veneer. When done after veneering it shows but protects the edges of the veneer.
Framed and faced door. Modern. Usually the framework is dowelled and panels of plywood or hard board glued on, preferably on both sides. When the door is large it is advisable to bore holes through the framework so that the air contained in the spaces remains at equilibrium with the outside atmosphere. Such doors are usually used for kitchen fitments, etc., and are intended to be painted. The intermediate rails are desirable because otherwise the panels are liable to sink locally.
Folding-sliding doors. Modern. Invariably the flush-type door is used, the three members being hinged together as shown. Pivots are fixed top and bottom at the edge of the centre door, these sliding in grooves in the top and bottom. As it is difficult to fit the pivots at the extreme edge of the door, the width of the latter needs to be calculated carefully so that when opened fully it lies back flat with the door hinged to the cabinet side. The doors nowadays are usually veneered plywood or blockboard, in which case they are lipped.
Frameless sliding glass door. Modern. Although the glass can slide in grooves worked in the wood, it is more usual nowadays to use the special metal or plastic channelling made for the purpose—at any rate at the bottom. It is essential that the top grooves are double the depth of those below so that the doors can be lifted out.
Framed sliding door. Mostly twentieth century. Here modern practice is to use gliders beneath the door, these running on special fibre track. Bottom edge of door is grooved, but track does not engage with this. It is made to take the gliders and at the same time give clearance over the track. Top of door may slide in wide groove.
Bow-front door. Eighteenth century and onwards. Framework is rebated and moulded to receive the panel, an essential feature being that the stile rebates are parallel so that the panel can be inserted after assembly. Owing to the short grain of the rails, it is more satisfactory to use dowels than tenons as the last named would have little strength. An alternative is to fit loose tenons.
Serpentine doors. Eighteenth century and onwards. Here again the rebates have to be set out so that they are parallel, but usually there is no difficulty because the curves often cancel each other out. When curvature is only slight the panels are usually bent. Today all rebates and mouldings would be worked on the spindle moulder or with the electric router. For hand work the rebates would be part planed and part gouged and chiselled. For the mouldings the scratch stock would be used.
Bow flush door. Eighteenth century and onwards. Traditional construction was to cooper the doors and veneer both sides, preferably counter-veneering as shown. Present-day tendency is to laminate, gluing the layers between pairs of formers. The face veneer could be made up separately and put down with a curved caul, though care would have to be taken to ensure that the mitre lines coincide with the corners. Otherwise the centre panel could be laid, and the elliptical shape cut round the edge of a templet. Afterwards, the border is fitted up to it. To avoid a bad joint it is common to fit an inlay line round the edge of the ellipse.
French bombe door. Mostly eighteenth century. Expensive doors owing to the compound curvature. Setting out in both plan and elevation essential. By jointing pieces together and adapting their width according to their position, it is only necessary to level the joints to reveal the line at the fulness. At top and bottom a templet is used to show the shape. Some such procedure is essential as the doors are always made in pairs, and the two must obviously be alike. At the meeting edge another templet is used to mark the shape, but the blending of the curves becomes a matter of judgment. The work on each should be done in stages, and the two placed together in position for the final shaping. Parallel lines drawn horizontally enable further testing templets to be used in various positions, but the hand drawn lightly over the surface reveals any waviness. Veneering both sides follows, and invariably a built-up pattern is used to enable the veneer to be tailored to the curve. Reliable straight-grained wood is essential for the groundwork.
Tambour doors. Eighteenth century onwards. Consists of a series of narrow strips glued to canvas backing. Ends fit in grooves worked in top and bottom. As most tambours bend in one direction only it is necessary to cut a feeding channel at the back as shown by the dotted line, this being afterwards filled in. Strips may be of the same wood or in contrasting woods. In the former case they are often cut from a single board and assembled in same order, When a flat section is used (V), the joints are almost invisible. Narrow-bead sections may be worked in pairs (W), but wider ones need to be worked singly (X). When bending in both directions is necessary a similar section to either (Y) or (Z) is necessary, though only slight reverse bending is possible. This curvature is sometimes needed on serpentine shapes. It is necessary to assemble the strips on a jig as it is essential that they are put together square, otherwise curious complications can arise. For a bow-front cabinet the assembling jig would have to be correspondingly curved.
Chief types of doors. We show here in simplified form the main types, with all decorations and complications omitted. All doors are based on one of these, or combinations of them. 1. Slab or solid type. Has the advantage of simplicity but has some drawbacks such as liability to cast and to shrink leaving gap at closing edge. 2. Framed and panelled. Panel may be grooved or rebated in. Latter preferable for work to be french polished. Edge may be moulded or moulding may be applied. 3. Clamped. Suitable for flush, narrow doors only, and wood must be well seasoned. A combination of this and No. 2 is the framed and flush panelled type, the panel being tongued in and finishing level at the front. 4. Flush. Of laminboard or multi-ply. For polished work it is veneered both sides. Lipping may be added and an extra wide lipping fixed one side to take hinge screws. 5. Framed and faced. Used mainly for painted work. 6. Tambour. Useful alternatives for a wide, shallow space; also when hingeing would be impracticable.
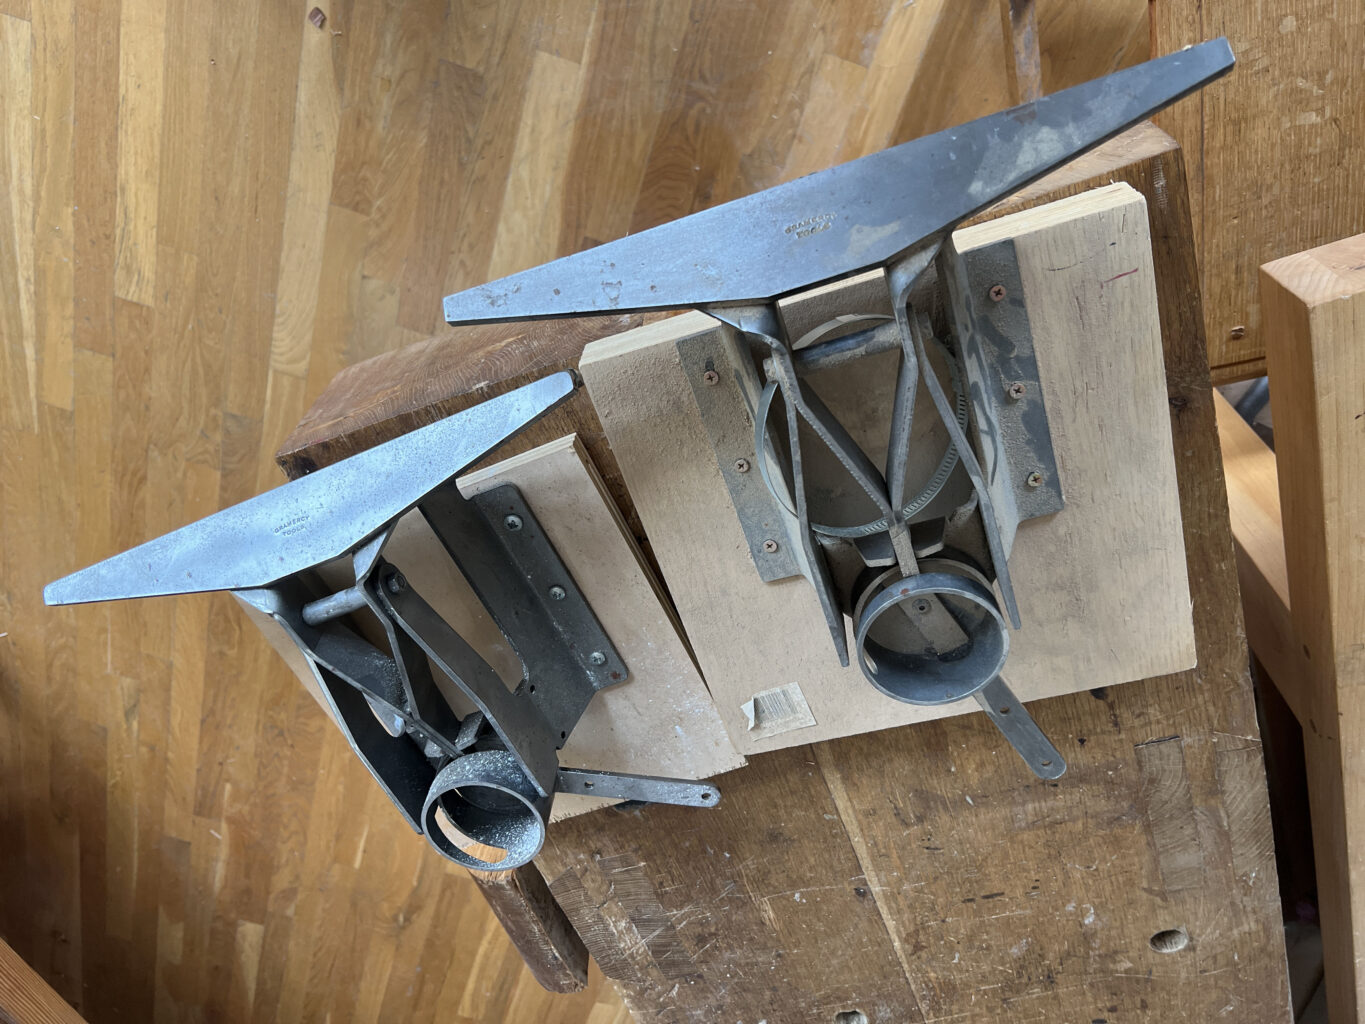
The Gramercy saw vise on the left has plaster dust on it from my basement. The one on the right has wood dust on it from Chris’ basement. We are a collective embarrassment.
I think the last time these saw vises got used was during Matt Cianci’s last saw sharpening class in our shop. In 2019. We unearthed them from our respective basements for Matt’s class going on today and tomorrow – and we will have our ear plugs at the ready. (It is not a quiet class.) And I will try to talk Matt into taking my super-dull dovetail saw home with him to sharpen. (I have a good saw vise, obviously – but I also have bad astigmatism – I’m not touching my dovetail saw with a saw file!)
Chris and I will be at our computers all day (that’s a lie), ready to answer your woodworking questions (that part is not a lie). You know hos this goes: Post your (succinct) question(s) in the comments field below, and we shall do our best to answer.
I hope no on has a heart attack upon reading this…but I will be turning in the completed manuscript for the long-promised Dutch Tool Chest book by the end of this month. This year. In two weeks.
Why is it so late? I am definitely the problem. I’m not great anymore at working 18 hours a day like I used to. And after a full day at work, well, I just want to go home and weed the garden (temperature allowing) – not stare at a screen. Or sit on the couch with my cats and read a book. But…that’s really no excuse. I’ve to some extent made myself busy during the day; Chris would absolutely have let me work less at the office and work more at home on the book. So there is no one to blame but me. I’ve become a lazy git. (See also: My house renovation is not done.) But the shame and pressure are now outweighing the laziness – on the book, not the house.
With that mea culpa out of the way:
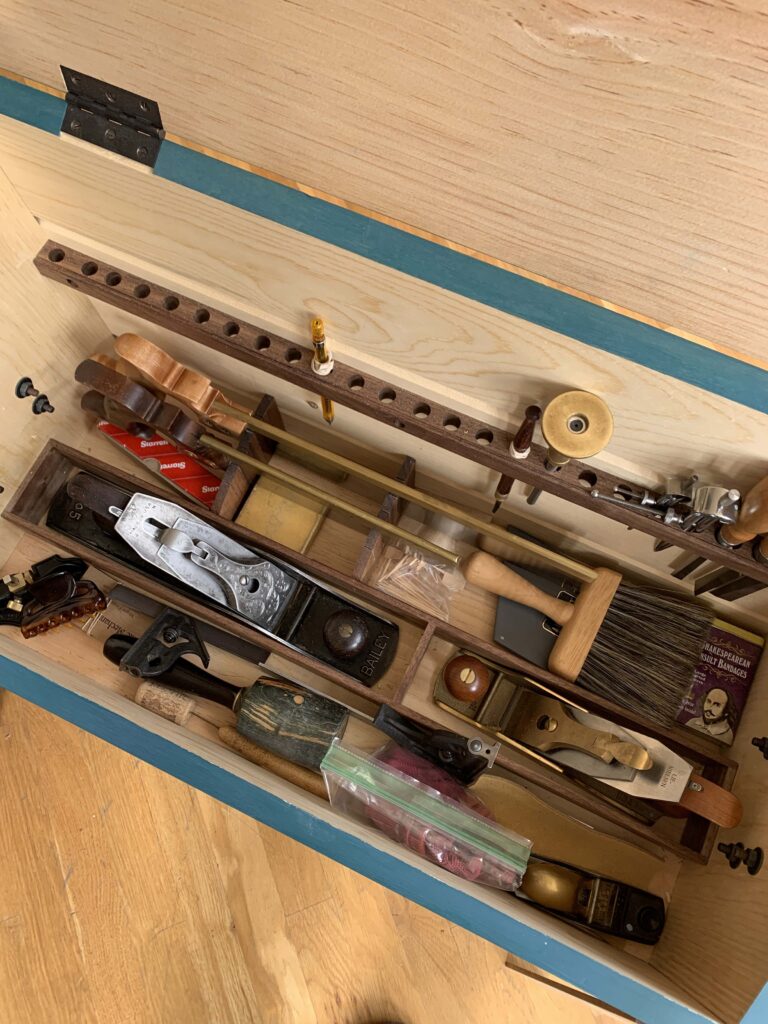
I’m including a gallery of pictures from other makers that shows as many different interesting and effective layouts as possible of the interior. Cool adaptations for a specific set of tools. Cool adaptations for a non-specific set of tools. Interesting use of the spaces in the bay (or bays). Clever rolling bases. Wacky oversized (or undersized) chests. Mind-blowing uses of the back of the fall front and or/underside of the lid. You know – anything that is nifty and sets it apart from the basic interior shown below.
(Mind you, the basic interior works quite well. I like its flexibility, because my tool needs change depending on the class I’m teaching (this chest travels with me if I’m driving). In theory, anyway; 90 percent of my time on the road, I’m teaching either the ATC or DTC.
Never forget to pack your hair clip.
All images used in the book will, of course, be properly credited – and I’d love to include a sentence or two about your inspiration, and/or why you did what you did. I need high-resolution (at minimum, 300 dpi at 5″ x 7″), non-blurry, decently lit images. It would be great to have an overall shot of your chest open and closed, and detail shots of the clever bits. Please also include your name (as you wish it to appear) and your phone number, in case I am in desperate need of contacting you (though I’ll use email first…who talks on the phone anymore?!). The deadline for your submissions is June 7.
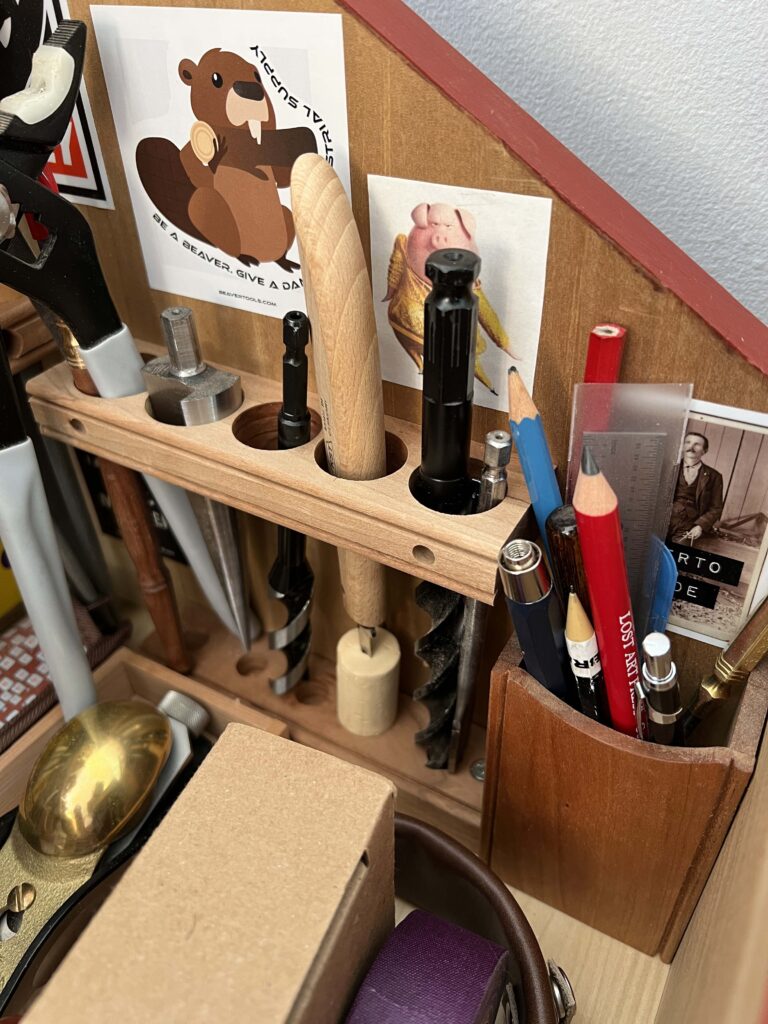
Here’s an excellent example of a clever idea…though a bad photo, hurriedly snapped by me during a class in our shop (it’s too close up, and without the context of more background, it’s a little hard to immediately understand that you’re looking at the side wall of the chest, outfitted with storage for large-diameter tools (how is it attached?!) and a clever pencil box. (Olivia, if you’re reading this and have time to send me better pictures…)
Please send pictures to me at fitz@lostartpress.com. (If the file sizes are too large to email, I can send you a WeTransfer or Dropbox invite – whatever you prefer.)
Detail shot of cleverness inside Olivia Bradley’s tool chest.
And thank you to those who’ve already sent submissions – I do still have them!
Join via Zoom (if you can’t make it to Bloomington, Ind., in person) at 6 p.m. Eastern on May 24, for the 2024 Rosemary Miller Lecture, this year celebrating the life and work of Nancy Hiller (1959-2022).
Duncan Campbell will speak about Nancy and her deep commitment to historic preservation, her superb writing and woodworking, and her all-around excellence.