The following is excerpted from “The Joiner and Cabinet Maker,” by Anonymous, Christopher Schwarz and Joel Moskowitz.
It begins in 1839. In that year, an English publisher issued a small book on woodworking that has – until now – escaped detection by scholars, historians and woodworkers.Titled “The Joiner and Cabinet Maker,” this short book was written by an anonymous tradesman and tells the fictional tale of Thomas, a lad of 13 or 14 who is apprenticed to a rural shop that builds everything from built-ins to more elaborate veneered casework. The book was written to guide young people who might be considering a life in the joinery or cabinetmaking trades, and every page is filled with surprises.
Unlike other woodworking books of the time, “The Joiner and Cabinet Maker” focuses on how apprentices can obtain the basic skills needed to work in a hand-tool shop. It begins with Thomas tending the fire to keep the hide glue warm, and it details how he learns stock preparation, many forms of joinery and casework construction. It ends with Thomas building a veneered mahogany chest of drawers that is French polished. However, this is not a book for children. It is a book for anyone exploring hand-tool woodworking.
Thanks to this book, we can stop guessing at how some operations were performed by hand and read first-hand how joints were cut and casework was assembled in one rural England shop.
Here’s what you’ll find in our expanded edition of this book:
• A historical snapshot of early 19th-century England. Moskowitz, a book collector and avid history buff, explains what England was like at the time this book was written, including the state of the labor force and woodworking technology. This dip into the historical record will expand your enjoyment of Thomas’s tale.
• The complete text of “The Joiner and Cabinet Maker,” unabridged and unaltered. We present every word of the 1839 original (plus a chapter on so-called “modern tools” added in a later edition), with footnotes from Moskowitz that will help you understand the significance of the story.
• Chapters on the construction of the three projects from “The Joiner and Cabinet Maker.” Schwarz built all three projects – a Packing Box, a dovetailed Schoolbox and a Chest of Drawers – using hand tools. The construction chapters in this new edition of “The Joiner and Cabinet Maker” show the operations in the book, explain details on construction and discuss the hand-tool methods that have arisen since this book was originally published.
• Complete construction drawings. Lost Art Press drafted all three projects in SketchUp to create detailed drawings and cutting lists for the modern woodworker.
Confession time: No one has ever taught me how to fit a lock. I have always done it by instinct, feeling along in the dark until the thing fit and worked (after a good deal of fussing).
So reading the directions in “The Joiner and Cabinet Maker” was a real revelation. As a result, fitting the lock for the Schoolbox was straightforward, fast and simple. That’s the good news. The bad news is that I don’t have anything to compare it to except my own self-taught ham-handed cave-carving methods. So you’re not going to get anything to compare Thomas’s methods to.
In any case, this method works great. Here we go. The key to everything with setting the lock is the pin that the key turns on. Yes, the keyhole is important, but not as important as the location of the pin. Let this square piece of brass guide you and you’ll be fine.
Bore a hole through the front of the box using a birdcage awl. The sharp arrises of the awl will bore through the front. Barring that, drill a hole that is smaller than the pin in the lockset and test the fit.
Find the centerline of the front of the Schoolbox and strike a vertical centerline near the top. The line need only be 1″ or 2″ long. Now you want to bore a scant hole through the front that the pin will push into (that’s why the pin is proud of the lock mechanism). You can measure this location, as Thomas did. Or you can line up the top of the lockset with the top of the carcase and push the pin into the soft pine. Then set the lockset aside and use a birdcage awl to bore a hole straight through the front of the box, where the pin should go. When you break through to the inside of the box, try to fit the pin into the hole in the front of the box. Widen the hole on both sides until the pine holds the pin right where it will be in the end.
With the lockset in place, position your square up to the extents of the top plate and trace those lines on the top edge of your box.
Now mark where the top plate of the lockset will fit in the top edge of the Schoolbox. Working from the front of the box, press the pin into your hole. Clamp the lockset in place and trace the extents of the lockset onto the top edge of the Schoolbox. Use a square to help.
Here I’m using a cutting gauge to mark the front edge of the lockset on the top edge of the box. Then measure the thickness of this top plate and mark that on the inside of the box. Start wasting away this shallow mortise.
Now you want to mark out the width of the top of the lockset’s plate on the box. Set your marking or cutting gauge to the width of the plate and use the gauge to connect the distance between the two pencil lines you just struck. The mortise for the top plate of your lockset is now ready to be wasted away.
Router planes excel at this type of detail work. When you need mortises that are exactly the same depth (such as matching hinge mortises), a small router plane is the tool for the job.
To remove this waste, score it with a chisel that you drive with taps of your mallet. You can then remove the waste with the chisel or use a router plane to ensure the depth of your mortise is consistent.
A drawer-lock chisel is great for this sort of close-quarters work. Score the waste with the drawer-lock chisel then remove the scored waste with a bench chisel by working from the top.
Now push the pin of the lock into the hole in the inside of the Schoolbox. The works of the lock will butt against the front piece. Trace around the box that holds the works. Measure the thickness of the lockset and mark this as the finished depth of your lock’s mortise. You can chisel out this recess, or you can saw its extents, then chisel it.
Use a fairly thick pencil lead to mark around the works of the lock. The corners of the lockset might be rounded over during manufacturing, and a thick pencil will actually give you a more accurate line than a skinny pencil lead.
The rest is easy. Press the lock into this mortise and trace around its back plate. Then waste away this area using the same techniques discussed above. If you measured carefully you should have a fullmortise lock that fits completely flush without thinning the front of the Schoolbox any more than necessary.
Use some small files to enlarge the hole for the key. Use a rattail file to enlarge the hole around the pin. Use a flat file to make room for the rest of the key. It doesn’t have to be perfect if you are going to cover the keyhole with an escutcheon plate.
Screw the lockset in place and fetch the steel hinges. They need to be installed in the case before the lid is affixed.
These are some of the tools of the joiner shown in “Spons’ Mechanics’ Own Book” (1885).
The following is excerpted from Joel Moskowitz’s history of trades and explication of trades in England at the time “The Joiner and Cabinet Maker” was originally published (the full chapter is titled “England in 1839). The Lost Art Press edition of the book include not only the original text, but Joel’s fascinating chapter as well as how-to chapters by Christopher Schwarz on the construction of the three projects described in the original text: a Packing Box, a dovetailed Schoolbox and a Chest of Drawers – using hand tools.
Why collect stuff? Is there something in one’s DNA that suggests that picking up an extra thing or two just to have them is a good idea? Before you know it, you are sitting around with a lot of things that seem kind of similar: a collection. The game ends for some collectors right there, and for others it prompts more questions about what they’ve collected and what other items would make the collection perfect.
When I began studying woodworking formally in the 1980s, there were few new tools worth buying. Fortunately, my teacher, Maurice Fraser, taught us how to buy old tools that worked. I soon bought my first old tool, a Stanley Bedrock 604C, then some more stuff, and more stuff after that. At some point I realized that if I continued making rationalizations about the tools I was buying (that I needed all of them to do woodworking; if my 32 other smooth planes were to be destroyed in a fire, I’d be comforted to know that I had number 33 waiting in the wings), I would have to sharpen all the tools I bought. On the other hand, if I relaxed and admitted I was a collector, it would save a lot of work.
So that’s what I did. In the process, I joined a lot of interesting organizations (EAIA, MWTCA, TATHS, CRAFTS and others) and found an outlet for my continuing interest in social history. I had never been much interested in who had been king when whichever side had won the Indo-Franco-Prussian-Franco wars, but I was interested in things such as why the heck anyone in their right mind in 1790 would spend a king’s ransom on a miter plane when a good smoother could plane just as well. So like many tool collectors, I started studying up on tools and industrial history, and in the process I bought a lot of books.
At some point I ran out of interesting tools to buy. I just couldn’t afford what I wanted to collect. But books were cheap, so I continued to buy interesting books on tools, woodworking and industry in general. When I started collecting in the period before 1880, I hit a snag. There just isn’t all that much to collect from that period. Woodworkers as a group are not nearly as interested in writing stuff down as, say, theologians, politicians or poets. I collected the same pre-1880 material that other collectors did, and frankly most of it was turgid and just not all that interesting to read. Much to my pleasure, “The Joiner and Cabinet Maker” was different.
A lot of people have asked me how I found this book. The answer is: I didn’t. It found me. Here’s the secret to collecting a lot of stuff: If it’s cheap enough and you don’t have it, you buy it. I picked up tons of material that way. Most of it is just fun to have. Sometimes you actually learn something about woodworking in the book. Sometimes, as in this case, you acquire the book, poke through a few pages and shout “Eureka!” when you realize what a monumental find you have. And that is exactly what this book is.
After a few reads of “The Joiner and Cabinet Maker,” it became apparent that inside the text were the earliest descriptions of certain woodworking practices that answered a lot of questions we have today, and it put to rest some modern speculation.
Various editions of the book from the left: 1839 Knight edition, leather-bound Knight edition of several volumes in the series, 1883 Houlston edition, 1841 Houlston edition.
I started buying up other copies of the book to get a handle on how various editions differed. At some point, I called Christopher Schwarz and asked if he was interested in reading what I now considered to be the most important pre-1850 book on teaching woodworking. I sent him a copy of “The Joiner and Cabinet Maker” and he, like me, was charmed. We both thought this book needed to see the light of day once more. Chris wanted to build the projects and give the book relevance to beginners today. I was especially interested in its historical context and what it tells us about shop practice in the early 19th century.
Historical Context The earliest book on woodworking in English that tells us about basic technique is Joseph Moxon’s “Mechanick Exercises,” which was published from 1677-1680 by subscription in an edition of 500 copies. Its audience was educated gentlemen who wanted to learn a little about how things are done. Men such as the noted diarist Samuel Pepys (1633-1703), who was a subscriber. “Mechanick Exercises” is pretty spotty and contains no real sense of what needs to be learned in a training course. It’s more a summary of common woodworking operations. This in itself is interesting, and readers today could certainly learn much from a social and historical standpoint, but the book doesn’t tell us anything about training a tradesman.
A century later (1769-1774), a Frenchman named André Roubo wrote a giant tome, “L’Art du Menuisier,” on all aspects of advanced woodworking just before the French Revolution got rid of a lot of the luxury styles he describes. This book is also a wonderful addition to our knowledge of 18th-century French woodworking, but Roubo concentrates on advanced subjects; it isn’t a beginner’s course. In England and the United States, the only books on woodworking during this period are “builder’s dictionaries,” “pattern books” and “price books.”
Builder’s dictionaries are glossaries of woodworking and architectural terms that include some basic information on how much things cost, and in most cases, formulas and tables for calculating materials and dimensions. The main purpose of these books was to allow rich patrons to figure out what the joiner meant when he said, “I’ll need a crown to purchase the deals I need to make the barn siding, my lord.”
Pattern books, which are collections of drawings, were sold to designers and masters who wanted to show potential customers the latest styles. The most important of these pattern books was Thomas Chippendale’s “Gentleman and Cabinet-Maker’s Director” (1754). Pattern books don’t show much furniture anatomy, which would have been familiar to any skilled craftsman, but they show endless design variations that you could show a client.
Another type of book that appeared in this period is the price book, which explained to union and craft society members how much they should be paid for different kinds of woodwork. Price books usually are tied to a region, with London price books being the most common. But price books crop up in all the important cities, even in the United States – pretty much anywhere there was enough work for a journeyman working in a shop for wages. As the industry grew, labor relations became more complicated and societies of trades, or unions, began to form in the 18th century. Small shops could of course get away with paying what they wanted to, but larger shops followed the price books. Price books served as a last vestige of the medieval guild system, which regulated pay, among other functions.
In the 18th century, all books were still hand printed, with hand-set type on hand-laid paper. Books were expensive, so the shortage of popular, practical books for woodworking apprentices is understandable. “Mechanick Exercises” was far too expensive for a poor apprentice to afford. Of the few professional how-to books that exist from the early 18th century in English, one of the more noteworthy is “The Complete English Tradesman,” which was published in 1703 by none other than Daniel Defoe of “Robinson Crusoe” fame. The book is a guide to running a millinery shop. So there was a demand for “how to” books, but the hand-printed nature of the book would have kept circulation from all but the fairly well-off milliner.
I have a reference book from 1777 for ironmongers, “Mr. Hoppus’s Measurer.” It’s carefully inscribed, “George Barter His Book June 3, 1787.” The inscription suggests this was a treasured book that was purchased used 10 years after it was published. If a new, up-to-date copy could be afforded, certainly a used copy would not be so prized. Even if there had been a demand for an apprentice’s guide, the book would have been too expensive for apprentices to buy, and certainly many would think that there was no point in paying for a book about something you did every day anyway.
Technical books of all sorts began to appear in the late 18th and early 19th centuries as a booming industrial economy started to change everything. In general, the books addressed the cutting edge of technology, not basic skills. The audience for books on wood was comprised of professional builders and woodworkers who already knew all the basics. They were not interested in directions for cutting dovetails; that, they learned to do in their sleep during their apprenticeship. What they wanted were books on the finer points of their craft. Probably the most famous book in this class was Peter Nicholson’s “The New and Improved Practical Builder” (1809).
Nicholson wrote a whole series of books on various aspects of carpentry and construction. His books are the best-known of the early 19th-century books on woodworking, especially those on advanced architectural work. Nicholson explained the math and layout for all sorts of woodwork structures. While they are totally useless as training exercises, they are great books on applied geometry. They offer an engraving of the tools of the joiner and lots of information on layout and design, but almost nothing on how to use the tools. These books are different than the really limited-run volumes such as Roubo. Some of them were reprinted continuously for most of the 19th century. While all of these books are fascinating today to historians, and they tell us a lot about the practice of woodworking, there is almost nothing on basic technique from the period. But this is what we all want: A book that shows us and teaches us the lessons of apprentices from before the machine age.
A list of the topics covered in “The Guide to Service” and “The Guide to Trade” series from 1845.
By the early 19th century, steam-powered printing presses and machine-made paper made daily newspapers ubiquitous for the masses. Reading became a fundamental skill, and books, while still expensive, became affordable to the middle class. When first published in 1839 by Charles Knight and Co. “The Joiner and Cabinet Maker” was part of a series called “The Guide to Trade.” A few years later the series was re-titled “The Industrial Library” and was published variously under the “Houlston & Wright,” “Houlston & Stone,” and later just “Houlston” imprints. “Industrial” in this sense means hard working, not jobs in manufacturing.
Few of these books are preserved in research libraries around the world. These were titles for the masses, not for scholars. And unless a library was specifically collecting popular literature (which they mostly weren’t), there would be no reason to acquire these books.
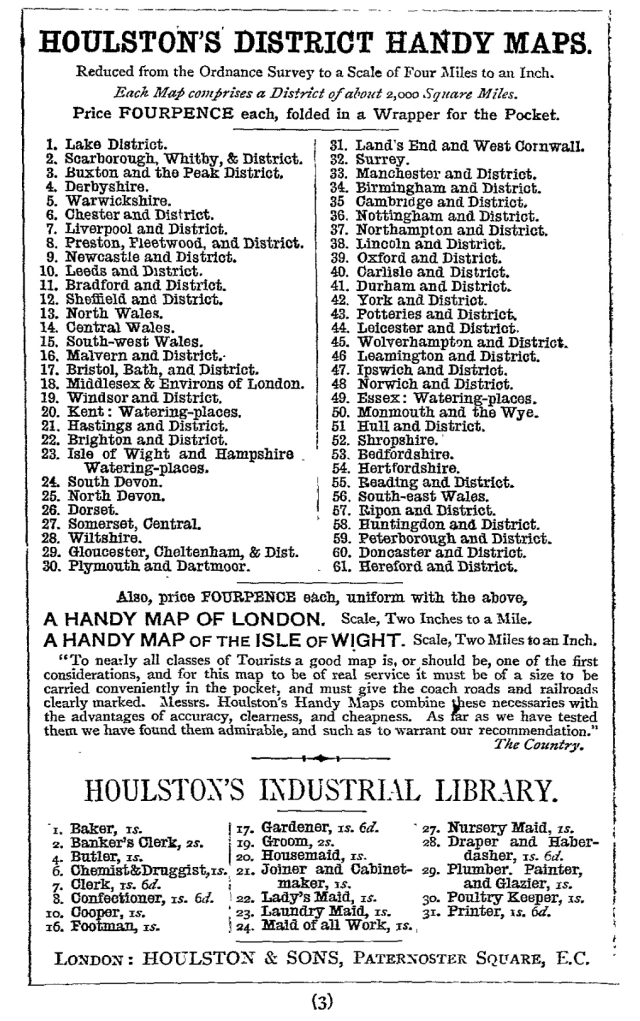
The goal of the “The Guide to Trade” series and its companion series, “The Guide to Service” series, was ambitious. It appeared to be a comprehensive group of nearly 100 books, printed as inexpensively as possible to serve as a overview of all sorts of vocations “to prepare young persons for the choice of an occupation.” Of all the books listed in the original series, only a few are marked as available. And the series was obviously not successful for Knight because only two years later, in 1841, the list was greatly pruned and was printed under the “Houlston” imprint. Thirty-six books made it into this new series now titled “The Industrial Library,” which was announced in a full-page advertisement in “The Joiner and Cabinet Maker.” By the time of the 1883 edition, 44 years later, the advertisement for the series has been reduced to a fraction of a page, and it competes with a bunch of other self-improvement series. There’s a lot to be learned about how England changed during the time this series ran. Of the 36 original titles of 1841, no less than seven deal with traditional agricultural jobs, and nine deal with domestic jobs.
In 1841, the series was greatly pruned and was printed under the “Houlston” imprint. Thirty-six books made it into this new series now titled “The Industrial Library,” which was announced in this full-page advertisement at the back of the book.
By the time of the 1883 edition, the advertisement for the series has been reduced to a fraction of a page, and it competes with a bunch of other self-improvement series and maps.
The prices of the books are largely the same, reflecting massive changes in book publishing. What is most interesting is the change in titles. The series numbering now has gaps, as only 20 books remain. The books that have been removed are almost all agricultural. I was able to locate only one agricultural title in a library, anywhere. Agricultural workers would have been the poorest and least literate of all the trades in the series, so it makes sense that they didn’t buy these books. But the deletions are also a testimony to the shift from a rural economy to a predominantly urban one.
The craft books that have vanished include “The Dressmaker and Milliner,” “The Tailor” and “The Shoemaker.” These are all trades that changed from real crafts in the early 19th century to brutal industrial manufacturing jobs by the latter half of the century; they didn’t require much training (except on the very high end) and certainly were not desirable jobs in the public imagination.
Two other new titles have been added: “The Butler” and “The Footman,” which are both domestic jobs. The large number of titles about domestic employment might be an indication of employers trying to train their hires, or it’s evidence of a rising middle class that hired domestic workers to emulate richer household practices. In addition, books such as these might help a young person get a domestic position – jobs that were hard to get and considered pretty good.
While both lists have “Clerk” and “Banker’s Clerk” on them, jobs that I would suppose are fairly prestigious, it’s interesting to see the titles (which I also could not locate copies of) intermixed with all these titles for domestic jobs. The urban office world, with its shift to “white collar” work, still hadn’t taken place on any great scale. That was a 20th-century innovation.
Some of the books in the series are credited to various authors but “The Joiner and Cabinet Maker” is not. This isn’t unusual for the time, but it is a shame that we don’t know more about who wrote it.
Of all the “Industrial Library” books that I’ve been able to locate, only “The Joiner and Cabinet Maker” is told in the form of a story. (The book on the housemaid has a limited narration.) The other books seem to be early attempts at writing how-to books, with limited success in condensing a complicated trade to a hundred or so pages. Various editions of “The Joiner and Cabinet Maker” have turned up, but it is not known if the book was continually available from its first publication in 1839 to the last in 1883, from which this facsimile was taken. The later edition was made from the same plates as the 1839 edition and is identical. An addendum about new modern tools was added to this later edition. It’s included here, but it’s not really worth much. We chose to scan the later edition of the book because it’s visually the same as the earlier edition but its binding was in better shape than the other copies in my collection.
The books themselves are a microcosm of invention, a window in how book publishing changed during the 19th century. (For more information about the books themselves, and the book technologies used in printing these books, see “Contextualizing ‘The Joiner and Cabinet Maker’” by Jeff Peachy, a noted bookbinder and book conservator, at the back of this book.) What is a shame, of course, is that the original Knight series was never completed. How wonderful would it be to have a copy of “Cutler” or “Watchmaker” today.
Here I’m using a zig-zag rule and a carpenter’s pencil to lay out the cuts on the pine stock for the Packing Box. I dislike zig-zags for this work because they don’t lay flat. They have the precision of a hand grenade.
The following is excerpted from “The Joiner and Cabinet Maker,” by Anonymous, Christopher Schwarz and Joel Moskowitz.
It begins in 1839. In that year, an English publisher issued a small book on woodworking that has – until now – escaped detection by scholars, historians and woodworkers.Titled “The Joiner and Cabinet Maker,” this short book was written by an anonymous tradesman and tells the fictional tale of Thomas, a lad of 13 or 14 who is apprenticed to a rural shop that builds everything from built-ins to more elaborate veneered casework. The book was written to guide young people who might be considering a life in the joinery or cabinetmaking trades, and every page is filled with surprises.
Unlike other woodworking books of the time, “The Joiner and Cabinet Maker” focuses on how apprentices can obtain the basic skills needed to work in a hand-tool shop. It begins with Thomas tending the fire to keep the hide glue warm, and it details how he learns stock preparation, many forms of joinery and casework construction. It ends with Thomas building a veneered mahogany chest of drawers that is French polished. However, this is not a book for children. It is a book for anyone exploring hand-tool woodworking.
Thanks to this book, we can stop guessing at how some operations were performed by hand and read first-hand how joints were cut and casework was assembled in one rural England shop.
Here’s what you’ll find in our expanded edition of this book:
• A historical snapshot of early 19th-century England. Moskowitz, a book collector and avid history buff, explains what England was like at the time this book was written, including the state of the labor force and woodworking technology. This dip into the historical record will expand your enjoyment of Thomas’s tale.
• The complete text of “The Joiner and Cabinet Maker,” unabridged and unaltered. We present every word of the 1839 original (plus a chapter on so-called “modern tools” added in a later edition), with footnotes from Moskowitz that will help you understand the significance of the story.
• Chapters on the construction of the three projects from “The Joiner and Cabinet Maker.” Schwarz built all three projects – a Packing Box, a dovetailed Schoolbox and a Chest of Drawers – using hand tools. The construction chapters in this new edition of “The Joiner and Cabinet Maker” show the operations in the book, explain details on construction and discuss the hand-tool methods that have arisen since this book was originally published.
• Complete construction drawings. Lost Art Press drafted all three projects in SketchUp to create detailed drawings and cutting lists for the modern woodworker.
The two-foot rule was the standard measuring device for woodworking for hundreds of years. The steel tape was likely invented in the 19th century. Its invention is sometimes credited to Alvin J. Fellows of New Haven, Conn., who patented his device in 1868, though the patent states that several kinds of tape measures were already on the market.
Tape measures didn’t become ubiquitous, however, until the 1930s or so. The tool production of Stanley Works points this out nicely. The company had made folding rules almost since the company’s inception in 1843. The company’s production of tape measures appears to have cranked up in the late 1920s, according to John Walter’s book “Stanley Tools” (Tool Merchant).
The disadvantage of steel tapes is also their prime advantage: They are flexible. So they sag and can be wildly inaccurate thanks to the sliding tab at the end, which is easily bent out of calibration.
What’s worse, steel tapes don’t lay flat on your work. They curl across their width enough to function a bit like a gutter. So you’re always pressing the tape flat to the work to make an accurate mark.
Folding two-foot rules are ideal for most cabinet-scale work. They are stiff. They lay flat. They fold up to take up little space. When you place them on edge on your work you can make an accurate mark.
They do have disadvantages. You have to switch to a different tool after you get to lengths that exceed 24″, which is a common occurrence in woodworking. Or you have to switch techniques. When I lay out joinery on a 30″-long leg with a 24″-long rule I’ll tick off most of the dimensions by aligning the rule to the top of the leg. Then – if I have to – I’ll shift the rule to the bottom of the leg and align off that. This technique allows me to work with stock 48″ long – which covers about 95 percent of the work.
Other disadvantages: The good folding rules are vintage and typically need some restoration. When I fixed up my grandfather’s folding rule, two of the rule’s three joints were loose – they flopped around like when my youngest sister broke her arm. To fix this, I put the rule on my shop’s concrete floor and tapped the pins in the ruler’s hinges using a nail set and a hammer. About six taps peened the steel pins a bit, spreading them out to tighten up the hinge.
Another problem with vintage folding rules is that the scales have become grimy or dark after years of use. You can clean the rules with a lanolin-based cleaner such as Boraxo. This helps. Or you can go whole hog and lighten the boxwood using oxalic acid (a mild acidic solution sold as “wood bleach” at every hardware store).
One leg of this scale has been cleaned with lanolin. The other has been wiped with wood bleach, which lightened the boxwood but didn’t affect the markings.
Vintage folding rules are so common that there is no reason to purchase a bad one. Look for a folding rule where the wooden scales are entirely bound in brass. These, I have found, are less likely to have warped. A common version of this vintage rule is the Stanley No. 62, which shows up on eBay just about every day and typically sells for $20 or less.
The folding rule was Thomas’s first tool purchase as soon as Mr. Jackson started paying him. I think that says a lot about how important these tools were to hand work.
When marking out his stock, Thomas uses chalk in conjunction with the rule. The author also notes that Thomas always has chalk in his pocket. What gives?
Chalk is ideal for marking out coarse measurements on boards because it won’t snap like a pencil lead on a rough-sawn wooden surface. It’s also far easier to see than pencil lead. In my shop, I’ve always used chalk at every stage in construction. You can make very bold (but easily removed) marks on your parts to keep them organized. I also use chalk to mark all the areas of tear-out that need to be addressed on a nearly finished piece of work. (Does chalk dull your edge tools? I haven’t had a problem.)
I also like how the chalk dust in my pocket absorbs excess moisture on my hands, which is a trick from the rock climbing and billiards set.
The third unfamiliar thing at this stage of the book is the way the author throws around the word “deal.” It’s easy to get the impression that deal is merely an English word for dimensional pine. But if you dig around, it can become confusing. “The Joiner and Cabinet Maker” instructs you to build one project using either “pine or deal.”
Huh? Let’s hit the books.
In my library, the accounts I dug up all agree that a “deal” is a plank of pine or spruce that is 9″ wide. But they disagree on the thickness. According to Bernard E. Jones’s “Practical Woodworker” (10 Speed Press), deal is 9″ wide and no more than 4″ thick. Charles H. Hayward’s “Carpentry for Beginners” (Drake) agrees that deal is 9″ wide, but says the thickness is between 2″ and 4″. And Paul N. Hasluck’s “The Handyman’s Book” (Senate) states that deal is 9″ wide and 2-1/2″ thick.
What is also helpful to know is that deal is just one word that English books use to describe standard sizes of wood. According to Hayward, a 20th-century author, here are some others:
Plank: A piece of wood that is 11″ wide or wider and 2″ to 4″ thick.
Batten: A piece of wood that is 5″ to 8″ wide and 2″ to 4″ thick.
Board: Anything that is more than 4″ wide and less than 2″ thick. This term is usually used with floorboards and tongued-and-grooved boards.
Scantling: Small bits that are 2″ to 4-1/2″ wide and 2″ to 4″ thick. Strip: Pieces that are less than 4″ wide and less than 2″ thick.
But that’s not all. There are different kinds of deal. Deal that is Northern pine (Pinus sylvestris) can be called Baltic red deal, Dantzic deal or yellow deal. And Spruce (Picea excelsa) shows up as white deal. And Canadian spruce (Picea nigra) can be called New Brunswick spruce deal.
The following is excerpted from “The Joiner & Cabinet Maker,” by Anonymous, Christopher Schwarz and Joel Moskowitz, from the chapter on making the dovetailed schoolbox.
In this chapter, as with the other projects in the book, Chris builds “alongside” young Thomas, the main character in the charming 1839 fictional account of an apprentice in a rural shop that builds everything from built-ins to more elaborate veneered casework. The book was written to guide young people who might be considering a life in the joinery or cabinetmaking trades, and every page is filled with surprises. You can read more about it here.
To understand how little that is certain with dovetails, let’s take an abbreviated journey through the literature. I promise to be quick like a bunny. Charles H. Hayward, the mid-20th-century pope of hand-cut joinery, suggests three slopes: Use 12° for coarse work. Use 10° or 7° for decorative dovetails. There is no advice on hardwoods vs. softwoods. F.E. Hoard and A.W. Marlow, the authors of the 1952 tome “The Cabinetmaker’s Treasury,” say you should use 15°. Period.
“Audel’s Carpenter’s Guide,” an early 20th-century technical manual, says that 7.5° is for an exposed joint and 10° is right for “heavier work.” No advice on hardwoods vs. softwoods. “Modern Practical Joinery,” the 1902 book by George Ellis, recommends 10° for all joints, as does Paul Hasluck in his 1903 “The Handyman’s Book.” So at least among our dearly departed dovetailers, the advice is to use shallow angles for joints that show and steeper angles if your work is coarse, heavy or hidden. Or just to use one angle and be done with it.
At least in my library, the advice on softwoods and hardwoods seems to become more common with modern writing. Percy Blandford, who has been writing about woodworking for a long time, writes in “The Woodworker’s Bible” that any angle between 7.5° and 10° is acceptable. The ideal, he says, is 8.5° for softwoods and 7.5° when joining hardwoods.
The finished schoolbox.
One Wednesday morning as I toiled with these old books, I went into the shop and laid out and cut a bunch of these dovetails. I ignored the really shallow slopes because I wanted to adopt something more angular. The 10° dovetails looked OK. The 12° dovetails looked better. The 14° tails looked better still. And the 15° looked good as well. Whatever angle you use for your joint, you can rest easy knowing that someone out there (living or dead) thinks you are doing the right thing.
One thing is certain: As dovetails have become somewhat of a cultish joint (a 20th-century phenomenon), their angles have gotten bolder. As Thomas’s slope looked too shallow for my eye, I chose 14°.
Before you can begin traversing with your jack plane, you should bevel off the far edge of the board with a few good strokes of your jack plane. This bevel reduces the “spelching” on that edge. (Spelching is the fun English word for “splintering.”)
The following is excerpted from “The Joiner & Cabinet Maker,” by Anonymous, Christopher Schwarz and Joel Moskowitz. The original short, book released in 1839, tells the fictional tale of Thomas, a lad of 13 or 14 who is apprenticed to a rural shop that builds everything from built-ins to more elaborate veneered casework. The book was written to guide young people who might be considering a life in the joinery or cabinetmaking trades, and every page is filled with surprises.
Unlike other woodworking books of the time, “The Joiner and Cabinet Maker” focuses on how apprentices can obtain the basic skills needed to work in a hand-tool shop. It begins with Thomas tending the fire to keep the hide glue warm, and it details how he learns stock preparation, many forms of joinery and casework construction. It ends with Thomas building a veneered mahogany chest of drawers that is French polished. However, this is not a book for children. It is a book for anyone exploring hand-tool woodworking.
In our expanded version you’ll find the unabridged and unaltered original text; a historical snapshot of early 19th-century England; chapters on the construction of the three projects that show the operations in the book, explain details on construction and discuss the hand-tool methods that have arisen since this book was originally published; and complete construction drawings (you can download those files here).
With the glue dry, it’s time to flatten one face of all of your panels. Thomas begins with the jack plane then moves to the trying plane, yet the details of the operation are sketchy in “The Joiner and Cabinet Maker.”
Early workshop practice was to use the jack plane (sometimes called the fore plane) across the grain of a panel. This operation, which Joesph Moxon called “traversing” in his “Mechanick Exercises” of 1678, allows you to remove a good deal of deal without tearing the grain too deeply. Working the grain diagonally in both directions allows you to get the board fairly flat – Thomas checks the board with a straightedge as he works, which is always a good idea.
Before traversing a panel, check the panel using the edge of your plane, which is a fairly good straightedge. If the panel is cupped across its width (typically on the bark side of a board), then the work should be fairly easy to accomplish. If the board is crowned in the middle (typically on the heart side of a board), you need to watch what you are doing. Sometimes traversing and diagonal strokes aren’t enough to flatten a crowned surface.
Note: When you work at 45° to the grain of a panel, you will typically see more tearing in one direction than in the other. This is normal. Just make sure you finish your diagonal strokes in the direction that produces less tearing.
Traversing is a powerful hand-tool technique. You can remove a lot of material quickly and make the board flatter than when you began.
Determining when a board is flat can be a challenge. After some practice, you learn to tell by the way your planes respond when dressing the panel. The shavings become consistent in thickness, width and length all along the board. A straightedge can help. So can winding sticks, which aren’t mentioned in “The Joiner and Cabinet Maker.”
Diagonal strokes, as shown here, allow more of the plane’s sole to touch the panel. After some overlapping, you’ll find the panel is pretty flat once you can take a shaving from every point on the board.
Winding sticks are two identical sticks that are longer than the board is wide. They are placed at several points across the width of the board and compared by eye. When the panel is twisted, the sticks aren’t parallel. And because they are longer than the board is wide, they exaggerate any wind. The author of “The Joiner and Cabinet Maker” has a novel solution: Compare your panel to a known flat panel. If your panel rocks on the flat one, it’s in wind. Of course, the trick is getting that first panel flat. It’s possible to create two panels that are in wind but don’t rock on one another – the high spots of one panel nest into the low spots of the other and result in a false reading.
Check the panel using the wooden straightedge. Look for light as you hold the tool diagonally one way, then the other. Work the remaining high spots using the jack plane until the panel is close to flat.
However, once you get one panel flat, the method explained in the book works well.
Then dress the panel using the trying plane (sometimes called a jointer). I use diagonal strokes first. Then I finish up with strokes that follow the grain of the panel.
The top panel is flat. By placing it on top of the panel I am working and trying to rock the panel at the corners, I can test for wind. You do have to be careful here. Sometimes you can miss a problem when you have one low corner but the three other corners are coplanar. Keep a sharp eye.