Editor’s note: Our Mind Upon Mind series is a nod to a 1937 Chips from the Chisel column (also featured in “Honest Labour: The Charles H. Hayward Years”), in which Hayward wrote, “The influence of mind upon mind is extraordinary.” The idea being there’s often room for improvement.To that end, we’ve asked you what else you have thought of, tried out and improved upon after building projects from our books.
Send us your own ideas! Email kara@lostartpress.com. You can read more about the submission process here.
I used a wire brush all over the chair to wear down the softer earlywood, to give it some texture.
Then a lot of burnishing with a deer antler and a smooth rock, especially near the hands and at the back of the head rest.
Then, a mix of BLO (boiled linseed oil) with some earth pigments, more like a wash than a paint, just to get a consistent deep color underneath.
Then I made a thick mix of Old Fashioned Milk Paint in Lexington Green, and globbed it on and wiped it off, mostly around sticks. The oil was dry, but I didn’t want it to cure because I wanted to be able to wipe some of the paint off.
John Porritt uses a heat gun to get the paint to peel, but I didn’t want to light mine on fire yet (with the layer of BLO underneath), so I just tried to let it dry a bit before rubbing it off. That helped it come off in patches.
Then I did the same with Real Milk Paint Co. Arabian Night on the top. I had to use a 3M pad with a little water in places where the paint needed to be blended better.
Then, I mixed a little burnt sienna pigment with BLO again on the top (like a wash), rubbed that in, then some Liberon Black Bison wax in dark oak.
With the finishing complete, the appearance of wear is believable along the seat, sticks and comb.
The following is excerpted from John Porritt’s “The Belligerent Finisher.” This shows the first two steps (surface preparation and adding color) before he goes on to burnish, stain, paint, shellac, oil, dent, wax, and add the finishing touches. It sounds overwhelming but the process is such an incredible transformation that you can’t help but to want to give it a try.
Porritt, who works from a small red barn in upstate New York, has been at his trade for many decades, and his eye for color and patina is outstanding. We’ve seen many examples of his work, and it is impressive because you cannot tell that any repair or restoration has been done.
His techniques are simple and use (mostly) everyday objects and chemicals – a pot scrubber, a deer antler, vinegar and tea. How you apply these tools – with a wee bit of belligerence – is what’s important.
The book is lavishly illustrated with color photos that clearly explain the process. With the help of this book, you’ll be able to fool at least some of the people some of the time with your own “aged” finishes.
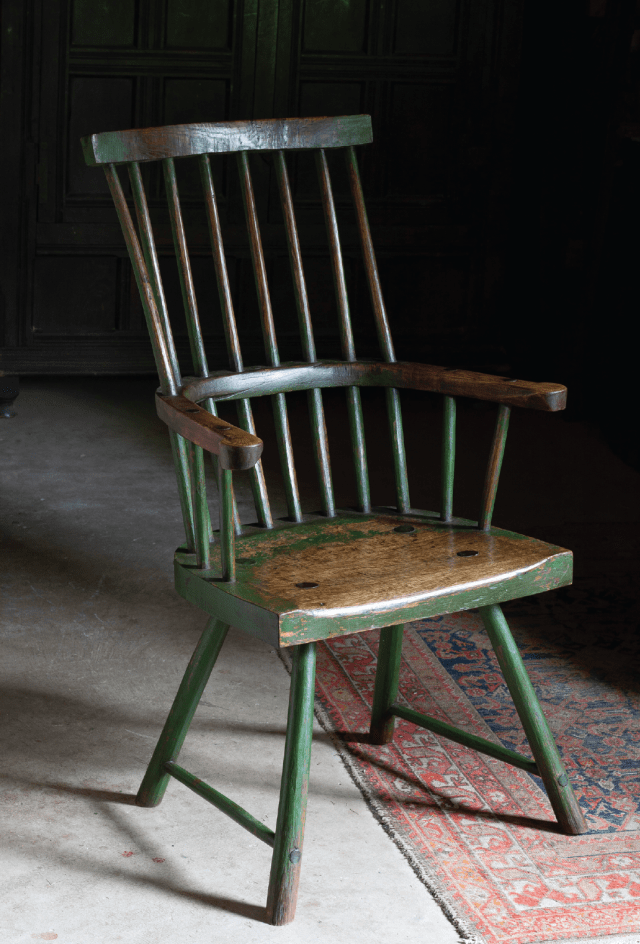
While similar to its cousin behind it, this chair features a square-cornered seat and a backrest that is straight. Soon, many of these crisp lines will be eased by burnishing.
This second side chair is made of oak. The seat is white oak and the rest of its parts are red oak. Because I built this chair using American species, the grain is quite straight and regular. With Welsh stick chairs and other vernacular forms, the wood is often quite gnarly. So my goal with this chair is to add quite a bit of texture to make the chair more interesting.
To help the chair look more like an old survivor, I used young, small-diameter trees. These were available to me after the workers came through. Now they’re all using wood chippers, which is most unfortunate – certainly for me. The grain of these small trees has more character than large-diameter trees with long-straight trunks.
In addition to the texture, I want the chair to have a nice chestnut brown color to the wood that looks like it has been covered in green paint – a common color on old chairs. In the areas where the sitter would rub against the seat, the green paint will be worn through. Plus, like all chairs that have had a long and interesting life, this chair will have lots of burnished surfaces.
Just like with the first chair, this chair was finished straight from the tools – no sandpaper. Plus the tenons and any pegs have been left a little proud, which makes them easy to burnish.
Give the piece a good soaking with water to raise the grain and soften the wood a bit.
Surface Preparation. I begin this process by giving the chair a good soaking with water, which will raise the grain and soften it. I immediately follow that with the nylon brush, which is chucked into an electric drill. This is the first step to adding texture, as the nylon bristles wear away some of the softer earlywood in the oak.
You could probably get the same effect with a wire brush. As you go over your chair, spend more time brushing the areas that would contact the sitter, including the seat, sticks, backrest and the leg ends.
The nylon brush adds texture to the piece by gently wearing away some of the softer earlywood. Focus your efforts on the areas that contact the sitter.
It may seem strange to hear about using the nylon wheel brush to take out the soft earlywood and then burnish it to get a surface skin. The thing with old surfaces is they have undulations. Sometimes these are like a fine ripple, a movement to the surface where the wood has shrunk, expanded with moisture, or been abraded by time so that there are ridges and troughs. It’s not a surface straight from a cutting tool, so the brush action gets movement intothe wood and the burnishing pulls it over to consolidate it. A good, used, worn surface that reflects light in an uneven fashion.
Sample sticks are a roadmap for your finishing process and show you how the different colors and chemicals will interact. It can be helpful to label each sample.
Add Color. Before I start adding color to a piece, I’ll make sample sticks using scraps from the project itself. This prevents unwanted surprises.
The first coloring step requires us to first add tannin to the wood. Then we’ll add a solution made with vinegar and steel wool, which reacts with the tannins to give a nice, aged color to the wood.
Add tannins to the wood by brushing on a solution of black tea mixed with household ammonia.
To make the tannic solution, first make a batch of strong, black tea that you steep overnight (do not add milk or sugar). With the tea at room temperature, add some household ammonia – the final mixture should be about 10 percent ammonia and 90 percent tea. (Use ammonia without added soap.)
The ammonia seems to help drive the tannins into the wood.
Once the mixture is applied, I follow that by going over all the surfaces with a heat gun. The heat gun raises the grain and speeds the process along. If you aren’t in a hurry, you can let the tea flash off on its own.
The vinegar and iron solution should turn the wood a blackish color. If no color appears – or it is weak – use a stronger solution.
Now it’s time to add the color. The solution is made by dissolving a pad of oil-free steel wool in a jar of household white vinegar. I make mine in a large lidded jar. It usually takes three days to a week for the metal to dissolve. I also like to make batches in different strengths. You can make a stronger color by adding more steel wool to the solution.
I brush the solution on with a chip brush. If the wood does not quickly turn a brown/black, you should use a stronger solution. Set the chair aside and allow the solution to dry.
Future armbows and combs for stick chairs in a corner of John Porritt’s shop. (Photo by Sue Porritt.)
by Brian Crawley
John Porritt recently gave a stick chair talk in Austerlitz, New York (click here to read about it). With so many of his chairs gathered in one place, I was able to take some quick photos of John’s different approaches to armbows. The joints are all based on those he has seen in traditional Welsh pieces. I’ve added a few more comments, too, on how he fashions sticks, legs, tenons, seats etc., intended less as prescription than permission to explore. Given that so many Welsh chairmakers look to have figured things out for themselves, there are an endless variety of solutions to be found, both within the tradition and outside it.
In the woods nearby, John looks out for near 90° bends he can use for armbows, and gentler bends for combs. His friends know by now to keep a lookout for him, too. If a bent branch is big enough, John can get bookmatched grain on the arms by sawing the limbs in two. But whether sawn from one limb or two, the armbow pieces need to be joined together in the middle somehow.
The two antique chairs John brought with him to the talk display two different common solutions. One has a long scarf, which stretches about 5″ across four of the chair’s six long sticks. The scarf is pegged at the center, I presume before the holes for the sticks were drilled, to help keep the assembly together. (The joint is not glued.)
The other, shorter of the two chairs uses a small square-edged half-lap, and a doubler above. There is no visible peg in the doubler, but there is a cut nail by the left side of the moulding. Maybe this is a later fix, as there is not one in the parallel position on the right. But there are several large builder’s cut nails underneath, one of which goes through the half-lap; of course the sticks going through reinforce the assembly too.
John suspects this chair may have been a lobster pot style, where the outer two sticks on each side bend inward toward a small comb. The doubler helps hold against the extra tension introduced by the bent sticks. John felt the more extreme bend of the outermost sticks of a lobster pot chair might be steamed, where the gentler bends beside it might not.
Two antique armbows, one a long scarf, the other a half-lap.
John’s chair with birch burl armbow uses the same scarf joint as the antique, pegged through the center (and glued). It strikes me that such a joint might be the first solution a self-taught woodworker might come up with, after the first time a butt joint fails on them. Though a simple joint, the two long slopes, angles matched with hand tools, are likely trickier to get right than a beginning craftsperson might imagine.
Six-stick black birch armbow, pegged scarf. (Photos by David Douyard.)
Sometimes John uses a doubler to bridge a long scarf joint. It might be called for if the grain in the arm’s bend is getting short, and will break over time, without support. Or it might be more a design choice, prompted by a visual need. John likes to consider how to bolster the confidence a sitter has in the look of a chair. (I have a light Texas ladderback chair, with a seat of woven twine. People always ask if I’m sure it will support them before they take a seat. They have no such insecurities with John’s chairs!)
Six-stick red chair, pegged scarf, doubler.
And as seen in the second antique chair, John sometimes uses a half-lap in his armbows. His joint is a bit more elaborate. The half-laps have angled outer edges, and central wedged and tapered keys to lock it together. After it is hammered home it is pegged from above once or twice, the number of pegs dependent on how deep the armbow.
Two chairs with half-laps, wedged and pegged.
It looks almost like a large timber-frame joint, and is in fact patterned after one John saw in a ridge board in a house in Wales. Another variation is a longer half-lap that extends across four sticks, not two.
A chair with a longer half-lap, wedged and pegged.
Two of the chairs John had in Austerlitz feature three-piece armbows with more elaborate timber-beam-style joinery. In both cases these joints span the middle of the armbow. The grain of these arms is too short to have stood the test of time without the extra support. The central piece has a dovetail in its bottom half; in the upper, there are angled edges at the sides, with pinned and tapered wedges at either side of the central two sticks. Tim Bailey, an antiques dealer in Nassau, New York, showed John how local German cabinetmakers from the Mohawk Valley wedged their dovetails. He admired their use of “belts and braces” (Brit-speak for suspenders!).
Eight stick chair, three-piece armbow, dovetailed, wedged, and pegged.
John’s current chair of soft maple and ash has a central insert cut from a piece of wood twice as thick as the arms. A dovetailed section abuts the arm, and a longer section above with a long-grained glue surface. I thought the upper half was a fourth piece to the armbow, but that’s a trick of the grain. It has two big locust pegs, wedged top and bottom, wide of the five sticks, down through the central piece into the arms, inspired by those German cabinetmakers. (“Belts, braces, and concrete abutments,” quipped John.) 1
Five stick chair, three-piece armbow, dovetailed, pegged and wedged.
John uses a limited tool set to make his chairs. The first stage of removing waste from a comb or an armbow is done with a band saw, one of his few powered tools. He keeps more wood than he thinks he’ll need, until late in the process. After the band saw, he uses a drawknife, not with a shavehorse, but with a big, old Record vise he uses while standing. We took turns working on the leg shown below, winded ourselves, then broke for tea.
John working on a leg with his drawknife. Note the bandsaw behind him.
John favors a Siegley or Hahn jack plane (prior to the c. 1901 acquisition by Stanley, when they still looked distinct from a Bailey plane). The iron is thicker than a Stanley, so it doesn’t flex in use. There is no chipbreaker; the lever cap, set back from the cutting edge, secures the iron. The single blade “just works better for green wood … rather than have …shavings getting jammed in there,” says John. It is also a pound lighter than a Stanley No 5.
With a very sharp blade, John uses it to shape the legs, sticks and their tenons. Next he uses one or more of several shaves. The largest of these is a Stanley cast iron shave with a cutter he has reground to work as a scraper. With diamond sharpeners, he makes two flats that meet at just under 90°. The scraper removes any tear-out left by the jack. It cuts at the arris, not with a burr. The mouth is quite open.
The block plane, a Stanley No. 60-1/2 set up as a scraper plane, further refines those surfaces. He does not round off all the flats and ridges, but leaves them for textural interest. John likes the surface to look worked, but not careless.
John’s tools. Note the surface of the finished sticks in the green box behind the bench.
A second, more recent power tool, is what John calls a planer, which I call a jointer; it’s a Craftsman pedestal model from the ’50s. (I think a Yank’s “planer” is a Brit’s “thicknesser.”) John needs to fix the Craftsman tool up, but the idea is to save some of the wear and tear on his wrists. He has a lathe, too, but rarely uses it for chairs. He did do a chair with a front turned short stick, like one of the antique chairs pictured above. John was little worried he’d managed to turn the front stick into a cricket bail; maybe there’s a design memory, akin to muscle memory?
The front sticks were turned on a lathe. Howzat!
John likes to leave the ends of tenons on his short sticks and legs a little proud – the same with pegs. Given wood movement, a perfectly flattened tenon won’t be flush with the chair’s seat or arm for long, so why fuss over it?2 John thinks the tenon’s extra height, and the mushrooming effect on its edge, gives a wedge a little extra to hold onto. He shaves them from the perimeter of the tenon toward the center, with a spokeshave set fine, or a chisel. He then burnishes them with a deer antler.
The short stick, leg and peg tenons are proud by a bit more than 1/16″, a bit less than 1/8″, which done by eye, not measured. John has kept some of the wane in this armbow.
The tenons on the underside of the seat protrude a bit further, maybe 3/16th” and are also done by eye. John likes to leave the ridges or “dawks,” made by a round moulding plane set up like a scrub plane.
To saddle a seat, John uses a scorp and adze. One chair has an unsaddled seat – common in the tradition. Most of John’s, though, are lightly saddled. He used the adze more in the past than now. “I’m actually ruining my hands, with too much handwork … though I don’t ever want a machine to dictate what I do,” he says. He uses a handsaw to trim tenons down, and a sliding bevel to set angles. (You can see more of his kit in a photo essay of John’s shop Megan Fitzpatrick did for Fine Woodworking.)
Though most of his chair seats are from one piece of wood, when John joins two, he uses pegged loose tenons. I’ve done a similar joint in a cricket table top, in a Derek Jones class. There, we cut the mortises as deep and wide as a Domino 500 could manage, made our own tenons, and drawbored them to close the joint as tightly as possible. John does the same process – minus the Domino.
A seat made from two pieces often has pegged loose tenons.
John’s stretcher configurations are as various as the armbows. Some have none; others have stretchers on the side, back to front; still others have a medial stretcher as well, resulting in an H-shape. Several chairs have seats of white elm, which, with its interlocking grain, it is very difficult to split. “If that’s dry, and the legs are dry, and they’re driven in, and they’re wedged” it doesn’t need stretchers, says John. With a seat of ash or oak, though (eminently splittable), stretchers “just give more confidence,” to the maker and the sitter, he says
Sometimes, not usually, John leaves the tenons of the long sticks proud of the comb. (Photo by David Douyard.).
For reference, John recommends the website and Instagram of Tim Bowen Antiques. Tim and his wife, Betsan, wrote about some of the pieces that passed through their hands in The Welsh Stick Chair.3Harvard & Harvard Antiques is another website John tracks. I found a couple of nice lobster pot chairs pictured there on a recent visit. 1stDibs, an conglomerate site of different antique dealers’ wares, often has a few good stick chairs among its offerings.
John sometimes shares a wry lament about the length of time it takes him to build a chair, but at this point in his life he’s unwilling to rush it. He does a variety of other work to make ends meet. He fixes plane totes, saw handles, infills and the like, for major antique tool dealers in the U.S. and private clients. He works on other, larger antique pieces as well. Passing through his workshop I’ve seen an original Holtzapffel lathe, with many missing pieces he had to fabricate, and a harp made in a medieval style. It had a key piece of wood the soundboard was anchored to; its grain was tearing apart under pressure of the strings, so John had figure out how to rebuild and reorient the piece, without modernizing the design. Both pieces are back in use now.
A few years back, Martin Donnelly posted a picture to a Facebook saw group that caused quite a stir. A very rare 17th-century saw was restored by John and his friend Tom Curran. After together working out how the missing piece might look, John added the wood to complete the missing section, and wood to fill old fastener holes. Tom carved the added piece in a style sympathetic to the original, and John colored the new to match the old. One of Tom’s specialties had been making beautifully worked flintlock rifles, from whence his carving skills derived.
A saw handle restored by Tom Curran and John Porritt (Photo by Martin Donnelly).
John did a simpler repair to a J. Nicholls saw of mine (Nicholls was one of the mid-19th-century Philadelphia saw makers Henry Disston eventually bought out). Simpler but not simple – the large chip missing from the lower ogee curve had sprung the alignment back to front. I watched John do the repair, with minimal intrusion on the old surface, and the color matching he’s perfected over his years of working on antiques.
I’d found out John is interested in teaching, but not in travel. So I asked if we could work for a couple of days one fall. I brought two stools I’d made, and we worked on finishing them; I brought some old saws in as well, and he worked on the Nicholls while I tried fixing an old Groves saw handle.
My J. Nicholls saw handle, restored by John Porritt.
There’s a sense of adventure, and play to John’s work that struck me in watching him. Once a wood repair is in place, he’ll add a stain, maybe burn it off, add another color, wipe it off, rub in some roofer’s cement, scrub it off. It’s a back-and-forth process that mimics the dings and furrows of outrageous aging. Hours are involved, but fun, too, in working toward beautifully imperfect patinated surfaces, which I think because they remind of our own temporality, and our connection to those who came before us, and those who will follow after.
Brian Crawley is a woodworker, screenwriter and award-winning playwright.
To see more of John Porritt’s work in aging a surface, check out his book, “The Belligerent Finisher” (Lost Art Press).
Near to John’s home is a place called Germantown, clearly named for those who settled there. I remember driving north on the Taconic Parkway years before I met John, joking with my daughter on the madcap tour of Europe we were on, given the place names on the exit signs: Athens, Nassau, Ghent, Rotterdam, Guilderland, Troy. Some of these were doubtless settled by corresponding Europeans. But Austerlitz was named by the eighth U.S. President, Martin van Buren, to piss off a political rival who had named a town Waterloo. (At Austerlitz, Napoleon won his battle. Which we in the States would be more likely to know if Abba had recorded a follow-up to “Waterloo.” As they still could. I think they’re all still with us. “Austerlitz! Could be the next of our megahits, whoa whoa whoa whoa, Austerlitz! Martin van Buren says it’s the tits.” ↩︎
I took a class with Mike Pekovich once, and by a similar line of thinking, Mike prefers his dovetail pins proud. If a pin will only stay perfectly flat for one season, he makes a design feature of the height difference.) ↩︎
Editor’s note: Lost Art Press is currently out of stock; we hope to have it available again soon. ↩︎
John Porritt at the Old Austerlitz Historical Society’s chancel. (Photo by David Douyard.)
by Brian Crawley
On a bracing day this past Sunday – cold enough to move the event from a large unheated barn in Austerlitz, New York, to a little body-heated church – John Porritt gave a talk on his masterful stick chairs. He brought two Welsh antiques he’d found in nearby Hudson, New York, and 20 chairs by his own hand, mostly Welsh-style stick chairs, an English-style forest chair, and several side and children’s chairs. A few he brought over from his workshop, but mostly his friends and customers brought their own Porritt chairs along to show off and share a sit in.
A congregation of chairs. A pride of chairs? A throng.
John views making a chair as a journey. In one sense, the journey is the improvisatory interplay between the wood sourced for arm bows and crowns, then the seat, legs and sticks shaped to complement these. In another, the journey is more literal, actually starting with walking the dog. While John used to find curved pieces in the trees and limbs linemen left cut at the roadside, once they started using chippers, he began to rely instead on himself and his friends spotting roughly right-angled trunks and boughs on their walks.
A “forest” stick chair, more English than Welsh in style.
John spoke of one such tree, a black birch on a friend’s property, which was a sapling when a terrible ice storm in 1983 bent it parallel to the ground. It was held in that position long enough to be set that way. In time it grew upward normally again, and formed, as the trunk grew up and bigger around, two nearly 90°-angled sections that John used some 30 years later in one of his chairs. John spotted a similar ash trunk, pictured below, while on a walk with his dog. (With this one, nobody knows exactly why it grew that way.) During a visit with Chris Williams, Kevin Adams and me a year and a half ago, John had enough helpers on hand to harvest this pair of angled turns. The armbow in his latest completed chair is from this ash. A fire wood, ash dries quicker than most.
John and Chris Williams harvest some promising arm bows.
The advantage of a naturally curved piece is that the grain is continuous and strong along its length. It also allows for (or suggests? requires?) the wide variety of shapes found in vernacular Welsh chairs. You can get continuous grain strength by steam-bending chair parts, but the old chairs John is referencing, and building typically have 1-1/4″ or thicker arms, which can be very hard to bend successfully. And, it requires extra tools and experience – and is outside the tradition.
Woodworkers who make Windsor, or forest, chairs typically employ steam-bending to impose a consistency on the wood, to make a repeatable production form. It is a different aim than allowing found wood to spur design. A person who is looking to make a few chairs for family and neighbors, a side hustle perhaps, hasn’t the same need for a uniform, easily replicable chair. This is the type of person we imagine a 19th-, 18th- and 17th-century Welsh chairmaker to have been.
In the 20th century, John’s commissioned chairs are likewise destined for family, friends and neighbors. One was made to place by the wood stove a friend tends for warmth. It sits deeper than most so she can push back from a just-stirred fire; its fore-edges are developing a rich patina. Another made for a fellow craftsman lacks the “belligerent” finish John often uses — because Tom wanted to distress it himself, by shoving it under the table after dinner to abrade the arms and butt-burnishing the seat. A kitchen chair made for Lydia, who carries on Tom’s work at Monster Machine in Chatham, New York, is armless so that she might more easily spring to stove, sink or counter in the course of a meal.
A use-weathered chair. (Photo by Lydia Curran.)
But John more often builds his chairs on spec. Then the only client to please is himself. A four-stick chair made at the start of the COVID-19 pandemic marked a turning point. John answered one question, as to how much time each chair takes, with: “Far too long! Up to a point I don’t care how long it takes me, because I really want to do it the way I want to do it.” One example of mid-chair change of direction was in the chair with the black birch arm bow, from the tree mentioned above. The two arms were colored with nitric acid and burnished “like crazy” with a chain-mail pot scrubber and a deer’s antler. At first they were square in section, but when viewed with the seat, the shapes didn’t look right to John’s eye. So he visibly softened and rounded the arms with a rasp and scraper to better suit the piece. This had the happy accident of making the short stick tenons a little more visibly worn, with the arms falling away from those high spots, like the thumbprints you can sometimes see on an old, well-loved saw’s handle or plane’s tote.
These arms started square in form, but didn’t look right to John, so he rounded them as work progressed. (Photo by David Douyard.)
Another example: His most recently completed chair is made of soft maple, with ash arms sourced from the tree he is sawing through in the photo above. John said he colored it with a milk paint he made himself from powdered milk and lime. A first thin wash looked good, but a second went on too heavy, so he cut it back to almost nothing. Rather than continue on to a darker color and an aged finish, his wife, Sue, suggested he bring it to the talk as-is. (The final stage of a chair’s journey comes in deciding how to finish it.) John has a keen sense of color, texture and their interplay, developed through long experience in restoring and refinishing antique furniture and tools. His book The Belligerent Finisher(2022, Lost Art Press) goes into detail on those techniques.
He had planned for the chair to have more sticks, five, maybe seven, in the lobster-pot style. But that felt overcrowded when he mocked it up. He liked the fifth stick at the top, but it was too crowded at the bottom. So he removed the bottom half of the stick. Chris Williams saw a photo and loved it. And given the diversity of form in the tradition, Chris noted that Welshmen have done the same thing in the past. So that’s how it stands today.
John’s soft maple and ash chair is the frontmost here of … an assembly of chairs? A flock of them? Or, a muster of chairs. There, that’s the term: a muster of chairs from a master of them. (Photo by Sue Porritt.)
I’m guessing a quarter of John’s audience last Sunday were fellow woodworkers. I recognized some, professional chairmakers includinng David Douyard and Charles Thompson, and hobbyists including Kevin Adams and me. Others I didn’t know, but their questions revealed them. Lay members of John’s congregation were just as involved in the talk. (“Do you find all your own wood?“ ”How long does it take to cure?“ “Why do some have rungs, and some do not?“) The head of the Old Austerlitz Historical Society said they’d never had a talk quite like it. I imagine because John, after a brief introduction, asked for questions rather than give an academic talk. One thought then followed another very naturally, and he had a bevy of chairs nearby to hoist up and illustrate his answers. John’s daughter, Mia, came up from college for the weekend to help lug and place all the chairs, and to sell copies of his book. And we all hung around in the churchyard afterward, until rain started to fall on the chairs that hadn’t yet been tucked away in everyone’s cars and trucks.
Brian Crawley is a woodworker, screenwriter and award-winning playwright.
The following is excerpted from “The Belligerent Finisher,” by John Porritt. After walking you step by step through creating a believable aged finish, the book includes a gallery of just some of John’s gorgeous work.
Top: the “hands” of two chairs. Above: A scarf joint on one of the armbows of my chairs. The details of the finish are extremely important to me.
I think the phrase “standing on the shoulders of giants” has the ring of truth, certainly in woodworking. That, and the idiosyncratic nature of many vernacular woodworkers, plus the vagaries of time, have inspired me to try to understand some of the mystery of the old stick chairs. To work with that, simulate it (or “stimulate” as my old friend Johnny Jones would have said) and then, on occasion – having fallen short – sitting down in an odd chair with a restorative cup of tea, to ponder having another go. That’s my form of belligerence, and these are some of my chairs.
My first Welsh-inspired stick chair, made circa 1994 in Shropshire, England. I sent photos of several English and American-influenced chairs along with one of this chair – which draws on what at the time I thought of as a Welsh stick chair – to John Brown. He kindly wrote back to me and for a while we had a correspondence. He went so far as to speak highly of the chair and published a photo in Good Woodworking magazine. Looking back I now feel this chair is an amalgam of John Brown’s work with the steam-bent arm and an American way of shaping the hands, along with an exaggerated Welsh comb. It was my jumping-off point as I started to look more carefully at what the old Welsh chairmakers, in all their diversity, had achieved.
The chair has lived in Shropshire ever since and is a well-used and appreciated member of a friend’s family. It has an elm seat and steam-bent ash arm-bow, with ash legs, sticks and comb. The green paint was my first attempt at making a milk paint. It was not waxed and has had no intentional distressing other than the normal wear and tear of family life. It’s doing well.
This commissioned chair was an adventure. I found a curved ash branch, so I was able to make my first two-part scarfed and wedged armbow. The chair has a piece of oak with character for the seat, 10 ash sticks and an ash comb, legs and stretchers. The naturally curved ash arm supports have that gnarly grain that seems to encapsulate the life of a small tree in a harsh environment. The wood was never aged. It was painted with Lexington green milk paint, with a little added black, then waxed. Nearly 20 years later, every-thing has mellowed to a pleasing warmth with that dry bloom look some of the old chairs have. I once heard an elderly antique furniture dealer describe this look as “sleepy.” It was a pleasure to exhibit this chair at Westonbirt, The National Arboretum in Gloucestershire in “Chairs 2004.”
This, and the following chairs, were made in Spencertown, N.Y. The seat of this chair is English-grown burr oak from Picklescott, Shropshire. Ash sticks, legs and comb. Three-part arm in hard maple. Side stretchers and two arm posts in white oak, center stretcher hickory.
Finished with boiled linseed oil, no wax involved. I left the seat unfinished, owing to burr wood taking up the linseed oil quite aggressively in parts. It’s coloring down well with time. It’s my daughter’s favorite chair.
This and the two previous chairs are known as “lobster pot” chairs. Linseed oil and wax finish. English elm seat with ash throughout, scarfed and wedged armbow. Neither this chair nor the previous one had any wood-aging treatment. After several years, the color is getting good and mellow.
This chair, made at the start of the COVID-19 pandemic, was a major step for me down the road of getting the feeling I needed into a chair. It’s the only chair I have ever pictured completely in my head, then built and finished. It seemed to flow through me. Most chairs are a journey from armbow to what is possible, and I will work through various cul-de-sacs and hiccups along the way. Not this one.
The finishing process on this chair was similar to that described in chapter one. This one was finished with homemade black milk paint. American white elm seat (extremely difficult to work – much belligerence needed). Scarfed and wedged ash armbow. This was my first North Wales four-stick-inspired chair. It owes a lot to the chair on the over of John Brown’s great book, “Welsh Stick Chairs.” I consider this to be the most important chair I’ve ever made, certainly in my understanding and development.
Inspired by a chair from the wonderful book “The Welsh Stick Chair” by Tim and Betsan Bowen. Finished using nitric acid, Lexington green milk paint with a little added black, shellac, cement dust, linseed oil and 10-percent roofing cement with wax. The scarfed arms are in black birch – a great wood to work and color. They were eventually burnished with heavy brown paper after the chainmail burnisher and antler. White oak seat, American white elm comb; red oak legs, stretchers and sticks.
My first attempt at working a chair in red. Before painting, I used nitric acid, then Salem red paint, most of which I took right back off, scrubbing with coarse and medium 3M pads with thinners. After that, I painted it over with one coat of a mixture of red, brown and black milk paint. Shellac, cement dust, linseed oil, 10-percent roofing cement and wax completed the process. English elm seat, black birch two-part armbow, white oak comb. The legs, stretchers and sticks are red oak.
Soft maple two-part seat, cross-tenoned and pegged with scarfed hickory arms and sticks, oak comb, ash arm supports, legs and stretchers. Finished using nitric acid, a workshop-mixed thin brown milk paint, then shellac, cement dust, linseed oil and wax, with 10-percent roofing cement. I enjoy its stolid, “I’m here. That alright with you?” stance.
Another version of a North Wales four-stick chair. This exceedingly comfortable chair was left in the paint and waxed to allow Tom, its owner, to perform DIY chair distressing, at least three times a day. Oh yes, and let’s not forget the tea breaks. American white elm two-part seat, cross-tenoned and pegged, scarfed black birch armbow, hickory sticks and legs with an ash comb.
I really enjoy the visual movement of this chair. It is entirely made of white oak, apart from the scarfed and pegged arms of ash. The chair was fumed for 72 hours with ammonia then (minus the use of vinegar iron and brown mahogany oil stain) it was worked in a similar fashion to the green chair, Backstool No. 2 in chapter two. I did over-paint a lot of the Lily Pad green to get that crusty look, which I later distressed with the chainmail burnisher.
Apart from being stung by a tiny wasp while foraging by the roadside – where I managed to find an excellent piece of white oak for the comb – this chair came together happily.
Another very comfortable red chair. The photo of the entire chair was taken right after it was made; the two detail shots are after several months of use.
Note how the workshop-mixed milk-paint surface of mulberry is chipping with use to let the thick flag-red milk paint come through. Not introduced wear. I have enjoyed watching this evolve. Better than watching paint dry. White oak seat, legs, stretchers and comb, hickory sticks, ash armbow and doubler.
Over the years, I’ve made quite a few child’s chairs. To my eye, this one works well for proportion. The paint is Lily Pad green with a coat of Lexington green over the top, cut back to let the Lily Pad come through on the seat. The wear-through to the wood on the seat front, and slight wear all around, is my suggestion of rough-and-tumble in a nursery. Soft maple cross-tenoned and pegged seat, black birch two-part scarfed and pegged arm, ash legs, stretchers and sticks. Two outer sticks red oak.
I spent a long time attempting to get the white oak seat, hickory sticks, and ash arms and doubler, legs, stretchers and comb to a satisfactory surface. It didn’t work. So, over the entire chair (bar the arms) I painted Arabian Night black milk paint. Things don’t always work out – I think I was pushing too hard for an effect the chair didn’t need. I think this chair, which has a busy appearance, looks better for its unity of surface. This might be considered a fall-back position, but it is one I’m happy with. How much belligerence can one chair take? How much tea can one man drink?