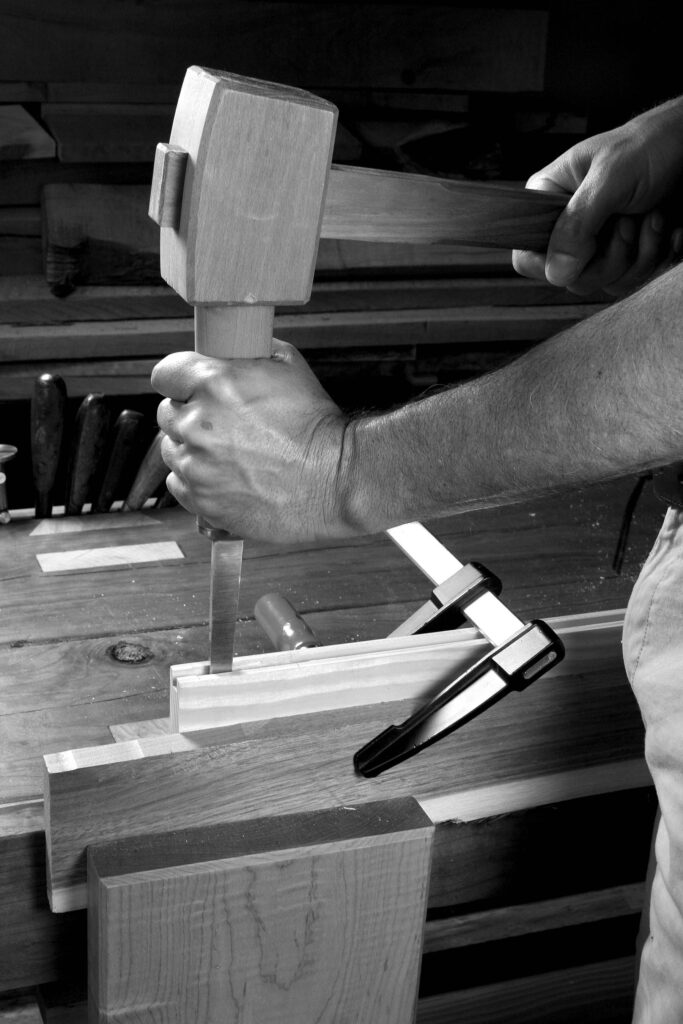
Photo 13 . Chopping the mortice. The true mortice chisel is shown and the workpiece is cramped to a morticing block which is held in a bench vice.
The following is excerpted from “The Essential Woodworker,” by Robert Wearing. In our opinion, “The Essential Woodworker” is one of the best books on hand-tool usage written in the post-Charles Hayward era. Wearing was classically trained in England as a woodworker and embraced both power and hand tools in his shop and in his teaching.
The mortices should be cut before sawing the tenons, as the latter are more liable to suffer accidental damage before assembly. It is not good practice to grip the work in the vice because then it cannot be tested for verticality, and if it is driven down in the vice during the process, it can become scored. Instead, cramp the work to a morticing block (Fig 106a) with G-cramps or handscrews. The block can be gripped in the vice (Fig 106b) or bolted to the bench (Fig 106c). This method is particularly useful when the bench has a front apron which prevents cramping. The morticing block is useful when the workpiece is small and thin.
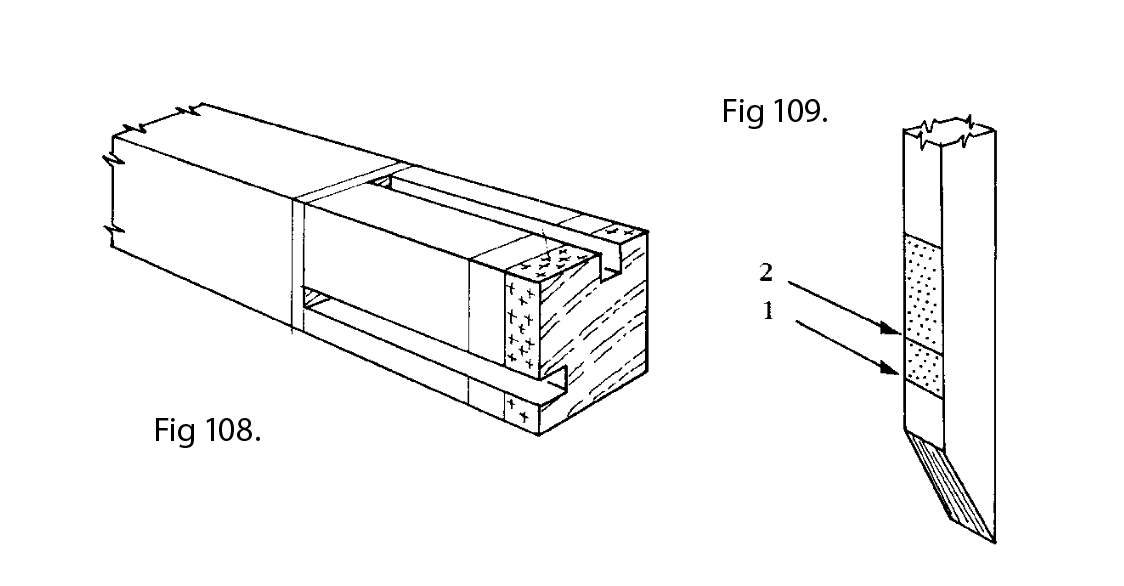
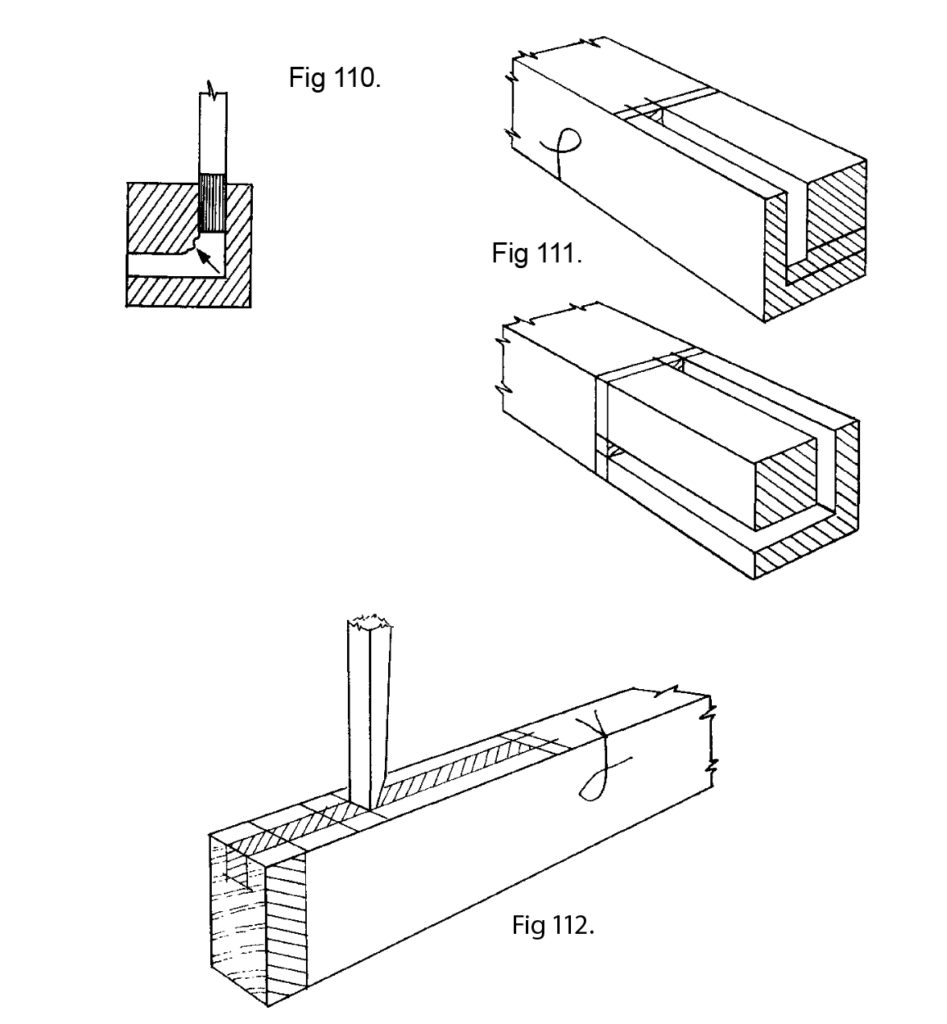
Fig 107a shows how a shallow trench can be cut before beginning the mortice proper. Simply lean on the chisel until there is a crunch, then wipe the chisel across (Fig 107b) removing the small chips. The chisel can now be positioned without effort. Before starting to chop, put a depth mark on the chisel (a piece of masking tape will do). If two mortices are to be cut (Fig 108), two depth marks are required (Fig 109). Do not cut the first mortice to full depth or the second will be chopped over a hole and the inside corner may break away (Fig 110). The first mortice should be chopped to a reduced depth (Fig 111) then the second to full depth, thus avoiding this risk.
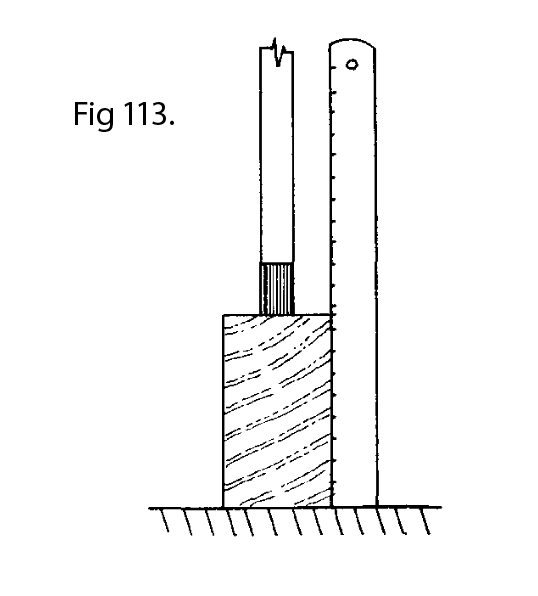
Having cramped the work securely to the block, drive in the chisel near one end of the mortice, bevel towards the centre (Fig 112). Check that it is vertical by placing a small straightedge against the true face (Fig 113); a longer rule will foul the handle. Withdraw the chisel, turn it round and drive in again with the bevel towards the hole. Push forward to break off the chip, then lever it out. Continue the sequence of drive in (Fig 114), break off the chip (Fig 115) then lever out (Fig 116). Continue almost to the end of the mortice, leaving a small piece of waste on which to lever. Frequently check that the chisel is vertical. Reverse the chisel and proceed to the other end. Continue the method, backwards and forwards until full depth has been reached (Fig 117). Finally chop down the ends at the knife marks, break off and remove the chip without bruising the ends.
Accuracy of depth can be tested by using an adjustable depth gauge or an improvized wooden one (Fig 118). If there is a haunch socket, this is chopped in the same way, right to the end of the component as in Fig 108. The mortice cannot be narrower than the width of the chisel, so it follows that any whittling of the sides of the mortice to neaten it will make it oversize. Keep the chisel vertical and do not permit it to twist as this will also result in an oversize mortice. The practice of first drilling a row of holes and then opening them up neither saves time nor produces a more accurate mortice.
Roy Underhill in his office, recording the audiobook of “The Joiner and Cabient Maker.”
“The Joiner and Cabinet Maker” is a short book written by an anonymous tradesman; it was first published in 1839. It tells the fictional tale of Thomas, a lad of 13 or 14 who is apprenticed to a rural shop, that builds everything from built-ins to more elaborate veneered casework. The book was written to guide young people who might be considering a life in the joinery or cabinetmaking trades, and every page is filled with surprises.
Unlike other woodworking books of the time, “The Joiner and Cabinet Maker” focuses on how apprentices can obtain the basic skills needed to work in a hand-tool shop. It begins with Thomas tending the fire to keep the hide glue warm, and it details how he learns stock preparation, many forms of joinery and casework construction. It ends with Thomas building a veneered mahogany chest of drawers that is French polished. However, this is not a book for children. It is a book for anyone exploring hand-tool woodworking.
Even more delightful is that Thomas builds three projects during the course of his journey in the book, and there is enough detail in the text and illustrations to re-create these three projects just as they were built in 1839.
When Lost Art Press published the expanded edition* of “The Joiner and Cabinet Maker” in 2011, a teacher of autistic students approached LAP about an audiobook of the original 1839 text to help teach craft history. Their students weren’t able to read the book, but they could listen to it. So we asked the inimitable Roy Underhill to help us out. He brought not only his hand-tool knowledge but his excellent thespian training to the project.
Why don’t we offer audiobooks of more of our books? Well, they are the posters of our aural world…which is to say this one made no money. Was it worthwhile? Absolutely – it helped an underserved audience of students. But it took a lot of investment of various resources, and we do have lots of cats to keep in kibble.
But because the audiobook made almost no money, we’ve decided to now offer it free to blog readers. You can download the 22 zipped mp3 files below for 125 minutes of listening pleasure. When you click the button below, the file will likely go directly to you “downloads” folder. (Yes, we are sure the link works; we have checked it a dozen times.)
*The expanded edition of “The Joiner and Cabinet Maker” includes not only the original text, but a historical snapshot of England in the early 19th century by Joel Moskowitz, and chapters on building the three projects (a Packing Box, a dovetailed Schoolbox and a Chest of Drawers), plus complete plans, from Christopher Schwarz.
As the Industrial Revolution mechanized the jobs of the joiner – building doors and windows by hand – one anonymous joiner watched the traditional skills disappear and decided to do something about it. That joiner wrote two short illustrated booklets that explained how to build doors and windows by hand. And what was most unusual about the booklets is that they focused on the basics of construction, from layout to joinery to construction – for both doors and windows.
Plenty of books exist on building windows and doors, but most of them assume you have had a seven-year apprenticeship and don’t need to know the basic skills of the house joiner. Or the doors and windows these books describe are impossibly complex or ornamental.
“Doormaking and Window-Making” starts you off at the beginning, with simple tools and simple assemblies; then it moves you step-by-step into the more complex doors and windows.
Every step in the layout and construction process is shown with handmade line drawings and clear text. The booklets are written from a voice of authority – someone who has clearly done this for a long time.
During the last 100 years, most of these booklets disappeared. Booklets don’t survive as well as books. And so we were thrilled when we were approached by joiner Richard Arnold in England, who presented us with a copy of each booklet to scan and reproduce for a book.
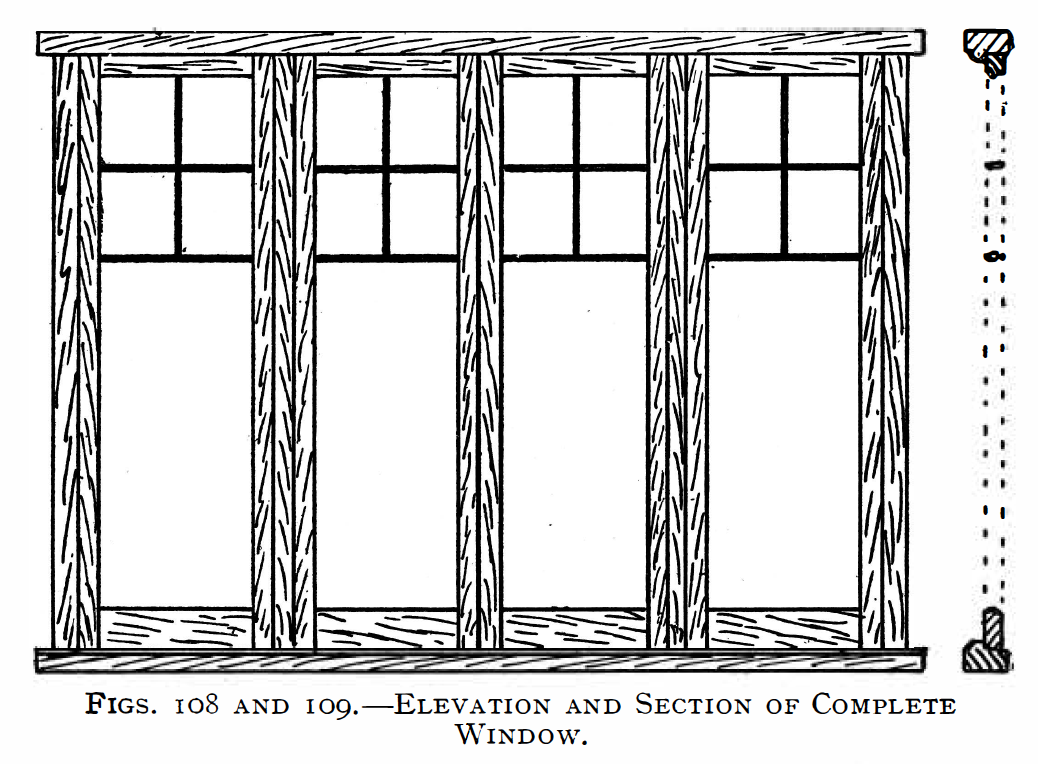
VENETIAN, or, as they are sometimes called, marginal light, windows are very fashionable at the present time, having in a great measure replaced the bay window, although the same style is sometimes adapted to the bay, instead of the usual upside-down sliding sashes. These windows are, as may be gathered from the drawings, of the casement variety, and the sashes should be made to open outwards if possible, this being the better way to keep out the wet.
In Fig. 108 we show one of these windows fitted with four lights or casements, the two outside ones being hinged to the jambs, and the two middle ones, which fold together, being hinged in like manner to the mullions. The casements in this frame run from sill to head, the upper part being divided into small squares as shown, which is the simplest way of forming an artistic window.
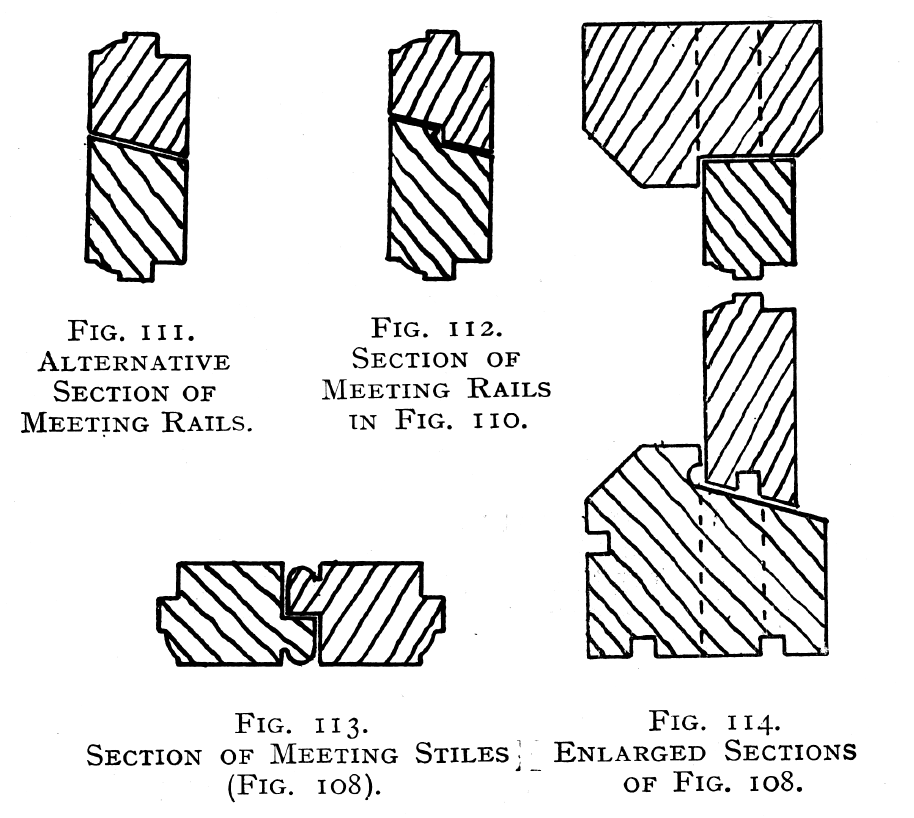
Another method of filling in these window frames is shown in Fig. 110, which shows the filling between the mullions. Here the casements are in two heights, the bottom pair being hinged in the ordinary way to the mullions ; the other, which is wide enough to fill the whole space, is hinged at the top, and opens outwards, the bottom rail of this fitting to the others either as section, Figs. 111 or 112. The former is the simplest way and least liable to get out of order, but the latter is best as regards the stopping out of wind and water; but when the window has been repainted a few times it is apt to work badly.
Windows made in this way are very convenient, as it is possible to have the top only open, or the whole, as required. The folding casements in either style of window come together with a rebated joint, as Fig. 113.
Suitable sections for head and sill for these frames are shown in Fig. 114, the grooves in the latter being to form a cement key under, and to take the window board. It will also be noticed that the bevel of the sill finishes with a hollow, forming an undercut rebate ; this should not be omitted, owing to its use as a water trap.
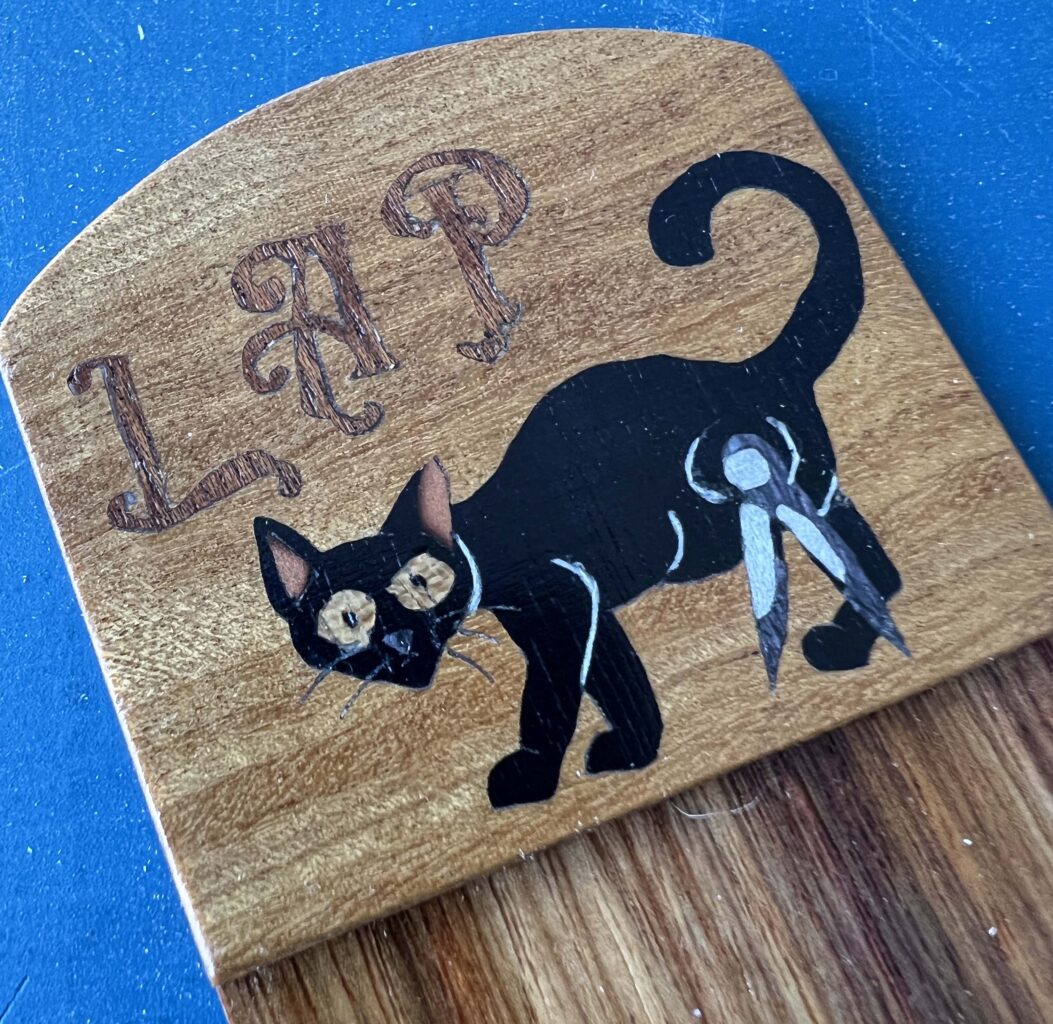
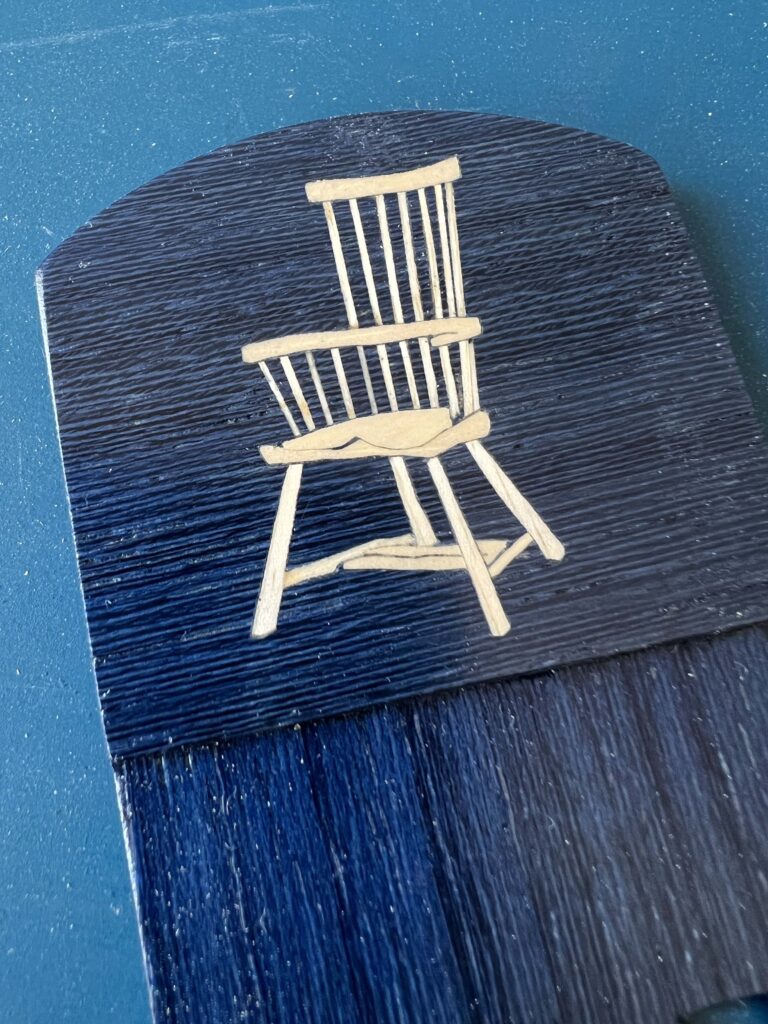
(Publisher’s note: We try to kindly discourage readers from giving us gifts. We have all the tools we need. And there are so many other people in the world who need help. But once in a very great while something shows up that is so stunning that we feel compelled to share. — CS)
When we get an unexpected package at Lost Art Press from the other side of the world, it’s typically a book proposal – but once in a while, we are stunned by the kindness of strangers. The hand-cut marquetry bookmarks shown above, by Elena Simonova (@woodsimka on Instagram), are just such a surprise. They were commissioned by Russian reader Alexandr (no last name in his accompanying letter), and feature Bean the Shop Cat as drawn by Katherine Schwarz for a LAP sticker a few years back, the Lost Art Press dividers and stylized lettering, and a six-stick Kentucky stick chair a la Christopher Schwarz.
Even before we realized the pictures are hand-cut marquetry, we were impressed by the scrollsaw pattern work on the lower portion of the bookmarks. Then we took a close look at the tops:
That is some tiny and impressive work!
Thank you, Alexandr (and BTW, your English is impeccable despite your concern to the contrary), and thank you Elena; we will treasure and use these gorgeous and generous gifts.
Jonathan Fisher (1768-1847) was the first settled minister of the frontier town of Blue Hill, Maine. Harvard-educated and handy with an axe, Fisher spent his adult life building furniture for his community. Fortunately for us, Fisher recorded every aspect of his life as a woodworker and minister on the frontier.
In this book, Klein, the founder of Mortise & Tenon Magazine, examines what might be the most complete record of the life of an early 19th-century American craftsman. Using Fisher’s papers, his tools and the surviving furniture, Klein paints a picture of a man of remarkable mechanical genius, seemingly boundless energy and the deepest devotion. It is a portrait that is at times both familiar and completely alien to a modern reader – and one that will likely change your view of furniture making in the early days of the United States.
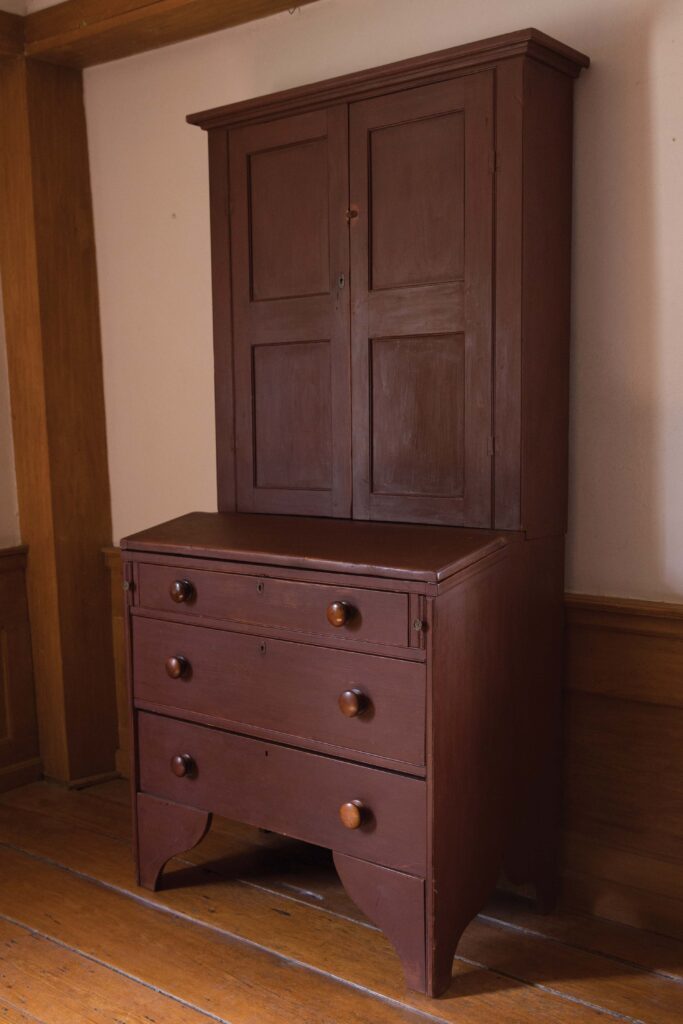
The value of a minister’s library was substantial and, therefore, the fact that Fisher invested time in the construction of a desk and bookcase is not surprising. One biographer calculated that Fisher owned approximately 300 books, describing it as “not an inconsiderable store for a poor minister in a small village.” That Fisher valued reading is even seen in the plans for his house in which one of only two items of furniture depicted was a bookcase in the kitchen.
Though Fisher’s desk and bookcase is not explicitly mentioned in the surviving journal entries, attribution can be confidently made based on provenance, numerous construction features and the homemade wooden lock on the door.
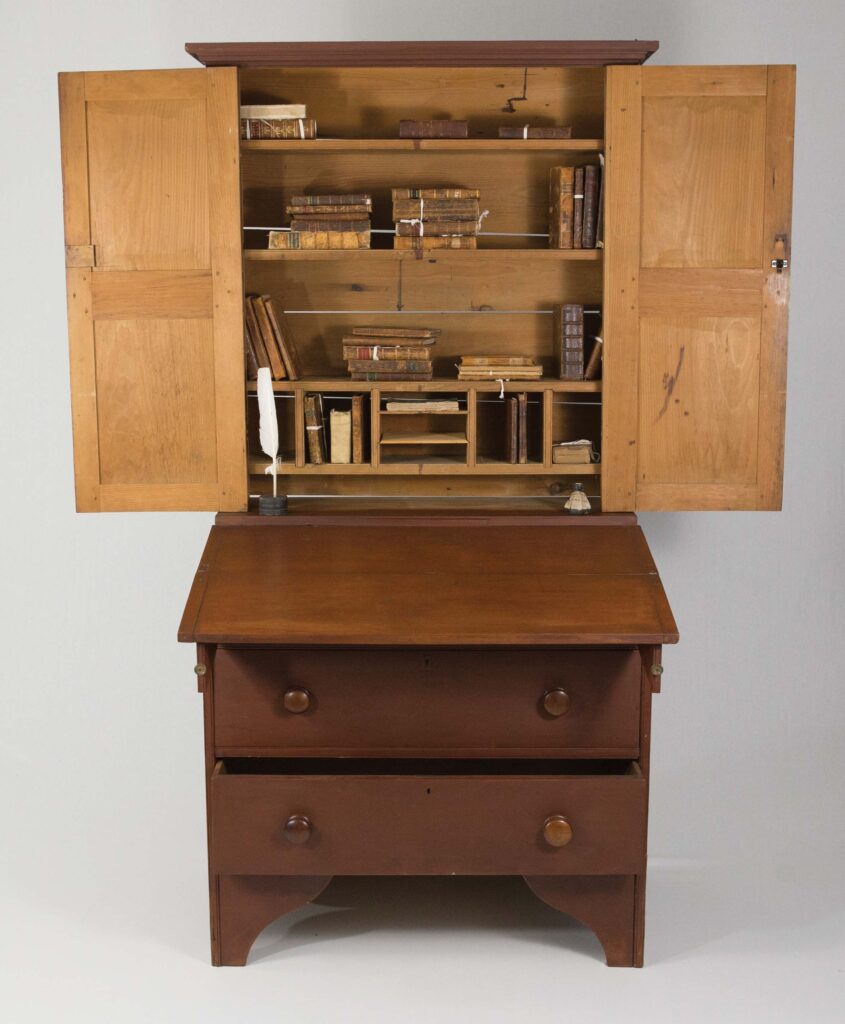
The desk and bookcase was an essential piece of furniture for a minister because it housed his most important books.
The desk is constructed of pine and was painted (although the current paint is modern). The desk has three drawers and downward-extending lopers that provide a slanted writing surface. At the top of the writing surface, there is a small secret compartment with a sliding-dovetail lid for valuables. The bookcase has both full-length shelves as well as small compartments for letters, etc. The panel doors lap with a beveled edge when closed, and a homemade wooden lock secures the minister’s library from tampering. Despite the fact that the lock operated with a key that is now missing, there is an identical lock on the door to his clock face that still functions, operating by turning a knob. Fisher made many wooden latches in his house, all of which are fascinating, but these locks are particularly delightful. They are easy to overlook by assuming that they are the same metal locks Fisher might have purchased from Mr. Witham’s store at the head of the bay, but they are clearly Fisher-made and completely made of wood. Their delicateness and smoothness of operation add a touch of sophistication to an otherwise unassuming piece of furniture.
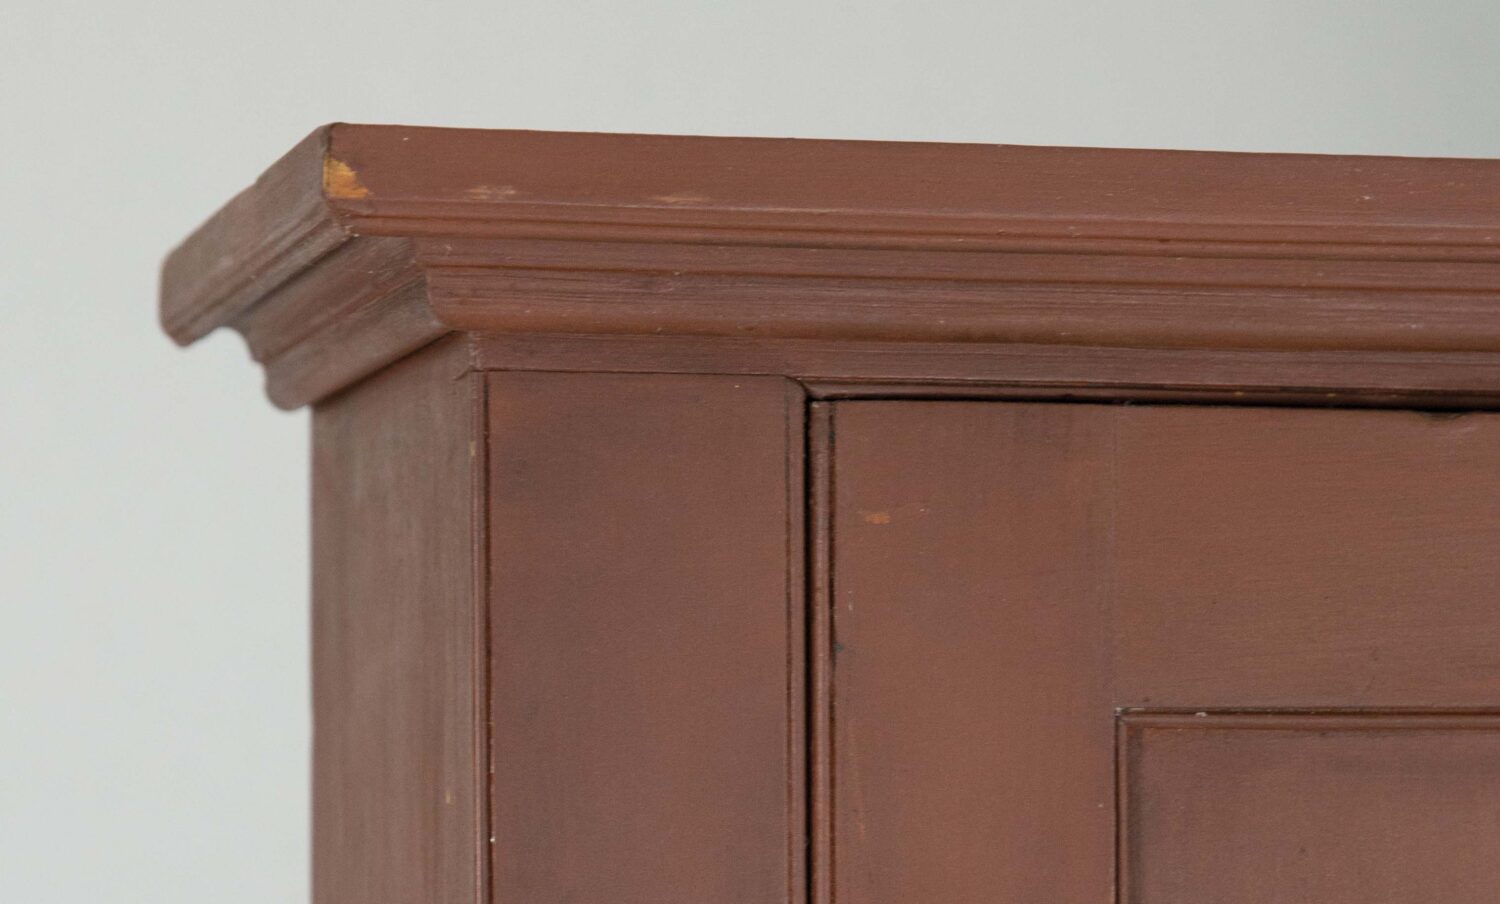
Fisher’s work has been sometimes compared to that of the Shakers because of its simplicity and conscious restraint. While the overall association stands, it is significant to point out that the primary difference between Fisher and the Shakers is their view of ornamentation. While classic Shaker work has little to no moulding, Fisher relished elaborate profiles. The cornice of this desk (as well as that of his wardrobe) sat like a crown over Fisher as he studied. His artistic vision of furniture design, though similar to the Shakers’ in its modesty, was less inhibited. Even as a young child, his mother, Katherine, taught him to value artistic expression. Katherine, whose drawings look so much like her son’s, saw a world in which chastity and artistic beauty were not mutually exclusive. Fisher was not afraid of flourish.
The cornice on the desk and bookcase sets it apart from Shaker work.
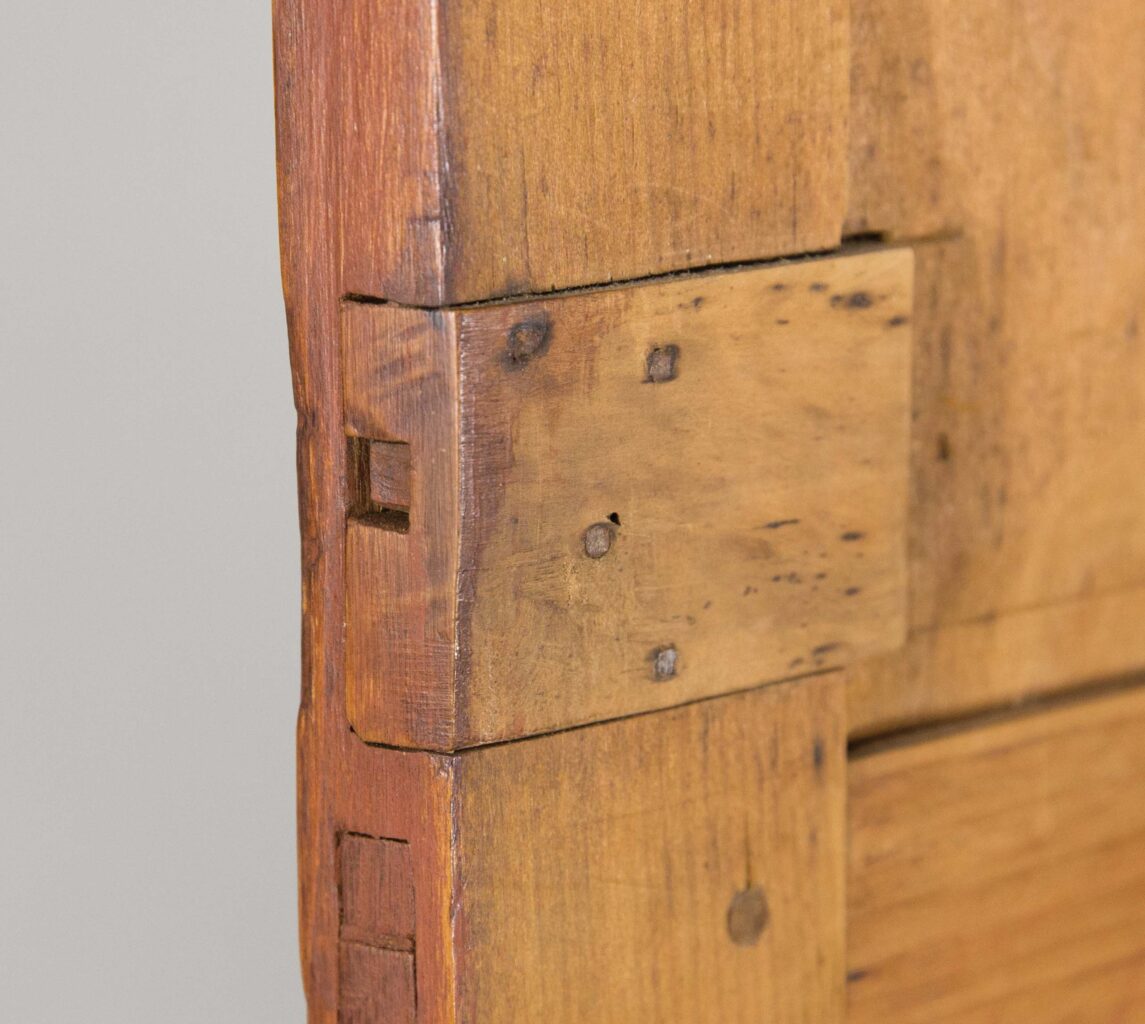
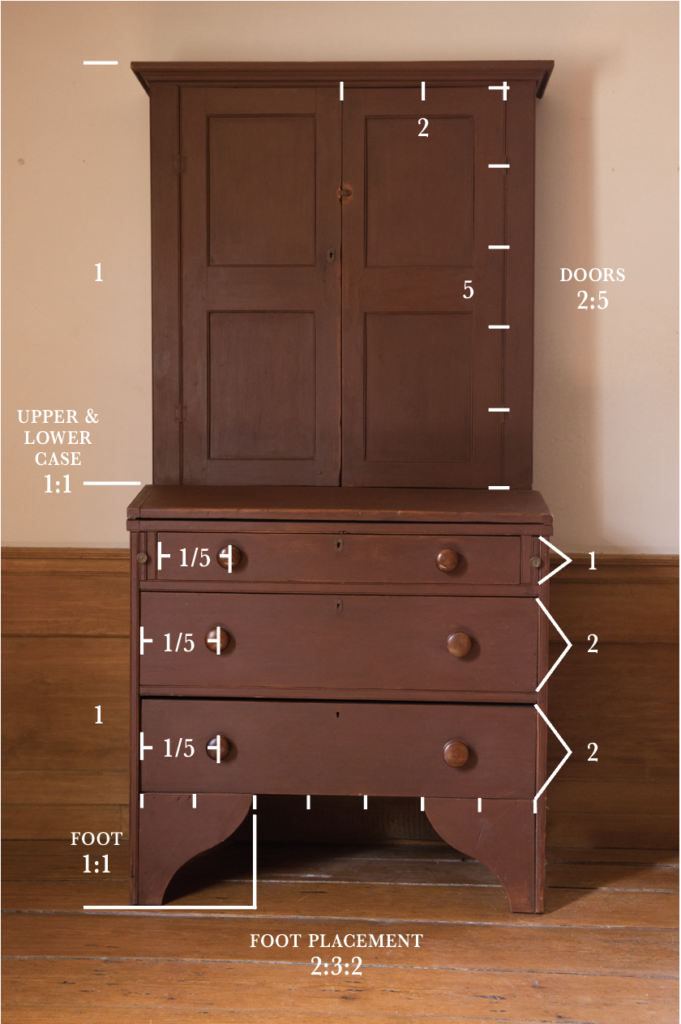
His work fits much more squarely in the Federal vernacular classification than that of the Shakers. The desk carcase is interesting in that it is constructed like a six-board chest, with the sides extending to the floor with bootjack feet. The dados are a scant 3⁄4″ wide, matching his surviving dado plane. The backboards are unplaned, rough-sawn boards nailed into rabbets in the sides. The drawers (with the exception of the bottom one, which is a replacement) are of conventional dovetail construction – half-blind dovetails at the front, and through-dovetails at the back. The drawers’ bottoms are beveled and fitted into grooves in the sides and front, and are nailed to the drawer backs.
The lock is made of wood, with the exception of the metal pins. This is exactly the kind of detail work Fisher seemed to enjoy.
The overall composition of this piece illustrates the minister’s education. Even this simple desk was designed with classical proportions from his architectural training. Fisher’s fluency in this geometric layout is obvious from his college geometry notebooks in the archives. These notebooks are full of compass exercises to lay out complex patterns. Designing a desk was easy compared to the drawings he usually did. This “artisan’s design language” (as George Walker has called it) must have been intuitive in Fisher’s cosmos of order and mathematical rationality.
Rather than rely on measurements from a ruler, Fisher relied on simple whole-number proportions used in classical architecture.
The panels in the doors are interesting in their irregularity. Their flat sides face out in the Federal style and are beveled only where needed on the inside. The insides of the panels have heavy scalloping from the fore plane, even leaving behind evidence of a nick in the iron of the plane. This tendency to continue to use a nicked iron without regrinding the bevel is consistent throughout his work and concurs with the notion of pre-industrial indifference toward secondary surface condition. For the bottom two panels, he seems to have run short on material because the panels are only barely as thick as the 5⁄16″ groove and, even at that, both retain minor, rough-sawn texture. It appears he was scraping the bottom of the barrel to get those doors finished.
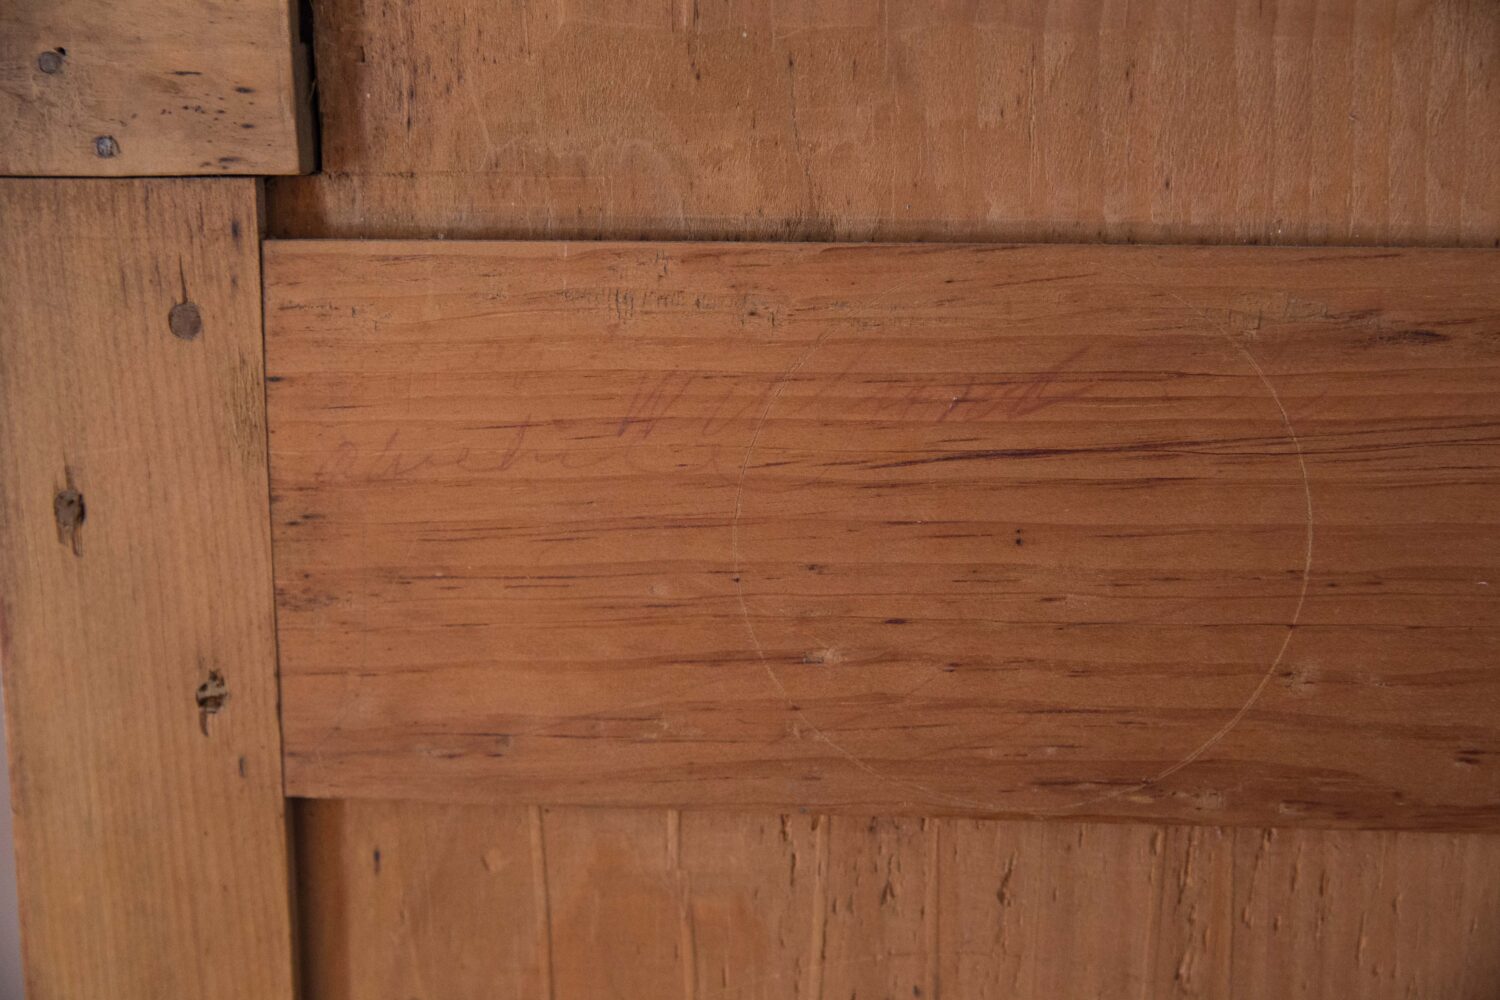
Willard wrote his name all over the house. His father’s bookcase door was no exception.
The insides of the doors have several inscriptions. “Willard” is written in red ink on one door, and “Josiah F” on the other. There are also compass-scribed circles on the inside of both doors whose randomness appears to have no significance beyond doodling. Even more perplexing, however, is the recording of “1 gallon of vinegar” on the inside of the door. This pattern of documenting purchases (and then crossing them off when paid) as well as notable life events is seen in several other pieces throughout the house. Jonathan seemed to have started the habit but Willard definitely took it far beyond his father. Willard’s name, agricultural notes and weather reports appear all over the house and his son, Fred, seems to have continued the tradition.